1
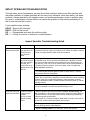
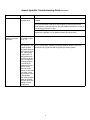
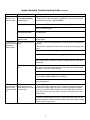
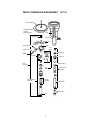
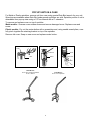
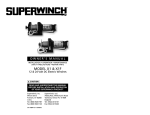
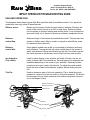
RAIN
BIRD
Customer Support Center
6991 E. Southpoint Rd., Bldg. #1
Tucson, AZ 85706 1-800-RAIN-BIRD
®
IMPACT SPRINKLER TROUBLESHOOTING GUIDE
USE AND OPERATION
The diagrams below depict typical Rain Bird sprinklers with all available controls. Your particular
model may have only some of these features.
Diffuser screw:
Breaks up the stream of water for more close-in watering. Shortens distance of the stream (throw) up to 25% of total throw. Screw clockwise
into the stream to produce misting and shorten throw. Turn counterclockwise until totally out of stream for maximum distance (unadjusted throw).
Distance
control flap:
Reduces length of the stream and redistributes water. Tilt downward into
stream to deflect water. May be used in conjunction with diffuser screw
for maximum throw reduction.
Distance
control dial:
Some plastic models have a dial on top marked for minimum and maximum distance. Turning the dial will cause modification of the stream of
water and distance of throw as indicated on the dial. This feature serves
the same purpose as the distance control flap found on other models.
Arc Adjusters
(Trip collar):
Used to adjust degree of arc sprinkler will rotate. Position one arc adjuster for each side of the desired arc. Several types of arc adjusters are
available depending on the model of your sprinkler. Generally, plastic
models move by just a push of the thumb. To adjust the metal models,
pinch the ends of each metal adjuster together before sliding into position.
Trip Pin:
Used to determine part or full circle operation. Flip or bend the trip pin
upward so it does not hit the trip collar for full circle operation. Pin should
be downward for part circle operation (then slide arc adjusters into position to set degree of arc).
Diffuser Control Dial
Diffuser Control Flap
Diffuser Screw
Nozzle
Arc Adjusters
25PJDA
P5-PJ
Trip Pin
1
IMPACT SPRINKLER TROUBLESHOOTING
Through many years of experience, we have found that conditions which most often interfere with
the proper operation of impact sprinklers are the use of any lubricants (other than water), low water
pressure, foreign materials in the irrigation water, and excessive damage or wear to sprinkler parts.
Any one or a combination of these factors can cause the sprinkler to stop rotating completely or rotate to one side and fail to return.
If your sprinkler stops working:
DON'T....Spray it with lubricant!
DON'T....Drill out the nozzle!
DO..........Disassemble and clean the unit thoroughly.
DO..........Check for sources of reduction in water pressure.
Impact Sprinkler Troubleshooting Guide
Problem
Cause
Remedy
a. Remove sprinkler head and attach pressure gauge to riser. Check operatA. Sprinkler does not 1. Insufficient
rotate back and forth. water pressure. Re- ing pressure with line running. If pressure is low. check for breaks in the line
or water running elsewhere which could drain pressure.
quirements vary
from model to
model.
Most popular models need at least 25
psi at the last sprinkler head, and
should have an unadjusted throw of at
least 36'.
b. Pop-up Models: Check for water coming out around the guide seal below
the sprinkler head. This is a pressure activated seal. if pressure is insufficient, water will leak around this seal causing the unit to stall and pop up
only part way. If the unit is new or others on the line have same problem, it
is probably related to pressure. If the unit is older, clean or replace the
guide nut seal if necessary.
c. Try switching with another sprinkler closer to water source. If it works,
then pressure could be the problem.
d. If the sprinkler stopped working within a month or two of installation, the
system may not have been designed to accommodate the normal operating
pressure of the type of sprinklers installed. If metal sprinklers are being
used, try switching to plastic. If plastic sprinklers are being used, try a lower
gallonage variety.
e. If measures above do not provide enough pressure boost, system may
have to be rerouted to include less sprinkler heads per line.
A. Sprinkler does not 2. Debris in nozzle
rotate back and forth. or other parts of
sprinkler.
Build up of water
deposits causing
friction.
a. Remove sprinkler and check for debris in nozzle, swivel bearing, and
inlet. Sometimes, a wire pushed gently into the nozzle will loosen debris so
it can be rinsed out. Do not drill or alter nozzles as this may permanently
hinder the sprinkler performance.
Metal models only: If sand is caught in vane inside of nozzle, it will need to
be removed. Loosen nozzle with wrench and unscrew.
b. Thoroughly wash sprinkler to remove dirt and oil. A vinegar and water
solution will help remove water deposits.
c. Replace bearing washers if oil has been used on the sprinkler.
2
Impact Sprinkler Troubleshooting Guide Continued
Problem
Cause
Remedy
3. Worn or
damaged parts.
a. If arm or body of sprinkler is bent or damaged, replace sprinkler or part if
available.
b. Arm spring tension may need increasing. Metal models: Unhook spring
from arm with needle-nosed pliers. Bend slightly to shorten and re-hook.
Plastic Models: Unhook spring from arm with needle-nosed pliers, re-hook to
next adjoining protrusion on arm.
c. Replace bearing washers if less than 2/3 of original thickness, if mineral
deposits are a problem, or if oil based products have been used.
B. Sprinkler
rotates to one side
and stops.
1. Check points for
non-rotation in Section A, 1-3.
a. Put more heads on your line or try making adjustments in the flow at the
2. Excessive
water pressure. Just valve. In some cases, installing a pressure regulator ahead of your main
shutoff valve is a good idea and will protect your entire system.
as each sprinkler
has a lower pressure
limit for proper operation, there is also
an upper limit. For
most sprinklers the
limit is 80 psi at the
head. The optimum
operating pressure
is around 50 psi.
Pressure that is too
high will, at the
worst, cause the
sprinkler to stall, and
at the least, cause
the premature wear
of the sprinkler
parts. If the sprinkler
rotates or reverses
very fast, this a forewarning of excessive pressure.
3
Impact Sprinkler Troubleshooting Guide
Continued
Problem
Cause
Remedy
B. Sprinkler
rotates to one
side and stops.
3. Trip spring broken or
other trip mechanism
parts damaged.
a. Metal models: Replace with trip assembly repair kit for your model.
b. Plastic models: Only trip spring is replaceable. Call our toll free hotline
for replacement springs. 1-800-RAIN-BIRD
4. Trip collar missing.
a. Metal models: Replace with repair kit for your specific model.
b. Plastic models: Call our toll free hotline for replacement plastic arc adjusters. 1-800-RAIN-BIRD
5. Trip pin missing or not a. Call our toll free hotline for replacement trip pins for most models. 1in downward position.
800-RAIN-BIRD
6. Pop-up models:
debris in case.
C. Special prob- 1. Unit will not pop up or
lems with Pop Up down.
sprinklers in
cases (rotors).
a. Check for debris or water in case which could restrict movement of
sprinkler head.
a. Check for insufficient water pressure to fully pop up unit or seal internal
assembly.
b. Remove dirt or debris from case which may be obstructing pop up/down
action.
c. Check that internal assembly is properly screwed into case.
d. Rock or debris trapped in retract spring or spring is damaged.
e. Remove internal assembly from case using wrench available for your
model. Disassemble, inspect for damage or foreign materials, clean and
reassemble.
2. Case fills up with water.
a. Check as in Section C-1 a and c above. If water is coming out around
seal. there may be dirt lodged between the seal and pop up shaft preventing sealing, or seal may need replacing.
b. Internal assembly may not be properly screwed into case.
c. Case installed too low without sufficient gravel drainage below sprinkler.
Try enlarging the drain holes with a screwdriver.
d. Dense, clay soil may not allow swift drainage of sprinkler even with
gravel drainage area.
D. Water continues to leak out of
sprinkler when
system is turned
off.
1. This is not a problem
with the sprinkler, but
rather with one of the two
points at right.
a. Water continues to drain out of the lowest sprinkler head on the line for
a period of time when system is shut off. The less the angle of slope and
the longer the length of pipe, the longer it takes for all the water to drain.
Consult your local Rain Bird contractor about sprinklers which contain a
built-in check valve to prevent water in the pipe from draining out of the
sprinkler head.
b. Valve controlling sprinkler line is not shutting off all the way and allowing water to continue seeping through. If water continues to leak from the
sprinkler head when area has not been watered within the last day, a faulty
valve is most likely the cause.
4
IMPACT SPRINKLER DISASSEMBLY 15111A
Cover Assembly
Internal Assembly:
1511A/B
(Metal Sprinkler)
Case
Arm Spring
Drain Holes
Arm
Diffuser Screw
Body
Trip
Spring
Nozzle Vane
Guide Seal
Nozzle
Trip Collar
Guide Nut
Trip
Pin
Head
Assembly
Retract Spring
Trip
Mechanism
Swivel Bearing
Assembly
Bearing
Washers
Guide Sleeve
Assembly
Pop-up Shaft
Inlet Screens
Inlet
5
POP UP UNITS IN A CASE
For Metal or Plastic sprinklers, remove unit from case using special Rain Bird wrench for your unit.
Wrenches are available where Rain Bird underground sprinklers arc sold. Sprinkler portion of unit is
detachable from pop-up stem using a 1/2" hex wrench with a 6" extension.
To remove and replace cover on top of sprinkler:
Metal models - Unscrew cover retainer screw and remove damaged cover. Replace cover and
screw.
Plastic models - Pry out the center button with a screwdriver and, using needle-nosed pliers, carefully pinch together the retaining bracket on top of the sprinkler.
Remove old cover. Snap on new cover and replace center button.
Cover
Wrench
Sleeve
Case
n
42064 Wrench
For LG-3, and MG-4 Sprinklers
n AG-5, 2045-A
n
6
Sleeve
Screen
41045 Wrench
For 15111A Sprinkler
DISASSEMBLY OF METAL SPRINKLER HEAD
To replace the trip collar and bearing washers, lock the body of sprinkler in a vise, making sure the
sprinkler arm is not touching the vise. Insert a file into nipple slot (figure A) or use a bearing wrench.
Rotate file counterclockwise to unscrew nipple. Clean nipple in a solvent if necessary, to remove corrosion and dirt before installing washer.
To replace the arm or arm spring, you will need to disassemble the top portion of the sprinkler.
Grasp the pin at the top of the sprinkler with a pair of large diagonals or side cutting pliers and pry
out (See Figure B). Take note of the way the arm spring is held in place. Use a pair of needle-nosed
pliers to remove the spring.
To replace trip assembly, grasp trip shaft (See Figure C) with a pair of pliers and remove. Attach the
"E" ring to the end of the new trip shaft that does not have vertical grooves. Install the lower trip
and the upper trip on the trip shaft. Insert the bent end of the new trip spring into the small hole in
the upper trip, and slip the other end of the spring into the small "U" notch in the lower trip. Insert
new trip shaft into the sprinkler (Figure C). Gently tap in until there is a small clearance between the
trips. When finished, the lower trips should "click" when pushed back and forth.
Fulcrum Pin
Bearing
Assembly
Slot
File
Pry Down
How to replace friction collars and
bearing washer
Removing the fulcrum pin
Figure B
Figure A
Trip Spring
Upper Trip
Casting
Trip Washers
Make bend such that
spring will pivot freely
and cut off excess.
“E” Ring
Flat Collars:
Install the round wire spacer
onto the bearing, then install
the new friction collars.
Trip
Shaft
Changing the Trip Mechanism
Round Collars:
Discard the round wire
spacer, then install the new
friction collars.
Installing Trip Collars
Figure D
7
DISASSEMBLY OF PLASTIC SPRINKLER HEAD
Most components of plastic sprinkler heads are not detachable for cleaning or replacement. It is,
however, possible to install a new trip spring using a needle-nosed pliers or plastic arc adjusters
without damaging the sprinkler. On pop-up models, the cap can be replaced. Call our toll free hotline for availability of parts for your particular model. 1-800-RAIN-BIRD
PARTS AND REPAIR SERVICES
A variety of parts and parts assemblies are available for Rain Bird metal and plastic sprinklers. If
your local Rain Bird dealer does not carry the part you need, ask if it can be ordered, or call our toll
free Technical Services hotline at 1-800-RAIN-BIRD for dealer referral or factory direct ordering information. If you are unsure of the model you have or need help in identifying or finding a part, the
Technicians on our toll-free line are eager to assist you. A parts breakdown on your particular
model is available upon request. In addition, the Rain Bird Parts Service Center offers a repair service on many of our metal sprinklers for a nominal fee; please see our website at www.rainbird.com.
If you have any questions about the items addressed in this pamphlet or any Rain Bird products,
IMPACT SPRINKLER PARTS
4
5
3
12
13
7
6
11
8
9
10
10
16
Maxi-Paw
AG-5
2045-A
Mini-Paw
LG-3
MG-4
15
1
17
18
2
19
20
Please see parts number chart on the next page.
21
8
RAIN
BIRD
®
MASTER PARTS LIST
PART CIRCLE ROTOR
MINI-PAW / MAXI-PAW / MAXI-PAW SAM
Catalog No.: 401
Date: 2/95
Page: 1 of 1
Ref.
Part Description
Mini-Paw
Maxi-Paw
Maxi-Paw-SAM
CASES
1
2
Case Assembly
Plug
205175-01
208320
207281-01
208320
207281-01
208320
COVER ASSEMBLIES
3
Cover Kit
4
Dust Cap
5
Cover, Snap On
206973
208001
(A) (204423-07) (204423-12)
(A) (204422-01) (207301)
208001
(204423-12)
(207301)
NOZZLES (B)
6
Low Angle Nozzle
6
Standard Nozzle
7
Vane
—
—
—
115902
206592
202141
115902
206592
202141
INTERNAL ASSEMBLY (B)
8
Head Assembly (B)
Diffuser Screw
Trip Spring
Bearing Hood (Black)
206678
(A) (206776)
203933
207740
(C) (202965)
206644
206638
203933
207740
(C) (202965)
206637
206638
203933
207740
(C) (202965)
9
10
11
12
13
14
15
16
17
18
19
20
21
21
(C) (203871)
(C) (206071)
202415
204555
202011
(202012)
203171
203148
(C) (203363)
(C) (204374)
(C) (0(202138)
(C) (202007)
202076
—
(C) (203871)
(C) (206071)
202415
204555
202011
(202012)
203171
203148
(C) (203363)
(C) (204374)
(C) (202138)
(C) (202007)
202076
—
(C) (203871)
(C) (206071)
204400
204555
202011
(204398)
203171
203148
(C) (203363)
(C) (204374)
(C) (202138)
(C) (202007)
—
205396
Upthrust Spring
Bearing Washer (Blue)
Pop-Up Sleeve Assembly
Guide Nut
O-Ring Seal
Retract Spring
Guide SIeeve
Friction Collars (2)
Buna N Washer (Black)
Wearing Washer (White)
Brg Backup Washer (Gray)
Body Retainer
Inlet Screen (Standard)
SAM Screen/Seal Assembly
MINI-PAW WRENCH
42064
(A) Included in Body Cover Assembly # 206974. (Specify nozzle size.)
(B) Specify nozzle size when ordering.
(C) Included in Bearing Washer Kit # 202190.
NOTE: Part numbers enclosed in brackets ( ) are not available individually, but may be sold in assemblies or kits.
INSURE QUALITY - USE ONLY GENUINE RAIN BIRD PARTS
© COPYRIGHT 1991 RAIN BIRD SPRINKLER MFG. CORP.
9