1
ASTR .:.CAST
WARRANTY
INNOVATION'
DESIGN'
ASTR -=-CAST
PERFORMANCE
INNOVATION· DESiGN· PERFORMANCE
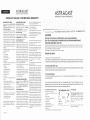
ASTRACAST USA, INC. KITCHEN SINKS WARRANTY
GRANITE ROK@ SINKS
Astracast
USA, lnc. carries
WARRANTY
on Granite
of all manufacturing
LIMITED
STAINLESS STEEL SINKS
a LIMITED
LIFETIME
ROKl') sinks to be free
defects under normal use.
(excluding
charge.
labor) any Granite ROK~ sink
by Astracasr USA,lnc that is proven to
be defective
within the specified
period from date of purchase,
residential
application
and
the
Astraccst
USA, Inc. Premium
installed
accordance
with
instructions,
used and cleaned as recommend-
Asuacast
-tmorooer in~l(J!latiofJlrnodifiC(lfi()n
stainless
steel
sinks
fe8ture
WARRANTY
manufacturinq
& Esatto
be
to
detects
a
range
LIMITED
free
of all
in
LIMITED
(such as exposure
under normal use.
In the event of a warranty claim, the owner will
labor)
any
Stainless
be required
charge,
Steel
sink
to provide
This warranty
will
n01
which rnight be caused
Granite ROK'y warranty:
date
• Bubbling
provided
due to abuse. misuse, or
negligence,
be defective. with
The following
are covered by this
conditions
of purchase,
the original
to
tial application
"nconsisfenr Color
with the Asrracast installation
· Routing lmpetiections
•Surface blemishes
· Warped deck
used and cleaned
are not covered
by
this Granite ROK~ warranty:
JS
and not
as heavy
to be detective
prior to
of the sink. All decisions
are final.
Replacement
expressed
EXCLUDES transportation
cost
labor
for the
costs
supersedes
removal
The foregoing
warranties
are exclusive
• Improper opplications
WARHANTY, WHETHER EXPRESS, IMPLIED, OR
· Scratches due to
(such as exposure to
ccrroslve chemicals, pIJoto!:.1rop/Jic solutions, ete)
· Any modifications made
use
the product after it
10
• Commercial
• Improper
instalJatiorvmocfification
• Damages
resulting
from
abuse, such as
heavy
or dropped objects
. Improper care or motmerorce
impact
the
buyer.
STATUTORY, INCLUDING
MEIKHANTARILITY
OTHER
ANY WARRANTY
OR
EXIST IN CONNECTION
application
FITNESS
OF
FOR
WITH
ANY OF THE
CERAMIC FIRECLAY SINKS
AND ANY IMPLIED WARRANTIES FOR A PERIOD
Astracast
GREATER THAN
USA, Inc. carries
WARRANTY
use and a LIMITED
LIMITED 1 YEAR
Fireclay sinks to be
on Ceramic
free of all manutacturinq
J
defects under normal
10 YEAR WARRANTV
on
CONTAINED
THE
WARRANTY
IN THE ASTRACAST
LIMITED WARRANTY
ARE HEREBY EXCLUDED.
ASTRACAST USA, INC. SHALL NOT BE LIABLE
fading and sTaining .
fOR ANY INDIRECT. INCIDENTAL, SPECIAL OR
lIMITEO
CONSEQUENTIAL
elc.)
Astracast USA, Inc. will replace without
applicalions
(SUcil as exposure
• Any modifications made to the producr after it
SINK WARRANTY
(excluding
labor)
left·AsrracQst USA,inc. premises other than
supplied
owreatv
be defective
drilled fauwt holes
· Commercial
by
any Ceramic
Astracast US,.\
within the specified
period from date of purchase,
applications
owner. provided
Burns and Heat Marks ~Temperatures
under
residential
it has been
application
to the original
with
covered.
ed, and not damaged
u
or negligence.
Astracast
installed
used and cleaned as recommend-
do not affect these
IN ANY
OR
WAY
SERVICES
SUPPLIED HEREUNDER. No employee, agent, or
warranties on behalf of Astracast USA, Inc. in
instructions,
BOK7;I)
GOODS
appropriate
accordance
536 F (Granite
DAMAGES
TO THE
other
used solely in a
and
RELATED
is proven to
producrs. Temperatures over 536 F are not
0
the
r.harqe,
Fireclay sink
111(, That
in
installation
due to abuse,
scratches
If you
drawings
and descriptions
of its parts.
read the instructions first, you will know what tools and
or breakage.
misuse,
person
is authorized
to
qive
any
addition to or different from the herein given
to assume
for Astracast
liability in connection
except
you
for purchasing
this
Astracast
Kitchen
Sink.
PLEASE READ ALL INSTRUCTIONS PRIOR TO INSTALLATION OF THE SINK. PLEASE ALSO READ AND FOLLOW
if in writing
USA, Inc. any other
with any of its products
which
is signed
by an
officer of Astracast USA, Inc. and expressly and
intentionally
such liability.
gives such warranties
CAUTION: HANDLE WITH CARE
PLEASE NOTE THAT THE EDGE OF THE SINK MAY BE SHARP.TAKE ANY PRECAUTIONS NECESSARYTO AVOID
PHYSICAL INJURY DUlliNG HANDLING AND INSTALLATION.
TOOLS AND MATERIALS
ASK YOUR COUNTERTOP DEALER FOR A LIST OF THE PROPER TOOLS NECESSARY TO CUT A HOLE IN
YOUR COUNTERTOP.
PERIOD
USA, INC.
rc
corrosive chemicals, photographic solutions,
• Improper
carefully to prevent
your new sink. It includes
A
GOODS OR SERVICES SUPPLIED HEREUNDER,
Astracast USA, Inc. sball not be liable in any
case of:
for
PARTICUI.AR PURPOSE SHAl.l. BE DEEMED TO
left Asrracast USA, Inc. premises
• Scuff marks
only
NO
and
• Freight/Shipping damoqe
incorrectly
all parts
installing
in this guide.
THE INSTALLATION INSTRUCTIONS FOR ANY OTHER PRODUCTS INTENDED TO BE INSTALLED WITH THIS SINK.
aU other warranties,
made
damaqe
about
all
or implied.
«tmproper care or maintenance
-tratottotion
examine
BEFORE YOU BEGIN
Thank
or
• Cursand Nicks
• Holes drilled
to know
handle
and any
dropped abjecrs
or
you need
Please
reinstallation.
impact
everything
states do not allow such limitation, so this ref-
replacement
instructions.
•..•tnne, sucn
describes
erence may not apply to you.)
This warranty
from
This guide
parts and the drawings
materials you should have ready during installation,
• Improper installation/modification
resulting
any damages
by the product. (Some
Tel: 866.854.2516 \ '
Read ALL instructions carefully before commencing installation.
EASY TO FOllOW GUIDE FOR HOME INSTALLATION AND MAINTENANCE
HOW THIS GUIDE Will HELP YOU
you begin,
any sink reported
in accordance
recommended,
cover
-
91710
CAUTION
Before
Astracast USA, Inc.shall not be liable in case of:
• Damoges
. Chipping
installed
due to abuse, misuse, or negligence.
damaged
conditions
and
of purchase
~~~w.astnLcast.co,D. 14525 Monte Vista Ave, Chino,CA
Astracast USA,Inc. reserves the nqht to inspect
it has been used solely in a residen-
• Thermal Cracking
The following
owner,
proof
please save sales receipt.
supplied by Astracast USA,Inc.that is proven to
an equivalent replacement.
within the specified approprtate period from
ed, and not damaged
to
left AsrrQcasr USA, Inc. premises
SINK WARRANTY
(excludtnq
applications
• Commercial aopncouon
10 be free of all manulac-
Astracast USA, Inc. will replace without
installation
-,
. Improper care or maintenance
·Any modifications made to the oroaua aner it
Asnacasr US/\, Inc. Edge & Echo range of
turing defects
heavy
05
tmnaa or dropped objects
corrosive chemicals, photographic solutions, etc.)
EDGE & ECHO RANGE
YEAR W[,RRANTY
• Damages resulting from abuse, such
-tmoroper
under normal use,
stainless steel sinks feature a LIMITED 15
appropriate
to the original
it has been used solely in a
owner, provided
Asrracast US!""Inc. shalt not be liable in case of:
& ESATTO RANGE
liFETIME
SINK WARRANTY
Astracast USA, Inc. will replace without
supplied
PREMIUM
or assumes
READ THE INSTALLATION INSTRUCTIONS THAT ACCOMPANIED
FAUCETS AND ACCESSORIES THAT ARE
INTENDED TO BE INSTALLED WITH THE SINK. THE INSTALLATION INSTRUCTIONS SHOULD PROVIDE A LIST OF
INSTALLATION TOOLS, AIDS AND TIPS FOR EACH INDIVIDUAL PRODUCT.
To install this sink you may need:
An electric saber saw or router
A caulking
RECOMMENDED
gun with Acrylic or Silicone caulk
TOOLS
THE TEMPLATE
THE TEMPLATE
A pencil
A tape measure
Pencil
A hole saw 1 3/8'; carbide/diamond
Electric: Drill
wil.11 here sow
(plloJ:bit)
guarantee
due to the
practices
An electric drill
our control.
A Phillips screwdriver
Scrap lumber (Two 2"x 4"each
2'
(Icurie sober saw
or router
long would be sufficient)
A paint brush
such as disposable
cloths. soap and water.
wide
and
You should
defects
TO BE USED
Manufacturer
or in any way warrant
tip recommended
Clean up materials
IS INTENDED
AS A GUIDE ONLY!
variance
other
inspect
does
not
installation
of installation
conditions
beyond
"II products
for any
prior to installation.
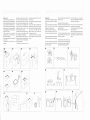
Fitting
the sink:
Note: please
1. Place the undermount
template
onto the
be careful when
coming
fall Clway. This may cause
countertop and position accordinqly, ensure
bf'.'ing cut does not
that the bowl will sit inside the cabinet
the saw blade to catch or dameqe
fitting is complete
and that it will not inter-
fere with the cabinet
orientated
when
framework.lt
should
as shown in the attached
and run parallel to the countertop
if allowed
be
diagram
edge and
template
aperture
onto the countertop
the cabinet
to fall away completely.
attach a strip of wood to the underside
ccuntertcp that spans the cut-out
someone
and position
it so it hues up with the cut our of
the worksurtece
the counter top so the bowls do not foul the
cabinet
brush the edges with a dusting
carefully
brush.
10. Only
whilst
Ensure that the
doing
to cure according
this.
to the
to
your
Using a router
router.
Note
and the jig create
drawings
you have made
around
has cured to avoid the sink
4.Support
the sink around the faucet hole area.
S. Dry fit the sink under the countertop.
7. Carefully place the sink into the base unit
the position
I
...-
the top of the
1
I---J.
l
:~T\
_._._
_.._1
1.___ _. __ .._..
_
r"·······--····-····
o
I
l_~_
then
screwdriver.
...
._._
shown.
i:15
compressing
the
faucet into the sink and ccuntertop.
Of
the faucet. it may damaqe
countertop.
under the ccun-
terrop, lining up the cut out and faucet holes
then secure the sink in place using all the 'U'
brackets
provided
pass through
contact
details.
sink rim in an even bead
shaped
~~:~~~:"J
..
I
,
Mark
of lhe faucet holes on the under-
'[81]'
__
Apply silicone around
8. Move the sink into position
that you
cover the entire profile.
r····"Tr"'J
<,
and the sink rim thor-
Drill the faucet holes using a 03Smm hole saw.
o
i'I
wood
the clips in the
note: Your faucet muy require a longer bolt to
7. Clean the countertop
oughly.
side of the countertop.
r!<~
using the marks made as a quide for the center
the under-
mount sink cut out required in the countertop.
fit the waste kit and the pipework
after the sealant
blend)
move
instructions.
moving.
ccuntertop.
9. Fit the faucet
Do not overtighten
and
the rim of the sink ensuring
the countertop
the sink
manufacturers
of the
Drill the faucet holes through
Drill each hole using a 03Smm hole saw
1OO%siliwne and not a silicone/acrylic
area
to create a timber jig
of each hole required.
6. Run a bead of silicone (make sure that this is
the waste
2.Use the paper template
3. Clamp the router jig to the counterrop.
not
3. Using a jigsaw carefully cut out the line that
remove
order shown using
available for CNC cuttinq machines
does
is not
6. Remove the sink from the countertop
any excess silicone is removed.
then remove the template
4. Carefully
counter top
suited
Allow the sealant
edges,
If the
inserts may be required, tighten
9. U~ing a damp
sink
spirit
note:
carefully clean the edges of the sink to ensure
or hove
cloth and methylated
the profile of the
cut out
of the
out
sharp
countertop
refer to fig. 8.
5. Carefully sand or polish the edge of the cut
any
Also check the sink matches
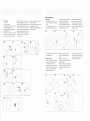
1. Position the Sink Centrally front to back on
Either
else hold the waste part.
to remove
Fitting the sink:
8. Fix the slnk in place using the dips provided
the
central across its depth.
2. With a pencil draw a line around
to the
end of the cut, that the area of the countertop
spaced evenly.
both the countertop
your faucet
manufacturer
and sink.
for further
Bistro models only
Fitting the sink:
8. Carefully
remove
the
waste
area
of
1.Tum sink over.
countertcp.
2. Lay sink on countertop.
corning to the end of the cut that the "rea of
3.Check
alignment
with unit ensure it will not
interfere with cabinet framework,
4. With <I pencil mark sink outline
(UNE 'A').
line '6' 1N' (steel sink),
ROKl',) sink) inside the sink outline
Please be careful when
that: is gojn~J to be removed
does
not fall away. This may cause the saw blade
5. Carefully remove sink,
6.Mark
countertop
NOTE:
to catch or damece
the cabinet
fall <Jway completely.
1/2"
(granite
(LINE 'N).
7. Cut the sink cutout to the inside of lineB'
wood
to the underside
that spans the cut-out
is allowed
Either attach
to
c.Apply a bead
underside
of 100[10 silicone around
the
of sink edge.
11. Carefully place sink into cutout.
all clips, finally, tighten
subsequently
1. Ensure that the base unit is in the correct
the ccuntertops and sink will all run
position
IO.Turn sink over so that is the right way round.
1). Lightly tighten
Fitting the sink:
and is securely 'fitted to the wall
or floor.
fit. Ensure that when the countertcps
are
position
while fitting the countertops.
4. Place the sink onto the unit and press
the sink.
of silicone sealant along
down
firmly. If there
between
is any discrepancy
the length of the sink and the
the top edge of the base unit. This is only
base unit (due to normal tolerances)
to help keep the sink in the correct
this equal
make
at both ends.
clips in order shown.
a strip of
of the countertop
or have someone
else
hold the waste part.
5. Clean off any excess
uSing
Methylated
sealant from the area
Spirit.
Fitting the countertop:
butt up to the sink ensuring
done
carefully cut the countertop
countertop
to length.
joints between
particles.
tops and sink and also along the back
Do this for both sides of the sink.
edges where the
sealant.
off and
ensure the front edges of the countertops
and the sink all run parallel. Screw them
into position.
the ends of the counter-
edge that sits against
countertops have been cut with a suitable
10. Put the counter tops in place.level
and
11. Run a brad of silicone sealant along the
to remove any sharp edges and loose
water-proof
that this is
from the end of the
sink to the wall! adjoining
i:t
that will
squarely to the front edge.
7. Measure the distance
8. Gently sand the edges of the cut only
9. Seal the exposed
6. Cut the ends of the countertops
@'
to each other. Remove
3. Run a thin bead
2. Place the sink onto the unit to check the
all
parallel
fitted that the front faces of
the wall.
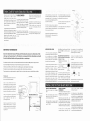
Always
wipe
soapy
water
your
everyday
stains.
ltmescale
deposits
over a period
become
coffee
sink down
and
a
cloth
with
to
In hard
warm
water
areas,
strongly
Do not pour strong
can build up on the sink
of tirne. The Hmescale
colored
Please
PLEASE AVOID
remove
can
by such foods as
and red wine.
down
your
sink such as bleach. ammonia, caustic
soda,
paint
stripper,
solutions.
chemicals
brush cleaners
minute
soak using diluted
biological
cleaning
washing
agent
to
parts
10
water)
Cut the countertop
top should
damage
If this should occur accidentally,
If bleach
with a dry
should
your sink, rinse
come
Stainless
in (on tact
thoroughly
with
JS
shown, the counter-
the sink bowl walls by
tnmrn/ 3/8", the front edge of
approximately
to all sinks even
0)
overhang
stand slightly forward
Steel.
with
warm
Dry fit the sink, base
to ensure
il
components
soapy water.
units and
to remove any dirt
or grease. Apply sealant
around
the left, back
and right side of the rim of the sink.
Lower the countertop
(1)
base units
sink (2).
the
(7) and
on the
into position
counter top
good fit before finally fixing the
together,
Clean the sink thoroughly
of the
base units and countertop.
Seal the edges
between
the countertop
and
the sink with silicone (5).
make any adjustments
at this point.
theft are necessary
bleach or diluted
(one
are
Please avoid the use of plastic wash bowls,
in the bowls, a 30
powder
on the
boards
the sink should
the use
of mild acids such as lemon juice or vinegar,
ingrained
directly
Leaving bleach to soak in sink bowls causes
cloth, then rinse with plenty of water,
If stains become
food
sink. Chopping
of your
available for this purpose,
or sterilizing
wlpe the spill away immediately
To remove llmescaie we recommend
do not chop
surface
as particles
in the
part
bowl
Avoid dropping
of grit that may be impregnated
could
scratch
the
surface
sharp objects
as this may scratch or damage
of
into your sink
the surface,
Apply clear low modulus
silicone (5) to the top
of the base board (3) as shown; now bed the
your sink.
sink into the silicone.
should
remove the marks easily. Rinse the sink with
water afterwards.
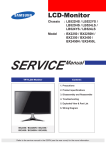
BEFORE INSTALLATION
IMPORTANT INFORMATION
Hole drilling to Faucet/Accessory
placement
Due to the handmade nature of fireclay and the production process, the dimensions of the
sink may vary by plus/minus 2%. We therefore recommend that the cabinetmaker wait until
the sink is delivered before cutting any cabinets or countertops.
1. This sink
experienced
for
any
produced
W<.I.S
and packaged
problems
prior
of the sink, please
to
installation.
installation
that prevent
return
it to the merchant
in which the sink is to be fitted should
Due to the weight
All areas around
of this product
we recommend
be reinforced
two people
to hold 130-1501bs plus the weight
of water.
the top of the sink must be sealed; any gaps could originate
holes
water damage.
that
from your faucet the number
your
accommodate
Fireclay sinks are best suited to either wood, granite, tiled or solid surface worksurfaces.
These instruct.ions
are only intended
as a guide, if there is any doubt
then contact
a certified
kitchen
installer.
require
1,2,3,4
already
purchased
lotion
faucet.
holes
place and are level before beginning.
Create
reinforce
a
sturdy
softwood
frame
inside the base unit (7)
50
the top
'A'
'N
I
j
of the frame is level with the top of the unit.
Note: the center
water
of accessory
of holes
number
to determine
holes to drill into the sink.
(3) lIsing
board
plywood
or similar material then cut a hole through
board
to
pass through
allow
the
sink
sink and ensure
accept the sink.
the
structurally
sound
sink. Doing
so will
to the countertcp.
centred
on the
on
underside
the
sink
of the sink is
and
indicates
hole
positioning.
Ii
2. Use
5. Drill straight
3/8/1
1
(1
Saw with
Hole
tipped
Use
down from the underside
of
the sink, until the pilot bit pierces throuqh
a pilot bit. (Fig. 1)
(Note:
sink surface.
completely
carbide/diamond
DO allow the hole
through
the
to cut
S20W
the sink. (Fig.2)
Fig.l
Hole Saw
for best results.)
3.Turn the sink upside down being certain to
not damage
ledge
the topside.
The two pieces
mentioned
sound
of scrap
lumber
in the 1'0015 and Materials section
can be used to support
Fig,2
Sink
Bottom
Make sure the sink
by a structurally
is supported
surface.
waste
appearance
Please
the
objects
avoid
dropping
sharp
Into the sink as the
scratch or damage
to
and
heavy
objects
the sink. (Do not use
6. Repeat instruction
faucet/accessory
step number
5 for each
hole needed.
over 536'" F (280" C).
so they do not foul the
the base is level and flat to
dishes
thoroughly
of any
should
Granite sink if
Scotch-Brite
the surface and
Astracast
sink
is to
For stubborn
stains / calcium
white ring around the bottom
rinse with plenty of water.
deposits
may be done
with
a non-
If stains become
ingrained
product.
in the bowls, an
abrasive cleaner (for example Softscntb {with
overnight
or without
will help remove stains, Rinse well.
bleach}, Bar Keepers
Friend, or
soak using diluted
bleach
(10:1)
baking soda). After every use, rinse and wipe
the sink dry with
a clean soft cloth
to
Use of strong
chemicals,
abrasive
eliminate any water spots or soap build-up.
and steel wool pads will degrade
For stains,
use
The
mentioned
cleaners
any
of
along
the
previously
with
a soft
warranty
caused
docs
not
cover
powders
the surface,
and make the sink more susceptible
. FralJ'i(! {D)
(a
of your Sink),
use Lime Away or a comparable
Daily cleaning
or saucepans
scour
pad
(for example
Soft Scour), Rinse well.
can
the surface.
not be placed in a Astracast
(3) to the top of the
frame (6) and the base unit (7) _. any screws
should be countersunk
4. Scoring
The first action to maintain
Hot Casserole
board
DRiLLING FAUCET/ACCESSORY HOLES
READ THIS ENTIRE SECTION BEFORE
STARTING TO DRILL.
. 'I
board
the board,
Screw the base
result in damage
PRODUCT CLEANING
INFORMATION
"-- Countcrtop lil
a base
as the
to support
installation.
Please do not use your sink as a chopping
PRODUCT CARE INFORMATION
brace of the frame should be
located so it will not foul the waste of the sink.
Create
countertop
surface
(6) to
the base unit as shown; this should
be screwed
the
for faucet installations,
the total numberof
the
to install
purified
etc.) Add the number
to
to
can
arE a soap/
(Examples
air-qap.
of
You may have
sink accessories
required
required
Faucets
or 5 holes,
dispenser,
dispenser
PLAN VIEW;
Ensure that suitably sized base units (1) are in
in order
sink requires
the
on the sink ledge.
Fitting the sink:
to
of the sink.
2. Determine
to move this sink.
prior
1. Drill holes from the Underside
from whom the sink was purchased,
The cabinet
Holes and
be performed
Please inspect your sink
people.
If there are problems
by
MUST
to stains.
damages
by improper cleaning methods.