1
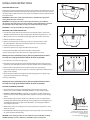
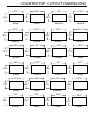
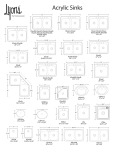
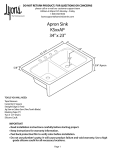
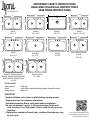
IMPORTANT SAFETY INSTRUCTIONS
READ AND FOLLOW ALL INSTRUCTIONS
SAVE THESE INSTRUCTIONS
25"
29"
22”
19-1/2"
17"
KSxxEE
25” x 19.5”
KSxxA
29” x 17”
28"
17-1/2"
22"
KSxxK
28.875” x 21.375”
33"
25"
19"
22"
19"
KSxxSB3
33” x 19”
33"
21-3/8"
KSxxES
33” x 22”
33"
KSxxS
28” x 17.5”
25-7/8"
33”
KSxxX
25” x 22”
31"
KSxxC, KSxxCB, KSxxJ,
KSxxR
33” x 19”
20½"
KSxxCAF, KSxxDX, KSxxGC,
KSxxHL, KSxxID, KSxxIN, KSxxLD,
KSxxP, KSxxTE, KSxxVE, KSxxY
33” x 22”
DO YOU HAVE?
Tape measure
Pencil
Safety glasses
KSxxLX, KSxxZ
31” x 20.5”
Caulk gun
Caulk (color matched and high grade silicone for drains)
Saber saw
IMPORTANT
•Read installation instructions carefully before starting project.
•Keep instructions for warranty information.
•Peel back protective film to verify color before installation.
•Do not use plumber’s putty. It will cause product failure and
void warranty. Use a high grade silicone caulk for all necessary
locations.
•Clip location, number of faucet holes, and bowl location may vary
by sink style.
Scan code for installation video
or visit www.lyonsindustries.com
and select “How To Videos”
INSTALLATION INSTRUCTIONS
REPLACING YOUR OLD SINK:
Cutting of your existing countertop may not be necessary. Refer to cutout dimensions on next
page. Place the sink in the hole and make sure the rim of your new sink rests on your counter
top. If you need to adjust the hole size, use a saber saw or keyhole saw then continue with the
instructions below.
IMPORTANT - Refer to the counter top manufacturer to determine the appropriate
cutting method for your counter top.
IMPORTANT - The clip system on this sink is designed to hold it in place while the
silicone dries. If the sink opening is too large the sink can be weighed down to hold it in
place while the silicone dries. Take care not to scratch the sink if using a weight.
FIGURE 1. Place the sink in the hole at an angle.
IMPORTANT - Leave protective film on during installation.
MOUNTING SINK IN A NEW COUNTER TOP:
+Place the sink upside down on the counter top in the desired location. Please allow
adequate room from the back of the counter top for manufacturing tolerances +/- 1/8”.
+With a pencil, trace a line around the outside edge of the sink onto the counter top.
+Remove sink from the counter top.
+Refer to cutout dimensions on next page, locate your sink style and then center
the cutout dimension within the traced outline of the sink on the counter top.
+Cut the counter top on this new line.
+ Install faucet and drains to sink per manufacturers instructions.
FIGURE 2. Push down on the front of the sink.
+ Peel back protective film around drain hole before installing drains.
+ When installing drain to sink make sure to use a high grade silicone caulk.
Warning: Do not use plumber’s putty. It will cause product failure and void
warranty. Use a high grade silicone caulk for all necessary locations.
+Place the sink in the hole at an angle. (Fig 1)
+ Push down on the front and sides of the sink while holding the faucet side against the
counter top. Push down firmly to make sure the sink sits flush on the countertop. (Fig 2)
+ Shift sink side to side and front to back to make sure the clips “seat properly”.
+ If sink needs removed for any reason push in on clips from underneath and then push up
gently on sink until free.
+Peel back protective film around edge of sink before applying silicone. Apply a high
grade of color-matched silicone caulk. (Fig 3)
FIGURE 3. Apply Silicone.
+ Connect all plumbing.
Warning: Do not use plumber’s putty. It will cause product failure and void
warranty. Use a high grade silicone caulk for all necessary locations.
CARE AND CLEANING INSTRUCTIONS
+Clean surface with nonabrasive liquid detergent and warm water. Use cleaning
products such as Soft Scrub Gel®, Comet Gel®, Gel Gloss® or other similar products.
+DO NOT USE ABRASIVE CLEANERS, "steel wool" or wire brushes on surface. Caustic drain
cleaners may cause surface damage. Open flames (cigarettes, candles, etc.) may damage
surface.
+Surface damage-light scratches, dulled areas, and small cuts and are restored by first
scrubbing with automotive-type white body cleaning compound, such as Meguire's #9
Swirl®Remover, followed by an application of Gel Gloss®. See next page for detailed
Scratch Repair Instructions.
+Remember to always use a cutting board or sink protector when using knives or sharp
objects in your sink.
+Recommendation: When pouring boiling water or placing hot pots or pans into the sink,
run some cold water simultaneously.
WARNING: Some cleaning products are not suitable for use. Read all labels carefully.
DO NOT USE if they say “not suitable for use with ABS, acrylic or polystyrene”.
LYONS INDUSTRIES, INC.
30000 M-62 West, Dowagiac, MI 49047
phone (800) 458-9036 fax (269) 782-5159
lyonsindustries.com
e-mail [email protected]
05/05/14
COUNTER TOP CUTOUT DIMENSIONS
277⁄8”
16¼”
32”
321⁄8”
207⁄8”
18”
317⁄8”
175⁄8”
KSxxA
KSxxC
KSxxCAF
KSxxCB
32¼”
23¾”
321⁄8”
31½”
175⁄8”
207⁄8”
KSxxEE
KSxxDX
325⁄8”
21½”
21½”
20½”
32”
207⁄8”
KSxxES
KSxxGC
313⁄8”
321⁄8”
175⁄8”
205⁄8”
KSxxHL
KSxxID
KSxxIN
KSxxJ
24¾”
31¼”
30”
317⁄8”
201⁄8”
20¼”
207⁄8”
187⁄8”
KSxxK
KSxxLD
KSxxLX
KSxxP
31¼”
26¾”
317⁄8”
32¼”
175⁄8”
163⁄8”
175⁄8”
KSxxR
KSxxS
311⁄8”
241⁄8”
203⁄8”
21¼”
KSxxVE
207⁄8”
KSxxSB3
303⁄8”
197⁄8”
KSxxX
KSxxTE
29¾”
19½”
KSxxY
KSxxZ
SCRATCH REMOVAL INSTRUCTIONS
1.For effective scratch removal and polishing, you will need to purchase these items.
1 sheet 1000 grit 3M® wet-dry sandpaper
1 sheet 1500 grit 3M® wet-dry sandpaper
1 sheet 2000 grit 3M® wet-dry sandpaper
1 small container of 3M® rubbing compound #05933
These items can be purchased at most auto supply stores that provide supplies to professional paint and body shops. Call
before you go. Not all auto supply stores will have these items.
2.Start sanding with 2000 grit paper. Use small squares of paper about 2” x 2" for all sanding and use lots of water. The water
serves as both a lubricant and to prevent residue buildup on the paper. Residue buildup shortens the effective life of the paper
and may scratch the surface you're trying to polish.
3. 2000 grit paper is the finest grit available (the higher the number, the finer the grit). If you can't remove all of the scratches
with 2000 grit, switch to 1500 grit. Remember to wash the paper frequently with water as you sand.
4.If all of the scratches can't be removed with 1500 grit, switch to 1000 grit. This should remove most fine scratches. If you have
deep scratches or a gouge, coarser paper may have to be used (see chart to right). Be careful! Using grit that is too coarse may
actually put in more scratches than it removes.
5.Once you have removed all of the scratches, by sanding with the finest paper possible, repeat the sanding process using
successively finer grits of paper until you've once again sanded with 2000 grit.
6. Now use 3M® rubbing compound #05933 on a soft, damp cloth. Polish using considerable pressure to produce a smooth,
shinny finish.
SUPERFICIAL SCRATCH
2000 grit
LIGHT SCRATCH
1500 – 2000 grit
MEDIUM SCRATCH
1000 – 2000 grit
DEEP GOUGE
600 – 2000 grit
SCRATCH / SANDPAPER GUIDE
LYONS PREMIUM CAST ACRYLIC KITCHEN SINK — LIFETIME LIMITED WARRANTY
Lyons Industries, Inc warrants to the original purchaser that this Kitchen Sink will be free of manufacturing defects, which affect the performance of this product for the use it was intended. The warranty period begins when the consumer/user purchases the unit.
FROM DATE OF PURCHASE
1st Year - Should the unit be otherwise than warranted, Lyons Industries, Inc will repair or exchange a defective unit. The exchange of a
unit will be limited to supplying a replacement unit or component part of comparable size and style, and does not include any cost of
removal, installation or transportation.
2nd Year - Should the unit be otherwise than warranted, Lyons Industries, Inc will pay 50% of the sink value toward repair or exchange of
a defective unit. The exchange of a unit will be limited to supplying a replacement unit or component part of comparable size and style,
and does not include any cost of removal, installation or transportation.
3rd Year - Should the unit be otherwise than warranted, Lyons Industries, Inc will pay 25% of the sink value toward repair or exchange of
a defective unit. The exchange of a unit will be limited to supplying a replacement unit or component part of comparable size and style,
and does not include any cost of removal, installation or transportation.
4 or More Years - Should the unit be otherwise than warranted, Lyons Industries, Inc will pay 10% of the sink value toward repair or
exchange of a defective unit. The exchange of a unit will be limited to supplying a replacement unit or component part of comparable
size and style, and does not include any cost of removal, installation or transportation. Lyons Industries, Inc reserves the right to require
the return, at the purchaser’s expense, of the damaged product for repair or exchange before providing the services under this warranty.
Warranty does not cover damage that can be repaired by following the Scratch Removal lnstructions or the Care and Cleaning
Instructions. This warranty excludes normal wear and tear. This warranty shall be voided by improper maintenance contrary to use and
care Instructions. This warranty does not apply to units installed in commercial or business establishments, hotels, or apartments. Nor
does the warranty apply if the unit is moved from its place of initial installation, subject to accident, abuse or misuse. No warranty will
apply if the unit is not installed in accordance with the instructions supplied by Lyons Industries, Inc, local building codes and ordinances
or if the care and cleaning instructions have not been followed. Any implied warranty of fitness for a particular use or purpose, or
warranty of merchantability is limited in duration to the express warranty provided herein unless a shorter period is allowed by law.
Lyons Industries, Inc shall not be liable for incidental or consequential damages for any damage to building, its contents or occupants.
Some states do not allow limitations of incidental or consequential damages so the above limitations and exclusions may not apply to
you. In such a state, liability shall be limited to the extent permitted by state law. Any claim under this warranty must be made in writing,
with your original proof of purchase enclosed to Lyons Industries, Inc, 30000 M-62 West, Dowagiac, Michigan 49047 to request performance
by Lyons Industries, Inc under the terms of this warranty. After such notice, a prompt investigation of the claim shall be made by Lyons
Industries, Inc who will promptly perform its obligation under the terms of this warranty.
FOR ASSISTANCE CALL (800) 458-9036