1
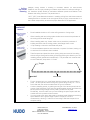
Installation
Guidelines
6009.A
Nudo Utilite™
Wall and Ceilings
____________________________________________________________________ Rev. 04 10/14
Please Read Disclaimers:
PLEASE READ ALL INSTRUCTIONS BEFORE BEGINNING INSTALLATION.
These guidelines are provided in good faith to help prevent any problems caused by common errors in
installation. The manufacturer and/or distributor of this product shall not be held responsible for
installation actions taken or not taken. There are many details of installation that are assumed to be
general construction knowledge to experienced installers; which are not included in these instructions.
These installation guidelines are intended to be strictly recommendations and are NOT to serve as a
step-by-step, fail-safe installation checklist. It is the project owners responsibility to insure product is in
compliance with local building codes. Selection of an experienced installer is the sole responsibility of
the project owner and architect.
Nudo Products, Inc. does not accept any responsibility for job failure resulting from or associated with
improper site environmental conditions and installation failure due to expansion contraction issues. The
warranty on Utilite is void, if not installed according to installation guidelines.
Safety
Instructions:
When cutting or drilling, always wear protective glasses or goggles
and a face mask which covers the face and mouth. Itching due to
fibers may be avoided by the use of barrier creams on exposed skin
areas.
Tools Needed
!
!
!
Circular saw with fine tooth carbide tipped saw blade
Power drill with carbide bits
Trim Cutter
Materials Needed
!
!
!
!
!
!
!
!
!
!
!
Utilite Panels
Personal protection equipment (goggles & mask)
Poly Vapor Barrier sheeting
Fasteners (Masonry, Metal or Wood Frame Screws)
Nail-In Anchors
Seam Finishing: PVC Inside Corner (IC), Outside Corner
(OC), J-Cap (J)
Silicone Sealant (for installation in high moisture areas)
Non-abrasive cleaner, soap and water, mineral spirits, for use in
clean-up
Rags
Tape measure
Saw horses
Painter’s tape
1' -2x4 Wood
!
DO NOT USE Power Nail Gun or Staples
!
!
Note:
Nudo Products, Inc.
1500 Taylor Avenue
Springfield, IL 62703
Phone 1.800.826.4132 * 1.217.528.5636
Fax 1.217.528.8722
Form 6009.A Rev. 04 10/14
[email protected]
www.nudo.com
PreInstallation
Inspection
Panels should be inspected upon receipt.
Nudo Products, Inc. inspects
composite panels for physical and cosmetic abnormalities prior to shipment;
however it is the installer’s responsibility to fully inspect all panels for defects prior
to installation. If the panels are not acceptable, please contact Nudo Products,
Inc. customer services immediately. DO NOT INSTALL QUESTIONABLE
PANELS! Nudo Corporation will NOT be responsible for installation or removal
cost of unacceptable panels.
Storage
All Utilite panels should be stored indoors on a solid, flat, dry surface. Do not
stand panels on edge or stack on fresh concrete floor or any other surface that
emits moisture. Lay panels flat with proper support on the ends of panels.
Optimum storage conditions are 60°F (16°C) to 75°F (24°C) and 35% to 55%
relative humidity.
Environmental
Conditions
Temperature is always a factor when working with composite vinyl materials. In
warm temperature conditions, above 70°F (21°C) cool panels to a minimum of
60°F (16°C) overnight. In cold temperature conditions, below 40°F (4°C) warm
panels to a minimum of 60°F (16°) overnight. When installation conditions of
under 60° (16°) is unavoidable, insert penny between panels. When below 32°F
(0°C), insert a nickel between panels to allow spacing for expansion in hot
weather. Use a silicone and adhesive recommended for low temperatures,
following the manufacturer’s application guidelines. Check with the local building
codes for specific requirements. Do NOT use Utilite panels in high temperature
conditions; PVC has a heat distortion threshold in temperatures exceeding 120° F
(55°C). Please discuss with your HVAC contractor prior to install. Ceiling fans and
blowers may need to be installed, along with shielded Tube Radiant Heaters with
a maintained clearance of 24" to distribute heat uniformly throughout facility.
Prolonged exposure to direct sunlight MAY CAUSE the panels to fade and/or
rapid expansion. Please use extreme caution when installing panels in these
types of environments. Nudo will not warranty any panels distorted because of
excessive heat exposure due to improper installation and operation of heaters and
furnaces in areas where Utilite has been installed.
Cutting
Instructions
Prior to
Installation
Always use proper personal protection equipment when cutting Utilite panels.
Read and follow manufacturer's guidelines for use of cutting tools.
Panels can be cut using a power miter saw with fine tooth blade, utility knife with
guiding straight edge (cutting panel 5-7 times to score and cut through panel), and
table saw with fine tooth carbide blade. DO NOT RUSH. CUT THROUGH
PANELS SLOW AND STEADY. A test cut is always recommended to see
performance of cutting tool with Utilite panels.
Installation should NOT begin until building is enclosed (windows and doors
installed). Permanent heating and cooling equipment is in operation, and residual
moisture from plaster, concrete, etc. is dissipated. Prior to installation, the installer
must determine that the environmental conditions meets or exceeds all
requirements specified in the installation guidelines. CEILINGS SHOULD BE
INSTALLED PRIOR TO WALLS. Before installing remove packaging materials.
Allow the panels to acclimate to the room temperature and humidity for 48 hours
before installing. Acclimation temperature range should be 60° to 75°F (16°C to
24°) and relative humidity should be 35% to 55%.
Maximum temperature
exposure during installation 32°-120°. Ideally, the room temperature and humidity
during acclimation and installation should be the same as the final operation
conditions. DO NOT install panels tight when cold (below 60°), panels will expand
in warmer temperatures (above 70°). Allow room for expansion contraction
between each panel.
CEILING PANELS SHOULD BE INSTALLED PRIOR TO WALLS (if possible).
Take proper measurements. The panels should NOT SPAN LONGER than 24"
Nudo Products, Inc.
1500 Taylor Avenue
Springfield, IL 62703
Phone 1.800.826.4132 * 1.217.528.5636
Fax 1.217.528.8722
Form 6009.A Rev. 04 10/14
[email protected]
www.nudo.com
between ceiling trusses. If building is insulated, PRIOR TO INSTALLING
PANELS, use 3mm poly sheeting to create a vapor barrier on walls and ceilings. A
24" clearance shield should be maintained between panels and Radiant Tube
Heaters and ceiling furnaces. The panels have a
Ceiling
Pre-Install
Planning
120° F (55°C) heat distortion threshold. Installing ceiling fans and blowers around
heating devices to circulate hot air throughout facility is highly recommended. It is
the installer responsibility to select the proper fasteners for the application.
Ceiling
Installation
Method
Walls and Ceiling
Inside Corner
Flange up
Walls Only
Inside Corner
Flange Down
!
Panel installed should run 90° to the ceiling trusses or furring strips.
!
When installing wall and ceilings place inside corner around the perimeter of
the ceiling with the wide flange up.
!
When installing walls only, fasten inside corner around the perimeter of
building wall flush with the ceiling panels, wide flange down or with
J-Cap creating a channel to terminate wall panel.
!
!
To accommodate expansion and contraction, cut panel ½ shorter, leaving a ¼
on each end for movement when installed.
!
Take first panel and place face down (shinny side) at one end of the ceiling
with the tongue facing wall and the groove flange facing the direction you are
installing panels (parallel with outside wall). The perimeter trim must be able
to cover fasteners, keep within 1" of wall.
Tongue
Wall
!
!
!
Groove
Face Down
For the 1st panel only you must fasten both the tongue and groove sides of
panel. All other panels, fasten through the groove flange, every 16" - 24" at
each rafter with the recommended screw for type of substrate.
Continue installing panels, by placing the tongue of the second panel into the
groove of the first panel. Push and lock panels together loosely and fasten the
second panel through flange at every rafter, just like the 1st panel.
Periodically, check to make sure you are installing the panel square with the
outside wall or the panels will look uneven.
You may need to trim down last panel to complete install. Measure remaining
space distance at the groove edge of panel. Cut panel ¼ short of
measurement, allowing 1" wall trim to cover edge. Slide the last panel in to
complete ceiling.
Nudo Products, Inc.
1500 Taylor Avenue
Springfield, IL 62703
Phone 1.800.826.4132 * 1.217.528.5636
Fax 1.217.528.8722
Form 6009.A Rev. 04 10/14
[email protected]
www.nudo.com
Vertical Wall
Preparation
Pre-Install
Planning
Vertical
Installation
Method
J-Cap
Open Face-down
Ceiling
J-Cap
Open Face-up
Floor
THE CEILINGS SHOULD BE INSTALLED PRIOR TO WALLS. If the ceiling has
just been installed use the existing inside corner trim to edge wall panels. Panels
can be installed over masonry block, metal and wood framing studs, so make sure
you have selected the proper fasteners for the application.
Measure Area. Panels should be pre-fit cut ½ shorter than actual wall height to
allow for expansion and contraction. Cove base molding should not restrict panel,
but allow for expansion and contraction. Poured molding should be completed
prior to installation of panels. Cut panels ¼” short of where the base molding will
extend.
! Start in one corner and lay J-Cap edge, open face-up, along the floor and open
face-down along ceiling creating a channel to insert wall panel (unless inside
corner is installed at ceiling). Insert a thin bead of clear silicone caulking along the
inside of J-Trim to provide a waterproof seal and fasten every 16" or 24" along top
and bottom of wall.
! Make a nice clean border around doors and windows openings by installing JCap or OC, prior to installing wall panels.
! Depending on the application and conditions, you may want to apply adhesive to
the back center of the panels from top to bottom and add a small bead of clear
silicone caulking on channel opening of trim piece to provide waterproofing.
! Take first wall panel which is ½" shorter than actual wall, and place in corner,
tongue first and raise up into the ceiling trim (IC or J-Cap) and then bend slightly
in the middle as to get the panel to fit into J-Cap channel at base of wall.
! To allow for expansion and contraction, raise the panel ¼ off the floor and fasten
the panels groove flange every 16" - 24". On the first panel you must also fasten
the tongue side with screws near the corner, within an 1" from the edge allowing
the trim piece to cover them.
! Make sure First panel is level in place and proceed to install the remaining
panels in the same fashion. You may choose to use a 2x4 wood piece to tap
groove flange onto tongue of panels. Continue to add trim pieces to terminate top
and bottom of panel in the process.
! To create a water-tight corner at door and window openings please insert a small
bead of clear silicone caulking on channel opening of trim pieces before installing
panels.
! Continue the method working in one direction around the room.
! You may need to trim down last panel to complete install. Measure remaining
space distance at the groove edge of panel. Cut panel ¼ short of measurement,
allowing 1" wall trim to cover edge. Insert a small bead of clear silicone caulk into
edge trim piece, slide the last panel in to terminating trim channel, fasten screws
along the cut edge within 1" of the corner, allowing trim to cover screws
completing installation.
Nudo Products, Inc.
1500 Taylor Avenue
Springfield, IL 62703
Phone 1.800.826.4132 * 1.217.528.5636
Fax 1.217.528.8722
Form 6009.A Rev. 04 10/14
[email protected]
www.nudo.com
Horizontal
Installation
Finish Work
Review vertical panel installation guidelines above. During horizontal
installation, start hanging wall panels from top down to floor. Install first
panel, horizontally at ceiling with the groove flange pointing to floor. Insert
small clear silicone bead to insure no water will nest in groove of panel.
Continue the method working in one direction to the floor terminating in
channel edge cap.
Waste materials shall be disposed of in a safe manner and in compliance
with site, local, state and/or federal requirements.
Nudo Products, Inc.
1500 Taylor Avenue
Springfield, IL 62703
Phone 1.800.826.4132 * 1.217.528.5636
Fax 1.217.528.8722
Form 6009.A Rev. 04 10/14
[email protected]
www.nudo.com