Transcript
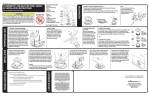
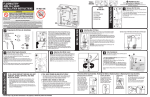
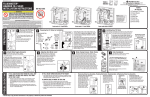
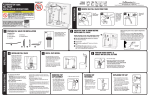
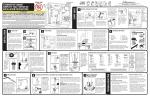
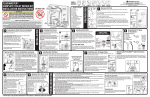
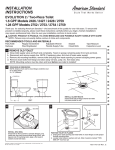
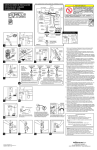
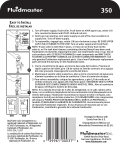
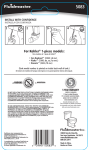
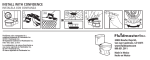
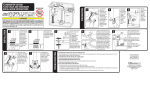
TOOLS NEEDED FOR INSTALLATION
• Putty knife
• Pliers or adjustable wrench
• Hacksaw
• Wire brush
• Bucket Sponge and Rag
• Screw Driver
FLUIDMASTER® 7503 WAX FREE BOWL GASKET
KIT INSTALLATION INSTRUCTIONS
NOTE: SAVE INSTRUCTION SHEET FOR FUTURE REFERENCE.
WARNING
DO NOT USE IN-TANK DROP-IN TOILET BOWL CLEANERS CONTAINING BLEACH OR CHLORINE. Use of such
products will: (1) RESULT IN DAMAGE to tank components and MAY CAUSE FLOODING and PROPERTY
DAMAGE and (2) VOID FLUIDMASTER WARRANTY. Fluidmaster Flush 'n Sparkle Toilet Bowl Cleaning System
is recommended for those choosing to use in-tank bowl cleaners and WILL NOT VOID the FLUIDMASTER
WARRANTY because it will not damage the components. DO NOT overtighten nuts or tank/bowl may crack.
Always use quality Fluidmaster parts when installing or repairing. Fluidmaster will not be responsible or liable
for use of non-Fluidmaster parts during installation or repair.
DO NOT USE
CONTENTS
• 1 Bowl Gasket
• 2 O-Rings (1 thin, 1 thick)
• 2 Bolts, 2 Stainless Steel Washers,
PREPARATION CONT.
INSTALLATION
A. Slightly insert the bowl gasket assembly into
the drain pipe. Before completely installing, wrap
the cardboard spacer around the bowl gasket
and secure at the two cut corners.
TOILET BOWL
HEX NUT
STAINLESS STEEL
WASHER
BOLT CAP BASE
(NOT INCLUDED)
BOWL HORN
• 1 Cardboard Spacer
BOWL GASKET
0-RING
(THICK OR THIN)
FLOOR BOLT
CARDBOARD
SPACER
PLASTIC RETAINER
WASHER
FLOOR FLANGE
(NOT INCLUDED)
2 Hex Nuts
• 2 Plastic Retainer Washers
DO NOT LUBRICATE THE O-RINGS
1. TOILET BOWL & FLOOR FLANGE PREPARATION
Turn off water supply. Flush tank and bowl. Sponge out
remaining water in tank and bowl. Disconnect water supply
line at toilet tank. Now, take bolt caps (if present) off base
of bowl. Remove nuts from bolts at base of bowl. Lift the
bowl off of bolts and safely lay bowl on its side.
Place a rag in the hole to block sewer gas odor. Temporarily
cover the floor flange with a bucket, until you are ready to
begin installation on new bowl gasket.
If a wax ring was used previously then use a putty knife to
remove old wax from floor flange and under side of toilet.
Clean the bowl horn and floor flange with a stiff brush.
BOLT CAP
(NOT INCLUDED)
PREPARATION
PART # 5-1007, Grev.4, 10/11
2
1
3
3" DRAIN PIPE PARTS & ASSEMBLY
On the 3" Wax-Free Bowl Gasket place a thick O-ring
at the bottom of the gasket just above the four
flanges. If you can’t insert the gasket with the thick
O-ring into the drain pipe then use the thin O-ring
instead.
2. CHECK FIT ON BOWL
Before installing bowl gasket press it onto the
horn of bowl to check fit. If gasket goes on horn,
but does not cover completely use sand paper on
horn to bring into round. Test fit before
proceeding to next step. If gasket will not cover
horn at all you will have to use wax-ring instead.
B. Slowly and evenly push the bowl gasket assembly downward
into the pipe until it is positioned 1" above the floor surface (It
may or may not touch the spacer depending on your floor and
floor flange. This will allow the bowl horn to contact the rubber
opening of the bowl gasket before the bowl touches the floor.) The
O-ring should roll into the drain pipe and will move up the bowl
gasket assembly as needed to create a tight seal. The cardboard
spacer is designed to collapse and remain in place once the toilet
is installed. It will not interfere with the seal of the bowl gasket.
TO REMOVE A PRE-EXISTING FLUIDMASTER BOWL GASKET
1. Make two loops of string and place the loops between the floor flange and the bowl gasket.
2. Pull the string loops outward in opposite directions.
3. Pull the string loops upward toward the center making sure they rest between hooks on the bowl
gasket. Insert screwdriver as shown and pull upward to remove bowl gasket from drain pipe.
0-ring
(thick or thin)
place at bottom of bowl gasket base
3" BOWL GASKET
C. Connect floor bolts to floor flange by inserting
floor bolts, head down, into mounting adjustment
slots on floor flange. Slide plastic retainer washers
down the threads to hold bolts in place.
D. Line up holes in toilet base with floor bolts in floor
flange. This will line up the top of the bowl gasket
with the horn on the bottom of the toilet bowl. Lower
toilet. Apply weight to get toilet to rest on the floor.
E. Place bolt cap base (not included), stainless steel
washer, then hex nut on bolt. Tighten just enough
to prevent movement of the toilet bowl. DO NOT
OVERTIGHTEN or bowl may crack. If floor bolts are
too long to allow the bolt caps to fit, carefully cut
the floor bolts with hacksaw to correct length.
Install bolt caps (not included). Reconnect tank to
bowl. Reconnect water supply connector to tank fill
valve. Turn on water supply.
If toilet rocks after installing, it may be:
A.Floor flange is too high above the floor.
• The floor flange needs to be lowered or floor raised to correct this condition.
B. Bowl Gasket is not completely inserted in the drain pipe.
• Pipe rust may be obstructing Bowl Gasket.
• The drain pipe is offset. Bowl Gasket will not work with this condition.
• The drain pipe makes 90 degree turn so that Bowl Gasket bottoms out.
C. Floor bolts are not secured properly.
D. Uneven floor. May require shims.
LIMITED WARRANTY
TROUBLESHOOTING
CAUTION
If floor flange is above the floor and toilet rocks after installation,
you may need to call a professional to correct this condition before
installing the Bowl Gasket. SEE TROUBLESHOOTING.
Subject to the “Exclusions” set forth below, Fluidmaster Inc.
promises to the consumer to repair, or at the option of
Fluidmaster Inc. to replace any part of this plumbing product
which proves to be defective in workmanship or materials under
normal use for Ten years from the date of purchase. All costs of
removal, transportation and reinstallation to obtain warranty
service shall be paid by the consumer. During this “Limited Ten
Year Express Warranty,” Fluidmaster Inc. will provide, subject to
the “Exclusions” section set forth below, all replacement parts
free of charge, necessary to correct such defects. This “Limited
Ten Year Warranty” is null and void if this plumbing product has
not been installed and maintained in accordance with all written
instructions accompanying the product, and if non-Fluidmaster
Inc. parts are used in installation.
Exclusions:
FLUIDMASTER INC. SHALL NOT BE LIABLE FOR INCIDENTAL
OR CONSEQUENTIAL DAMAGES, INCLUDING COSTS OF
INSTALLATION, WATER DAMAGE, PERSONAL INJURY OR FOR
ANY DAMAGES RESULTING FROM ABUSE OR MISUSE OF THE
PRODUCT, FROM OVERTIGHTENING OR FROM FAILURE TO
INSTALL OR MAINTAIN THIS PLUMBING PRODUCT IN
ACCORDANCE WITH THE WRITTEN INSTRUCTIONS,
INCLUDING USE OF NON-FLUIDMASTER PARTS. DO NOT USE
IN-TANK DROP-IN TOILET BOWL CLEANERS CONTAINING
BLEACH OR CHLORINE. USE OF SUCH PRODUCTS WILL
RESULT IN DAMAGE TO TANK COMPONENTS AND MAY CAUSE
FLOODING AND PROPERTY DAMAGE. USE OF SUCH
PRODUCTS WILL VOID THIS WARRANTY.
Contact Fluidmaster for troubleshooting
help or Ask Bob on www.fluidmaster.com
30800 Rancho Viejo Road
San Juan Capistrano, CA 92675
www.fluidmaster.com
800-631-2011