1
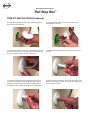
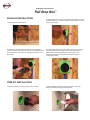
Installation Instructions For
Pull Stop Box ™
ROUGH-IN INSTALLATION
1. Identify desired outlet location.
3. Fasten Pull Stop Box using two screws or two nails into
a stud or thread a hyco strap through the mounting bracket slot
and secure with a screw. (Do not over tighten screws or over
drive nails.)
2. Attach supply line to valve inlet via pipe manufacturer’s recommended practice (i.e. sweat for copper, solvent cement for CPVC,
crimp rings for PEX).
4. Pull Stop Box arrives in the off position. Once box is securely
attached to wall and the supply line is properly attached, no
further work is necessary during the rough-in phase. The
included protective cover will protect the valve during the
construction process.
TRIM KIT INSTALLATION
1. Remove protective cover by pulling away from wall.
2. Feed a flexible connector through escutcheon. It may be
helpful to first attach supply line to the fixture.
Installation Instructions For
Pull Stop Box ™
TRIM KIT INSTALLATION (Continued)
3. Thread flexible supply line onto valve outlet and tighten to
manufacturer’s specifications.
4. Swing threaded metal arm on the valve out until it is
perpendicular to the wall.
5. Line up square hole in escutcheon with threaded metal arm
and push the escutcheon into the Pull Stop Box. Make sure to
feed the threaded metal arm through square hole.
6. Thread knob onto threaded metal arm a minimum of four
full turns.
7. Continue threading knob onto threaded metal arm until
square portion of knob’s shank is flush with square hole in
escutcheon. Note: square hole prevents overtightening or
accidental removal of knob while valve is in the ON position.
8. Push the knob in towards the wall to turn the valve on and
allow for water supply to fixture. To stop the flow of water, pull
the knob away from wall.