1
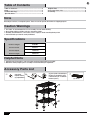
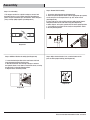
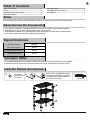
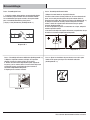
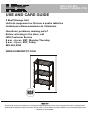
SKU # 461 554
Model # 31424PS-YOW
USE AND CARE GUIDE
3 Shelf Storage Unit
Unité de rangement en Chrome á quatre tablettes
Unidad para Almacenamiento de 3 Estantes
Questions, problems, missing parts?
Before returning to the store, call
HDX Customer Service
8 a.m – 6 p.m., EST, Monday-Thursday
8 a.m - 5 p.m., EST, Friday
888-449-5520
WWW.HOMEDEPOT.COM
THANK YOU
We appreciate the trust and confidence you have placed in HDX through the purchase of this Storage Unit. We strive to continually create
quality products designed to enhance your home. Visit us online to see our full line of products available for your home improvement needs.
Thank you for choosing HDX!
E
Table of Contents
Helpful Hints...................................................................2
Accessory Parts List..................................................... 2
Assembly........................................................................ 3
Table of Contents .......................................................... 2
Note... ............................................................................. 2
Caution Warnings.......................................................... 2
Specifications................................................................ 2
Note
Please dispose of loose, round plastic pieces. These are used to separate the shelves for shipping purposes.
Caution Warnings
1. Two adults are recommended for ease of assembly. Use care when handling.
2. Do not allow children to climb or play in or around the shelves.
3. Assembly recommended on a soft surface, such as carpet, to avoid scratching flooring finish.
4. Each shelf holds up to 250 lbs. evenly distributed.
Specifications
Product weight
10.63 lbs.
Product width
23.25 in.
Product depth
13.375 in.
Product height
30.375 in.
Helpful Hints
1. Carefully read all instructions, note and caution warnings before beginning assembly.
2. Determine shelving heights prior to assembly to avoid dismantling for adjustment.
Accessory Parts List
(8) posts (with 4 threaded post
jointers pre-installed in posts,
4 foot levelers pre- installed in
bottom of posts)
(24) plastic
tapered sleeves
(2) replacements
a
b
b
c
2
(3) shelves
Assembly
Step 1: Post Assembly
Step 2: Bottom Shelf Assembly
i. The top post section has a plastic endcap on one end and
the bottom post has a foot leveler attached. Threaded post
jointers are pre-installed for your convenience. Screw the posts
(1 long & short) tightly together. (See Diagram #1)
i. Locate the desired position of the bottom shelf.
ii. Insert four plastic tapered sleeves into the appropriate post groove,
one in each post. Ensure tapered end is up. See arrow on lock.
(See Diagram #2)
iii. Place shelf on its side and slide each post with tapered sleeves
through the bottom of the shelf until snug. (See Diagram #3)
iv. After all posts are in place, position the unit in the upright position.
v. Push down on each corner of the shelf, ensuring that the shelf is
in the fully locked position.
TOP
Diagram #1
Diagram #3
Diagram #2
Step 3: Additional Shelves Assembly (See Diagram #4)
Step 4: Adjust the foot levelers in or out at the bottom of the
posts to attain proper leveling. (See Diagram #5)
i. Locate the desired position of the next lowest shelf and
insert the tapered sleeves into the posts.
ii. Slide the shelf down from the top of the posts and onto
the tapered sleeves. Push down on each shelf corner, ensuring
that the shelf is in the fully locked position.
iii. Repeat for the remaining shelves.
Diagram #5
Diagram #4
3
HOMEDEPOT.COM
Please contact 888-449-5520 for further assistance.
S
Table of Contents
Consejos Útiles.............................................................6
Lista De Piezas Accesorias......................................... 6
Ensamblaje.................................................................... 7
Table of Contents .......................................................... 6
Aviso... ............................................................................ 6
Advertencias De Precaución.........................................6
Especificaciones............................................................6
Aviso
Favor de deshacerse de las piezas redondas de plástico. Solamente se usan para separar los estantes durante el envio.
Advertencias De Precaución
1.
2.
3.
4.
Para facilitar el ensamblaje, se recomienda realizarlo entre dos personas adultas. Tenga cuidado al manejarlo.
No permita que los niños se suban o jueguen en los estantes o cerca de ellos.
Se recomienda ensamblarlo en una superfioie blanda, como una alfombra, para evitar arañar el acabado del piso.
Cada estante sostiene hasta 250 libras, distribuidas de forma pareja.
Especificaciones
peso del producto
10.63 lbs.
ancho del producto
23 ¼ in.
profundidad del producto
13 ⅜ in.
altura del producto
30 ⅜ in.
Consejos Útiles
1. Lea cuidadosamente todas las instrucciones y advertencias de precaución, antes de comenzar con el ensamblaje.
2. Determine las alturas de los estantes antes de ensamblar para no tener que desarmarlos para futuros ajustes.
Lista De Piezas Accesorias
(8) postes (con 4 ensambladores para poste roscados preinstalados en los postes,
4 niveladores de patas preinstalados en la
parte inferior de los postes)
(24) uniones
cónicas plásticas
(2) repuesto
a
b
b
c
4
(3) estantes
Ensamblaje
Paso 1: Ensamblaje del Poste
Paso 2: Ensamblaje del Estante Inferior
i. La sección superior del poste tiene una terminación plástica
en un extremo y el poste inferior tiene un nivelador añadido.
Los ensambladores para poste roscados se han preinstalado
para su comodidad. Atornille los postes juntos
(1 largo y 1 corto) firmemente. (Ver Diagrama N.º 1)
i. Ubique el estante inferior en la posición deseada.
ii. Inserte cuatro uniones cónicas plásticas en la ranura adecuada del
poste, una en cada poste. Asegúrese de que el extremo cónico se
encuentre hacia arriba. Vea la flecha en el seguro. (Ver Diagrama N.° 2)
iii. Coloque el estante de costado y deslice cada poste con uniones
cónicas a través de la parte inferior del estante hasta que quede
ajustado. (Ver Diagrama N.° 3)
iv. Una vez que todos los postes se encuentren en su lugar, coloque la
unidad en posición vertical.
v. Presione hacia abajo cada esquina del estante, asegurándose de que
el estante se encuentre completamente bloqueado.
TOP
Diagrama N.°1
Diagrama N.° 2
Paso 3: Ensamblaje de Estantes Adicionales (Ver Diagrama N.° 4)
i. Ubique los siguientes estantes más bajos en la posición
deseada e inserte las uniones cónicas en los postes.
ii. Deslice el estante hacia abajo desde la parte superior de
los postes y en las uniones cónicas. Presione hacia abajo cada
esquina del estante, asegurándose de que el estante se
encuentre completamente bloqueado.
iii. Repita para los estantes restantes.
Diagrama N.° 3
Paso 4: Ajuste los niveladores de patas dentro o fuera de la parte
inferior de los postes para lograr una nivelación adecuada.
(Ver Diagrama N.° 5)
Diagrama N.° 5
Diagrama N.° 4
5
HOMEDEPOT.COM
Please contact 888-449-5520 for further assistance.
Questions, problems, missing parts? Before returning to the store call
HDX Customer Service
8 a.m – 6 p.m., EST, Monday-Thursday
8 a.m - 5 p.m., EST, Friday
888-449-5520
WWW.HOMEDEPOT.COM
Retain this manual for future use.