Transcript
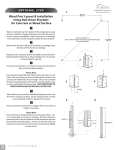
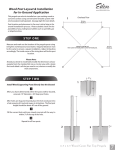
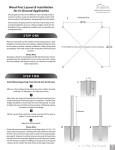
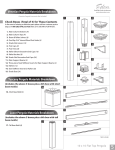
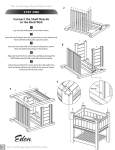
OPTIONAL STEP
1
www.edenarbors.com
147.5 in.
374.65 cm.
Wood Post Layout & Installation using
Bolt Down Brackets for Concrete or
Wood Surface for Attached Pergola
1
Measure and mark out the location of the pergola posts using
string or chalk line. Adjust string lines accordingly.
The inside corner of the string lines will be the post location.
2
135 5/16 in.
343.7 cm.
Wall
Mark out the location of bolt down brackets accordingly using
the base of the bracket accordingly.
Using the 5/32” masonry drill bit included in your bolt down
bracket kit, drill 3” deep holes to allow installation of 2 1/2 concrete
screws included in your kit.
2
4
Marker
3
Proceed to install three 2 1/2 concrete screws into the bottom
base of the bolt down bracket.
Please Note:
Concrete patios generally have sloped surface for water run-off.
If this is the case, when you secure the bolt down bracket to the
concrete, the bracket may be at an angle. This can be corrected
for level using galvanized steel washers (not provided), acting
as shims underneath the base to level - VERY IMPORTANT OR
PERGOLA BEAMS AND RAFTERS WILL NOT BE LEVEL.
4
3
3“ (Deep)
5
With the two post brackets installed plumb, proceed to set
the 4x4 x7’ wood post in place. Secure using the same concrete
screws included in the kit. Repeat for both posts.
5
6
6
Posts should not exceed 84” in height. Please cut down in
height if necessary.
Please Note:
Some 4x4 pressure treated wood posts can be larger than 3 1/2 x
3 1/2 square due to twisting or cracking. We have allowed a
tolerance for this in the post brackets and the internal one way and
two way 4x4 wood post guides. However in extreme cases, you
may need to shave down the end of your 4x4 wood post slightly
to allow access.
8
12 x 12 Flat Top Pergola
Level
84” (Maximum)