1
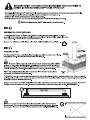
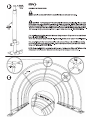
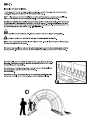
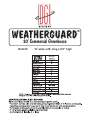
 WORLDWIDE
20' Commercial Greenhouse
15-6310 12’ wide x 20’ long x 8°6” high
MATERIALS 1S-6310
INCLUDED 20' Cover
Base Plates 12
Connector Fittings 12
Cross Fittings 12
Curve Pipes 24
Elastic Cords 50
Lacing Ropes 2
Pull Ropes 2
Purlins 25
Ratchets 4
Roof Skin 1-200 gram
Safety Ropes 3
Solid End Panel 1-200 gram
Split Door Panel 1-200 gram
Straight Vertical Tubes| 12-18”
“T” Fittings 6
NOTE: Replacement cover, door, end are available in both standard 200 gram and
275 gram material for all Weatherguard™ shelters.
ADDITIONAL MATERIALS (NOT SUPPLIED)
NOTE: Read Steps #1 and #2 to determine your specific needs.
* Foundation: concrete slab, concrete footing, pressure-treated timbers or railroad ties can be used.
(Foundation requirement are 6” longer and 6” wider overall than the size of the purchased shelter.)
* 6 (minimum) earth/ground anchors (if assembled without concrete slab or footing)
* 2" x 6" pressure-treated seal plates (recommended)
* 24 (minimum) 3/8" lag bolts, 2" or longer
IMPORTANT NOTICE! PLEASE READ THESE INSTRUCTIONS COMPLETELY PRIOR TO
ASSEMBLING YOUR WEATHERGUARD™ ROUND TOP SHELTER!
» This high-quality Weatherguard™ Round Top Shelter requires a permanent foundation to serve your storage needs effectively.
* A very heavy-duty base plate system is supplied; however, earth/ground anchoring is not.
Each base plate must be anchored prior to assembling the frame.
« Carefully following Steps #1 and #2 makes the remaining Round Top Shelter assembly easy and safe.
ás Watch for helpful assembly "HINTS" while following these instructions.
ster)
SITE CHOICE AND GROUND PREPARATION
This Weatherguard™ Round Top Shelter is designed with a non-rigid flex frame system, allowing it to move in
moderately windy conditions. Locating your shelter next to a natural or man-made wind block (e.qg., building, fence,
trees, hedges, etc.) is beneficial in case of severe wind conditions.
Once you have selected your shelter location, clear a FLAT, LEVEL, SQUARE site free of all debris. O es
STEP@) La
| 2x6 Pressure
Treated Seal Plate
FOUNDATION CHOICES
Heavy Duty
Base Plate
Your Weatherguard™ Round Top Shelter includes heavy-duty base plates (4 of them corner plates).
Each plate has 4 pre-drilled bolt holes and additional tie down locations.
HINT! itis easier to align and square the shelter foundation if you first attach base plates and lower EE me EEE
purlins to a 2" x 6" pressure-treated seal plate. You will need a minimum of four 3/8" lag bolts (2" or Ч 2e
longer) per base plate. The preassembled seal plate can then be anchored to your concrete foundation, Sider
or simply lag bolted to the pressure-treated timber foundation of choice. SEE DRAWING A. RE
NOTE: After you lag each base plate, slide the adjacent purlin into the anchored base plate to Concrete „A
predetermine correct spacing for next base plate. Slab
The foundation of choice is a concrete slab or concrete footing, such as a house-style foundation. A pressure treated 6" x 6" timber or railroad tie
(sold separately) can also be used, however, this type of foundation must be permanently anchored to the ground using earth/ground anchors (sold
separately, found at any local home center store).
Once you have anchored one straight and level line of base plates and purlins to the foundation, measure 12' across (14' for the 32' long unit) and
install the second set of plates and purlins. Measurement is taken between inside edges of base plate uprights. SEE DRAWING B.
(1275014)
HINT! Do not anchor down the second line of plates and purlins until you make sure the two E ===
lines are square. This is easily accomplished using the diagonal measuring process. Diagonal -
measurements (from corner to corner) will be the same if squared correctly. SEE DRAWING C. x
© Y
ze
Vertical
Extension
Tube
ZU
T-Fitting
Straight
Connector
Fitting
STEP€)
ASSEMBLY OF FRAMEWORK
HINT! 3 people assisting with framework assembly makes the task easier and safer.
A CAUTION! The Weatherguard™ Round Top Shelter frame design is flexible. Please be aware
that overhead parts and/or pipes can come loose and fall during assembly. DO NOT allow children on
or around the assembly site when erecting your shelter. And ALWAYS pay attention overhead for safety!
Using the 3 safety ropes supplied to firmly tie each arch together will hold all fittings and purlins in place.
After assembly, safety ropes must be left tied in place for added wind stability. SEE DRAWING E.
First, install the straight vertical extension tubes and straight connector fittings over the top shaft of each
base plate. SEE DRAWING D.
NOTE: Use 18" extension tubes for models I1S-11598 and 1S-152299, and 55" tubes for model 1S-83099H.
Next, using T-fittings for the front and rear shelter ends and cross fittings in the middle, begin forming
the arches and inserting the remaining purlins. Each arch requires 4 curved pipes with either 3 cross
fittings or 3 T-fittings. SEE DRAWING E.
NOTE: On model 1S-83099H, assemble the additional line of purlins, cross fittings and T-fittings on top
of the straight vertical extension tubes before continuing with curved pipes to form arches.
ster)
INSTALLING THE ROOF SKIN PANEL
The Weatherguard™ Round Top Shelter includes a polyethylene roof skin with a silver exterior and white interior
coating. This design provides maximum life at a very reasonable price.
NOTE: Please take great care when handling the roof skin to prevent scratching or piercing during installation.
Place a ground tarp under the roof skin during assembly. Do not walk on the material at any time.
Unfold the roof skin white side up and lay it next to the bottom purlin on one side of your shelter. Center the roof skin
so approximately 6" of material extends beyond both ends of the framework. Using the supplied lacing rope, lace
the bottom edge of the roof skin through the reinforced grommets to the bottom purlin. The space between the roof
skin and bottom purlin should be between 1/2"-1". SEE DRAWING F.
HINT! Begin lacing in the middle of the skin. Once you reach the ends, tie off lacing on end base plates.
МА слотом LACING THE GROMMETS TOO TIGHTLY CAN DAMAGE THE COVER.
NOTE: The roof skin features an outside flap sewn along the bottom. This flap lays on the ground, eliminating gaps
between the metal frame and the ground.
Now you are ready to pull the roof skin over the arch framework. Tie ropes to the skin's center grommet and 2 end
(corner) grommets. Keeping the roof centered, VERY CAREFULLY pull the ropes and roof skin over the frame.
One person pulling each rope will keep the skin centered as it is pulled across the frame.
If possible, another person can carefully push up the underside of the roof skin to help
the material pass over ridge purlins.
Use caution to avoid weakening the grommets or tearing them out of the skin. Also take
care not to scratch or tear the roof skin on the framework.
SEE DRAWING G.
Now that the roof skin is over the frame, lace the bottom grommets to the bottom purlins,
starting from the middle, as on the first side. Again, avoid overtightening lacing.
sera
INSTALLING THE SOLID END PANEL AND SPLIT DOOR PANEL
After determining which end will be the door and which will be the solid panel, use the supplied elastic cords to attach the panels to the end arches.
NOTE: When storing large items (e.g., boats, trucks, tractors, etc.), removing the door panel will help to avoid possible damage to the door.
ster) i
TIGHTENING THE FOUR RATCHETS ON EACH CORNER BASE PLATE Q |
Using the four ratchets supplied, install one on each corner base plate. SEE DRAWING H.
A flat webbing rope extends from all 4 corners of the roof skin. Insert the webbing into the
ratchets and slowly begin tightening each corner, alternating between the 4 corners and tightening
a little at a time. As you tighten the ratchets, the 6" roof skin flap will fold over the framework
ends, helping to secure your galvanized framework together.
7 DO NOT OVERTIGHTEN THE RATCHETS! Tighten only until the skin
folds over the framework by approximately 6". The roof material is intended to drape over the
framework only — it is not designed to be stretched. Additional ratcheting will only stretch the
polyethylene material, thinning and weakening the roof skin and potentially voiding the warranty.
Z
WORLDWIDE
Congratulations! You now have a completed high-quality Weatherguard™ Round Top Shelter.
HINT! ONE LAST HINT! If you ever disassemble your Weatherguard™ Round Top Shelter, clean and dry the skin completely before
* storing to prevent mildew, which can rot the polyethylene. Always use caution when disassembling overhead framework!
All of us at DGI Worldwide, Inc. thank you for purchasing our products.
For product information, replacement parts and customer service,
call us toll-free at 800-955-2879, or
Ask about other quality DCI Worldwide products:
Weatherguard™ Deck/Patio Greenhouse
Lucky Dog™ Modular Dog Run
Lucky Dog™ Easy-Ship Boxed Kennel
Weatherguard™ Kennel Cover
LIMITED EXPRESS WARRANTY
DGI WORLDWIDE, INC. warranties your Weatherguard™
Shelter to be free of defects in material and workmanship and
further warrants that, in normal use, the Weatherguard™
Shelter is waterproof, will not tear, and will not be affected by
mildew. This warranty is extended to the first retail purchaser
of the Shelter for consumer use, and lasts for one (1) year
from the date of purchase. DGI Worldwide, Inc. will replace
any cover that is defective (unless those defects result from
abuse or misuse of the cover, such as puncture or damage
caused by excessive wind or heat). The replacement will be
without charge to you, if you notify DGI Worldwide, Inc. in
Writing within the first six (6) months after date of purchase.
If you notify DGI Worldwide, Inc. in writing six (6) months
after the date of purchase but before the expiration of this
Warranty, DGI Worldwide, Inc. will provide you with a
replacement cover for 50% off its then-current retail price.
DGI WORLDWIDE, INC. WILL NOT HAVE OTHER OR GREATER
LIABILITY FOR DEFECTS IN THE COVER, NOR WILL DGI
WORLDWIDE, INC. HAVE ANY LIABILITY FOR INCIDENTAL
OR CONSEQUENTIAL DAMAGES. Some states do not allow
the exclusion or limitation of incidental or consequential
damages, so the above limitation or exclusion may not apply
to you. If you discover a defect in the cover during the warranty
period, and wish to obtain a replacement, send notice of your
claim to:
DGI WORLDWIDE, INC.
25150 S METZLER PARK ROAD
ESTACADA, OR 97023
www.dgiworldwide.com
[email protected]
Include your return address and phone number, and a copy of
the original invoice or further proof of the date of purchase,
plus a description of the claimed defect. ALL IMPLIED
WARRANTIES, INCLUDING BUT NOT LIMITED TO IMPLIED
WARRANTIES OF MERCHANTABILITY AND FITNESS FOR
PARTICULAR PURPOSE, ARE LIMITED IN DURATION TO ONE
(1) YEAR FROM THE DATE OF PURCHASE. Some states do
not allow limitations on how long an implied warrant lasts, so
the above limitations may not apply to you. This Warranty
gives you specific legal right, and you may also have other
rights which may vary from state to state.
WARNING
THIS PRODUCT IS NOT SOLD OR INTENDED FOR USE AS A
FLAME RETARDANT ARTICLE: this product can be burned and
under some conditions may continue to burn once ignited.
This product meets the flammability requirements of commercial
standards CS-192-53 (paragraph 4.10) for general purposes
vinyl plastic film to which the Flammable Fabrics Act, Public
law 88 refers. Weatherguard™ Shelters, unless specifically
labeled for such use, do not meet the flammability standards
for use as tent materials.