1
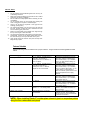
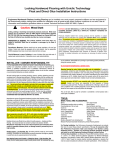
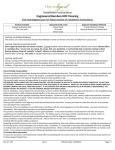
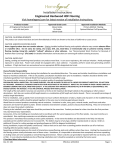
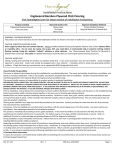
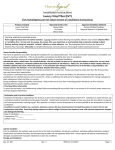
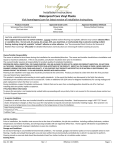
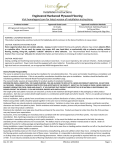
¾” Solid Hardwood Flooring Installation Information Solid Hardwood Flooring can be installed over most properly prepared subfloors and are engineered to be dimensionally stable, making them suitable for installation on or above grade levels where moisture conditions do not exist. See all information and INSTALLERS installation guidelines ATTN: below or contact Technical Services at 888-387-9881, Option 3 Caution: Wood Dust Caution: Wood Dust Cutting, sanding or machining wood products produces wood dust. While wood products are not hazardous under the OSHA Hazard Communication Standard (29 CFR 1910.1200), the International Agency for Research on Cancer (IARC) and the State of California have classified wood dust as a human carcinogen. PROPOSITION 65 WARNING: This product produces wood dust when cut, sanded or machined. Wood dust is considered a carcinogen by the State of California. Precautionary Measures: Airborne wood dust can cause respiratory, skin and eye irritation. Power tools should be equipped with a dust collector. Use an appropriate NIOSH-designated dust mask. Avoid dust contact with skin and eyes. First Aid Measures in case of irritations: In case of irritation flush eyes with water. If needed seek medical attention. If dermatitis occurs, seek medical attention. INSTALLER / OWNER RESPONSIBILITY: I It is the responsibility of the installer and owner to ensure that job site environmental, sub-floor and subsurface conditions involved meet or exceed all requirements as outlined in installation instructions prior to installation. Manufacturer declines all responsibility for product performance or installation failure due to sub-floor, substrate or environmental deficiencies or jobsite conditions. All work involving water or moisture (plumbing, masonry, painting, plastering) must be completed prior to flooring being delivered. Building envelope must be complete and exterior doors and windows installed. Exterior grading and gutter downspouts should be completed and permanent HVAC systems in operation for 14 days prior to flooring being delivered to job site. Measures should be taken to protect floors from other trade work. Do not cover floors with plastic, red rosin, felt or wax paper or previously used cardboard. Instead use a breathable material such as clean, dry, plain uncoated cardboard or Kraft paper. Inks from printed cardboard could damage the hardwood floor The floor should be thoroughly cleaned before covering to remove grit and debris that would damage the finish. The floor must be completely covered to eliminate uneven ambering from exposure to UV light. Manufacturer requires Solid Hardwood products acclimate for 72 hours prior to installation. Acclimation allows flooring to achieve equilibrium moisture content (EMC) with the installation environment. All wood continually expands and contracts until it reaches moisture equilibrium with the environment in which it’s installed. As with all wood flooring, expansion and contraction will be minimized if climate control is consistently maintained year round. This is especially important with tropical species, because denser woods experience more significant shrinkage in low moisture / low humidity environments. 0 Room temperature should be 60 – 80 F, with relative humidity between 35 – 55%. These environmental conditions are specified as pre-installation requirements and must be maintained for the life of the product. Building interiors are affected by two distinct humidity seasons – Heating and Non- Heating. Care should be taken to maintain humidity levels between 35-55%. Manufacturer warranties do not cover natural expansion and contraction which results in separation WARNING! DO NOT MECHANICALLY CHIP OR PULVERIZE WARNING! DO NOT MECHANICALLY CHIP OR PULVERIZE EXISTING RESILIENT FLOORING, BACKING, LINING FELT, ASPHALTIC “CUTBACK” ADHESIVES OR OTHER ADHESIVES. Previously installed resilient floor covering products and the asphaltic or cutback adhesives used to install them may contain either asbestos fibers and/or crystalline silica. The products in this carton do not contain asbestos. Avoid creating dust. Inhalation of such dust is a cancer and respiratory tract hazard. Smoking by individuals exposed to asbestos fibers greatly increases the risk of serious bodily harm. Unless positively certain that the product is a non-asbestos containing material, you must presume it contains asbestos. Regulations may require the material be tested to determine asbestos content and may govern the removal and disposal of material. See current edition of the Resilient Floor Covering Institute (RFCI) publication “Recommended Work Practices for Removal of Resilient Floor Coverings” for detailed information and instructions on removing all resilient covering structures. between planks, or damage caused by excessively low or high humidity. Heating season – Low Humidity, Dry. All heating methods create dry, low humidity conditions. Humidifiers are recommended to prevent excessive shrinkage or gapping in wood floors due to seasonal periods of low humidity. Non Heating Season and Coastal or Waterfront Areas – High Humidity, During the non heating season proper humidity levels should be maintained by using an air conditioner, dehumidifier or by turning on your heating system periodically during the summer months. Do not install in full bathrooms or powder rooms. Examine flooring for color, finish and quality prior to installation. If material is unacceptable, contact the seller immediately. Wood is a natural product and contains characteristics such as variations in color, tone and graining. Flooring is manufactured in accordance with industry standards, which allows manufacturing and natural defect tolerances up to 5% of the total installation. Installer should work from several cartons at the same time to ensure good color and shade blend. Installer should not install undesirable pieces. Flooring warranties DO NOT cover materials with visible defects once they are installed. Installer and Owner are responsible for final inspection of flooring manufacture, grade and finish. Purchase an additional 5% of flooring to allow for cuts and an additional 10% if installing diagonally. WARRANTY NOTE: Installer should provide owner with one carton end label from product installed for warranty purposes. Owner should retain carton end label and copy of invoice for their records. Excess flooring should be retained and stored for future repairs in the event planks are damaged. The use of stain, filler or putty for correction is considered a normal practice and a routine part of installation. STORAGE AND HANDLING: Material should be stored on the job site for minimum of 72 hours before being installed. Open the cartons but do not remove the product from the cartons. Make sure the room temperature is set at a normal living temperature as described above. The flooring is acclimated and ready for installation when it has reached a moisture level consistent with the job site and normal living conditions. PRE-INSTALLATION & JOBSITE CONDITIONS • Your solid hardwood flooring must undergo an acclimatization period (i.e. it must be stored in the room where it will be laid) for at least 72 hours prior to installation or test the floor with appropriate moisture meter. The moisture levels should differ no more than 4% between the subfloor and the planks. For wood flooring plank products (products wider than 3”) there should be no more than 2% moisture difference between the flooring and subfloor. • • • • SUBFLOOR REQUIREMENTS The following subfloor recommendations are intended to complement the installation of hardwood flooring as an interior finish. Hardwood flooring is not a structural component. These recommendations are not intended to supersede federal, state or local building codes, but as with many other interior finish products, may require modifying existing structural components for a successful installation. We recommend 3 types of sub-floors- plywood/OSB, solid wood planks (1 X 6 or larger), or sleepers (2 X 4 inch). Each sub-floor has separate installation instructions as follows: • Solid Hardwood flooring may be installed on or above grade provided that the sub-floor is: • • SOLID WOOD SUBFLOOR- Solid planks should be nailed diagonally across the joists with a ¼” gap between the boards. CONCRETE- There are several methods of installing solid flooring over concrete. One method is to use 5/8” or ¾” plywood. It is recommended that a vapor barrier be used prior to installation of the floor, preferably, a 4-6 mil. Polyethylene film with enough excess to be placed under the baseboards. Fasten the plywood to the concrete using the appropriate fasteners. Another way of laying the plywood on concrete is to cut the plywood in 4’ X 4’ squares and lay it in mastic. A moisture barrier must also be used with this method. Another alternative would be to use “sleepers”. This method uses treated 2” X 4” lumber laid flat in asphalt mastic every 12 inches at right angles to the finished floor. Overlap or stagger the sleepers by at least 4’ and make sure each one is securely imbedded into the mastic. A polyethylene moisture barrier is then laid over the sleepers. Be certain not to puncture or bunch up the poly, or it will not create an effective vapor barrier. Nail the flooring through the plastic into the sleepers. Sub-floors should be clean prior to the floor installation. Sweep the area to remove all dust and debris. Make sure the subfloor is dry to 12% moisture content or less. Blending of cartons: To achieve a uniform installation appearance, preselect and set aside hardwood planks that blend best with all trims and moldings. Install these planks next to best blended moldings. Floor should be installed blending planks from several cartons at the same time to ensure good color and shade mixture throughout the installation. Be attentive to staggering the ends of the boards at least 4” 6” (10-15 cm) when possible in adjacent rows. Do not install in areas of high moisture such as bathrooms and powder rooms. • • • Flat - within ¼” in a 10’ radius. Dry - always test the sub-floor with the appropriate moisture meter. Installation cannot continue until the sub-floor moisture does not exceed 12% and the subfloor and flooring moisture differ no more than 4%. On 3”or wider the sub-floor and the flooring being installed should not differ more than 2%. Clean – all construction debris, soil, mud and any other objects on or adhering to the floor are scraped and swept away before the installation. Sound – All damaged or swollen sub-flooring should be replaced. Check the floor for squeaks / loose components, repair any found by adding fasteners or adhesive. Do not Install Solid Hardwood Flooring over radiant heating systems or attempt to glue the flooring directly to any sub-floor surface. st 1 Row Nail through Face Sub-floors should be level within ¼” in each 10’ direction. High areas should be sanded flat. Low areas should be filled with latex leveling compound Eased Edge Urethane Finish 15# Felt 3. PRE-INSTALLATION PREPARATION TOOLS NEEDED Tape Measure Chalk line or string Hammer Nail Set Drill Mechanical Fastener Mallet SUPPLIES NEEDED 10D Nails Drill bit smaller than nail 15# Felt Paper Cleats or Staples Color Matched Wood Putty Pry Bar Broom Mohawk FloorCare Essentials Hardwood & Laminate Cleaner BEFORE YOU START: • • • Plan your layout and determine the direction of the installation in the room. Planks installed parallel to windows accent the hardwood best. Remove existing base, shoe molding or threshold carefully. They can be used to cover the ¾” expansion gap left around the perimeter of the room. Undercut doors and casings using a handsaw laid flat on a piece of scrap flooring. This will eliminate difficult scribe cuts. Subsequent Rows Power Nailed Plywood Subfloor Solid Wood Floor Do not install Solid Hardwood Flooring over particleboard, fiberboard, wafer board, or pressed wood panel INSTALLATION INSTALLING ¾" SOLID HARDWOOD OVER CONCRETE Solid Hardwood Flooring can be installed on Concrete Slabs (minimum 3,000 psi) that are on or above grade. The moisture content of the slab should be tested with a Calcium Chloride Test and emit less than 3 pounds per 1000 square feet per 24 hours. Then the appropriate subfloor (nailing surface) can be installed. There are several methods by which this can be accomplished: STEP 1 - LAYOUT • Measure and mark 3” from the wall at two spots near each end of the room. Drive a nail at each spot Stretch string and tie each end of the string around the nails so the nails become posts. Use the string as your flooring guide. Subfloor (Beneath Felt) String Guide 15# Felt • Nail ¾” • Note: this dimension should be 4” when installing 3-1/4” wide flooring. When a room is greater than 20 ft. in width the direction of the installation should start near the center and work out towards the walls, placing a loose spline where the two grooves come together. • STEP 2- INSTALL FIRST ROW • Using the string as a straight edge, lay the first row of flooring in place with the tongue facing the center or the room. Leaving a ¾” gap at the wall, pre-drill and face nail using 10D nails. Continue nailing the entire length of the room 6” to 8” apart. Tongue of wood flooring facing center of room ¾” space for expansion at ends and against walls String guide and nails • Leave a ¾” expansion gap at each end. Set nails and fill holes with matching putty. Remove string and nails. STEP 3 – INSTALL REMAINING ROWS • Continue the laying process (using a mechanical fastener) until the room is complete Helpful Hint – Use flooring lengths that offset or stagger the end joints at least 6” or more for a professional look. • • Carefully cut the last row to leave a ¾” expansion space (See Figure 3) Replace trim moldings ¾” or thicker Exterior Grade Plywood laid over a vapor retarder of 6 mil poly or two layers of 15# felt and power nailed into the concrete slab. The ends of the plywood panels should be staggered ½ panel in alternating rows and an expansion space of ½” should be left around the perimeter of the room. An expansion gap of ⅛” must be left between the panels. The flooring may then be nailed to the plywood surface using 1½” fasteners. ¾” or thicker Exterior Grade Plywood may also be glued to the vapor retarder that has been glued to the concrete floor. The vapor retarder and plywood should be glued using cutback adhesive or other approved adhesive, applied according to the manufacturer’s directions. The plywood panels should be cut down to 4’ X 4’ or 16” X8’ and the panel joints should be staggered by 2’. Score the backs of the panels 3/8” deep on a 12” grid, laying the scored side into the adhesive observing a 1/8” gap between the panels and a ½” space around the perimeter. As an alternative a floating plywood base can be installed. In this method a 6 mil poly vapor retarder is laid on the floor lapping the seams at least 6”. Loose lay 3/8” exterior grade plywood panels on the floor, allowing 1/8” between panels and ½” between the panels and walls or other vertical surfaces and offsetting the ends by ½ panel. Lay a second layer of plywood at 90º angles to the first layer allowing 1/8” between the panels and ½” between the panels and walls or other vertical surfaces and offsetting the ends ½ panel. Staple the panels together with staples that have crowns at least ¼” and that do not penetrate the bottom layer in a pattern not exceeding 6” X 6”. Lay an additional vapor retardant barrier over the plywood panels and begin installation of the flooring. Flat, dry Screeds or 2” X 4” boards of Group 1 softwood in random lengths from 18” to 48” may be used as a nailing base. The boards must be preservative treated (suitable for interior use) and dried to no more than 12% moisture. The screeds should be adhered to the floor using suitable mastic adhesive at 12” on center. A 6 mil poly vapor retarder is draped over the screeds and the flooring is nailed directly to the screeds, provided the flooring is less that 4” wide. For flooring 4” wide and over a wood subfloor must be applied over the screeds to provide adequate nailing surface. 5/8” CDX plywood or ¾” OSB are recommended for this application. In high moisture conditions such as coastal areas an additional vapor retarder should be glued directly to the slab before the screeds are installed in addition to the vapor retarder over the screed. COMPLETING THE JOB • Countersink and fill all nail holes. • Clean the floor with an approved Mohawk FloorCare Essentials Hardwood & Laminate Cleaner. • Reinstall all moldings and transition pieces, nailing into the walls or sub-floor, not the flooring. • Use felt tips on the bottom of all furniture. HELPFUL HINTS 1. Do not install this product BELOW grade level. Use only AT or ABOVE ground level. 2. Make sure mechanical fastener is approved for use in OSB if plywood is not used as a substrate. 3. Do not install from multiple pallets without checking for color compatibility. 4. Lay out several cartons to check quality and grading and “rack” or stagger the end joints in random lengths. 5. Leave ¾” at all edges for expansion. Cover gap with trim moldings. (See Figure 3) 6. The mechanical fastener can’t be used on the first and last few rows. Pre-drill, nail with 10D nails, countersink the nails and use matching putty to fill holes. 7. Rows to be hand nailed may be drilled at an angle through the top of the tongue to hide nail heads. 8. Lay flooring perpendicular to the direction of the floor joists. 9. Occasionally, a piece may be slightly bowed. Nail one end first, then use the pry bar to push the other end in place. 10. Using shorter pieces at undercut door jams will help when fitting flooring in place. Fastener Schedule Hardwood flooring must be installed over a proper sub-floor. Tongue and Grooved flooring MUST be blind nailed. Wood Flooring Type Solid Strip T&G ¾” x less than 3” Size Fastener to be Used Fastener Spacing 1 ½” - 2” fastener, or 6d-8d casing or finish nails. On slab with ¾” underlayment use 1 ½” fastener, ½” crown on staples Blind fastener spacing along the length of the strips, minimum 2 fasteners per piece near the ends (1”-3”). In addition, every 8”-10” apart for blind nailing, 10”12” for face nailing. Blind fastener spacing along the length of the strips, minimum 2 fasteners per piece near the ends (1”-3”). In addition, every 6”-8” apart for blind nailing, 10”-12” for face nailing. To assist nailing on planks 5” and wider, options are to screw and plug the plank ends or to apply adhesive. Blind fastener spacing along the length of the strips, minimum 2 fasteners per piece near the ends (1”-3”). In addition, apply fastener ever 10”. Blind fastener spacing along the length of the strips, minimum 2 fasteners per piece near the ends (1”-3”). In addition, apply fastener ever 8”. Space fasteners at 3”-4” intervals for staples, 4”-6” for cleats and within 1”-2” of the end joints. Minimum of 50% of fastener must penetrate concrete. Space fasteners one per square foot or as recommended by fastener manufacturer. Solid Strip T&G ¾” x 3” and wider 1 ½” - 2” fastener, or 6d-8d casing or finish nails. On slab with ¾” underlayment, use 1 ½” fastener. Staples are not recommended. Solid Strip T&G ½” x 1 ½”, ½” x 2” 1 ½” fastener Solid Strip T&G 3/8” x 1 ½”, 3/8” x 2” 1 ¼” fastener Solid Strip T&G 5/16” Narrow crowned (under 3/8”) 1”-1 ½” staples or 1” – 1 ¼” flooring cleats. Subfloor over concrete Hardened steel pins, 11/4 to 21/8 recommended. NOTE: When installing Planks 5” or wider place a bead of glue in a serpentine pattern along the floor underneath each plank. MAINTENANCE Solid Hardwood Floors are very easily maintained. No wax, no mess. Simply use Mohawk’s FloorCare Essentials Hardwood & Laminate Floor Cleaner and a terry cloth flooring mop. STEP ONE: Sweep your floor to remove any particles that could scratch your floor. Warning: Vacuums with a beater bar or power rotary brush head can damage a wood floor and never should be used. STEP TWO: Apply the approved Mohawk FloorCare Essentials Hardwood Floor Cleaner directly to the terry cloth flooring mop, not to the floor! STEP THREE: Use a back and forth motion with the mop. When the terry cloth cover becomes soiled, simply replace it with a clean one. Cleaning the floor with a soiled cover could cause streaking. The covers are re-usable so simple throw the cover in the wash and dry it as you would any towel. DO NOT USE FABRIC SOFTENER when washing terry cloth covers. Tips & Warnings: • • • • • • • • • • • • Sweep regularly, with a soft bristle broom. Remove spills promptly and use approved Mohawk FloorCare Essentials Hardwood & Laminate Flooring Cleaner and a clean white cloth. Use felt protectors under heavy pieces of furniture and chairs. Use protective mats at all exterior entrances. Do not use mats or area rug cushions constructed of rubber or PVC. Instead use urethane backed products. Spiked heels or shoes in need of repair can severely damage your floor. Replace hard plastic, metal casters or wheels on furniture with soft rubber casters or by using a protective mat under the casters. Never wet or damp mop your wood floors. Water can cause damage to wood flooring. Never use oil soaps, wax, liquid or other household products to clean your floor. The sun’s UV rays can change the color of your floor. Keep animal nails trimmed. Protect your floor when using a dolly for moving furniture or appliances. Never slide or roll heavy furniture or appliances across the floor. Use protective window coverings to prevent hardwood flooring from excessive heat during periods of direct sunlight. Exterior and interior walk off mats should be used at all exterior entrances to avoid exposure to moisture from tracking during period of inclement weather. Walk off mats should be routinely maintained to avoid becoming a soil source. Do not use mats or under mat cushions constructed of rubber of PVC. Instead use urethane back products. Hardwoods react to sunlight Hardwood contains certain types of acids in their cellular structure. With exposure to sunlight these acids begin to amber. The color change is referred to as patina. The wood will reach its own natural warmth and patina level and stop ambering. The amount of patina is directly related to the species, amount of acids and the level of sunlight. The entire floor will reach the same patina over time. This is often noticed after a rug is removed and the floor is noticeably different in color underneath. If you remove the rug and expose the entire floor to the same amount of light, it will even out over time and become uniform in color. Hardwood flooring will scratch and dent With today’s active lifestyles it is important to note that hardwood flooring can, and will, scratch and dent. See Tips & Warnings for protecting your hardwood floor. In order to prevent excessive abuse the use of strategically placed mats and area rugs as well as floor protectors on chair and table legs are a must. WARRANTIES A copy of the Warranty may be obtained by calling the Technical Service Department at 888-387-9881 option 3.