1
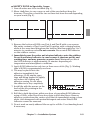
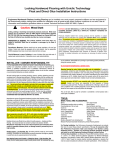
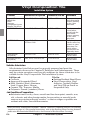
Vinyl Composition Tile
Installation System
Product
Adhesive/Full Spread
Adhesive/Tile-On
Comment
Imperial Texture
MultiColor
RAVE
Stonetex
Companion Square
Feature Tile/Strips
ARTEFFECTS
S-89, S-515, S-700 or S-750
S-515 or S-750
Stonetex—lay
with directional
arrows pointing
in the same
direction.
S-89, S-515, S-700 or S-750
S-515 or S-750
For best overall
visual effect,
install with the
directional
arrows pointing
in the same
direction.
SAFETY ZONE
S-89, S-515, S-700,
S-750 or S-230
S-515 or S-750
Roll tile with
100-lb. roller. Lay
arrows in same
direction. For
S-230, follow
instructions for
Specialty Areas.
Vinyl No-Wax
(Dry Back)
Urethane No-Wax
(Dry Back)
S-515 or S-750
S-515 or S-750
Roll tile with
100-lb. roller
S-89, S-515, S-700 or S-750
S-515 or S-750
Roll tile with
100-lb. roller
Suitable Substrates:
All substrates listed below must be properly prepared and meet the
requirements discussed in Chapter IV, Subfloors and Underlayments. There
may be certain exceptions and special conditions for these substrates to be
suitable for the Vinyl Composition Tile Installation System.
Full Spread:
Tile-On:
■ Concrete
■ Existing Resilient Sheet Floors
■ Approved Suspended Wood
■ Vinyl Composition, Vinyl
■ Steel, Stainless Steel, Aluminum,
Asbestos, Asphalt, Rubber
Lead, Copper, Brass, Bronze
and Vinyl Tile-on Grade or
■ Ceramic Tile, Terrazzo, Marble
Suspended Only
■ Polymeric Poured (seamless) Floors
Job Conditions/Preparation:
■ Substrates must be dry, clean, smooth and free from paint, varnish, wax,
oils, solvents and other foreign matter. In renovation or remodel work,
remove any existing adhesive residue* so that no ridges or puddles are
evident and a thin, smooth film remains.
* Some previously manufactured asphaltic “cutback” adhesives contained asbestos (see warning
statement on page xii). For removal instructions, refer to the Resilient Floor Covering Institute’s
publication Recommended Work Practices for Removal of Resilient Floor Coverings.
158
Chapter V — Installation Systems
■ When
using S-230, remove any existing adhesive residue* so that 80%
of the overall area of the original substrate is exposed. If these
requirements are not followed, curled and/or loose tile could result. For
Tile-On, remove wax or other finishes with a commercially available liquid
wax stripper. Replace or repair indented or otherwise damaged areas.
■ Allow all flooring materials and adhesives to condition to the room
temperature a minimum of 48 hours before starting the installation.
■ The area to receive resilient flooring should be maintained at a minimum
of 65°F (18°C) and a maximum of 100°F (38°C) for 48 hours before, during
and for 48 hours after completion. When using S-230 Epoxy Adhesive the
maximum room temperature should not exceed 85°F (29°C).
■ During the service life of the floor the temperature should never fall below
55°F (13°C). The performance of the flooring material and adhesives can be
adversely affected below this minimum temperature.
■ Conduct calcium chloride tests or percent relative humidity tests. Bond
Tests should also be conducted for compatibility with the substrate. Please
refer to Chapter IV, Subfloors and Underlayments.
■ Radiant-heated substrates must not exceed a maximum surface
temperature of 85°F (29°C).
■ Concrete floors should be tested for alkalinity. The allowable readings for
the installation of Armstrong flooring are 5 to 9 on the pH scale.
Fitting:
See Chapter VII, Layout and Fitting, for room layout.
Before installing the material, plan the layout so tile joints fall at least 6″ (15.2 cm)
away from subfloor/underlayment joints. Do not install over expansion joints.
When installing over an existing resilient floor, plan the layout so the new
joints are a minimum of 6″ (15.2 cm) away from the original seams. When
installing over tile floors, joints should fall in the center of the tile.
When installing 12″ × 12″ (30.5 cm × 30.5 cm) tiles, avoid having border pieces
less than 6″ (15.2 cm) wide.
Abutting Different Gauges of Resilient Flooring: When installing thinner
gauge material next to thicker gauge materials, install thicker material first and
then butt a 12″ (30.5 cm) wide piece of S-153 Scribing Felt against the thicker
material. Adhere the Scribing Felt to the subfloor with S-235 Adhesive. Use the
fine notching of the Armstrong S-891 Trowel over nonporous substrates such
as existing resilient flooring, and use the regular notching of the Armstrong
S-891 Trowel over porous subfloors such as wood and concrete. Use
Armstrong S-184 Fast-Setting Cement-Based Patch and Skim Coat or S-194
Patch, Underlayment and Embossing Leveler to feather the edge of the S-153
Scribing Felt to the level of the substrate. Allow the patch to dry completely
before installing the flooring. Scribing Felt is not recommended to be used
under the entire installation.
* Some previously manufactured asphaltic “cutback” adhesives contained asbestos (see warning
statement on page xii). For removal instructions, refer to the Resilient Floor Covering Institute’s
publication Recommended Work Practices for Removal of Resilient Floor Coverings.
Chapter V — Installation Systems
159
Adhesive Open Times and Working Times
Adhesive
Open Time
Working Time
S-89
S-515
S-700
S-750
S-230
60 minutes or more
Approximately 30 minutes or more
Approximately 30 minutes or more
Approximately 30 minutes or more
Minimum 20 minutes
18 hours
24 hours
18 hours
6 hours
1 hour
NOTE: All adhesives except S-230 should be dry-to-touch before installing tile.
The amount of open time will vary according to job conditions, temperature,
humidity, air flow and type of substrate. All adhesives are applied with fine
notching [1/32″ (0.8 mm) deep, 1/16″ (1.6 mm) wide, 5/64″ (2 mm) apart].
Procedure:
See Chapter VI, Adhesives, Trowel Notchings and Seam Treatments.
When using tile from two or more cartons, check to be sure all pattern and
lot numbers are the same to ensure proper color match. On larger
installations, open several cartons and mix them as they are installed to help
blend any slight shade differences from one carton to the next.
Tile products with directional arrows on the back should be installed with
the arrows all pointing in the same direction.
■ Tile Installed Using S-89, S-515, S-700 or S-750:
11. Line off entire area to be installed.
12. Apply the adhesive over the area not covering the chalk lines and using
the fine notching of the S-891 Trowel. You may prefer to spread and
install one quarter of the room at a time.
13. Allow the adhesive to set until dry-to-touch (except S-230) following the
recommended open time. To test, press your thumb lightly on the
surface of the adhesive in several places. If the surface feels slightly
tacky as your thumb is drawn away and does not stick to your thumb,
the adhesive is ready for the installation.
14. Install the tile along the chalk lines, laying the field area first and then
fitting in the border tile.
15. Roll all residential tile and SAFETY ZONE in both directions within the
adhesive working time using a 100-lb. roller.
16. Clean adhesive from the surface of the tile using a clean white cloth
dampened with a neutral detergent and water.
17. Tile should not be exposed to rolling load traffic for at least 72 hours
after installation to allow setting and drying of the adhesive.
160
Chapter V — Installation Systems
■ SAFETY ZONE in Specialty Areas:
1. Line off entire area to be installed (Fig. 1).
2 . Move chalk lines to one corner or end of the area farthest from the
doorway. These lines should be two or three feet from the wall depending
on your reach (Fig. 2).
Fig. 1
Fig. 2
3. Remove the bottom of S-230 cans Part A and Part B with a can opener.
Mix entire contents of Part A and Part B together with a stirring motion
while at the same time lifting from the bottom. Mix thoroughly for 3 to 5
minutes to a uniform color. Do not over mix. Never mix S-230 Adhesive
on the subfloor surface.
4. Immediately pour the entire unit of mixed adhesive onto the subfloor.
Do not leave mixed adhesive in cans because it shortens pot life and
working time, and may generate excessive heat. Maximum pot life of
the S-230 Adhesive is approximately 10 minutes depending on
temperature and atmospheric conditions.
5. Apply S-230 Adhesive for only two or three rows of tile (Fig. 3). Working
time of S-230 is approximately one hour.
6. Tile may be placed into the
adhesive immediately, but
allowing a 15–20 minute open
time and fitting border tile tightly
will reduce tile shifting and
adhesive oozing. Do not allow
the adhesive to dry completely.
7. Install tile with the arrows on the
S-230 Adhesive
back of the tile pointing in the
Fig. 3
same direction.
8. Roll tile in both directions within one hour of spreading S-230 Adhesive
using a 100-lb. roller. Re-roll one hour later in both directions. Remove
adhesive residue from the surface of all the tile immediately using a clean
white cloth dampened with neutral detergent and water. Dried S-230
Adhesive cannot be removed.
9. Do not work on newly adhered tile except to roll tile. Use a kneeling board
if necessary.
Chapter V — Installation Systems
161
10. Continue Steps 4 through 9 until entire area is completed.
11. Do not allow traffic on tile for 24 hours after installation.
12. Flooring should not be exposed to rolling load traffic for at least 72 hours
after installation to allow setting and drying of the adhesive.
Precautions:
■ S-230 Adhesive is recommended for SAFETY ZONE in areas that may
be exposed to frequent surface moisture and/or cooler temperatures.
■ S-230 Adhesive may also be used to install the first 3 to 5 rows of
SAFETY ZONE when used in areas that will be affected by surface
moisture and/or cooler temperatures.
■ Tiles are to be heated from the back only, never the face.
■ Do not wash tile for at least four days after installation. This will allow the
tile to become well seated in the adhesive and prevent excess moisture
and cleaning agents from interfering with the adhesive bond.
■ Products installed using the Tile-On System may have less resistance to
indentation. We strongly recommend the use of Armstrong Floor Protectors.
■ S-89 is not recommended over wood substrates.
162
Chapter V — Installation Systems