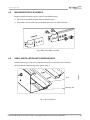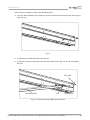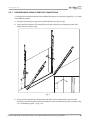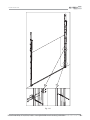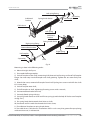
1
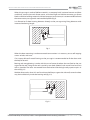
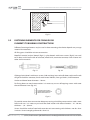
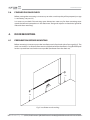
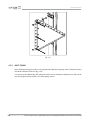
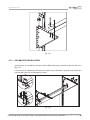
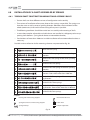
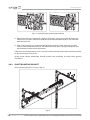
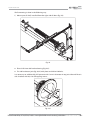
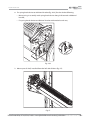
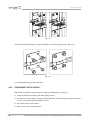
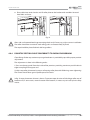
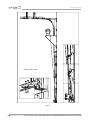
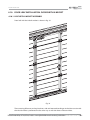
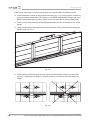
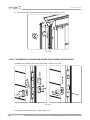
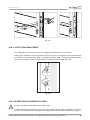
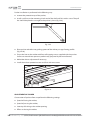
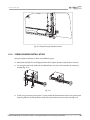
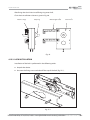
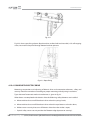
INSTALLATION MANUAL
INDUSTRIAL DOORS
HIGH MOUNTING
WITH BOTTOM SHAFT POSITIONING
November 2011
Distributed by JD (UK) Ltd - www.jdukltd.co.uk [email protected] 01924 472924
Distributed by JD (UK) Ltd - www.jdukltd.co.uk [email protected] 01924 472924
INSTALLATION MANUAL
INDUSTRIAL DOORS
HIGH MOUNTING
WITH BOTTOM SHAFT POSITIONING
Contents
1.
GENERAL INSTRUCTIONS .......................................................................................................................... 2
1.1.
1.2.
OPTIMAL NUMBER OF MOUNTING CREW..................................................................................................................................................................2
RECOMMENDED KIT OF TOOLS AND FIXINGS NEEDED FOR MOUNTING CREW..........................................................................................2
2.
SAFETY MEASURES .................................................................................................................................... 3
3.
INSTALLATION AND FIXING RULES FOR DOOR BEARING CONSTRUCTION ........................................... 4
3.1.
3.2.
3.3.
3.4.
3.5.
3.6.
REQUIREMENTS FOR MOUNTING..................................................................................................................................................................................4
FIXING RULES FOR BEARING STRUCTURES OF DOORS .........................................................................................................................................4
FASTENING ELEMENTS FOR FIXING DOOR ELEMENTS TO BEARING CONSTRUCTIONS.............................................................................6
APERTURE PERFORMING FOR FIXING ..........................................................................................................................................................................7
REQUIREMENTS TO THE PASSAGES OF THE PREMISES .........................................................................................................................................7
FINISHED PASSAGE CHECK .............................................................................................................................................................................................8
4.
DOOR MOUNTING ...................................................................................................................................... 8
4.1.
4.2.
4.3.
4.4.
4.5.
4.6.
4.7.
4.8.
4.9.
4.10.
4.11.
4.12.
4.13.
4.14.
4.15.
PREPARATION BEFORE MOUNTING ..............................................................................................................................................................................8
MEASURE PROFILE ASSEMBLY .......................................................................................................................................................................................9
SEALS INSTALLATION INTO BEARING RODS ..............................................................................................................................................................9
DOOR BEARING CARCASS VERTICAL FRAME ASSEMBLY ................................................................................................................................... 10
DOOR BEARING CARCASS MOUNTING .................................................................................................................................................................... 12
HORIZONTAL TRACK FIXING TO CEILING CONSTRUCTIONS ............................................................................................................................ 20
JOIST INSTALLATION ....................................................................................................................................................................................................... 25
INSTALLATION OF A SHAFT ASSEMBLED BY SPRINGS ........................................................................................................................................ 28
DOOR LEAF INSTALLATION. DOORS WITHOUT A WICKET ................................................................................................................................ 38
DOOR LEAF INSTALLATION. DOORS WITH A WICKET.......................................................................................................................................... 45
ROPE TENSION ADJUSTMENT...................................................................................................................................................................................... 52
SPRING TENSION .............................................................................................................................................................................................................. 53
DOOR LEAF CONTROLS INSTALLATION (STANDARD KITTING) ........................................................................................................................ 55
SPRING BUMPER INSTALLATION ..................................................................................................................................................................................57
DOOR LEAF CONTROLS INSTALLATION. (ADDITIONAL KITTING).................................................................................................................... 58
5.
FINISHING WORKS ...................................................................................................................................65
6.
ADJUSTMENT, TESTING AND CHECKING OF THE PRODUCT .................................................................65
7.
HANDLING OVER OF MOUNTED PRODUCTS .........................................................................................65
APPENDIX A. SPRING BREAK DEVICE MECHANISM ............................................................................... 67
APPENDIX B. SAFETY MEASURES............................................................................................................68
Proper sectional door mounting is an essential condition for ensuring high consumer quality of goods.
In this Manual the recommended procedure and description of the main typical technology process operations on door
mounting are given and also the list of the necessary instruments and accessories.
The present Manual may be used as guidelines in training and working of the technical staf. It is made basing on our
knowledge and experience. All the rules and regulations, applying to door mounting, should be strictly observed.
The content of this document cannot be a basis for claims. ALUTECH Company reserves the right to change and make
additions to the door coniguration and this manual.
© 2011 by Alutech Door Systems
INSTALLATION MANUAL.
DOORS.
HIGH MOUNTING WITH BOTTOM
SHAFT POSITIONING
1
Distributed
by JDINDUSTRIAL
(UK) Ltd
- www.jdukltd.co.uk
[email protected]
01924 472924
GENERAL INSTRUCTIONS
1.
GENERAL INSTRUCTIONS
1.1
OPTIMAL NUMBER OF MOUNTING CREW
Optimal number of mounting crew is 3 people. There should be a itter in a crew while mounting
an automated door. The number of the crew may be increased when mounting big size doors.
An average norm for mounting crew is mounting of 1 door in 4 hours.
1.2
RECOMMENDED KIT OF TOOLS AND FIXINGS
NEEDED FOR MOUNTING CREW
Tool title
Number, item.
Electric punch
2
Electric drill
1
Battery screwdriver
1
Electric corner cutof machine
1
SDS adapter with quick-key lock vice
2
Riveting gun
1
Carpenter’s bar levels (1,5 and 0,5m)
1of each
Tool box
2
Fitter’s hammer (400 g)
2
Impactor tools set (chisel, plugging chisel, punch, piercer)
1
Multi-purpose hack-saw with changeable blades
1
Scissors for metal
1
Side nippers of middle size
1
Big combination pliers
1
Files set
1
Hard metal screwdriver set
1
Magnet screwdriver with nozzles
1
Electro-indicated screwdriver
1
Hex key wrench assembly set
2
Straight bits and cap keys set
1
Open end and ring spanner set
1
SDS magnetic heads set
1
Bank of drills
1
2
INSTALLATION
INDUSTRIAL DOORS. HIGH
MOUNTING WITH BOTTOM SHAFT
POSITIONING
Distributed
by JD (UK)
Ltd MANUAL.
- www.jdukltd.co.uk
[email protected]
01924
472924
SAFETY MEASURES
Tool title
2.
Number, item.
Drill-machine for concrete Ø 6 mm L=160-200 mm
2
Drill-machine for concrete Ø 8 mm L=200-260 mm
2
Drill-machine for concrete Ø 10 mm L=550 mm
2
Drill-machine for concrete Ø 12 mm L=550 mm
2
Drill-machine for concrete Ø 14 mm L=750 mm
2
Taps set
1
Multipurpose tap holder
1
Chisel set
1
Silicon gun
1
Tester-equipment
1
Electric soldering iron 60 W
1
Strip 30 m minimum
1
Multi-purpose 4 fold step ladder
1
Multi-purpose step ladder of three section (more than 6 m)
2
Trammel 125 mm
1
Tape-measure 5 m
1
Tape-measure 10 m
1
Safety spectacles
2
Respirator
2
Headpiece
3
Protective gloves set
3
Multi-purpose irst-aid set
1
SAFETY MEASURES
Only qualiied personnel familiar with door design and its mounting process, trained and instructed on safety measures is admitted to door mounting. Safety measures description is given
in Appendix B.
INSTALLATION MANUAL.
DOORS.
HIGH MOUNTING WITH BOTTOM
SHAFT POSITIONING
3
Distributed
by JDINDUSTRIAL
(UK) Ltd
- www.jdukltd.co.uk
[email protected]
01924 472924
INSTALLATION AND FIXING RULES FOR DOOR BEARING CONSTRUCTION
3.
INSTALLATION AND FIXING RULES FOR
DOOR BEARING CONSTRUCTION
3.1
REQUIREMENTS FOR MOUNTING
Doors should be placed symmetrically relatively to passage pintle.
On mounting door bearing bases should be leveled in vertical planes.
Bearing rods should be placed close to passage framing along the full length. The gaps of 5 mm
maximum are accepted. The diference of diagonals measured between two end points of bearing rods’ ends should not exceed 2 mm.
Product elements mounting and leveling on the wall before their ixing may be carried out with
the help of metal washers, mounted in area of ixing points.
Mounting accuracy of the product is controlled by the builder’s level dimension type US6-1/US6-4
1-st group of accuracy State Standard 9416-83 and tape-measure 8 m 2nd group of accuracy
State Standard 7502-89. It is accepted to use builder’s levels and tape-measures of other types
but not with less accuracy.
3.2
FIXING RULES FOR BEARING STRUCTURES OF DOORS
The door should be properly ixed not to pose any potential hazard for the life or health of people.
Fixing points of the goods should ensure regular allocation of forces that efect the product and
their secure transmission on building structure elements.
The choice of the ixing element depends on load distribution and durability of the building
construction. Building constructions should stand the expansion force that appears while tightening ixing elements.
Wooden cork, construction foam is prohibited to use as ixing elements.
When the passage is made of solid mass materials, as concrete, natural stone, whole brick, then
the ixing of door bearing elements is made directly to the passage (ig. 1)
Fig. 1
4
INSTALLATION
INDUSTRIAL DOORS. HIGH
MOUNTING WITH BOTTOM SHAFT
POSITIONING
Distributed
by JD (UK)
Ltd MANUAL.
- www.jdukltd.co.uk
[email protected]
01924
472924
INSTALLATION AND FIXING RULES FOR DOOR BEARING CONSTRUCTION
When the passage is made of hollow materials, as economy brick (cavitated ceramic and limesand brick), ceramic slot and silicate stones, and also of light and cellular concrete, gas silicate
blocks and other building materials with low compressive resistance, it is recommended to frame
the construction passage with steel moulded proile (ig.2).
It is allowed to ix door bearing elements directly to the passage using ixing elements with
increased enchoring length.
Fig. 2
When the door mounting is made onto metal constructions it is necessary to use self-tapping
screws or bolts with nuts.
If it is impossible to ix metal framing on the passage it is recommended to ix the doors with
the help of tie rods.
Bearing rod strengthening is made with the use of corner brackets that are ixed to the passage and the rod. Fixing to the rod is made by two bolts (М6х16) with round head and nuts
with a shoulder. The bolts are entered from the bracket side through ready aperture pairs in
the rod (ig.3.1).
With the distance less than 125 mm from the end of the passage to the side wall, corner brackets
may be installed only inside the bearing rod (ig. 3.2).
Fig. 3.1
INSTALLATION MANUAL.
DOORS.
HIGH MOUNTING WITH BOTTOM
SHAFT POSITIONING
5
Distributed
by JDINDUSTRIAL
(UK) Ltd
- www.jdukltd.co.uk
[email protected]
01924 472924
INSTALLATION AND FIXING RULES FOR DOOR BEARING CONSTRUCTION
Fig. 3.2
3.3
FASTENING ELEMENTS FOR FIXING DOOR
ELEMENTS TO BEARING CONSTRUCTIONS
Diferent fastening elements may be used in door mounting; the choice depends on passage
material characteristics.
All ixing parts should be resistant to corrosion.
Metallic frame tie (anchor) dowels (ig.4.1), nylon dowels with inturn screws (ig.4.2) are used
to ix doors to the wall made of concrete, whole brick, ceramsite concrete, natural stone and
other similar materials.
Fig. 4.1
Fig. 4.2
Oblong plastic dowels with inturn screws (160 mm long) are used to ix doors to the wall made
of light and cellular concretes, bricks with vertical hollows, lime-gas blocks, shell limestone.
Anchor and dowel outer diameter – 10 mm.
For ixing doors to metal constructions it is necessary to use self-tapping screws with outer
thread diameter 8 mm (ig. 4.3).
Fig. 4.3
To provide secure door construction element pressing to building constructions under screw
heads and nuts it is necessary to install lat steel washer with outer diameter – 24…30 mm,
thickness – 1,6…2,0 mm.
Screws should be made of steel with corrosion-resistant coating with thickness not less than
9 micron. Screw strength grade not less than 5.6.
6
INSTALLATION
INDUSTRIAL DOORS. HIGH
MOUNTING WITH BOTTOM SHAFT
POSITIONING
Distributed
by JD (UK)
Ltd MANUAL.
- www.jdukltd.co.uk
[email protected]
01924
472924
INSTALLATION AND FIXING RULES FOR DOOR BEARING CONSTRUCTION
3.4
APERTURE PERFORMING FOR FIXING
The following drilling regimes for ixing element installation are recommended depending on
wall construction material:
•
•
•
Pure drilling regime (without punches). This regime is recommended for aperture performing in hollow brick, light and cellular concretes, lime-gas blocks, shell limestone and
also in metal constructions;
Drilling regime with light punches is recommended for aperture drilling in whole brick;
Punching regime is recommended for walls of concrete with density more than 700 kg/m3
and constructions of natural stone.
The depth of aperture drilling should be one screw diameter more than the anchoring part of
dowel.
The aperture diameter should not exceed the dowel diameter; the aperture should be clean
of drilling waste.
Minimal dowel anchoring depth is given in the table below.
Wall material
3.5
Minimal depth, mm
Concrete
40
Whole brick
40
Brick with vertical hollows
60
Bkey locks of cellular natural stone
50
Light concrete
60
REQUIREMENTS TO THE PASSAGES OF THE PREMISES
We draw the attention of our partners, that the essential precondition for the door mounting
with the least expenses is the quality preparation of passage frame for door installation. It’s
very important for the irst step to carefully measure the passage, mentioning the material of
walls and their thickness.
Prepared passages should meet the following requirements:
•
•
•
•
the passages should be of a rectangular shape or other shape, agreed by the Customer
and the Producer;
the surface of frame planes should be straight and smooth, without burls of plaster or
cracks.
the deviation of work surfaces from vertical and horizontal lines should not exceed
1,5 mm/m, but not more than 5mm.
the area, needed for door mounting, should be free from building, heating piping, and
ventilation etc.
If the passages are prepared by the Customer with deviations from the presented norms, the
Customer is to eliminate them before door mounting start.
INSTALLATION MANUAL.
DOORS.
HIGH MOUNTING WITH BOTTOM
SHAFT POSITIONING
7
Distributed
by JDINDUSTRIAL
(UK) Ltd
- www.jdukltd.co.uk
[email protected]
01924 472924
DOOR MOUNTING
3.6
FINISHED PASSAGE CHECK
Before starting door mounting it is necessary to make sure the quality of the prepared passage
is satisfactory (see part 3.5).
It is necessary to check if the existing space dimensions necessary for door mounting correspond the demands pointed out in the document “Design description and technical guide for
industrial door mounting”.
4.
DOOR MOUNTING
4.1
PREPARATION BEFORE MOUNTING
Before mounting it is necessary to make installation marks from both sides of passage (ig.5). The
marks are made at 1 m distance from zero mark (the level of the clean loor) using lexible liquid
level or squared level used with measure proile (headroom from the door set).
1m
1m
Fig. 5. Installation marks making
8
INSTALLATION
INDUSTRIAL DOORS. HIGH
MOUNTING WITH BOTTOM SHAFT
POSITIONING
Distributed
by JD (UK)
Ltd MANUAL.
- www.jdukltd.co.uk
[email protected]
01924
472924
DOOR MOUNTING
4.2
MEASURE PROFILE ASSEMBLY
Measure proile assembly (ig. 6) is done in the following way:
•
•
place measure profile brackets from headroom butts;
fix brackets with two M8×25 round-head bolts and nuts with shoulders.
Fig. 6. Measure proile assembly
4.3
SEALS INSTALLATION INTO BEARING RODS
Before mounting it is necessary unpack bearing rods and place seals into them.
Seal installation into bearing rod is shown in ig. 7.
Seal
Bearing rod
Fig. 7. Seal installation
INSTALLATION MANUAL.
DOORS.
HIGH MOUNTING WITH BOTTOM
SHAFT POSITIONING
9
Distributed
by JDINDUSTRIAL
(UK) Ltd
- www.jdukltd.co.uk
[email protected]
01924 472924
DOOR MOUNTING
4.4
DOOR BEARING CARCASS VERTICAL FRAME ASSEMBLY
In industrial doors with high mounting with bottom shaft positioning bearing rods are produced in two variants: whole rods and compound rods. In the present manual whole bearing
rod variant is considered.
Vertical frame consists of three main elements – two bearing rods and measure proile (ig.8)
Fig. 8. Vertical frame of bearing rod in assembly
10
INSTALLATION
INDUSTRIAL DOORS. HIGH
MOUNTING WITH BOTTOM SHAFT
POSITIONING
Distributed
by JD (UK)
Ltd MANUAL.
- www.jdukltd.co.uk
[email protected]
01924
472924
DOOR MOUNTING
Vertical frame assembly is done in the following order:
•
unscrew M6×16 bottom press-bolt nuts that fix vertical track to bearing rod, extract pressbolts (fig. 9.1);
Fig. 9.1
•
•
install measure profile between bearing rods;
install press-bolts placing them from outside of bearing rod (fig. 9.2). Install and tighten
the nuts.
Press-bolt
Measure proile
Nut
Bearing rod
Fig. 9.2. Fixing of measure proile to bearing rod
INSTALLATION MANUAL.
DOORS.
HIGH MOUNTING WITH BOTTOM
SHAFT POSITIONING
11
Distributed
by JDINDUSTRIAL
(UK) Ltd
- www.jdukltd.co.uk
[email protected]
01924 472924
DOOR MOUNTING
4.5
DOOR BEARING CARCASS MOUNTING
Door bearing carcass consists of two bearing rods (1) with vertical tracks and seals, two radius
proiles (2), two horizontal tracks (3) and rear headroom (4). The scheme of the bearing carcass
is shown in ig. 10.
1. bearing rod with vertical track and seal
2. radius proile
3. horizontal track
4. rear headroom
Fig. 10. Door bearing carcass scheme
12
INSTALLATION
INDUSTRIAL DOORS. HIGH
MOUNTING WITH BOTTOM SHAFT
POSITIONING
Distributed
by JD (UK)
Ltd MANUAL.
- www.jdukltd.co.uk
[email protected]
01924
472924
DOOR MOUNTING
4.5.1
DOOR BEARING CARCASS VERTICAL FRAME FIXING
1. Fixing of the assembled vertical frame of door bearing carcass to the passage (ig. 11) is made
in the following order:
•
•
Put the frame to the passage and symmetrize the frame to passage;
Level and fix the frame in the vertical plane, match notchings in the bearing rods with
meter marks on the passage;
1m
1m
Fig. 11
•
on the rods fix reinforcing side brackets with M6×16 round-head bolts and nuts with
shoulders. Reinforcing side bracket installation variant outside bearing rods is shown in fig.
12.1, inside bearing rods – in fig. 12.2.
INSTALLATION MANUAL.
DOORS.
HIGH MOUNTING WITH BOTTOM
SHAFT POSITIONING
13
Distributed
by JDINDUSTRIAL
(UK) Ltd
- www.jdukltd.co.uk
[email protected]
01924 472924
DOOR MOUNTING
Fig. 12.1
14
INSTALLATION
INDUSTRIAL DOORS. HIGH
MOUNTING WITH BOTTOM SHAFT
POSITIONING
Distributed
by JD (UK)
Ltd MANUAL.
- www.jdukltd.co.uk
[email protected]
01924
472924
DOOR MOUNTING
Fig. 12.2
INSTALLATION MANUAL.
DOORS.
HIGH MOUNTING WITH BOTTOM
SHAFT POSITIONING
15
Distributed
by JDINDUSTRIAL
(UK) Ltd
- www.jdukltd.co.uk
[email protected]
01924 472924
DOOR MOUNTING
•
on the wall mark the places where apertures for fixing elements will be (dowels, screws,
etc.);
Scheme of door bearing carcass vertical frame ixing elements placing is presented on ig. 13.1
and 13.2.
When reinforcing corner brackets are installed on the outer side of bearing rods (ig. 13.1), rod
and brackets’ ixing elements are staggered.
When reinforcing corner brackets are installed on the inside of bearing rods (ig.13.2), ixing
elements are placed in each perforating hole, drilled in the rod shelf.
Fixing elements’ installation places
Fig. 13.1
•
•
Fig. 13.2
according to the marking executed drill in the wall the apertures of the necessary size for
fixing elements;
place the fixing elements, tighten them controlling the fixed bearing rods verticality;
2. Remove measure proile, for this purpose unfasten and extract the nuts of press-bolts (ig. 14);
Fig. 14
16
INSTALLATION
INDUSTRIAL DOORS. HIGH
MOUNTING WITH BOTTOM SHAFT
POSITIONING
Distributed
by JD (UK)
Ltd MANUAL.
- www.jdukltd.co.uk
[email protected]
01924
472924
DOOR MOUNTING
3. Place press-bolts from the inside of bearing rod (ig.15). Place and fasten the nuts with a wrench.
Fig. 15
4.5.2
HORIZONTAL TRACKS FIXING TO BEARING RODS
Assembly and ixing of tracks to bearing rods is shown in ig. 16
Fig. 16
Horizontal tracks assembly and ixing is made in the following way:
1) Assemble horizontal track with radius proile. To ix radius proile to horizontal track joint plate
it is necessary to install two M6×16 press-bolts and nuts with shoulders (ig.16.1)
Place bolts from inside of the proile.
INSTALLATION MANUAL.
DOORS.
HIGH MOUNTING WITH BOTTOM
SHAFT POSITIONING
17
Distributed
by JDINDUSTRIAL
(UK) Ltd
- www.jdukltd.co.uk
[email protected]
01924 472924
DOOR MOUNTING
Fig. 16.1
Vertical track and radius proile rolling path edges should be matched to provide punchless
rolling of feed rollers.
2) Place horizontal track in assemblage with radius proile to bearing rod and ix it with two
M8×25 roundhead bolts and nuts (ig. 16.2);
Fig. 16.2
18
INSTALLATION
INDUSTRIAL DOORS. HIGH
MOUNTING WITH BOTTOM SHAFT
POSITIONING
Distributed
by JD (UK)
Ltd MANUAL.
- www.jdukltd.co.uk
[email protected]
01924
472924
DOOR MOUNTING
3) ix radius proile to bearing rod ixing plate with one M6×16 press-bolt and nut with shoulder
(ig. 16.3). Place bolt from inside of radius proile;
Fig. 16.3
Vertical track and radius proile rolling path edges should be matched;
4) ix another track to bearing rod analogically.
4.5.3
REAR HEADROOM INSTALLATION
Measure proile in assembly can be used as a rear headroom. Its ixing to horizontal track is done
with M8×25 roundhead bolts and nuts with shoulders (ig. 17)
Fig. 17
INSTALLATION MANUAL.
DOORS.
HIGH MOUNTING WITH BOTTOM
SHAFT POSITIONING
19
Distributed
by JDINDUSTRIAL
(UK) Ltd
- www.jdukltd.co.uk
[email protected]
01924 472924
DOOR MOUNTING
4.6
HORIZONTAL TRACK FIXING TO CEILING CONSTRUCTIONS
4.6.1
Hanger placement
Hangers are placed along horizontal tracks (ig. 18). The front hanger should be placed at 900…
1000 mm distance of of the premises passage. The rear hanger should be placed 300 mm from
horizontal track edge.
Fig. 18
20
INSTALLATION
INDUSTRIAL DOORS. HIGH
MOUNTING WITH BOTTOM SHAFT
POSITIONING
Distributed
by JD (UK)
Ltd MANUAL.
- www.jdukltd.co.uk
[email protected]
01924
472924
DOOR MOUNTING
4.6.2
HANGER CONSTRUCTION
Horizontal track hanging to ceiling constructions should be carried out on hangers. Hanger
construction is shown in ig. 18.1.
Corner bracket
C-proile
Top mounting
bracket
Horizontal track
Bottom bearing
bracket
Fig. 18.1. Hanger
•
Before hanger installation it is necessary to do its subassembly (fig. 18.2). for that do the
following:
–
place side bracket into C-profile, that serves for hanger fixing to ceiling;
–
install M8×25 round-head bolt;
–
slide bracket out of C-profile firmly into bolt, install and tighten nut with shoulder;
INSTALLATION MANUAL.
DOORS.
HIGH MOUNTING WITH BOTTOM
SHAFT POSITIONING
21
Distributed
by JDINDUSTRIAL
(UK) Ltd
- www.jdukltd.co.uk
[email protected]
01924 472924
DOOR MOUNTING
Fig. 18.2.
4.6.3
Hanger mounting
Place horizontal tracks using carpenter bar level with a slight inclination towards passage (~
0,5%).
Hanger mounting is done in the following way:
1) Check diagonal frames of horizontal tracks. Acceptable diference in sizes is no more than 2
mm. Fix the frame in the leveled position.
2) Install hanger subassembling (ig. 18.2) up to the ceiling, make hole marks for dowel
installation.
3) Drill a hole in the ceiling, hammer a dowel in a hole, and ix the hanger to the ceiling.
22
INSTALLATION
INDUSTRIAL DOORS. HIGH
MOUNTING WITH BOTTOM SHAFT
POSITIONING
Distributed
by JD (UK)
Ltd MANUAL.
- www.jdukltd.co.uk
[email protected]
01924
472924
DOOR MOUNTING
4) Install bottom support bracket into hanger C- proile and ix it with M8×16 bolt with hexagon
head (ig. 18.3);
5) Install top mounting bracket and ix it with M8×16 bolt with hexagon head;
6) Check diagonals of horizontal track frame. Diagonals should be equal.
7) Check nut ixing;
8) If necessary cut of excess hanger C- proile part from below.
Hanger
subassembling
Top mounting
bracket
Horizontal
track
Bottom
bearing
bracket
Fig. 18.3. hanger mounting
4.6.4
INSTALLATION OF BRACE ON THE HANGER
Horizontal track rear hanger should be additionally enforced with brace (ig.18.4).
Brace consists of mounting proile and corner bracket, connected together by М8х25 roundhead
bolt with a shoulder nut.
Brace is ixed to hanger C-proile with 8х25 self tapping screw. For screw installation in the proile
sidewall make an aperture 7 mm in diameter.
The brace is ixed to the ceiling covering or garage premises wall by a dowel.
INSTALLATION MANUAL.
DOORS.
HIGH MOUNTING WITH BOTTOM
SHAFT POSITIONING
23
Distributed
by JDINDUSTRIAL
(UK) Ltd
- www.jdukltd.co.uk
[email protected]
01924 472924
DOOR MOUNTING
Corner bracket
Bolt M8×25
Mounting bracket
Self tapping screw
Fig. 18.4. Installation of brace on the hanger
After door bearing carcass ixing to building constructions of the garage premises it is necessary
to check construction mounting and ixing element tightening.
24
INSTALLATION
INDUSTRIAL DOORS. HIGH
MOUNTING WITH BOTTOM SHAFT
POSITIONING
Distributed
by JD (UK)
Ltd MANUAL.
- www.jdukltd.co.uk
[email protected]
01924
472924
DOOR MOUNTING
4.7
JOIST INSTALLATION
Joist installation scheme is shown in ig. 19.
Fig. 19. Joist installation
4.7.1 TRIANGULAR PLATE INSTALLATION.
Triangular plate installation is shown in ig. 19 and is made in the following order:
1) Fix two clamp plates to the triangular plate by the M8×25 round head bolts. Wrench bolt
nuts providing a 3-5 mm gap between clamp plate and bracket.
2) Place bracket irmly into passage barrier entering clamp plates inside C- cover plates on
bearing rod.
3) Fix bolted assembly.
4) Fix triangular plate to passage barrier. Bracket ixing is done in three points.
INSTALLATION MANUAL.
DOORS.
HIGH MOUNTING WITH BOTTOM
SHAFT POSITIONING
25
Distributed
by JDINDUSTRIAL
(UK) Ltd
- www.jdukltd.co.uk
[email protected]
01924 472924
DOOR MOUNTING
Fig. 19.1
4.7.2 JOIST FIXING
Joist is ixed on triangular plates in a way to provide cable drum placing. Joist is ixed with plates
and M10×130 bolts with nuts (ig. 19.2).
It is necessary to additionally drill apertures with 5 mm in diameter in bottom joist side and ix
joist to triangular plates with 6,3×16 self-tapping screws.
26
INSTALLATION
INDUSTRIAL DOORS. HIGH
MOUNTING WITH BOTTOM SHAFT
POSITIONING
Distributed
by JD (UK)
Ltd MANUAL.
- www.jdukltd.co.uk
[email protected]
01924
472924
DOOR MOUNTING
Fig. 19.2
4.7.3 SIDE BRACKET INSTALLATION
Side brackets are installed on the joist and are ixed with plates and M10×130 bolts with nuts
(ig. 19.3).
It is necessary to additionally drill apertures with 5 mm in diameter in top joist side and ix to it
side brackets with 6,3×16 self-tapping screws.
Fig. 19.3
INSTALLATION MANUAL.
DOORS.
HIGH MOUNTING WITH BOTTOM
SHAFT POSITIONING
27
Distributed
by JDINDUSTRIAL
(UK) Ltd
- www.jdukltd.co.uk
[email protected]
01924 472924
DOOR MOUNTING
4.8
INSTALLATION OF A SHAFT ASSEMBLED BY SPRINGS
4.8.1 TORSION SHAFT CONSTRUCTION VARIANTS AND ASSEMBLY RULES
–
Torsion shafts can have different variants of configuration and assembly.
–
The variants of installation of one, two, three or four springs are possible. The springs can
have the same as well as reverse spiraling direction. Moreover, the installations of the
whole (continuous) shaft and shaft consisting of two parts is possible.
–
The following conditions should be carried out in assembly and mounting of shaft:
–
In area where coupler adjustable and cable drums are installed it is obligatory to have supporting shaft element – spring break device or intermediate bracket;
–
For the doors of more than 4100 mm in width installation of two intermediate brackets is
necessary.
Possible variants of torsion shafts mounting schemes are presented on ig. 20.
Whole shaft. One spring
Whole shaft. Two springs of reverse spiraling
direction
Whole shaft. Two springs of the same spiraling
direction
Divided shaft. One spring
Divided shaft. Two springs of reverse spiraling
direction
Divided shaft. Two springs of reverse spiraling
direction. Door width more than 4100 mm
Divided shaft. Two springs of the same spiraling direction
Divided shaft. Three springs
Divided shaft. Three springs of the same spiraling direction. Door width more than 4100 mm
Divided shaft. Four springs
Graphics
Bearing rod with bearing support
Intermediate bracket
Spring break device with bearing support
Cable drum
Spring with tips
Coupler adjustable
Fig. 20
28
INSTALLATION
INDUSTRIAL DOORS. HIGH
MOUNTING WITH BOTTOM SHAFT
POSITIONING
Distributed
by JD (UK)
Ltd MANUAL.
- www.jdukltd.co.uk
[email protected]
01924
472924
DOOR MOUNTING
•
•
Spring break devices art.SBD-1 are used with the shaft with diameter 1” (25,4 mm), Spring
break devices art.SBD-5/4 are used with the shaft with diameter 1 ¼” (31,75 mm).
If the shaft axis is placed from the wall at a distance more than 86 mm spring break devices art.SBD-1 are used with the bracket art.В-86 (fig. 21). Bolts М8×25 and nuts are used
for fixing.
Bracket art.B-86
Fig. 2.1
•
On springs with high level of turning spring break device art.SBD-5/4 is used together
with bracket art.В-152 and reinforcing side bracket art.В-152А (fig. 22).
Bracket art. B-152
Bracket art. B-152A
Fig. 22
INSTALLATION MANUAL.
DOORS.
HIGH MOUNTING WITH BOTTOM
SHAFT POSITIONING
29
Distributed
by JDINDUSTRIAL
(UK) Ltd
- www.jdukltd.co.uk
[email protected]
01924 472924
DOOR MOUNTING
Mind spring extension when it stretches when determining bracket position. Minimal distance
A (ig. 23) between spring itting (spring is not winded) and intermediate bracket is counted
considering spring length extension when it is winded by formula:
А = d • n + 5, where:
A – distance between spring tip to intermediate bracket, mm;
d – spring wire diameter, mm;
n – number of spring winding turns.
Fig. 23
4.8.2
PREPARATION BEFORE MOUNTING
•
It’s necessary to conduct shaft assembly before mounting. Below is given the order of
divided torsion shaft with two springs of reverse spiraling direction assembly (fig. 24). By
assembling the following requirements should be met:
–
Left spring fitting and cable drum (code LH), with red marks, should be installed on the
left side of the shaft, when looking from the inside of the premises. Right spring fitting
and cable drum (code RH), with black marks, should be placed on the right side of the
shaft;
–
Left spring should be marked by a red line, right – by any other color;
–
Cable drums are set on the shaft in such a way, that the slot for the cable, on butt-end of
the drum, was placed from the outer side.
30
INSTALLATION
INDUSTRIAL DOORS. HIGH
MOUNTING WITH BOTTOM SHAFT
POSITIONING
Distributed
by JD (UK)
Ltd MANUAL.
- www.jdukltd.co.uk
[email protected]
01924
472924
DOOR MOUNTING
Left spring itting
Additional
bracket
Square key
Half-coupler
Spring break device
Shaft
Cable drum
Left spring
Additional
bracket
Spring break device
Right spring itting
Cable drum
Intermediate bracket
Right spring
Half-coupler
Square key
Shaft
Fig. 24
Mounting is done in the following order:
•
Mount the right shaft part:
1) Dismantle the lange coupler;
2) Set half-coupler on the shaft, connecting shaft butt end and bearing surface of half-coupler
lange. Set water stop into half-coupler and shaft grooving. Tighten the set screw irmly into
shaft;
3) Wrench the screw; remove half-coupler from shaft. By the given screw mark drills the shaft
0.5-1.0 mm deep.
4) Set half-coupler onto shaft;
5) Fix half-coupler on shaft, tightening fastening screws with a wrench;
6) Set intermediate bracket on shaft;
7) Set ready-itted spring with tips;
8) Set spring break device on shaft and ix it to spring tip with the help of 2 bolts out of coupler
set (ig. 24.1);
9) Put spring break device tooth chain hoist on shaft;
10) Set dowel and ix it with clutch tooth chain hoist screw;
11) Fix additional brackets to spring break device;
12) Set cable drum. Cable drum is installed on shaft in such a way that groove for rope placing,
made on drum end, is withoutside.
INSTALLATION MANUAL.
DOORS.
HIGH MOUNTING WITH BOTTOM
SHAFT POSITIONING
31
Distributed
by JDINDUSTRIAL
(UK) Ltd
- www.jdukltd.co.uk
[email protected]
01924 472924
DOOR MOUNTING
•
•
Fig. 24.1 Spring ixing to sparing break device
Mount left shaft part analogically, setting half-coupler, spring, spring break device and
cable drum. For doors more than 4100 mm wide intermediate bracket is also mounted
onto the left shaft.
After shaft assembly it is recommended, to eliminate errors while mounting, to place
shafts on the floor of the premises and determine cable drum, spring break device and
intermediate bracket mutual disposition.
Cable drum should be placed in such a way that in door operation totally eliminate the possibility
of rope touching leaf and tracks.
Spring break device disposition should provide the possibility of cable drum groove
installation.
4.8.3 SHAFT MOUNTING ON JOIST
Shaft mounting on joist is shown in ig. 25:
Fig. 25
32
INSTALLATION
INDUSTRIAL DOORS. HIGH
MOUNTING WITH BOTTOM SHAFT
POSITIONING
Distributed
by JD (UK)
Ltd MANUAL.
- www.jdukltd.co.uk
[email protected]
01924
472924
DOOR MOUNTING
Shaft mounting is done in the following way:
1) Mount part of shaft, installed from the right side of doors (ig. 26):
Fig. 26
•
•
Place shaft into side bracket bearing (fig.26.1)
Fix side bracket on joist (fig. 26.2) with plates and M10×130 bolts.
It is necessary to additionally drill aperture with 5 mm in diameter in top joist side and ix to it
side brackets with 6,3×16 self-tapping screws.
Fig. 26.1
INSTALLATION MANUAL.
DOORS.
HIGH MOUNTING WITH BOTTOM
SHAFT POSITIONING
33
Distributed
by JDINDUSTRIAL
(UK) Ltd
- www.jdukltd.co.uk
[email protected]
01924 472924
DOOR MOUNTING
Fig. 26.2
•
Fix spring break device on, for that do the following:
–
Unscrew additional bracket fixing nuts to the clutch;
–
Move spring in assembly with spring break device along shaft towards intermediate
bracket to provide the possibility of spring break device additional bracket installation;
–
Fix additional bracket on joist (fig. 26.3) with plates and M10×130 bolts;
It is recommended to drill aperture with 5 mm in diameter in top joist side and ix to it side
brackets with 6,3×16 self-tapping screws.
Fig. 26.3
34
INSTALLATION
INDUSTRIAL DOORS. HIGH
MOUNTING WITH BOTTOM SHAFT
POSITIONING
Distributed
by JD (UK)
Ltd MANUAL.
- www.jdukltd.co.uk
[email protected]
01924
472924
DOOR MOUNTING
•
Fix spring break device to additional bracket (fig. 26.4), for that do the following:
–
Move spring in assembly with spring break device along shaft towards additional
bracket;
–
Fix spring break device to additional bracket with two bolts and nuts;
Fig. 26.4
2. Mount part of shaft, installed from the left side of doors (ig. 27):
Fig. 27
INSTALLATION MANUAL.
DOORS.
HIGH MOUNTING WITH BOTTOM
SHAFT POSITIONING
35
Distributed
by JDINDUSTRIAL
(UK) Ltd
- www.jdukltd.co.uk
[email protected]
01924 472924
DOOR MOUNTING
•
•
Place shaft into side bracket bearing
Join shafts with a coupler, setting clutch coupler bolts (fig. 27.1), tighten slightly coupler
bolt nuts.
Both square key grooves should be placed in one line;
•
Fig. 27.1
Fix spring break device on joist (fig. 27.2), for that do the following:
Fig. 27.2
3. Install stop rings close to side bracket inner bearing race (ig. 28) and ix them tightening set
screws;
Fig. 28
36
INSTALLATION
INDUSTRIAL DOORS. HIGH
MOUNTING WITH BOTTOM SHAFT
POSITIONING
Distributed
by JD (UK)
Ltd MANUAL.
- www.jdukltd.co.uk
[email protected]
01924
472924
DOOR MOUNTING
4. Spring break device preparation to work is done in the following way:
–
Temporarily block the latch, installing fixing pin (fig. 29).
Attention: extract pin only after door inal assembly.
Fig. 29
Attention: Between spring tip and spring break device bracket, and also between bracket and
clutch joint plate there should be a 1-2 mm gap that is provided by space washer installation.
–
Place and fix tooth chain hoist on shaft with set screws. Chain hoist rim should be
placed symmetrically relatively latch long axis.
INSTALLATION MANUAL.
DOORS.
HIGH MOUNTING WITH BOTTOM
SHAFT POSITIONING
37
Distributed
by JDINDUSTRIAL
(UK) Ltd
- www.jdukltd.co.uk
[email protected]
01924 472924
DOOR MOUNTING
4.9
DOOR LEAF INSTALLATION. DOORS WITHOUT A WICKET
4.9.1
BOTTOM SECTION INSTALLATION
Assembly and installation of door leaf bottom section is shown in ig. 30
Fig. 30
Assembly and installation of door leaf bottom section is held in the following order:
1) Fix the panel on the mounting place. Use, when needed, supports, level the panel in the
horizontal position with the help of carpenter’s bar level. Support height should be no more
than 10 mm maximum;
2) Install and ix side brackets together with hinges to the section. Place side bracket over bottom part of the hinge. Fixing is done with three 6,3×16 self-tapping screws (ig. 30.1).
Fig. 30.1
38
INSTALLATION
INDUSTRIAL DOORS. HIGH
MOUNTING WITH BOTTOM SHAFT
POSITIONING
Distributed
by JD (UK)
Ltd MANUAL.
- www.jdukltd.co.uk
[email protected]
01924
472924
DOOR MOUNTING
3) Put Litol-24 lubricant on rollers.
4) Set rollers into roller cover plate. Place safety plastic insert on roller axes;
5) Place roller into horizontal track proile and ix roller cover plate to side bracket with two
M6×16 roundhead bolts and nuts with shoulder (ig. 30.2).
Roller cover plate adjustment is done in such a way that roller adjoins vertical track path at minimal gap between section and bearing rod side seal. The roller should rotate freely by hand.
Fig. 30.2
6) Turning shaft slowly unwind the ropes.
It is forbidden to unwind ropes from the drums that are put of the shaft to avoid rope kink that
can lead to rope lay splitting;
7) Put on rope loops on bottom bracket thread chasers (ig. 30.3). Place rope loops between two
washers. To ix rope place nut on thread chaser. While assembly pay attention that the rope is
placed in special bottom bracket groove. Install splint to prevent rope coming out of the groove.
splint
Fig. 30.3
INSTALLATION MANUAL.
DOORS.
HIGH MOUNTING WITH BOTTOM
SHAFT POSITIONING
39
Distributed
by JDINDUSTRIAL
(UK) Ltd
- www.jdukltd.co.uk
[email protected]
01924 472924
DOOR MOUNTING
8) install and ix bottom brackets on the section:
•
•
•
•
put Litol-24 lubrication on rollers;
set distance rings on rollers to prevent door leaf from side shift (fig. 30.4). Distance rings
are chosen in such a way to prevent leaf motion 4-6 mm.
place runners into bottom bracket ears, place rollers into vertical tracks, fix each bracket to
the panel with six 6,3×16 self-tapping screws (fig. 30.4).
Fig. 30.4
When the doors are completed with manual control elements such as pull rope or HKU001
manual lift block with a rope, installation of proper self-tapping screws is done when ixing
rope branches(see ig. 38.2, 42.2).
4.9.2
INSTALLATION OF THE FOLLOWING LEAF SECTIONS
Door leaf sections are mounted according to marking that deines sequence number. Carry
sections vertically. Fix sections with side and intermediate hinges (ig. 31)
40
INSTALLATION
INDUSTRIAL DOORS. HIGH
MOUNTING WITH BOTTOM SHAFT
POSITIONING
Distributed
by JD (UK)
Ltd MANUAL.
- www.jdukltd.co.uk
[email protected]
01924
472924
DOOR MOUNTING
Fig. 31
Leaf assembly is done in the following way:
1) install second section on the bottom one. Panel ends should be in one plane.
2) install and ix side hinges to the second section according to ig. 30.1 and 30.2
3) ix top side hinge half-loop (ig. 31.1), installed on bottom panel, to the panel with two 6,3×16
self-tapping screws . The panel should be strictly vertical;
INSTALLATION MANUAL.
DOORS.
HIGH MOUNTING WITH BOTTOM
SHAFT POSITIONING
41
Distributed
by JDINDUSTRIAL
(UK) Ltd
- www.jdukltd.co.uk
[email protected]
01924 472924
DOOR MOUNTING
Fig. 31.1
4) install intermediate hinges, ix each with four 6,3×16 self-tapping screws (ig. 31.2);
Fig. 31.2
5) install the following section and so on.
4.9.3 TOP BRACKET INSTALLATION
Top bracket installation onto the panel is done in the following way (ig. 32):
•
•
•
•
fix top bracket with three 6,3×16 self-tapping screws;
set distance rings on rollers to prevent door leaf from side shift. Distance rings are chosen
in such a way to prevent leaf motion 4-6 mm.
Put Litol-24 lubricant on rollers.
Place runners into roller plate ears.
42
INSTALLATION
INDUSTRIAL DOORS. HIGH
MOUNTING WITH BOTTOM SHAFT
POSITIONING
Distributed
by JD (UK)
Ltd MANUAL.
- www.jdukltd.co.uk
[email protected]
01924
472924
DOOR MOUNTING
•
Place roller into vertical tracks and fix roller plate to the bracket with two M6×16 roundhead bolts and nuts .
Fig. 32
After side and intermediate hinge mounting check and, if necessary, adjust runner installation.
The roller should lean to vertical track rolling paths and rotate freely by hand.
The rope should be placed behind side hinge rollers.
4.9.4
DOOR TOP SECTION CLOSE CONFORMITY TO PASSAGE HEADROOM
Close itting of door top section to passage headroom is provided by top roller proper position
adjustment.
The adjustment is done in the following order:
1) Press on the top panel from the inside of the premises providing maximum possible elastic
edge crumpling of the upper seal.
2) adjust top roller placement by means of moving roller plate with following screw tightening.
The runner should bear against proile part of the track.
In ig. 33 rope placement scheme is shown. To prevent rope abrasion of side hinge roller axes of
bottom and, in some cases, second section from bottom, it’s necessary to install plastic safety
inserts.
INSTALLATION MANUAL.
DOORS.
HIGH MOUNTING WITH BOTTOM
SHAFT POSITIONING
43
Distributed
by JDINDUSTRIAL
(UK) Ltd
- www.jdukltd.co.uk
[email protected]
01924 472924
DOOR MOUNTING
Plastic safety insert
Fig. 33
44
INSTALLATION
INDUSTRIAL DOORS. HIGH
MOUNTING WITH BOTTOM SHAFT
POSITIONING
Distributed
by JD (UK)
Ltd MANUAL.
- www.jdukltd.co.uk
[email protected]
01924
472924
DOOR MOUNTING
4.10 DOOR LEAF INSTALLATION. DOORS WITH A WICKET
4.10.1 LEAF WITH A WICKET ASSEMBLY
Door leaf with the inbuilt wicket is shown in ig. 34.
Fig. 34
The mounting of bottom and top brackets, side and intermediate hinges in the door curtain with
the inbuilt wicket is performed in the same way as with the doors without wicket.
INSTALLATION MANUAL.
DOORS.
HIGH MOUNTING WITH BOTTOM
SHAFT POSITIONING
45
Distributed
by JDINDUSTRIAL
(UK) Ltd
- www.jdukltd.co.uk
[email protected]
01924 472924
DOOR MOUNTING
Door curtain mounting has its own peculiarities and is performed in the following way:
•
•
•
Install the bottom section on the place of mounting (Fig. 34.1). Using supports if necessary
place the section horizontally. The supports are installed under bottom section side stops.
Bottom stop end positioning plane should match zero mark plane (wearing floor level).
Install an eaves lath under the end profile of the bottom section at the central axes of the
wicket.
Check horizontality of mounted section with carpenter’s level, placed on panel head and
wicket wings (Fig. 34.1).
Fig. 34.1
•
At the mounting of wicket door sections planes of intermediate sections must coincide
(Fig. 34.2). Adjustment of sections in vertical position is carried out with the help of side
hinges;
Fig. 34.2
46
INSTALLATION
INDUSTRIAL DOORS. HIGH
MOUNTING WITH BOTTOM SHAFT
POSITIONING
Distributed
by JD (UK)
Ltd MANUAL.
- www.jdukltd.co.uk
[email protected]
01924
472924
DOOR MOUNTING
•
After installing the wicket sections it is necessary to unwind self-tapping screws and
remove transport braces (Fig. 34.3). Way of removing the braces – top-down;
Fig. 34.3
•
Place hinges on wicket passage framing and wicket leaf, fix them with 6,3×16 self-tapping
screws. Hinge positioning is shown in Fig. 34.4.
Fig. 34.4
INSTALLATION MANUAL.
DOORS.
HIGH MOUNTING WITH BOTTOM
SHAFT POSITIONING
47
Distributed
by JDINDUSTRIAL
(UK) Ltd
- www.jdukltd.co.uk
[email protected]
01924 472924
DOOR MOUNTING
•
Open the wicket and remove remote intermediate plates (Fig. 34.5)
Fig. 34.5
4.10.2 CYLINDER KEY LOCK MECHANISM AND PUSH HANDLE INSTALLATION
Installation of cylinder mechanism of the lock is shown in ig. 34.6.
Fig. 34.6
Installation of wicket handles is shown in ig. 34.7.
48
INSTALLATION
INDUSTRIAL DOORS. HIGH
MOUNTING WITH BOTTOM SHAFT
POSITIONING
Distributed
by JD (UK)
Ltd MANUAL.
- www.jdukltd.co.uk
[email protected]
01924
472924
DOOR MOUNTING
Fig. 34.7
4.10.3 SAFETY GEAR ADJUSTMENT
Two safety gears are used to prevent the sagging of the wicket when it is closed.
Safety gears are ixed on the end of door curtain with screws. Fixing devices are installed on the
end of the wicket. When the wicket is closed ixing device enters in the gear groove. Groove
apertures in the gears allow to regulate the gear positioning at height. (ig. 34.8)
Fig. 34.8
4.10.4 WICKET DOOR CLOSER INSTALLATION
Pusher is installed on the door curtain from inside.
Pusher should be positioned in such a way that wicket closing efort regulation nut (spring
tension) is placed from the side opposite to ledge (from the side of wicket opening hinges).
INSTALLATION MANUAL.
DOORS.
HIGH MOUNTING WITH BOTTOM
SHAFT POSITIONING
49
Distributed
by JDINDUSTRIAL
(UK) Ltd
- www.jdukltd.co.uk
[email protected]
01924 472924
DOOR MOUNTING
Pusher installation is performed in the following way:
•
•
remove the protective cap of the pusher;
install a pull bar on the mounting shank end of the shaft and fix it with a screw. The pull
bar should be placed at an angle to the pusher’s plane. (fig. 34.9);
Fig. 34.9.
•
•
•
•
Place pusher rod roller into guiding groove of the wicket passage framing profile
(Fig. 34.10);
Fix pusher box on the wicket with four self-tapping screws supplied with the pusher.
Screws are wound into apertures preliminarily prepared by the manufacturer;
Make door closer adjustment if necessary;
Install door closer protective cover and fix it with two screws.
Fig. 34.10
ADJUSTMENT OF PUSHER
Construction of pusher allows to perform the following settings:
•
•
•
•
Speed of closing the wicket;
Speed of pressing the wicket;
Intensity of braking at the wicket opening;
Efforts at closing the wicket.
50
INSTALLATION
INDUSTRIAL DOORS. HIGH
MOUNTING WITH BOTTOM SHAFT
POSITIONING
Distributed
by JD (UK)
Ltd MANUAL.
- www.jdukltd.co.uk
[email protected]
01924
472924
DOOR MOUNTING
Wicket leaf
Back-check control nut
Door leaf
Spring power adjusting nut
Closing speed nut
Door closer
Latch speed nut
Fig. 34.11
When all adjustments are been made fulill the requirements below and also the requirements
of the Manual enclosed to door closer by the Manufacturer.
Wicket closing and pressing speed adjustment
Closing cycle consists of two consecutive stages: wicket preliminary closing and compressing
(ixing).
Door closer has the following factory setting:
•
•
Wicket closing cycle starts when headroom angle is approximately 70 degrees.
Wicket compressing starts when the headroom angle is approximately 10 degrees.
Leaf speed on the compressing stage is established much lower than on preliminary closing stage.
Wicket closing and compressing speed change is done by turning two deinite screws (valves)
placed in the closer body.
First adjust wicket closing speed and then wicket compressing speed.
INSTALLATION MANUAL.
DOORS.
HIGH MOUNTING WITH BOTTOM
SHAFT POSITIONING
51
Distributed
by JDINDUSTRIAL
(UK) Ltd
- www.jdukltd.co.uk
[email protected]
01924 472924
DOOR MOUNTING
For wicket closing DECELERATION turn the closing speed screw CKEY LOCKWISE.
For wicket closing ACCELERATION turn the closing speed screw ANTICKEY LOCKWISE.
Wicket compressing speed adjustment is done with a closing speed screw analogically.
Slowing-down intensity adjustment when closing the wicket
The closer is factory adjusted in such a way that when the wicket headroom angle is more than
70 degrees wicket slow-down happens.
For wicket slow-down intensity increase turn the back-check control screw CKEY LOCKWISE.
For wicket slow-down intensity decrease turn the back-check control screw ANTICKEY
LOCKWISE.
WARNING!
1. It is prohibited to turn wicket closing speed screw, compressing speed screw, back-check
control screw more than 2 turns ANTICKEY LOCKWISE from factory adjustments. Larger turn
may lead to hydraulic liquid leaking out.
2. It is prohibited to cut of slow-down adjustment valve.
Wicket closing efort adjustment
Wicket closing efort factory adjustment is made in such a way that for normal exploitation you
do not need to change it.
If for some reason it is necessary for you to adjust wicket closing efort it is done in the following way.
For wicket closing efort INCREASE turn the spring power adjusting nut CKEY LOCKWISE.
For wicket closing efort DECREASE turn the spring power adjusting nut ANTICKEY LOCKWISE.
Wicket closing efort adjustment range is ±9 turns relatively factory adjustment.
It is prohibited to make adjustments more than established range.
4.11 ROPE TENSION ADJUSTMENT
Drums should be leveled on shaft in such a way that the ropes do not touch door elements on
their lifting.
Drum position adjustment in relation to shaft in axial position is made in the following way:
•
•
•
Turn fixing screw in the drum hub on the value needed for free axial movement of cable
drum relatively shaft;
Level the drum in proper axial position;
Set dowel and fix drum position tightening fastening screw.
52
INSTALLATION
INDUSTRIAL DOORS. HIGH
MOUNTING WITH BOTTOM SHAFT
POSITIONING
Distributed
by JD (UK)
Ltd MANUAL.
- www.jdukltd.co.uk
[email protected]
01924
472924
DOOR MOUNTING
For regular door exploitation ropes should be tightened. No rope sagging is admitted.
Rope tightening regulation
•
•
after bottom bracket fixing on the door leaf section it is necessary to turn shaft till rope
sagging is adjusted.
For rope tightening make spring winding 1,5-2 turns and fix it in this position tightening
tip bolts.
In case one of the ropes is still sagging, the sag can be eliminated by simultaneous shaft turn,
which is provided by a coupler construction (it has slot holes for tightening screws).
For that unfasten coupler tightening bolts, turn the shaft on which side there is sagging, holding another shaft in initial position. After eliminating rope sagging ix tightening bolts of the
coupler.
When the doors are completed with continuous shaft for sag elimination of one of the ropes
do following:
•
•
•
Lift the panel loosening rope tension and fix the panel in this position with the help of
support;
Unfasten the fixating screw of the rope in a drum;
•
Adjust rope working length as needed;
•
Pull down the panel in the initial position and check the evenness of rope tension.
•
Fasten the fixating screw of the rope in a drum;
4.12 SPRING TENSION
4.12.1 Before spring tensioning it’s necessary to take
measures for door leaf lifting prevention.
Be careful by tensioning the springs, use tensioning tool of proper size.
4.12.2 Spring tensioning is done in the following order:
•
•
•
•
release spring spring fitting bolts;
Insert drive into spring fitting slot below (fig.35).
While turning the drive, turn over tip for a quarter of turn.
Holding the first drive, install the second drive into the next spring fitting slot.
INSTALLATION MANUAL.
DOORS.
HIGH MOUNTING WITH BOTTOM
SHAFT POSITIONING
53
Distributed
by JDINDUSTRIAL
(UK) Ltd
- www.jdukltd.co.uk
[email protected]
01924 472924
DOOR MOUNTING
•
•
•
•
•
•
Holding the second drive, remove the first drive out of spring fitting slot.
Repeat steps 2-4 making the proper number of spring tensions. The proper number of
turns for tensioning of each spring is presented in the door table.
Check the number of spring tension turns by the number of turns made by marking line.
After tensioning, for the purpose of turn-to-turn friction reduction, stretch the springs in
the axis direction for 5-10 mm until there are gaps between the turns. Install square key
into shaft and spring fitting slots;
fix in this position, fastening tips bolts;
Extract the drive from the tip slot.
Fig. 35
4.12.3 Check door balancing.
For this purpose lift door leaf for about half of the passage height. Door leaf should be held in
this position. If the leaf is taken down or up, it’s necessary to conduct additional adjustment of
spring tension. Increase or decrease of spring tension is allowed within the limits of 1-2 turns.
54
INSTALLATION
INDUSTRIAL DOORS. HIGH
MOUNTING WITH BOTTOM SHAFT
POSITIONING
Distributed
by JD (UK)
Ltd MANUAL.
- www.jdukltd.co.uk
[email protected]
01924
472924
DOOR MOUNTING
4.13 DOOR LEAF CONTROLS INSTALLATION (STANDARD KITTING)
•
On doors in standard kitting the following control elements are installed:
–
Double-sided handle;
–
Locking bar;
–
Pull rope.
•
Handle art.HGI007 is installed into the aperture made in the door curtain. Handle set
includes a pull 1 with a bearing plate 2, an overlay 3, a pan-shape handle 4, insulation sealing 5 (fig. 36). While the mounting pulls are tied with screws and nuts. Screws are installed
at the inner side of the doors (fig. 36.2). After the handle is fixed it is required to install caps
that close the nuts.
3
5
1
2
4
Fig. 36. Handle set HGI007
Fig. 36.1 Handle installation. Outside view
•
Fig. 36.2. Handle installation. Inside view
Locking bar (fig. 37) is installed into four apertures made in door leaf section. Locking bar
is fixed with four 6,3×16 self-tapping screws.
When locking bar is installed make an aperture with diameter 16 mm in bearing rod.
INSTALLATION MANUAL.
DOORS.
HIGH MOUNTING WITH BOTTOM
SHAFT POSITIONING
55
Distributed
by JDINDUSTRIAL
(UK) Ltd
- www.jdukltd.co.uk
[email protected]
01924 472924
DOOR MOUNTING
•
Fig. 37
Pull rope fastening is shown in fig. 38.1 and 38.2.
The upper end of the rope is ixed to bearing rod with a brace, to do that it is necessary to preliminarily drill in bracket lange an aperture with 6,5… 7 mm diameter. The lower end is ixed
with washer and 6,3×35 self-tapping screw, inturned in the panel through bottom bracket
aperture.
Fig. 38.1. Rope ixing
56
INSTALLATION
INDUSTRIAL DOORS. HIGH
MOUNTING WITH BOTTOM SHAFT
POSITIONING
Distributed
by JD (UK)
Ltd MANUAL.
- www.jdukltd.co.uk
[email protected]
01924
472924
DOOR MOUNTING
Fig. 38.2. Rope ixing to bottom bracket
4.14 SPRING BUMPER INSTALLATION
Spring bumper installation is done in the following way:
•
•
Make door leaf full lift, mark edge position of the upper section and pull down the leaf.
Fix spring bumper with 4 M6×16 roundhead bolts and nuts with shoulder to mounting
bracket (fig. 39.1)
Fig. 39.1
•
Install spring bumper placing into C-shape profile of the horizontal track insert plates with
fastening M8×25 roundhead bolts. bolts are placed from the insert plate side (fig.39.2)
INSTALLATION MANUAL.
DOORS.
HIGH MOUNTING WITH BOTTOM
SHAFT POSITIONING
57
Distributed
by JDINDUSTRIAL
(UK) Ltd
- www.jdukltd.co.uk
[email protected]
01924 472924
DOOR MOUNTING
Fig. 39.2
•
Fix spring bumper in such a way that when the doors are fully lifted spring bumper spring
is approximately 2/3 length compressed in its free state (fig. 39.3).
Fig. 39.3
4.15 DOOR LEAF CONTROLS INSTALLATION. (ADDITIONAL KITTING)
4.15.1 CHAIN HOIST INSTALLATION
•
•
Manual control doors may also be actuated with a chain hoist with chain hoist ratio 1:4.
Door lifting and lowering is carried out with steel round-link chain, which actuates chain
hoist mechanism. Chain fixing is carried out with key locking device, chain link is entered
into key locking device slot. Key locking device is fixed to passage wall.
Chain hoist is installed directly on door shaft. Chain hoist fixing is done to the wall of the
premises or to door carcass triangular plates with mounting angle profile and two M6
round head bolts that come with chain hoist. Install distance rings on the bolts that come
with the chain hoist.
58
INSTALLATION
INDUSTRIAL DOORS. HIGH
MOUNTING WITH BOTTOM SHAFT
POSITIONING
Distributed
by JD (UK)
Ltd MANUAL.
- www.jdukltd.co.uk
[email protected]
01924
472924
DOOR MOUNTING
After ixing the chain hoist install ixing ring onto shaft.
Chain hoist installation scheme is given in ig. 40.
Distance rings
Stop ring
Mounting bracket
Chain hoist
Fig. 40
4.15.2 LOCK INSTALLATION
Installation of the lock is performed in the following order:
•
•
Unpack the device.
Unscrew the fixing screw and take off the cap of the lock (fig. 37.1).
ig. 37.1
INSTALLATION MANUAL.
DOORS.
HIGH MOUNTING WITH BOTTOM
SHAFT POSITIONING
59
Distributed
by JDINDUSTRIAL
(UK) Ltd
- www.jdukltd.co.uk
[email protected]
01924 472924
DOOR MOUNTING
•
Fix on the door curtain the locking device together with the remote plate (fig. 37.2) with
the help of 6 self-tapping screws. Screws must be placed into the apertures done by the
manufacturer.
Fig. 37.2
•
Turning the handle pull out the wicket locking mechanism as far as it would go in the support of the doors. Make the marking and do an aperture with the diameter 16 mm in the
support for the input of the wicket locking mechanism (fig. 37.3).
Fig. 37.3
•
Turning the handle-button pull out the wicket locking mechanism entirely. Open the
aperture for the installation of one fixing screw of outer cover plate. Place the outer cover
plate into the ready aperture in the door curtain putting the sealing on it in advance. The
cover plate must be fixed with 2 tightening screws. (fig. 37.4).
60
INSTALLATION
INDUSTRIAL DOORS. HIGH
MOUNTING WITH BOTTOM SHAFT
POSITIONING
Distributed
by JD (UK)
Ltd MANUAL.
- www.jdukltd.co.uk
[email protected]
01924
472924
DOOR MOUNTING
Fig. 37.4
•
Open the lock, place the cylinder mechanism (center of the lock) and fix it with a screw.
(fig. 37.5)
Fig. 37.5
•
Place the cap of the lock and fix it with a screw.
4.15.3 HKU001 MANUAL LIFT BLOCK INSTALLATION
Rope for manual lift/pull down of door leaf can be supplied with HKU001bkey lock and a rope.
Fig 42.1 shows the scheme of block ixing.
Before block installation it is necessary to make 4 apertures in triangular plate with diameter
8,5mm. The block is ixed with four bolts and nuts.
INSTALLATION MANUAL.
DOORS.
HIGH MOUNTING WITH BOTTOM
SHAFT POSITIONING
61
Distributed
by JDINDUSTRIAL
(UK) Ltd
- www.jdukltd.co.uk
[email protected]
01924 472924
DOOR MOUNTING
Fig. 42.1
Fig. 42.2 shows rope ixing scheme. Rope branches are ixed with washer and 6,3×35 self=tapping
screw, inturned in the panel through bottom bracket aperture.
Fig. 42.2. Rope ixing
4.15.4 DOORS WITH ELECTRIC DRIVE
Mounting, connection and adjusting of electric drive and automation elements, safety and
security should be carried out according to proper mounting and adjusting instructions.
Type scheme of automatic mechanism elements is given in ig. 43.
When doors are completed with electric drive the following safety elements are installed:
•
•
Microswitches that turn off the electric drive when the springs break;
Microswitches that turn off the electric drive when the rope loosens or breaks down;
•
Wicket sensor security that turns off electric drive when the wicket is open;
–
Optical safety sensor security on door leaf bottom edge (optosensor security).
62
INSTALLATION
INDUSTRIAL DOORS. HIGH
MOUNTING WITH BOTTOM SHAFT
POSITIONING
Distributed
by JD (UK)
Ltd MANUAL.
- www.jdukltd.co.uk
[email protected]
01924
472924
DOOR MOUNTING
1 – electric drive
2- control unit
3- junction box
4- spring breakage microswitch
5- rope rupture microswitch
6- wicket sensor security
7- optosensor security emitter
8- optosensor security receiver
Fig. 43.
•
Microswitch that turns off electric drive when the springs break is fixed on spring break
device with two screws.
Make switch positioning in such a way that it is activated in contact with clutch A movable plate
lug when the plate is turned in case spring breaks (see ig. 43.1).
Microswitch connection is done to electric drive control unit according to the scheme with
normally closed contact.
INSTALLATION MANUAL.
DOORS.
HIGH MOUNTING WITH BOTTOM
SHAFT POSITIONING
63
Distributed
by JDINDUSTRIAL
(UK) Ltd
- www.jdukltd.co.uk
[email protected]
01924 472924
DOOR MOUNTING
Fig. 43.1
•
Microswitch that turns off the electric drive when the rope loosens or breaks down, in assembly with mounting bracket (see fig. 43.2) is fixed to bottom bracket movable part.
For installation it is necessary to weaken nut from bottom bracket motionless straight A lug
side, install mounting bracket in assembly with microswitch under the nut. Tighten the nut
(see. ig. 43.3).
Make switch positioning in such a way that it is activated in contact with A lug when the bottom
bracket movable part is turned in case rope loosens or breaks.
Microswitch connection is done to junction box ixed on door leaf according to the scheme
with normally closed contact.
Mounting
bracket
Microswitch
А lug
Fig. 43.2
•
Fig. 43.3
Wicket sensor security is installed in plant conditions.
Microswitch connection is done to junction box according to the scheme with normally closed
contact.
64
INSTALLATION
INDUSTRIAL DOORS. HIGH
MOUNTING WITH BOTTOM SHAFT
POSITIONING
Distributed
by JD (UK)
Ltd MANUAL.
- www.jdukltd.co.uk
[email protected]
01924
472924
FINISHING WORKS
Optosensor securities are installed on doors completed with “Dynamic” electric drive.
Optosensor security consists of two infrared sensor security – emitter and receiver installed in
bottom sealing proile.
When the proile is deformed (door leaf tripping over obstacle) optical ray is disconnected and
a signal for door stopping and leaf lift is generated by control unit.
5.
FINISHING WORKS
By sealing of joints and gaps it’s necessary to use compressors in tubes (silicon-, polyurethane-,
acryl-based). Filling foams should not pop-up. By using polyurethane foam it’s important to
check on door elements not to change their form.
After consolidation of sealing material that comes out of bearing rods’ plane, they are erased,
and if necessary the decorative sealing of joints can be done.
By sealing of separate joints and gaps, that are more than 3 mm in size, there should be used
plasters, compatible with passage material and allowed to use by the Customer.
Before conducting of plastering works it’s necessary to protect doors from ingress of splashes
mortar mix, concrete, gypsum.
After inishing mounting works remove protective ilm from panels. Clean dirty spots on doors.
Door cleaning is done with clean water and mild washing liquids with a sponge or soft cloth.
For window cleaning, if necessary, use liquids for cleaning plastic. Washing liquids used must
be neutral to acryl and polycarbonate. Don’t use abrasive washing liquids or window washing
liquids, containing alcohol.
6.
ADJUSTMENT, TESTING AND CHECKING OF THE PRODUCT
After door mounting carrying out check key locking devices and electric drive programming.
Door operability should be checked by ive times leaf “lifting-lowering” cycle.
For doors with electric drive check additionally automation on every mode programmed.
7.
HANDLING OVER OF MOUNTED PRODUCTS
•
•
•
•
•
•
Installed product handling-over to Customer is carried out in the following order:
Full door operational demonstration is carried out by the representative of the Organization that carried out door mounting;
Fulfillment of part “Mounting Certificate” in the Passport is carried out:
Product implementation date is recorded;
Signature of a person (with clarification) responsible for mounting is set;
Data of the organization (name, address, tel.number) that carried out door mounting is
fixed;
Stamp of the Organization that carried out door mounting is put.
«Mounting Certiicate» is signed by the Customer with stamping (if there is one with the Customer).
INSTALLATION MANUAL.
DOORS.
HIGH MOUNTING WITH BOTTOM
SHAFT POSITIONING
65
Distributed
by JDINDUSTRIAL
(UK) Ltd
- www.jdukltd.co.uk
[email protected]
01924 472924
HANDLING OVER OF MOUNTED PRODUCTS
66
INSTALLATION
INDUSTRIAL DOORS. HIGH
MOUNTING WITH BOTTOM SHAFT
POSITIONING
Distributed
by JD (UK)
Ltd MANUAL.
- www.jdukltd.co.uk
[email protected]
01924
472924
APPENDIX A. SPRING BREAK DEVICE MECHANISM
APPENDIX A. SPRING BREAK DEVICE MECHANISM
•
•
•
Spring break device safety function is realized when torsion spring breaks. Mechanism is
based on door shaft mechanical block.
In regular exploitation conditions owing to door torsion spring torque moment joint plate
(1) is turned in such a way that the latch (2) under the influence of spring break device
spring is pressed to joint plate lug (A). Ratchet chain hoist (3), installed on shaft (4), can
turn freely together with shaft on square key when headroom and closing the door.
In case of breakage door torsion spring tend to untwist, turning the joint plate (1). When
the plate turns the latch (2) comes off the lug (A) and under action of spring break device
spring comes into ratchet chain hoist (3) gash that turns together with shaft. Shaft blocking from cranking occurs thereby leaf drop is prevented.
INSTALLATION MANUAL.
DOORS.
HIGH MOUNTING WITH BOTTOM
SHAFT POSITIONING
67
Distributed
by JDINDUSTRIAL
(UK) Ltd
- www.jdukltd.co.uk
[email protected]
01924 472924
APPENDIX B. SAFETY MEASURES
APPENDIX B. SAFETY MEASURES
GENERAL REQUIREMENTS
Door mounting should be done only by qualiied specialists, who know door design and door
mounting technological process, trained and instructed on security measures.
Mounting works are allowed to be done only in work wear, not limiting movement, and also
in a skull guard.
On material drilling, that have thrown chips, by metal chopping or cutting it’s necessary to use
protective glasses. A respirator should be used to protect respiratory apparatus from building
dust.
Fitter’s hammers and sledge-hammers should have smooth, a little bit convex surfaces of lats,
without dents, slants, handerings, chips and splits. The length of hammer handle should be no
more than 250 mm, and sledge-hammer handle length –no more than 700 mm; hammers and
sledge-hammers should be irmly it on handles and ixed by wedges.
All the tools that have sharpened ends for handles (iles, screw-drivers etc.), should have length
of handles of not more than 150 mm. Wooden handles should be tightened by bandage rings.
Percussion devices (chisels, plugging chisels, mandrels, punches) should not have oblique and
battered shanks, splits, burs. Length of chisel, plugging chisel should be not more than 150 mm,
including tapered part of a chisel, it should be not more than 60-70 mm; cutting edge – straight
or a little bit convex.
Wrenches should not have splits or nicks, and should match sizes of nuts and bolt heads; wrench
jaws should be parallel, not worked out or rolled.
To move working tool to work place it’s necessary to use special bag or box. When working on
the tool boxing it’s necessary to use special belts. It’s prohibited to put tools in the pockets of
work wear.
SECURITY MEASURES BY WORKING AT HEIGHT
Works at heights of 1,5 m and more from the loor surface are considered works, conducted
at height.
Works at height of 5 m from ground surface, overlaps or working platforms and stages, are
considered steeplejack works. Health state of people doing steeplejack works, should meet
medical requirements, set for workers doing this type of work.
Safety mounting belt should be used by working at heights.
In case it’s impossible to ix safety belt to the elements of building construction, it’s necessary
to use safety rope, which has been set behind the construction elements in advance. The works,
in this case, are fulilled by two mounting workers.
Devices and tools should be ixed (tightened) to prevent their falling when working on the
constructions, under which there are current-carrying parts alive.
IT’S PROHIBITED to use safety belts with metal chain slings by work with constructions, under
which there are current-carrying parts alive.
68
INSTALLATION
INDUSTRIAL DOORS. HIGH
MOUNTING WITH BOTTOM SHAFT
POSITIONING
Distributed
by JD (UK)
Ltd MANUAL.
- www.jdukltd.co.uk
[email protected]
01924
472924
APPENDIX B. SAFETY MEASURES
Endless cable should be used for upward supply of door elements, tools and mounting devices.
The worker standing below should hold the cable to prevent load swinging and coming it close
to current-carrying parts.
IT’S PROHIBITED TO:
•
•
stand under the ladder, on which the works are held;
throw up anything for the worker above. The supply should be done with the help of
a strong rope.
SECURITY MEASURES BY WORK
WITH THE USE OF LADDERS AND STEPS
Ladders and steps should be supplied with a device, preventing possibility of shear and turn
over by working. Bottom ends of ladders and steps should have binding with sharp ends for
installation on soil, and for using ladders on smooth surfaces (metal, tile, concrete), shoes from
rubber or other material are used.
IT’S PROHIBITED TO:
•
•
•
•
•
•
work with a ladder when standing on steps which are less than 1 m away from its upper
end;
work with power tool from ladders;
work on two last steps of ladders that do not have railings and stops;
stand on steps ladder or step-ladder for more than one person;
stand under the ladder, where the work is held;
put a tool on ladder steps.
SAFETY MEASURES BY WORK WITH ELECTRIC TOOL
Work with electric tools is allowed for people specially trained and instructed on the working
place, and also have proper qualiication group on electrical safety.
Electric instrument working at voltage not more than 380/220 V should be used by mounting
works. The choice of electric instrument class is done according to the category of premises on
the degree of electrical shock hazard.
Metal electric tool body, working on voltage more than 42 V of AC current and more than 110
V of direct current in the premises of heightened danger, specially dangerous and in outside
mounts, should be grounded. Shifter fork should be with ground contact. Tool switching is made
to grounded network. Extenders used should have a plug and a socket with ground contact.
By work with such a tool it’s necessary to use preservers (rubber gloves, galoshes). Preservers
should be tested according to established legitimate procedures.
INSTALLATION MANUAL.
DOORS.
HIGH MOUNTING WITH BOTTOM
SHAFT POSITIONING
69
Distributed
by JDINDUSTRIAL
(UK) Ltd
- www.jdukltd.co.uk
[email protected]
01924 472924
APPENDIX B. SAFETY MEASURES
•
•
•
•
•
•
•
Before starting the work it is necessary to do the following:
check the set for completeness and for reliability of fixing parts;
external examination check for cable intact (cord), its protective pipe and plug;
integrity of isolating body parts, handle and brush holder caps;
availability of protective covers and their servicing;
ground network servicing check (between body and plug ground contact;
switcher definition functional check;
functional check of electric instrument out-of-chain hoist.
By work use only serviceable tool, tested and sealed.
Prevent breaks, bending of electricity cable, and also laying it in the places of construction
material piling, traic low. By work in rainy weather (by snowfall) the places of cable laying and
the places where the works with electric tools are being conducted should be covered by tents.
•
•
By work with electric tools IT’S PROHIBITED to:
•
•
•
•
hold a tool at the cable;
remove chips and sawdust from a cutting tool, as well as to change cutting tool until it’s
fully stopped. Fixing of a changeable working tool should be done by a proper instrument;
switch electric tool to network with characteristics, that do not meet the requirements
indicated in engineering manual;
move electric tool from one working place to another with the engine switched on;
leave unsupervised the instrument switched to network, and a tool with working engine;
leave unsupervised electrified tool to prevent using it by strangers.
If electric tool body is getting hot it’s necessary to make routine breaks. If there is a smell or smoke,
loud noise or vibration, immediately switch the instrument of of network till the fault is handled.
By conducting work, it’s necessary to prevent direct contact between cable or wire, powering
electriied tool, and metallic items, hot, wet or oil-covered surfaces to prevent electric shock
injury by insulant damage. It’s necessary to check the places of wire points to the contacts of
manual electriied tool, they should not be any tension, and wires should not have any fractures.
Crossing of electric wire (cable) with electrical welding wires, supply hose of oxygen, acetylene
and other gas is prohibited.
SECURITY MEASURES BY CONDUCTING
INSTALLATION AND WIRING WORKS
Installation and wiring works should be done according to «Procedure for electrical installation
design» (PEID) with meeting the requirements of «Safety regulations by electrical installation
operation» (SR by electrical installation operation).
70
INSTALLATION
INDUSTRIAL DOORS. HIGH
MOUNTING WITH BOTTOM SHAFT
POSITIONING
Distributed
by JD (UK)
Ltd MANUAL.
- www.jdukltd.co.uk
[email protected]
01924
472924
Distributed by JD (UK) Ltd - www.jdukltd.co.uk [email protected] 01924 472924
ALUTECH GROUP OF COMPANIES
WWW.ALUTECH-COMPANY.COM
Ingenernaya str., 4
220075, Minsk, Republic of Belarus
Tel. +375 (17) 299 62 22
Fax +375 (17) 299 60 77
e-mail: [email protected]
Distributed by JD (UK) Ltd - www.jdukltd.co.uk [email protected] 01924 472924