1
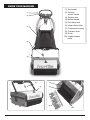
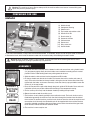
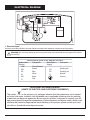
MULTIWASH 14
OPERATOR’S MANUAL
WARNING: OPERATOR MUST READ AND UNDERSTAND THIS MANUAL
COMPLETELY BEFORE OPERATING THIS EQUIPMENT.
1
MW14-MAN 8-08
CONTENTS
Page
Product information . . . . . . . . . . . . . . . . . . . . . . . . . . . . . . . . . 3
• Important safety advice . . . . . . . . . . . . . . . . . . . . . . . . . . . . . . . . . . . . 3
• Guidelines for the operator . . . . . . . . . . . . . . . . . . . . . . . . . . . . . . . . . 3
• Working principle . . . . . . . . . . . . . . . . . . . . . . . . . . . . . . . . . . . . . . . . . 3
• Know your machine . . . . . . . . . . . . . . . . . . . . . . . . . . . . . . . . . . . . . . . 4
Preparing for use . . . . . . . . . . . . . . . . . . . . . . . . . . . . . . . . . . . . 5
• Assembly . . . . . . . . . . . . . . . . . . . . . . . . . . . . . . . . . . . . . . . . . . . . . . . 5
• Brush selection guide . . . . . . . . . . . . . . . . . . . . . . . . . . . . . . . . . . . . . 6
• Brush identification . . . . . . . . . . . . . . . . . . . . . . . . . . . . . . . . . . . . . . . 6
Controls . . . . . . . . . . . . . . . . . . . . . . . . . . . . . . . . . . . . . . . . . . . . . . 7
Operating machine . . . . . . . . . . . . . . . . . . . . . . . . . . . . . . . . . . 8
Care of the machine . . . . . . . . . . . . . . . . . . . . . . . . . . . . . . . . . 9
Maintenance . . . . . . . . . . . . . . . . . . . . . . . . . . . . . . . . . . . . . . . . . 9
Accessories . . . . . . . . . . . . . . . . . . . . . . . . . . . . . . . . . . . . . . . . . 10
After sales service . . . . . . . . . . . . . . . . . . . . . . . . . . . . . . . . . 10
Electrical diagram . . . . . . . . . . . . . . . . . . . . . . . . . . . . . . . . . . 11
Technical specifications . . . . . . . . . . . . . . . . . . . . . . . . . . . 12
2
IMPORTANT!
READ THESE INSTRUCTIONS AND RETAIN FOR FUTURE REFERENCE
• DO NOT use where hazardous dust is present.
PRODUCT INFORMATION
• DO NOT use machine near flammable liquids.
• DO NOT use in an explosive atmosphere.
This symbol is used in this manual to identify particular areas that are essential for your safety. Please
pass all safety instructions on to other persons operating
this machine.
• DO NOT use on a gradient or slopes.
GUIDELINES FOR THE OPERATOR
• Operators must be fully trained in accordance with these
instructions, able to perform routine upkeep of the machine and correct selection of brushes.
The Powr-Flite floor cleaning machines are designed for
use on smooth, even floors in indoor areas. They can be
used on most floor surfaces including short pile carpet,
wood, rubber and stone. They should not be used on rough
uneven surfaces.
• Operators should be physically capable to maneuver,
transport and operate the machine.
• DO NOT run the machine dry, as this could damage the
floor surface or the machine itself.
We are confident the machines will give years of trouble
free service, coupled with ease of use and minimum maintenance.
• Take adequate care to hold the machine firmly while
installing and removing the brushes.
• Never use excessive foaming or highly corrosive cleaning
solutions.
Equipment must be operated, serviced and maintained in
accordance with the manufacturer’s instructions. If in doubt,
contact the supplier of your machine.
• While operating on a flooded floor, always ensure that
the water level does not exceed 1/4" or 6 mm.
The following instructions contain important information
about the machine and safety advice for the operator.
• DO NOT operate this machine on rough uneven surfaces
e.g. industrial concrete floors.
IMPORTANT SAFETY INSTRUCTIONS
• DO NOT clean the machine using pressure washers or
steam cleaners.
• Ensure all parts are fitted properly before operation.
Please read the following instructions completely
before operating the machine. Any violation of the
same will not only invalidate the warranty, but may
also result in a safety hazard.
ELECTRICAL CONNECTIONS
Before connecting the machine to the power supply, check
that your supply voltage corresponds with that marked on
the rating label on the body of the machine.
• The machine must be unpacked and assembled in accordance with these instructions before connecting to the
electrical supply.
THE WORKING PRINCIPLE
• This machine should always be connected to a fully
grounded power supply of the right voltage and frequency.
• Keep the power supply cord away from moving parts.
During operation, hazard may occur when running machine over the power cord.
FRONT
• The machine must be disconnected from the power outlet (by pulling the plug out) before changing the brushes,
cleaning the machine or performing routine maintenance.
Fig. f
• Warning! Only use brushes/accessories as per the
instruction manual. Usage of any other brushes/accessories can cause safety problems.
1. Cleaning liquid, in the solution tank, is applied to the floor
by gravity through the solution manifold.
2. The contra rotating brushes scrub the floor and also throw
the dirty water on the conveyor drum. The front brush
does
most of the scrubbing and drying. The rear brush
Front
completes the scrubbing and collects the remaining water
off the floor.
• Periodically inspect the cord for possible damage. A
damaged cord must be replaced with the proper cord
available from the manufacturer or an authorized service
agent.
• DO NOT leave the machine connected to the power
supply when not in use; always remove the plug from
the power outlet.
3. A blade fitted to the dirty water tank wipes the drum and
collects the dirty water. Fig. g
3
KNOW YOUR MACHINE
(1) Top handle
(2) Solution
control handle
(1)
(2)
(3) Solution tank
(4) Bottom handle
(5) Dirty water tank
(6) Inline solution filter
(3)
(7) Component housing
(8) Conveyor drum
(9) Brush
(10) Handle release
pedal
(4)
(5)
(6)
(8)
(7)
(9)
(5)
(10)
4
Warning! This machine is heavy. Do not attempt to lift the machine without assistance. Incorrect lifting techniques may result in personal injury.
PREPARING FOR USE
UNPACK
(2)
(1)
(11)
(4)
(3)
(9)
(10)
(5)
(7)
(6)
(12)
(1)
(2)
(3)
(4)
(5)
(6)
(7)
(8)
(9)
(10)
(11)
(12)
Bottom handle
Machine body
Component housing
Solution tank
Top handle and solution cable
Handle LH & RH
Brush shafts (2)
Screws & washers
Cable retainer
Power cord
Dirty water tank
Handle knobs
(8)
1. The Powr-Flite Multiwash 14 ships with the handle dismantled. To assemble, verify that all of the parts listed are included.
2. Remove the hook, which holds the bottom handle with the machine body, while holding the bottom handle.
Warning! Since the bottom handle is spring loaded, care must be taken when removing the hook to avoid
sudden springing back, leading to possible injury to personnel.
ASSEMBLY
1. Insert the two tubular handles into the bottom handle and secure them using handle knobs
(12) by tightening lightly. Verify that the handles are assembled according to their marked
position and the cable holding hooks are pointing towards the rear.
2. Slide the electric cable retainer into the top portion of RH handle.
3. Fit the top handle over the tubular handles and secure them with a washer and screw (2
sets). Ensure that the label on the top handle is facing the front of the machine. Now firmly
tighten both the knobs and screws alternately. Insert the dummy caps provided to cover the
screws (2) in the top handle.
RIGHT
BOTTOM
REAR
LEFT
BOTTOM
REAR
4. Pass the free end of the pull cable through the plastic guide in RH Handle. Press and twist
clockwise to firmly secure the cable end to the fitting in the component housing.
5. Fix the auxiliary tank firmly into the bottom handle by holding the top handle.
6. Rotate the knob to hold the auxiliary tank.
7. The brushes are only loosely packed in the machine for transit. The brush shafts must be
fitted before operating the machine. Push the shafts through the brushes from the side of
the machine. To remove brushes, push the brush shaft out from the side of the machine and
remove the shaft. Normally the standard brush will be supplied with the machine. Brushes
should be selected according to the type of floor surface to be cleaned and the type of dirt
to be removed. Please refer Brush Selection Guide.
8. The machine is now ready for use.
5
BRUSH SELECTION GUIDE
Type of floor
First time cleaning
Maintenance cleaning
Grouted Tile, Ceramic,
Mosaic, Wood, Sports
floors, Rubber, Vinyl tile
Short Pile Carpet
Marble, Granite, Slate
Smooth Concrete
Escalator
Others
Standard
Soft
Soft
Soft
Soft
Soft
Hard
Standard
Escalator
Escalator
To suit individual floor conditions
BRUSH IDENTIFICATION
This is applicable when the customer has more than one set of brushes of same type.
(a)
(b)
(a) Hole provided for plugging button.
(b) Brush with button plugged.
Distinct color coding make it easy to separate tools into their correct areas of use.
Restroom brushes are kept in the restroom, kitchen brushes are kept in the kitchen
- reducing bacteria cross-contamination between high and low-risk areas. RED, BLUE,
WHITE and YELLOW brush buttons are packed with the machine. Simply plug the buttons into the hole in the brush as shown.
Clear identification, by color coding, helps to prevent cross contamination.
6
CONTROLS
On/Off Control
ON
ON
2
OFF
OFF
2
ON
OFF
2
Release the pedal handle lightly with your foot (1), pull back the handle (2) to start the motor.
The brushes and the drum starts rotating. Pulling the handle further without pressing the pedal,
lowers the machine and engages the rotating brushes onto the floor. To stop working, take the
handle to the vertical position.
1
1
1
Transport/Working Mode Control
ON
OFF
2
Slide this knob to TOP position (Working Mode) to operate the machine. Slide this knob to BOTTOM position to move the machine and park the machine.
Warning! Keeping the knob in the top position (working mode) and moving the machine will
damage the brushes.
1
Brush Contact Control
Brush contact with the floor is adjustable in 4 steps, contact is MINIMUM when the knob is fully
down and MAXIMUM when it is fully raised. This helps you to compensate for the wear of brushes
and also to control the scrubbing effect. If the machine does not move when the handle is lowered,
slide the transport/working mode knob up one step.
Solution Control
By pulling the solution control handle up, the cleaning solution is dispensed on the floor. The solution stops once the solution control handle is released.
Pull Cable Connect / Disconnect Control
!!
!
WAI T
WA
3 0I T
S ECON DS
30
S ECON DS
BEFORE
WAI T
R
ESET
BEFORE
30
R SEE CSO NED ST
PBEFORE
R E SS
PRREESSES T
Insert the free end of solution cable into the valve body fitted in the auxiliary tank. Press and twist
clockwise to secure the cable end. Similarly, press and twist counter-clockwise to disconnect the
cable end.
P R E SS
Motor Circuit Breaker
!
WAI T
30
S ECON DS
BEFORE
RESET
In the event of motor getting overloaded due to improper power supply or unexpected obstruction to
the brush/drum rotation, the circuit breaker trips and protects the motor from damage. If this happens, identify the cause, correct it and, reset the breaker after minimum of 30 seconds from tripping
by pressing the circuit breaker button manually and continue working.
P R E SS
Important - Should the machine fail to operate, contact the supplier from whom you purchased the machine.
7
OPERATING THE MACHINE
Before the washing operation starts
Warning! Pre-sweep the floor to remove debris before using the Multiwash.
(i)
(i)
1. Verify that the brushes are fitted properly.
ON
ON
2. Fill fresh water tank with cleaning solution.
3. Insert the plug into grounded 3-pronged outlet.
3
3
OFF
OFF
1
1
2
2
(ii)
(ii)
(i)
3
ON
OFF
1
(i)
1
(i)
(i)
Recommended washing sequence
2
3
ON
2
OFF
3
3
ON
ON
OFF
OFF
(ii)
1
1
(ii)
2
2
Model (Standard)
(ii)
(ii)
(Iii)
(Iii)
(a)
(b)
(a) Recommended pattern for small rooms
(b) Recommended pattern for large halls
(Iii)
(Iii)
(a)
(Iv)
(b)
(a)
(a)
(Iv)
(a) Recommended pattern for small rooms
(b) Recommended pattern for large halls
(b)
(b)
(a) Recommended pattern for small rooms
(a) Recommended pattern for small rooms
(b) Recommended pattern for large halls
(b) Recommended pattern for large halls
(Iv)
(Iv)
(V)
1. Start the machine by pressing the handle release
pedal and pulling the handle back (Fig-ii).
(Iii)
(Iii)
2. Move forward, while sparingly pulling the solution control handle (Fig-iii). This handle should only be pulled
intermittently, based on the floor type and the amount
of soil on the floor. For tiled or stone floors, apply very
little water.
3. Stop the solution discharge approximately 12 inches
before the end of forward motion. Continue to move
forward up to the wall without pulling the pull handle.
4. Pull the machine backwards in the same track, but
without discharging any solution. When you reach
the starting point, change the track and repeat steps
2 through 4. When you are changing the track allow
some overlap with the cleaned area. In case of large
halls take a U-turn and move forward. If quick drying
is required, move on the same track, without discharging any solution (Fig-iv).
(a)
(a)
(Iv)
(Iv)
(V)
(V)
5. When you are finished with the cleaning operation,
switch off the machine and unplug the power cord.
Lift the recovery tank lid and remove the recovery
tank. Empty the tank, rinse with clean water and
clean off the steel wiper blade before replacing the
tank on the machine.
IMPORTANT — Dispose of dirty water in accordance
with all local, state and federal hazardous material disposal regulations.
(V)
Warning! Avoid touching the sharp edge of dirty water tank. It may cause injury to hands.
(V)
(V)
(Vi)
(Vi)
(b)
(b)
(a) Recommended pattern for small rooms
(a)
rooms
(b) Recommended
Recommended pattern
pattern for
for small
large halls
(b) Recommended pattern for large halls
8
(Vi)
(Vi)
CARE OF THE MACHINE
Warning! Before cleaning the machine, switch off the machine and unplug from the electrical supply.
1. Move the Transport / Working mode control knob to BOTTOM (Transport) position (Figviii).
2. Disconnect the power supply by unplugging the electrical plug and wind the cable over
cable holders in the handle.
(viii)
(viii)
(viii)
(viii)
3. Pull out the dirty water tank and wash it completely.
4. To prevent possible clogging of filter, drain cleaning liquid and keep the fresh water tank
clean.
5. Remove the brushes by pushing the brush shaft out (Fig-ix).
1
1
1
1
2
2
2
2
3
3
3
3
(ix)
(ix)
(ix)
(ix)
6. Wash the brushes either by dipping in a bucket/sink or in running water (Fig-x).
7. Turn the machine sideways and wipe clean the conveyor and machine body with a
damp cloth (Fig-xi).
8. Re-install the brushes after washing. It is easier to push the brush shaft from the right
hand side (identified by the electrical cable).
9. Store the machine in a dry indoor area only.
(x)
(x)
(x)
(x)
(xi)
(xi)
(xi)
(xi)
MAINTENANCE
Warning! Before undertaking any maintenance operations or adjustments, switch off the machine and unplug
from the electrical supply.
•
Power cord
Regularly inspect power cord, plug and strain relief for damage or loose connection.
•
Brushes
For maximum life, wash the brushes regularly. Ensure machine is in Transport mode when not in use. Store additional
brushes in a vertical position to avoid bending of bristles. Check for permanent bending of bristles in a particular direction. This may occur if the machine is operated for several days without removing the brushes, which is not recommended. If this occurs, reverse the brush so that the bent bristles are automatically straightened.
•
Wiper Blade
After years of use the wiper blade may wear. If this occurs the water collection performance will decrease. It should be
replaced by an authorized service agent.
•
Solution tank filter
The filter prevents clogging of the drip holes in the tank. Periodically clean the filter to ensure uniform discharge of
liquid. In case of non uniform discharge from the drip holes, back flush the tank in running water. Clean the drip holes
using wire or a blunt pin.
9
ACCESSORIES
Transport Cart
The transport cart provides for ease of movement when transporting the machine.
Warning! Empty all liquid from the machine before using the transport cart.
Using the transport cart
1. With the machine handle in the upright position place the cart centrally alongside the machine.
2. By holding the machine firmly, tilt the handle away from your body. Slide the cart base
under the machine and strap it to the machine with the velcro.
3. Ensure that the velcro strap is securely wrapped around the bottom handle.
4. Now the cart is ready to use. The machine can then be maneuvered easily while holding
the top handle.
Side Brush
To clean up to walls, the side brush may be used. Switch off and unplug the machine before fitting the side brush.
Warning! Do not use side brush in a room with no wall skirting, otherwise, the wall may get dirty.
Fitting the side brush
1. Remove the front brush and brush shaft.
2. Fix the shield assembly on the side plate.
3. Insert the side brush through the shield and main brush.
Using the side brush
1. Tilt the machine at an angle, move forward. This way, the dirty water
thrown by the side brush will be collected by the rear brush.
2. Use side brush only for washing the edges
AFTER SALES SERVICE
Should you require after sales service please contact the supplier from whom you purchased the machine, who will arrange service. Repairs and servicing should only be performed by trained staff. Improper repairs can cause considerable
danger to the user and void any warranty.
WARRANTY
The manufacturer warrants to the original purchaser that products manufactured are free from defects of
workmanship and material, provided such goods are installed, operated and maintained in accordance with
written manuals or other instructions for a period of 5 years from date of purchase on housings and frame,
and 1 year on parts and workmanship. In case you as our customer, meet any trouble with your machine,
contact your Powr-Flite representative who will be happy to be of service to you and will take care of the warranty settlement.
NOTE: Alterations and changes made to the machine without written approval of the manufacturer and use of
unapproved spare parts will not be covered by warranty.
10
W
BK
BR
BR
BL
CBE
R
BR/W
G/Y
MOTOR
BR
BL
SC
N
RC
BL/BK
ELECTRICAL DIAGRAM
928746
CAPACITOR
1. Electrical layout
Diagrams are made available in the cover (Power cord side) of the respective machine for service purpose.
Warning! Any service or attempt to service by persons other than authorized servicing agent will invalidate
the warranty.
Abbreviations given in the diagram as listed:
Abbreviation /
Symbol
CBE
BR
BL
W
BK
R
Abbreviation /
Symbol
G/Y
SC
RC
N
Description
Circuit Breaker
Brown
Blue
White
Black
Red
Description
Green / Yellow
Starting coil
Running coil
Normal
Ground
ADDITIONAL INFORMATION-WEEE
( WASTE OF ELECTRIC AND ELECTRONIC EQUIPMENT )
BR
BR
BL
CBE
BR
BL
W
BK
R
BR/W
G/Y
SC
N
RC
BL/BK
The symbol
on the product or its packages indicates that the product may not be treated
as house hold waste. Instead it shall be handed over to applicable collection point for recycling
of electrical and electronic equipment. By ensuring this product is disposed of correctly, you will
help prevent potential negative consequence of the environment and human health, which could
otherwise be caused by inappropriate waste handling of this product, please contact your local
city office or household waste disposal service.
MOTOR
11
CAPACITOR
TECHNICAL SPECIFICATIONS
Specification
Cleaning capacity*
Multiwash 14
Units
square feet/hr
5500
Cleaning width
inches
14
Fresh water tank capacity
gallons
1
Height with handle
inches
44"
Height without handle
inches
8.5"
Width
inches
17.5"
Length
inches
15"
Weight
lbs.
53 lbs.
Noise level (see note 1)
dB(A)
Overall dimensions
Handle vibration (see note 2)
Model
Multiwash 14
m/s
69
2
<2.5
Power supply
110 VAC ±6%, 60Hz, Single Phase
Power (W)
750
Brush speed (rpm)
780
*Theoretical
Note:
1. Noise levels measured at a distance of 3.28 feet from machine and 5.25 feet above floor, when washing a hard floor.
Measurements recorded using a hand held meter.
2. Handle vibration does not exceed 2.5 m/s2, when operating on a smooth hard surface.
3. Above dimensions are approx. Since the companies policy is to continuously improve the product, there could be
changes without prior notice.
12
13
A Tacony Company
3101 Wichita Court • Ft. Worth, TX 76140-1755
Tel: 800.880.2913 • Fax: 817.551.0700
www.Powr-Flite.com
14