1
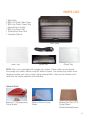
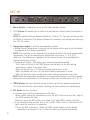
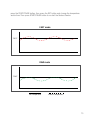
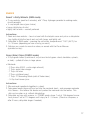
SD-P9150
OPERATION MANUAL
Read Instructions Before Using
2
TABLE OF CONTENTS
Introduction.................................................................................................................. 4
Important Safety Precautions..........................................................................................6
Safety Tips....................................................................................................................8
Parts List......................................................................................................................9
Set-Up........................................................................................................................10
Operating Instructions..................................................................................................14
Cleaning and Maintenance...........................................................................................16
About Dual Fan Technology...........................................................................................16
Troubleshooting...........................................................................................................17
Warranty.....................................................................................................................18
When You Need Service...............................................................................................20
Tips for Dehydrating.....................................................................................................21
Recipes...................................................................................................................... 23
Product Information.....................................................................................................30
3
INTRODUCTION
Congratulations! You are now the proud owner of a Tribest® Sedona® Combo Rawfood
Dehydrator. With the advanced Tribest Sedona Combo Rawfood Dehydrator, you can enjoy
the benefits of efficiently and conveniently dehydrating your favorite food and vegetables,
utilizing the latest in digital dehydration technology and the revolutionary Two-Stage Sequential
Temperature-Timer (TST). From apples to zucchini, breads to pâtés, and crackers to your
favorite jerky recipes, you can set the Sedona Combo to meet all your dehydrating needs.
The Tribest Sedona Combo introduces our latest innovation: the Two-Stage Sequential
Temperature-Timer (TST). The TST allows you to easily set the Tribest Sedona Combo to start
at a higher temperature, to kick-start the dehydration process. Then it automatically switches
to a lower temperature to finish off the job without raising the temperature of the food above
the desired level. The TST lowers the amount of time it takes to dehydrate your favorite raw
recipes without all the hassle.
The Tribest Sedona Combo is the advanced solution to dehydration - offering you all
the options you require to make the dehydration process as simple and as convenient
as possible. With the Tribest Sedona Combo, you have the control to set the timer for up
to 99 hours, or to use continuous mode for up to 150 hours of worry-free uninterrupted
operation. Because the Tribest Sedona Combo utilizes Dual Fan Technology, with its two
independent heating mechanisms, the heated air is evenly circulated and distributed for
uniform dehydration of your foods. The Dual Fan Technology allows you to save electricity
when you only want to dehydrate a smaller batch by switching off one of the independent
heating mechanisms. Dehydrate up to 9 trays of fruits and vegetables or divide the machine
into two 4-tray chambers for smaller batches of your favorite dehydrated recipes.
The Tribest Sedona Combo also offers you a convenient way to monitor your foods with
a see through glass window at the front of the unit. As an added convenience, there are
now two internal LED lights, which can be switched on to see inside the machine without
disrupting the dehydration process.
Be sure to carefully unpack your Tribest Sedona Combo and check that all of the parts are
included with your package. Also take the time to become familiar with the functions of the
unit before you begin dehydrating foods. It is a good idea to press each button to check their
functionality – making you aware of what each button controls. Nine trays have been included
with your machine to make your dehydrating experience easier and to enhance the versatility
of the food preparation capabilities.
We recommend that you wash all of the trays with warm water and a mild detergent before
you first use your Tribest Sedona Combo. Now you are ready to begin dehydrating with your
Tribest Sedona Combo. We hope you enjoy your new dehydrator, as it helps you better
4
preserve the nutrition of your favorite fruits and vegetables and helps you continue your
journey to better health.
Please take the time to thoroughly read through the entire operation manual for proper use
and care instructions. Following the instructions in this manual will ensure that your Tribest
Sedona Combo Rawfood Dehydrator operates optimally for the years to come.
5
IMPORTANT SAFETY PRECAUTIONS
When using electrical appliances, basic safety precautions should always
be followed including the following:
1. Read all instructions.
2. Do not touch hot surfaces. Use handles or knobs.
3. To protect against electrical shock do not immerse cord, plugs, or the Tribest Sedona
Combo in water or other liquid.
4. Only use an approved power cord included with your machine or supplied by the
manufacturer.
5. Only plug the machine into an electrical outlet that has a compatible electricity rating.
Failure to do so may damage the fan motor and/or heating coil and will void the warranty.
6. Never handle the plug with wet hands.
7. Close supervision is necessary when any appliance is used by or near children.
8. Do not place on or near a hot gas or electric burner, or in a heated oven.
9. Always use the Tribest Sedona Combo on a level surface, and keep it a minimal
distance of 10 cm from other appliances or furniture.
10. Unplug from outlet when not in use and before cleaning. Allow to cool before putting
on or taking off parts.
11. Do not attempt to disassemble or modify the Tribest Sedona Combo. It may cause a
fire, an electric shock or a malfunction. Any attempt to modify the Tribest Sedona
Combo will void the warranty.
12. Opening the Tribest Sedona Combo door stops the dehydrator from operating. Once the
door is closed, operation will resume. If the Tribest Sedona Combo continues to operate
while the door is opened, please unplug the Tribest Sedona Combo and contact the
nearest Warranty Service Center.
13. Never put your fingers or other foreign objects such as spoons, knives, or any other
kitchen utensils into the air vents while in operation. It may cause physical harm such
as a burn, electric shock, or fire.
14. Do not move the Tribest Sedona Combo while in operation.
15. Do not operate any appliance with a damaged cord or plug or after the appliance
malfunctions or has been damaged in any manner. Contact the manufacturer for the
nearest Warranty Service Center should your Tribest Sedona Combo malfunction or
require service.
16. Use of unauthorized accessories or attachments not approved or recommended by the
manufacturer may cause injuries.
17. Do not use the Tribest Sedona Combo outdoors. The Tribest Sedona Combo is intended
for indoor use only.
18. Do not let the power cord hang over the edge of your table or counter, or come in
contact with hot surfaces.
6
19. Extreme caution must be used when moving an appliance containing hot oil or other
hot liquids.
20. Always attach the power cord to the appliance first, then plug the cord into the wall
outlet. To disconnect, turn the unit OFF and then remove the plug from the wall outlet.
21. Do not use the Tribest Sedona Combo for anything other than its intended use.
SAVE THESE INSTRUCTIONS
7
SAFETY TIPS
To avoid any possible damage or injury, please follow the basic safety tips:
1. Do not clean the Tribest Sedona Combo main body directly with water. Always use a
wet towel to clean the Tribest Sedona Combo.
2. Do not use the Tribest Sedona Combo in a humid room such as a bathroom. Use
the Tribest Sedona Combo in a well ventilated setting.
3. Always use a separate outlet that has a minimum of 10 amps. Don’t plug the Tribest
Sedona Combo into an extension cord and then into an outlet.
4. Do not block the air vents while the Tribest Sedona Combo is in operation.
5. Do not expose the Tribest Sedona Combo to high temperatures over 176°F (80°C).
6. Plug in the Tribest Sedona Combo with the main switch OFF.
7. Do not attempt to dehydrate any liquids or very fine powder that will turn into dust,
glass, or metal.
8. To avoid deterioration of food, do not keep the dehydrated food in the Tribest Sedona
Combo too long without the Tribest Sedona Combo operating. Remove the dehydrated
food immediately after the dehydration procedure is over.
9. Store dehydrated foods in a proper place.
TIP: For best results, store in a suitable airtight container.
8
PARTS LIST
1 Main Body
9 BPA Free Plastic Mesh Trays
1 BPA Free Plastic Closed Tray
(Compartment Divider)
1 BPA Free Debris Mat
1 Detachable Power Cord
1 Operation Manual
Main Body
Power Cord
Mesh Tray
Debris Mat
Closed Tray
NOTE: Each unit is packaged with sponge tray holders. Please make sure to remove
the sponge tray holders before using the Sedona Combo. The sponge tray holders were
designed to keep your trays in place during transportation. They are not intended to be
used with the normal operation of the Sedona.
Optional Parts
Sedona PP (Polypropylene)
Drying Sheets
Sedona Silicone Drying
Sheets
Sedona Non-Stick PTFE
Drying Sheets
(Polytetrafluoroethylene)
9
SET-UP
1. Power Switch is used to turn on or off the Tribest Sedona Combo.
2. °F/°C button will enable you to select the temperature display mode (Fahrenheit or
Celcius).
NOTE: The default setting of Sedona Combo is in Celsius (°C). Once you set the machine
to Celsius or Fahrenheit, the Sedona Combo will remember your setting even after you
turn OFF the switch.
3. Temperature display is used for two separate functions:
• Setting Desired Temperature- During set up this display will be used to set the desired
temperature of the drying compartment.
NOTE: The condition of the inflowing air may adversely affect the actual compartment
temperature. The actual compartment temperature may read a +/- 5°C (9°F)
difference. The difference is registered by the thermal sensor, thus regulating the
heating mechanism activity.
• Temperature Display- Will display your desired temperature setting.
-The 2 icons on the left in the TEMP display indicate which of the two heating
mechanism is active at any given time.
-When the top left icon is lit, the top heating mechanism is active.
-When the bottom left icon is lit, the lower heating mechanism is active.
-When the two icons light up alternately, both heating mechanisms are active.
NOTE: While the temperature displayed by the Temperature Display is set to the desired
setting, the actual temperature in the drying chamber may fluctuate up to ±5°C (41°F).
4. TIMER display will show the total number of hours set for each desired temperature.
This timer automatically counts down, showing the time remaining for dehydrating.
5. SET button has two functions:
• It enables you to set the temperature and the time.
-When initially setting the temperature, press the SET button once and the 3 digit of
the TEMP window will flash.
-When you press the SET button once more, the 2 digit TIMER window will flash.
• Once the temperature and the time is set, the SET button turns on two internal LED
lights while the machine is in operation.
1) Press the SET button once – While the TEMP window flashes, set the desired
temperature by using the 10 or 1 buttons to select your desired temperature.
10
2) When the TEMP window displays your desired temperature, press the SET button
again to finalize your temperature setting. Your desired temperature is now set up,
and the TIMER window will flash.
3) When the TIMER window flashes, set the desired hours by using the 10 or 1 buttons to
select the desired time, then press the SET button to finalize your choice.
NOTE:
• For faster and more accurate setting of the temperature and time, the Sedona Combo
has 2 separate buttons of 10 and 1. The buttons under the 10 represent increments of
ten, whereas the buttons under the 1 represent increments of one.
• You may set the dehydrating time up to 99 hours.
• The Sedona Combo has a continuous dehydration function which allows you to
continuously dehydrate for more than 99 hours. To enable this function, press and hold
the 10 up button until CO is displayed.
• The CO function will dehydrate for a maximum of 150 hours.
• The default setting for Fast Mode: 68°C (155°F) for 1 hour.
• The default setting for Raw Mode: 47°C (117°F) for 10 hours.
• The Sedona Combo will save your settings for next use even when you turn off the
dehydrator.
While the machine is operating, the SET button also turns on two internal LED lights so you
can see inside the machine without opening the door. While the machine is running, press
the SET button, and two small LED lights in the rear, turn on for up to 10 seconds, creating
a small beeping sound twice. The lights turn off automatically.
6. UP/DOWN (10,1) buttons are for setting the temperature or the hours for the timerone short press will change the number by 10 or 1, and when the button is pressed for
more than 1 second the number will continuously change.
7. TRAY button is used to select which compartment will be activated, which is indicated by
the lights to the right of the TRAY button.
• When the top light is lit GREEN, the upper compartment is activated.
• When the bottom light is lit GREEN, the lower compartment is activated.
• When both tray lights are lit, this indicates both upper and lower compartments are
activated for dehydrating.
You can choose to dehydrate up to 9 trays of foods by selecting both compartments or up
to 4 trays of food in either the upper half or the lower half of the unit in
order to conserve energy when dehydrating smaller quantities of food.
1) Insert the Closed Tray in the middle slot (just above the white indicators on both
right and left sides, where the trays slide in and out) to divide the Sedona Combo into
two 4 tray dehydrators.
2) Press the TRAY button to select which fan with heating coil will be active.
11
3) Load the trays into the chosen half of Sedona according to which fan with heating
coil is selected.
NOTE:
• The default setting of Sedona is whole (upper half + lower half).
• Since Sedona Combo is equipped with two independent fans with heating coils, the
Sedona Combo can be used to dehydrate food in the upper or lower half of the unit
when divided.
• The Sedona Combo will not remember your tray setting, and it will go back to whole
when you turn the Sedona Combo off.
• We recommend using the upper half only when drying up to 4 trays.
8. MODE button allows you to choose one of three settings. The lights to the right of the
MODE button indicate which mode is activated.
• When the top RED light is lit, only FAST mode is activated.
• When the bottom GREEN light is lit, only RAW mode is activated.
• When both the top RED and bottom GREEN light are lit, the Two-Stage Sequential
Temperature-Timer is activated (both FAST and RAW mode are activated).
The three settings:
1) FAST mode: The average internal temperature levels will be maintained at the indicated
temperature. As the heating element cycles on and off, internal temperature will rise
and fall. The indicated temperature is the average temperature maintained by the
Sedona Combo. (See chart on page 13).
2) RAW mode: Internal temperature will never go above the indicated temperature.
Indicated temperature is not the average temperature, indicated temperature is the
maximum temperature that the machine will go up to. This is useful for preserving
certain vital nutrients that can degrade at high temperatures. (See chart on page 13).
3) COMBO mode: Uses the Two-Stage Sequential Temperature-Timer to set the two
temperature/time settings. It starts at a higher temperature for a set time (FAST mode)
then automatically drops down to a lower temperature for a set amount of time.
• FAST mode: The first temperature setting and is set at a higher temperature to
encourage more initial dehydrating, less spoiling/fermenting of foods.
• RAW mode: The second temperature setting and is set at lower temperatures for
longer times.
9. START/PAUSE button is to restart or pause operation.
NOTE:
• While Tribest Sedona Combo is in operation, if you open the door, the power
supply to both the heating coil and the fan will be cut-off. Tribest Sedona Combo will
automatically restart as soon as the door is closed.
• You will hear a buzzing sound when the buttons are pressed, when the door is opened,
and when the assigned time is over.
• To change the temperature and/or operation hours while the Sedona Combo is running,
12
press the START/PAUSE button, then press the SET button and change the temperature
and/or time. Then press START/PAUSE button to re-start the Sedona Combo.
FAST mode
150°F
RAW mode
118°F
Set Temperature
Internal Temperature
13
OPERATING INSTRUCTIONS
For your safety and to protect your Tribest Sedona Combo, please follow
the instructions below:
1. Always keep the Tribest Sedona Combo on a level surface.
• Keep the Tribest Sedona Combo at least 10 cm away from walls, other appliances
or furniture.
2. Open the door to insert trays into the Tribest Sedona Combo. Hold the tray in the
horizontal position and push the tray into the proper slots.
• Place the food evenly and neatly on each tray as close as possible (remember dehydrating
removes water and/or shrinks food). For best results, cut the food into even slices.
• It is recommended to use separate trays for each type of food.
• You may dehydrate up to 9 trays simultaneously.
• For 4-5 trays of dehydrated recipes, use the upper compartment for best results.
The white plastic dividers on the side of the Sedona Combo now help as a simple
visual device to separate upper and lower compartments.
• Double check whether all the trays are properly loaded.
3. Plug into an outlet that has 10 amp capacity.
4. Turn the main switch ON.
5. There are three settings to choose with the Sedona Combo:
14
• TWO-STAGE SEQUENTIAL TEMPERATURE-TIMER (TST) Use Only
The Two-Stage Sequential Temperature-Timer (TST), a 2-phase mode that allows for both
FAST mode and RAW mode to be applied sequentially. This is the default setting of the
when it is turned on.
1) Turn the Sedona Combo on, both the RED and GREEN lights to the right of the MODE
button will be lit. (Red=FAST mode, Green=RAW mode.)
2) Press the F°/C° button to choose farenheit or celcius.
3) Press the SET button to set FAST mode to your desired temperature using the
UP/DOWN 10 or 1 buttons.
4) Press SET again to set the desired time using the UP/DOWN 10 or 1 buttons for
FAST mode.
5) Press SET again to set the desired temperature using the UP/DOWN 10 or 1 buttons
for RAW mode.
6) Press SET again to set the desired time using the UP/DOWN 10 or 1 buttons for
RAW mode.
7) Press SET to finalize settings.
8) Press the TRAY button to choose the upper, lower, or both drying compartments.
9) Press the START/PAUSE button to begin operation.
NOTE: During FAST mode the upper red light blinks - while the higher temperature operates
first for the desired set time. RAW mode, the lower green light blinks- automatically
lowers the temperature to the second setting for the remaining dehydrating time.
• FAST Mode Use Only
This setting holds and maintains a higher temperature (e.g. 155°F) for faster dehydrating.
1) Set the Sedona Combo to FAST mode by pressing the MODE button once to change
the default Two-Stage Sequential Temperature-Timer (TST) to FAST mode. (A RED
light lit to the upper right of the MODE button indicates that the Sedona Combo is
set at FAST mode.)
2) Press the F°/C° button to choose farenheit or celcius.
3) Press the SET button to set FAST mode to your desired temperature using the UP/
DOWN 10 or 1 buttons.
4) Press the SET button once again to set your desired time using the UP/DOWN 10 or
1 buttons.
5) Press the SET button again to finalize your settings.
6) Press the TRAY button to choose the upper, lower, or both drying compartments.
7) Press the START/PAUSE button to begin operation.
• RAW Mode Use Only
The RAW mode operates in a way such that when the heat sensor reaches the set temperature,
heating assembly will cut off to sustain a drying environment lower than indicated
temperature to protect from overheating your food.
1) Set the Sedona Combo to RAW mode by pressing the MODE button two times.
(A GREEN light to the lower right of the MODE button will indicate that the unit is set
on RAW mode.)
2) Press the F°/C° button to choose farenheit or celcius.
3) Press the SET button to set RAW mode (the GREEN light is blinking) to your desired
temperature using the UP/DOWN 10 or 1 buttons.
4) Press the SET button to set RAW mode to your desired time using the UP/DOWN
10 or 1 buttons.
5) Press the SET button to finalize your settings.
6) Press the TRAY button to choose the upper, lower, or both drying compartments.
7) Press the START/PAUSE button to begin operation.
6. Tribest Sedona Combo will automatically switch to stand-by mode after the drying
time has expired. Also, a beep will sound when the drying time has expired.
7. Turn the main switch OFF after dehydration has finished.
NOTE:
• Tribest Sedona Combo is designed to evenly distribute warm air from the rear to
the front of the unit. Depending on the climate and temperature of the air flowing
into the unit from the rear, there may be a slight difference in temperature between
the trays and inside the drying compartment.
• Because heat rises naturally, it is normal for the top trays to be exposed to more heat
than the trays in the center or on the bottom. For best results, rotate the trays periodically.
15
CLEANING AND MAINTENANCE
1. Clean the trays and tray sheets with a mild detergent under warm water after each use.
WARNING: The trays are NOT dishwasher safe.
2. To clean the main body, first unplug the machine and then clean with a wet towel. Do
not rinse the Sedona with water or submerge the machine in water.
3. For easier screen/tray cleaning – cover with wet paper towels and soak for a short while.
4. Make sure the trays and tray sheets are thoroughly dried before inserting them back
into the machine. Keep your machine and machine parts in a safe place out of reach
of children.
ABOUT DUAL FAN TECHNOLOGY
The Sedona is the first dehydrator to offer a total of 600 watts using two sets of 300-watt
independent fans, two heating coils, and two digital thermostats grouped together to form
two fan and heater sets which can be set to operate independently or simultaneously,
giving you the option to dehydrate up to nine trays of your favorite dehydrated recipes at
once. Because the Sedona can be set using only one fan and heater set with thermometer
(one fan with heating coil and digital thermometer), less energy is used when dehydrating
smaller batches of your favorite recipe, overall noise is reduced during operation, and
heated air is managed more accurately and distributed more evenly throughout the Sedona.
Each digital thermostat within each fan heater set monitors the current temperature
of each independent fan and heater set within its own compartment. These digital
thermostats are designed to improve the efficiency and overall quality of circulated air
during the dehydration process.
16
TROUBLESHOOTING
SYMPTOM
LIKELY CAUSE
REMEDY
Machine doesn’t turn on • The plug is incorrectly
positioned in the
electrical outlet
• The machine is not
switched on
• Plug in again
Display lights are not on
• The machine is not
switched on
• Turn the switch ON
Fan is working but there
is no heat
• Heating system is out
of order
• Turn the machine OFF and
contact the nearest service
center
Heater is working but
the fan is not working
• The fan is out of order
• Turn the machine OFF and
contact the nearest service
center
• Remove the foreign material
• Foreign material is stuck
on the fan
Not dehydrating
• Turn the switch ON
• Too much food on the tray • Reduce the food quantity
• Food is overlapped on
• Evenly spread the food
the tray
quantity
• The fan is slow
• Turn the machine off and
contact the nearest service
center
Water drops on the door • Too much food on the tray • Reduce the food quantity
• The food contains too
• Reduce the food quantity and
much water
increase the dehydration time
Over heating or little
heating
• Temperature control
system is not working
properly
• Turn the machine off and
contact the nearest service
center
Foods are not evenly
dehydrated
• The thickness of the food
is not even
• There is too much food
on the tray
• Evenly slice the food
• Reduce the food on the tray
• Choose the correct tray
Abnormal Sound from
the fan
• The fan is out of order
• Turn the machine off and
contact the nearest service
center
17
WARRANTY
We warrant to you, the “end-user” who has properly registered after purchasing the
Sedona Combo Rawfood Dehydrator (hereinafter referred to as “SD”) for a valuable
consideration, that the Plastic Body, Fan Motor and the Heating Coil of this SD will be free
from defects in materials and workmanship for a period of five (5) years from the date
of purchase. All other accessories, including but not limited to the Plastic Trays, Plastic
Sheets, optional parts or Cleaning Brush are not subject to any warranty.
In order for you to receive the benefits of this warranty, you are required to complete and
mail the warranty registration card to us within ten (10) days following the purchase of
your SD.
1. No warranty will be provided until after we have actually received the enclosed warranty
registration card, containing all the requested information, within ten (10) days of the
date of the original purchase. The warranty is only good for the original purchaser for
value. This warranty is non-transferable.
2. If the SD exhibits defective behavior while in normal household use, we, upon our
actual receipt of a written notice of such defects from you during the warranty period,
will, at our option, either repair or replace the SD which proves to be defective.
However, we have no such obligation to repair or replace the SD until after you have,
by insured mail and in protective packaging*, delivered the SD to the location of your
service center. Replacement SD may be either new or like-new. SD may contain
re-manufactured or re-conditioned parts, which are equivalent to new in performance
or may have been subject to incidental use.
3. We do not warrant that the operation of the SD will be uninterrupted or error free.
In no event shall our liability exceed the retail value of the SD.
This Warranty does not cover defects resulting from:
[a] failure to operate the SD in accordance with the instructions; [b] use of parts or
supplies not provided or authorized by the manufacturer; [c] negligent, improper or
inadequate maintenance; [d] service performed or attempted by an unauthorized service
person; [e] damages, accidental or otherwise to the SD, which are not directly caused
by us or the manufacturer; or [f] damages resulting from abuse, tampering, misuse,
commercial use, or unauthorized modification of the SD.
WE MAKE NO OTHER EXPRESS OR IMPLIED WARRANTY OR CONDITION WHETHER
WRITTEN OR ORAL. TO THE EXTENT ALLOWED BY LOCAL LAW, ANY IMPLIED WARRANTY
OFFITNESS FOR A PARTICULAR PURPOSE OR IMPLIED WARRANTY OR CONDITION OF
MERCHANTABILITY IS LIMITED TO ONE (1) YEAR. In the event that such limitation or
18
exclusion on the duration of an implied warranty is not allowed in the state or county
wherein you reside, the above limitation or exclusion will not apply. This warranty gives
you specific legal rights and protection, and you might also have other rights that vary
from state to state, or county to county.
TO THE EXTENT ALLOWED BY LOCAL LAW, THE REMEDIES IN THIS WARRANTY STATEMENT
ARE YOUR SOLE AND EXCLUSIVE REMEDIES. EXCEPT AS INDICATED ABOVE, IN NO
EVENT WILL WE BE LIABLE FOR DIRECT, SPECIAL, INCIDENTAL, CONSEQUENTIAL
(INCLUDING LOST PROFIT), OR OTHER DAMAGE, WHETHER BASED IN CONTRACT, TORT,
OR OTHERWISE. Some states or counties may not allow the exclusion or limitation of
incidental or consequential damages. If you reside in such a state or county, the above
limitation or exclusion may not be applicable.
Do not send your SD back to the Service Center without a Return Merchandise Authorization.
*Save Original Shipping Box
19
WHEN YOU NEED SERVICE
In the unlikely event that you require service on your Sedona Combo Rawfood Dehydrator, or
if it fails to function properly within the warranty period during normal household operation,
contact the Sedona Warranty Service Center.
SERVICE CENTER
For all service inquiries, please contact the Warranty Service Center for a Return Merchandise
Authorization (RMA) number and proper routing instructions.
Warranty Service Center
Tribest Corporation
1143 N. Patt St.
Anaheim, CA 92801
TEL: 888-254-7336
FAX: 714-879-7140
If you need service:
1) Call the Warranty Service Center (888-254-7336) to get a Return Merchandise
Authorization (RMA) number to send your Sedona to the service center. Returns will
NOT be accepted without an RMA number clearly written on the box.
2) Pack your Sedona securely in the original shipping box. Make sure all affected parts
are enclosed.
3) Fill out the service request form and enclose it in the shipping box.
4) Seal the shipping box securely with packing tape.
5) Address the box to the Warranty Service Center. Be sure to put your return address on
the outside of the package.
6) It is always wise to insure the package against possible damages or loss in transit.
Ship prepaid.
20
TIPS FOR DEHYDRATING
When dehydrating fruits, vegetables, nuts, or spices keep these tips in mind:
• Find foods in season, grown organically/locally (for more flavor, keeps prices down,
availability up.)
• Use crisp foods (fruits or vegetables), with no soft spots that discolor during dehydrating.
• Remove unwanted parts: stalks, cores, unwanted seeds, rinds that are not wanted, or
outside skins, peel if desired.
• Keep the slices the same size: this will help the dehydrating time stay the same as well.
• When using spice -e.g. BBQ or salty flavors – coat foods with something wet, sticky,
or oily to help the spices/flavorings adhere to the food. Olive oil, miso, liquid marinades,
or sweeteners like honey or agave work well.
• Store in airtight glass containers to keep the food dried longer.
• To re-hydrate, if you over dry, put a moist paper towel, add a lettuce leaf into the container,
or lightly mist the foods with water to re-hydrate back to the desired texture.
FRUITS:
• Fruit chips are tasty and a good way to save extra produce for camping, hiking, or for
later use.
• Use crisp fruits, or fruits not overly ripened for best results.
• Most fruits lose their sweetness when dehydrated-especially bananas, so putting a
desired spice (e.g. cinnamon, nutmeg, or vanilla) or sweetener (e.g. agave, stevia, or
maple syrup) on top can sweeten the finished food.
• Make sure to take remove cores, seeds, and other inedible parts (peels, etc.).
• When dehydrating larger pieces of produce (e.g. a small apple or pitted fruits), select
those of similar size to optimize dehydration.
GRAINS:
• For best results soak or sprout grains for two or three days before dehydrating.
• Grains can be sprouted and dried back in order to make a sprouted flour.
• Savory or sweet crackers and breads can be made by combining the grains with spices,
herbs, vegetables, dried fruits, or even the pulp from juices. The best part of making
these foods is that you can improvise. It is not like baking, where exact measurements are
necessary for success.
• Grain recipes are done best in the COMBO mode.
NUTS:
• Soak nuts initially in enough water to cover entirely, then add a splash of hydrogen
peroxide into the soaking water, and rinse thoroughly after 5 minutes (this gets rid of
unwanted mold.)
21
• Softer nuts, (e.g. cashews or pecans, hardly need any soaking) just the initial soak/rinse
(as mentioned above with hydrogen peroxide) to remove unwanted molds.
• The harder nuts (e.g. almonds, brazil nuts) need to be soaked for longer (between 6 –
12 hours), after the initial soaking/rinsing.
• Drying soaked nuts keeps them fresh longer, without the enzymes that coat the nuts
(that’s why nuts need rinsing) that inhibit/block digestion. They can take up to 48 hours
to fully dehydrate, depending on the size of the nut, the weather (more humidity takes
longer), and how long the nut has soaked.
• After a nut has been soaked and dried – it can be ground into a ‘flour’ and used in
other recipes.
SEEDS:
• Soak seeds to remove the coating that protects them from automatically sprouting into a
plant. If you want you can sprout some seeds (e.g. sunflower seeds)
• If you want to make a flour, soak and dry the seeds so that you can grind them.
• Soaked seeds combine well with all the foods (vegetables, fruits, nuts, or grains) in many
dehydrated recipes – they act as a thickener, as well as their own lovely flavors.
• Combine to make ‘cereals’ or granolas.
• The RAW mode is fine for solo seed snacks.
• For crackers/cereals/breads use the COMBO mode.
SPICES:
• When using fresh herbs, remove the stems and stalks or anything else inedible.
• Find, create your own combinations, or look at your favorite spice bottles and use that as
a guide.
• Dried spices are done best in the RAW mode.
VEGETABLES:
• Dried vegetables (e.g. carrots, corn, zucchini, mushrooms, etc.) can be great foods to
use for soups later in the year, when the food is out of season, or to take on camping/
hiking trips.
• Cut into uniform sizes/shapes when dehydrating.
• Take off skins, seeds, and other unwanted parts before dehydrating.
• Some vegetables (e.g. onions) get more spicy/hot flavored when dehydrated and some
get sweeter. Test different foods to see what happens to the foods you enjoy.
• Vegetable ‘chips’ are done best in the RAW mode.
Be your own food ‘alchemist’ and make up your own favorite recipes. Be inspired by
recipes, and then create your own.
22
RECIPES
Whole Foods................................................................................................................24
Jerky...........................................................................................................................24
Pâté............................................................................................................................25
Fruit............................................................................................................................25
Snacks........................................................................................................................27
Spices.........................................................................................................................28
Desserts......................................................................................................................28
23
WHOLE FOODS
Onion Rings
• Onion slices - as thin as you can slice them (choose from: sweet, red, Vidalia, or other
onion in season)
• Spicing choices:
- Wet BBQ sauce (add a splash of olive oil)
- Dry BBQ sauce (mix with water and a dash of olive oil)
Instructions:
1. Place onion rings, plain or coated on tray with screen, start machine in RAW mode, set
temperature at 110°–115°F (43°C-46°C).
2. Dehydrate until done (18 – 30 hours) to desired crispness.
3. Store in glass container.
Teriyaki Dried Tomatoes
• Tomato slices - as thin as you can slice them
• Sauce:
-Teriyaki sauce (use your favorite recipe, or your favorite bottled variety)
- Sea salt (for a real treat use applewood smoked sea salt)
- Fresh basil leaf on top (optional)
Instructions:
1. Coat sliced tomatoes – brushing sauce, lightly salting, and a basil leaf (optional) on top
of each slice – and place on tray with screen
2. Start machine in TWO-STAGE SEQUENTIAL TEMPERATURE-TIMER (TST) mode
3. Set FAST mode to 140°F (60°C) for 1 hour
4. Then set RAW mode at 115°F (46°C) for 18 – 26 hours, until desired crispness.
5. Store in glass container.
JERKY
FAST mode – high temp, long time
Turkey jerky
Instructions:
1. Slice deli cooked turkey slices (nitrite/nitrate free) into strips and place on tray with screen
2. Start machine in FAST mode, set temperature at 130°F (54°C) for 4 – 6 hours.
NOTE: Check occasionally after 3 hours and every so often until dried to desired consistency.
3. Best stored in vacuum packages, or use for camping / hiking.
24
PÂTÉ
Pecan Pâté
• 2 cups pecan pieces
• 1 small red onion (cut into quarters)
• 1 tsp. poultry spice
• ¼ cup minced parsley
• ½ cup diced bell pepper (red, yellow, or orange)
• sea salt to taste
Instructions:
1. In a food processor mix pecans, quartered onion, and poultry spice to pâté consistency.
TIP: If you want a creamier pâté, add water to create desired consistency.
2. In bowl stir in remaining ingredients: parsley, bell pepper, salting to taste.
3. Mold into desired shape (not more than 1” thick) – into a patty, ball, croquette, or loaf
4. Place on a tray with screen.
5. Start in TST mode.
-FAST mode set to 145°F (63°C) for 2 hours,
-RAW mode to 115°F (46°C), for 6 – 24 hours, until desired consistency.
6. Serve as is, or stuffed into a bell pepper half shell.
7. Store in glass container.
FRUIT
Fruit leather
• 1 cup frozen pineapple pieces
• 1 cup frozen mango pieces
• 1 frozen banana
• ½ cup dried cranberries
• ½ cup currants
• 1 ¼ cup filtered water
Instructions:
1. Blend all ingredients, adding 1 cup of water initially, adding more if needed to blend into
a smooth ‘sauce’.
2. Pour onto tray with PTFE sheet, and set dehydrator in COMBO mode
-FAST mode at 135°F (57°C) for 1 hour
-RAW mode at 115°F (46°C) for 18 – 26 hours
3. Peel off the PTFE sheet, remove, and turn over, continuing to dehydrate until ‘chewy’ or
to desired consistency.
25
NOTE: Let yourself explore other dried fruits to make different flavored ‘leathers’ – apricot
on it’s own is heavenly (use sulfur free dried Turkish apricots). Banana helps ‘bind’ the
leather together, as well as other sweet fruits like raisins, currents or dates.
Fruit Chips
• Choose from the fruits in season, that grow locally in your area, and / or the ones you
want to store / save for later:
-Bananas-Tomatoes
-Apples-Plums
-Papaya-Apricots
-Pineapple-Cherries
• Possible marinades / sweeteners/ spices:
-Agave nectar
-Maple syrup
-Pineapple juice
-Cinnamon-Orange juice-Tangerine juice
-Sea salt-Lemon juice -Dates
-Pumpkin pie spice
-21 seasoning salute (from Trader Joes)
-Soy sauce (especially good on tomatoes) – Nama Shoyu or low Sodium, wheat
free San-J Soy Sauce
• Fruit concentrates: -Black Cherry
-Cranberry
-Elderberry
-Pomegranate
-Orange
-Pineapple
Instructions:
1. Clean fruit(s), take off skin, where appropriate (e.g. bananas, papaya, pineapple), and
take out pits (e.g. plums, apricots, cherries, etc.) and cut/make into thin slices.
2. Put fruit into a bowl and coat/cover with desired marinades/sweetener(s)/spice(s) –
or leave as is.
3. Place on dehydrator trays (screens only) and dehydrate at 110°F (43°C), in RAW mode,
until dried to desired consistency. Check after 2, 4, 8 hours – depending on fruit, and
where you live.
NOTE:
• Certain fruits do not taste sweeter when dehydrated, (e.g. banana chips or papaya). Others
taste sweeter, (e.g. apples and apricots). That is why marinades/sweeteners/spices
are suggested here to coat/cover the fruit – to enhance their flavor when dried.
• Try different combinations, different spices, and seasonings.
• The thicker the slices, the longer the dehydrating time – therefore there is no ‘set’ time
for dehydrating any fruit.
• How you like your fruit chips, crispy or chewy, will also contribute to the length of time
26 you dehydrate any fruit chip.
SNACKS
Sweet ‘n Salty Walnuts (RAW mode)
• 2 cups walnuts (soak for 5 minutes), add 1 Tbsp. Hydrogen peroxide to soaking water,
rinse thoroughly
• ¼ cup teriyaki sauce (your choice)
• honey (drizzle top of nuts )
• lightly salt to taste – sea salt preferred
Instructions:
1. Soak and rinse walnuts – toss in a bowl with the teriyaki sauce and put on a dehydrator
tray, lightly drizzle the top of each nut with honey, and lightly salt.
2. Dehydrate in RAW mode – pressing the set button, temperature at 115°F (46°C), for
6 – 9 hours (depending on how crunchy you want).
3. Delicious as a snack to munch on alone, or served with the Pecan Mousse
(sprinkled on top.)
Green (Kale) Chips (COMBO mode)
• 3 Cups green leaves (a mixture of, or just one kind of green: chard, dandelion, spinach,
or kale) – pulled off stem, in large pieces
• Marinade:
- 3 Tbsp. olive (EVOO = extra virgin olive oil)
- 1 Tbsp. apple cider vinegar
- 1 Tbsp. red miso
- 2 Tbsp. nutritional yeast
- 1 Tbsp. 21 Seasoning Salute (sold at Trader Joes)
- ¼ Cup fresh lemon juice
Instructions:
1. Mix marinade ingredients together in a bowl.
2. Take green leaves (stems off) and put into the marinade bowl – and massage marinade
into leaves – this softens the leaves and pushes the marinade into the leaves. This
dish can be eaten as is, without dehydrating.
3. Dehydrate on trays with screens, in COMBO mode, phase 1 set at 145 degrees for one
hour, phase 2 set at 110 degrees until crispy for 3 – 5 hours. (Check on crispness, a
after 3 hours, dehydrate longer if needed.)
27
SPICES
Choose the leaves of the spice(s) you want to dehydrate:
• Basil
• Dill
• Oregano
• Parsley
• Rosemary
• Thyme
• Sage
• Whatever spice you want dried
Instructions:
1. Chose the spice(s) you want to dehydrate. If you want to keep them separate, keep
each spice on different trays – if not, then put any/all the spices together, leaves only.
2. Dehydrate in RAW mode, at 110°F (43°C) until desired crispness.
3. When finished, pour spices off into a measuring cup – and then pour into a blender to
‘powder’ – or crush spice with a mortar and pistol to desired consistency.
4. Store in glass spice jars – or wide mouthed glass jars, label and date spice(s). Keep in
a dark, cool place.
NOTE:
• There are so many spice varieties you can make, the most popular are the Italian spice
blends, or Poultry spices – parsley, sage, rosemary and thyme.
• It is recommend that only the leaves be dried, but you can dehydrate the stems if desired.
The whole food/spice – with the exception of the woody stems of the rosemary and
thyme (and a few other) plants are too difficult to dry/digest.
POPULAR SPICE MIXTURES:
- Italian: oregano, thyme, basil
- Mexican: cilantro, onion, cumin
- Poultry: sage, thyme, rosemary, parsley
DESSERTS
Pecan Mousse with Cranberry/currant sauce (COMBO mode)
28
• Pecan Mousse:
- 1 cup pecans (soak 5 minutes), add 1 Tbsp. hydrogen peroxide to soaking water rinse
thoroughly
- 2 – 4 pitted dates (soak as above – this removes any mold on nuts, dried fruits)
- 1 cup filtered water
- dash of cinnamon powder
- dash of Chinese 5 spice
• Sauce:
- ½ Cup dried cranberries (soak 2 minutes)
- ½ Cup currants (soak 2 minutes, adding 1 Tbsp. hydrogen peroxide to soaking water –
rinse thoroughly)
- 1 cup water
• Garnish:
- dash of lemon zest
- fresh strawberry slices
Instructions:
Pecan Mousse:
1. Blend soaked and rinsed pecans and dates with water, add a few dashes of cinnamon
into blender, stir.
2. Pour into glass pie plate, or large enough pyrex glass container so that thickness of
liquid is ½ inch or less.
3. Sprinkle Chinese 5 spice, stir gently into mixture – and dehydrate in TST mode.
- FAST mode set at 145°F (63°C) for 1 hour
- RAW mode set at 115°F (46°C) until done (8 – 12 hours). Taste occasionally to test
for desired consistency.
Sauce:
1. Blend soaked and rinsed dried fruits with water until smooth – pour into glass pie plate,
or large enough pyrex glass container (square or rectangular) so that thickness of liquid
is ½ inch or less.
2. Dehydrate in TST mode.
- FAST mode 145°F (63°C) for 1 hour
- RAW mode 115°F (46°C) until done (8 – 10 hours). Taste occasionally to test for
desired consistency.
Serving suggestions:
1. Eating warm from the dehydrator is wonderful, or these ingredients can be chilled and
eaten for up to a week.
2. Cover the pecan mousse with the cranberry/currant sauce – garnishing with lemon
zest and fresh sliced strawberries.
3. When storing put the sauce on top. Garnish when ready to serve or eat.
29
PRODUCT INFORMATION
ITEM
Sedona Combo Rawfood Dehydrator
ITEM DESCRIPTION
9 Tray Food Dehydrator
600 Watts max.
Made in Korea
SKU
SD-P9150
UNIT DIMENSIONS
17(W) x 19.7(D) x 14.6(H) in.
433(W) x 500(D) x 370(H) mm
UNIT NET WEIGHT
23.4 lbs. (10.6 kg)
TRAY SIZE
15.25(L) x 13(W) x 1(H) in.
TRAY AREA
14(L) x 11.5(W) x 9= 1449 sq. in.
SHIPPING WEIGHT
32 lbs. (14.5 kg)
SHIPPING SIZE
20.1(W) x 23.3(D) x 16.2(H) in.
510(W) x 590(D) x 410(H) mm
PACKAGING
Single Unit in a Carton
POWER RATING
AC120V, 60Hz, 600W for the USA and Canada
AC230V, 50Hz, 600W for European and Asian countries
INCLUDES
9 BPA-Free Plastic Open Trays
1 BPA-Free Plastic Closed Tray (Compartment Divider)
1 Debris Mat
1 Detachable Power Cord
1 Operational Manual
WARRANTY
5 Years
© 2013 Tribest Corp.
No copies, transmission, or translation into other language of this booklet by any means
without written permission of Tribest Corp. is allowed. All rights are reserved.
30
31
Tribest Corporation
1143 N. Patt St., Anaheim, CA 92801
toll free: 888-254-7336 | fax: 714-879-7140
www.tribest.com | [email protected]
©2013 Tribest Corporation v.1 20130507