1
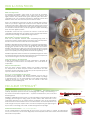
DIGITAL 5 & 9 TRAY DEHYDRATOR MANUAL - 3548/3948
041615
www.ExcaliburDehydrator.com
Contents
Introduction
Important Safeguards . . . . . . . . . . . . . . . . . . . . . . . . . . . . . . . . . 1
10 Stainless Steel Trays with Digital Controller . . . . . . . . . . . . . . . . . . . . 2
Trouble Shooting Guide . . . . . . . . . . . . . . . . . . . . . . . . . . . . . . . . 2
One Time / One Temperature Cycles . . . . . . . . . . . . . . . . . . . . . . . . 3
Two Time / Two Temperature Cycles . . . . . . . . . . . . . . . . . . . . . . . . 3
Fruits Drying Guide . . . . . . . . . . . . . . . . . . . . . . . . . . . . . . . . . . . 4
Vegetables Drying Guide . . . . . . . . . . . . . . . . . . . . . . . . . . . . . . . 5
Raw Living Foods . . . . . . . . . . . . . . . . . . . . . . . . . . . . . . . . . . . . 6
Drying Guide . . . . . . . . . . . . . . . . . . . . . . . . . . . . . . . . . . . . . . 7
Preparation . . . . . . . . . . . . . . . . . . . . . . . . . . . . . . . . . . . . . . . 7
Storage & Reconstruction . . . . . . . . . . . . . . . . . . . . . . . . . . . . . . . 7
Year Round Dehydration Tips . . . . . . . . . . . . . . . . . . . . . . . . . . . . . 8
Helpful Hints & Tips . . . . . . . . . . . . . . . . . . . . . . . . . . . . . . . . . . . 9
An Introduction to Your Dehydrating Life . . . . . . . . . . . . . . . . . . . . 10-15
Leathers & Fruit Rolls . . . . . . . . . . . . . . . . . . . . . . . . . . . . . . . . . .10
Jerky10
Vegetables . . . . . . . . . . . . . . . . . . . . . . . . . . . . . . . . . . . . . . .11
Fruits11
Trailmixes, Granola & Nuts . . . . . . . . . . . . . . . . . . . . . . . . . . . . . . 12
Herbs & Spices . . . . . . . . . . . . . . . . . . . . . . . . . . . . . . . . . . . . .12
Pet Treats . . . . . . . . . . . . . . . . . . . . . . . . . . . . . . . . . . . . . . . .13
Yogurt13
Raise Bread & Re-Crisping . . . . . . . . . . . . . . . . . . . . . . . . . . . . . . 14
Pasta14
Cheese . . . . . . . . . . . . . . . . . . . . . . . . . . . . . . . . . . . . . . . . .15
Potpourri, Arts & Crafts . . . . . . . . . . . . . . . . . . . . . . . . . . . . . . . . 15
Celebrity Chefs and Their Dehydrating Recipes . . . . . . . . . . . . . . . . 16-21
Tess Masters . . . . . . . . . . . . . . . . . . . . . . . . . . . . . . . . . . . . . . .16
Carol Alt . . . . . . . . . . . . . . . . . . . . . . . . . . . . . . . . . . . . . . . . 17
Jason Wrobel . . . . . . . . . . . . . . . . . . . . . . . . . . . . . . . . . . . . . .18
Marie-Claire Hermans . . . . . . . . . . . . . . . . . . . . . . . . . . . . . . . . .19
Eva Rawposa . . . . . . . . . . . . . . . . . . . . . . . . . . . . . . . . . . . . . .20
Brendan Brazier . . . . . . . . . . . . . . . . . . . . . . . . . . . . . . . . . . . . 20
Matt Amsden . . . . . . . . . . . . . . . . . . . . . . . . . . . . . . . . . . . . . .21
Kristina Gabrielle Carillo-Bucaram . . . . . . . . . . . . . . . . . . . . . . . . . .21
Christy Smith . . . . . . . . . . . . . . . . . . . . . . . . . . . . . . . . . . . . . . 21
Introduction
Working on a simple premise, the Excalibur® Dehydrator removes water from food by a
continuous circulation of thermostatically-controlled warm air. A variety of foods, from
bright golden kernels of farm-fresh corn to rings of island-sweetened pineapple can be
dehydrated. Produce, however, is not the only food commonly preserved in a food
dryer! Slices of beef, chicken, fish or even venison can be marinated in a combination
of sauces and spices and easily transformed into homemade jerky. A carton of
yogurt spread over a sheet of Paraflexx® or plastic wrap, dries, and becomes a vividly
colored, taffy-like snack or fruit roll.
ExcaliburDehydrator.com
Important Safeguards
When using electrical appliances, these basic safety precautions
should always be followed.
1.
2.
3.
4.
5.
6.
7.
8.
9.
10.
11.
12.
13.
14.
15.
16.
17.
18.
19.
20.
21.
22.
Read all instructions. SAve these instructions.
Do not touch hot surfaces.
To protect against electrical hazards do not immerse any part of the dehydrator, cord, or plug in water
or other liquid.
Close supervision is necessary when any appliance is used near children. Keep the appliance and
the cord away from children under the age of 8 years old.
Unplug from outlet when not in use and before cleaning. Allow to cool before putting on or taking
off parts.
Do not operate any appliance with a damaged cord or plug or after the appliance malfunctions, or
has been damaged in any manner. Return appliance to the nearest authorized service facility for
examination, repair, or adjustment.
The use of accessory attachments not recommended by the appliance manufacturer may cause hazards.
Sharp utensils should not be used inside the dehydrator.
CAUTION HOT SURFACE: the dehydrator does get hot to the touch.
Do not let cord hang over the edge of the table or counter, or touch hot surfaces.
Do not use outdoors.
Do not place on or near a hot gas or electric burner, or in a heated oven.
Always plug cord into the wall outlet before turning machine on. To disconnect, turn switch to “off”
before removing plug from wall outlet.
Do not use appliance for other than intended use.
Do not remove the ground pin on your power cord.
Avoid contacting moving parts.
Clean only sides and bottom, don’t wipe any electrical components.
This appliance should not be used by children under 8 years old or persons with reduced physical,
sensory or mental capabilities or lack of experience and knowledge of using the appliance.
Only persons who properly understand the safe use of the appliance the hazards involved shall
use this appliance. C hildren should only operate the appliance under close supervision and in
no case should they play with the appliance. C leaning and user maintenance shall not be made
by children without supervision.
T his appliances is not intended to be operated with an external timer or separate remote
control system.
The symbol on the product or its packaging indicates that this product must not be disposed of with
your other household waste. Instead, it is your responsibility to dispose of your waste equipment by
handing it over to a designated collection point for recycling of waste, electrical and electronic
equipment. The separate collection and recycling of your waste equipment at the time of disposal
will help conserve natural resources and ensure that it is recycled in a manner that protects human
health and the environment. For more information about where you can drop off your waste for
recycling, please contact your local authority, or where you purchased your product.
This appliance is not intended for use by persons (including children) with reduced physical, sensory
or mental capabilities, or lack of experience and knowledge, unless they have been given supervision
or instruction concerning use of the appliance by a person responsible for their safety. Children should
be supervised to ensure that they do not play with the appliance.
This appliance is not intended to be operated by means of an external timer or separate remotecontrol system.
SAve these instructions.
1
DIGITAL 5 & 9 TRAY DEHYDRATOR MANUAL - 3548/3948
Digital Interface Controller
Adjustable Thermostat
Select precise drying
temperature. 95°F to 165°F.
48-Hour Timer
2 Time / 2 Temperature
Program 2 time durations and
2 temperatures
Clear Door
Large Drying Capacity
5 tray / 8 square foot capacity and
9 tray / 15 square foot capacity
Hyperwave™ Technology
Fluctuates temperature to dry surface moisture and
move inner moisture to the dryer surface.
Parallexx™ Horizontal AirFlow
Distributes air for fast, even dehydrating.
Easy as:
Simply wash,
slice and load
food onto the
dehydrator
trays.
1
2
Next, place trays
in the dehydrator
and set the
time(s) and
temperature(s).
3
Lastly, remove the dried
food and store in airtight container or bag.
Trays may be placed in
the dishwasher.
Trouble Shooting Guide
All Excalibur® Dehydrators are checked before shipping for electrical or mechanical problems. If you see any damage to the machine due
to rough shipping, report it to the shipper or dealer you purchased from. Excalibur® will not be responsible for damage due to shipping.
Problem
Answer
Nothing turns ON
Test the outlet with another appliance that works. Test the dehydrator on another outlet that you know has
power.
Fan makes a
rubbing noise
Due to rough shipping the trays may have been forced into the fan’s protective screen. Take out the trays,
and blow on the fan blade to locate where it is rubbing against the screen. You may need to turn the fan on
and press gently against the screen and listen where the noise increases. With a pair of needle nose pliers pull
the screen away from the fan blade at point of contact.
No heat,
but fan works
Remove trays and check for any loose wires. There may be a piece of dust or shipping debris blocking the
tiny electrical points in the thermostat, or it may simply be stuck due to rough shipping.
Accessories
are missing
Kitchen accessories are shipped in the dehydrator box with exception of larger items like the apple peeler,
v-slicer, jerky gun or cannon. They are placed on the side of the dehydrator and may have slid underneath.
Double check by removing all packaging. Paraflexx® sheets are the same color as the corrugated box, so
look closely.
For Product Registration or if you have Warranty Questions,
please contact Excalibur Customer Service or Technical Support
(800) 875-4254 or (916) 381-4254 from 8am-5pm Mon-Fri Pacific Standard Time.
ONE TIME / ONE TEMPERATURE CYCLES
Operating Instructions
Step 1
Plug unit into a power source.
Step 2
Default temperature is set to Fahrenheit (F). To select Celsius (C), press the “Start” key and the “Time
Subtract” key simultaneously for two seconds.
Step 3
Set temperature & time. Press temp key once to change by 1° increments or “press and hold”
for rapid change. Press time key once to change by 1 minute increments or “press and hold” briefly for
15 minute increments. Continue to “press and hold” for rapid hour change.
Step 4
Press START to begin
Step 5
Press STOP to end or cancel program.
TWO TIME / TWO TEMPERATURE CYCLES
Operating Instructions
Step 1
Plug unit into a power source.
Step 2
Default temperature is set to Fahrenheit (F). To select Celsius (C), press the “Start” key and the “Time
Subtract” key simultaneously for two seconds.
Step 3
To select two time, two temp mode, press the “Stop” key
and the “Time Subtract” key simultaneously for two seconds.
Step 4
Set temperature & time. Press temp key once to change
by 1° increments or “press and hold” for rapid change.
Step 5
Press time key once to change by 1 minute increments or “press and hold” briefly for 15 minute
increments. Continue to “press and hold” for rapid hour change.
Step 6
Press the “Stop” key and the “Time Subtract” key simultaneously for two seconds.
Step 7
Set temperature & time. Press temp key once to change by 1° increments or “press and hold”
for rapid change.
Step 8
Press time key once to change by 1 minute increments or “press and hold” briefly for 15 minute
increments. Continue to “press and hold” for rapid hour change.
Step 9
Press START to begin
Step 10
Press STOP to end or cancel program.
3
Fruits Drying Guide Food
Dry best at 135ºF/57ºC
Preparation
Test
Time
Apples
Pare, core & cut into ¼” slices or rings. May be sprinkled with cinnamon if
desired.
Pliable
7-15
hours
Apricots
Wash, cut in half, slice and remove pit. Push in backs dry skin side down.
Pliable
20-28
hours
Bananas
Peel & cut into 1/8” slices.
Leathery or
Crisp
6-10
hours
Leathery
10-15
hours
Leathery &
Sticky
13-21
hours
Same process as berries.
Pliable
10-12
hours
Figs
Wash, cut out blemishes, quarter & spread one layer deep, skin side down.
Pliable
22-30
hours
Grapes
Wash, remove stems & cut in half or leave whole, skin side down. Blanching
will reduce drying time by 50%.
Pliable
22-30
hours
Wash, pit and peel. Cut into 3/8” slices, dry skin side down.
Pliable
8-16
hours
Wash, pit and peel-if desired 1/4” slices.
Pliable
8-16
hours
Wash, remove core, peel 1/4” slices, or 1/4 the pear.
Pliable
8-16
hours
Leathery
11-19
hours
Pliable
10-18
hours
Wash, cut in half, remove pit and pop the back to expose more surface to
the air.
Leathery
8-16
hours
Wash, cut into 1” lengths.
Leathery
6-10
hours
Leathery &
Sticky
7-15
hours
Pliable &
Sticky
8-10
hours
Berries
Cherries
Cranberries
Nectarines
Peaches
Pears
Persimmons
Pineapple
Prune Plums
Rhubarb
Leave whole. For wax skin berries pretreat by crazing.
Remove stems & pits. Cut in half & place skin side down & sticky on tray. Will
be like raisins, watch to prevent over drying.
Wash, remove cap & peel 1/4” slices.
Peel, remove fibrous eyes and core. Cut into 1/4” slices or wedges.
Strawberries
Wash, cut off caps, slice 1/4” thick.
Watermelon
Cut off rind, cut into wedges and remove seeds.
*For raw & living foods - use 105ºF/the drying time is extended
vegetables Drying Guide
Food
Asparagus
Beans, Greens
or Wax
Beets
Broccoli
Cabbage
Preparation
Dry best at 125ºF/52ºC
Test
Time
Wash & cut into 1” pieces.
Brittle
5-6 hours
Wash, remove ends, cut 1” pieces or French style.
Brittle
8-12 hours
Leathery
8-12 hours
Wash & trim, cut stems into 1/4” pieces. Dry florets whole.
Brittle
10 -14
hours
Wash, trim & cut into 1/8” strips.
Brittle
7-11 hours
Remove all but 1/2” of the top scrub thoroughly, steam until tender. Cool,
peel & cut 1/4” slice or 1/8” cubes.
Carrots
Wash, trim tops, peel if desired. Cut into 1/8” cubes or circles.
Leathery
6-10 hours
Celery
Wash thoroughly, separate stalks, cut into 1/4” strips.
Leathery
3-10 hours
Brittle
6-10 hours
Wash, slice 1/8” thick.
Leathery
4-8 hours
Wash, peel, slice 1/4” thick.
Leathery
4-8 hours
Brush off dirt or wipe with damp cloth, slice 3/8” slice from cap through
stem ends. Spread in single layer on tray.
Leathery
3-7 hours
Wash, trim, slice 1/4” circles.
Leathery
4-8 hours
Remove root, top and skin, 1/4” slices, 1/8” rings or chop. Dry at 145ºF/63ºC.
Leathery
4-8 hours
Brittle
4-8 hours
Corn
Cucumber
Eggplant
Mushrooms
Okra
Onions
Peas
Shuck corn, trim silk & steam until milk is set. Cut off from cob & spread on
tray, stirring several times while drying.
Shell peas, wash and steam only until they indent, rinse with cold water,
blot dry with paper towel.
Peppers
Remove stem, seeds and white section. Wash and pat dry, chop or cut 1/4”
strips or rings.
Leathery
4-8 hours
Popcorn
Leave kernels on cob until well dried, then remove from cob and dry until
shriveled.
Shriveled
4-8 hours
Brittle or
Leathery
6-14 hours
Cut into pieces, remove all seeds. Bake or steam until tender, scrape pulp
from skin and puree in a blender. Pour onto Paraflexx® sheets or kitchen
parchment paper. When dry cover with plastic wrap & roll.
Leathery
7-11 hours
Wash, peel if desired, cut into 1/4” slices.
Leathery
10-14
hours
Potatoes
Pumpkin
Summer Squash
Use new potatoes, wash and steam for 4-6 minutes. Cut French style, in
1/4” slices, 1/8” circles or grate.
Tomatoes
Wash & remove stems, slice 1/4:, Circles & for cherry/grape tomatoes, slice
in half, dry skin side down.
Leathery or
Brittle
5-9 hours
Winter Squash
Wash & cut into pieces, bake or steam until tender, puree pulp in blender,
pour onto Paraflexx® drying sheets.
Brittle
7-11 hours
Wash, steam until just tender, peel and cut into 1/4” slices.
Brittle
7-11 hours
Wash & cut into 1/4” slices or into 1/8” slices for chips.
Brittle
7-11 hours
Yams
Zucchini
*For raw & living foods - use 105ºF/the drying time is extended
5
Raw & Living Foods
What are Living Foods?
Ann Wigmore Foundation: “Living foods or raw foods are uncooked,
free from animal products, organic, easy to digest, rich in enzymes, and
highly nutritious. They include home grown sprouted grains and beans,
vegetables, fruits, nuts, fermented preparations, dehydrated snacks and
delicious deserts such as fruit and nut pies and fruit ice cream.”
There is no nutritional loss caused by the heat of cooking. Raw foods are
easier for your body to digest than cooked food. The enzymes are what
make raw foods easier to digest than cooked foods. When food is cooked
the enzymes become deactivated by heat. During the digestive process,
the natural food enzymes assist your body’s digestive enzymes in breaking
down food into digestive proteins.
Dehydration is the best way to preserve the essence of raw fruits and
vegetables. Dehydrating does not subject foods to the high temperatures
associated with cooking, or traditional canning methods.
Why Excalibur® is Superior for Living Foods
There are two important elements when dehydrating living foods to
preserve the enzymes. The first element is the proper control of temperature,
and the second, is the time it takes the food to dehydrate.
Excalibur’s adjustable thermostat allows you to control the air temperature,
and the rear-mounted fan that creates the Parallexx™ Horizontal-Airflow
Drying System provides fast and even drying. With these two features,
Excalibur® Dehydrators are able to keep the food temperature low enough
to preserve the enzymes while raising the air temperature high enough to
dry the food quickly, preventing mold and bacteria from growing.
Excalibur® adjustable thermostat has been specifically designed to create
a proper fluctuation in the air temperature. This keeps the food temperature
very constant throughout the entire dehydrating cycle.
Food Temperature vs. Air Temperature
During the dehydration process the food temperature is generally 20
to 30 degrees F cooler than the air temperature, due to the effects of
evaporation.
Enzymes and Temperature
There are many varying opinions among raw foodists concerning
the temperature at which enzymes become deactivated. The most
frequently quoted temperature is 118ºF/47ºC (food temperature) based
upon the studies of Dr. Edward Howell.
How to use your Dehydrator for Living Foods
According to Ann Wigmore and Viktoras Kulvinskas, the best way to
preserve the living enzymes, and overcome the potential of spoilage
or bacteria growth, is to set the dehydrator on the highest temperature
setting for the first two or three hours, then turn it down to less than
120ºF/49ºC for the remaining time.
Excalibur hyperwave™
Excalibur dries BETTER, FASTER & SAFER thanks to our HYPERWAVE™ FLUCTUATION TECHNOLOGY!
Ordinary dehydrators produce constant, unchanging heat causing “case hardening,” a
dry surface with moisture trapped inside — a perfect environment for yeast, mold, and
bacteria growth.
Excalibur’s Adjustable Thermostat lets you take advantage of Hyperwave™ Fluctuation
(changing heat through the drying cycle) for faster, better, safer dried foods. As the
temperature fluctuates up, the surface moisture evaporates. Then, as the temperature
fluctuates down the inner moisture moves to the drier surface. The food temperature stays
LOW enough to keep the enzymes active, and the air temperature gets high enough to
dry food fast, overcoming yeast, mold, and bacteria growth and spoilage.
™
Ordinary dried foods
Dry outside
Still moist
inside
Parallexx® Horizontal Airflow — Fast, even dehydration.
The fan, heating element, and thermostat are in the back. Cool air is drawn in, heated, and d i s tributed
evenly over each tray. This exclusive design helps the food dry faster, retain more nutrients, and look and taste
better, without tray rotation.
Excalibur dried foods
Dry outside Dry inside
Drying Guide
Timing
Drying times, are enormously dependent on factors: amount of humidity in the air, the moisture content of the food being dried and the method
of preparation.
Humidity: Check with your local weather service to determine the day’s humidity level. The closer the humidity is to 100%, the longer it will take for
your food to dry.
Moisture Content: Water content of a fruit or vegetable can vary due to growing season, rainfall and environmental factors, as well as the ripeness
of the food.
Slicing: Should be uniformly sliced, (not more than 1/4" thick) and spread evenly in a single layer on the drying trays.
Cleaning
DO NOT USE harsh chemicals or abrasive materials for cleaning. DO NOT immerse any portion of this appliance in water except the trays. Clean
interior with a cloth or sponge, warm water and mild detergant.
Preparation
Pre-treatment
Pretreating food is not an essential procedure when using your Excalibur® Food Dehydrator. There are basically two types of pre-treatment, dipping
and blanching.
Dipping
Dipping is a treatment used primarily to prevent fruits or vegetables from oxidizing.
Sodium Bisulfite: When mixed with water, sodium bisulfite is a liquid form of sulfur. It is the most effective and least expensive anti-oxidant. Use only a
food-safe grade of sodium bisulfite that is made especially for dehydration. Sodium Bisulfite is available directly through Excalibur®.
If subject to sulfur allergic reactions, check with your physician before using Sodium Bisulfite as a dip.
Fruits: Mix 1 1/2 tablespoons of Sodium Bisulfite in one gallon of water. Soak fruit slices for five minutes and halved fruit for fifteen minutes. Rinse.
Vegetables: Recommended for steam blanching only. Add 1 teaspoon Sodium Bisulfite to each cup of steaming water and blanch as you would
normally. This is particularly recommended for vegetables to be stored in excess of three months.
Ascorbic Acid-Citric Acid Dip: is simply a form of vitamin C. Citric acid is found in all citrus fruits. These citrus type dips are available through Excalibur,
in drug or health food stores in crystal, powder or tablet form. Soak the prepared produce in a solution of 2 tablespoons of powder to 1 quart of
water for 2 minutes.
Fruit Juice Dip: Citrus juices, such as pineapple, lemon or lime, may be used as a natural anti-oxidant. Stir 1 cup of juice into 1 quart of lukewarm water
and soak for 10 minutes. Note: fruit juice is only 1/6 as effective as pure ascorbic acid and may add taste to your food.
Honey Dip: Honey dips are used quite frequently on fruits to be dried. The honey will make fruit considerably sweeter and will add calories as well.
Dissolve 1 cup of sugar in 3 cups of hot water. Allow mixture to cool until lukewarm, and add 1 cup honey. Dip fruits in small batches, remove with a
slotted spoon and drain thoroughly before dehydrating.
Blanching
Blanching, as a means of pre-treatment, can be done either in boiling water or by steaming the foods. This pre-treatment is sometimes referred to as
“checking” or “crazing.” Use this method most effectively on tough-skinned fruits (sometimes having natural protective wax coating) such as grapes,
plums, cranberries, etc. By boiling fruits in water for 1 to 2 minutes, the skin “cracks” and allows the moisture to more readily escape, thus the drying
time is faster.
Storage & Reconstitution
Containers for dried foods should be safe from moisture and insects. Glass jars with tightly fitted lids, plastic zip-lock and vacuum/heat-sealable bags
are recommended storage containers. Food-safe metal cans, such as coffee cans or cookie tins, may be used to store individual bags for extra
protection.
Your dried foods should be stored in a cool, dark and dry area. The ideal temperature for food storage is 50º - 60ºF/10º - 16ºC. Storing foods in this
manner further protects the flavors and colors of your dried products from fading.
Reconstitution
Properly dried foods rehydrate well. They return practically to their original size, form and appearance.
An Electric Steamer is one of the most efficient and successful means of rehydrating foods. The food is placed into the rice bowl, and covered with
a liquid.
Soaking: place the pieces in a shallow pan, cover with the liquid, and allow 1 to 2 hours for the rehydration process to occur. If rehydrating overnight,
place the pan in the refrigerator.
Boiling Water: To reconstitute vegetables, place 1 cup of dried vegetables into 1 cup boiling water. Soak for 5 to 20 minutes. Prepare according to
your recipe. To reconstitute fruits, place 1 cup of water and 1 cup dried fruit into a pan and simmer until tender.
Cooking: For vegetable side dishes, fruit toppings or compotes, use 1 part liquid to 1 part dried food. For foods used in soufflés, pies and quick breads,
add 2 parts of liquid to 3 parts dried food. When cooking fruits, place them into a saucepan with boiling water, turn heat to low and simmer 1 to 15
minutes or until tender.
7
Year-Round Season for fruits/vegetables
January
Good Buys: Avocados, Bananas, Cabbage, Cauliflower,
Mushrooms, Pears, Potatoes, Turnips and Winter Squash.
February
Good Buys: Avocados, Bananas, Broccoli, Cabbage,
Cauliflower, Kumquats, Mangos, Mushrooms, Pears, Tangerines,
Winter Squash.
March
Good Buys: Artichokes, Asparagus, Avocados, Bananas,
Broccoli, Grapefruit, Kumquats, Lettuce, Mushrooms, Radishes,
Spinach.
April
Good Buys: Asparagus, Bananas, Cabbage, Chicory, Escarole,
Onions, Pineapple, Radishes, Rhubarb, Spinach, Strawberries.
May
Good Buys: Asparagus, Bananas, Celery, Papaya, Peas,
Pineapple, Potatoes, Strawberries, Tomatoes, Watercress.
June
Good Buys: Avocados, Apricots, Bananas, Cantaloupe,
Cherries, Corn, Cucumber, Figs, Green Beans, Limes, Mangos,
Nectarines, Onions, Peaches, Peas, Peppers, Pineapple, Plums,
Summer Squash.
July
Good Buys: Apricots, Bananas, Blueberries, Cabbage,
Cantaloupe, Cherries, Corn, Cucumbers, Dill, Eggplant, Figs,
Gravenstein, Apples, Green Beans, Nectarines, Okra, Peaches,
Peppers, Prunes, Watermelon.
August
Good Buys: Apples, Bananas, Beets, Berries, Cabbage, Carrots,
Corn, Cucumbers, Dill, Eggplant, Figs, Melons, Nectarines,
Peaches, Pears, Peppers, Plums, Potatoes, Summer Squash,
Tomatoes.
September
Good Buys: Apples, Bananas, Broccoli, Carrots, Cauliflower,
Corn, Cucumbers, Dill, Figs, Grapes, Greens, Melons, Okra,
Onions, Pears, Peppers, Potatoes, Summer Squash, Tomatoes,
Yams.
October
Good Buys: Apples, Bananas, Broccoli, Grapes, Peppers,
Persimmons, Pumpkin, Yams.
November
Good Buys: Apples, Bananas, Broccoli, Cabbage, Cauliflower,
Cranberries, Dates, Eggplant, Mushrooms, Pumpkin, Sweet
Potatoes.
December
Good Buys: Apples, Avocados, Bananas, Grapefruit, Lemon,
Limes, Mushrooms, Oranges, Pears, Pineapple, Tangerines.
Helpful Hints & Tips
Cut all your items the same thickness.
If you don’t, they’ll dry at different times. A slicer is helpful.
Do small or Large batches.
If you are doing a small batch, put the remaining empty trays in the dehydrator. Your dehydrator is designed to work with all or none of the
trays.
Experiment with your drying times.
Everyone’s tastes are different. You may like some food dried longer for a crispier texture. You may like other dried less for a chewier texture.
Be sure to write down the food and times so you remember what you like!
Store your Paraflexx® sheets in the bottom of the dehydrator.
This is a great way to protect your sheets when you’re not using them. They can also double as a drip liner at the bottom of your dehydrator
for easy cleaning.
Cleaning tips for Paraflexx® sheets.
DO NOT SOAK your Paraflexx® sheets. This will damage them. Simply wipe down with a warm, soapy cloth. Then again with
clean water. That’s it.
Register your warranty online:
http://www.ExcaliburDehydrator.com
Not sure your foods are dry enough?
Put some of your foods in an air-tight bag and check it in a few minutes – if you see water droplets in the bag then you need to dry the food
more. Some small fogging is normal as the food cools off.
One side of my drying trays seems to be dried before the other.
What should I do?
Because your dehydrator may dry one side faster than the other, halfway through the drying cycle you may want to turn the trays 180º. This
will speed up the dehydration process and will reduce energy consumption.
My apples and pears have darkened to a rusty-brown color while drying.
Are they safe to eat?
Yes. Fruits that have turned brownish color are safe to eat. Many fruits will oxidize during the drying process. Oxidation happens when the flesh
of the fruit is exposed to air. By pretreating fruits oxidation is reduced.
Why should the edges of my fruit leather be thicker than the center?
With fruit leathers, the edges of the mixture tend to dry first. If the edges are the same thickness as the center, they will dry too quickly and
become brittle.
My fruit leathers are very thin and brittle. I’d like to make them like the ones sold commercially.
How can I do that?
Juicy fresh fruits, such as strawberries, can be too runny to create a thick, chewy leather like the commercial types. By simply adding a banana
when pureeing, the mixture will become thick and the fruit leather will as well. Be sure to pour 3/4 to 1 cup of puree on each tray and allow
it to spread out. Remember, the poured puree should be 1/4” thick at the edges.
If I powdered my dried vegetables, what could I use them for?
Powdered onion and garlic, of course, are favorite seasonings for meats and sauces. Powdered tomatoes can be reconstituted into tomato
sauce, paste, catsup, juice or soup. Powders are easy to make. A blender or food processor will give you the finest texture. Simply place pieces
of dried vegetables into a blender and process. Store in air-tight bottles or jars.
As items dry, should they be removed to allow better circulation for still moist foods and avoid over drying?
Yes. As foods dry, remove them from the trays and package. The other still moist pieces should remain in the dehydrator until they are
completely dry. However, if you have sliced your food into uniform pieces and have turned your trays 180º halfway through the cycle, your
load should be finished at the same time.
Do you have more detailed information in your Manual?
Check out our dehydrator book, Preserve It, Naturally! over 250 page book. It contains hundreds of color pictures and diagrams! The book
completely details every aspect of drying from mint leaves to pistachio nuts. It has detailed directions for craft ideas, instructions for yogurt and
cheese making, dehydrating grains and even making baby food! There are 275 recipes using home dried fruits, vegetables, meats and grains for
you to try, experiment with or use as a guideline while concocting your own!
On the following pages
Dehydrating Recipes and
Recipes from Celebrity Chefs
09
Leathers & Fruit Rolls
APRICOT-CHERRY LEATHER
WHAT YOU NEED:
1 cup apricots
1/2 cup cherries
honey or sugar to taste
HOW TO PREPARE:
Puree apricots with a small amount of water.
Add cherries and sweetener; blend and pour
onto Paraflexx®, kitchen parchment paper,
or plastic wrap. Dehydrate at 135°F/57°C until
leathery.
Leathers are an easy answer to the often heard request of “What is there to eat?”
Yogurt, leftover fruits or vegetables can be pureed, sweetened and spiced and
made into a nutritious, high-energy snack food. Spread the pureed, produce thinly
on Paraflexx® sheets or plastic wrap and dehydrate, transforming the liquid into a
chewy, quick-energy snack! Leathers are so simple to make!
Select ripe or slightly overripe (but not spoiling) produce that blends and tastes
well together. Strawberries and rhubarb, or bananas and pineapple make great
combinations. Wash, remove any blemishes, stems or pits and peel produce if
desired. Keep in mind produce skins are highly nutritious. Puree the produce in a
blender until it is smooth.
Pour 1 1/2 to 2 cups of puree or yogurt onto the Paraflexx® or plastic wrap covered
trays. Since the edges tend to dry more rapidly, the poured puree should be 1/8”
thick at the center and 1/4” thick at the edges. Place the prepared puree in the
dehydrator with the temperature set at 135º/57ºC. Average drying time for leathers is
4-6 hours. When the leather has dried, it will be a bit shiny and non-sticky to the touch.
Allow the leather to cool and peel it from the tray. Roll it into a tight cylindrical shape.
A piece of plastic wrap, measured to fit the length and width, is then tightly wrapped
around the leather.
JERKY
Western BBQ Jerky
WHAT YOU NEED:
1 lb. lean meat
1 tsp. salt
3 tbsp. brown sugar
¼ tsp. pepper
1/3 cup red wine vinegar
1/8 tsp. cayenne pepper
1 tsp. onion powder
½ tsp. garlic powder
1 tsp. dry mustard
HOW TO PREPARE:
Mix all ingredients except meat in shallow dish
or bowl. Stir well. Cut meat into 3/16 -inch-thick
pieces.
Place in marinade making sure meat is
covered. Cover and refrigerate for at least 12
hours. Place meat on dehydrator trays and dry
at 155˚F/68˚C until meat cracks, approx. 5-6
hours. Serves 1.
You can use virtually any combination of
the following ingredients: soy, Worcestershire,
tomato or barbecue sauce; garlic, onion
or curry powder, seasoned salt or pepper.
Pick a lean cut of raw meat as free from fat
as possible; the higher the fat content, the
shorter the storage life of the jerky. The best
way to get uniform pieces is with a meat slicer,
but a sharp knife will do. When using a knife,
partially freezing raw meat will make slicing
easier. Slice the meat either with or across the
grain. Jerky cut with the grain will be chewy;
cut across the grain will be very tender but
more brittle. Cut into strips 1’ wide, 3/18” thick
and as long as you want. Once sliced, cut off
all visible fat.
Dry at 155ºF/68ºC for approximately 4-6 hours,
occasionally blotting off any fat droplets that
appear on the surface. While drying, the
temperature will go up and down around the
set point - this is important to dry correctly.
Your meat will hit 160º if you use the 155º - set
point on the dial.
Always test jerky using a cooled piece.
Properly dried jerky, when bent, should crack
but not break.
Fish/Shellfish
% Fat
Catfish*5.2
Cod0.53
Croaker2.5
Flounder1.4
Greenland Turbot
3.5
Grouper1.0
Haddock0.5
Halibut4.3
Lake Trout*
11.1
Mackerel*9.9
Monkfish1.5
Mullet*6.0
Ocean Perch
1.4
Pollock1.3
Rainbow Trout*
6.8
Rockfish0.2
Salmon*9.3
Sea Bass
1.6
Sea Herring
2.8
Sea Trout
3.8
Shark*5.2
Shrimp1.6
Smelt2.0
Snapper1.1
Sole1.4
Tuna*5.1
Whitefish*7.2
Whiting1.3
Yellow Perch
1.1
PB
VEGETABLES
Nacho - Cheese Kale Chips
WHAT YOU NEED:
1 cup cashews
1 cup shredded carrots
1 cup filtered water
2 tbsp. nutritional yeast
2 tsp. chili powder
½ tsp. lemon juice
1 tsp. salt
1 tsp. pureed garlic (about 2 cloves)
½ tsp. onion powder
½ tsp. ground cumin
1/8 tsp. ground cayenne pepper
½ pound stemmed curly kale
(about 1 ½ large bunches)
HOW TO PREPARE:
Soak the cashews in water for 4 to 6 hours. Rinse and drain. To
make the cheese sauce, combine the cashews, carrot, water,
nutritional yeast, chili powder, lemon juice, salt, garlic, onion
powder, cumin, and cayenne, blend until smooth and creamy.
Wash and dry the kale. Toss the kale with the sauce. Place the
leaves on Excalibur dehydrator trays covered with a nonstick
sheet. Make sure that each leaf is separated from the others.
This ensures that the leaves dry quickly and evenly. Dehydrate
at 105˚F/41˚C until completely crisp, about 12 hours or longer. Roll
tight into bite size lengths and serve. Keep refrigerated.
You can dry a different vegetable each day for a month and still not
go through the entire list. Some are more suitable for dehydrating
than others but once you get started, you’ll want to try them all.
To preserve most of this goodness in your dehydrated food, start
with vegetables that are ripe and in prime condition. Buy or pick
the crispest, freshest, most flavorful ones that can be obtained.
Dehydrating retains most of the nutrition and good taste, but it can’t
improve on the original quality of the food. The fresher the vegetables
are when processed, the better they will taste when rehydrated and
cooked.
Dehydrating
Vegetables have a lower moisture content than fruits, so cooler drying
temperatures must be employed. If the temperature is too high, the
vegetable pieces will “case harden.” Let the dehydrator’s thermostat
at 125°F/52°C and spread vegetables in a single layer on the drying
trays. Leave space between pieces for better air circulation; do not
overlap pieces. Note: For tomatoes and onions, dry at 155°F/68°C
instead of 125°F/52°C. In case of other exceptions, always refer to the
individual listings before beginning to dry. Different vegetables may
be dried together as long as none are strong-smelling. Some strongsmelling vegetables include onions, peppers, and brussels sprouts. Dry
on average 4 to 14 hours.
FRUITS
Blueberry Cookies
WHAT YOU NEED:
2 cups blueberries
2 cups almonds
blanch & soak over night 1 cup soaked raisins (small cup)
HOW TO PREPARE:
Blend
all
ingredients
to
a
crumby
consistency.
Drop 1 teaspoon of mixture on Excalibur® dehydrator tray.
Dehydrate at 115°F for 18-22 hours until dry. Turn cookies over
about halfway through drying cycle.
You’ll have fun drying fruit; it’s one of the oldest and most popular
dehydrated foods. Enjoy dried fruit as a naturally sweet snack, in your
favorite recipes, candied, or in good tasting leathers. Apples, peaches,
bananas, and pears are long-time dehydrating favorites. But why stick
to the tried and true? Dare to dry dates, have a fling with figs, or perk
yourself up with persimmons. Challenge yourself to master them all!
General Rules for Dehydrating Fruits
If fruits (or vegetables) are to be dried with skins on, they should be
washed thoroughly. Some fruits, like grapes and certain berries, have a
natural wax coating that must be removed by checking.
Uniform slicing makes a big difference in how evenly your fruit dries.
Dehydrating
Most fruits do not have strong odors, so feel free to dry them together.
Do not add fresh fruit to a batch that is nearly dry food. For exact
instructions, refer to the fruit dehydrating guide.
11
Trailmixes, Granola & Nuts
Candied Pecans
WHAT YOU NEED:
1 cup soaked, rinsed and towel blotted
pecan halves
1/2 cup maple syrup
1 tsp. cinnamon
Pinch of nutmeg
HOW TO PREPARE:
Toss the soaked pecans, maple syrup,
cinnamon and nutmeg together and
spread them on a Paraflexx® sheet.
Dehydrate pecans at 105˚F for 12 hours
or until they are crisp in a Excalibur®
dehydrator. Enjoy as a snack or salad
topper, or use in desserts, like Black
Bottom Pecan Pie. Store Candied
Pecans or other flavored nuts in a sealed
glass jar in the refrigerator for up to 3
months.
Looking for an after school energy snack or a healthy treat before a big game? Heading
out on the trail? Dried fruit and nut trail mix is easy to do in an Excalibur dehydrator and
you can personalize it to your taste. Add dry fruits to include natural sugars, all the while
controlling the sugar and salt content. These snacks also reduce pounds of juicy goodness
into ounces for lightweight meals and snacking on longer backpacking trips.
Nuts about Nuts!
It is recommended that you prepare nuts, by soaking them. By soaking, enzyme inhibitors
are neutralized, the beneficial enzymes are activated and the vitamin content increases.
After nuts are done soaking for a period of 8-16 hours, place on drying trays and dehydrate.
Time and temperature will vary based on the recipe.
Granola & Energy Bars
Most of the store-bought granolas are high in sugar, contain unhealthy fats and oils, and
are packed full of fillers and unnecessary ingredients. Make your own deliciously sweet
combination of granola with all the good-for-you ingredients your body craves.
Trail Blazers & Preppers
You know who you are! With an Excalibur, you can make healthy, delicious meals, snacks
and desserts. Dehydrate and store for years at a fraction of the space and the weight of
canning.
HERBS & SPICES
Basil
WHAT YOU NEED:
Basil Leaves
This herb is an excellent seasoning
commonly employed in Italian and
Mediterranean style cooking. Its leaves
add a pleasant, spicy flavor to tomato
and potato dishes, vegetable juices,
cheese and egg mixtures, salads, and
many types of meat. Although it has a
savory clove-like aroma, basil actually
belongs to the mint family. The leaves
must be dried quickly to avoid molding.
Because of its very delicate nature, treat
basil carefully to prevent damage.
HOW TO PREPARE:
Wash plant leaves the evening prior to
harvesting; if the leaves are still wet, they
may turn brown when dried. Clip leaves
before the flowers open. Subsequent
cuttings may then be made. Throw
away dirty leaves. Space the leaves
on the trays so they are not touching.
Dehydrate the leaves at no more than
95°F/35°C until the leaves are crisp
enough to crumble in your hand.
Use your Excalibur® dehydrator to dry your own freshly grown herbs! Buy bulk quantities of
fresh herbs and spices, dry them and create special teas and seasonings. Left-over parsley
will no longer be wasted…as drying herbs and spices require rather simple preparation.
Preparation
First, trim off any dead or discolored plant parts. Wash off the leaves and stems of most herbs
in cool water. A sink spray attachment is ideal for this purpose because it is gentle. Flower
heads should be rinsed thoroughly before the petals are removed. Discard damaged parts.
Keep the heads whole for use in teas. After it is sufficiently dried, remove the outer covering
of the herb seeds by rubbing it between your hands. Be sure to dry the seeds.
Dehydrating
Place the prepared plants on the trays in a sparse layer. When dehydrating large clusters,
remove alternate trays so that the tops of the clusters are not touching the tray above.
Most herbs and spices require 2 to 4 hours to dry completely, but some may take longer.
pet treats
Fluffy’s Chicken Delights
WHAT YOU NEED:
8 oz. boiled chicken liver
1/2 cup cornmeal
1 cup wheat flour
1 tsp. garlic powder
1 tsp. beef bouillon
1 large egg
1 tbsp. yeast flakes
2 tbsp. vegetable oil
Parmesan cheese, set aside
HOW TO PREPARE:
Blend all ingredients in food
processor until a dough is formed.
Roll out dough about 1/4 inch
thick. Lay on dehydrator trays
and sprinkle Parmesan cheese on
top. Dehydrate at 155°F/68°C until
done. Approximately 1 hour before
the dough is finished dehydrating,
cut into shapes or squares. Finish
dehydrating until thoroughly dry.
More and more Americans are tuning in to the food system, trying to avoid nasty artificial
ingredients. And increasingly, people are looking harder at what’s best for their four-legged
family members, too.
Preparation
1. U
se healthy, fresh, whole ingredients to create homemade dog treats free of additives
and preservatives.
2. In a large bowl, mix all ingredients and form into a ball. On a flour-dusted cutting board,
roll out the dough to about ¼-inch thick.
3. Cut with bone-shaped cookie cutter or any cutter shape your pet will like.
Dehydrating
1. D
ehydrate at the highest setting—145˚-155˚F (63˚-68˚C)—until done, approximately 6 to
8 hours.
2. For crunchier treats, dehydrate longer until they have the consistency you like.
yogurt
FROZEN YOGURT
WHAT YOU NEED:
1 1/4 cup dried strawberries,
raspberries, peaches, bananas, or
any other favorite fruit.
1 cup milk
1 cup homemade yogurt
2-4 tbsp. honey (optional)
HOW TO PREPARE:
Blend dried fruit with milk in blender.
Add yogurt and honey. Pour into
freezer container. Freeze until crystal
form around edges. Stir. Freeze until
firm. 4 servings.
Yogurt is extremely easy to make. All that is required is 4 cups milk, 1/2 cup powdered milk, and 2
tablespoons of plain yogurt. Use either whole, low fat, or skimmed milk; it’s up to you. The yogurt,
though, must be plain; there’s no substituting.
Making Your Yogurt
Add the powdered milk to the fresh milk and heat to boiling for a few seconds. Allow the milk to
cool to 120°F/49°C; then take 1/4 cup of the mixture and stir in the yogurt. When it is thick and
sauce-like, pour it into the remaining milk and mix well.
Spoon the yogurt into clean glass jars that have lids or into plastic yogurt cups. Place the
containers on the bottom of the dehydrator, set the temperature for 115°F/46°C, and heat for 3
hours. Using a higher temperature would destroy the yogurt culture. If the yogurt has set, cool it.
If not, continue to check the batch every 15 minutes until it does.
After the finished yogurt has cooled, add the fruit or flavoring before placing it in the refrigerator.
If sweetening is desired, use powdered sugar or honey to maintain the thick, smooth texture. For
a variation, blend 1/2 cup of fruit with 1/4 cup water and make a sauce to pour over the yogurt
right before it is eaten.
13
RAISE BREAD & RECRISPING
WHEAT BREAD
WHAT YOU NEED:
1 package dry yeast
2 cups warm water
2 tbsp. sugar.
2 tsp. salt
4 cups white flour
1/2 cup hot water
1/2 cup brown sugar, packed
3 tbsp. shortening
4 cups whole wheat flour
HOW TO PREPARE:
Place yeast in warm water. Add sugar, salt, and white
flour. Beat until smooth. Cover and put in warm dehydrator
until light in color and bubbles appear on top of dough,
approximately 1 hour.
Combine hot water, brown sugar, and shortening. Cool to
lukewarm. Add to yeast mixture. Now add whole wheat
flour and mix until smooth. Turn dough out onto lightly
floured surface. Knead about 10 minutes using a little wheat
flour on your hands until dough loses its stickiness. Place
dough into greased bowl; turn over once to grease top
of dough. Cover. Let rise in warm dehydrator until double.
Punch down dough. Cut in half with knife.
Yes, you can use your Excalibur Dehydrator to make your bread rise! An
Excalibur can make a big difference in speeding up the time it takes for
dough to rise. Remove the trays from the dehydrator, set the thermostat
to 115˚F / 46˚C and allow the unit to pre-heat. Place a shallow pan of
water on the bottom of the dehydrator. Insert a drying tray above the
water and place the bowl of dough on the tray. Cover the dough with a
cloth to keep it from drying out. Allow the dough 30 minutes to 1 hour of
time to rise. When it has risen, continue with preparation to your recipe.
Re-Crisping
You’ll never have to throw away crackers, chips, cookies or cereals that
have become stale. Dry them at 145˚F / 63˚C for 1 hour.
Bread Crumbs, Stuffing Mixes & Poultry Seasonings
Put your extra breads of all types in your Excalibur to dry for making bread
crumb recipes. Crumble by hand or process for a few seconds in your food
processor. Store in air tight containers until needed. Add your favorite herbs
and spices to create stuffing mixes for side dishes or poultry stuffing.
Shape each half to form a ball; cover and let rise 10 minutes.
Place into lightly-greased loaf pans, cover, and let rise until
double. Bake at 375°F/191°C approximately 40 to 50 minutes.
Pasta
PASTA PRIMAVERA WITH DRIED TOMATOES
WHAT YOU NEED:
8 oz. Rotini, Twists or Spirals, uncooked
1 tbsp. olive or vegetable oil
2 cloves garlic, minced
1/8 tsp. hot red pepper flakes
1 cup tender fresh green beans, cut into 1” pieces
2 small zucchini, sliced
2 small yellow squash, sliced
1 cup carrot sliced thin
1 medium red onion, cut into eighths
1/4 cup chicken broth
1/4 cup lightly pack fresh basil leaves, chopped
1/2 cup oil-packed dried tomatoes, chopped
1/4 cup grated Parmesan cheese
1/4 cup chopped fresh parsley
HOW TO PREPARE:
Prepare pasta according to package instructions. Drain.
In medium skillet, heat oil and garlic. Stir in red pepper
flakes. Add zucchini, squash, carrots and onion and stir-fry
until tender-crisp about 5 minutes. Add chicken broth and
simmer 1 minute. Toss together pasta, vegetables, basil
and dried tomatoes. Garnish with Parmesan cheese and
parsley. Serves 4.
Your dehydrator is perfect for preparing pasta. Store bought varieties can’t
compete with the taste of homemade.
Make and cut the noodles according to the recipe directions. No need
for separate pasta racks! Place strips of freshly made pasta in single layers
onto your drying trays. Dry for 2 to 4 hours at 135ºF/57ºC. Store in airtight
packages. Dried noodles can be used in soups and casseroles; as a main
dish buttered; or in a cream, tomato, or cheese sauce.
What to do with Dehydrated Pasta
1. Perfect for soups and stews
2. Excellent for thermos bottle cooking and MRE’s
3. Serve with your favorite sauce
4. Use in salads and one dish meals
Cheese
Cottage Cheese
WHAT YOU NEED:
1 gallon of pasteurized milk and either
4 tbsp. unflavored yogurt made in your dehydrator
1/2 cup fresh buttermilk, or 1/4 tablet of rennet (an enzyme) dissolved in 1/2 cup warm water
HOW TO PREPARE:
Pour the milk into a crock and warm it to room temperature, about 72°F/22°C. Mix in the yogurt, buttermilk, or
rennet and cover the crock with cheesecloth. Place the crock in the dehydrator and hold the temperature
inside at 85°F/29°C for 12 to 18 hours until clabbered. Clabbering means that the milk has separated to form
thick, solid “curd” and watery, liquid “whey.”
When the milk has thickened into curds and a little whey lays on the surface, the cheese is clabbered. Now
your next task is to cut the curd as follows. Use a long-bladed knife and make all cuts approximately 1/2”
apart. (1) Holding the knife vertically, make straight up and down cuts across the curd. (2) Now slant the knife
and make diagonal slices down through the cheese following the cuts of step 1. Make the first cut at a 45”
angle, but gradually straighten the blade so that the last cut is nearly vertical. (3) Repeat the process of step
2, only slant the knife in the opposite direction. (4) Turn the crock 180°F/82°C and make a final set of vertical
cuts to form a crosshatch pattern on the surface. This cubing process helps the sour whey to drain out.
The Final Steps. Place several inches of water in a large pan, set the crock in it, and heat to 115°F/46°C.
Hold the cottage cheese at this temperature for 1/2 hour, stirring occasionally. Once the time is up, line a
colander with cheesecloth and pour in the curds and whey. Allow the whey to drain off; otherwise, it will give
the cottage cheese a bitter taste. To get rid of even more of the sour taste, dip the colander in cold water
and gently stir the curds to wash away the last traces of the whey. Let the curds drain thoroughly. If desired
add 1 teaspoon salt per pound of cottage cheese and 4 to 6 tablespoons of cream. After refrigeration, your
cottage cheese will be ready to eat as is or in fruit salads, dips, cheesecake, and casseroles.
The low temperatures
of your dehydrator are
ideal for ripening milk into
cheese. Cottage cheese
is unripened cheese that is, it has not been
aged. Hard cheeses,
on the other hand,
are pressed, dipped in
paraffin wax, and aged.
Longhorn,
cheddar,
Colby, and Romano are
all hard type cheeses.
In addition, there are
the semi-hard or soft
cheeses:
Scamorze,
Neufchatel, and cheese
spreads.
These
are
generally milder in flavor
than the hard cheeses
and are only aged for a
short time, if at all. Refer
to Excalibur’s Preserve It
Naturally Book for more
directions on making
cheese.
Potpourri, Arts & Crafts
Your dehydrator can help satisfy your creative cravings by shortening the drying times for ceramics, dough art or decoupage.
Potpourri
Nearly any garden blossoms, leaves, herbs, spices or cones can be used for potpourri. Fixatives must be added to the potpourri to prevent the
fragrances from evaporating. Orris, benzoin, calamus and oak moss are common fixatives. Using scissors, cut only unblemished herbs and flower
heads; one decaying leaf or petal can destroy a whole potpourri. Spread the petals or herbs sparsely over the drying trays. Try to avoid drying
both at the same time to prevent the distinctive fragrances from mixing. Dry for 6 to 8 hours at 110°F/43°C until dry and brittle. Let cool.
Photographs
Treat and wash as usual; then shake or blot off the excess liquid. Place on the dryer trays. Dry until no wet spots remain. Note: Dry only
photographs that have been printed on resin-coated stock; other paper types will crinkle unless pressed flat.
Pomander Balls
These charming, old-fashioned aromatic delights dry quickly and easily in a dehydrator. For each pomander, select a ripe, attractive apple,
lemon, lime, or orange. Using an ice pick or awl, punch holes evenly all over the skin of the fruit and push a whole clove in each; the skin should
be completely covered. Roll the ball in a mixture of 1/2 oz ground cinnamon, 1/2 oz ground allspice or nutmeg, 1 teaspoon powdered orris
root, and a sprinkling of glitter. Thoroughly coat. Let it stand in the mixture for several days, turning occasionally. Next arrange on a Paraflexx®
sheet and place in Excalibur dehydrator with the thermostat set at the lowest temperature. Dry till shrunken and
lightweight; then tie a long ribbon or cord around it for hanging..
Dried Macrame Beads
With a little ingenuity, you can dehydrate vegetables for use as beads in macrame and other crafts.
Dough Art
Dough art is a fun craft for children and adults. Roll the dough, coil it, braid it, stamp it, or press it to make
wall plaques, napkin rings, jewelry, figurines, small sculptures, and even Christmas tree ornaments.
15
Tess Masters
Grab-and-Gorge
Garlic Kale Chips
Australian-born Tess Masters is a cook,
writer, actor, voiceover artist and author
of The Blender Girl cookbook. She shares
her enthusiasm for healthy fast food on
theblendergirl.com.
As a presenter and recipe developer, Tess
collaborates with leading food, culinary, and
lifestyle brands. She has been featured in
the LA Times, Vegetarian Times, InStyle, Real
Simple, Clean Eating, Chow.Com, Today.
Com, and Glamour.Com among other
publications and websites. Away from the
blender, Tess enjoys a diverse performance
career. She has toured internationally with
stage productions, worked in film and
television, and lent her voice to commercial
campaigns, audiobooks, and popular video
game characters.
What You’ll Need:
1 large bunch of curly green kale – about 8 firmly packed cups
1 cup raw cashews soaked in filtered water for 2 – 4 hours
(soaking is optional)
1/8 cup filtered water as needed for desired consistency
3 tbsp. freshly squeezed lemon juice
1/4 cup nutritional yeast to taste
1 whole bulb of garlic (about 8-10 cloves) chopped roughly
1 tsp. Celtic sea salt
1 tbsp. coconut nectar (optional)
4 tsp. granulated garlic
Let’s Get Started!
•R
ip the kale from off the stalks (discard the stalks), wash and
place in a colander to drain. You want a little bit of water left
on the kale.
• T ransfer to a large bowl.
•P
lace all the ingredients except the granulated garlic in a
food processor until smooth, thick and creamy. You want
something like the consistency of hummus. You might need to
add a little bit more water.
• T ake small handfuls of the cashew cheese and massage into
the kale. I use kitchen gloves for this. Repeat this until all of the
mixture has been added and the kale is evenly coated with
no large clumps of “cheese”.
• T oss through the granulated garlic so that it is evenly
distributed.
•P
lace the kale evenly on dehydrator sheets and dehydrate
at 115˚F/46˚C for about 8 hours until crisp.
• If you don’t have a dehydrator you can place them on
baking sheets in the oven on the lowest setting for about 1012 hours.
NUT-FREE VERSION
What You’ll Need:
1 large bunch or curly green kale – about 8 firmly packed cups
2 1/2 tbsp. cold pressed extra virgin olive oil
1/4 cup nutritional yeast
3 tsp. granulated garlic
1 tsp. Celtic sea salt
3 tsp. extra granulated garlic (to toss through)
Let’s Get Started!
• Rip the kale from the stalks (discard the stalks), wash, and place in a
colander to drain slightly. You want a little bit of water left on the kale.
• Stir all of the other ingredients (except the extra garlic) together in a
bowl.
• Massage the mixture into the wet kale.
• Sprinkle the extra granulated garlic onto the kale and toss through.
• Place in your Excalibur dehydrator on 105˚F/41˚C or about 4-6 hours
until crispy.
Carol Alt
Vegan Salad pizza
A true superstar – Carol Alt. Since her days
as the world’s most famous supermodel,
Carol Alt has been a multi-award-winning
actress that has appeared in more than 65
films; host of countless TV and radio shows;
had a number one music hit in Europe;
graced the cover of over 700 magazines;
worked as a dedicated philanthropist;
and is now also a skincare entrepreneur,
jewelry designer, and bestselling author
on raw food nutrition. She’s written three
raw food books: EATING IN THE RAW, THE
RAW 50, and EASY SEXY RAW. As well
as raw food recipes, check out Carol’s
natural skincare line, Raw Essentials.
Pizza Crust:
1 cup ground flax seeds or chia seeds
2 tbsp. onion powder
5 cups roughly chopped mixed vegetables (some favorite
combinations are cucumber and broccoli stalk, fennel and
broccoli stalk , or zucchini)
2 cups soaked raw walnuts or pecans
2 garlic cloves
1 tbsp. plus 1 tsp. fresh lemon juice
2 to 4 drops liquid stevia OR 1 tbsp. plus 1 tsp. raw honey
1 tsp. sea salt or more to taste
¼ cup fresh basil leaves
*Makes two 8-inch pizza crusts
Mama Tanya’s Favorite Tomato Sauce
¾ cup sun-dried tomatoes
1 large ripe tomato, seeded and roughly chopped
1 small garlic clove (optional)
Small handful of basil leaves
1 tsp. dried oregano
2 tsp. pizza seasoning or Italian seasoning
1 ½ inch piece fresh ginger, peeled and chopped
Pinch of cayenne pepper
2 to 4 tbsp. cold-pressed extra- virgin olive oil
2 tbsp. pitted sun-dried olives
Sea salt
*Makes about 2 cups
Mama Claire’s Red Wine Vinaigrette
¼ cup Eden raw red wine vinegar
½ cup cold-pressed extra-virgin olive oil
2 tsp. raw agave nectar, raw honey, or coconut nectar
1 tbsp. fresh lemon juice
½ tsp. sea salt
½ tsp. onion powder
½ tsp. garlic powder
½ tsp. dried oregano
½ tsp. dried basil
*Makes 3/4 cup
Pizza Salad
1 head of romaine or green leaf lettuce
1 or 2 medium tomatoes, seeded and chopped (optional)
1/2 medium red onion, thinly sliced
1/4 cup sun-dried olives, pitted and sliced (optional)
To make the pizza crust:
Combine the flax meal and onion powder in a medium bowl and set
aside. Place the chopped vegetables, walnuts, garlic, lemon juice, stevia,
and salt in a food processor or high-speed blender and process until
smooth, scraping the sides of the machine a couple of times or tamping
down with the tamper if using a blender. Add the basil and pulse until well
incorporated but with small bits remaining visible. Add the flax meal and
onion powder and stir until well combined. Spread out half the dough on
a Paraflexx®-lined Excalibur dehydrator tray in a circle about 8 inches in
diameter and ½ inch thick. Repeat with the remaining dough on a second
lined tray. Place in the dehydrator and set the machine to 105°F/41˚C and
dehydrate for 6 to 8 hours or overnight. Flip the crust onto a dehydrator
screen (remove the Paraflexx®) and continue to dehydrate until the
desired crispness is obtained, 2 to 8 hours, or longer if you like your crust
very crisp.
While the pizza crust is dehydrating, make the sauce: In a medium bowl,
soak the sun-dried tomatoes in water to cover for 1 hour to soften. In a
blender or food processor, combine the sun-dried tomatoes and their
soaking water, the fresh tomato, the garlic, if using, the basil, oregano,
pizza seasoning, ginger, and cayenne and blend until smooth. With the
motor running, slowly add the oil through the hole in the top of the food
processor and blend well.
Add the olives and pulse until chopped. Season with salt.
To make the vinaigrette: Place all the dressing ingredients in a jar with a lid,
cover, and shake until the mixture is emulsified.
To make the salad:
Combine the lettuce, tomatoes, red onion, and olives in a bowl and toss
well with enough of the vinaigrette to coat
To assemble:
Spread the pizza sauce over the crusts. Arrange the salad over the crusts,
cut the pizza into slices, and serve. *Serves 2-4
Hints and Tips:
The pizza crust takes under 30 minutes to put together, but it does involve
some advance planning to soak the nuts, and a full day for dehydrating
the pizza crust. A strategic way to go about this is to put together the crust
the night before, dehydrate the first side while you sleep, then flip it, go to
work, and come home to pizza night. That will give you a crisp crust. For
a softer crust, you can start in the morning and it will be ready for dinner.
You can make the sauce a day ahead as well. Tanya and Claire suggest
doubling the recipe and freezing half of the crust after dehydrating. This
way, whenever you are in the mood for a pizza, all you have to do is
defrost briefly in the dehydrator.
If you think you won’t be eating the entire pizza at one sitting, leave the
crusts plain, cut them into individual portions, and let everybody top their
own as they like. (Kids love the “make your own pizza” theme.) This keeps
the dough from getting soggy and you can save the crust for another
meal and top it on the spot.
17
Jason Wrobel
Fudge brownies
Jason Wrobel is a world-renowned leader in
organic raw vegan cuisine, culinary education
and epicurean entertainment. With a focus
on radical simplicity and artful presentation, he
imbues his ecstatic raw food creations with the
energy of fresh, local, organic produce and the
healing properties of raw superfoods, which have
rendered his dishes hands-down favorites among
celebrity clients, and regular folk alike. Jason is
also the host of the first longevity cooking show
on television, How to Live to 100, which debuted
on The Cooking Channel in January 2013. His
DVD, Simple Vegan Classics, is an international
bestseller, which teaches people how to prepare
easy and nutritious raw vegan foods. He is also the
host of The J-Wro Show®, on YouTube, showcasing
healthy recipes, lifestyle transformation tips and
culinary comedy. www.jasonwrobel.com
Superfood Brownie Mix
8 cups raw pecans, soaked for 8 hours & dehydrated for 24
hours, until crisp
1 1⁄2 cups dates, pitted & packed
1 1⁄2 cups raw cacao powder
1⁄2 tbsp. Vitamineral Green or other green superfood powder
1⁄2 tbsp. maca powder
1⁄2 tsp. Himalayan Crystal Salt or Celtic sea salt
1⁄4 tsp. shilajit powder
1/2 tsp. ground cinnamon
1⁄2 cup dried goji berries, reserved
1 tsp. ground vanilla powder
1 cup crushed raw pecans, reserved
Warm Fudge Sauce
2 3⁄4 cups clear raw agave nectar,
coconut palm nectar or Jerusalem Artichoke inulin
1 cup raw cacao powder
1 1⁄4 cup extra-virgin raw coconut oil
1⁄4 cup raw cacao butter
1⁄4 cup mesquite powder
1⁄4 tsp. Himalayan Crystal Salt or Celtic sea salt
For the Brownies:
In a large mixing bowl, soak the pecans for a minimum of 8 hours. Drain the
water, rinse the pecans in fresh water and use your Excalibur dehydrator to
dehydrate on Paraflexx® sheets for 24 hours, until crisp and dry to the touch.
In a large food processor, pulse the pecans into medium-size crumbs, until
mealy. Be sure not to over process, as the pecans can break down easily
and become pecan butter. Add the dates slowly into the mixture and
process until very well combined. The mixture should be somewhat cakey
– a slightly moist batter with a little texture. Add the raw cacao powder,
Vitamineral Green, maca, sea salt and shilajit powder and process. Once
ready, the mixture should begin to “ball up” in the food processor as the
raw cacao powder becomes well incorporated. Take the brownie mix out
of the processor bowl and add to the baking dish. Spread the mixture
evenly into the baking dish and fold in the reserved pecans and dried
cherries. Mix with your hands. Press with even, medium pressure to make a
flat, even distribution of the batter. Chill in the refrigerator for 30 minutes to
1 hour to set the brownie batter. Once set, cut the brownies to the size you
desire. If you want warm brownies, place them in the Excalibur dehydrator
at 118˚F/48˚C for 20 minutes to warm.
For the fudge sauce:
Add the agave nectar and coconut oil to a high-speed blender and blend
until very smooth. Add the remaining ingredients, except the cacao butter,
and blend again. Once an ultra-smooth consistency is attained, add
the cacao butter (either solid of liquefied) and blend again. Place in the
Excalibur dehydrator at 105˚F/40˚C for 10 minutes before serving with the
Superfood Brownies. *Yields 16-20 medium brownies (Standard 9x13 baking
dish)
Recipe Variations:
Instead of dried goji berries, try golden berries, mulberries or black cherries
for an extra superfood nutrient kick OR substitute dried organic pineapple
or mango for tropical tango brownies. Experiment and play, baby!
Marie-Claire Hermans
Lasagna stacks / mille feuilles
Marie-Claire Hermans from Ravishing Raw.
Marie-Claire is a raw food chef, author, and
coach in Belgium, Europe. She specializes in
making raw food look and taste like cooked
food. This is especially helpful for raw food
beginners who are craving cooked foods
during their transitional period. Those of you
who sign up for Marie-Claire’s free newsletter
will receive explanations of the benefits
of eating live raw foods, menu ideas, and
shopping lists.
Vegetables required per person:
1/2 to 1 small round zucchini
1/2 red bell pepper
1/2 yellow bell pepper
Fresh basil to taste
1/2 pack of wild mushrooms
some sprigs of fresh thyme
a sprig of fresh rosemary
1/4 tsp. of Celtic sea salt or more to taste
organic cold pressed extra virgin olive oil
To make the cocktail sauce:
1/2 red bell pepper
2 tbsp. cold pressed extra virgin olive oil
1/4 cup sun dried tomatoes (soaked in oil)
1/4 cup of raw cashew nuts or pine nuts
Next prepare the vegetables:
• Cut the round zucchini in two halves.
• S lice up the zucchini with a wide potato peeler or a
mandolin. Make about 5 to 6 thin slices
• Place them on a plate and cover them up with olive oil.
• Sprinkle some sea salt on top to soften.
•M
arinate for one hour until they are soft and look like cooked.
•Y
ou can speed up the process by placing them in your
Excalibur dehydrator for about a half hour and then covering
them up with plastic to keep them moist.
In the meantime:
• Slice up the bell peppers into small strips.
• Slice up the mushrooms.
• Throw everything into separate bowls.
• Add fresh herbs and sea salt to taste.
• Pour olive oil generously on top, mix and let marinate for
about 20 minutes.
• S pread the marinated veggies on a Paraflexx® sheet on
Excalibur dehydrator sheets.
• L et them soften in your dehydrator at 108°F/42°C
for about 60 minutes.
To assemble:
• T ake a nice plate and start with a slice of zucchini at the bottom.
•P
lace some of the marinated vegetables on top and a few
leaves of basil.
• T op with a new slice of zucchini.
•P
ut a spoon of cocktail sauce on the side of the plate and draw
a line with the “head” of the spoon.
• F inish with some fresh herbs out of your garden or some course
black pepper.
• S erve like this or warm them up in your dehydrator at 108°F/ 42°C.
Some tips from Marie-Claire:
• If you want a thinner sauce, add a little bit of water.
• T hese vegetable stacks are perfect with a fresh green salad.
• T he longer these vegetables marinate, the softer they become.
•E
njoy as a starter, vegetable side, or main meal.
19
Eva Rawposa
super easy falafel with
lemon garlic aioli
Eva Rawposa created Uncooking101.com
with business partner Venita Hale. Eva is a
raw chef and vegan health educator, who
is passionate about sharing her knowledge
about eating raw foods after noticing such
a dramatic improvement in her health
thanks to a raw foods diet. Determined to
create an online community where people
could come together, learn and share their
experiences with raw foods, she created
Uncooking 101.
To make the falafel:
2 cups roughly chopped carrots
1 cup dry sunflower seeds
1/4 cup flax seeds, ground (after grinding, equals 1/3 cup)
1 cup fresh parsley, chopped finely
3 tbsp. diced onion
1 clove minced garlic
1/4 tsp. Celtic sea salt
1/2 tsp. ground cumin
1/2 tsp. curry powder
1/2 cup sesame seeds (*to be added after processing)
Preparing the Falafel:
• F irst, add only the carrots to the food processor, and process until
your carrots are nearly a paste. (Very well chopped!)
•N
ext add in the sunflower seeds, flax seeds, garlic, and spices
and process until well mixed. Finally, add the onion and parsley,
making sure to scrape the sides as needed to mix everything
together well.
•M
ove to a large bowl, and add the sesame seeds by hand.
•R
oll 1 tbsp. at a time into falafel balls. Place these balls directly
onto your Excalibur dehydrator sheets and dehydrate for 2-12
hours depending on how moist you prefer the inside to be. The
longer you dehydrate, the more crisp the outside becomes.
Brendan Brazier
To make the lemon garlic aioli:
1/4 cup dry cashews
2 cloves garlic
1/8 tsp. salt
1 lemon, juiced
Preparing the Lemon Garlic Aioli:
• Process the cashews, garlic, and salt in a coffee grinder or spice grinder
until there are NO remaining chunks.
• Remove from the food processor, add to bowl with the lemon juice,
and whip with a fork.
• You can turn this aioli into a fabulous dressing by blending 2/3 cup
cashews soaked in 2/3 cup water with 1/2 of a preserved lemon in
your blender.
These falafels are fantastic as appetizers, or for use in raw wraps or as a
topping on salads.
Vegan “Toasted”
Apple Cinnamon Cereal
Brendan Brazier, formulator of VEGA, and creator
of Zon Fitness, and Thrive Foods Direct. Brendan
is widely considered by many as an authority in
plant-based nutrition. He trains elite sports stars
and celebrities, consults and develops products
for top companies, and is a notable public
speaker. Brendan Brazier is a Canadian former
pro ironman; formulator of the amazing VEGA
products, (widely considered in health and
athletic circles as the best protein supplements
in the world), and bestselling author of the THRIVE
series: THRIVE, THE THRIVE DIET, THRIVE FITNESS,
and THRIVE FOODS. Brendan recently launched
Thrive Foods Direct, a food delivery service
based on the nutritional philosophy in his books.
What you will need:
1/2 apple, diced
1/4 tsp. Celtic sea salt
1/2 cup diced raw almonds
1/2 cup ground flaxseed
1/2 cup hemp flour
1/2 cup unhulled sesame seeds
1/2 cup sunflower seeds
1 1/2 tsp. ground cinnamon
1/4 tsp. ground nutmeg
1/4 tsp. ground stevia leaf
1/4 cup blackstrap molasses
2 tbsp. fresh apple juice
1/4 cup hemp oil or Vega Antioxidant & Omega Oil
1 cup gluten free oats or sprouted quinoa
Let’s Get Started!
• Combine the apple, oats, almonds, ground flaxseed, hemp flour, sesame
seeds, sunflower seeds, cinnamon, nutmeg, stevia,
and sea salt and stir until well combined.
• Blend together the hemp oil, molasses, and apple juice.
• Combine the liquid and dry ingredients and mix well.
• Spread on lined Excalibur dehydrator sheets.
• Dehydrate on 115˚F/46˚C for 24 - 48 hours depending on how much “crunch”
you want.
• If you don’t have a dehydrator, you can use the lowest setting of your oven.
• Break up into pieces and enjoy.
*This will keep refrigerated for up to 2 weeks.
*Makes 4 cups or about 5 servings.
onion bread crisp
What you’ll need:
1 large yellow onion
2 cups ground flaxseeds
2 cups ground sunflower seeds
3/4 cup coconut aminos or Nama Shoyu (*not gluten free)
3/4 cups cold pressed extra virgin olive oil
Matt’s recipe Onion Bread Crisp,
(Courtesy of Matt Amsden, RAWvolution)
Lets get started!
• Peel and halve the onions.
• In a food processor, cut the onions using the slicing blade.
• Transfer the cut onions to a mixing bowl, add the remaining ingredients, and mix until the
ingredients are thoroughly combined.
• Evenly spread 1 ½ cups of the mixture on an Excalibur dehydrator tray lined with a
Paraflexx® sheet.
•Dehydrate at 100°F/38˚C for 36 hours, removing the Paraflexx® sheet after the
first 24 hours.
• Once dehydrated, cut into 9 equal pieces (2 cuts horizontally, 2 cuts vertically).
• Makes about 2 ½ trays
Zucchini Chips with Marinara dip
For Zucchini Chips:
2 - 4 zucchinis
Preparing the Zucchini Chips:
• Slice the zucchini into slices with a knife or with a mandolin.
• Place the slices in your Excalibur dehydrator and leave in for as long as desired.
• The longer that you leave the slices in the dehydrator, the more crisp they become.
• These “chips” were left in the dehydrator about 6 hours on a low setting of about 105˚ to
115˚F (41˚ to 46˚C).
• Once done, organize them beautifully on a platter and get ready to make your marinara!
Kristina’s recipe Zucchini Chips
with Marinara Dip,
(Courtesy of Kristina Gabrielle
Carillo-Bucaram, founder of
Fully Raw and Rawfull Organic)
For Marinara:
1-2 ripe fresh tomatoes
3 stalks of Swiss chard
Juice of 1/2 Lemon (Optional)
1/2 cup fresh cilantro
1/2 cup fresh basil
1/4 cup of fresh oregano or thyme (optional)
1/2 red bell pepper for an added kick (optional)
Celtic sea salt to taste
Preparing the Marinara:
• Place all of your ingredients into a food processor and process until you achieve the
desired consistency.
• Serve and enjoy!
PUmpkin Nut cakes
½ cup raw pumpkin seeds, soaked 4-6 hours
½ cup raw walnuts
½ cup raw pecans
2 medjool dates
½ tsp. pumpkin pie spice
¼ tsp. Celtic sea salt
• Pulse your ingredients in the food processor until the mixture holds together when pressed
against the side of the bowl.
• Dump out onto waxed paper and flatten/roll out to about ¼” thick.
• At this point you could cut them into circles with a cookie cutter.
• Place on Paraflexx® sheets in your Excalibur dehydrator at 115˚F/46˚C for 6 hours, flipping
half way through. You can also place them on the regular dehydrator screens after 3
hours for a drier texture. These can be dehydrated for longer, depending on what texture
you want. The longer they are in the dehydrator, the crunchier they become.
• These cakes store very well. You could make them days ahead, or even freeze them for
a future event.
Christy’s recipe Pumpkin Nut Cakes
and Caramel Cashew Cream,
(Courtesy of Christy Smith,
Nutrition Therapist, Whole to Healthy)
Caramel Cashew Cream
1 cup raw cashews (soaking not necessary)
¼ cup date paste
1 tbsp. maple syrup or raw agave
2 tsp. maca powder
2-3 tbsp. filtered water, until
desired consistency
• Blend all the ingredients in your high speed blender until smooth, but still thick.
• You can always add more spices or sweetener to this until it suits your taste buds.
• This can be stored in the refrigerator for 3-4 days before use.
DRY IT, YOU’LL LIKE IT.
CONNECT WITH US!
www.facebook.com/ExcaliburDehydrators
www.twitter.com/drying123
http://www.youtube.com/excaliburdehydrators
http://www.pinterest.com/drying123/
8250 Ferguson Ave., Sacramento, CA 95828 | 1.800.875.4254 | ExcaliburDehydrator.com