1
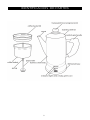
12 Cup Stainless Steel
Coffee Percolator
Model EC-120
INSTRUCTION MANUAL & RECIPES
Before operating your new appliance, please read all instructions
carefully and keep for future reference.
TABLE OF CONTENTS
…
….
IMPORTANT SAFEGUARDS________________________
1
PARTS IDENTIFICATION _________________________
2
OPERATING INSTRUCTIONS _______________________
4-5
CARE & MAINTENANCE __________________________
5
TROUBLESHOOTING ____________________________
5
WARRANTY & CUSTOMER SERVICE __________________
6
IMPORTANT SAFEGUARDS
When using electrical appliances, basic safety precautions should always be followed,
including the following:
• Read all instructions and retain the instruction manual in a safe place.
• Do not touch hot surfaces always use the handles and knobs.
• Do not immerse cord, plug, or base unit in water or other liquids.
• Close supervision is recommended when the appliance is used near children.
• Unplug when not in use or before cleaning.
• Always allow the percolator to cool before cleaning.
• Do not operate any appliance with a damaged cord or plug or after the
appliance malfunctions or has been damaged.
• The use of accessories or attachments is not recommended.
• Do not use outdoors or in wet/damp environments
• Do not let power cord hang over edge of table, counter, or touch hot surfaces.
• Do not place on or near sources of heat.
• Always fill the percolator first, then set the appliance onto the swivel base and
plug in.
• Do not operate when the water is below the minimum level.
• The appliance is not intended to be operated by means of an external timer or
separate remote-control system.
• The housing may get hot when the appliance is operating.
1
PARTS IDENTIFICATION
STOP!
Under NO circumstances should this Percolator or any of
its parts or components be placed ON or NEAR a
Stovetop, Range, or Open Flame.
Doing so will cause serious damage to the Percolator
and/or injury to person.
This is NOT a Stovetop Percolator.
2
OPERATING INSTRUCTIONS
1)
2)
3)
4)
5)
Before using your percolator for the first time, thoroughly wash all parts of the
percolator.
Remove coffee basket lid, coffee basket, stainless steel lid, and pump tube with
spring. Using the measurement markings found on the inside of the unit, fill the
Percolator with the desired amount of water. For best results, please use cold
water.
Place Coffee Basket over pump tube and spring. Add desired amount of coffee
grounds using the markings found inside the Coffee Basket.
Place Coffee Basket and Pump Tube assembly into the Percolator so that the bowl
shaped end of the Pump Tube fits directly into the well found on the bottom of the
inside of the Percolator. Place Coffee Basket Lid over the Coffee Basket and push
the Stainless Steel Lid on top of the Percolator.
Plug the Swivel Base into an outlet and connect the Percolator to the Swivel Base.
The green indicator light will light up. When coffee is finished brewing the red
indicator light will illuminate.
NOTE: It is best to use coarse ground coffee as finer grounds will sift through the
holes in the Coffee Basket. The following chart can be referenced as a guide for
brewing coffee at various strengths.
No of Cups of coffee 12 Mild (cups) Medium (cups) Strong (cups) 6 8 10 10 5 7 9 8 4 6 8 6 3 4 6 4 2 3 4 3
CARE & MAINTENANCE
•
•
•
•
•
•
•
•
•
Always remove the Percolator from the Swivel Base then unplug Swivel Base
from the wall outlet before attempting to clean the Percolator.
Allow Percolator to cool before cleaning.
Remove the Percolator body from the swivel base. Make sure the unit is sitting
evenly on a flat surface. Grasp the lid with the Brew Progress knob and gently
pull straight up.
Gently, pull the Coffee Basket, Coffee Basket Lid, and Pump Tube straight up
and out of the body. Take the Coffee Basket Lid off the Coffee Basket and
dispose of used coffee grounds.
The Stainless Steel Lid, Coffee Basket, Coffee Basket Lid, and Pump Tube (with
spring) can all be placed into the upper rack of a dishwasher or washed in
warm soapy water and rinse thoroughly.
Never immerse the Swivel base, its cables or the plug into water or wash in a
dishwasher
Simply wipe the Percolator body and base with a clean, damp cloth and dry
before storing.
Do not use scouring agents or harsh cleaners on any part of the Percolator.
Storage: The power supply cord is attached to the swivel base. For clutter free
storage, wrap the power cord into a coil underneath the swivel base.
NOTE: The washer at the bottom of the pump tube must be able to move freely to ensure
error free operation. In the event that coffee grounds become trapped near the washer,
loosen the trapped coffee grounds with a toothpick, and then run under water to clean.
4
LIMITED WARRANTY* ONE (1) YEAR
WARRANTY IS ONLY VALID WITH A DATED PROOF OF PURCHASE
1. Your small kitchen appliance is built with precision, inspected and tested before leaving
our factory.
2. It is warranted, to the original purchaser to be free from any manufacturing defects
under normal use and conditions for one (1) year, cord excluded. This Warranty applies
only to the original purchaser of this product.
3. If you need to exchange the unit, please return it in its original carton, with a sales
receipt, to the store where you purchased it. If you are past the store's allowed return policy
period, please see the enclosed Warranty.
4. If you use your appliance for household use and according to instructions, it should give
you years of satisfactory service.
5. During the one-year warranty period, a product with a defect will be either repaired or
replaced with a new or reconditioned comparable model (at our option) when the product is
returned to our Service Center. (See the “Returns” section below).
6. The repaired or replacement product will be in warranty for the remaining balance of the
one-year warranty period and an additional one-month period.
7. This limited warranty covers appliances purchased and used within the 50
contiguous states plus the District of Columbia and does NOT cover:
- Damages caused by unreasonable use, neglect, normal wear and tear, commercial use,
improper assembly or installation of product.
- Damages caused in shipping.
- Damages caused by replacement or resetting of house fuses or circuit breakers.
- Defects other than manufacturing defects.
- Breakage caused by misuse, abuse, accident, alteration, lack of proper care and
maintenance, or incorrect current or voltage.
- Lost or missing parts of the product. Parts will need to be purchased separately.
- Damages of parts that are not electrical; for example: cracked or broken plastic or glass.
- Damage from service or repair by unauthorized personnel.
- Extended warranties purchased via a separate company or reseller.
- Consumer’s remorse is not an acceptable reason to return a product to our Service
Center.
*One Year Limited Warranty valid only in the 50 contiguous states plus the District of
Columbia, excluding Puerto Rico and the Virgin Islands.
This warranty is effective only if the product is purchased and operated in the USA; product
usage which is in violation of the written instructions provided with the unit will void this
warranty.
For international warranty, please contact the local distributor.
**Any instruction or policy included in this manual may be subject to change at any time.
MAXI-MATIC, USA
18401 E. Arenth Ave. City of Industry, CA 91748
Customer Service Dept: (626) 912-9877 Ext: 120/107 MON-FRI 8am-5pm PST
Website: www.maxi-matic.com email: [email protected]
5
RETURN INSTRUCTIONS
RETURNS:
A. Any return of defective merchandise to the manufacturer must be processed
accordingly by first contacting customer service (contact information shown below) to
obtain an RA # (Return Authorization Number). We will not accept any returns of
merchandise without an applicable RA #.
B. IMPORTANT RETURN INSTRUCTIONS. Your Warranty depends on your following
these instructions if you are returning the unit to Maxi-Matic USA:
1. Carefully pack the item in its original carton or other suitable box to avoid
damage in shipping.
2. Before packing your unit for return, be sure to enclose:
a) Your name, full address with zip code, daytime telephone number,
and RA#,
b) A dated sales receipt or PROOF OF PURCHASE,
c) The model number of the unit and the problem you are having
(Enclose in an envelope and tape directly to the unit before the box is
sealed,) and
d) Any parts or accessories related to the problem.
3. Maxi-Matic USA recommends you ship the package U.P.S ground service for
tracking purposes. We cannot assume responsibility for lost or damaged
products returned to us during incoming shipment. For your protection, always
carefully package the product for shipment and insure it with the carrier. C.O.D
shipments cannot be accepted.
4. All return shipping charges must be prepaid by you.
5. Mark the outside of your package:
MAXI-MATIC USA
18401 E. ARENTH AVE.
CITY OF INDUSTRY, CA 91748
6. Once your return has been received by our warehouse, Maxi-Matic USA will
repair or replace the product if it is defective in material or workmanship, subject
to the conditions in paragraph B.
7. Maxi-Matic will pay the shipping charges to ship the repaired or
replacement product back to you.
6
TABLA DE CONTENIDO
….
1 IMPORTANTES MEDIDAS DE SEGURIDAD
2 IDENTIFICACIÓN DE PARTES
3 MANUAL
4 MANTENIMIENTO Y CUIDADOS
5 SOLUCIÓN DE PROBLEMAS
6 SERVICIO AL CLIENTE Y GARANTÍA
IMPORTANTES MEDIDAS DE SEGURIDAD
Cuando use aparatos eléctricos, precauciones básicas de seguridad deberán de seguirse,
incluyendo lo siguiente.
• Lea todas las instrucciones cuidadosamente y guarde el manual en un lugar
seguro
• No toque las superficies calientes, siempre utilize las agarraderas o perillas.
• No sumerja el cordón o enchufe eléctrico en agua o ningún otro líquido.
• Cercana supervisión es recomendada cuando el aparato es usado cerca de
niños.
• Desconecte el aparato cuando no este en uso o antes de limpiar.
• Siempre permita que el aparato enfríe completamente antes de limpiar.
• Si el cordón de alimentación esta dañado este debe ser remplazado por el
fabricante, personal capacitado o su agente de servicio, para evitar riezgos
• El uso de accesorios que no son del fabricante no es recomendado.
• No lo utilice a la intemperie, lugares húmedos o mojados.
• No deje que el cordón eléctrico cuelgue de la orilla de la mesa o toque
superficies calientes
• No coloque el aparato sobre o cerca de alguna fuente de calor.
• Siempre llene su percoladora con agua primero, luego coloquela sobre la base,
conecte el enchufe al toma corriente y encienda.
• No utilize su percoladora cuando el agua este abajo del minimo nivel.
• Este aparato no es con la intención de utilizarlo por medio de temporizadores
externos o sistemas de control remoto.
• El exterior de su aparato podría estar caliente, cuando esta en uso.
7
IDENTIFICACION DE PARTES
8
INSTRUCCIONES
1)
Lave todas las partes cuidadosamente de su percoladora antes de utilizarla por
primera vez.
Quite la tapa de acero inoxidable del filtro, tubo bomba y resorte de la cafetera. Utilize
las marcas de medición en el interior de la unidad y llene con la cantidad de agua
deceada, Para obtener mejores resultados, favor de usar agua fría.
Coloque el filtro sobre el resorte y tubo. Ponga la cantidad de cafe granulado a su
gusto, utilizando las marcas en el interior del filtro.
Coloque el filtro ya ensamblado en el tubo bomba e introduzca dentro de la
percoladora, asegurandose de que la punta inferior del tubo en forma de media bola
entre directamente en el hueco de la percoladora. Coloque la tapadera en el filtro
despues coloque y presione la tapadera con botón sobre la percoladora.
Conecte el enchufe de la base al toma corriente luego coloque la cafetera en la
misma base. La luz verde indicadora de encendido se iluminara y finalmente cuando
el café este ya preparado, una luz roja encendera.
2)
3)
4)
5)
NOTA: Es mucho mejor utilizar café granulado grueso, el fino podría colarse a travez
de los hoyos del filtro y quedar en en el fondo de la percoladora. La siguiente tabla de
referencia le servira como una gía para elaborar café
# De tazas Suave (Tazas) Medio (Tazas) Fuerte (Tazas) 12 6 8 10 10 5 7 9 8 4 6 8 6 3 4 6 4 2 3 4 9
MANTENIMIENTO Y CUIDADOS
•
•
•
•
•
•
•
•
•
Siempre remueva la cafetera de la base giratoria. Luego desconecte del toma
corriente antes de tratar de limpiarla
Permita que la cafetera enfrié completamente antes de limpiar.
Remueva la percoladora de la base giratoria . Asegurese de que la percoladora
este sentada en una superficie plana y solida. Agarre la perilla transparente de
la tapadera y jale con cuidado.
Cuidadosamente saque el filtro, tapadera, resorte y tubo fuera de la
percoladora. Quite la tapadera del filtro y desagase de los residuos de cafe ya
utilizados.
La tapadera de acero inoxidable del filtro, filtro, resorte y tubo podrán ser
colocados el la parte superior de un lavaplatos o si lo prefiere lavarlos en agua
tíbia con jabón y luego secarlos.
Nunca sumerja la base de la percoladora, cordon eléctrico o enchufe en agua o
lavar en el lavaplatos.
Simplemente limpie la superficie exterior de la percoladora con un trapo
húmedo y limpio. Seque antes de guardar.
No use limpiadores abrasivos o estropajos de metal en ninguna parte de su
percoladora.
El cordon de alimentación esta integrado en la base giratoria Para librarse de lo
largo del cordon eléctrico, enrredelo en la parte inferior de la base giratoria y
guardelo junto con la percoladora.
NOTA: La arandela en la parte baja del tubo bomba, devera de moverse
libremente para asegurar una operación sin errores En caso de que algunos
granos de café queden atrapados cerca de la arandela, remueva los granos de
café con un picadientes y despues limpie con un chorro de agua.
ESPECIFICACIONES ELÉCTRICAS PERCOLADORA
MODELO: EC120
120 Vca 60 Hz 1000 W
ECHO EN CHINA
USO DOMÉSTICO UNICAMENTE
10
GARANTÍA LIMITADA * UN (1) AÑO
GARANTIA ES VALIDA CON UNA PRUEBA DE COMPRA FECHADA
1. Su aparato de cocina está construido con precisión, inspeccionados y probados antes
de salir de nuestra fábrica.
2. Se garantiza, al comprador original, de estar libres de defectos de fabricación en
condiciones de uso normales y las condiciones para un (1) año, cordones excluidos. Esta
garantía se aplica sólo al comprador original de este producto.
3. Si necesita cambiar la unidad, devuélvala en su caja original, con el recibo de compra, a
la tienda donde lo compró. Si usted está más allá del plazo concedido para el retorno por
la política de la tienda, por favor consulte la garantía incluida.
4. Si utiliza el aparato para uso doméstico y de acuerdo con las instrucciones, debería
ofrecerle años de servicio satisfactorio.
5. Durante el período de garantía de un año, un producto con un defecto será reparado o
reemplazado por un modelo nuevo o reacondicionado (a nuestro criterio) cuando el
producto sea devuelto a nuestro Centro de Servicio. (Consulte la sección "Devoluciones" a
continuación).
6. El producto reparado o reemplazado estará garantizado por el saldo restante del
período de garantía de un año y un plazo adicional de un mes.
7. Esta garantía limitada cubre los aparatos comprados y usados en los 50 estados
contiguos y el Distrito de Columbia, y no cubre:
- Los daños causados por el uso excesivo, negligencia, uso y desgaste normal, uso
comercial, montaje o instalación incorrecta del producto.
- Los daños causados durante el envío.
- Los daños causados por la sustitución o reposición de fusibles o disyuntores.
- Defectos que no sean defectos de fabricación.
- Rotura causada por mal uso, abuso, accidente, alteración, falta de cuidado y
mantenimiento, o incorrecta de corriente o voltaje.
- Pérdida o falta alguna pieza del producto. Las piezas se deben comprar por separado.
- Daños de piezas que no sean eléctricos; por ejemplo: agrietado o roto de plástico o de
vidrio.
- Daños por servicio o reparación por personal no autorizado.
- Las garantías extendidas compradas a través de una empresa independiente o
revendedor.
- Remordimiento del consumidor no es una razón aceptable para devolver un producto a
nuestro Centro de Servicio.
* Un año de garantía limitada válida solamente en los 50 estados contiguos y el Distrito
de Columbia, excluyendo Puerto Rico y las Islas Vírgenes.
Esta garantía es válida sólo si el producto es comprado y operado en los EE.UU., el uso
del producto que se encuentra en violación de las instrucciones escritas proporcionadas
con la unidad anulará esta garantía.
Para la garantía internacional, por favor póngase en contacto con el distribuidor local.
** Cualquier instrucción o política incluida en este manual puede estar sujeta a cambios en
cualquier momento.
MAXI-MATIC, EE.UU.
18401 E. Ave Arenth. City of Industry, CA 91748
Departamento de Atención al Cliente: (626) 912-9877 Ext: 120/107 Lunes a viernes 8am5pm PST
Sitio web: www.maxi-matic.com email: [email protected]
11
INSTRUCCIONES DE DEVOLUCIÓN
DEVOLUCIONES:
A. Cualquier devolución de mercancía defectuosa al fabricante deben ser procesados
apropiadamente contactando primero al servicio al cliente (información de contacto se
muestra a continuación) para obtener un # RA (Número de autorización de devolución). No
se aceptará ninguna devolución de mercancía sin un # RA aplicable.
B. INSTRUCCIONES IMPORTANTES DE RETORNO. Su garantía depende que usted
siga estas instrucciones si va a devolver la unidad a Maxi-Matic EE.UU.:
1. Empaque cuidadosamente el producto en su caja original o en otra caja
adecuada para evitar daños durante el envío.
2. Antes del envío de la devolución unidad, asegúrese de adjuntar:
a) Su nombre, dirección completa con código postal, número de
teléfono durante el día, y #RA
b) Un recibo de compra fechado o COMPROBANTE DE COMPRA,
c) El número de modelo de la unidad y el problema que tiene (Encierre
en un sobre y pegue directamente a la unidad antes de
sellar la caja) y
d) Todas las piezas o accesorios relacionados con el problema.
3. Maxi-Matic EE.UU. recomienda enviar el paquete de servicio terrestre de UPS
para fines de seguimiento. No podemos asumir la responsabilidad por productos
perdidos o dañados devueltos a nosotros durante el transporte entrante. Para su
protección, siempre cuidadosamente empaquetar el producto para su envío y
asegurarlo con la compañía. Envíos C.O.D no puede ser aceptado.
4. Todos los gastos de envío de devolución debe ser pagado por usted.
5. Marque el exterior del paquete:
MAXI-MATIC EE.UU.
18401 E. ARENTH AVE.
CITY OF INDUSTRY, CA 91748
6. Una vez que su devolución ha sido recibida por nuestro almacén, Maxi-Matic
EE.UU. se compromete a reparar o sustituir el producto si presenta defectos
de materiales o mano de obra, sujeto a las condiciones del apartado B.
7. Maxi-Matic pagará los gastos de envío para enviar el producto reparado
o reemplazado de nuevo a usted.
12