1
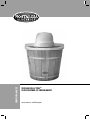
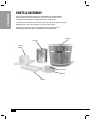
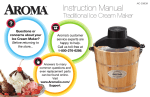
All products are trademarks of Nostalgia Products Group, LLC.
Worldwide design & utility patented or patents pending.
© 2012 Nostalgia Products Group, LLC.
www.nostalgia electrics.com
(rev. 11/12/2012)
ICMP400WD
VINTAGE COLLECTION™
OLD FASHIONED ICE CREAM MAKER
Instructions and Recipes
CONTENTS
IMPORTANT PRECAUTIONS . . . . . . . . . . . . . . . . . . . . . . . . . . . . . . 3
IMPORTANT SAFEGUARDS . . . . . . . . . . . . . . . . . . . . . . . . . . . . . . 3
INTRODUCTION . . . . . . . . . . . . . . . . . . . . . . . . . . . . . . . . . . . . . 4
PARTS & ASSEMBLY . . . . . . . . . . . . . . . . . . . . . . . . . . . . . . . . . . . 5
HOW TO OPERATE . . . . . . . . . . . . . . . . . . . . . . . . . . . . . . . . . . . 6
HELPFUL TIPS . . . . . . . . . . . . . . . . . . . . . . . . . . . . . . . . . . . . . . 7
CLEANING & MAINTENANCE . . . . . . . . . . . . . . . . . . . . . . . . . . . . . 8
RECIPES . . . . . . . . . . . . . . . . . . . . . . . . . . . . . . . . . . . . . . . . . . 9
RETURNS & WARRANTY . . . . . . . . . . . . . . . . . . . . . . . . . . . . . . . 14
SAFETY
Your safety and the safety of others is very important.
We have provided many important safety messages in this manual
and on your appliance. Always read and obey all safety messages.
This is the safety alert symbol.
This symbol alerts you to potential hazards that can kill or hurt you and others.
All safety messages will follow the safety alert symbol.
All safety messages will tell you what the potential hazard is, tell you how to reduce the
chance of injury, and tell you what can happen if the instructions are not followed.
Appliance Specifications:
120 Volts, 60 Hz
50 Watts, ETL Approved
THIS PRODUCT IS FOR USE IN 120V AC OUTLET ONLY.
2
ENGLISH
Make everyday a party!
Visit www.nostalgiaelectrics.com for more fun products.
ENGLISH
IMPORTANT PRECAUTIONS
1.
NEVER immerse in water.
2.
NEVER use near water.
3.
NEVER use an abrasive sponge or cloth on the unit.
4.
NEVER leave unit unattended while in use.
5.
NEVER add nuts, candy, fruit or other chunky ingredients to the unit. They
may clog the dispenser and prevent ice cream from churning properly.
6.
Unplug unit from outlet when not in use and when cleaning.
7.
DO NOT operate this appliance with a damaged cord or plug
or in the event the appliance ever malfunctions.
8.
DO NOT put in dishwasher.
9.
Keep out of reach of children.
10. This appliance is NOT A TOY.
11. This appliance is not intended for use by unsupervised young
children or cognitively challenged individuals.
12. Young children should be supervised while product is in use
to ensure that they do not play with the appliance.
IMPORTANT SAFEGUARDS
When using electrical appliances, basic safety precautions
should always be followed, including:
1.
Read all instructions before operating this appliance.
2.
To protect against electrical shock do not immerse cord, plug
or any part of this unit in water or other liquids.
3.
Close supervision is necessary when any appliance is used by or near children.
4.
To avoid fire or shock hazard, or damage to the unit, this unit should
be plugged into a polarized 120 Volt AC outlet ONLY.
5.
Unplug from outlet when not in use and before removing parts for cleaning.
6.
DO NOT operate any appliance with a damaged cord or plug or if the
appliance has been damaged in any manner. Return the appliance
to the nearest repair shop for examination or repair.
7.
The manufacturer does not recommend the use of accessory
attachments. Use of attachments may cause injuries.
8.
NEVER operate the unit dry. Always have ice cream mixture
inside of the container while plugged in.
9.
DO NOT use hot oil or liquids in the Bucket. Always chill mixture before churning.
10. DO NOT use outdoors.
11. DO NOT let the cord touch hot surfaces.
12. DO NOT place on or near a hot gas or electric burner, or in a heated oven.
3
13. This unit must be on a level surface to operate properly.
ENGLISH
14. DO NOT use this appliance for other than its intended use.
15. DO NOT leave unit unattended while in use or when plugged into an outlet.
16. A short power supply cord is provided to reduce the risk resulting
from becoming entangled or tripping over a long cord.
17. Extension cord can be used if care is exercised in use.
18. The marked electrical rating of an extension cord should be at
least as great as the electrical rating of the appliance.
19. This appliance has a polarized plug (one blade is wider than the other). To reduce the
risk of electrical shock, this plug is intended to fit into a polarized outlet only one way.
20. DO NOT put hands or any foreign objects into this appliance
while it is plugged in and operating.
SAVE THESE INSTRUCTIONS!
INTRODUCTION
Thank you for purchasing the VINTAGE COLLECTION™ OLD FASHIONED ICE CREAM
MAKER from Nostalgia Electrics. The VINTAGE COLLECTION™ OLD FASHIONED ICE
CREAM MAKER provides a homemade ice cream experience with modern convenience.
Simply place the aluminum canister filled with ingredients in the center of the
bucket, fill the bucket with ice, and the electric motor does the churning for you.
Soon, delicious ice cream is ready to serve! Makes 4 quarts of ice cream per batch.
4
ENGLISH
PARTS & ASSEMBLY
Take the VINTAGE COLLECTION™ OLD FASHIONED ICE CREAM MAKER
out of the box and wash the Bucket, Canister, Lid and all accessories
(except for Electric Motor and plug) with warm, soapy water.
Carefully wipe down the Electric Motor with a non-abrasive cloth or sponge.
NEVER immerse the Electric Motor in water. Dry thoroughly.
Now you are ready to enjoy creamy, delicious ice cream from your
VINTAGE COLLECTION™ OLD FASHIONED ICE CREAM MAKER.
Bucket
Canister
Electric
Motor
Lid Cap
Lid
Dasher
5
1.
First, find a stable surface near an electrical outlet before starting. Make sure the cord
is away from any water source. It is acceptable to use an extension cord if needed.
2.
Chill ice cream Canister until cold to the touch.
3.
Choose your favorite recipe and prepare ice cream mixture per recipe instructions.
4.
Pour chilled ice cream mixture into the chilled Canister. Make sure that you do not
fill Canister more than ²/3 full, as mixture will expand during freezing process.
5.
Insert the Dasher into the Canister and make sure the bottom of the
Dasher is properly aligned in the center of the Canister.
6.
Place the Lid on the Canister.
7.
Place the Canister into the bottom center of the Bucket.
8.
Slide the two rectangular ends of the Electric Motor into the
two rectangular holes on the rim of the bucket.
9.
Before adding ice, be sure that the ice you put into the bucket is broken into small,
rough pieces. You may use a mallet or hammer to break into smaller pieces if
needed. For each batch of ice cream, expect to use 1-2 medium bags of ice.
ENGLISH
HOW TO OPERATE
10. Fill the Bucket with a small layer of ice (about 6 cups) evenly
distributed around the base of the Canister.
11. Cover the first layer of ice evenly with a thin layer of rock salt (about ½ cup). Regular
table salt or kosher salt can also be used. Salt is necessary for the freezing process.
It may take a total of 2 - 4 cups of salt to freeze ice cream mixture properly (1 lb.
salt = 2 cups / 2 lbs. salt = 4 cups). The more salt that you use, the better.
12. Repeat steps 10 and 11, layering the ice and salt until it reaches the top of the Canister.
Stop when the top of the mixture reaches the bottom of the drainage hole on the side
of the Bucket. Adding more ice may cause the mixture to leak out of the drainage hole.
13. As the ice melts down 2 to 3 inches, you may add more ice and more rock salt to the Bucket.
14. Plug the power cord attached to the Electric Motor into an outlet to turn unit on.
15. As the Canister turns, stir and mix the salt and ice together every 10-15
minutes, or as needed, while the ice cream maker is in use.
16. Turn off and unplug Electric Motor once ice cream has churned for about
30 minutes, or once the Electric Motor has stopped. If the motor stops
prematurely, turn it off, break up any ice blockages, and start again.
17. With one hand on the Canister Lid, remove the Electric Motor from the
Bucket. Be careful as the Canister may float in the ice water.
18. Clear the ice and salt away from the top of the Canister. Wipe carefully
to remove the salt and water before removing the cover.
19. Take the Dasher out and scrape off excess ice cream with a spatula.
20. Transfer ice cream to a freezer-safe container and freeze, or serve straight from the Canister.
Lid and Lid Cap are included for the option of storing the Canister in the freezer.
6
ENGLISH
HELPFUL TIPS
Taste
Finished ice cream will always taste less sweet than the initial mixture. You
may adjust the amount of sugar in the recipe to suit your taste.
Artificial sweeteners may be used in place of sugar. Use
the following measurements for reference:
•
1 packet of sweetener = 2 tsp. of sugar
•
6 packets of sweetener = ¼ cup of sugar
•
8 packets of sweetener = ¹/3 cup of sugar
•
12 packets of sweetener = ½ cup of sugar
Texture
To ensure that ice crystals do not form in ice cream mixture, do not stop
the churning process at any time until the ice cream is ready.
If the texture of ice cream is hard or grainy, make sure that you do not have too
much rock salt in the ice water. Too much salt can cause the mixture to freeze
too quickly, which can also cause ice crystals to form in the ice cream.
Consistency
Homemade ice cream generally has a thick, milkshake texture. If you
prefer a thicker, or firm consistency try one of the following:
•
Remove the Dasher and place the Lid and Cap on the
Canister. Place Canister in freezer to harden.
•
Remove the Dasher and add more ice to the ice-salt mixture. Cover
with a towel and let sit until ice cream becomes firm.
•
Too little salt may inhibit the freezing of the ice cream mixture. Try adding more salt.
•
Recipes that call for alcohol may inhibit the freezing process. Be sure to
add any alcohol during the last few minutes of the freezing cycle.
Jamming
If the Dasher gets jammed or Electric Motor stops prematurely, try the following:
•
Ice may cause a blockage in the Bucket. Turn off the Electric Motor and make sure
that the ice is broken up into small pieces. You may use a plastic stirrer to do this.
•
Make sure that the consistency of the ice cream is not thicker
than soft serve ice cream or the Dasher may get stuck.
•
Ice Cream recipes that include hard ingredients like nuts or chocolate
chips may cause the Dasher to become lodged in the Canister. DO
NOT add hard ingredients until the churning process is done.
•
DO NOT stop the churning process until ice cream is finished. Stopping in the middle of the
process can cause the ice cream to harden and restrict the movement of the Dasher.
7
•
The Canister was not cold enough. Try adding more ice and salt. Salt
is a critical part of the freezing process and you will need plenty of
salt added to the ice for the ice cream to freeze properly.
•
The mixture was too warm. Make sure that the ingredients that you add are chilled
and not warm, lukewarm or of room temperature before adding to the Canister.
ENGLISH
Freezing
•
DO NOT operate the unit longer than required. If after 30 minutes the
mixture has not yet achieved the slush consistency or has thawed again, do
not continue. Possible reasons for mixture not chilling or freezing:
CLEANING & MAINTENANCE
1.
Make sure the Electric Motor is turned off and the unit is unplugged.
2.
Remove Electric Motor and wipe with slightly damp, non-abrasive cloth. NEVER
immerse Electric Motor in water or any other liquid. Dry thoroughly.
3.
Wash Bucket in warm, soapy water to thoroughly remove all salt water residue.
4.
Wash Canister, Lid and Dasher in warm, soapy water and dry thoroughly.
DO NOT replace Lid until the Canister is completely dry.
5.
DO NOT use harsh or abrasive cleaners.
6.
DO NOT place Canister or any other parts in a dishwasher. Hand wash only.
7.
DO NOT freeze the Canister when it is wet.
8
ENGLISH
RECIPES
The VINTAGE COLLECTION™ OLD FASHIONED ICE CREAM MAKER makes
rich, creamy ice cream anytime! Try these delicious recipes and tips:
•
To reduce the risk of salmonella poisoning caused by raw eggs, heat
mixtures with eggs to a temperature of 160° F, but DO NOT bring to a
boil. You may also use pasteurized eggs in place of raw eggs.
•
Be sure to add ice cream mixture to Canister and chill for 30 minutes prior to use.
•
For ice cream recipes that require cooking, it is recommended that you cook one
day in advance. The mixture will then have time to cool completely and expand.
EASY CHOCOLATE ICE CREAM
•
6 Cups Milk
In a large mixing bowl, combine milk and condensed milk.
•
3 Large Cans
Condensed Milk
Dissolve the cocoa in a bit of hot water.
•
15 Tbsp. Cocoa
Once dissolved, stir cocoa into the milk
mixture until completely blended.
Pour ingredients into the Canister and follow
directions in HOW TO OPERATE section.
Do not fill the Canister more than ²/3 full, as
the mixture will expand during freezing.
EASY VANILLA ICE CREAM
•
6 Cups Cream
Combine all ingredients in Canister.
•
4 ½ Cups Half
and Half
Do not fill the Canister more than ²/3 full, as
the mixture will expand during freezing.
•
2 ¼ Cup Sugar
•
1 ½ Tbsp. Vanilla
Stir well until sugar has dissolved.
Freeze until Canister is cold to touch.
Follow directions in HOW TO OPERATE section.
9
RICH & CREAMY CHOCOLATE ICE CREAM
2 ²/3 Cups
Granulated Sugar
Mix the sugar, corn starch, and salt in a
large saucepan over medium heat.
•
2 Tsp. Corn Starch
•
½ Tsp. Salt
Slowly pour in the milk, stirring constantly
until the milk begins to simmer.
•
6 Cups Milk
Very slowly add the beaten eggs and continue to stir.
•
4 Eggs, beaten
Reduce heat to low and cook until mixture thickens slightly.
•
6 Squares Semi-Sweet
Chocolate, melted
Slowly stir in the melted chocolate and whisk until
all chocolate is combined and mixture is smooth.
•
2 Tbsp. Vanilla Extract
•
1 ¹/3 Cups Half
and Half
•
2 Cups Heavy Cream
ENGLISH
•
Slowly add vanilla, half and half, and heavy cream.
Pour into a large glass bowl and refrigerate for 2-4 hours
or until mixture has chilled. Remove from refrigerator.
Pour ingredients into the Canister and follow
directions in HOW TO OPERATE section.
Do not fill the Canister more than ²/3 full, as
the mixture will expand during freezing.
OLD FASHIONED VANILLA ICE CREAM
•
2 Cups Granulated
Sugar
Mix the sugar, corn starch, and salt in a
large saucepan over medium heat.
•
1 ½ Tbsp. Corn Starch
Slowly pour in the milk while stirring constantly.
•
¼ Tsp. Salt
Very slowly add the beaten eggs and continue to stir.
•
7 Cups Milk
•
5 Eggs, beaten
•
1 ½ Tbsp. Vanilla
•
1½ Cups Half and Half
•
2 ¾ Cups Heavy
Cream
Reduce heat to low and cook until mixture thickens slightly.
Slowly add vanilla, half and half and heavy cream.
Pour into a large glass bowl and refrigerate for 2-4 hours
or until mixture has chilled. Remove from refrigerator.
Pour mixture into the Canister and follow
directions in the HOW TO OPERATE section.
Do not fill the Canister more than ²/3 full, as
the mixture will expand during freezing.
10
ENGLISH
COOKIE DOUGH ICE CREAM
•
6 Large Eggs
•
2 ¼ Cups Sugar
•
6 Cups Heavy Cream
•
3 Cups Milk
•
1 Cup Mini
Chocolate Chips
•
1 Cup Chocolate
Chip Cookie Dough,
crumbled into
small pieces
Place the cookie dough and the chocolate chips
in a separate bowl. Cover and chill until cold.
Whisk the eggs in a mixing bowl 1-2
minutes until light and fluffy.
Slowly add sugar, whisking until completely blended.
Slowly add cream and milk and whisk until blended.
Pour mixture into the Canister and follow
directions in the HOW TO OPERATE section.
Do not fill the Canister more than ²/3 full, as
the mixture will expand during freezing.
When the mixture has finished churning, add cookie
dough and chocolate chips and stir in evenly.
ROCKY ROAD ICE CREAM
Mix the milk and chocolate chips in a large saucepan over
medium heat until the chocolate has completely melted.
•
2 Cups Milk
•
1 ½ Cups
Chocolate Chips
•
1 ¾ Cup Granulated
Sugar
•
½ Tsp Salt
Stir in the remaining ingredients except the
marshmallows, pecans and chocolate chips.
•
6 Cups Whipping
Cream
Cover and refrigerate for about 30 minutes
or until mixture has chilled.
•
2 Cups Half and Half
•
1 Tbsp Vanilla Extract
Pour mixture into the Canister and follow
directions in the HOW TO OPERATE section.
•
1 Cup Chopped
Pecans
Do not fill the Canister more than ²/3 full, as
the mixture will expand during freezing.
•
2 Cups Mini
Marshmallows
When mixture has finished churning, add marshmallows,
pecans, and chocolate chips and stir in evenly.
11
Remove from heat and slowly add sugar
and salt, mixing well, until dissolved.
PEANUT BUTTER CHOCOLATE CHIP ICE CREAM
2 ²/3 Cups
Granulated Sugar
Mix the sugar, corn starch, and salt in a
large saucepan over medium heat.
•
½ Tsp. Salt
Slowly pour in the milk while stirring constantly.
•
2 Tbsp. Corn Starch
•
6 Cups Milk
•
4 Eggs, beaten
•
1 Cup Peanut Butter
or Melted Peanut
Butter Morsels
•
1 ½ Tsp. Vanilla
•
1 ¹/3 Cups Half
and Half
•
2 Cups Heavy Cream
Pour mixture into the Canister and follow
directions in the HOW TO OPERATE section.
•
1 ½ Cup Chocolate
Chips
Do not fill the Canister more than ²/3 full, as
the mixture will expand during freezing.
Very slowly, add the beaten eggs and continue to stir.
Reduce heat to low and cook until mixture thickens slightly.
Slowly stir in peanut butter and whisk until all peanut
butter is combined and mixture is smooth.
Slowly add vanilla, half and half, and heavy cream.
Pour mixture into a large glass bowl and refrigerate for 2-4
hours or until mixture has chilled. Remove from refrigerator.
When mixture has finished churning, add
chocolate chips and stir evenly.
COFFEE ICE CREAM
•
6 Cups Cream
Combine all ingredients in Canister.
•
4 ½ Cups Half
and Half
Do not fill the Canister more than ²/3 full, as
the mixture will expand during freezing.
•
2 ¼ Cup Sugar
•
4 ½ Tbsp. Instant
Coffee Powder
Stir well until both sugar and instant
coffee powder have dissolved.
Freeze until Canister is cold to touch.
Follow directions in HOW TO OPERATE section.
12
ENGLISH
•
ENGLISH
BERRY SORBET
•
2 (12-oz.) Bags of
Frozen Mixed Berries
Finely puree the berries in a blender
with apple juice and water.
•
1 Cup Apple Juice
•
1 Cup Water
Strain mixture into a large saucepan to
remove seeds. Discard seeds.
•
2 Cups Granulated
Sugar
Add sugar to the seedless berry mixture, bring to
a boil for 3-4 minutes. Stir in remaining juices.
•
¹/3 Cup Fresh
Lemon Juice
Pour into a large glass bowl and refrigerate for 2-4 hours.
•
4 Cups Cranberry
& Raspberry
Juice Mixture
Pour mixture into the Canister and follow
directions in the HOW TO OPERATE section.
Do not fill the Canister more than ²/3 full, as
the mixture will expand during freezing.
PINEAPPLE SORBET
•
2 (12-oz.) Bags of
Frozen Pineapple
Finely puree the pineapple in a blender
with apple juice and water.
•
1 Cup Apple Juice
•
1 Cup Water
Strain mixture into a large saucepan
to get a smooth consistency.
•
2 Cups Granulated
Sugar
Add sugar to the pineapple mixture, bring to a
boil for 3-4 minutes. Stir in remaining juices.
•
½ Cup Fresh
Lemon Juice
Pour into a large glass bowl and refrigerate for 2-4 hours.
•
4 ½ Cups
Pineapple Juice
Pour mixture into the Canister and follow
directions in the HOW TO OPERATE section.
Do not fill the Canister more than ²/3 full, as
the mixture will expand during freezing.
13
ENGLISH
RETURNS & WARRANTY
SHOULD YOUR UNIT NOT WORK OR IF DAMAGED WHEN YOU FIRST TAKE IT OUT
OF THE BOX PLEASE RETURN IT TO THE PLACE OF PURCHASE IMMEDIATELY.
VINTAGE COLLECTION™ OLD FASHIONED ICE CREAM MAKER / ICMP400WD
Should you have any questions, please contact us via email or at the
customer service number listed below between the hours of 8:00 AM
and 5:00 PM, Monday through Friday, Central Standard Time.
Distributed by:
Nostalgia Products Group LLC
1471 Partnership Dr.
Green Bay, WI 54304-5685
Customer Service
Phone: (920) 347-9122
Web: www.nostalgiaelectrics.com
Customer Service Inquiry
To submit a Customer Service inquiry, go to www.nostalgiaelectrics.com and
fill out the Customer Service Inquiry form and click the Submit button.
A representative will contact you as soon as possible.
This appliance is designed and built to provide many years of satisfactory performance
under normal household use. The distributor pledges to the original owner that
should there be any defects in material or workmanship during the first 90 days of
purchase, we will repair or replace the unit at our option. Our pledge does not apply
to damages caused by shipping, mishandling or unit being dropped. A product
deemed defective either from manufacturing or being mishandled is up to the
distributor’s discretion. In order to obtain service under this warranty, please contact
Nostalgia Products Group, LLC at the telephone number listed above or by filling
out the Customer Service Inquiry Form located at www.nostalgiaelectrics.com.
This product is not recommended for use outside of North America. The warranty
is void if products are exported outside of the USA, Canada or Mexico.
This warranty does not apply to re-manufactured merchandise.
Please read these instructions carefully. Failure to comply with these instructions,
damages caused by improper replacement parts, abuse or misuse will void this
pledge to you and is being made in place of all other expressed warranties.
For more information, visit us online at www.nostalgiaelectrics.com.
Like us on Facebook at www.facebook.com/NostalgiaElectrics.
14