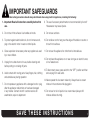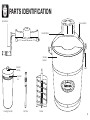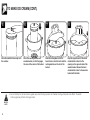
1
Instruction Manual
Traditional Ice Cream Maker
Questions or
concerns about your
Ice Cream Maker?
Before returning to
the store...
Aroma’s customer
service experts are
happy to help.
Call us toll-free at
1-800-276-6286.
Answers to many
common questions and
even replacement parts
can be found online.
Visit
www.AromaCo.com/
Support.
AIC-206EM
Thank you for your purchase of the Aroma® Traditional Ice Cream Maker. This unique appliance will bring the fun tradition of homemade ice cream into your home. Enjoy
creating classic ice cream flavors or even experimenting with new favorites.
The included hand crank allows for the traditional experience of churning a homemade frozen treat yourself. And the electric motor allows for the modern convenience of
the ice cream maker completing the job itself. Whatever your preference, the Aroma® Traditional Ice Cream Maker is a fun and easy way to enjoy the timeless American
tradition of fresh, homemade ice cream.
In addition to instructions and tips on the use of your new ice cream maker, this manual also contains a number of delicious recipes. For more recipes (and even to submit
your own), replacement parts, service and other great kitchen solutions, visit www.AromaCo.com.
Published By:
Aroma Housewares Co.
6469 Flanders Drive
San Diego, CA 92121
U.S.A.
1-800-276-6286
www.AromaCo.com
©2014 Aroma Housewares Company
All rights reserved.
IMPORTANT SAFEGUARDS
Basic safety precautions should always be followed when using electrical appliances, including the following:
1. Important: Read all instructions carefully before first
use.
8. The use of accessory attachments not recommended by Aroma®
Housewares may cause injuries.
2. Do not touch hot surfaces. Use handles or knobs.
9. Do not use outdoors.
3. To protect against electrical shock, do not immerse cord,
plug or the electric motor in water or other liquids.
10. Do not allow cord to hang over the edge of the table or counter or
to touch hot surfaces.
4. Close supervision is necessary when any appliance is used
by or near children.
11. Do not use this appliance for other than its intended use.
5. Unplug from outlet when not in use, before cleaning and
before putting on or taking off parts.
6. Avoid contact with moving parts. Keep fingers, hair, clothing
and utensils away during operation.
7. Do not operate any appliance with a damaged cord or plug,
after the appliance malfunctions or has been damaged
in any manner. Contact Aroma® customer service for
examination, repair or adjustment.
12. Do not place this appliance on or near a hot gas or electric burner,
or in a heated oven.
13. To disconnect power, press switch to the “OFF” position and then
remove plug from wall outlet.
14. Never operate the ice cream maker dry. Always have ice cream
mixture in the container while plugged in.
15. Do not use hot oil or liquids in ice cream maker (always chill
mixtures before churning).
SAVE THESE INSTRUCTIONS
1
IMPORTANT SAFEGUARDS
DO NOT DRAPE CORD!
Short Cord Instructions
1. A short power-supply cord is provided to reduce the risks resulting from becoming
entangled in or tripping over a longer cord.
2. Longer extension cords are available and may be used if care is exercised in their use.
3. If a longer extension cord is used:
a.
The marked electrical rating of the extension cord should be at least as great as
the electrical rating of the appliance.
b.
The longer cord should be arranged so that it will not drape over the counter top
or tabletop where it can be pulled by children or tripped over unintentionally.
KEEP AWAY
FROM CHILDREN!
Polarized Plug
This appliance has a polarized plug (one blade is wider than the other); follow the instructions below:
To reduce the risk of electric shock, this plug is intended to fit into a polarized outlet only one way. If the plug does not fit fully into the outlet,
reverse the plug. If it still does not fit, contact a qualified electrician. Do not attempt to modify the plug in any way.
If the supply cord is damaged, it must be replaced by the manufacturer, its service agent or a similarly qualified person in order to avoid a hazard.
2
THIS APPLIANCE IS FOR HOUSEHOLD USE ONLY.
PARTS IDENTIFICATION
Hand Crank
Power Switch
Electric Motor
Wooden
Bucket
Canister
Lid Cap
Latch
Canister
Lid
Freezing Canister
Stir Stick
Dasher
3
BEFORE FIRST USE
1.
Read all instructions and important safeguards.
2.
Remove all packaging materials and ensure items have been received in good condition.
3.
Tear up all plastic bags, as they can pose a risk to children.
4.
Wash the canister lid, freezing canister, canister cap, dasher and stir stick in warm, soapy water. Dry thoroughly.
5.
Wipe electric motor and hand crank with a damp cloth.
6.
Treat the wooden bucket. To prevent leaks, the wooden bucket will need to be treated before each use. Place the bucket in a water-safe area and fill it roughly ⅔
full with water. Allow it to soak for about one and a half hours. This will give the wood a chance to expand so that the water/salt mixture will not leak during use.
7.
Assemble the hand crank. To assemble, attach the handle portion to the crank (Figure A). Secure the handle to the crank with the provided screw using a
Phillips-head screwdriver (Figure B).
Figure A
NOTE
4
Figure B
• When first opening the ice cream maker, an odor may be present from the treatment process of the wooden bucket. This is normal.
Allow the wood bucket to air out and the odor should dissipate shortly.
• Do not use abrasive cleaners or scouring pads.
• Do not immerse the electric motor, cord or plug in liquid at any time.
TO MAKE ICE CREAM
1
2
Chill the freezing canister in the
freezer overnight (or at least for one
hour).
NOTE
Following your chosen recipe, mix
ice cream ingredients together. For
best results, chill the ice cream
mixture in the refrigerator until cold.
• For best results, chill the ice cream mixture before making ice
cream. The mixture should be cold when it is added to the
freezing canister.
3
4
Pour ice cream mixture into the
freezing canister (fill no more than
⅔ full, as mixture will expand during
freezing).
HELPFUL
HINTS
Insert the dasher into the center of
the freezing canister so that the end
of the dasher nestles into the dimple
at the center of the freezing canister.
• There are many classic ice cream recipes included in the back
of this manual. For more delicious frozen treat ideas, or even to
submit your own, visit www.AromaCo.com.
• Expect to use 20 pounds of ice (one large bag) for each batch of
ice cream.
5
TO MAKE ICE CREAM (CONT.)
5
6
Place the canister lid securely onto
the canister.
Place the freezing canister into
wooden bucket, so that it engages
the cone at the center of the bucket.
7
Slide the rectangular end of the
hand crank or electric motor into the
rectangular hole on the rim of the
bucket.
8
Drop the opposite end of the hand
crank/electric motor into the
opening on the opposite side of the
wooden bucket. Secure the hand
crank/electric motor to the wooden
bucket with the latch.
• For a bit of family fun, the hand crank is a great way to start churning ice cream. As it freezes churning will become more difficult. The electric
motor is a great way to finish churning ice cream.
HELPFUL
HINTS
6
TO MAKE ICE CREAM (CONT.)
9
10
11
12
40 min.
Fill the wooden bucket with a
mixture of ice and rock salt. Fill the
ice in layers, topping each layer with
rock salt, until the ice/salt mixture
nears the drainage hole of the
wooden bucket.
NOTE
Begin churning ice cream by either
turning the hand crank or plugging
in and turning on the electric motor.
• As water and ice will leak out of the drainage hole during use, the ice cream
maker should be setup in an area that will not be damage. Placing a towel
down under the ice cream maker will also help reduce cleanup.
• The amount of rock salt used is key. Too little rock salt, and the ice cream
will not properly freeze; too much and it will freeze too quickly.
• When using the electric motor, the freezing canister will spin, but the dasher
will not. The hand crank will turn both the freezing canister and the dasher.
The ice cream should continue to
churn for roughly 40 minutes or
until the electric motor stops or it
becomes very difficult to churn with
the hand crank.
HELPFUL
HINTS
With one hand holding the freezing
canister in place, remove the hand
crank/electric motor.
• When adding water, the level of ice will drop down as ice melts.
More ice may need to be added if the ice level drops too far below
the drainage hole.
• Use the stir stick accessory to break up any blockages in the ice
that may prevent the canister from spinning.
• Rock salt can be found in the salt section of most grocery chains or
purchased from most major online retailers.
7
TO MAKE ICE CREAM (CONT.)
13
14
15
Clearing ice and salt away from the
top of the freezing canister, remove
the freezing canister from the
wooden bucket.
Once salt and ice are cleared from
the top of the canister, remove the
canister lid and pull the dasher out.
Scrape excess ice cream from the
dasher.
Ice cream is now ready to serve.
Store ice cream in a freezable
container.
HELPFUL
HINTS
8
• If storing ice cream in the freezing canister, close the canister hole with the included canister cap. Do not lay the canister flat to avoid spills.
• For more tips and hints on using the ice cream maker, refer to “Troubleshooting” on page 10.
• Because homemade ice cream lacks the preservatives of store-bought ice cream, it will typically last about one week when stored properly.
TO CLEAN
Always unplug the ice cream maker and allow all parts to cool completely before cleaning.
1
2
Wipe the electric motor and/or hand
crank with a damp cloth to remove
any debris.
NOTE
•
•
•
•
Thoroughly clean the wooden bucket
with a soapy sponge to remove all
saltwater residue. Rinse to ensure
salt does not corrode metal parts.
3
Wash the freezing canister, canister
lid, dasher, stir stick and canister
cap with soapy water and dry
thoroughly.
3
Reassemble for next use.
Do not use harsh, abrasive cleaners.
This appliance and its accessories are NOT dishwasher-safe.
Do not place the canister lid back on the canister until it is completely dry.
Any other servicing should be performed by Aroma® Housewares. Contact Aroma® customer service at 1-800-276-6286
Mon-Fri, 8:30am to 4:30pm PST or via email at [email protected].
9
TROUBLESHOOTING
10
Problem
Solutions
Ice cream turned out soft or runny.
Homemade ice cream traditionally has the consistency of a milkshake. If a firmer consistency is preferred, follow these
steps:
• Allow the ice cream mixture to freeze further by placing the freezing canister into the freezer. The freezing canister
can also be frozen further by leaving it in the wooden bucket and adding more ice and covering with a towel.
• Once the electric motor stops churning, place the hand crank onto the ice cream maker and manually churn until
it reaches the desired consistency.
• Recipes that include alcohol (including vanilla or peppermint extract) may inhibit the freezing process. It is best to
add alcoholic ingredients toward the end.
• Pay close attention to the amount of rock salt used. Too little salt may inhibit the freezing of ice cream. See step 9 of
“To Make Ice Cream” on page 7 for tips on adding rock salt.
The salt water mixture leaked out
of the wooden bucket.
Before using the ice cream maker, it is necessary to soak the wooden bucket in water for at least one and a half hours.
This allows the wood to expand and prevents leaks. To do so, simply fill the wooden bucket about ⅔ full with water
and allow it to sit in the sink or another water-safe area. Pour out the water and it is ready to use.
TROUBLESHOOTING (CONT.)
Problem
Solutions
The canister and/or dasher
jammed or stopped during the
churning process.
Jamming of the canister or dasher may be due to one of the following issues:
• Ice may have caused a blockage in the wooden bucket. Stop churning by turning off the motor or ceasing use of
the hand crank and check that the ice in the bucket is broken up into small, coarse pieces. The plastic stir stick can
be used to break up any blockages that may occur.
• If the dasher becomes stuck, check to see if ice cream is done churning. Homemade ice cream should have the
consistency of a milk shake.
• If there are hard pieces in the ice cream mixture (such as chocolate chips or nuts) they may cause the dasher to
become jammed. It is best to add any such ingredients roughly 30 minutes into the churning process.
• Check the freezing canister to see if the ice cream mixture has frozen around the edges. If it has, use a spatula or
plastic spoon to scrape the edges and break up the frozen ice cream. The dasher should work normally once the
edges are clear.
The ice cream mixture tasted fine,
but after churning it does not taste
the same.
Actual ice cream will always taste less sweet than the initial mixture. The amount of sugar in the recipe can be adjusted
to suit personal tastes, keeping in mind the freezing process will lessen the sweetness of the final ice cream.
The ice cream went bad when
stored in the freezer.
Because homemade ice cream lacks many of the preservatives that come in store-bought ice cream, it does not store
well. Usually homemade ice cream will last about one week when stored properly.
To keep ice cream at its freshest, place it in an airtight plastic container and store it in the freezer.
11
RECIPES
Aroma’s Favorite Easy Vanilla Ice Cream
Ingredients
10 cups
2 cans
5 tbsp
half and half
sweetened condensed milk
real vanilla extract (do not use imitation)
Combine all ingredients in a large bowl and allow to chill. Add chilled mixture to the
freezing canister. Follow the instructions in “To Make Ice Cream” on pages 5-8. Do not
fill the freezing canister more than ⅔ full, as the mixture will expand during freezing. This
recipe will make a couple of batches.
Cherries and Chocolate Ice Cream
Ingredients
1½ cups
1½ cups
12
4½ cups
12 cups
6 cups
12
chocolate shavings
fresh cherries, pitted and halved
large eggs
sugar
heavy cream
milk
Place the cherries and the chocolate shavings in separate bowls. Cover and chill until
cold. Whisk the eggs in a mixing bowl until light and fluffy, 1 to 2 minutes. Slowly mix
in sugar, whisking until completely blended. Slowly add cream and milk; whisk until
blended. Pour mixture into freezing canister and follow the directions in the “To Make
Ice Cream” section, pages 5-8. Do not fill the freezing canister more than ⅔ full, as the
mixture will expand during freezing. Add chocolate shavings and cherries to finished ice
cream and enjoy! This recipe will make a couple of batches.
For additional ice cream maker recipes, or even to submit your own, visit our website at www.AromaCo.com!
RECIPES
Cookie Dough Ice Cream
Ingredients
2 cups
1¼ cups
12
4½ cups
12 cups
6 cups
chocolate chip cookie dough,
crumbled into small pieces
mini chocolate chips (optional)
large eggs
sugar
heavy cream
milk
Place the cookie dough and the chocolate chips in separate bowls. Cover and chill until
cold. Whisk the eggs in a mixing bowl 1-2 minutes, until light and fluffy. Slowly mix in
sugar, whisking until completely blended. Slowly add cream and milk and whisk until
blended. Pour mixture into freezing canister and follow the directions in the “To Make
Ice Cream” section, pages 5-8. Do not fill the freezing canister more than ⅔ full, as the
mixture will expand during freezing. When the mixture has finished churning, add cookie
dough and chocolate chips (optional) and stir in evenly. This recipe will make a couple of
batches.
Coffee Ice Cream
Ingredients
9 cups
4½ cups
9 tbsp
12 cups
half and half
sugar
instant coffee powder
heavy cream
Combine all ingredients in the freezing canister. Stir well until both sugar and instant
coffee powder are dissolved. Freeze as instructed and follow the directions in the “To
Make Ice Cream” section, pages 5-8. Do not fill the freezing canister more than ⅔ full,
as the mixture will expand during freezing. This recipe will make a couple of batches.
For additional ice cream maker recipes, or even to submit your own, visit our website at www.AromaCo.com!
13
RECIPES
Rocky Road Ice Cream
Ingredients
2½ cups
1 tsp
4 cups
12 squares
4 cups
12 cups
2 tbsp
4 cups
3 cups
2 cups
granulated sugar
salt
milk
semi-sweet chocolate
half and half
whipping cream
vanilla extract
mini marshmallows
chocolate chips
chopped pecans
Mix the milk and chocolate in a large saucepan. Over medium heat, stir until the
chocolate is completely melted. Remove from heat and slowly add sugar and salt,
mixing well, until dissolved. Stir in the remaining ingredients, except the marshmallows,
pecans and chocolate chips, then cover and refrigerate for about 30 minutes or until
the mixture has chilled. Pour mixture into the freezing canister and follow the directions
in the “To Make Ice Cream” section, pages 5-8. Do not fill the freezing canister more
than ⅔ full, as the mixture will expand during freezing. Add marshmallows, pecans and
chocolate chips after the ice cream has finished churning and stir in evenly. This recipe
will make a couple of batches.
Vanilla Ice Cream
Ingredients
3 cups
2¼ tbsp
⅓ tsp
2¼ tbsp
10½ cups
8
4¹⁄₈ cups
2¼ cups
granulated sugar
cornstarch
salt
vanilla
milk
eggs, beaten
heavy cream
half and half
Mix the sugar, cornstarch and salt in a large saucepan. Over medium heat, slowly stir
in the milk, stirring constantly. Very slowly, add the beaten eggs and continue to stir.
Reduce heat to low and cook until mixture thickens slightly. Slowly add vanilla, half and
half and heavy cream. Pour into a large glass bowl and refrigerate for 2-4 hours or until
mixture has chilled. Remove from refrigerator. Pour mixture into the freezing canister
and follow the directions in the “To Make Ice Cream” section, pages 5-8. Do not fill
the freezing canister more than ⅔ full, as the mixture will expand during freezing. This
recipe will make a couple of batches.
For additional ice cream maker recipes, or even to submit your own, visit our website at www.AromaCo.com!
14
RECIPES
Chocolate Ice Cream
Ingredients
5⅓ cups
4 tsp
1 tsp
12 cups
8
12 squares
2⅔ cups
4 cups
4 tbsp
granulated sugar
cornstarch
Salt
milk
eggs, beaten
semi-sweet chocolate, melted
half and half
whipping cream
vanilla extract
Mix the sugar, cornstarch and salt in a large saucepan. Over medium heat, slowly stir
in the milk, stirring constantly until the mixture begins to simmer. Very slowly, add the
beaten eggs and continue to stir. Reduce heat to low and cook until mixture thickens
slightly. Slowly stir in the melted chocolate and whisk until all chocolate is combined and
themixture is smooth. Slowly add vanilla, half and half and heavy cream. Pour into a large
glass bowl, cover and refrigerate for 2-4 hours or until mixture has chilled. Pour mixture
into the freezing canister and follow the directions in the “To Make Ice Cream” section,
pages 5-8. Do not fill the freezing canister more than ⅔ full, as the mixture will expand
during freezing. This recipe will make a couple of batches.
Peanut Butter Chocolate Chip Ice Cream
Ingredients
5⅓ cups
4 tbsp
1 tsp
3 tsp
12 cups
8
4 cups
2⅔ cups
3 cups
2 cup
granulated sugar
cornstarch
salt
vanilla
milk
eggs, beaten
heavy cream
half and half
chocolate chips
peanut butter or peanut butter chips, melted
Mix the sugar, cornstarch and salt in a large saucepan. Over medium heat, slowly stir
in the milk, stirring constantly. Very slowly, add the beaten eggs and continue to stir.
Reduce heat to low and cook until mixture thickens slightly. Slowly stir in peanut butter
and whisk until all peanut butter is combined and mixture is smooth. Slowly add vanilla,
half and half and heavy cream. Pour into a large glass bowl and refrigerate for 2-4 hours
or until the mixture has chilled. Pour the mixture into the freezing canister and follow
the directions in the “To Make Ice Cream” section, pages 5-8. Do not fill the freezing
canister more than ⅔ full, as the mixture will expand during freezing. Stir in chocolate
chips once ice cream is finished churning and stir evenly. This recipe will make a couple
of batches.
For additional ice cream maker recipes, or even to submit your own, visit our website at www.AromaCo.com!
15
WARRANTY
SERVICE & SUPPORT
LIMITED WARRANTY
Aroma Housewares Company warrants its products against defects in
material and workmanship for one year from provable date of purchase in
the United States.
Within this warranty period, Aroma Housewares Company will repair or
replace, at its discretion, defective parts at no charge, provided the product
is returned, freight prepaid with proof of purchase and U.S. $25.00 for
shipping and handling charges payable to Aroma Housewares Company.
Before returning an item, please call the toll free number below for a return
authorization number. Allow 2-4 weeks for return shipping.
This warranty does not apply if the warranty period expired; the products
has been modified by any unauthorized service center or personnel; the
defect was subject to abuse, improper use not conforming to product
manual instructions, or environment conditions more severe than those
specified in the manual and specification, neglect of the owner or improper
installation; the defect was subject to Force Majeure such as flood,
lightning, earthquake, other natural calamities, war, vandalism, theft,
brownouts or sags (damage due to low voltage disturbances).
In the event of a warranty claim, or if service is required for this product, please
contact Aroma® customer service toll-free at:
1-800-276-6286
M-F, 8:30AM-4:30PM, Pacific Time
Or we can be reached online at [email protected].
For your records, we recommend stapling your sales receipt to this page along with
a written record of the following:
Date of Purchase:
Place of Purchase:
This warranty gives you specific legal rights, which may vary from state to
state, and does not cover areas outside the United States.
AROMA HOUSEWARES COMPANY
6469 Flanders Drive
San Diego, California 92121
1-800-276-6286
M-F, 8:30 AM - 4:30 PM, Pacific Time
Website: www.AromaCo.com
16
• Proof of purchase is required for all warranty claims.
NOTE