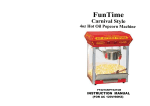
1
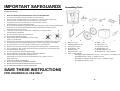
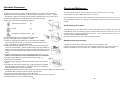
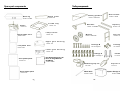
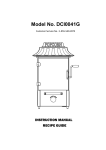
FunTime
Carnival Style
4oz Hot Oil Popcorn Machine
TABLETOP: FT422CR/FT422CB
W/CAR
B T: FT454CR/FT454
INSTRUCTION MANUAL
(FOR AC 120V/60HZ)
IMPORTANT SAFEGUARDS
Assembling Parts
When using any electrical appliance, basic safety precautions should always be followed,
including the following:
1.
READ ALL INSTRUCTIONS BEFORE USING YOUR POPCORN MACHINE.
2.
3.
4.
5.
6.
7.
Do not touch hot surfaces. Always use handles or knobs to operate.
To avoid any risk of electrical shock, do not immerge cord or plug into water or other liquid.
Close supervision is necessary when it is being used by or near children.
Unplug main power cord from outlet while not in use and before cleaning.
Allow HOT parts to cool down before maneuvering.
Do not operate the appliance with damaged cord or plug, malfunction or with any mechanical damages.
Send the unit to the nearest authorized service center for examination and repairs. (ONLY
technicians should open up the unit)
It may cause injury by using any accessories or attachments not being provided or
recommended by manufacturer.
Do not pop the kernel with a dry pot (without oil).
Do not immerge kettle set into water.
Kettle surface is HOT and should NOT be touched during
Popping or just after used.
Unplug, clean and cover the unit and store into dry and safe place if not being use for a long time.
Do not leave power cord hanging over edge of table or counter or touch with any hot surfaces.
Do not place the unit on or near a hot gas or electric burner or in a heated oven.
Extreme caution must be paid when moving the appliance containing hot oil or other hot liquids.
Turn ALL switches to “OFF” position before disconnecting power plug from the wall supply outlet.
Not recommended for outdoor use.
Do not use appliance for other than indicated usage.
To avoid overheating, always add oil and then kernel before operating.
Extreme caution must be paid when unloading popcorns.
Always place the unit over a counter-top so that residual hot oil or water running out
will not cause burnt.
KEEP OUT OF REACH OF CHILDREN.
DO NOT CLEAN USING ANY ABRASIVE MATERIAL.
NEVER FORCE ANY PARTS OR BRACKETS INTO POSITION.
NO PARTS ARE INTENDED FOR THE DISHWASHER.
8.
9.
10.
11.
12.
13.
14.
15.
16.
17.
18.
19.
20.
21.
22.
23.
24.
A.
C.
E.
G.
J.
L.
N.
Main unit x 1 pc
B. Kettle x 1 pc
Working platform x 1 pc
D. Hand rail x 1 pc
Square pole x 2 pcs
F. Long stand x 1 set
Short stand x 1 set
H. Wheel axle x 1 pc.
Wheels x 2 pcs.
K. Storage cabinet x 1 pc
Popcorn scoop x 1 pc
M. Kernel scoop + Oil scoop set
Parts x 1 box include:
(Package A) gold plated bolts x 8 pcs. + nuts x 8 pcs. + washers x 8 pcs.
(Package B) bolts x 8 pcs. + washers x 4 pcs.,
(Package C) nuts with round cap x 2 pcs. + washers x 2 pcs.
(Package D) wrench x 2 pcs.
SAVE THESE INSTRUCTIONS
FOR HOUSEHOLD USE ONLY
-1-
-2-
FT422CR / FT422CB – Voltage: AC 120V ~60Hz
FT454CR/FT454CB
Assembling Parts
Assembling Procedures:
A. Main unit x 1 pc
C. Popcorn scoop x 1 pc
1.
2.
3.
4.
5.
B. Kettle x 1 pc
D. Kernel scoop + Oil scoop set
Assemble the kettle (B) on the supporters which
are built into the main unit (A), and connect the
socket.
6.
7.
8.
9.
Use bolts & washers (Package B) provided to connect the Long stand (F) and the 2 pcs
square pole (E) together.
Connect the completed above (1) with the short stand (G) by the bolts & washers
(Package B).
Insert axle (H) into short stand. Place sleeves and washers (Package C) onto each side of
wheels (J) and then fix it with round cap nuts by wrenches provided (Package D).
Turn the storage cabinet (K) up side down for convenient assembling. Insert both ends
of the short and long stand into the bottom of (H) and then fix by bolts in (Package B).
Turn the complete unit back to up-right position. Install the handrail (D) onto the left hand
& the working platform (C) on the right hand by bolts & nuts with washers included in
(Package A).
Place the main unit (A) onto the topside of
the storage cabinet. (Caution: Power cord
outlet should be inserted into
the u-shape position.)
Hook up the Kettle (B) onto the hanger.
(Caution: Roller bar should be on the
door side and also check if gears between
pot and ceiling are perfectly matched).
Connect the power plug from the
ceiling with the socket on the bottom
of the kettle .
Open the door of the storage cabinet
and release the spring shaft beneath the main
unit in order to fix the main unit with
the storage base.
Remark: Main unit alone could be used
and placed onto stable counter top for operation
.
-3-
-4-
Operation Procedures:
Cleaning and Maintenance
User should follow these procedures:
1) Make sure the popcorn maker is unplugged before you do any of the following.
2) Before using the unit, please check carefully if voltage is suitable to the country. (Please
check if the voltage is matching with rating label specified next to the power cord).
3) Clean the internal surface of the kettle and main unit surfaces.
4) Main unit has 3 function switches as follows:
Fig. 1
Spot light and warmer
To avoid burning excess amount of sugar from bottom of the inner pot , it is strongly
recommended to clean the kettle after using 3 to 4 times.
After using the popcorn machine, users should use wet towel to clean up the main unit, main
body and glasses; rubbish tray is strongly recommended to clean up frequently so that there is no
bacteria.
(I)
Quick Cleaning Procedure:
Stirrer
(II)
Fig. 2
Stainless steel Kettle heater
(III)
Switch OFF (II & III). Pour 300 to 500 ml of water (NO detergent is necessary) into inner pot.
Switch ON the stirrer (II) & heater (III) again to boil the water and let the stirrer to turn in order to
remove excess amount of sugar stuck on the surface. Pour out the water after about 1 to 2
minutes of boiling. Caution: Hot kettle!
Repeat the same procedure 2 to 3 times to get better result.
5) Hook up the kettle onto the hanger of the main unit.
6) Plug in the power cord to the popcorn maker.
7) Switch on the light and heater (I & III), and then fill in suitable
Standard cleaning procedure:
amount of butter or oil (Fig. 1). Consumer could fill amount of oil
(Max. 15g) subject to your own preference .
1. Repeat the above “Quick cleaning procedure” until it’s relatively clean.
8) Kettle should be pre-heated for 3 to 4 minutes with oil (until steam
2. Switch off the machine and wait for the popping pot become cold. Clean the inside and
comes out from the kettle). Please prepare kernels with sugar. (Measure
outside of the kettle by brush and wet towel. (NEVER immerse the kettle into water.)
amount of kernels by measuring scoop provided and amount of sugar
subject to your own preference, liquid sugar and honey are prohibited to be
used.)
9) Open the lid and then pour in pre-mixed kernel and sugar. (Fig. 2)
Caution: Lid might be hot and recommend using an oven mitten.
10) Switch ON the Stirrer (II) so that it starts stirring. (Fig. 3)
Fig. 4
11) Close the door carefully.
12) Popcorn starts popping out through the lid after about 2 to 3 minutes.
(Fig. 4)
13) Switch OFF the stirrer & heater (II & III) when popping completed
(No more popping sound from kettle). Rotate the roller bar of the kettle and
pour out all remaining popcorn from kettle.
14) Keep heater switch (III) OFF if the unit is not continuously running. Keep only the spot light
and warmer ON to keep the popcorn warm, dry and tasty.
15) Serve your popcorn with popcorn scoop provided.
16) Remove plug from power supply if the unit is not being used for a long time.
17) Repeat steps 7 to 10 for continue popping.
-5-
-6-
Trolley components
Spare part components
Housing
Block plate
PC454 -105B/R
PC454-109
Crumb tray
Kettle
PC454- 11 0
PC454-111
Lamp holder
R i g h t plastic d o o r
PC454- 1 0 4
PC454-106R
Working platform
PC454-112RG/ B S
Hand rai l
PC454-113RG/BS
Wheels
Short stand
PC454- 11 6 R / B
Square poles
PC454- 11 4 R / B
Long stand
PC454 -118RG/BS
PC454-115R/ B
Upper gear housing
PC454- 1 0 2
L e ft plastic d o o r
Package B
Package C
PC-Package-B
PC-Package-C
PC454-106L
Lower gear housing
PC454- 1 0 3
Package A
Package D
PC-Package-A
PC-Package-D
Hot Buttered Popcorn 5C
Door w/ Hinge & Handle
Red/Black
S i d e plastic panel
PC454-107
PC454-120R/B
Measuring cup set
PC101B
B a c k plastic panel
PC454-108
-7_ -
Po p co r n s c o o p
PC101A
Wheel Axle
Square Storage Cabinet
PC454-117R/B
PC454-119R/B
-8-