1
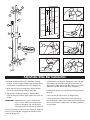
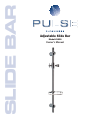
SLIDE BAR
Adjustable Slide Bar
Model #1010
Owner's Manual
10
8
7
22 5/8" (575 mm)
9
6
13
H
14
G
K
I
J
L
M
11
15
12
8
9
10
7
Adjustable Slide Bar Installation
1. Hold Adjustable Slide Bar (6) in desired mounting
location. Evaluate range of adjustment and potential
interference of handshower hose (15) (Diagram G).
2. M
ark wall for two mounting holes. Before drilling
ensure no live plumbing could be damaged.
3. Slowly drill 1/4" (6mm) wide by 1" (25mm) deep
holes 22 5/8 inch (575mm) apart. Make sure holes are
plumb.
IMPORTANT: Supplied anchors are for solid surface
only i.e. tile, marble etc. If mounting to
hollow or fiberglass wall a different anchor/screw and hole size may be required.
4. Insert wall anchors (10) until flush with wall. Slide top
mount (7) over slide bar (Diagram H) and secure with
screw (8) (Diagram I).
2
5. Slide plastic soap dish (12) (Diagram J) onto slide bar
followed by narrow end of tapered nylon sleeve (11)
(Diagram K). Align tab on soap dish with slot on sleeve
and push soap dish down until flush. (Diagram L)
5. Slide lower mount (7) over slide bar and secure with
screw (8).
6. Press covers (9) into mounts (7) (Diagram M).
7. Place washer (14) in hex head of hose (15) and connect to diverter outlet. Place washer (14) in smooth end
of hose and connect handshower (13). Place handshower into holder.