1
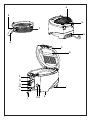
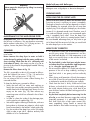
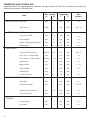
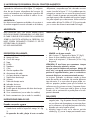
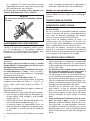
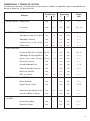
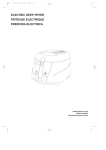
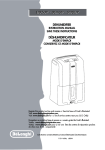
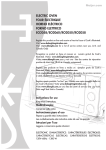
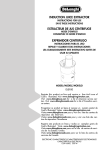
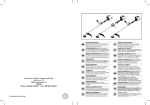
De’Longhi America, Inc.
250 Pehle Avenue, Suite 405
Saddle Brook, NJ 07663
1 800 322 3848
Fiducia Italiana S.A de C.V.
Erasmo Castellanos Quinto
calle B manzana II #29
Col. Educación
C.P. 04400
Deleg. Coyoacán
México D.F.
Lada sin costo: 1800 711 8805
www.delonghi.com
5712510221/06.10
DEEP FRYER
FREIDORA
D28313
Register this product on-line and receive a free trial issue of Cook's Illustrated. Visit http://www.delonghiregistration.com/select.html
Visit www.delonghi.com for a list of service centers near you. (U.S. and
Canada Only)
Registre este producto en línea y reciba un ejemplar gratis de Cook's Illustrated. Visite http://www.delonghiregistration.com/select.html
Visite www.delonghi.com para ver la lista de centros de servicios cercanos a usted. (Solamente en los Estados Unidos y Canada)
Instructions for use
Keep these instructions
Instrucciones para el uso
Repase y guarde estas instrucciones
Lea cuidadosamente este instructivo antes de usar su aparato.
120 V~ 60 Hz 1 500 W
2
E
B
G
F
H
A
C
D
P
O
N
M
L
I
J
3
RQ
K
2
1
3
O
4
5
6
8
9
J
L
7
4
G
1
10
2
11
12
14
15
2
1
13
A
X
B
16
5
17
18
IMPORTANT SAFEGUARDS
The use of all electrical appliances implies the observance of some fundamental rules.
1. Read all the instructions.
2. Avoid contact with hot surfaces. Use the special handles.
3. To avoid electric shock, never immerse the cable, plug or deep fryer itself in water or other liquids.
4. Take maximum care when the appliance is being used by or near children.
5. When not in use and before cleaning, always unplug from the outlet. Allow to cool before installing or removing components and before cleaning.
6. Do not use the appliance if the plug or cable appear damaged or if the appliance appears to be malfunctioning or has been damaged in any way. Take the appliance to your nearest service center for advice or repair.
7. The use of accessories not recommended by the manufacturer could cause damage.
8. Do not use the appliance outdoors.
9. Do not leave the cord hanging from the edge, on top of the deep fryer or in contact with hot surfaces.
10. Do not place the appliance on or near hot plates or gas rings. Do not place in a hot oven.
11. Take particular care when moving the appliance while it contains hot oil or other liquids.
12. Plug the cable into the appliance first then into the wall socket. To turn the unit off press the ON/OFF button
then unplug from the outlet.
13. Never use the appliance for purposes other than those for which it was specifically designed.
14. Make sure the handle is correctly assembled and attached to the basket.
SAVE THESE INSTRUCTIONS
THIS PRODUCT IS INTENDED FOR HOUSHOLD USE ONLY.
WARNINGS
• Turn the deep fryer on only after filling it with oil or fat. Operating the appliance without oil or fat causes serious damage.
• If heated empty, a thermal cut-out device trips and shuts the appliance down.
• Connect the cable to an outlet rated at about 120 V.
• The appliance is fitted with a polarized safety plug (a plug with one blade larger than the other), to reduce the risk
of electric shock, it can be inserted into the outlet in one direction only. This is a safety feature. If you cannot fully
insert the plug into the outlet, try the other way. If the plug is not suitable for the socket, have the obsolete outlet
replaced by a qualified electrician. Do not tamper with the polarized plug protection system."
• Clean the bowl, basket and cover of the appliance thoroughly with hot water and mild detergent before using for
the first time. Dry thoroughly.
• If oil leaks from the appliance, contact an authorized technical service center.
• To guarantee safe use, do not attempt to insert excessively bulky food or utensils into the deep fryer.
• Do not allow the appliance to be used by children without supervision.
• Never allow children to play with the appliance.
• To avoid burns, do not touch metal parts as these could become extremely hot. Use oven mitts.
• Do not open the oil drain tap (if present) when the oil is still hot.
• The appliance may give off a "new" smell the first time you use it. This is completely normal. Ventilate the room.
• When the appliance is not in use and before cleaning, unplug from the outlet.
Do not use extension cords
The appliance is fitted with a short power cord to avoid the risks associated with twisting of the cord.
6
IF THE DEEP FRYER HAS A CORD WITH MAGNETIC CONNECTOR
First, connect the magnetic connector to the appliance
as shown in figure 17, making sure the protruding part
of the connector (X) is correctly inserted into the corresponding outlet on the appliance. Then plug the cord
into the outlet.
Warning
Never leave the appliance plugged into the outlet if the
magnetic connector is not fitted to the deep fryer, figu-
re 18. If the magnetic connector does not remain in
place, check that it has been inserted correctly, (see
figure 17). If the problem persists, contact an authorized service center. When the appliance is in operation,
always leave free space around the magnetic connector to prevent it from becoming detached. Only use a
type TA-35PA or LT-512 cord set supplied by De'Longhi authorised service centres.
IMPORTANT SAFEGUARD
A DEEP FRYER FALLING FROM A HIGH PLACE MAY
CAUSE SERIOUS BURNS. NEVER LEAVE THE CORD
HANGING FROM THE EDGE OF THE SURFACE THE
DEEP FRYER IS RESTING ON WHERE IT COULD BE
GRASPED BY A CHILD OR GET IN THE WAY OF THE
USER. DO NOT USE EXTENSION CORDS.
KEEP OUT OF REACH OF CHILDREN
DESCRIPTION OF THE APPLIANCE
(see diagram pag. 3)
A. Basket handle
B. Handle slide
C. Lid
D. Viewing window
E. Filter cover
F. Basket
G. Filter cover hook
H. Cable holder compartment
I. Handle for lifting up the appliance
J. Drainage pipe plug
K. Foot
L. Oil drainage pipe
M. Signal lamp
N. Thermostat
O. Inspection door for pipe compartment
P. Opening button
Q. Minute timer display (some models only)
R. Minute timer button (some models only)
INSTRUCTIONS FOR USE
Filling with oil or fat
• Raise the basket (F) to the highest position by pulling the special “A” handle upwards (fig.1).
The lid should ALWAYS be closed when the basket
is raised and lowered.
• Open lid “C” by pressing button “P” (fig.2).
• Remove the basket by pulling it upwards (fig.3).
• Pour into the container 1.2 litres of oil (or 1 kg. of
fat).
WARNING: The level must always be between the
maximum and minimum levels indicated.
Never use the deep fryer when the oil is below the
“min” level as it could cause the thermal safety device to come into operation; to replace it you need to
contact one of our service centres.
Best results are obtained by using a good peanut oil.
Avoid mixing different types of oil. If you use lumps of
solid fat, cut them into small pieces so that the deep
fryer does not heat up in the first few minutes without a
covering of fat. The temperature must be set to 300°F
until the fat has melted completely. The required temperature can then be set.
STARTING TO FRY
1. Put the food which is to be fried into the basket,
without ever overfilling it (max. 1 kg. of fresh potatoes).
In order to obtain a more even frying, we recommend concentrating the food especially around the
perimeter of the basket., leaving the central part
more sparingly filled.
2. Put the basket into the boiler pan in a raised position (fig.3) and close the lid by pressing lightly
down upon it until the hooks click. Always close the
7
3.
4.
•
•
•
lid before lowering the basket in order to avoid hot
oil from splashing out.
Plug into the mains socket and set thermostat knob
“N” to the required temperature (fig.4). When the
temperature set has been reached, signal lamp “M”
will go off.
As soon as the signal lamp goes off, immerse the
basket in the oil, lowering the handle slowly after
sliding the handle’s “B” slider back.
It is completely normal for a considerable amount of
very hot steam to pour out of filter cover “E” immediately after this.
At the start of cooking, immediately after the food
has been immersed in the oil, the internal wall of
viewing window “D” will steam up, before progressively clearing.
It is normal for drops of condensation to form
around the basket handle while the appliance is
working.
MODELS WITH ELECTRONIC MINUTE TIMER
1 Set the cooking time by pressing the "R" button. The
display "Q" will show the minutes set.
2 The numbers will straight away begin to flash. This
shows that the cooking time has begun. The last
minute is displayed in seconds.
3 If an error is made, the new cooking time can be set
by holding the button down for more than 2 seconds. The display will reset and the process can
then be repeated from point 1.
4 The minute timer will indicate the end of the cooking time with two series of beeps about 20 seconds
apart. To turn the acoustic signal off, press the
minute timer button "R".
IMPORTANT: the minute timer does not turn the appliance off.
Replacing the minute timer battery (fig. 16)
• Remove the minute timer from its housing by prising
it from the lower side (see fig. 16A).
• Turn the battery cover on the back of the battery
anticlockwise (fig. 16B) until it comes free.
• Replace the battery with another of the same type
(L1131).
When replacing or disposing of the appliance, the battery must be removed and disposed of according to current legislation as it represents a hazard to the environment.
8
AFTER FRYING
When the cooking time runs out raise the basket and
check if the food has reached the required golden
colour. In the models fitted with a viewing window this
check can be carried out by looking through the window without opening the lid. If cooking is complete, turn
off the appliance by unpluging from the outlet.
Drain excess oil by leaving the basket inside the deep
fryer for a while in the high position.
FILTERING THE OIL OR FAT
We recommend that you carry out this procedure each
time you have finished frying as, especially when the
food has been breaded or floured, the food particles
tend to burn if they remain in the liquid thus causing
much quicker deterioration in the oil or fat.
Check that the oil is cool enough (waiting about 2 hours).
Models with drainage pipe
Bring the front part of the deep fryer to the edge of
the work surface, taking care that the feet (K) never
protrude over the edge (fig. 5).
1. Open the lid of the deep fryer and remove the
basket (fig. 3).
2. Open inspection door “O” as shown in fig. 6.
3. Remove drainage pipe “L”.
4. Remove plug “J” while at the same time squeezing
the pipe with two fingers to prevent the oil or fat
from leaking out before the pipe has been directed
into a container (fig. 7).
5. Allow the oil or fat to drip into a container (fig. 8).
6. Remove any deposits from the tank using a sponge
or absorbent paper.
7. At the end of the procedure fit the plug back onto
the drainage pipe and reposition it in its compartment.
8. Put the basket back in the high position and place
one of the filters (optional) at the bottom of the
basket (fig. 9). You can obtain the filters from your
retailer or one of our service centres.
9. Next pour the oil or fat very slowly into the deep
fryer so that it does not spill out of the filter (fig. 10).
10. The oil which has been filtered in this way can be preserved inside the deep fryer. However, if a long time
elapses before it is next used, it is advisable to preserve the oil in a closed container in order to stop it deteriorating. It is good practice to keep oil used for frying
fish separate from that used for frying other food.
If fat is used, be careful not to let it cool down too
much or it will solidify.
WARNING
Never empty the deep fryer by tilting it or turning
it upside down.
Model with non-stick boiler pan
To clean the boiler pan use a soft cloth with a neutral
detergent never using objects or abrasive detergents.
COOKING HINTS
HOW LONG THE OIL OR FAT LASTS
MAINTENANCE OF THE ANTI-ODOUR FILTER
Removable filter: over time, the anti-odour filter inside
the lid loses its efficiency. You are therefore recommended to replace it after every 10/15 frying sessions. To
replace, remove the plastic filter grille.
CLEANING
Before cleaning, always remove the plug from the electrical socket.
Never immerse the deep fryer in water or hold it
under the tap. By getting inside the water would cause
short circuiting. Check that the oil is sufficiently cold
(wait about 2 hours), then empty out the oil or fat as
previously described in the paragraph headed “filtering
the oil or fat”.
Remove the lid as shown in fig. 13.
The lid is removable, to take it off, proceed as follows:
push the lid back (see arrow "1" fig. 13) and at the
same time, lift it up (see arrow "2" fig. 13).
Do not immerse the lid in water without having first
removed the filter.
To clean the boiler pan, proceed as follows:
• Wash the tank with hot water and washing up
liquid, then rinse and dry everything carefully. In the
models fitted with oil drainage pipe, always use it to
empty out the water (fig. 14); then remove any
remaining water which has collected in the oil drainage pipe.
• In order to clean the inside of the drainage pipe,
use the pipe brush supplied (fig. 15).
• We advise regular cleaning of the basket, with care
being taken to eliminate any deposits which might
have accumulated in the basket’s wheel guide ring.
• Dry the outside of the deep fryer with a soft, damp
cloth in order to get rid of splashes and any little
dribbles of oil or condensation.
The oil or fat must never go below the minimum level.
From time to time it is necessary to renew it completely.
The length of time the oil or fat lasts depends on what is
fried. Breading, for example, dirties the oil more than
simple frying. As for all types of deep fryer, the oil deteriorates if it is reheated several times! Therefore, even if
it is used and filtered correctly, we recommend replacing it completely fairly often. Since the deep fryer
works with little oil, due to its rotating basket, there is
the considerable advantage that you only have to get
rid of about half the amount of oil that you would with
the other deep fryers on the market.
HOW TO FRY CORRECTLY
• It is important to follow the recommended temperature for every recipe. If the temperature is too low,
the fried food absorbs oil. If the temperature is too
high a crust quickly forms on the outside while the
inside remains uncooked.
• The food which is to be fried must only be immersed when the oil has reached the right temperature, i.e. when the signal lamp goes off.
• Do not overfill the basket. This would cause the temperature of the oil to drop suddenly, resulting in
fried food which is too greasy and not uniformly
fried.
• When frying small quantities of food, the temperature of the oil must be set lower than the temperature indicated to avoid the oil boiling too violently.
• Check that the food is thinly sliced and of even
thickness, as food which is too thick cooks badly on
the inside, despite looking nice, while food of an
even thickness reaches the ideal cooking point all at
the same time.
• Dry the food completely before immersing it in the
oil or fat, as wet food becomes soggy after cooking
(especially potatoes). It is advisable to bread or
flour food which has a high water content (fish,
meat, vegetables), being careful to remove the
excess bread or flour before immersing it in the oil.
9
TEMPERATURE AND COOKING TIME
Remember that the cooking temperatures and times are approximate, and will vary according to the quantity of
food being fried and to individual tastes.
Max. quantity
gr
lb
Temperature
°C
°F
500
1
190
370
7-8
1000
2
190
370
14 - 16
Crispy Shrimp Balls
750
1.5
160
320
7-8
Zesty Meatballs
500
1
170
340
6-7
Chicken and Vegetable Egg Rolls
250
0.5
170
340
4-5
Fried wontons
250
0.5
170
340
3-4
500-750
1-1.5
170
340
20 - 25
500
1
170
340
3-4
750-1kg
1.5 - 2
160
320
5-6
Veal Parmesan
500
1
170
340
6-7
Batter-Fried Fish
500
1
160
320
9 - 10
Crispy Fish Fillets
500
1
160
320
8-9
Chicken Fingers
500
1
170
340
3
Sesame-Nut Chicken
250
0.5
170
340
5-6
Potato Puffs
500
1
190
370
3-5
Fried Potato Wedges
500
1
190
370
12-15
Vegetable Fritters Parmesan
250
0.5
150
300
3-5
Crispy Onion Rings
500
1
150
300
3-5
Yeast Doughnuts
500
1
190
370
4-5
Fruit Fritters
500
1
190
370
4-6
Food
FRIED POTATOES half portion
whole portion
Time
(minutes)
APPETIZER AND SNACKS
MAIN DISHES
Crispy Fried Chicken Pieces
Sweet and Sour Chicken Balls
Clams, Oysters, Scallops, Shrimps
VEGETABLES AND SIDE DISHES
DESSERTS
10
OPERATING FAULTS
FAULT
CAUSE
REMEDY
The odour-eater filter is saturated.
The oil has deteriorated.
The cooking liquid is unsuitable.
Replace the filter.
Replace the oil or fat.
Use a good peanut oil.
The oil has deteriorated and causes too
much foam.
You have immersed food which is not
sufficiently dry in the hot oil.
The basket has been immersed too
quickly. The oil level in the deep fryer is
over the maximum limit.
Replace the oil or fat.
The oil does not heat up
The deep fryer has previously been used
without oil in the boiler pan, causing the
thermal safety device to break.
Contact the Service Centre (the
device must be replaced).
Only half of the basket
has fried properly.
The basket does not rotate during
cooking.
Clean the bottom of the boiler
pan. Clean the basket wheel
guide ring.
Bad smell
The oil overflows
Dry the food well.
Immerse it slowly.
Reduce the amount of oil In the
boiler pan.
11
This warranty applies to all products with De’Longhi or Kenwood brand names.
Limited Warranty
What does the warranty cover?
We warrant each appliance to be free from defects in material and workmanship. Our obligation under this
warranty is limited to repair at our factory or authorized service center of any defective parts or part thereof,
other than parts damaged in transit. In the event of a products replacement or return, the unit must be returned
transportation prepaid. The repaired or new model will be returned at the company expense.
This warranty shall apply only if the appliance is used in accordance with the factory directions, which accompany it, and on an Alternating current ( AC ) circuit.
How long does the coverage last?
This warranty runs for one year ( 1 ) from the purchase date found on your receipt and applies only to the original purchaser for use.
What is not covered by the warranty?
The warranty does not cover defects or damage of the appliance, which result from repairs or alterations to the
appliance outside our factory or authorized service centers, nor shall it apply to any appliance, which has been
subject to abuse, misuse, negligence or accidents. Also, consequential and incidental damage resulting from the
use of this product or arising out of any breach of contract or breach of this warranty are not recoverable under
this warranty. Some states do not allow the exclusion or limitation of incidental or consequential damage, so the
above limitation may not apply to you.
How do you get service?
If repairs become necessary, see contact information below:
U.S. Residents:
Please contact our toll free hotline at 1-800-322-3848 or log onto our website at www.delonghi.com.
For all accessories, spare parts or replacement parts, please contact our parts division at 1-800-865-6330.
Residents of Canada: Please contact our toll free hotline at 1-888-335-6644 or log onto our website at
www.delonghi.com.
Residents of Mexico: Please refer to the Limited Warranty statement for Mexico.
Please refer to the back page of the manual for De’Longhi addresses.
The above warranty is in lieu of all other express warranties and representations. All implied warranties are limited to the applicable warranty period set forth above. This limitation does not apply if you enter into an extended
warranty with De’Longhi. Some states do not allow limitations on how long an implied warranty lasts, so the
above exclusions may not apply to you. De’Longhi does not authorize any other person or company to assume
for it any liability in connection with the sale or use of its appliance.
How does state law apply?
This warranty gives you specific legal rights, and you may also have other rights, which vary from state to state.
12
ADVERTENCIAS IMPORTANTES
Cuando use aparatos eléctricos, debe respetar algunas normas de seguridad fundamentales, entre las que se
incluyen las siguientes:
1. Lea todas las instrucciones.
2. No toque las superficies calientes. Utilice los las asas específicas.
3. Para evitar descargas eléctricas no introduzca la clavija ni el aparato en el agua o en otros líquidos.
4. Cuando el aparato es usado por o con niños en las proximidades, extreme las precauciones.
5. Desenchufe el aparato de la corriente cuando no lo use o antes de limpiarlo. Deje enfriar el aparato antes de
montar o desmontar partes de éste y antes de limpiarlo.
6. No haga funcionar el aparato con el cable o la clavija estropeados, o si se ha producido algún funcionamiento
incorrecto, o si el aparato resulta en cualquier modo estropeado. Lleve el aparato al centro de asistencia autorizado más cercano para que lo examine o repare.
7. El uso de accesorios no recomendados por el fabricante puede provocar daños.
8. No use el aparato al aire libre.
9. No deje que el cable de alimentación cuelgue en la superficie sobre el que está apoyado o que entre en contacto con superficies calientes.
10. No coloque el aparato sobre o cerca de hornillos calientes de gas o eléctricos, ni lo introduzca en el horno
cuando esté aún caliente.
11. Extreme las precauciones si debe mover el aparato con aceite u otros líquidos calientes.
12. Antes de nada conecte la clavija al aparato, a continuación enchufe el cable a la corriente. Para apagarlo,
desenchufe el aparato de la corriente.
13. No utilice este aparato para objetivos que sean distintos a los objetivos para los que ha sido concebido.
14. Asegúrese de que el asa esté correctamente montada y fijada en la cesta.
CONSERVE ESTAS INSTRUCCIONES
ESTE PRODUCTO ESTÁ DESTINADO EXCLUSIVAMENTE AL USO DOMÉSTICO
ADVERTENCIAS
• Encienda la freidora únicamente después de haberla llenado con aceite o grasa. La freidora se estropearía
gravemente si se encendiese en seco.
• Si se calienta en vacío, interviene un dispositivo de seguridad térmico que bloquea el funcionamiento.
• Enchufe el cable a un enchufe de 120 vol c.a.
• Si el aparato está equipado con una clavija de seguridad polarizada (una clavija con un terminal más largo
que el otro), dicha clavija entrará en el enchufe únicamente en un sentido. Esta es una característica de seguridad. Si la clavija no entra completamente en el enchufe, pruebe a introducirla en el otro sentido. En última
instancia, si la clavija resultase inadecuada para el enchufe, llame a un electricista para la sustitución de un
enchufe de tipo obsoleto. No altere el sistema de protección de la clavija polarizada.
• Limpie correctamente el aparato antes de usarlo por primera vez: la cubeta, la cesta, la tapadera (sin filtro)
con agua caliente y detergente lavavajillas. A continuación, séquelos meticulosamente.
• Si detecta pérdidas de aceite, póngase en contacto con un centro de asistencia técnica o con el personal autorizado por el fabricante.
• Para garantizar un funcionamiento en condiciones de seguridad, no introduzca alimentos demasiado grandes
o utensilios en la freidora.
• Sin la oportuna vigilancia, no permita a niños usar este aparato.
• No deje que niños jueguen con el aparato.
• Para evitar posibles quemaduras, no toque ninguna parte metálica, porque podría estar muy caliente: use
guantes adecuados.
• No abra la portezuela del grifo de vaciado aceite (si previsto), si el aceite está aún caliente.
• Es perfectamente normal que se desprenda un olor “a nuevo” del aparato después de usarlo por primera vez.
Si ello ocurriese, ventile el ambiente.
• Cuando el aparato no está funcionando y antes de limpiarlo, asegúrese de que esté desenchufado de la corriente.
No use cables alargadores
El aparato cuenta con un cable de alimentación corto para disminuir los riesgos derivados de retorcimientos del cable.
13
SI LA FREIDORA ESTÁ EQUIPADA CON UN CONECTOR MAGNÉTICO
Conecte ante todo el conector magnético al aparato
siguiendo las indicaciones de la figura 17, asegurándose de que la parte sobresaliente del conector (X)
encaje correctamente en el alojamiento específico del
aparato y a continuación enchufe el cable a la corriente.
ADVERTENCIA
No deje nunca el aparato enchufado a la corriente si
el conector magnético no está colocado en la freidora,
figura 18. Si el conector magnético sobresale de su
alojamiento, compruebe que esté colocado correctamente (consulte la figura 17. Si el problema persiste,
póngase en contacto con un centro de asistencia autorizado. Cuando el aparato está encendido, deje siempre algún espacio libre alrededor del conector magnético para impedir que se desconecte. Utilice exclusivamente cables del tipo TA-35PA o LT-512 suministrados
por un centro de asistencia autorizado De’Longhi.
ADVERTENCIA
UNA FREIDORA QUE CAE DESDE ARRIBA PUEDE
PROVOCAR GRAVES QUEMADURAS. NO DEJE QUE
EL CABLE CUELGUE POR EL BORDE DE LA SUPERFICIE
SOBRE LA QUE ESTÁ APOYADA LA FREIDORA, UN
NIÑO PODRÍA FÁCILMENTE COGERLO O SER DE
ESTORBO PARA EL USUARIO.
NO USE ALARGADORES.
MANTÉNGASE FUERA DEL ALCANCE DE LOS NIÑOS.
DESCRIPCIÓN DEL APARATO
SIEMPRE con la tapa cerrada.
• Abrir la tapa "C" apretando el botón "P" (fig.2)
• Sacar el cesto tirándolo hacia el alto (fig.3).
• Verter en el recipiente 1,2 l de aceite ( o sino 1 Kg.
de grasa).
ATENCIÓN: El nivel tiene que encontrarse siempre
entre las referencias máximo y mínimo.
No usar nunca la freidora con aceite por debajo del
nivel "min", esto puede causar la intervención del dispositivo de seguridad térmico, para su sustitución es
necesario dirigirse a un centro autorizado nuestro.
Los mejores resultados se obtienen usando un buen
aceite de semillas de cacahuete. No mezclar diferentes
tipos de aceite. Si se usan cubos de grasa sólida, cortarla en pequeóos pedazos para que la freidora no
caliente a seco los primeros minutos. Programar la temperatura a 150°C hasta que toda la grasa se haya
licuado, sólo a continuación se podrá pasar a la temperatura deseada.
(consulte el dibujo de la página 3)
A. Mango del cesto
B. Cursor del mango
C. Tapa
D. Portillo
E. Tapadera
F. Cesto
G. Gancho tapadera filtro
H. Alojamiento del cable
I. Asa para levantar el aparato
J Tapón tubito de drenaje
K. Sostenes
L. Tubito de drenaje aceite
M. Indicador luminoso
N. Manopla termostato
O. Portillo para el alojamiento del tubito de drenaje
P. Botón abertura
Q. Visor cuentaminutos (no en todos los modelos)
R. Botón cuentaminutos (no en todos los modelos)
INSTRUCCIONES PARA EL USO
Llenado con aceite o grasa
• Levantar el cesto (F) hasta la posición más alta
tirando hacia arriba el espec'fico mango "A" (fig.
1).
La operación de subir y bajar el cesto se realiza
14
PARA FREÍR
1. Colocar los alimentos a freír en el cesto, sin sobrecargarlo (máx 1 kg. de patatas frescas). Para obtener una fritura más homogénea, se aconseja disponer los alimentos a lo largo del perímetro del cesto,
dejando más vacía la parte central.
2. Introducir luego el cesto en la cuba en posición
subida (fig. 3) y cerrar la tapa presionando suave-
3.
4.
•
•
•
mente hasta que disparen los ganchos. Para evitar
que salgan salpicaduras de aceite caliente, cerrar
siempre la tapa antes de bajar el cesto.
Enchufe el aparato a la corriente y colocar el cursor
del termostato "N" en la temperatura deseada (fig.
4). Cuando se alcanza la temperatura deseada, el
indicador luminoso "M" se apaga.
Una vez apagado el indicador luminoso, sumergir
inmediatamente el cesto en aceite, bajando lentamente el mango después de haber deslizado hacia
atrás el cursor "B".
Es del todo normal que inmediatamente después de
esta operación, salga de las ranuras de la tapa del
filtro “E”, una notable cantidad de vapor muy
caliente.
Al inicio de la cocción, inmediatamente después de
haber sumergido los alimentos en aceite, el interior
del portillo "D" (donde es suministrado) se cubrirá de
vapor, que luego desaparecerá progresivamente.
Es normal que durante el funcionamiento se formen
unas gotas de condensación cerca del mango del
cesto.
EN LOS MODELOS EQUIPADOS CON MINUTERO
ELECTRÓNICO
1. Plantear el tiempo de cocción apretando el botón
"R", el visor "Q" visualizará los minutos planteados.
2. Inmediatamente después, las cifras comenzarán a
centellar, esto significa que el tiempo de cocción ha
comenzado. El œltimo minuto se visualiza en
segundos.
3. En caso de error se debe plantear el nuevo tiempo
de cocción, manteniendo apretado el pulsante por
más de 2 segundos. El visor se ajustará a cero,
repetir desde el punto 1.
4. El cuenta minutos indicará la finalización del tiempo de
cocción con dos series de bipóbip a intervalos de 20
segundos. Para apagar el avisador acœstico basta
apretar el botón cuentaminutos "R".
Atención: el minutero no sirve para apagar el aparato.
Cambio de la pila cuentaminutos (fig. 16)
• Quitar el cuentaminutos de su alojamiento haciendo palanca en el lado superiorver fig. 16A.
• Girar en sentido contrario a las agujas del reloj la
tapa de la pila fig. 16 B colocado en la parte posterior del mismo hasta que se desenganche.
• Extraer la pila y cambiarla con otra de las mismas
características.
Para deshacerse de la pila, respetar las disposiciones
de ley vigentes para la descarga de productos tóxicos.
FINAL DE LA OPERACIÓN DE FRITURA
Al finalizar el tiempo programado, subir el cesto y controlar si la comida está dorada como se desea.
En los modelos dotados con portillo de inspección, esta
operación se puede efectuar a través del mismo, sin
abrir la tapadera.
Si se considera que la cocción ha terminado, apagar el
aparato llevando el cursor del termostato a la posición
“O” hasta escuchar el click del interruptor interno.
Escurrir el aceite en exceso, dejando el cesto durante
algœn tiempo en el interior de la freidora, en la posición más alta.
FILTRADO DE ACEITE O GRASA
Aconsejamos que realicen estas operaciones después
de cada fritura, ya que las partículas de los alimentos,
sobre todo cuando están pasados por pan o harina,
quedando en el líquido, tienen tendencia a quemar y,
por lo tanto, a provocar una alteración mucho más
rápida del aceite o grasa.
Controlar que el aceite esté suficientemente frío, esperar aproximadamente 2 horas.
Modelos con tubo de drenaje
Acercar la parte anterior de la freidora al borde del
plano de apoyo, poner atención que los sostenes (K) se
encuentren siempre en el interior del mismo plano (fig.
5).
1. Abrir la tapa de la freidora y sacar el cesto (fig. 3).
2. Abrir la ventanilla “O” como indicado en fig. 6.
3. Extraer el tubito de drenaje “L”.
4. Sacar el tapón “J” y al mismo tiempo cortar con dos
dedos el tubito para evitar que el aceite o la grasa
salga, hasta cuando el líquido no esté dirigido a un
recipiente (fig. 7).
5. Hacer fluir el aceite o la grasa en un recipiente (fig. 8).
6. Sacar eventuales depósitos de la cuba con el auxilio de una esponja o papel absorbente.
7. Terminada la operación, volver a colocar el tubito de
drenaje en su lugar, después de haber puesto el tapón.
8. Volver a colocar el cesto en la posición alta y disponer en el fondo del cesto uno de los filtros que
vienen con el aparato (fig. 9). Los filtros pueden
encontrarse en un revendedor o en un centro de
asistencia nuestro.
9. Volver a verter el aceite o el graso en la freidora muy
lentamente para que no desborde del filtro (fig. 10).
10. El aceite, así filtrado, se puede conservar en el interior de la freidora. Sin embargo, si entre una cocción y otra, pasa mucho tiempo, se aconseja conservar el aceite en un recipiente cerrado, para evi15
tar su deterioro. Es buena costumbre conservar
separadamente el aceite usado para freír pescado
del usado para freír otros alimentos.
En el caso que se use grasa, poner atención a no
dejarlo enfriar demasiado, sino se solidifica.
ATENCIÓN
No vaciar nunca la freidora inclinándola o dándola vuelta.
suave y hœmedo para eliminar las salpicaduras y
eventuales salidas de aceite o de condensación.
Modelo con cuba antiadherente
Para la limpieza de la cuba no usar detergentes ni
esponjas abrasivas, sino un paóo suave con detergente neutro.
CONSEJOS PARA LA COCCIÓN
DURACIÓN DEL ACEITE O GRASA.
Filtro amovible: con el paso del tiempo el filtro antiolor,
situado en el interior de la tapadera, pierde su eficiacia. Por consiguiente, le aconsejamos cambiarlo
después de 10/15 utilizaciones. Para cambiarlo, quite
la rejilla correspondiente cubrefiltro de plástico.
El aceite o la grasa no deben estar nunca por debajo
del nivel mínimo.
De vez en cuando es aconsejable cambiarlo completamente. La duración del aceite o grasa depende de lo
que se fría. Los alimentos empanados, por ejemplo,
ensucian el aceite más que la sencilla fritura.
Como ocurre con cualquier freidora, jel aceite, si se
calienta varias veces, se desgasta!. Por lo tanto, aunque se lo utilice y filtre debidamente, se aconseja cambiarlo completamente con una cierta frecuencia.
Puesto que, esta freidora, funciona con poco aceite,
gracias a su cesto giratorio, brinda la gran ventaja de
tener que eliminar aproximadamente la mitad del aceite con respecto a las freidoras en el mercado.
LIMPIEZA
PARA FREIR DE MODO CORRECTO
Antes de cualquier operación de limpieza, desenchufar
el aparato.
No sumergir nunca la freidora en agua ni ponerla
debajo del grifo. Si entrara agua en su interior se producirían descargas eléctricas.
Controlar que el aceite esté suficientemente frío (esperar aproximadamente 2 horas), vaciar el aceite o
grasa como descripto anteriormente en el parágrafo
“filtrado de aceite o grasa”.
Quitar la tapa como indicado en la fig. 13.
La tapa es amovible, para sacarla realizar lo siguiente:
empujarla hacia atrás (ver flecha “1”, fig.13) y al
mismo tiempo tirarlo hacia arriba (ver flecha “2”,
fig.13).
No poner la tapadera debajo del agua sin haber quitado previamente el filtro.
Para la limpieza de la cuba, actuar del modo siguiente:
• Lavar la cuba con agua caliente y detergente l'quido para vajillas, luego enjuagar y secar cuidadosamente (fig. 14).
• Para limpiar el interior del tubito de drenaje, utilizar la escobilla del equipamiento (fig. 15).
• Se aconseja limpiar con regularidad el cesto, tratando de eliminar los depósitos que puedan haberse acumulado en el anillo gu'a de las ruedas del
mismo.
• Secar la parte exterior de la freidora con un paóo
• Es importante mantener por cada receta la temperatura aconsejada. Si la temperatura es demasiado
baja, la fritura absorbe aceite. Con una temperatura demasiado alta se forma enseguida la costra y el
interior sigue crudo.
• Los alimentos a freír se deben sumergir sólo cuando el aceite ha alcanzado la justa temperatura, o
sea cuando el indicador luminoso se apaga.
• No sobrecargar el cesto. Esto provocaría la disminución repentina de la temperatura del aceite y por
tanto una fritura demasiado grasa y no uniforme.
• Para freír una pequeña cantidad de alimentos, programar una temperatura para el aceite inferior a la
indicada para evitar borboteos del aceite.
• Controlar que los alimentos sean finos y tengan
igual espesor, ya que los alimentos demasiado
gruesos se cuecen mal en el interior, a pesar de
tener un buen aspecto, mientras que los de espesor
uniforme alcanzan al mismo tiempo la cocción
ideal.
• Secar perfectamente los alimentos antes de sumergirlos en aceite o grasa, ya que los alimentos
hœmedos quedar'an blandos después de la cocción (sobre todo si se trata de patatas). Se aconseja empanar o enharinar los alimentos muy ricos en
agua (pescado, carne, verduras) cuidando eliminar
el pan o la harina excesiva antes de sumergirlos en
aceite.
MANTENIMIENTO DEL FILTRO ANTIOLOR
16
TEMPERATURAS Y TIEMPOS DE COCCION
Considerar que el tiempo y la temperatura son aproximativos y deben ser reguladozs según la cantidad de comida que se desea freir y el gusto personal.
Cantidad máx.
gr
lb
Temperatura
°C
°F
media ración
500
1
190
370
7-8
una ración
1000
2
190
370
14 - 16
Albóndigas de Camarones Crujientes
750
1.5
160
320
7-8
Albóndigas Sabrosas
500
1
170
340
6-7
Arrollados de Huevo con Pollo y Verduras
250
0.5
170
340
4-5
Wontons fritos
250
0.5
170
340
3-4
1-1.5
170
340
20 - 25
1
170
340
3-4
1.5 - 2
160
320
5-6
Alimento
PATATAS FRITAS
Tiempo
(min)
ENTRADAS Y APERITIVOS
PLATO PRINCIPAL
Porción de Pollo Frito Crujiente 500-750
Albóndigas de Pollo Agridulces
500
Almejas, Ostras, Vieiras, Camarones 750-1kg
Parmessano Vacuno
500
1
170
340
6-7
Pescado Rebozado Frito
500
1
160
320
9 - 10
Filetes de Pescado Crujientes
500
1
160
320
8-9
Bastoncitos de Pollo
500
1
170
340
3
Pollo con Sésamo
250
0.5
170
340
5-6
Bolitas de Papas
500
1
190
370
3-5
Papas Fritas en Cuñas
500
1
190
370
12-15
Parmessano de Verduras Fritas
250
0.5
150
300
3-5
Aros de Cebollas Crujientes
500
1
150
300
3-5
Roscas de Levadura
500
1
190
370
4-5
Buñuelos de frutas
500
1
190
370
4-6
VERDURAS Y GUARNICIONES
POSTRES
17
DESPERFECTOS
ANOMALÍA
18
CAUSA
REMEDIOS
Emanación de malos
olores
El filtro antiolores está lleno.
El aceite está deteriorado.
El Liquido de cocción no es adecuado.
Cambiar el filtro.
Cambiar aceite o grasa.
Usar un buen aceite de semillas de
cacahuete.
El aceite sobresale
El aceite está deteriorado y forma demasiada espuma.
Se ha sumergido en el aceite caliente alimentos no suficientemente secos.
Se ha sumergido el cesto demasiado
rápidamente.
El nivel de aceite en la freidora excede el
l'mite máximo.
Cambiar aceite o grasa.
El aceite no se calienta
Se ha puesto en funcionamiento la freidora
anticipadamente sin aceite en la cuba, causando la rotura del protector térmico.
Dirigirse al Servicio Asistencia (se
tiene que sustituir el dispositivo).
La fritura ha salido
bien sólo a mitad del
cesto
El cesto no gira durante la cocción.
Limpiar el fondo de la cuba
Limpiar el anillo guía de las ruedas
del cesto.
Secar bien los alimentos.
Sumergirlo lentamente.
Reducir la cantidad de aceite en la
cuba.
Esta garantía cubre todos los productos con las marcas De'Longhi o Kenwood.
Garantía limitada
(para los Estados Unidos solamente)
Alcance de la garantía
Cada artefacto tiene garantía por defectos de materiales y de fabricación. Bajo los términos de esta garantía
limitada, nuestra obligación se limita a la reparación de partes o componentes (a excepción de partes dañadas
durante el transporte) en nuestra fábrica o en un centro autorizado de servicio. Al devolver un producto para
cambio o reparación, todos los costos de envío deben ser pagados por el propietario del mismo. El producto
nuevo o reparado será devuelto con los gastos de envío pagados por la compañía.
Esta garantía es válida únicamente si el artefacto se utiliza de acuerdo con las instrucciones del fabricante
(incluidas con el artefacto) y alimentada eléctricamente con corriente alterna (CA).
Duración de la garantía
Esta garantía es válida por un (1) año a partir de la fecha de compra que figura en el recibo o factura de venta
de la unidad, y sólo el comprador original tiene derecho a hacer uso de la garantía.
Exclusiones de la garantía
La garantía no cubre defectos ni daños que fueran consecuencia de reparaciones o modificaciones efectuadas al
artefacto por personal ajeno a nuestra fábrica o a centros autorizados de servicio, ni cubre fallas o daños causados por maltrato, uso indebido, negligencia o accidentes. Esta garantía tampoco reconocerá reclamos efectuados por perjuicios directos ni indirectos emergentes del uso del producto, ni perjuicios o daños resultantes del
uso del producto en incumplimiento de los términos y condiciones que hacen válida la garantía. En algunos
estados no se permiten exclusiones ni limitaciones de los perjuicios reconocidos por una garantía, por lo cual las
limitaciones mencionadas podrían ser no válidas en su caso particular.
Obtención de servicios de garantía
Si las reparaciones son necesarias, vea la información de contacto que aparece a continuación:
Residentes de los Estados Unidos: Por favor contactar a nuestra línea telefónica gratuita, al 1-800-322-3848 o
ingrese a nuestro sitio en el Internet www.delonghi.com. Para todos los accesorios, piezas de repuesto o de
reemplazo, por favor contactar a nuestra división de piezas, al 1-800-865-6330.
Residentes de Canadá: Por favor contactar a nuestra línea telefónica gratuita, al 1-888-335-6644 o ingrese a
nuestro sitio en el Internet www.delonghi.com <http://www.delonghi.com/>.
Residentes de México: Refiera por favor a la garantía limitada para México.
Por favor vea la página trasera donde encontrará las direcciones de De’Longhi.
La garantía explicada anteriormente se ofrece en reemplazo de cualquier otra garantía, sea expresa u ofrecida
de cualquier otra manera, y toda garantía implícita del producto estará limitada al período de duración mencionado anteriormente. Esta limitación queda anulada y es reemplazada por otros términos si el usuario decide
obtener una garantía prolongada de De’Longhi. En algunos estados no se permiten limitaciones del período de
garantía implícita, por lo cual las limitaciones mencionadas anteriormente podrían no ser válidas en su caso
particular. De’Longhi no autoriza a ninguna otra persona ni compañía a ofrecer ningún tipo de garantía ni
responsabilidad con respecto al uso o a los términos de venta de sus artefactos.
Leyes estatales/provinciales
Esta garantía le confiere derechos establecidos por ley, pero usted también podría tener otros derechos que
varían de un estado a otro.
19
Esta garantía cubre todos los productos con las marcas De'Longhi o Kenwood.
GARANTIA
GARANTIA Limitada
(para México solamente)
DESCRIPCIÓN Y MODELO: FREIDORA D28313
Garantizamos todo producto DE´LONGHI por defectos de fabricación, material y mano de obra. Nuestra obligación dentro de ésta garantía es proporcionar gratuitamente las refacciones y el servicio durante un año a
partir de la fecha de compra. Esta garantía se aplicará únicamente sí el producto se utiliza de acuerdo con las
instrucciones anexas del fabricante y con un circuito de corriente alterna (ca). Esta garantía reemplaza a cualquier otra garantía y acuerdo, expreso o implícito y a todas las demás obligaciones o responsabilidades de
nuestra parte. No autorizamos a ninguna otra persona o compañía a asumir nuestras responsabilidades relacionadas con la venta y el uso de nuestro producto. Esta garantía no implica ninguna responsabilidad de parte
nuestra en relación con la venta o el uso de nuestro producto.
Esta garantía no se hará válida en los siguientes casos:
a) Cuando el producto se hubiese utilizado en condiciones distintas a las normales
b) Cuando el producto no hubiese sido operado de acuerdo con el instructivo de uso que se le acompaña
c) Cuando el producto hubiese sido alterado o reparado por personas no autorizadas por el fabricante nacional, importador o comercializador responsable respectivo.
Para hacer efectiva la garantía o si se necesitan reparaciones o refacciones, componentes, combustibles y accesorios llame, con su garantía sellada por el establecimiento, al Centro Nacional de Servicio para proporcionarle
una cuenta de mensajería con la cual deberá remitir el producto y garantía. Los gastos que se deriven del cumplimiento de la presente garantía deberán ser absorbidos por el Centro Nacional de Servicio De´Longhi.
Obtención de servicios de garantía
Si las reparaciones son necesarias, vea la información de contacto que aparece a continuación:
Residentes de los Estados Unidos:
Por favor contactar a nuestra línea telefónica gratuita, al 1-800-322-3848 o ingrese a nuestro sitio en el Internet
www.delonghi.com.
Para todos los accesorios, piezas de repuesto o de reemplazo, por favor contactar a nuestra división de piezas,
al 1-800-865-6330.
Residentes de Canadá: Por favor contactar a nuestra línea telefónica gratuita, al 1-888-335-6644 o ingrese a
nuestro sitio en el Internet www.delonghi.com <http://www.delonghi.com/>.
Residentes de México: Por favor contactar a nuestra línea telefónica gratuita, al 01 800 711 8805 (lada sin
costo) o ingrese a nuestro sitio en el Internet www.delonghi.com <http://www.delonghi.com/>.
Centro Nacional de Servicio:
Fiducia Italiana S.A de C.V.
Erasmo Castellanos Quinto
calle B manzana II #29
Col. Educación
C.P. 04400
Deleg. Coyoacán
México D.F.
Lada sin costo: 1800 711 8805
FECHA DE COMPRA
20