1
ENGLISH
ESPAÑOL
OWNER’S MANUAL
DRYER
Please read this owner’s manual thoroughly before operating and
keep it handy for reference at all times.
DLEX5780*E
MFL67731040
DLGX5781*E
www.lg.com
2
TABLE OF CONTENTS
TABLE OF CONTENTS
3
IMPORTANT SAFETY INSTRUCTIONS
3
4
4
WHAT TO DO IF YOU SMELL GAS
BASIC SAFETY PRECAUTIONS
CALIFORNIA SAFE DRINKING WATER AND
TOXIC ENFORCEMENT ACT
GROUNDING INSTRUCTIONS
SAFETY INSTRUCTIONS FOR
INSTALLATION
SAFETY INSTRUCTIONS FOR CONNECTING
ELECTRICITY
5
5
7
8
PRODUCT FEATURES
9
INTRODUCING YOUR DRYER
9
9
10
11
Parts and Accessories
2-Way Reversible Door
Control Panel Features
Display
12
INSTALLATION INSTRUCTIONS
12
13
13
14
15
21
22
24
26
31
31
32
Preview Installation Order
Installation Location Requirements
Clearances
Leveling the Dryer
Reversing the Door
Installing the Side Vent Kit
Venting the Dryer
Connecting Gas Dryers
Connecting Electric Dryers
Special Requirements for Manufactured or
Mobile Homes
Final Installation Check
Installation Test (Duct Check)
34
HOW TO USE
34
35
35
35
36
37
38
38
Operating the Dryer
Sorting Loads
Loading the Dryer
Check the Lint Filter Before Every Load
Using the LG EasyLoad™
Cycle Guide
Cycle Settings and Options
Special Functions
39
39
41
42
43
Custom Program
Steam Functions
Steam Cycle Guide
Tag On
Using Tag On with Applications
49
MAINTENANCE
49
Regular Cleaning
50
TROUBLESHOOTING
50
Before Calling for Service
53
SPECIFICATIONS
54
USING SMART DIAGNOSIS™
55
WARRANTY
IMPORTANT SAFETY INSTRUCTIONS
3
IMPORTANT SAFETY INSTRUCTIONS
WWARNING
For your safety, the information in this manual must be followed to minimize the risk of fire or explosion, electric
shock, or to prevent property damage, injury to persons, or death.
Your safety and the safety of others is very important.
We have provided many important safety messages in this manual and on your appliance. Always read and obey all
safety messages.
This is the safety alert symbol.
This symbol alerts you to potential hazards that can kill or hurt you and others.
All safety messages will follow the safety alert symbol and either the word DANGER, WARNING, or CAUTION.
W
These words mean:
WDANGER
You will be killed or seriously injured if you don’t immediately follow instructions.
WWARNING
You can be killed or seriously injured if you don’t follow instructions.
WCAUTION
You may be slightly injured or cause damage to the product if you do not follow instructions.
All safety messages will tell you what the potential hazard is, tell you how to reduce the chance of injury, and tell
you what can happen if the instructions are not followed.
t%POPUJOTUBMMBDMPUIFTESZFSXJUIGMFYJCMFQMBTUJDWFOUJOHNBUFSJBMT*GGMFYJCMFNFUBMGPJMUZQF
EVDUJT
JOTUBMMFEJUNVTUCFPGBTQFDJGJDUZQFJEFOUJGJFECZUIFBQQMJBODFNBOVGBDUVSFSBTTVJUBCMFGPSVTFXJUI
DMPUIFTESZFST'MFYJCMFWFOUJOHNBUFSJBMTBSFLOPXOUPDPMMBQTFCFFBTJMZDSVTIFEBOEUSBQMJOU5IFTF
DPOEJUJPOTXJMMPCTUSVDUDMPUIFTESZFSBJSGMPXBOEJODSFBTFUIFSJTLPGGJSF
t%POPUTUPSFPSVTFHBTPMJOFPSPUIFSGMBNNBCMFWBQPSTBOEMJRVJETJOUIFWJDJOJUZPGUIJTBQQMJBODFPSBOZ
PUIFSBQQMJBODFT
t*OTUBMMBUJPOBOETFSWJDFNVTUCFQFSGPSNFECZBRVBMJGJFEJOTUBMMFSTFSWJDFBHFODZPSUIFHBTTVQQMJFS
t*OTUBMMUIFDMPUIFTESZFSBDDPSEJOHUPUIFNBOVGBDUVSFSTJOTUSVDUJPOTBOEMPDBMDPEFT
t4BWFUIFTFJOTUSVDUJPOT
8)"550%0*':064.&--("4
%POPUUSZUPMJHIUBNBUDIPSDJHBSFUUFPSUVSOPOBOZHBTPSFMFDUSJDBMBQQMJBODF
%POPUUPVDIBOZFMFDUSJDBMTXJUDIFT%POPUVTFBOZQIPOFJOZPVSCVJMEJOH
$MFBSUIFSPPNCVJMEJOHPSBSFBPGBMMPDDVQBOUT
*NNFEJBUFMZDBMMZPVSHBTTVQQMJFSGSPNBOFJHICPSTQIPOF'PMMPXUIFHBTTVQQMJFSTJOTUSVDUJPOTDBSFGVMMZ
*GZPVDBOOPUSFBDIZPVSHBTTVQQMJFSDBMMUIFGJSFEFQBSUNFOU
WWARNING:This product contains chemicals known to the State of California to cause cancer and birth defects or
other reproductive harm. Wash hands after handling.
ENGLISH
READ ALL INSTRUCTIONS BEFORE USE
4
IMPORTANT SAFETY INSTRUCTIONS
IMPORTANT SAFETY INSTRUCTIONS
READ ALL INSTRUCTIONS BEFORE USE
WWARNING
For your safety, the information in this manual must be followed to minimize the risk of fire or explosion, electric
shock, or to prevent property damage, injury to persons, or death.
#"4*$4"'&5:13&$"65*0/4
WWARNING
To reduce the risk of fire, electric shock, or injury to persons when using this appliance, follow basic precautions,
including the following:
t3FBEBMMJOTUSVDUJPOTCFGPSFVTJOHUIFESZFS
t#FGPSFVTFUIFESZFSNVTUCFQSPQFSMZJOTUBMMFEBT
described in this manual.
t%POPUQMBDFJUFNTFYQPTFEUPDPPLJOHPJMTJOZPVS
dryer. Items contaminated with cooking oils may
contribute to a chemical reaction that could cause a
load to catch fire.
t%POPUESZBSUJDMFTUIBUIBWFCFFOQSFWJPVTMZDMFBOFE
in, washed in, soaked in, or spotted with gasoline, drycleaning solvents, or other flammable or explosive
substances as they give off vapors that could ignite or
explode.
t%POPUVTFGBCSJDTPGUFOFSTPSQSPEVDUTUPFMJNJOBUF
static unless recommended by the manufacturer of
the fabric softener or product.
t%POPUVTFIFBUUPESZBSUJDMFTDPOUBJOJOHGPBNSVCCFS
or similarly textured rubber-like materials.
t,FFQBSFBBSPVOEUIFFYIBVTUPQFOJOHBOEBEKBDFOU
surrounding areas free from the accumulation of lint,
dust, and dirt.
t5IFJOUFSJPSPGUIFESZFSBOEFYIBVTUWFOUTIPVMECF
cleaned periodically by qualified service personnel.
t%POPUJOTUBMMPSTUPSFUIFESZFSXIFSFJUXJMMCF
exposed to the weather.
t%POPUSFBDIJOUPUIFESZFSJGUIFESVNPSBOZPUIFS
part is moving.
t"MXBZTDIFDLUIFJOTJEFPGUIFESZFSGPSGPSFJHO
objects.
t%POPUSFQBJSPSSFQMBDFBOZQBSUPGUIFESZFS
or attempt any servicing unless specifically
recommended in this owner’s manual or in published
user-repair instructions that you understand and have
the skills to carry out.
t$MFBOMJOUTDSFFOCFGPSFPSBGUFSFBDIMPBE
t%POPUUBNQFSXJUIDPOUSPMT
t#FGPSFUIFESZFSJTSFNPWFEGSPNTFSWJDFPSEJTDBSEFE
remove the door to the drying compartment.
t%POPUBMMPXDIJMESFOUPQMBZPOPSJOUIFESZFS$MPTF
supervision of children is necessary when the dryer is
used near children.
t%POPUTUPSFQMBTUJDQBQFSPSDMPUIJOHUIBUNBZ
CVSOPSNFMUPOUPQPGUIFESZFSEVSJOHPQFSBUJPO
t#FDBSFGVMXIFOPQFOJOHBOEDMPTJOHUIFEPPS'JOHFST
and hands can get caught in the door and cause injury
if the door drops forward unexpectedly.
t%POPUQMBDFIFBWZJUFNTPOPSMFBOBHBJOTUUIFUPQ
PGUIFEPPSXIFOJUJTPQFO
t%POPUBUUFNQUUPQVMMUIFIBNQFSEPPSPQFONPSF
UIBOEFHSFFT
t5IFESZFSDPVMEUJQGPSXBSEDBVTJOHJOKVSZPSEBNBHF
t%POPUQMBDFJUFNTPOUIFUPQPGUIFESZFS
$"-*'03/*"4"'&%3*/,*/(8"5&3"/%509*$&/'03$&.&/5"$5
This act requires the governor of California to publish a list of substances known to the state to cause cancer, birth
defects, or other reproductive harm and requires businesses to warn customers of potential exposure to such
substances.
Gas appliances can cause minor exposure to four of these substances, namely benzene, carbon monoxide,
formaldehyde, and soot, caused primarily by the incomplete combustion of natural gas or LP fuels.
Properly adjusted dryers will minimize incomplete combustion. Exposure to these substances can be minimized
further by properly venting the dryer to the outdoors.
IMPORTANT SAFETY INSTRUCTIONS
5
IMPORTANT SAFETY INSTRUCTIONS
WWARNING
For your safety, the information in this manual must be followed to minimize the risk of fire or explosion, electric
shock, or to prevent property damage, injury to persons, or death.
(306/%*/(*/4536$5*0/4
This appliance must be grounded. In the event of
malfunction or breakdown, grounding will reduce
the risk of electric shock by providing a path of least
resistance for electric current. This appliance must be
equipped with a cord having an equipment-grounding
conductor and a grounding plug. The plug must be
plugged into an appropriate outlet that is properly
installed and grounded in accordance with all local
codes and ordinances.
Do not modify the plug provided with the appliance. If
it will not fit the outlet, have a proper outlet installed by
a qualified electrician.
This appliance must be connected to a grounded metal,
permanent wiring system or an equipment-grounding
conductor must be run with the circuit conductors and
connected to the equipment-grounding terminal or
lead on the appliance.
Electric shock can result if the dryer is not properly
grounded.
WWARNING
Improper connection of the equipment-grounding conductor can result in a risk of electric shock. Check with a
qualified electrician or service person if you are in doubt that the appliance is properly grounded.
4"'&5:*/4536$5*0/4'03*/45"--"5*0/
WWARNING
To reduce the risk of fire, electric shock, or injury to persons when using this appliance, follow basic precautions,
including the following:
t1SPQFSMZHSPVOEESZFSUPDPOGPSNXJUIBMM
HPWFSOJOHDPEFTBOEPSEJOBODFT Follow details in
the installation instructions. Electric shock can result if
the dryer is not properly grounded.
t#FGPSFVTFUIFESZFSNVTUCFQSPQFSMZJOTUBMMFE as
described in this manual. Electric shock can result if
the dryer is not properly grounded.
t*OTUBMMBOETUPSFUIFESZFSXIFSFJUXJMMOPUCF
FYQPTFEUPUFNQFSBUVSFTCFMPXGSFF[JOHPS
FYQPTFEUPUIFXFBUIFS
t"MMSFQBJSTBOETFSWJDJOHNVTUCFQFSGPSNFE
CZBOBVUIPSJ[FETFSWJDFSVOMFTTTQFDJGJDBMMZ
SFDPNNFOEFEJOUIJTPXOFSTNBOVBM6TFPOMZ
BVUIPSJ[FEGBDUPSZQBSUTFailure to follow this
warning can cause serious injury, fire, electric shock, or
death.
t5PSFEVDFUIFSJTLPGFMFDUSJDTIPDLEPOPUJOTUBMM
UIFESZFSJOIVNJETQBDFT Failure to follow this
warning can cause serious injury, fire, electric shock, or
death.
t$POOFDUUPBQSPQFSMZSBUFEQSPUFDUFEBOETJ[FE
QPXFSDJSDVJUUPBWPJEFMFDUSJDBMPWFSMPBEImproper
power circuit can melt, creating electric shock and/or
fire hazard.
t3FNPWFBMMQBDLJOHJUFNTBOEEJTQPTFPGBMM
TIJQQJOHNBUFSJBMTQSPQFSMZFailure to do so can
result in death, explosion, fire, or burns.
t1MBDFESZFSBUMFBTUJODIFTBCPWFUIFGMPPSGPS
BHBSBHFJOTUBMMBUJPOFailure to do so can result in
death, explosion, fire, or burns.
t,FFQBMMQBDLBHJOHGSPNDIJMESFO Packaging
material can be dangerous for children. There is a risk
of suffocation.
t%POPUJOTUBMMOFBSBOPUIFSTPVSDFPGIFBUTVDIBT
BTUPWFDPPLJOHPWFO Failure to do so can cause
deform, smoke and fire.
t%POPUQMBDFDBOEMFTTNPLJOHNBUFSJBMTPSPUIFS
GMBNNBCMFTPOUPQPGUIFQSPEVDU Dripping wax,
smoke, or fire can result.
t3FNPWFBMMQSPUFDUJWFWJOZMGJMNGSPNUIFQSPEVDU
Failure to do so can cause product damage, smoke or
fire.
ENGLISH
READ ALL INSTRUCTIONS BEFORE USE
6
IMPORTANT SAFETY INSTRUCTIONS
IMPORTANT SAFETY INSTRUCTIONS
READ ALL INSTRUCTIONS BEFORE USE
WWARNING
For your safety, the information in this manual must be followed to minimize the risk of fire or explosion, electric
shock, or to prevent property damage, injury to persons, or death.
4"'&5:*/4536$5*0/4'03*/45"--"5*0/
WWARNING
To reduce the risk of injury to persons, follow all industry recommended safety procedures including the use of long
sleeved gloves and safety glasses. Failure to follow all of the safety warnings in this manual could result in property
damage, injury to persons, or death.
Exhaust/Ducting:
t(BTESZFST.645CFFYIBVTUFEUPUIFPVUTJEF
Failure to follow these instructions can result in fire or
death.
t5IFESZFSFYIBVTUTZTUFNNVTUCFFYIBVTUFE
UPUIFPVUTJEFPGUIFEXFMMJOH*GUIFESZFSJTOPU
FYIBVTUFEPVUEPPSTTPNFGJOFMJOUBOEMBSHF
BNPVOUTPGNPJTUVSFXJMMCFFYQFMMFEJOUPUIF
MBVOESZBSFB. An accumulation of lint in any area of
the home can create a health and fire hazard.
t6TFPOMZSJHJENFUBMPSGMFYJCMFNFUBMJODI
EJBNFUFSEVDUXPSLJOTJEFUIFESZFSDBCJOFUPSGPS
FYIBVTUJOHUPUIFPVUTJEF6TFPGQMBTUJDPSPUIFS
DPNCVTUJCMFEVDUXPSLDBODBVTFBGJSF Punctured
ductwork can cause a fire if it collapses or becomes
otherwise restricted in use or during installation.
t%VDUXPSLJTOPUQSPWJEFEXJUIUIFESZFSBOEZPV
TIPVMEPCUBJOUIFOFDFTTBSZEVDUXPSLMPDBMMZ5IF
FOEDBQTIPVMEIBWFIJOHFEEBNQFSTUPQSFWFOU
CBDLESBGUXIFOUIFESZFSJTOPUJOVTF Failure to
follow these instructions can result in fire or death.
t5IFFYIBVTUEVDUNVTUCFJODIFTDN
JO
EJBNFUFSXJUIOPPCTUSVDUJPOT5IFFYIBVTUEVDU
TIPVMECFLFQUBTTIPSUBTQPTTJCMF.BLFTVSF
UPDMFBOBOZPMEEVDUTCFGPSFJOTUBMMJOHZPVSOFX
dryer. Failure to follow these instructions can result in
fire or death.
t3JHJEPSTFNJSJHJENFUBMEVDUJOHJTSFDPNNFOEFE
GPSVTFCFUXFFOUIFESZFSBOEUIFXBMM*OTQFDJBM
JOTUBMMBUJPOTXIFOJUJTJNQPTTJCMFUPNBLFB
DPOOFDUJPOXJUIUIFBCPWFSFDPNNFOEBUJPOTB6-
MJTUFEGMFYJCMFNFUBMUSBOTJUJPOEVDUNBZCFVTFE
CFUXFFOUIFESZFSBOEXBMMDPOOFDUJPOPOMZ5IF
VTFPGUIJTEVDUJOHXJMMBGGFDUESZJOHUJNF Failure to
follow these instructions can result in fire or death.
t%0/05VTFTIFFUNFUBMTDSFXTPSPUIFSGBTUFOFST
XIJDIFYUFOEJOUPUIFEVDUUIBUDPVMEDBUDIMJOUBOE
SFEVDFUIFFGGJDJFODZPGUIFFYIBVTUTZTUFN Secure
all joints with duct tape. For complete details, follow
the Installation Instructions. Failure to follow these
instructions can result in fire or death.
IMPORTANT SAFETY INSTRUCTIONS
7
IMPORTANT SAFETY INSTRUCTIONS
WWARNING
For your safety, the information in this manual must be followed to minimize the risk of fire or explosion, electric
shock, or to prevent property damage, injury to persons, or death.
4"'&5:*/4536$5*0/4'03$0//&$5*/(&-&$53*$*5:
WWARNING
To reduce the risk of fire, electric shock, or injury to persons when using this appliance, follow basic precautions,
including the following:
t%POPUVOEFSBOZDJSDVNTUBODFTDVUPSSFNPWF
UIFHSPVOEQSPOHGSPNUIFQPXFSDPSETo prevent
injury to persons or damage to the dryer, the electrical
power cord must be plugged into a properly grounded
outlet.
t'PSQFSTPOBMTBGFUZUIJTESZFSNVTUCFQSPQFSMZ
HSPVOEFEFailure to do so can result in electric shock
or injury.
t3FGFSUPUIFJOTUBMMBUJPOJOTUSVDUJPOTJOUIJTNBOVBM
GPSTQFDJGJDFMFDUSJDBMSFRVJSFNFOUTGPSZPVSNPEFM
Failure to follow these instructions can create an
electric shock hazard and/or a fire hazard.
t5IJTESZFSNVTUCFQMVHHFEJOUPBQSPQFSMZ
HSPVOEFEPVUMFU&MFDUSJDTIPDLDBOSFTVMUJGUIF
ESZFSJTOPUQSPQFSMZHSPVOEFE)BWFUIFXBMM
PVUMFUBOEDJSDVJUDIFDLFECZBRVBMJGJFEFMFDUSJDJBO
UPNBLFTVSFUIFPVUMFUJTQSPQFSMZHSPVOEFE
Failure to follow these instructions can create an
electric shock hazard and/or a fire hazard.
t5IFESZFSTIPVMEBMXBZTCFQMVHHFEJOUPJUTPXO
JOEJWJEVBMFMFDUSJDBMPVUMFUXIJDIIBTBWPMUBHF
SBUJOHUIBUNBUDIFTUIFSBUJOHQMBUFThis provides
sparkling performance and also prevents overloading
house wiring circuits which could cause a fire hazard
from overheated wires.
t/FWFSVOQMVHZPVSESZFSCZQVMMJOHPOUIFQPXFS
DPSE"MXBZTHSJQQMVHGJSNMZBOEQVMMTUSBJHIUPVU
GSPNUIFPVUMFUThe power cord can be damaged,
resulting in a risk of fire and electric shock.
t3FQBJSPSSFQMBDFJNNFEJBUFMZBMMQPXFSDPSETUIBU
IBWFCFDPNFGSBZFEPSPUIFSXJTFEBNBHFE%POPU
VTFBDPSEUIBUTIPXTDSBDLTPSBCSBTJPOEBNBHF
BMPOHJUTMFOHUIPSBUFJUIFSFOEThe power cord can
melt, creating an electric shock and/or fire hazard.
t8IFOJOTUBMMJOHPSNPWJOHUIFESZFSCFDBSFGVMOPU
UPQJODIDSVTIPSEBNBHFUIFQPXFSDPSEThis will
prevent injury and prevent damage to the dryer from
fire and electric shock.
4"7&5)&4&*/4536$5*0/4
ENGLISH
READ ALL INSTRUCTIONS BEFORE USE
PRODUCT FEATURES
PRODUCT FEATURES
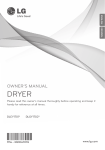
EASY-TO-USE CONTROL PANEL
Rotate the cycle selector knob to select the desired dry cycle. Add cycle options or adjust settings with the touch
of a button.
2-WAY EASY-ACCESS REVERSIBLE DOOR
The LG EasyLoad™ can be tilted open from the top, hamper-style, allowing you to easily load the dryer without
items falling on the floor. The door still swings open to provide easy access for unloading or loading of bulkier
items. The door hinge can be reversed to adjust for installation location.
STEAM FUNCTIONS
LG’s steam technology allows you to inject fabrics with a swirling jet of hot steam to refresh clothes, reduce static,
and make ironing easier. Simply select the Steam Fresh™ cycle, or you can add a Steam option to selected cycles.
Flow Sense™ DUCT BLOCKAGE SENSING SYSTEM INDICATOR
The Flow Sense™ duct blockage sensing system detects and alerts you to restrictions in the installed household
ductwork that reduce exhaust airflow through the dryer. If you see the alert: Clean or repair the ducts to remove
UIFSFTUSJDUJPOT,FFQZPVSEVDUTDMFBOUPIFMQJODSFBTFFGGJDJFODZBOESFEVDFMPOHESZJOHUJNFTDBVTFECZCMPDLFE
ducts.
Smart Diagnosis™
Should you experience any technical difficulty with your washing machine, it has the capability of transmitting
data by phone to the Customer Information Center. The call center agent records the data transmitted from your
machine and uses it to analyze the issue, providing a fast and effective diagnosis.
Tag On
The Tag On feature works on most smart phones equipped with the NFC function and based on the Android
operating system (OS).
Using the “LG Smart Laundry” application, the Tag On feature will allow you to diagnose your appliance, download
new cycles, and see the status of your appliance by simply touching the smartphone to the Tag On logo of the
appliance.
D
8
ES
C
ER
IGN
TIFIE
D
Protocol P154
Sanitization Performance of
Residential Clothes dryer
INTRODUCING YOUR DRYER
9
INTRODUCING YOUR DRYER
ENGLISH
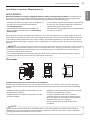
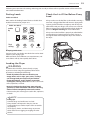
Parts and Accessories
Parts
Control
panel
Reversible
door
Lint filter
Leveling
feet
Accessories
*ODMVEFE"DDFTTPSJFT
Terminal
block
access panel
(Electric
models)
Power cord
location
(Gas
models)
Gas
connection
location
(Gas models)
Exhaust
duct
outlet
2-Way Reversible Door
0QUJPOBM"DDFTTPSJFT
Release
Hamper door
Swing door
Drying rack
Part No.
3750EL0001C
Side vent kit
(sold separately)
Kit No.
383EEL9001B
The LG EasyLoad™ feature allows you to open the dryer
door from the top, hamper-style, when loading the
dryer to help guide clothes into the drum and prevent
them from falling onto the floor. When unloading the
dryer or loading bulkier items, use the swing door for
easy access to the drum. For more details on using the
EPPSTFFQBHF'PSJOGPSNBUJPOPOSFWFSTJOHUIF
EPPSTXJOHTFFQBHF
NOTE
t$POUBDU-($VTUPNFS4FSWJDFBUJO$BOBEB
JGBOZBDDFTTPSJFTBSFNJTTJOH
t'PSZPVSTBGFUZBOEGPSFYUFOEFEQSPEVDUMJGFVTFPOMZBVUIPSJ[FEDPNQPOFOUT5IFNBOVGBDUVSFSJTOPU
responsible for product malfunction or accidents caused by the use of separately purchased unauthorized
components or parts.
t5IFJNBHFTJOUIJTPXOFSTNBOVBMNBZCFEJGGFSFOUGSPNUIFBDUVBMDPNQPOFOUTBOEBDDFTTPSJFTBOEBSF
subject to change by the manufacturer without prior notice for product improvement purposes.
10
INTRODUCING YOUR DRYER
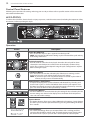
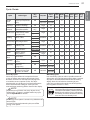
Control Panel Features
Following are instructions for starting and using your new dryer. Please refer to specific sections of this manual for
more detailed information.
WWARNING
To reduce the risk of fire, electric shock, or injury to persons, read this entire manual, including the Important Safety
Instructions, before operating this dryer.
Operation
Button
%FTDSJQUJPO
t1
PXFS0O0GG#VUUPO
- Press to turn the dryer On. Press again to turn the dryer Off.
/05& Pressing the On/Off button during a cycle will cancel that cycle and any
load settings will be lost.
t$
ZDMF4FMFDUPS,OPC
- Turn this knob to select the desired cycle. Once the desired cycle has been
selected, the standard presets will be shown in the display. On Manual Dry
cycles, these settings can be adjusted using the cycle setting buttons anytime
before starting the cycle.
t4UBSU1BVTF#VUUPO
- Press this button to Start the selected cycle. If the dryer is running, use this
button to Pause the cycle without losing the current settings.
/05&* GZPVEPOPUQSFTTUIF4UBSU1BVTFCVUUPOUPSFTVNFBDZDMFXJUIJO
minutes, the dryer turns off automatically.
t.
PSF5JNF-FTT5JNF#VUUPOT
- To adjust the drying time, use these buttons with Manual Dry, Time Dry, and
Steam Fresh™ cycles, as well as the Reduce Static and Easy Iron options. Press
the More Time button to increase the selected manual cycle time by a minute;
press Less Time to decrease the cycle time by a minute.
t$ZDMF4FUUJOH#VUUPOT
- Use these buttons to select the desired cycle settings for the selected cycle. The
current settings are shown in the display. Press the button for that option to
view and select other settings.
t0QUJPO#VUUPOT
- The Option buttons allow you to select additional cycle options. Certain buttons
also allow you to activate special functions by pressing and holding the button
GPSTFDPOET
t4UFBN'VODUJPOT
- LG’s steam technology allows you to inject fabrics with a swirling jet of hot
steam to refresh clothes, reduce static, and make ironing easier. Simply select
the Steam Fresh™ cycle, or you can add a Steam option to selected cycles.
INTRODUCING YOUR DRYER
11
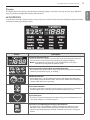
Display
WWARNING
To reduce the risk of fire, electric shock, or injury to persons, read this entire manual, including the Important Safety
Instructions, before operating this dryer.
Button
%FTDSJQUJPO
t&
TUJNBUFE5JNF3FNBJOJOH
- When the Start/Pause button is pressed, the dryer will display the estimated
(Sensor Dry) or set time (Time Dry) remaining, and begin tumbling.
/05& The cycle time on Sensor Dry cycles may fluctuate as the dryer
recalculates drying time for optimal results
t$ZDMF$PNQMFUJPO*OEJDBUPS8JUI$IFDL'JMUFS3FNJOEFS
- This portion of the display shows which stage of the drying cycle is currently
underway (Clean Filter, Drying, or Cooling).
t$IJME-PDL*OEJDBUPS
- When Child Lock is set, the Child Lock indicator will appear and all buttons
are disabled except the Power button. This prevents children from changing
settings while the dryer is operating
t$MFBO'JMUFS3FNJOEFS
- The display will show Clean Filter when the dryer is turned on as a reminder to
check the filter. It turns off when the Start/Pause button is pressed.
t$VTUPN1SPHSBN
- If you have a special combination of settings that you use frequently, you can
save these settings as a Custom Program.
t'MPX4FOTF%VDU#MPDLBHF4FOTJOH4ZTUFN*OEJDBUPS
- The Flow Sense™ duct blockage sensing system detects and alerts you to
blockages in the ductwork that reduce exhaust flow from the dryer. This
improves operating efficiency and helps minimize service calls, saving your
money.
ENGLISH
The display shows the settings, estimated time remaining, options, and status messages for your dryer. When the
dryer is turned on, the light in the display will illuminate.
12
INSTALLATION INSTRUCTIONS
INSTALLATION INSTRUCTIONS
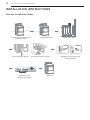
Preview Installation Order
Checking and choosing the
proper location
Leveling the dryer
Venting the dryer
120V
Connecting gas dryers
Connecting electric dryers
Press and hold
Installation test
(Refer to page 32.)
Test run
240V
Plugging in the power cord
and grounding
INSTALLATION INSTRUCTIONS
13
Installation Location Requirements
3FBEBMMJOTUBMMBUJPOJOTUSVDUJPOTDPNQMFUFMZCFGPSFJOTUBMMJOHBOEPQFSBUJOHZPVSESZFSIt is important that
you review this entire manual before installing and using your dryer. Detailed instructions concerning electrical
connections, gas connections, and exhaust requirements are provided on the following pages.
t"MPDBUJPOUIBUBMMPXTGPSQSPQFSFYIBVTUJOTUBMMBUJPO"
gas dryer must be exhausted to the outdoors.
See 7FOUJOHUIFESZFS
t"TUVSEZGMPPSUPTVQQPSUUIFUPUBMESZFSXFJHIUPG
MCTLH
5IFDPNCJOFEXFJHIUPGBDPNQBOJPO
appliance should also be considered.
t"HSPVOEFEFMFDUSJDBMPVUMFUMPDBUFEXJUIJOGU
DN
PGFJUIFSTJEFPGUIFESZFS4FF$POOFDUJOH
FMFDUSJDESZFST
tNo other fuel-burning appliance can be installed in the
same closet as a dryer.
%POPUPQFSBUFZPVSESZFSBUUFNQFSBUVSFTCFMPX¡'¡$
"UMPXFSUFNQFSBUVSFTUIFESZFSNJHIUOPUTIVUPGG
at the end of an automatic cycle. This can result in longer drying times. The dryer must not be installed or stored in
an area where it will be exposed to water and/or weather. Check code requirements. Some codes limit, or do not
permit, installation of the dryer in garages, closets, mobile homes or sleeping quarters. Contact your local building
inspector.
NOTE
t"MFWFMGMPPSXJUIBNBYJNVNTMPQFPGJODIDN
VOEFSFOUJSFESZFS*GTMPQFJTHSFBUFSUIBOJODIDN
JOTUBMMUIF&YUFOEFE%SZFS'FFU,JU$MPUIFTNBZOPUUVNCMFQSPQFSMZBOEBVUPNBUJDTFOTPSDZDMFTNBZOPU
operate correctly if dryer is not level.
t'PSBHBSBHFJOTUBMMBUJPOZPVXJMMOFFEUPQMBDFUIFESZFSBUMFBTUJODIFTDN
BCPWFUIFGMPPS*GVTJOHB
QFEFTUBMZPVXJMMOFFEJODIFTDN
UPUIFCPUUPNPGUIFESZFS
Clearances
(7.6 cm)
14" max.*
(35.6 cm)
21 1⁄4"
(54 cm)
45 7⁄16"
(115.3 cm)
28 15⁄16"
(73.4 cm)
5"**
(12.7 cm)
(2.54 cm)
50 1⁄4"
(127.5 cm)
(68.6 cm)
(2.54 cm)
Closet Door Vent
(7.6 cm) Requirements
Installation Spacing For Recessed Area Or Closet Installation
The following spacing dimensions are recommended for this dryer. This dryer has been tested for spacing of
JODIDN
DMFBSBODFPOUIFTJEFTBOESFBS3FDPNNFOEFETQBDJOHTIPVMECFDPOTJEFSFEGPSUIFGPMMPXJOH
reasons:
t"EEJUJPOBMTQBDJOHTIPVMECFDPOTJEFSFEGPSFBTFPG
installation and servicing.
t"EEJUJPOBMDMFBSBODFTNJHIUCFSFRVJSFEGPSXBMMEPPS
and floor moldings.
t"EEJUJPOBMTQBDJOHTIPVMECFDPOTJEFSFEPOBMMTJEFT
of the dryer to reduce noise transfer.
For closet installation, with a door, minimum
ventilation openings in the top and bottom of the
door are required. Louvered doors with equivalent
ventilation openings are acceptable.
t$PNQBOJPOBQQMJBODFTQBDJOHTIPVMEBMTPCF
considered.
NOTE
There should be at least a little space around the dryer (or any other appliance) to eliminate the transfer of
vibration from one to the other. Too much vibration, it could cause them to make noise or touch each other
causing paint damage and making even more noise.
ENGLISH
WWARNING
14
INSTALLATION INSTRUCTIONS
Clearances (cont.)
Recommended Installation Spacing For Cabinet Installation
tFor cabinet installation with a door, minimum ventilation openings in the top of the cabinet are required.
7"* (17.8 cm)
*Required spacing
7"* (17.8 cm)
**For side or bottom venting,
JODIFTDN
TQBDJOHJTBMMPXFE
5"* 28
1"*
(12.7 cm) (73.4 cm) (2.5 cm)
1"
27"
(2.54 cm) (68.6 cm)
1"
(2.54 cm)
Leveling the Dryer
WWARNING
t5PSFEVDFUIFSJTLPGJOKVSZUPQFSTPOTBEIFSFUPBMM
JOEVTUSZSFDPNNFOEFETBGFUZQSPDFEVSFTJODMVEJOH
UIFVTFPGMPOHTMFFWFEHMPWFTBOETBGFUZHMBTTFT
Failure to follow this warning can cause serious injury
or death.
t5IFBQQMJBODFTBSFIFBWZ5XPPSNPSFQFPQMFBSF
SFRVJSFEXIFOJOTUBMMJOHUIFESZFSFailure to follow
this warning can cause serious injury or death.
To ensure that the dryer provides optimal drying
performance, it must be level. To minimize vibration,
noise, and unwanted movement, the floor must be a
perfectly level, solid surface.
NOTE
Adjust the leveling feet only as far as necessary to
level the dryer. Extending the leveling feet more than
necessary can cause the dryer to vibrate.
1PTJUJPOUIFESZFSJOUIFGJOBMMPDBUJPO1MBDFBMFWFM
across the top of the dryer.
Level
Leveling Feet
t"MMGPVSMFWFMJOHGFFUNVTUSFTUTPMJEMZPOUIFGMPPS
Gently push on the top corners of the dryer to make
sure that the dryer does not rock from corner to corner.
If you are installing the dryer on the optional pedestal,
you must use the leveling feet on the pedestal to
level the dryer. The dryer leveling feet should be fully
retracted.
6TFBOBEKVTUBCMFXSFODIUPUVSOUIFMFWFMJOHGFFU
Turn clockwise to raise the dryer or counterclockwise
to lower it. Raise or lower the leveling feet until dryer
is level from side to side and front to back.
.BLFTVSFUIBUBMMMFWFMJOHGFFUBSFJOGJSNDPOUBDUXJUI
the floor.
INSTALLATION INSTRUCTIONS
15
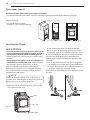
Reversing the Door
NOTE
The door reversal procedure for the two-way door
is far more complex than for a conventional dryer
door. It is recommended that you read through these
instructions in their entirety before beginning the
process, in order to gauge whether you prefer to have
the procedure done by a professional installer or
service person.
The door reversal procedure consists of four main parts:
t3FNPWJOHBOESFJOTUBMMJOHUIFEPPSBOEIJOHFT (steps
BOE
t3FNPWJOHBOESFWFSTJOHDPNQPOFOUTPOUIFESZFS
DBCJOFUTUFQ
t3FNPWJOHBOESFWFSTJOHDPNQPOFOUTPOUIFdoor
DPWFSTUFQTBOE
t3FNPWJOHBOESFWFSTJOHDPNQPOFOUTinside the door
TUFQTUISPVHI
5PPMT3FRVJSFE
t1IJMMJQTTDSFXESJWFS
t-BSHFGMBUCMBEFTDSFXESJWFS (recommended for hinge
screws if they are tight or your Phillips screwdriver is
worn)
t4NBMMGMBUCMBEFTDSFXESJWFS (for lifting out parts)
WWARNING
t5PBWPJEEBNBHFUPUIFESZFSPSUIFEPPSTVQQPSU
UIFEPPSXJUIBTUPPMPSCPYUIBUGJUTVOEFSUIFEPPS
PSIBWFBOBTTJTUBOUTVQQPSUUIFXFJHIUPGUIFEPPS
t"WPJEESPQQJOHUIFEPPSUPBWPJEEBNBHFUPUIF
EPPSPSUIFGMPPS
t6OQMVHUIFESZFSPSUVSOPGGQPXFSBUUIFNBJO
DJSDVJUCSFBLFSCFGPSFCFHJOOJOHEPPSSFWFSTBM
t5)&%3:&3%003*47&3:-"3(&"/%)&"7:
'BJMVSFUPGPMMPXUIFJOTUSVDUJPOTCFMPXDBOSFTVMUJO
EBNBHFUPUIFESZFSQSPQFSUZEBNBHFPSQFSTPOBM
JOKVSZ
*OTUSVDUJPOT
NOTE
The instructions here are for changing the door swing
from a right to a left side hinge. If the door has been
reversed, and it is necessary to change it back, use
care when following these instructions. Some of
the illustrations and the left/right references will be
reversed, and you will need to read the instructions
carefully.
WWARNING
#FTVSFUPTVQQPSUUIFXFJHIUPGUIFEPPSCFGPSF
removing the hinge screws.
0QFOUIFEPPSGSPNUIFTJEFTPUIBUUIFIJOHF
TDSFXTBSFBDDFTTJCMF
Two large
screws
Two small
screws
3FNPWFUIFGPVSIJOHFTDSFXT
While supporting the door, remove the four hinge
screws, two from each hinge. Set the door aside face
down on a protected surface to prevent damage to
the door or the work surface.
3FWFSTFUIFDPNQPOFOUTPOUIFDBCJOFU
a. Use a Phillips screwdriver to remove the two screws
and the latch mechanism on the front panel of the
cabinet.
hinge
cover
latch
mechanism
hinge
upper
hinge
latch hole
cover
hinge
bracket
b. Remove the latch hole cover by gently prying it
up with a flat blade screwdriver, being careful not
to scratch the paint. Install the latch hole cover on
the opposite side, where the latch mechanism was
removed. Install the latch mechanism in the position
from which you removed the latch hole cover, using
the two screws removed in step a.
c. Remove the hinge cover by gently prying it up with
a flat blade screwdriver, being careful not to scratch
UIFQBJOU3PUBUFUIFIJOHFDPWFSEFHSFFTBOE
install it on the opposite side, where the upper hinge
was attached.
ENGLISH
#FGPSFZPVCFHJO
16
INSTALLATION INSTRUCTIONS
Reversing the Door (continued)
hinge
cover
latch
mechanism
hinge
upper
hinge
latch hole
cover
hinge
bracket
ON THE DOOR:
-JGUPGGUIFEPPSDPWFS
With the door laid inside facing up on a protected
TVSGBDFSFNPWFUIFTDSFXTPOUIFJOTJEFPGUIF
door. Carefully lift off the door cover with the help of
a small flat blade screwdriver inserted in the upper
corner (circled below).
WWARNING
The edges of the door cover may be sharp. Take care
when handling, or wear gloves to avoid injury.
twelve screws
d. Reverse the hinge and the hinge bracket at the
bottom of the cabinet. Remove the two screws from
the hinge bracket at bottom right and remove the
hinge bracket.
Remove the lower of the two
screws behind the hinge
bracket. Do NOT remove the
upper screw behind the hinge
bracket. Set the parts aside.
Hole
plug
interlock
button
NOTE
Do /05 remove any of the eight screws on the face of
below). Doing so could
the cabinet (marked with
result in damage to the dryer and the need for a
service call to repair the dryer.
4XJUDIUIFEPPSTUSJLFBOEUIFCMBOLDPWFS
Remove the four screws on the door cover that secure
the door strike and the blank cover.
Switch the door strike and the blank cover, installing
them on the opposite sides from which they were
removed.
short
screws
long screw
blank cover
door strike
Gently pry out the hole plug on the side of the door
cover and install it in the hole on the opposite side.
e. Remove the three screws on the
hinge at bottom left. Remove the
hinge and reinstall it on the right
side. The top screw occupies the
hole where you removed the screw
behind the hinge bracket in step d.
f. Install the hinge bracket removed in step d on the
bottom left side, first installing one screw behind the
hinge bracket.
hole plug
Set the door cover aside.
INSTALLATION INSTRUCTIONS
17
Reversing the Door (continued)
Inner Structure of Door
(before reversing - right hinge swing)
Top interlock buttons
inner lock rods
upper hinge
assembly
upper hinge
filler
upper hinge
pivot
top lock rod
side lock rod
glass
Side Interlock button
lower hinge
filler
lower
hinge
assembly
lower
hinge
bracket
bumpers
interlock buttons
lower hinge filler
side lock rod
top lock rod
inner lock rods
lower hinge bracket
Hole plug
lower hinge assembly
ENGLISH
3FWFSTFUIFDPNQPOFOUTJOTJEFUIFEPPS
You will now be removing and reversing various components inside the door. See below for a detailed diagram
and identification of the inner structure and parts of the door. (The diagram shows the “before view” of the door,
with the default set-up for a right side hinge swing. After following these instructions, your door should be a
mirror image of the illustration.)
18
INSTALLATION INSTRUCTIONS
Reversing the Door (continued)
-JGUPVUUIFUXPUPQJOUFSMPDLCVUUPOT
Lift out the two grey interlock buttons from the top of
the outer door and set them aside for later use.
interlock buttons
side lock rod
b. While sliding the lock rod right, lift the right end up
and out of the guides.
-JGUPVUUIFHSFZJOUFSMPDLCVUUPOJOUIFTJEFPGUIF
door.
Make sure to remove the spring with the interlock
button and to keep the two together. Set the interlock
button aside. Do not confuse with interlock buttons
from the top of the outer door.
NOTE
%POPUSFNPWFUIFUXPJOOFSMPDLSPETTFFQBHF
located underneath the top lock rod. They do NOT
need to be reversed
3FNPWFUIFVQQFSIJOHFQJWPU
Once the top lock rod has been removed, the
hinge pivot can easily be removed from the hinge
assembly on the upper left and set aside.
upper hinge
assembly
3FNPWFUIFTJEFMPDLSPE
Remove the side lock rod from
the lower hinge bracket by lifting
the top end of the rod and sliding
it toward the top of the door. The
spring should remain attached to
the lock rod. Set the lock rod aside.
Spring
3FNPWFUIFUPQMPDLSPE
upper hinge
pivot
3FWFSTFUIFVQQFSIJOHFBTTFNCMZBOEIJOHF
GJMMFS
Lift out the upper hinge filler (on the right) and set it
aside.
Carefully lift the upper hinge assembly (on the left)
out of the outer door frame, using a small flat blade
screwdriver if necessary. Rotate the hinge assembly
EFHSFFTBOEJOTUBMMJUPOUIFVQQFSSJHIUTJEFPG
the outer door. You will need to press firmly to install
the hinge assembly.
5IFIJOHFQJWPUSFNPWFEJOTUFQXJMMCFJOTUBMMFE
later.
a. Slide the lock rod to the right to remove it from the
hinge assembly on the left side.
upper hinge assembly
upper hinge pivot
INSTALLATION INSTRUCTIONS
19
Reversing the Door (continued)
upper hinge filler
3FJOTUBMMUIFUPQMPDLSPE
3PUBUFUIFUPQMPDLSPESFNPWFEJOTUFQ
degrees end for end from its original position and
reinstall it. The spring should now be to the right of
center, with the spring on the side of the rod facing
the top of the door.
C3PUBUFUIFMPXFSIJOHFBTTFNCMZEFHSFFTBOE
install it on the right side using the two screws
removed in step a.
screws
lower hinge assembly
c. Flip over the lower hinge bracket and release the
tabs on the back locking the hinge filler to the hinge
bracket.
a. Insert the right end of the lock rod into the right
hinge assembly. Make sure the rod is aligned with
the guides in the door panel.
tabs
E3PUBUFUIFIJOHFGJMMFSEFHSFFTBOETOBQJUCBDL
onto the FRONT of the hinge bracket facing in the
opposite direction.
b. Lower the rod into position, sliding it to bypass the
center handle, making sure to align the lock rod
with the guides all the way across the door panel.
When released, the lock rod should slide completely
into the hinge assembly on the right. Slide the
lock rod back and forth to make sure it is correctly
positioned in the guides and slides easily.
3FWFSTFUIFMPXFSIJOHFCSBDLFUBOEIJOHF
BTTFNCMZ
a. Remove the screw from the lower hinge bracket (on
the right) and lift the hinge bracket out. Set it aside.
Remove the two screws from the lower hinge assembly
on the bottom left and lift the hinge assembly out.
e. Mount the lower hinge bracket and the filler on the
left side of the door with the screw removed in step a.
screw
*OTUBMMUIFTJEFMPDLSPE
Flip the side lock rod over and install it on the
opposite side. Insert the lower end into the left
hinge and lower the rod into the guides on the door
while compressing the spring inside the recess.
ENGLISH
/PXSPUBUFUIFIJOHFGJMMFSEFHSFFTBOEJOTUBMMJU
on the upper left side of the door.
20
INSTALLATION INSTRUCTIONS
Reversing the Door (continued)
Make sure the top of the side lock rod is beside the top
lock rod and the two do not overlap each other, so the
two rods can interact correctly. If they are not aligned
properly, the door will not operate properly.
interlock
buttons
bumpers
3FJOTUBMMUIFUPQJOUFSMPDLCVUUPOT
Reinstall the top gray interlock buttons removed in
TUFQPOFPOFBDITJEFPGUIFPVUFSEPPSQBOFM
3FJOTUBMMUIFTJEFJOUFSMPDLCVUUPO
3FJOTUBMMUIFTJEFJOUFSMPDLCVUUPOSFNPWFEJOTUFQ
Center the spring in the compartment and insert the
interlock button on top of it.
19. /PXQJDLVQUIFVQQFSIJOHFQJWPUSFNPWFEFBSMJFSBOE
SPUBUFJUEFHSFFT Press in the side interlock button
on the left side and hold it down while you press the hinge
pivot into the hinge assembly on the top right side. If the
door has been reassembled correctly, the lock rod will slide
back easily and lock the pivot in place. The door is now
ready to remount on the opposite side of the dryer.
WWARNING
#FTVSFUPTVQQPSUUIFXFJHIUPGUIFEPPSCFGPSFJOTUBMMJOH
the hinge screws.
3FJOTUBMMUIFEPPS
While supporting the door, install the four hinge screws
SFNPWFEJOTUFQ5FTUUIFTXJOHPGUIFEPPSUPNBLFTVSF
the hinges and latch are properly aligned and that the
door opens, closes and latches properly in both directions.
3FJOTUBMMUIFEPPSDPWFS
Clean the glass on the door and door cover, if
necessary.
Make sure the three gray interlock buttons are
properly installed and that the top and side lock
rods are properly aligned where they meet. Carefully
lower the door cover into place, aligning the holes in
the cover with the interlock buttons on the top and
side and the bumpers on the bottom. Take care not
to dislodge the lock rods while mounting the door
cover. Once the door cover is in place, secure it with
UIFTDSFXTSFNPWFEJOTUFQ
The ten similar screws go around the top and sides
of the door cover. Make sure to install the two
different screws on the bottom edge, in the locations
marked below
Two large
screws
Two small
screws
If the door doesn’t operate smoothly, remove the door
and then the door cover to check that the lock rods and
interlock buttons are properly mounted and aligned.
The interlock buttons should be oriented correctly and
operating smoothly. The interlock rods should be in the
proper position and should not overlap at the contact
QPJOU4FFTUFQT
If the door is damaged, or if the door does not work after
SFBTTFNCMZDPOUBDUUIFDBMMDFOUFSBU
INSTALLATION INSTRUCTIONS
21
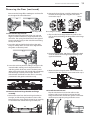
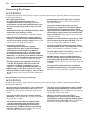
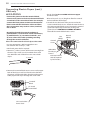
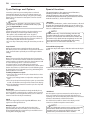
Installing the Side Vent Kit
t6TFBIFBWZNFUBMWFOU
t%POPUVTFQMBTUJDPSUIJOGPJMEVDU
t$MFBOPMEEVDUTCFGPSFJOTUBMMJOHUIJTESZFS
t5PSFEVDFUIFSJTLPGJOKVSZUPQFSTPOTBEIFSFUPBMM
JOEVTUSZSFDPNNFOEFETBGFUZQSPDFEVSFTJODMVEJOH
UIFVTFPGMPOHTMFFWFEHMPWFTBOETBGFUZHMBTTFT
tFailure to follow all of the safety warnings in this
manual could result in property damage, injury to
persons, or death.
1SFBTTFNCMFBJODIFTDN
FMCPXUPUIFOFYU
JODIFTDN
EVDUTFDUJPOBOETFDVSFBMMKPJOUT
XJUIEVDUUBQF#FTVSFUIBUUIFNBMFFOEPGUIF
elbow faces AWAY from the dryer. Insert the elbow/
duct assembly through the side opening and press it
onto the adapter duct. Secure in place with duct tape.
#FTVSFUIBUUIFNBMFFOEPGUIFEVDUQSPUSVEFT “
JODIFTDN
UPDPOOFDUUIFSFNBJOJOHEVDUXPSL
Attach cover plate to the back of the dryer with
included screw.
Your new dryer is shipped to vent to the rear. It can also
be configured to vent to the bottom or side (right-side
venting is not available on gas models).
"OBEBQUFSLJUQBSUOVNCFS&&-#NBZCF
purchased from your LG retailer. This kit contains the
necessary duct components to change the dryer vent
location.
Cover
Plate
Elbow
3FNPWFUIFSFBSFYIBVTUEVDUSFUBJOJOHTDSFX1VMM
out the exhaust duct.
Retaining
Screw
”
DN
015*0/#0550.7&/5*/(
1SFTTUIFBEBQUFSEVDUPOUPUIFCMPXFSIPVTJOHBOE
secure to the base of the dryer as shown.
Adapter
Duct
Rear
Exhaust Duct
#SBDLFU
015*0/4*%&7&/5*/(
1SFTTUIFUBCTPOUIFLOPDLPVUBOEDBSFGVMMZSFNPWF
the knockout for the desired vent opening (rightside venting is not available on gas models). Press the
adapter duct onto the blower housing and secure to
the base of the dryer as shown.
*OTFSUUIFJODIFTDN
FMCPXUISPVHIUIFSFBS
PQFOJOHBOEQSFTTJUPOUPUIFBEBQUFSEVDU#FTVSF
that the male end of the elbow faces down through
hole in the bottom of the dryer. Secure in place with
duct tape. Attach the cover plate to the back of the
dryer with included screw.
Adapter
Duct
Cover
Plate
#SBDLFU
,OPDLPVU
Elbow
ENGLISH
WWARNING
22
INSTALLATION INSTRUCTIONS
Venting the Dryer
WWARNING
To reduce the risk of fire, electric shock, or injury to persons when using this appliance, follow basic precautions,
including the following:
t%POPUDSVTIPSDPMMBQTFEVDUXPSL Failure to follow
these instructions can result in fire or death.
t%POPUBMMPXEVDUXPSLUPSFTUPOPSDPOUBDUTIBSQ
PCKFDUT Failure to follow these instructions can result
in fire or death.
t*GDPOOFDUJOHUPFYJTUJOHEVDUXPSLNBLFTVSFJU
JTTVJUBCMFBOEDMFBOCFGPSFJOTUBMMJOHUIFESZFS
Failure to follow these instructions can result in fire or
death.
t7FOUJOHNVTUDPOGPSNUPMPDBMCVJMEJOHDPEFT
Failure to follow these instructions can result in fire or
death.
t(BTESZFST.645FYIBVTUUPUIFPVUEPPST Failure to
follow these instructions can result in fire or death.
t6TFPOMZJODIDN
SJHJEPSGMFYJCMFNFUBM
EVDUXPSLJOTJEFUIFESZFSDBCJOFUBOEGPSWFOUJOH
outside. Failure to follow these instructions can result
in fire or death.
t5PSFEVDFUIFSJTLPGGJSFDPNCVTUJPOPS
BDDVNVMBUJPOPGDPNCVTUJCMFHBTFT%0/05
FYIBVTUESZFSBJSJOUPBOFODMPTFEBOEVOWFOUJMBUFE
BSFBTVDIBTBOBUUJDXBMMDFJMJOHDSBXMTQBDF
DIJNOFZHBTWFOUPSDPODFBMFETQBDFPGBCVJMEJOH
Failure to follow these instructions can result in fire or
death.
t5PSFEVDFUIFSJTLPGGJSF%0/05FYIBVTUUIFESZFS
XJUIQMBTUJDPSUIJOGPJMEVDUJOH Failure to follow
these instructions can result in fire or death.
t5IFFYIBVTUEVDUNVTUCFJODIFTDN
JO
EJBNFUFSXJUIOPPCTUSVDUJPOT5IFFYIBVTUEVDU
TIPVMECFLFQUBTTIPSUBTQPTTJCMF.BLFTVSF
UPDMFBOBOZPMEEVDUTCFGPSFJOTUBMMJOHZPVSOFX
dryer. Failure to follow these instructions can result in
fire or death.
t3JHJEPSTFNJSJHJENFUBMEVDUJOHJTSFDPNNFOEFE
GPSVTFCFUXFFOUIFESZFSBOEUIFXBMM*OTQFDJBM
JOTUBMMBUJPOTXIFOJUJTJNQPTTJCMFUPNBLFB
DPOOFDUJPOXJUIUIFBCPWFSFDPNNFOEBUJPOTB6-
MJTUFEGMFYJCMFNFUBMUSBOTJUJPOEVDUNBZCFVTFE
CFUXFFOUIFESZFSBOEXBMMDPOOFDUJPOPOMZ5IF
VTFPGUIJTEVDUJOHXJMMBGGFDUESZJOHUJNF Failure to
follow these instructions can result in fire or death.
t%0/05VTFTIFFUNFUBMTDSFXTPSPUIFSGBTUFOFST
XIJDIFYUFOEJOUPUIFEVDUUIBUDPVMEDBUDIMJOU
BOESFEVDFUIFFGGJDJFODZPGUIFFYIBVTUTZTUFN
4FDVSFBMMKPJOUTXJUIEVDUUBQF Failure to follow
these instructions can result in fire or death.
t%VDUXPSLJTOPUQSPWJEFEXJUIUIFESZFS:PV
TIPVMEPCUBJOUIFOFDFTTBSZEVDUXPSLMPDBMMZ5IF
FOEDBQTIPVMEIBWFIJOHFEEBNQFSTUPQSFWFOU
CBDLESBGUXIFOUIFESZFSJTOPUJOVTF Failure to
follow these instructions can result in fire or death.
t5IFUPUBMMFOHUIPGGMFYJCMFNFUBMEVDUTIBMMOPU
FYDFFEGUN
t*O$BOBEBPOMZUIPTFGPJMUZQFGMFYJCMFEVDUT
JGBOZTQFDJGJDBMMZJEFOUJGJFEGPSVTFXJUIUIF
BQQMJBODFCZUIFNBOVGBDUVSFSTIBMMCFVTFE In the
United States, only those foil-type flexible ducts, if any,
specifically identified for use with the appliance by the
manufacturer and that comply with the Outline for
$MPUIFT%SZFS5SBOTJUJPO%VDU4VCKFDU"TIBMMCF
used.
INSTALLATION INSTRUCTIONS
23
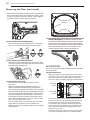
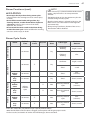
Venting the Dryer (cont.)
8BMM$BQ5ZQF
Recommended
w
DN
w
DN
Use only for
short run
installations
/”
DN
/VNCFS0G
¡&MCPXT
.BYJNVN-FOHUI0G
JODI%JBNFUFS
3JHJE.FUBM%VDU
GUN
GUN
GUN
GUN
GUN
GUN
GUN
GUN
GUN
GUN
NOTE
%FEVDUGUN
GPSFBDIBEEJUJPOBMFMCPX*UJTOPU
SFDPNNFOEFEUPVTFNPSFUIBOGPVS¡FMCPXT
Routing and Connecting Ductwork
NOTE
Follow the guidelines below to maximize drying
performance and reduce lint buildup and
condensation in the ductwork.
Ductwork and fittings are NOT included and must be
purchased separately.
t6TFJODIDN
EJBNFUFSSJHJEPSTFNJSJHJE
metal ductwork.
t5IFFYIBVTUEVDUSVOTIPVMECFBTTIPSUBTQPTTJCMF
t6TFBTGFXFMCPXKPJOUTBTQPTTJCMF
t5IFNBMFFOEPGFBDITFDUJPOPGFYIBVTUEVDUNVTU
point away from the dryer.
t6TFEVDUUBQFPOBMMEVDUKPJOUT
t*OTVMBUFEVDUXPSLUIBUSVOTUISPVHIVOIFBUFEBSFBT
in order to reduce condensation and lint buildup on
duct surfaces.
t*ODPSSFDUPSJOBEFRVBUFFYIBVTUTZTUFNTBSFOPU
covered by the dryer warranty. Failures or poor
performance caused by such exhaust systems will
not be covered by the dryer warranty.
$PSSFDU7FOUJOH
*ODPSSFDU7FOUJOH
ENGLISH
Ductwork
24
INSTALLATION INSTRUCTIONS
Connecting Gas Dryers
WWARNING
To reduce the risk of fire, electric shock, or injury to persons when using this appliance, follow basic precautions,
including the following:
t(BTTVQQMZSFRVJSFNFOUT
"TTIJQQFEGSPNUIFGBDUPSZUIJTESZFSJT
DPOGJHVSFEGPSVTFXJUIOBUVSBMHBT*UDBOCF
DPOWFSUFEGPSVTFXJUI-1-JRVFGJFE1SPQBOF
HBT
(BTQSFTTVSFNVTUOPUFYDFFEJODIFTPGXBUFS
DPMVNO
t"RVBMJGJFETFSWJDFPSHBTDPNQBOZUFDIOJDJBONVTU
DPOOFDUUIFESZFSUPUIFHBTTFSWJDF
Failure to do so can result in fire, explosion, or death.
t*TPMBUFUIFESZFSGSPNUIFHBTTVQQMZTZTUFNCZ
DMPTJOHJUTJOEJWJEVBMNBOVBMTIVUPGGWBMWFEVSJOH
BOZQSFTTVSFUFTUJOHPGUIFHBTTVQQMZ Failure to do
so can result in fire, explosion, or death.
t4VQQMZMJOFSFRVJSFNFOUT
:PVSMBVOESZSPPNNVTUIBWFBSJHJEHBT
TVQQMZMJOFUPZPVSESZFS*OUIF6OJUFE4UBUFT
BOJOEJWJEVBMNBOVBMTIVUPGGWBMWF.645CF
JOTUBMMFEXJUIJOBUMFBTUGUN
PGUIFESZFS
JOBDDPSEBODFXJUIUIF/BUJPOBM'VFM(BT$PEF
"/4*;PS$BOBEJBOHBTJOTUBMMBUJPODPEF$4"
B149.1. A 1cľJODI/15QJQFQMVHNVTUCFJOTUBMMFE
Failure to do so can result in fire, explosion, death.
t*GVTJOHBSJHJEQJQFUIFSJHJEQJQFTIPVMECF
JODI*14*GBDDFQUBCMFVOEFSMPDBMDPEFTBOE
PSEJOBODFTBOEXIFOBDDFQUBCMFUPZPVSHBT
TVQQMJFS3cľJODIBQQSPWFEUVCJOHNBZCFVTFE
XIFSFMFOHUITBSFMFTTUIBOGUN
-BSHFS
UVCJOHTIPVMECFVTFEGPSMFOHUITJOFYDFTTPGGU
N
Failure to do so can result in fire, explosion, or
death.
t$POOFDUUIFESZFSUPUIFUZQFPGHBTTIPXOPO
UIFOBNFQMBUFFailure to do so can result in fire,
explosion, or death.
t5PQSFWFOUDPOUBNJOBUJPOPGUIFHBTWBMWF
QVSHFUIFHBTTVQQMZPGBJSBOETFEJNFOUCFGPSF
DPOOFDUJOHUIFHBTTVQQMZUPUIFESZFS#FGPSF
UJHIUFOJOHUIFDPOOFDUJPOCFUXFFOUIFHBTTVQQMZ
BOEUIFESZFSQVSHFSFNBJOJOHBJSVOUJMUIFPEPS
PGHBTJTEFUFDUFE Failure to do so can result in fire,
explosion, or death.
t%0/05VTFBOPQFOGMBNFUPJOTQFDUGPSHBTMFBLT
6TFBOPODPSSPTJWFMFBLEFUFDUJPOGMVJE Failure to
do so can result in fire, explosion, or death.
t6TFPOMZBOFX"("PS$4"DFSUJGJFEHBTTVQQMZ
MJOFXJUIGMFYJCMFTUBJOMFTTTUFFMDPOOFDUPST Failure
to do so can result in fire, explosion, or death.
t4FDVSFMZUJHIUFOBMMHBTDPOOFDUJPOT Failure to do
so can result in fire, explosion, or death.
t%0/05BUUFNQUBOZEJTBTTFNCMZPGUIFESZFS
BOZEJTBTTFNCMZSFRVJSFTUIFBUUFOUJPOBOEUPPMT
PGBOBVUIPSJ[FEBOERVBMJGJFETFSWJDFQFSTPOPS
DPNQBOZ Failure to do so can result in fire, explosion,
or death.
t6TFBQJQFKPJOUDPNQPVOEUIBUJTJOTPMVCMFJO
-JRVFGJFE1FUSPMFVN-1
HBTPOBMMQJQFUISFBET
Failure to do so can result in fire, explosion, or death.
Electrical requirements for gas models only
WWARNING
To reduce the risk of fire, electric shock, or injury to persons when using this appliance, follow basic precautions,
including the following:
t%POPUVOEFSBOZDJSDVNTUBODFTDVUPSSFNPWFUIF
UIJSEHSPVOE
QSPOHGSPNUIFQPXFSDPSEFailure
to follow this warning can result in fire, explosion, or
death.
t5IJTESZFSNVTUCFQMVHHFEJOUPB)[7"$
HSPVOEFEPVUMFUQSPUFDUFECZBBNQFSFGVTF
PSDJSDVJUCSFBLFS Failure to follow this warning can
result in fire, explosion, or death.
t'PSQFSTPOBMTBGFUZUIJTESZFSNVTUCFQSPQFSMZ
HSPVOEFE Failure to follow this warning can result in
fire, explosion, or death.
t8IFSFBTUBOEBSEQSPOHXBMMPVUMFUJT
FODPVOUFSFEJUJTZPVSQFSTPOBMSFTQPOTJCJMJUZ
BOEPCMJHBUJPOUPIBWFJUSFQMBDFEXJUIBQSPQFSMZ
HSPVOEFEQSPOHXBMMPVUMFU Failure to follow this
warning can result in fire, explosion, or death.
t5IFQPXFSDPSEPGUIJTESZFSJTFRVJQQFEXJUI
BQSPOHHSPVOEJOH
QMVHXIJDINBUFTXJUI
BTUBOEBSEQSPOHHSPVOEJOH
XBMMPVUMFUUP
NJOJNJ[FUIFQPTTJCJMJUZPGFMFDUSJDTIPDLIB[BSE
GSPNUIJTBQQMJBODFFailure to follow this warning
can result in fire, explosion, or death.
INSTALLATION INSTRUCTIONS
25
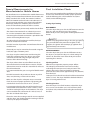
Connecting Gas Dryers (cont.)
Connecting the gas supply
To reduce the risk of fire, electric shock, or injury
to persons when using this appliance, follow basic
precautions, including the following:
.BLFTVSFUIBUUIFHBTTVQQMZUPUIFMBVOESZSPPNJT
turned OFF. Confirm that the type of gas available in
your laundry room is appropriate for the dryer. The
dryer is prepared for Natural Gas with a ⁄8 - inch NPT
gas connection.
t*OTUBMMBUJPOBOETFSWJDFNVTUCFQFSGPSNFECZ
BRVBMJGJFEJOTUBMMFSTFSWJDFBHFODZPSUIFHBT
TVQQMJFS Failure to do so can result in fire, explosion,
or death.
t6TFPOMZBOFXTUBJOMFTTTUFFMGMFYJCMFDPOOFDUPS
BOEBOFX"("DFSUJGJFEDPOOFDUPS Failure to do so
can result in fire, explosion, or death.
t"HBTTIVUPGGWBMWFNVTUCFJOTUBMMFEXJUIJOGU
N
PGUIFESZFSFailure to do so can result in fire,
explosion, or death.
t5IFESZFSJTDPOGJHVSFEGPS/BUVSBM(BTXIFO
TIJQQFEGSPNUIFGBDUPSZ.BLFTVSFUIBUUIFESZFS
JTFRVJQQFEXJUIUIFDPSSFDUCVSOFSPSJGJDFGPSUIF
UZQFPGHBTCFJOHVTFE/BUVSBM(BTPS-JRVFGJFE
1FUSPMFVN
Failure to do so can result in fire,
explosion, or death.
3FNPWFUIFTIJQQJOHDBQGSPNUIFHBTDPOOFDUJPO
BUUIFCBDLPGUIFESZFS#FDBSFGVMOPUUPEBNBHF
the threads of the gas connector when removing the
shipping cap.
$POOFDUUIFESZFSUPZPVSMBVOESZSPPNTHBTTVQQMZ
using a new flexible stainless steel connector with a ⁄8
- inch NPT fitting.
4FDVSFMZUJHIUFOBMMDPOOFDUJPOTCFUXFFOUIF
dryer and your laundry room’s gas supply. Turn on
your laundry room’s gas supply and check all pipe
connections (both internal and external) for gas leaks
with a noncorrosive leak-detection fluid.
Electrical connection
Plug dryer into a 7"$
)[HSPVOEFEQSPOH
outlet.
t*GOFDFTTBSZUIFDPSSFDUPSJGJDF'PSUIF-1PSJGJDF
LJUPSEFSQBSUOVNCFS&&-%
TIPVMECF
JOTUBMMFECZBRVBMJGJFEUFDIOJDJBOBOEUIFDIBOHF
TIPVMECFOPUFEPOUIFESZFS Failure to do so can
result in fire, explosion, or death.
t"MMDPOOFDUJPOTNVTUCFJOBDDPSEBODFXJUIMPDBM
DPEFTBOESFHVMBUJPOT. Failure to do so can result in
fire, explosion, or death.
t(BTESZFST.645FYIBVTUUPUIFPVUEPPST Failure to
do so can result in fire, explosion, or death.
w/15(BT
Connection
AGA/CSA-Certified
Stainless Steel Flexible
Connector
w/151JQF
Plug
Gas Supply
Shutoff Valve
High-altitude installations
5IF#56SBUJOHPGUIJTESZFSJT"("DFSUJGJFEGPS
FMFWBUJPOTCFMPXGFFU
If your gas dryer is being installed at an elevation above
GFFUJUNVTUCFEFSBUFECZBRVBMJGJFEUFDIOJDJBO
or gas supplier.
ENGLISH
WWARNING
26
INSTALLATION INSTRUCTIONS
Connecting Electric Dryers
WWARNING
WWARNING
To help prevent fire, electric shock, serious injury,
or death, the wiring and grounding must conform
to the latest edition of the National Electrical Code,
"/4*/'1"BOEBMMBQQMJDBCMFMPDBMSFHVMBUJPOT
Please contact a qualified electrician to check your
home’s wiring and fuses to ensure that your home has
adequate electrical power to operate the dryer.
To reduce the risk of fire, electric shock, or injury
to persons when using this appliance, follow basic
precautions, including the following:
Electrical requirements for electric models only
t*GJUEPFTOPUGJUUIFPVUMFUBQSPQFSPVUMFUXJMM
OFFEUPCFJOTUBMMFECZBRVBMJGJFEFMFDUSJDJBO
WWARNING
To reduce the risk of fire, electric shock, or injury
to persons when using this appliance, follow basic
precautions, including the following:
t5IJTESZFSNVTUCFDPOOFDUFEUPBHSPVOEFE
NFUBMQFSNBOFOUXJSJOHTZTUFNPSBOFRVJQNFOU
HSPVOEJOHDPOEVDUPSNVTUCFSVOXJUIUIFDJSDVJU
DPOEVDUPSTBOEDPOOFDUFEUPUIFFRVJQNFOU
HSPVOEJOHUFSNJOBMPSMFBEPOUIFESZFSFailure to
do so can result in fire, explosion, or death.
t5IFESZFSIBTJUTPXOUFSNJOBMCMPDLUIBUNVTU
CFDPOOFDUFEUPBTFQBSBUF7"$)FSU[
TJOHMFQIBTFDJSDVJUGVTFEBUBNQFSFTUIF
DJSDVJUNVTUCFGVTFEPOCPUITJEFTPGUIFMJOF
&-&$53*$"-4&37*$&'035)&%3:&34)06-%#&
0'5)&."9*.6.3"5&70-5"(&-*45&%0/5)&
/".&1-"5&%0/05$0//&$5%3:&350
0370-5$*3$6*5 Failure to follow these
instructions can result in fire, explosion, or death.
t*GCSBODIDJSDVJUUPESZFSJTGUN
PSMFTTJO
MFOHUIVTF6-6OEFSXSJUFST-BCPSBUPSJFT
MJTUFE
/P"8(XJSFDPQQFSXJSFPOMZ
PSBTSFRVJSFE
CZMPDBMDPEFT*GPWFSGUN
VTF6-MJTUFE
/P"8(XJSFDPQQFSXJSFPOMZ
PSBTSFRVJSFE
CZMPDBMDPEFT"MMPXTVGGJDJFOUTMBDLJOXJSJOH
TPESZFSDBOCFNPWFEGSPNJUTOPSNBMMPDBUJPO
XIFOOFDFTTBSZ Failure to do so can result in fire,
explosion, or death.
t5IFQPXFSDPSEQJHUBJM
DPOOFDUJPOCFUXFFO
XBMMSFDFQUBDMFBOEESZFSUFSNJOBMCMPDL*4/05
TVQQMJFEXJUIESZFS5ZQFPGQJHUBJMBOEHBVHF
PGXJSFNVTUDPOGPSNUPMPDBMDPEFTBOEXJUI
JOTUSVDUJPOTPOUIFGPMMPXJOHQBHFTFailure to
follow these instructions can result in fire, explosion,
or death.
t"XJSFDPOOFDUJPOJTSFRVJSFEGPSBMMNPCJMFBOE
NBOVGBDUVSFEIPNFJOTUBMMBUJPOTBTXFMMBTBMM
OFXDPOTUSVDUJPOBGUFS+BOVBSZ"XJSF
DPOOFDUJPONVTUCFVTFEXIFSFMPDBMDPEFTEPOPU
QFSNJUHSPVOEJOHUISPVHIUIFOFVUSBMXJSF Failure
to do so can result in fire, explosion, or death.
t%POPUNPEJGZUIFQMVHBOEJOUFSOBMXJSFQSPWJEFE
XJUIUIFESZFS
t5IFESZFSTIPVMECFDPOOFDUFEUPIPMFPVUMFU
WWARNING
To reduce the risk of fire, electric shock, or injury
to persons when using this appliance, follow basic
precautions, including the following:
t"OZJOTUBMMBUJPOJOBNBOVGBDUVSFEPSNPCJMF
IPNFNVTUDPNQMZXJUIUIF.BOVGBDUVSFE)PNF
$POTUSVDUJPOBOE4BGFUZ4UBOEBSET5JUMF$'3
1BSUPS4UBOEBSE$"/$4";.)BOE
MPDBMDPEFTBOEPSEJOBODFT
t"XJSFDPOOFDUJPOJTSFRVJSFEGPSBMMNPCJMFBOE
NBOVGBDUVSFEIPNFJOTUBMMBUJPOTBTXFMMBTBMM
OFXDPOTUSVDUJPOBGUFS+BOVBSZ Failure to
do so can result in fire, explosion, or death.
INSTALLATION INSTRUCTIONS
27
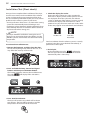
WWARNING
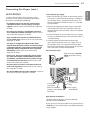
t$POOFDUUIFQPXFSDPSEUPUIFUFSNJOBMCMPDL
$POOFDUFBDIQPXFSDPSEXJSFUPUIFUFSNJOBMCMPDL
TDSFXUIBUIBTUIFTBNFDPMPSFEXJSF'PSFYBNQMF
DPOOFDUUIFCMBDLQPXFSDPSEXJSFUPUIFUFSNJOBM
CMPDLTDSFXXJUIUIFCMBDLXJSF'BJMVSFUPGPMMPX
UIFTFJOTUSVDUJPOTNBZSFTVMUJOBTIPSUPWFSMPBE
fire or death.
t(SPVOEJOHUISPVHIUIFOFVUSBMDPOEVDUPSJT
QSPIJCJUFEGPS
OFXCSBODIDJSDVJUJOTUBMMBUJPOT
NPCJMFIPNFT
SFDSFBUJPOBMWFIJDMFTBOE
BSFBTXIFSFMPDBMDPEFTQSPIJCJUHSPVOEJOH
UISPVHIUIFOFVUSBMDPOEVDUPS
Four-wire connection for electric dryers:
Power cord
t"XJSFDPOOFDUJPOJTSFRVJSFEGPSBMMNPCJMFBOE
manufactured home installations, as well as all new
DPOTUSVDUJPOBGUFS+BOVBSZ
t"6-MJTUFETUSBJOSFMJFGJTSFRVJSFE
3FNPWFUIFUFSNJOBMCMPDLBDDFTTDPWFSPOUIFVQQFS
back of the dryer. Install a UL-listed strain relief into
the power cord through-hole; then thread a UL-listed,
"7XJSF"8(NJOJNVNDPQQFS
conductor power cord through the strain relief.
Terminal
#MPDL
UL-Listed
Strain Relief
UL-Listed
8JSF1PXFS
Cord
t6TFB"76-MJTUFEQPXFSDPSEXJUI
"8(NJOJNVNDPQQFS conductor and closed loop or
forked terminals with upturned ends.
5SBOTGFSUIFESZFSTHSPVOEXJSFGSPNCFIJOEUIF
green ground screw to the center screw of the
terminal block. Attach the two hot leads of the power
cord to the outer terminal block screws. Attach the
white neutral wire to the center terminal block screw.
Attach the power cord ground wire to the green
ground screw. 5*()5&/"--4$3&844&$63&-:.
Reinstall the terminal block access cover.
Hot
#MBDL
Ground
Screw
Power Cord
Ground Wire
Neutral
(White)
Hot
(Red)
White Wire
moved from
Ground Screw
ENGLISH
Connecting Electric Dryers (cont.)
USA only
28
INSTALLATION INSTRUCTIONS
Connecting Electric Dryers (cont.)
USA only
WWARNING
t$POOFDUUIFQPXFSDPSEUPUIFUFSNJOBMCMPDL
$POOFDUFBDIQPXFSDPSEXJSFUPUIFUFSNJOBMCMPDL
TDSFXUIBUIBTUIFTBNFDPMPSFEXJSF'PSFYBNQMF
DPOOFDUUIFCMBDLQPXFSDPSEXJSFUPUIFUFSNJOBM
CMPDLTDSFXXJUIUIFCMBDLXJSF
'BJMVSFUPGPMMPXUIFTFJOTUSVDUJPOTNBZSFTVMUJOB
TIPSUPWFSMPBEGJSFPSEFBUI
t(SPVOEJOHUISPVHIUIFOFVUSBMDPOEVDUPSJT
QSPIJCJUFEGPS
OFXCSBODIDJSDVJUJOTUBMMBUJPOT
NPCJMFIPNFT
SFDSFBUJPOBMWFIJDMFTBOE
BSFBTXIFSFMPDBMDPEFTQSPIJCJUHSPVOEJOH
UISPVHIUIFOFVUSBMDPOEVDUPS
t6TF6-MJTUFEXJSF"8(NJOJNVNDPQQFS
conductor cable.
t"MMPXBUMFBTUGUN
MFOHUIUPBMMPXGPSSFNPWBM
and reinstallation of the dryer.
5SBOTGFSUIFESZFSTHSPVOEXJSFGSPNCFIJOEUIF
green ground screw to the center screw of the
terminal block. Attach the two hot leads of the power
cable to the outer terminal block screws. Attach the
white neutral wire to the center terminal block screw.
Attach the power cable ground wire to the green
ground screw. 5*()5&/"--4$3&844&$63&-:.
Reinstall the terminal block access cover.
Four-wire connection for electric dryers: Direct wire
t"XJSFDPOOFDUJPOJTSFRVJSFEGPSBMMNPCJMFBOE
manufactured home installations, as well as all new
DPOTUSVDUJPOBGUFS+BOVBSZ
Hot
#MBDL
Ground
Screw
Neutral
(White)
Hot
(Red)
t"6-MJTUFETUSBJOSFMJFGJTSFRVJSFE
3FNPWFJODIFTDN
PGUIFPVUFSDPWFSJOHGSPN
UIFXJSF3FNPWFJODIFTPGJOTVMBUJPOGSPNUIF
HSPVOEXJSF$VUPGGBQQSPYJNBUFMZcĸJODIFTDN
GSPNUIFPUIFSUISFFXJSFTBOETUSJQJODIDN
JOTVMBUJPOGSPNFBDIXJSF#FOEUIFFOETPGUIFUISFF
shorter wires into a hook shape.
DN
Ground Wire
DN
3FNPWFUIFUFSNJOBMCMPDLBDDFTTDPWFSPOUIFVQQFS
back of the dryer. Install a UL-listed strain relief into
the power cord through-hole; then thread the power
DBCMFQSFQBSFEJO4UFQUISPVHIUIFTUSBJOSFMJFG
Terminal
#MPDL
UL-Listed
Strain Relief
6--JTUFE8JSF
Power Cord
Power Cord
Ground Wire
White Wire
moved from
Ground Screw
INSTALLATION INSTRUCTIONS
29
WWARNING
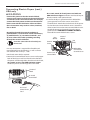
t$POOFDUUIFQPXFSDPSEUPUIFUFSNJOBMCMPDL
$POOFDUFBDIQPXFSDPSEXJSFUPUIFUFSNJOBM
CMPDLTDSFXUIBUIBTUIFTBNFDPMPSFEXJSF'PS
FYBNQMFDPOOFDUUIFCMBDLQPXFSDPSEXJSFUPUIF
UFSNJOBMCMPDLTDSFXXJUIUIFCMBDLXJSF'BJMVSF
UPGPMMPXUIFTFJOTUSVDUJPOTNBZSFTVMUJOBTIPSU
PWFSMPBEGJSFPSEFBUI
t(SPVOEJOHUISPVHIUIFOFVUSBMDPOEVDUPSJT
QSPIJCJUFEGPS
OFXCSBODIDJSDVJUJOTUBMMBUJPOT
NPCJMFIPNFT
SFDSFBUJPOBMWFIJDMFTBOE
BSFBTXIFSFMPDBMDPEFTQSPIJCJUHSPVOEJOH
UISPVHIUIFOFVUSBMDPOEVDUPS
t6TFB"76-MJTUFEQPXFSDPSEXJUI
"8(NJOJNVNDPQQFS conductor and closed loop or
forked terminals with upturned ends.
"UUBDIUIFUXPIPUMFBETPGUIFQPXFSDPSEUPUIF
outer terminal block screws. Attach the neutral wire to
the center terminal block screw. Connect the external
ground (if required by local codes) to the green
ground screw. 5*()5&/"--4$3&844&$63&-:.
Reinstall the terminal block access cover.
Hot
#MBDL
Ground
Screw
Three-wire connection for electric dryers:
Power cord
t"XJSFDPOOFDUJPOJT/05QFSNJUUFEPOOFX
DPOTUSVDUJPOBGUFS+BOVBSZ
t"6-MJTUFETUSBJOSFMJFGJTSFRVJSFE
3FNPWFUIFUFSNJOBMCMPDLBDDFTTDPWFSPOUIF
upper back of the dryer. Install a UL-listed strain relief
into the power cord through-hole; then thread a ULlisted, "7XJSF"8(NJOJNVN
DPQQFS conductor power cord through the strain
relief.
Terminal
#MPDL
UL-Listed
Strain Relief
UL-Listed
8JSF1PXFS
Cord
White Wire
from Dryer
harness
External Ground
Wire (If required
by local codes)
Neutral
(White)
Hot
(Red)
ENGLISH
Connecting Electric Dryers (cont.)
USA only
30
INSTALLATION INSTRUCTIONS
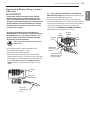
Connecting Electric Dryers (cont.)
USA only
WWARNING
t$POOFDUUIFQPXFSDPSEUPUIFUFSNJOBMCMPDL
$POOFDUFBDIQPXFSDPSEXJSFUPUIFUFSNJOBMCMPDL
TDSFXUIBUIBTUIFTBNFDPMPSFEXJSF'PSFYBNQMF
DPOOFDUUIFCMBDLQPXFSDPSEXJSFUPUIFUFSNJOBM
CMPDLTDSFXXJUIUIFCMBDLXJSF'BJMVSFUPGPMMPX
UIFTFJOTUSVDUJPOTNBZSFTVMUJOBTIPSUPWFSMPBE
fire or death.
t(SPVOEJOHUISPVHIUIFOFVUSBMDPOEVDUPSJT
QSPIJCJUFEGPS
OFXCSBODIDJSDVJUJOTUBMMBUJPOT
NPCJMFIPNFT
SFDSFBUJPOBMWFIJDMFTBOE
BSFBTXIFSFMPDBMDPEFTQSPIJCJUHSPVOEJOH
UISPVHIUIFOFVUSBMDPOEVDUPS
Three-wire connection for electric dryers: Direct wire
t6TF6-MJTUFEXJSF"8(NJOJNVNDPQQFS
conductor cable.
t"MMPXBUMFBTUGUN
MFOHUIUPBMMPXGPSSFNPWBM
and reinstallation of the dryer.
"UUBDIUIFUXPIPUMFBETPGUIFQPXFSDPSEUPUIF
outer terminal block screws. Attach the neutral wire to
the center terminal block screw. Connect the external
ground (if required by local codes) to the green
ground screw. 5*()5&/"--4$3&844&$63&-:.
Reinstall the terminal block access cover.
Hot
#MBDL
Ground
Screw
t"XJSFDPOOFDUJPOJT/05QFSNJUUFEPOOFX
DPOTUSVDUJPOBGUFS+BOVBSZ
t"6-MJTUFETUSBJOSFMJFGJTSFRVJSFE
3FNPWFcĸJODIFTDN
PGUIFPVUFSDPWFSJOHGSPN
UIFXJSF4USJQJODIDN
JOTVMBUJPOGSPNFBDI
XJSF#FOEUIFFOETPGUIFUISFFXJSFTJOUPBIPPL
shape.
DN
3FNPWFUIFUFSNJOBMCMPDLBDDFTTDPWFSPOUIFVQQFS
back of the dryer. Install a UL-listed strain relief into
the power cord through-hole; then thread the power
DBCMFQSFQBSFEJO4UFQUISPVHIUIFTUSBJOSFMJFG
Terminal
#MPDL
UL-Listed
Strain Relief
6--JTUFE8JSF
Power Cord
White Wire
from Dryer
harness
External Ground
Wire (If required
by local codes)
Neutral
(White)
Hot
(Red)
INSTALLATION INSTRUCTIONS
Any installation in a manufactured or mobile home must
comply with the Manufactured Home Construction and
4BGFUZ4UBOEBSET5JUMF$'31BSUPS4UBOEBSE
$"/$4";.)BOEMPDBMDPEFTBOEPSEJOBODFT*G
you are uncertain whether your proposed installation
will comply with these standards, please contact a
service and installation professional for assistance.
t"HBTESZFSNVTUCFQFSNBOFOUMZBUUBDIFEUPUIFGMPPS
t5IFFMFDUSJDBMDPOOFDUJPOGPSBOFMFDUSJDESZFSNVTU
CFBXJSFDPOOFDUJPO.PSFEFUBJMFEJOGPSNBUJPO
concerning the electrical connection is provided in the
section Connecting Electric Dryers.
t5PSFEVDFUIFSJTLPGDPNCVTUJPOBOEGJSFUIFESZFS
must be vented to the outside.
t%0/05WFOUUIFESZFSVOEFSBNBOVGBDUVSFEIPNFPS
mobile home.
t&MFDUSJDESZFSTNBZCFWFOUFEUPUIFPVUTJEFVTJOHUIF
back, left, right, or bottom panel.
t(BTESZFSTNBZCFWFOUFEUPUIFPVUTJEFVTJOHUIF
back, left, or bottom panel. Gas dryers may not be
vented to the outside using the right side panel
because of the burner housing.
t5IFESZFSFYIBVTUEVDUNVTUCFBGGJYFETFDVSFMZUP
the manufactured or mobile home structure, and the
exhaust duct must be made of a material that will resist
fire and combustion.
It is recommended that you use a rigid or flexible metal
duct.
t%0/05DPOOFDUUIFESZFSFYIBVTUEVDUUPBOZPUIFS
duct, vent, chimney, or other exhaust duct.
t.BLFTVSFUIFESZFSIBTBEFRVBUFBDDFTTUPPVUTJEF
fresh air to ensure proper operation. The opening for
PVUTJEFGSFTIBJSNVTUCFBUMFBTUJODN).
t*UJTJNQPSUBOUUIBUUIFDMFBSBODFPGUIFEVDUGSPNBOZ
DPNCVTUJCMFDPOTUSVDUJPOCFBUMFBTUJODIFTDN
and when venting the dryer to the outdoors, the dryer
DBOCFJOTUBMMFEXJUIBDMFBSBODFPGJODIDN
BU
the sides and back of the dryer.
t1MFBTFCFBXBSFUIBUWFOUJOHNBUFSJBMTBSFOPUTVQQMJFE
with the dryer. You should obtain the venting materials
necessary for proper installation.
Final Installation Check
Once you have completed the installation of the dryer
and it is in its final location, confirm proper operation
with the following tests and Installation Test (Duct
Check) on the following page.
Testing dryer heating
("4.0%&-4
Close the dryer door, press the On/Off button to turn the
dryer on, and start the dryer on a heat setting.
When the dryer starts, the igniter should ignite the main
burner.
NOTE
If all air is not purged from the gas line, the gas igniter
may turn off before the main burner ignites. If this
happens, the igniter will reattempt gas ignition after
approximately two minutes.
&-&$53*$.0%&-4
Close the dryer door, press the On/Off button to turn
the dryer on, and start the dryer on a heat setting. The
exhaust air should be warm after the dryer has been
PQFSBUJOHGPSNJOVUFT
Checking airflow
Effective dryer operation requires proper airflow.
The adequacy of the airflow can be measured by
evaluating the static pressure. Static pressure in the
exhaust duct can be measured with a manometer,
QMBDFEPOUIFFYIBVTUEVDUBQQSPYJNBUFMZGUDN
from the dryer.
4UBUJDQSFTTVSFJOUIFFYIBVTUEVDUTIPVMEOPUFYDFFE
JODIFTDN
5IFESZFSTIPVMECFDIFDLFEXIJMFUIF
dryer is running with no load.
Checking levelness
Once the dryer is in its final location, recheck the dryer
to be sure it is level. Make sure it is level front to back
BOETJEFUPTJEFBOEUIBUBMMMFWFMJOHGFFUBSFGJSNMZPO
the floor.
ENGLISH
Special Requirements for
Manufactured or Mobile Homes
31
32
INSTALLATION INSTRUCTIONS
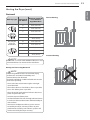
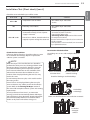
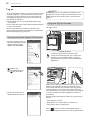
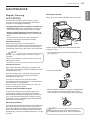
Installation Test (Duct check)
Once you have completed the installation of the dryer,
use this test to make sure the condition of the exhaust
system is adequate for proper operation of the dryer.
This test should be performed to alert you to any serious
problems in the exhaust system of your home.
t:PVSESZFSGFBUVSFT'MPX4FOTF™, an innovative sensing
system that automatically detects blockages and
SFTUSJDUJPOTJOESZFSEVDUXPSL,FFQJOHEVDUXPSLDMFBO
of lint buildup and free of restrictions allows clothes to
dry faster and reduces energy use.
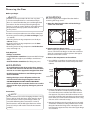
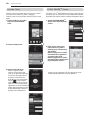
$IFDLUIFEJTQMBZGPSSFTVMUT
During the three minute test cycle, monitor the
Flow Sense™ display on the control panel. If no bars
are displayed, when the cycle ends, the exhaust
system is adequate. If the exhaust system is severely
restricted, the display will show four bars. Other
problems may also be shown with error codes. Refer
to the next page for error code details and solutions.
NOTE
The dryer should be cool before starting this test. If
the dryer was warmed up during installation, run the
AIR DRY cycle for a few minutes to reduce the interior
temperature.
5PBDUJWBUFUIFJOTUBMMBUJPOUFTU
3FNPWFUIFMJUFSBUVSFBOEUIFODMPTFUIFEPPS
Do not load anything in the drum for this test, as in
may affect the accuracy of the results.
1SFTTBOEIPMEUIF5FNQ$POUSPMBOE4JHOBM
CVUUPOTBOEUIFOQSFTTUIF1PXFSCVUUPO
This button sequence activates the installation test.
The code
will display if the activation is
successful.
1SFTT4UBSU1BVTFCVUUPO
The dryer will start the test, which will last about
two minutes. The heat will be turned on and the
temperatures in the drum will be measured.
/P#BST0L
'PVS#BST
Restricted
Four bars indicates that the exhaust system is severely
restricted. Have the system checked immediately, as
performance will be poor.
&OEPGDZDMF
At the end of the test cycle,
will display.
The test cycle will end and the dryer will shut off
automatically after a short delay.
INSTALLATION INSTRUCTIONS
33
Installation Test (Duct check) (cont.)
ENGLISH
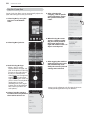
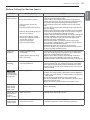
t$IFDLUIFFSSPSDPEFCFGPSFZPVDBMMGPSTFSWJDF
Error Code
U& or U&
)4
Possible Causes
Solutions
t5FNQFSBUVSFTFOTPSGBJMVSF
tTurn off the dryer and call for
service.
t)VNJEJUZTFOTPSGBJMVSF
tTurn off the dryer and call for
service.
tCheck the power supply or the
connection of power cord to the
terminal block. Refer to the
$POOFDUJOHFMFDUSJDESZFST section of this manual
t)PVTFGVTFJTCMPXODJSDVJUCSFBLFSIBT for complete instructions.
tripped, or power outage has occurred. t3FTFUDJSDVJUCSFBLFSPSSFQMBDFGVTF%POPUJODSFBTF
the fuse capacity.
If the problem is a circuit overload, have it corrected
by a qualified electrician.
t&MFDUSJDESZFSQPXFSDPSEJTOPU
connected correctly, or house power
supply is incorrect.
14 or 1' or O1
3FTUSJDUFEPSCMPDLFEBJSGMPX
t$IFDLUIFEVDUDPOEJUJPO
If the test displays four bars, check the exhaust system
for restrictions and damage. Repair or replace the
exhaust system as needed.
Avoid long runs or runs with multiple elbows or
bends.
NOTE
When the dryer is first installed, this test should be
performed to alert you to any existing problems with
the exhaust duct in your home. However, since the
test performed during normal operation provides
more accurate information on the condition of the
exhaust duct than does the installation test, the
number of bars displayed during the two tests may
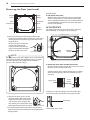
not be the same.
Excess or crushed
transition duct
Too many elbows or
exhaust too long
Check for blockages and lint buildup.
Do not interrupt the test cycle, as this could result in
the wrong results.
Even if no bars are displayed during the test cycle,
some restrictions may still be present in the exhaust
system. Refer to the 7FOUJOHUIF%SZFS section of
this manual for complete exhaust system and venting
requirements.
Your dryer features Flow Sense™, an innovative
sensing system that automatically detects blockages
BOESFTUSJDUJPOTJOESZFSEVDUXPSL,FFQJOHEVDUXPSL
clean of lint buildup and free of restrictions allows
clothes to dry faster and reduces energy use.
Lint buildup
or blockage
Make sure the ductwork is not crushed or restricted.
Crushed or
damaged
exhaust
34
HOW TO USE
HOW TO USE
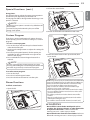
Operating the Dryer
1
$MFBOUIF-JOU'JMUFS
If the lint filter has not already been cleaned, lift out the filter and remove the
lint from the last load. This will help ensure the fastest and most efficient drying
performance.
Lint
Filter
2
-PBEUIF%SZFS
Load the dryer with the wet laundry from the washer. If the load is extra large,
you may need to divide it into smaller loads for proper performance and fabric
care.
3
5VSO0OUIF%SZFS
Press the Power button to turn on the dryer. The cycle LEDs will illuminate and
BTJHOBMXJMMTPVOEJGUVSOFEPO3FGFSUPQBHF
4
4FMFDUB$ZDMF
Turn the cycle selector knob either direction until the LED for the desired cycle
is on. The preset temperature, dry level, and option settings for that cycle will
CFTIPXO3FGFSUPQBHF%FGBVMUTFUUJOHTGPSUIFTFMFDUFEDZDMFDBOOPXCF
changed if desired. This can be done using the cycle modifier buttons as shown
POQBHF$ZDMFPQUJPOTDBOCFBEEFEVTJOHUIFPQUJPOCVUUPOTBTTIPXOPO
QBHF
NOTE
Not all options or modifiers are available on all cycles. A different chime will
sound and the LED will not come on if the selection is not allowed.
5
#FHJOUIFDZDMF
Press the Start/Pause button to begin the cycle. The cycle can be paused at
any time either by opening the door or by pressing the Start/Pause button. If
UIFDZDMFJTOPUSFTUBSUFEXJUIJONJOVUFTUIFESZFSXJMMTIVUPGGBOEUIFDZDMF
settings will be lost.
6
&OEPG$ZDMF
When the cycle is finished, the chime will sound if it is set. Remove your
clothing from the dryer immediately to reduce wrinkling. If Wrinkle Care is
selected, the dryer will tumble briefly every few minutes to help prevent
wrinkles from setting in the clothes.
HOW TO USE
35
Following are instructions for starting and using your new dryer. Please refer to specific sections of this manual for
more detailed information.
Check the Lint Filter Before Every
Load
Fabric care labels
Most articles of clothing feature fabric care labels that
include instructions for proper care.
To clean, pull the lint filter straight up and roll any lint
off the filter with your fingers. Do not rinse or wash the
filter to remove lint. Push the lint filter firmly back into
place. See 3FHVMBSDMFBOJOH for more information.
Fabric care labels
Tumble
dry
Dry
Gentle/
delicate
Always make sure the lint filter is clean before starting a
new load; a clogged lint filter will increase drying times.
Normal
Always ensure the lint filter is properly installed before
running the dryer. Running the dryer with a loose or
missing lint filter will damage the dryer and articles in
the dryer.
Permanent Press/
wrinkle resistant
Do not dry
Do not tumble dry (used with
do not wash)
Heat
setting
High
Medium
Low
No heat/air
Grouping similar items
For best results, sort clothes into loads that can be dried
with the same drying cycle.
Different fabrics have different care requirements, and
some fabrics will dry more quickly than others.
Loading the Dryer
WWARNING
To reduce the risk of fire, electric shock, or injury
to persons when using this appliance, follow basic
precautions, including the following:
t$IFDLBMMQPDLFUTUPNBLFTVSFUIBUUIFZBSF
FNQUZ*UFNTTVDIBTDMJQTQFOTDPJOTBOELFZT
DBOEBNBHFCPUIZPVSESZFSBOEZPVSDMPUIFT
'MBNNBCMFPCKFDUTTVDIBTMJHIUFSTPSNBUDIFT
DPVMEJHOJUFDBVTJOHBGJSF Failure to do so can result
in fire, explosion, or death.
t/FWFSESZDMPUIFTUIBUIBWFCFFOFYQPTFEUPPJM
HBTPMJOFPSPUIFSGMBNNBCMFTVCTUBODFT8BTIJOH
DMPUIFTXJMMOPUDPNQMFUFMZSFNPWFPJMSFTJEVFT
Failure to obey this warning can result in fire, explosion,
or death.
NOTE
Loading tips
t$PNCJOFMBSHFBOETNBMMJUFNTJOBMPBE
t%BNQDMPUIFTXJMMFYQBOEBTUIFZESZ%POPU
overload the dryer; clothes require room to tumble
dry properly.
t$MPTF[JQQFSTIPPLTBOEESBXTUSJOHTUPQSFWFOU
these items from snagging or tangling on other
clothes.
Lint
Filter
ENGLISH
Sorting Loads
36
HOW TO USE
Using the LG EasyLoad™
4XJOH%PPS
)BNQFS%PPS
Use the swing door when unloading, or when loading
bulkier items, for easy access to the drum.
Use the hamper door when loading. It acts as a chute, to
help guide items into the drum and help prevent items
from falling onto the floor. It also comes in handy when
unloading a few small items, helping prevent the rest of
the laundry from being pulled onto the floor.
To open the swing door, insert your fingers into the
handle recess on the top of the door on the side
opposite the hinge and pull the door open.
NOTE
Make sure the hamper door release is completely
closed before using the swing door.
To open the hamper door, press the release in the
middle of the handle recess on the top of the door and
pull the door forward.
Make sure laundry is fully inserted in the drum before
closing the door.
NOTE
Make sure the swing door latch is completely closed
before pressing the hamper door release.
Hamper door latch
Swing door
Interlock
#VUUPOT
WWARNING
Hamper door
When the door is opened if you press the three interlock
buttons, door may fall off.
Failure to follow this warning can cause serious injury.
WWARNING
t%POPUQMBDFIFBWZJUFNTPOPSMFBOBHBJOTUUIFUPQ
PGUIFEPPSXIFOJUJTPQFO
t%POPUBUUFNQUUPQVMMUIFIBNQFSEPPSPQFONPSF
UIBOEFHSFFT
The dryer could tip forward, causing injury or damage.
WWARNING
t#FDBSFGVMXIFOPQFOJOHBOEDMPTJOHUIFEPPS'JOHFST
and hands can get caught in the door and cause injury
if the door drops forward unexpectedly.
HOW TO USE
37
Cycle Guide
'BCSJD5ZQF
%SZ
-FWFM
5JNF
JO.JO
5FNQFSBUVSF
Comforter, Shirts,Trousers
Medium High
(except especially delicate
Off
Adjustable
fabrics)
Steam
$PNGPSUFS#FEEJOH
Off
High
SanitaryTM Children’s clothing
Anti
Do not use this cycle
Very
High
#BDUFSJBM
with delicate fabrics.
Dry
Only Normal &
Normal Dry
Small Load Cotton/Towels Fabric
High
Adjustable
5ZQF.BYMC
Normal Dry
#VMLZ
Comforters,
Medium
#FEEJOH
Pillows, Shirts
Adjustable
Normal Dry
Heavy Duty Jeans,
High
heavyweight items
Adjustable
Normal
Dry
Cotton/
Work clothes,
Medium
Normal
corduroys, etc.
Adjustable
Normal
Dry
Perm.Press/ Permanent press,
Low
Casual
synthetic items
Adjustable
Normal Dry Medium
Denims,
towels,
Towels
heavy cottons
High
Adjustable
Sports
Sports Wear
Off
Wear
Normal
Dry
Lingerie, sheets,
Low
Delicates
blouses
Adjustable
For small loads
High
Off
Speed Dry with short
Adjustable
drying times
For items that require
Air Dry
heat-free drying such
Off
No Heat
as plastics or rubber
Steam
FreshTM
Sensor dry cycles
Sensor dry cycles utilize LG’s unique dual sensor
system to detect and compare the moisture level
in clothes and in the air and adjust the drying time
as needed to ensure superior results. The dryer
automatically sets the dryness level and temperature
at the recommended setting for each cycle. The
estimated time remaining will be shown in the display.
NOTE
To protect your garments not every dryness level,
temperature, or option is available with every cycle.
See the $ZDMF(VJEF for details.
NOTE
The Energy Saver option is turned on by default in the
Normal cycle.
For faster drying in the Normal cycle, turn off the
Energy Saver option.
Adjustable
.PSF
5JNF 8SJOLMF %BNQ 3FEVDF &BTZ
%SZ
-FTT Care
4JHOBM 4UBUJD *SPO
5JNF
Å
Å
Å
Å
Å
Å
Å
Å
Å
Å
Å
Å
&MFD
(BT
Å
Å
Å
Å
Å
Å
Å
Å
Å
Å
Å
Å
Å
Å
Adjustable
Adjustable
&OFSHZ
4BWFS
Å
Å
Å
Å
Å
Å
Å
Å
Å
Å
Å
Manual dry cycles
Use manual dry cycles to select a specific amount of
drying time and a drying temperature. When a manual
dry cycle is selected, the Estimated Time Remainng
display shows the actual time remaining in your
cycle. You can change the actual time in the cycle by
pressing More Time or Less Time.
$FSUJGJFECZ/4'
NSF International (formerly the National
Sanitation Foundation), certifies that Anti
#BDUFSJBMDZDMFSFEVDFTPGCBDUFSJB
on laundry, and none of bacteria will carry
over onto the next laundry load.
ENGLISH
$ZDMF
38
HOW TO USE
Cycle Settings and Options
Special functions
Sensor dry cycles have preset settings that are selected
automatically. Manual dry cycles have default settings, but
you may also customize the settings using the cycle setting
buttons. Press the button for that option to view and select
other settings.
The option buttons also activate special functions,
including Child Lock and Rack Dry.
Select the option by pressing the option button. Press
and hold the option button for special features marked
with the asterisk (*), such as Child Lock.
NOTE
To protect your garments, not every dryness level,
temperature, or option is available with every cycle.
See the $ZDMF(VJEF for details.
Dry Level
Selects the level of dryness for the cycle. Press the Dry Level
button repeatedly to scroll through available settings.
t5IJTPQUJPOJTPOMZBWBJMBCMFXJUITFOTPSESZDZDMFT
t5IFESZFSXJMMBVUPNBUJDBMMZBEKVTUUIFDZDMFUJNF4FMFDUJOH
More Dry or Very Dry will increase the cycle time, while Less
Dry or Damp Dry will decrease the cycle time.
t6TFB-FTT%SZPS%BNQ%SZTFUUJOHGPSJUFNTUIBUZPVXJTIUP
iron.
Temp. Control
Adjusts the temperature setting from Ultra Low to High.
This allows precise care of your fabrics and garments. Press the
Temp. Control button repeatedly to scroll through available
settings.
Time Dry
"MMPXTZPVUPNBOVBMMZTFMFDUUIFESZJOHUJNFGSPNUP
NJOVUFTJONJOVUFJODSFNFOUT6TFUIJTGPSTNBMMMPBETPSUP
remove wrinkles. Use the More Time/Less Time buttons to add
PSSFEVDFUIFESZJOHUJNFJONJOVUFJODSFNFOUT
Your dryer features several additional cycle options to
customize cycles to meet your individual needs. Certain option
buttons also feature a special function (see the following page
for details) that can be activated by pressing and holding that
PQUJPOCVUUPOGPSTFDPOET
To Add Cycle Options to a Cycle:
5VSOPOUIFESZFSBOEUVSOUIFDZDMFTFMFDUPSLOPCUPTFMFDU
the desired cycle.
6TFUIFDZDMFTFUUJOHTCVUUPOTUPBEKVTUUIFTFUUJOHTGPSUIBU
cycle.
1SFTTUIFDZDMFPQUJPOCVUUPOT
GPSUIFPQUJPOZPVXPVMEMJLF
to add. A confirmation message will be shown in the display.
1SFTTUIF4UBSU1BVTFCVUUPOUPTUBSUUIFDZDMF5IFESZFSXJMM
start automatically.
Wrinkle Care
Selecting this option will tumble the load periodically for up
UPIPVSTBGUFSUIFTFMFDUFEDZDMFPSVOUJMUIFEPPSJTPQFOFE
This is helpful in preventing wrinkles when you are unable to
remove items from the dryer immediately.
Signal
To turn the Signal off, press the Signal On/Off button. Press
again to turn the Signal back on.
Damp Dry Signal
With this option, the dryer will signal when the load is
BQQSPYJNBUFMZESZ5IJTBMMPXTZPVUPSFNPWFGBTUFS
drying lightweight items or items that you would like to iron
or hang while still slightly damp.
* Rack Dry
Use Rack Dry with items, such as wool sweaters, silk, and
lingerie, that should dry flat. Rack Dry can also be used
with items that should not be tumbled dry, such as gym
shoes or stuffed animals.
NOTE
NEVER tumble dry a load of clothing with the rack
installed. When the rack is installed, the drum will
rotate as usual, but the rack will not move. Make sure
all articles to be dried remain completely on the rack
and cannot fall off or be pulled off by the turning
ESVN#FTVSFUPSFNPWFUIFSBDLBGUFSVTF
To install the drying rack:
8JUIUIFESZFSEPPSPQFOTMJEFUIFSBDLJOUPUIFESZFS
drum.
.BLFTVSFJUJTTFBUFEFWFOMZPOUIFFEHFPGUIFJOOFS
door rim and resting flat on the inside of the dryer.
* Child Lock
Use this option to prevent unwanted use of the dryer or to
keep cycle settings from being changed while the dryer is
PQFSBUJOH1SFTTBOEIPMEUIF&BTZ*SPOCVUUPOGPSTFDPOETUP
activate or deactivate the Child Lock function.
The Child Lock icon will be shown in the display, and all
controls are disabled except the Power button.
NOTE
Once set, Child Lock remains active until it is manually
deactivated. Child Lock must be turned off to run
another cycle. To deactivate Child Lock, press and
hold the Easy Iron button for three seconds.
HOW TO USE
39
-JGUPVUUIFTUFBNGFFEFS
Special Functions. (cont.)
NOTE
ENGLISH
Energy Saver
This option helps to reduce the energy consumption in
the Normal cycle, depending on the load size.
The drying time will be changed when the Energy Saver
option is selected.
2
1
The Energy Saver option is turned on by default in the
Normal cycle.
For faster drying in the Normal cycle, turn off the
Energy Saver option.
'JMMUIFTUFBNGFFEFSUPUIF."9MJOFXJUIXBUFS
Custom Program
Steam
Feeder
If you have a special combination of settings that you
use frequently, you can save these settings as a custom
program..
* To save a custom program:
5VSOPOUIFESZFSBOEUVSOUIFDZDMFTFMFDUPSLOPCUP
select the desired cycle.
6TFUIFDZDMFTFUUJOHCVUUPOTUPBEKVTUUIFTFUUJOHTGPS
that cycle.
1SFTTUIFDZDMFPQUJPOCVUUPOT
GPSUIFPQUJPOZPV
would like to add. A confirmation message will be
shown in the display.
1SFTTBOEIPMEUIF$VTUPN1SPHSBNCVUUPOGPS
seconds.
Water
ONLY
M
AX
1MBDFUIFTUFBNGFFEFSJOUIFTRVBSFCBSSFMUIFO
cover the lid.
NOTE
You may save only one custom program at a time.
Pressing and holding the Custom Program button will
overwrite any previously saved custom program.
To recall a custom program:
5VSOPOUIFESZFS
1SFTTUIF$VTUPN1SPHSBNCVUUPO
1SFTTUIF4UBSU1BVTFCVUUPOUPTUBSUUIFDZDMF
Steam Functions
To fill the steam feeder
0QFOUIFMJE
Lid
NOTE
#FGPSFVTJOHB4UFBN$ZDMFUIFTUFBNGFFEFSNVTUCFGJMMFEXJUI
XBUFSVQUPUIF."9MJOF*GOPUUIFXJMMCFEJTQMBZFE.BLFTVSF
that the steam feeder is filled with water or the drawer is fully
closed. Turn the dryer off then restart the steam cycle.
t0OMZVTFXBUFS%POPUGJMMUIFTUFBNGFFEFSXJUIGPSFJHO
substances, rinse agents, or detergents.
t#FGPSFNPWJOHUIFESZFSNBLFTVSFUIFTUFBNGFFEFSJTFNQUZ
t%POPUVTFEJTUJMMFEXBUFSUIFXBUFSMFWFMTFOTPSJOUIFTUFBN
generator will not work.
t#FDBSFGVMUPQVUUIF4UFBN'FFEFSPUIFSXJTFXBUFSXJMMCF
overflow.
t8JQFVQBOZTQJMMFEXBUFSBSPVOEUIF4UFBN'FFEFSBOEUIF
drawer before starting the dryer.
t%POPUGJMMUIFTUFBNGFFEFSXJUIIPUXBUFSPWFS¡'¡$
WWARNING
t%POPUGJMMUIFTUFBNGFFEFSXJUIMJRVJETTVDIBT
HBTPMJOFESZDMFBOJOHTPMWFOUTPSPUIFSGMBNNBCMF
PSFYQMPTJWFTVCTUBODFTFailure to follow this
warning can cause serious injury or death.
t%POPUESJOLXBUFSGSPNUIFTUFBNGFFEFS Failure to
follow this warning can cause serious injury or death.
40
HOW TO USE
Steam Functions (cont.)
LG’s new steam technology allows you to inject fabrics
with a swirling jet of hot steam to refresh clothes, reduce
static, and make ironing easier.
Simply select the Steam Fresh™ cycle, or you can add a
steam option to selected cycles.
Using the Steam FreshTM cycle
Steam Fresh™ uses the power of steam alone to quickly
reduce wrinkles and odor in fabrics. It brings new life to
wrinkled clothes that have been stored for an extended
time and makes heavily wrinkled clothes easier to iron.
Steam Fresh™ can also be used to help reduce odors in
fabrics.
NOTE
t3FEVDF4UBUJDPS&BTZ*SPOPQUJPOTDBOBMTPCFVTFE
during the Steam Fresh™ cycle.
t%FQFOEJOHPOUIFMPBERVBOUJUZPGJUFNT
ZPVNBZ
change the amount of time for the cycle by pressing
the More Time or Less Time button. The display will
show
PS
NFBOTPSGFXFSJUFNTJTGPSPS
JUFNTBOE
indicates a large load such as a
comforter.
To use the Steam FreshTM cycle:
5VSOPOUIFESZFSBOEUVSOUIFDZDMFTFMFDUPSLOPCUP
select the Steam Fresh ™ cycle.
5PBEEBOPQUJPOGVODUJPOTFMFDU3FEVDF4UBUJD&BTZ
Iron, or Wrinkle Care.
%FQFOEJOHPOUIFMPBERVBOUJUZPGJUFNT
TUFBN
time can be changed by pressing the More Time or
Less Time buttons.
1SFTT4UBSU1BVTFCVUUPOUPTUBSUUIFDZDMF
To add steam to a standard cycle:
5VSOPOUIFESZFSBOEUVSOUIFDZDMFTFMFDUPSLOPCUP
select the desired cycle.
6TFUIFDZDMFTFUUJOHCVUUPOTUPBEKVTUUIFTFUUJOHTGPS
that cycle.
1SFTTUIF4UFBNPQUJPOCVUUPOGPSUIF4UFBNPQUJPO
you would like to add. Then adjust for the load size
using the More Time or Less Time buttons.
1SFTT4UBSU1BVTFCVUUPOUPTUBSUUIFDZDMF
Using the steam options:
The Reduce Static option injects steam late in the drying
cycle to reduce the static electricity caused by dry fabrics
rubbing together. Change the amount of time for the
cycle by pressing the More Time or Less Time button,
depending on the load (quantity of items). The display
XJMMTIPXUIFSFDPNNFOEFEOVNCFSPGJUFNTTVDIBT
PS
The Easy Iron option provides uniform, properly
dampened fabrics for ironing, which can save time and
make ironing easier. Change the amount of time for the
cycle by pressing the More Time or Less Time button,
depending on the load (quantity of items). The display
XJMMTIPXUIFSFDPNNFOEFEOVNCFSPGJUFNTTVDIBT
PS
NOTE
t8IFO4FOTPS%SZJTTFMFDUFEXJUIUIF3FEVDF4UBUJD
or Easy Iron option, a Dry level of Less or Damp
cannot be selected.
t5IF3FEVDF4UBUJDPS&BTZ*SPOPQUJPONBZBMTPCF
selected during Time Dry cycles.
t"GUFSUIF4UFBNPQUJPOJTTFMFDUFEJO5JNF%SZUIF
More Time or Less Time buttons will change the
steam time only.
t"GUFSQSFTTJOH4UBSU1BVTFUIF.PSF5JNFPS-FTT
Time buttons will be disabled.
Using the Steam SanitaryTM cycle
The new Steam SanitaryTM cycle is ideal for sanitizing
non washable items quickly and easily using the power
of steam alone. Recommend to use this cycle for cotton
and polyester material. (Do NOT use for urethane foam,
down feathers or delicates items)
HOW TO USE
Steam Functions (cont.)
41
NOTE
t%POPUPQFOUIFESZFSEPPSEVSJOHTUFBNDZDMFT
Failure to follow this warning can cause serious injury
or death.
t%POPUGJMMUIFTUFBNGFFEFSXJUIHBTPMJOFESZ
DMFBOJOHTPMWFOUTPSPUIFSGMBNNBCMFPSFYQMPTJWF
TVCTUBODFTFailure to do so can result in death,
explosion, fire, or burns.
t%POPUUPVDIUIFTUFBNOP[[MFJOUIFESVNEVSJOH
PSBGUFSUIFTUFBNDZDMFFailure to follow this warning
can cause serious injury or death.
t5IF3FEVDF4UBUJDPS&BTZ*SPOPQUJPONBZBMTPCF
selected during Time Dry cycles.
t"GUFSUIF4UFBNPQUJPOJTTFMFDUFEJO5JNF%SZUIF
More Time or Less Time buttons will change the
steam time Only.
t"GUFSQSFTTJOH4UBSU1BVTFUIF.PSF5JNFPS-FTT
Time buttons will be disabled.
Steam Cycle Guide
4UFBN4BOJUBSZ5.
4UFBN
%FGBVMU
5JNF
4UFBN'SFTI5.
4UFBN0QUJPO
%SZ-FWFM
NJOVUFT
NJOVUFT
5JNF%SZ
5FNQ
$POUSPM
'BCSJD
4UBUF
'BCSJD5ZQF
.BYJNVN
Amount
Comforter
#FEEJOH
4JOHMFFBDI
Children’s
clothing
MCT
Comforter
4JOHMFFBDI
Shirts*
FBDI
Dry
Å
Dry
+
3FEVDF
4UBUJD
NJOVUFT
Dry
Shirts*
MCT
*UFNT
+
&BTZ
*SPO
NJOVUFT
Dry
Shirts*
4IJSUTFBDI
Å
Wet
Varies by selected
cycle
MCT
*UFNT
Å
Wet
Varies by selected
cycle
4IJSUTFBDI
+
3FEVDF
4UBUJD
+
&BTZ
*SPO
Follows
Selected
Cycle
+
3FEVDF
4UBUJD
NJOVUFT
Å
Wet
Varies by selected
cycle
MCT
*UFNT
+
&BTZ
*SPO
NJOVUFT
Å
Wet
Varies by selected
cycle
4IJSUTFBDI
4IJSUDPUUPOQPMZCMFOE&YDFQUFTQFDJBMMZEFMJDBUFGBCSJDT
t8IFOUIFMJOUGJMUFSPSFYIBVTUEVDUJTDMPHHFETUFBNPQUJPOTXJMMOPUHJWFQSPQFSSFTVMUT
t'PSCFTUSFTVMUTMPBEBSUJDMFTPGTJNJMBSTJ[FBOEGBCSJDUZQF%POPUPWFSMPBE
ENGLISH
WWARNING
t8IFO4FOTPS%SZJTTFMFDUFEXJUIUIF3FEVDF4UBUJD
option, a Dry level of Less or Damp cannot be
selected.
42
HOW TO USE
Tag on
NOTE
- The Tag On function allows you to conveniently use the
LG Smart Diagnosis™ , Cycle Download, Laundry Stats
and Tag On Cycle Set features to communicate with
your appliance right from your own smart phone. To
use the Tag On functions:
%PXOMPBEUIF-(4NBSU-BVOESZ%8"QQUPZPVS
smart phone.
5VSOPOUIF/'$/FBS'JFME$PNNVOJDBUJPO
GVODUJPO
in your smart phone.
- The Tag On function can only be used with smart
phones equipped with the NFC function and based on
the Android operating system (OS).
Depending on the smart phone manufacturer and
Android OS version, the NFC activation process may
differ. Refer to the manual of your smart phone for
details.
Using the Tag On Function
The Tag On icon
Turning on the Smart Phone’s NFC Function
&OUFSUIF4FUUJOHTNFOVPG
the smart phone and select
Share & Connect under
8*3&-&44/&5803,4
Tag On position
Look for the Tag On icon next to the LED
screen on the control panel. This is where you
position your smart phone when using the
Tag On function of the LG Smart Laundry&DW
application.
Set NFC and
%JSFDU"OESPJE#FBNUP
ON, and select NFC.
2
$IFDLUIF6TF3FBEBOE
8SJUF113FDFJWFPQUJPO
1
When you use the Tag On function, position your smart
phone so that the NFC antenna on the back of your
smart phone matches the position of the Tag On icon
on the appliance. If you do not know the position of
your NFC antenna, move your smart phone very slightly
in a circular motion until the application verifies the
connection.
#FDBVTFPGUIFDIBSBDUFSJTUJDTPG/'$UIFUSBOTNJTTJPO
can fail :
tJGUIFEJTUBODFJTUPPGBS
tJGUIFQIPOFIBTBNFUBMTUJDLFSPSBUIJDLDBTF
tJGUIFQIPOFEPFTOUTVQQPSU/'$
] in the LG Smart Laundry&DW app for a
Press [
more detailed guide on how to use the Tag On function.
HOW TO USE
43
Using Tag On with Applications
Tag On Diagnosis
*OTUBMM-(4NBSU-BVOESZ%8BQQMJDBUJPOPOB
/'$FRVJQQFETNBSUQIPOF
- Install the application from the Play store and run it.
5PVDIUIF5BH0OMPHP
- When a Tag On screen
appears (see at right), tap
your smart phone on the Tag
On icon on the right side of
the dryer’s control panel.
- If it isn’t recognized, touch
] on the upper right
[
of the Tag On screen on
your LG Smart Laundry&DW
application to see the
detailed guide. (This might
happen due to the different
NFC antenna positions for
each phone.)
$IFDLUIFEJBHOPTJTSFTVMUT
BOETPMVUJPOT
- It shows the diagnosis results
on the cycles recently used.
4FMFDU5BH0O
- Select Tag On by using the
top icons or the bottom icons.
4FMFDU5BH0O%JBHOPTJT
Images are for reference only.
The actual LG Smart Laundry&DW application may be
different.
ENGLISH
Touch the LG appliance’s Tag On logo with your
NFCequipped smart phone to use the LG Smart
Laundry&DW applications: LG Smart Diagnosis, Cycle
Download, Laundry Stats, and Tag on Cycle Set.
44
HOW TO USE
Call Center
If you receive a diagnosis from either the Tag On
Diagnosis or Smart Diagnosis application that is unclear
or directs you to call the LG Service Center, follow these
instructions:
4FMFDU1SFTTUP$BMM-(4FSWJDF
POUIF4NBSU%JBHOPTJT
3FTVMUTDSFFO
4FMFDUZPVSDPVOUSZ
"HSFFUP5FSNTBOE$POEJUJPOTPGUIF6TFBOE
1SJWBDZ1PMJDZTFMFDUJOH*"DDFQU
&OUFSZPVSQIPOFOVNCFSJOUIFGJFME6TFUIJT
QIPOFOVNCFSXIFOUBMLJOHUPUIF-(DVTUPNFS
TFSWJDFSFQSFTFOUBUJWFUPBMMPXUIFNUPGJOEZPVS
4NBSU%JBHOPTJTEBUB
1SFTTUIF$BMMCVUUPOUP
JOJUJBUFUIFDBMMUP-(T
4VQQPSU$FOUFS
Images are for reference only. The actual LG Smart
Laundry&DW application may be different.
HOW TO USE
45
Tag On Cycles Download
4FMFDU5BH0O
- Select Tag On by using the top
icons or the bottom icons.
4FMFDU5BH0O$ZDMF
%PXOMPBE
4FMFDUBDZDMFUPEPXOMPBE
- You can also check the existing
cycles already downloaded.
5PVDIUIF5BH0OMPHP
- When a Tag On screen
appears (see at right), tap
your smart phone on the Tag
On icon on the right side of
the dryer’s control panel.
- If it isn’t recognized, touch
] on the upper right
[
of the Tag On screen on
your LG Smart Laundry&DW
application to see the detailed
guide. (This might happen
due to the different NFC
antenna positions for each
phone.)
5IFOFXDZDMFJTEPXOMPBEFE
TVDDFTTGVMMZ
- Check the cycle at the
Downloaded cycle position
on the control panel.
Images are for reference only. The actual LG Smart
Laundry&DW application may be different.
5PVDIUIF5BH0OMPHP
- When a Tag On screen appears
(see at right), tap your smart
phone on the Tag On icon on
the right side of the dryer’s
control panel.
- If it isn’t recognized, touch
] on the upper right of
[
the Tag On screen on your
‘LG Smart Laundry&DW’
application to see the detailed
guide. (This might happen due
to the different NFC antenna
positions for each phone.)
ENGLISH
Tag On Cycle Download allows you to download cycles for later
use. The cycle is available at the Downloaded cycle position on
the control panel until another cycle is downloaded.
*OTUBMMUIF-(4NBSU-BVOESZ%8BQQMJDBUJPOPOB
/'$FRVJQQFETNBSUQIPOF
- Install the application from the Play store and run it.
46
HOW TO USE
Laundry Stats
Laundry Stats can monitor the Flow Sense™ result in
case your home exhaust system is clogged.
Laundry Stats can also tell you details of your last ten
cycles.
4FMFDU5BH0OCZVTJOHUIF
UPQJDPOTPSUIFCPUUPN
JDPOT
FLOW SENSETM Status
LG’s Flow SenseTM duct blockage sensing system detects
and alerts you to restrictions in the installed household
ductwork that reduce exhaust airflow through the dryer.
4FMFDUUIF'-084&/4&5.
4UBUVTJOUIF-BVOESZ4UBUT
TDSFFO
4FMFDU-BVOESZ4UBUT
*GUIFTUBUVTTIPXTZPVS
IPNFFYIBVTUTZTUFNJT
CMPDLFEQSFTTUIF7FOUJOH
5JQTCVUUPO
3FGFSUPQBHFTPGUIJT
NBOVBMGPSNPSFHVJEBODF
POWFOUJOHUIFESZFS
3FGFSUPQBHFTPGUIJT
NBOVBMGPSNPSFJOGPSNBUJPO
SFHBSEJOH'MPX4FOTF5..
5PVDIUIF5BH0OMPHP
- When a Tag On screen
appears (see at right), tap
your smart phone on the Tag
On icon on the right side of
the dryer’s control panel.
- If the phone isn’t recognized,
touch [
] on the upper
right of the Tag On screen on
your LG Smart Laundry&DW
application to see the detailed
guide.(This might happen due
to the different NFC antenna
positions for each phone.)
Images are for reference only. The actual LG Smart
Laundry&DW application may be different.
HOW TO USE
47
Run Cycle Again
$IFDLXIFUIFSESZJOHTUBSUT
XJUIUIFTFMFDUFEDZDMF
- The screen shown at right
appears and drying starts
immediately on the selected
cycle.
5PVDIUIF5BH0OMPHP
When a Tag On screen
appears(shown at right), tap
your smart phone on the Tag
On icon on the right side of
the dryer’s control panel.
- If the phone isn’t recognized,
] on the upper
touch [
right of the Tag On screen on
your LG Smart Laundry&DW
application to see the
detailed guide. (This might
happen due to the different
NFC antenna positions for
each phone.)
Images are for reference only. The actual LG Smart
Laundry&DW application may be different.
ENGLISH
4FMFDUUIF3VO$ZDMF"HBJO
CVUUPO
- The most used cycle or
most recent cycle can be
immediately started by
selecting the Run Cycle Again
button.
48
HOW TO USE
Tag On Cycle Set
Tag On Cycle Set allows you to automatically adjust the
cycle and settings based on your needs.
4FMFDU5BH0OCZVTJOHUIF
UPQJDPOTPSUIFCPUUPN
JDPOT
4FMFDU5BH0O$ZDMF4FU
5PVDIUIF5BH0OMPHP
- When a Tag On screen
appears(shown at right), tap
your smart phone on the Tag
On icon on the right side of
the dryer’s control panel.
- If the phone isn’t recognized,
] on the upper
touch [
right of the Tag On screen on
your LG Smart Laundry&DW
application to see the
detailed guide. (This might
happen due to the different
NFC antenna positions for
each phone.)
4FMFDUBMBVOESZDBUFHPSZ
CBTFEPOUIFJTTVFZPVXBOU
UIFNBDIJOFUPGPDVTPO
"GUFSTFMFDUJOHUIF
DBUFHPSZBMJTUPGTQFDJGJD
DZDMFTXJMMBQQFBS4FMFDU
UIFDZDMFCBTFEPOZPVS
needs.
8IFOUIF5BH0OTDSFFO
BQQFBSTTIPXOBUSJHIU
tap your smart phone to
UIF5BH0OMPHPPOUIF
SJHIUTJEFPGUIFXBTIFSTPS
ESZFSTDPOUSPMQBOFM
"GUFSUBHHJOHUIFNBDIJOF
XJUIZPVSQIPOFUIFDZDMF
XJMMBVUPNBUJDBMMZTUBSU
7FSJGZUIFDPSSFDUDZDMFBOE
TFUUJOHTXFSFTFMFDUFE
Images are for reference only. The actual LG Smart
Laundry&DW application may be different.
MAINTENANCE
49
MAINTENANCE
Cleaning the Lint Filter
WWARNING
Always clean the lint from the filter after every cycle.
To reduce the risk of fire, electric shock, or injury
to persons when using this appliance, follow basic
precautions, including the following:
t6OQMVHUIFESZFSCFGPSFDMFBOJOHUPBWPJEUIFSJTL
PGFMFDUSJDTIPDL Failure to follow this warning can
cause serious injury, fire, electrical shock, or death.
t/FWFSVTFIBSTIDIFNJDBMTBCSBTJWFDMFBOFSTPS
TPMWFOUTUPDMFBOUIFXBTIFSThey will damage the
finish.
t5PQSFWFOUJOKVSZEVSJOHDBSFBOENBJOUFOBODF
cleaning, wear gloves or protective clothing.
Cleaning the Exterior
Proper care of your dryer can extend its life.
The outside of the machine can be cleaned with warm
water and a mild, nonabrasive household detergent.
Immediately wipe off any spills with a soft, damp cloth.
NOTE
Do not use methylated spirits, solvents, or similar
products.
Lint
Filter
To clean, open the dryer door and pull the lint filter
straight up. Then:
'PSFWFSZEBZDMFBOJOHSPMMBOZMJOUPGGUIFGJMUFSXJUI
your fingers, or
Never use steel wool or abrasive cleansers; they can
damage the surface.
Cleaning the Interior
Wipe around the door opening and seal with a soft,
damp cloth to prevent lint and dust buildup that could
damage the door seal.
7BDVVNUIFMJOUGJMUFS
Clean the window with a soft cloth dampened with
warm water and a mild, nonabrasive household
detergent; then wipe dry.
The stainless steel drum can be cleaned with a
conventional stainless steel cleaner, used according to
the manufacturer’s specifications.
Never use steel wool or abrasive cleansers; they can
scratch or damage the surface.
Cleaning Around and Under the Dryer
Vacuum lint and dust from around the dryer and
underneath it regularly. Vent ductwork should be
checked for lint buildup and cleaned at least once per
year. If any noticeable reduction in airflow or drying
performance occurs, immediately check ductwork for
obstructions and blockages.
*GUIFMJOUGJMUFSIBTCFDPNFWFSZEJSUZPSDMPHHFEXJUI
fabric softener, wash the lint filter in warm, soapy
water and allow to dry thoroughly before reinstalling.
Maintaining Ductwork
Vent ductwork should be checked for lint buildup once
per month and cleaned at least once per year. If any
noticeable reduction in airflow or drying performance
occurs, immediately check ductwork for obstructions
and blockages. Contact a qualified technician or service
provider.
NOTE
NEVER operate the dryer without the lint filter in
place. NEVER operate the dryer with a wet lint filter.
ENGLISH
Regular Cleaning
50
TROUBLESHOOTING
TROUBLESHOOTING
Before Calling For Service
Your dryer is equipped with an automatic error-monitoring system to detect and diagnose problems at an early
stage. If your dryer does not function properly or does not function at all, check the following before you call for
service.
1SPCMFN
1PTTJCMF$BVTFT
4PMVUJPOT
Dryer will not
turn on
t1PXFSDPSEJTOPUQSPQFSMZ
plugged in.
t)PVTFGVTFJTCMPXODJSDVJU
breaker has tripped, or power
outage has occurred.
t.BLFTVSFUIBUUIFQMVHJTQMVHHFETFDVSFMZJOUPB
grounded outlet matching the dryer’s rating plate.
t3FTFUDJSDVJUCSFBLFSPSSFQMBDFGVTF%POPUJODSFBTF
fuse capacity. If the problem is a circuit overload, have it
corrected by a qualified electrician.
Dryer does not
heat
t)PVTFGVTFJTCMPXODJSDVJU
breaker has tripped, or power
outage has occurred.
t(BTTVQQMZPSTFSWJDFUVSOFEPGG
(gas models only).
t3FTFUDJSDVJUCSFBLFSPSSFQMBDFGVTF%POPUJODSFBTF
fuse capacity. If the problem is a circuit overload, have it
corrected by a qualified electrician.
t$POGJSNUIBUUIFIPVTFHBTTIVUPGGBOEUIFESZFSHBT
shutoff are both fully open.
Greasy or dirty
spots
on clothes
t'BCSJDTPGUFOFSVTFEJODPSSFDUMZ
t$MFBOBOEEJSUZDMPUIFTCFJOH
dried together.
t$POGJSNBOEGPMMPXUIFJOTUSVDUJPOTQSPWJEFEXJUIZPVS
fabric softener.
t.BLFTVSFUPVTFZPVSESZFSUPESZPOMZDMFBOJUFNT
because dirty items can soil clean clothes placed in the
same or subsequent loads.
t4UBJOTPOESJFEDMPUIFTBSFBDUVBMMZTUBJOTUIBUXFSFOPU
removed during the washing process.
Make sure that clothes are being completely cleaned
according to the instructions for your washer and
detergent.
Display shows
error
DPEFU&PSU&
t5IFSNJTUPSJTNBMGVODUJPOJOH
t5VSOPGGUIFESZFSBOEDBMMGPSTFSWJDF
Lint on clothes
t-JOUGJMUFSOPUDMFBOFEQSPQFSMZ
t.BLFTVSFUIFMJOUGJMUFSJTDMFBOFECFGPSFFWFSZMPBE8JUI
some loads that produce high amounts of lint, it may be
necessary to clean the filter during the cycle.
t4PNFGBCSJDTBSFMJOUQSPEVDFSTJFBGV[[ZXIJUFDPUUPO
towel) and should be dried separately from clothes that
are lint trappers (i.e., a pair of black linen pants).
t4FFUIF&YDFTTTUBUJDJODMPUIFTBGUFSESZJOHTFDUJPOCFMPX
t%JWJEFMBSHFSMPBETJOUPTNBMMFSMPBETGPSESZJOH
t$IFDLQPDLFUTUIPSPVHIMZCFGPSFXBTIJOHBOEESZJOH
clothes.
t-BVOESZOPUTPSUFEQSPQFSMZ
t&YDFTTTUBUJDJODMPUIFT
t%SZFSJTPWFSMPBEFE
t5JTTVFQBQFSFUDMFGUJOQPDLFUT
Excess static in
c l o t h e s a f te r
drying
t'BCSJDTPGUFOFSOPUVTFEPSVTFE
incorrectly.
t$MPUIFTESJFEUPPMPOH
(overdried).
t%SZJOHTZOUIFUJDTQFSNBOFOU
press, or synthetic blends.
t6TFBGBCSJDTPGUFOFSUPSFEVDFTUBUJDFMFDUSJDJUZDPSSFDUMZ
Do not use fabric softeners or products to eliminate static
unless recommended by the manufacturer of the fabric
softener or product.
t0WFSESZJOHBMPBEPGMBVOESZDBODBVTFBCVJMEVQPGTUBUJD
electricity. Adjust settings and use a shorter drying time,
or use Sensor Dry cycles.
t5IFTFNBUFSJBMTDBODBVTFTUBUJDCVJMEVQ5SZVTJOHBGBCSJD
softener.
Display shows
error
code PS
t1PXFSDPSEDPOOFDUJPOJT
incorrect.
t$IFDLUIFDPOOFDUJPOPGQPXFSDPSEUPUIFUFSNJOBMCMPDL
3FGFSUPQBHFTJOUIJTNBOVBM
Drying time is
not consistent
t)FBUTFUUJOHTMPBETJ[FPS
dampness of clothing is not
consistent.
t5IFESZJOHUJNFGPSBMPBEXJMMWBSZEFQFOEJOHPOUIFIFBU
setting, the type of heat used (electric, natural gas, or LP
gas), the size of the load, the type of fabrics, the wetness
of the clothes, and the condition of the exhaust ducts and
lint filter.
TROUBLESHOOTING
51
Before Calling For Service (cont.)
1PTTJCMF$BVTFT
t-PBEJTOPUQSPQFSMZTPSUFE
t-BSHFMPBEPGIFBWZGBCSJDT
t%SZFSDPOUSPMTBSFOPUTFU
properly.
t-JOUGJMUFSOFFETUPCFDMFBOFE
t&YIBVTUEVDUTCMPDLFEEJSUZPS
duct run is too long.
t)PVTFGVTFJTCMPXODJSDVJU
breaker has tripped, or power
outage has occurred.
t%SZFSJTPWFSMPBEFE
t%SZFSJTVOEFSMPBEFE
Clothes are
wrinkled
t$MPUIFTESJFEUPPMPOH
(overdried).
t$MPUIFTMFGUJOESZFSUPPMPOH
after cycle ends.
4PMVUJPOT
t4FQBSBUFIFBWZJUFNTGSPNMJHIUXFJHIUJUFNT-BSHFSBOE
heavier items take longer to dry.
t)FBWZGBCSJDTUBLFMPOHFSUPESZCFDBVTFUIFZUFOEUP
retain more moisture. To help reduce and maintain more
consistent drying times for large and heavy fabrics,
separate these items into smaller loads of a consistent
size.
t6TFUIFBQQSPQSJBUFDPOUSPMTFUUJOHTGPSUIFUZQFPGMPBE
you are drying.
t.BLFTVSFUIFMJOUGJMUFSJTDMFBOFECFGPSFFWFSZMPBE8JUI
some loads that produce high amounts of lint, it may be
necessary to clean the filter during the cycle.
t$POGJSNUIBUUIFFYIBVTUEVDUXPSLJTQSPQFSMZDPOGJHVSFE
and free of debris, lint, and obstructions. Make sure that
outside wall dampers can open properly and are not
blocked, jammed, or damaged.
t3FTFUDJSDVJUCSFBLFSPSSFQMBDFGVTF%POPUJODSFBTF
fuse capacity. If the problem is a circuit overload, have it
corrected by a qualified electrician.
t%JWJEFMBSHFSMPBETJOUPTNBMMFSMPBETGPSESZJOH
t*GZPVBSFESZJOHBWFSZTNBMMMPBEBEEBGFXFYUSBJUFNT
to ensure proper tumbling action.
t0WFSESZJOHBMPBEPGMBVOESZDBOMFBEUPXSJOLMFEDMPUIFT
Try a shorter drying time, and remove items while they
still retain a slight amount of moisture.
t3FNPWFJUFNTGSPNUIFESZFSJNNFEJBUFMZBUUIFFOE
of the cycle. Use the Wrinkle Care option to continue
UVNCMJOHDMPUIFTBUUIFFOEPGUIFDZDMFGPSVQUPIPVST
t(BSNFOUDBSFJOTUSVDUJPOTBSF
not being followed.
t5PBWPJETISJOLBHFQMFBTFDBSFGVMMZGPMMPXUIFGBCSJD
care instructions for your garment, because some fabrics
will naturally shrink when washed. Other fabrics can be
washed but will shrink when dried in a dryer. Use a low or
no heat setting.
t8BUFSTVQQMZFSSPS
t$IFDLTUFBNGFFEFSESBXFS
.BLFTVSFTUFBNGFFEFSJTGJMMFEXJUIXBUFSUP."9MJOF
.BLFTVSFTUFBNGFFEFSJTTFBUFEQSPQFSMZBOEESBXFSJT
fully closed.
5VSOUIFESZFSPGGUIFOSFTUBSUUIF4UFBNDZDMF
t%POPUVTFEJTUJMMFEXBUFSUIFXBUFSMFWFMTFOTPSJOTUFBN
generator will not work.
t1VNQOPUXPSLJOH6OQMVHESZFSBOEDBMMGPSTFSWJDF
Water drips
from nozzle
when Steam
Cycle starts
t5IJTJTOPSNBM
t5IJTJTTUFBNDPOEFOTBUJPO5IFESJQQJOHXBUFSXJMMTUPQ
after a short time.
Steam does not
generate but
no error
code is shown
t8BUFSMFWFMFSSPS
t6OQMVHESZFSBOEDBMMGPSTFSWJDF
Garments still
wrinkled after
Steam Fresh™
t5PPNBOZPSUPPEJGGFSFOUUZQFT
of garments in dryer.
t4NBMMMPBETPGUPJUFNTXPSLCFTU
t-PBEGFXFSHBSNFOUT-PBETJNJMBSUZQFHBSNFOUT
Clothes are
shrinking
indicator light
is on during the
drying cycle
ENGLISH
1SPCMFN
Clothes take
too long to dry
52
TROUBLESHOOTING
Before Calling For Service (cont.)
1SPCMFN
1PTTJCMF$BVTFT
4PMVUJPOT
There are no
creases left on
garment after
Steam Fresh™
t5IFGVODUJPOPGUIJTDZDMFJTUP
remove wrinkles from fabric.
t6TFBOJSPOUPNBLFDSFBTFT
Garments have
static after
Reduce Static
t5IJTJTOPSNBM
t%FQFOETPOJOEJWJEVBMNPJTUVSFMFWFMJOTLJO
Garments are
too damp or
too dry after
Reduce Static
t$PSSFDUESZJOHPQUJPOTOPU
selected.
t4FMFDUMPBEXFJHIUNBOVBMMZCFGPSFTUBSUJOH3FEVDF4UBUJD
option.
Garments are not
uniformly damp
after Easy Iron
tNumber of garments or load
size not properly selected at the
beginning of the cycle.
t4FMFDUUIFDPSSFDUOVNCFSPSHBSNFOUTPSMPBETJ[FCFGPSF
starting the cycle.
Water drips
from door
during Steam
Cycle
t5IJTJTOPSNBM
t$POEFOTBUJPOXJMMOPSNBMMZGPSNPOUIFJOTJEFPGUIF
dryer door during steam operation. Some condensation
may drip out the bottom of the door.
Steam is not
visible during
Steam Cycle
t5IJTJTOPSNBM
t4UFBNWBQPSJTEJGGJDVMUUPTFFXIFOUIFEPPSJTDMPTFE
However, condensation will normally form on the inside of
the dryer door if the steam system is operating normally.
Drum does not
turn during
Steam Cycle
t5IJTJTOPSNBM
t5IFESVNJTUVSOFEPGGTPUIBUUIFTUFBNWBQPSSFNBJOTJO
UIFESVN5IFESVNXJMMOPSNBMMZUVSOGPSBCPVUTFDPOET
once a minute.
Cannot see
steam vapor at
the beginning
of cycle
t5IJTJTOPSNBM
t4UFBNJTSFMFBTFEBUEJGGFSFOUTUBHFTPGUIFDZDMFGPSFBDI
option.
The display
shows
t.PSF5JNFCVUUPOQSFTTFE
t5IJTEJTQMBZJOEJDBUFTUIBUUIFTUFBNPQUJPOIBTCFFOTFU
for a “
” item such as a comforter.
Press the Less Time button to reduce the indicated load
size.
Odors remain
in clothing after
Steam Fresh™
t4UFBN'SFTIEJEOPUSFNPWF
odor completely.
t'BCSJDTDPOUBJOJOHTUSPOHPEPSTTIPVMECFXBTIFEJOB
normal cycle.
Clean Filter
light is on
during the
drying cycle
t-JOUGJMUFSJTBMNPTUDMPHHFEPS
full.
t1BVTFUIFESZJOHDZDMFBOEDMFBOUIFMJOUGJMUFS
Flow SenseTM
indicator
shows four
bars during the
drying cycle
t%VDUXPSLJTUPPMPOHPSIBTUPP
many turns/restrictions.
t4JHOJGJDBOUCMPDLBHFPGUIF
ductwork due to lint buildup or
debris.
t5IFBQQMJBODFIBTEFUFDUFEB
restriction in the external dryer
venting.
t*OTUBMMBTIPSUFSPSTUSBJHIUFSEVDUSVO4FFUIF*OTUBMMBUJPO
Instructions.
t%VDUXPSLTIPVMECFDIFDLFEDMFBOFETPPO
Dryer can be used in this condition, but drying times may
be longer.
t*GFYIBVTUSFTUSJDUJPOTBSFTFOTFECZUIF'MPX4FOTFTM
system, the indicator will remain on for two hours after
the end of the cycle. Opening the door or pressing the
Power button will turn off the display.
SPECIFICATIONS
53
SPECIFICATIONS
Description
Steam Dryer
Electrical requirements
Please refer to the rating label regarding detailed information.
Gas requirements
/(JODIFT8$
-1oJODIFT8$(BT.PEFMTPOMZ
Max. water pressure
_QTJ_L1B
Dimensions
w8
9/w%
9/w)
/” (D with door open)
DN8
9DN%
9DN)
DN%XJUIEPPSPQFO
Net weight
(BTESZFSMCTLH
&MFDUSJDESZFSMCTLH
Drying capacity
- Normal cycle
- Steam cycle
*&$DVGUMCTLH
*&$DVGUMCTLH
ENGLISH
4UFBN%SZFS.PEFMT%-&9&%-(9&
54
USING SMART DIAGNOSIS™
USING Smart DiagnosisTM
Should you experience any problems with your dryer, it has the capability of transmitting data to your Smart Phone
using the LG Smart Laundry Application or via your telephone to the LG call center.
Smart Diagnosis™ cannot be activated unless your dryer is turned on by pressing the Power button. If your dryer is
unable to turn on, then troubleshooting must be done without using Smart Diagnosis™.
Audible Diagnosis
Smart Diagnosis™ Using Your
Smart Phone
Smart Diagnosis™ Through the Call
Center
%PXOMPBEUIF-(4NBSU-BVOESZBQQMJDBUJPOPOZPVS
smart phone.
$BMMUIF-(DBMMDFOUFSBU-(64
-($BOBEB
0QFOUIF-(4NBSU-BVOESZBQQMJDBUJPOPOZPVS
smart phone. Press the right arrow button to advance
to the next screen.
8IFOJOTUSVDUFEUPEPTPCZUIFDBMMDFOUFSBHFOU
hold the mouthpiece of your phone over the Smart
Diagnosis™ logo on the machine. Hold the phone no
more than one inch (but not touching) the machine.
1SFTTUIF3FDPSECVUUPOPOUIFTNBSUQIPOFBOEUIFO
hold the mouth piece of the smart phone near the
Smart Diagnosis™ logo on the dryer.
8JUIUIFQIPOFIFMEJOQMBDFQSFTTBOEIPME5FNQ
Control button for three seconds.
NOTE
Do not touch any other buttons or icons on the
display screen.
,FFQUIFQIPOFJOQMBDFVOUJMUIFUPOFUSBOTNJTTJPO
has finished. It takes time on panel displayed.
1SFTTBOEIPMEUIF5FNQ$POUSPMCVUUPOGPSUISFF
seconds.
8IFOUIFSFDPSEJOHJTDPNQMFUFWJFXUIFEJBHOPTJT
by pressing the Next button on the phone.
,FFQUIFQIPOFJOQMBDFVOUJMUIFUPOFUSBOTNJTTJPO
has finished. It takes time on panel displayed.
NOTE
Smart Diagnosis™ is a troubleshooting feature
designed to assist, not replace, the traditional method
of troubleshooting through service calls. The
effectiveness of this feature depends upon various
factors, including, but not limited to, the reception
of the cellular phone being used for transmission,
any external noise that may be present during the
transmission, and the acoustics of the room where the
machine is located.
Accordingly, LG does not guarantee that Smart
Diagnosis™ would accurately troubleshoot any given
issue.
0ODFUIFDPVOUEPXOJTPWFSBOEUIFUPOFTIBWF
stopped, resume your conversation with the call
center agent, who will then be able to assist you in
using the information transmitted for analysis.
WARRANTY
55
Your LG Dryer will be will repaired or replaced, at LG’s option, if it proves to be defective in material or workmanship
under normal use, during the warranty period (“Warranty Period”) set forth below, effective from the date (“Date of
Purchase”) of original consumer purchase of the product. This warranty is good only to the original purchaser of the
product and effective only when used in the United States, including Alaska, Hawaii, and U.S. Territories.
8"33"/5:1&3*0%
)084&37*$&*4)"/%-&%
-"#030OF:FBSfrom the Date of Purchase.
*O)PNF4FSWJDF
1"3540OF:FBSfrom the Date of Purchase.
Please retain dealer’s dated bill of sale or delivery
ticket as evidence of the Date of Purchase for proof of
warranty, and submit a copy of the bill of sale to the
service person at the time warranty service is provided.
Replacement Units and Repair Parts may be new or
remanufactured.
Replacement Units and Repair Parts are warranted for
the remaining portion of the original unit’s warranty
period.
1MFBTFDBMMBOEDIPPTFUIF
BQQSPQSJBUFPQUJPOUPMPDBUFZPVSOFBSFTU-(
"VUIPSJ[FE4FSWJDF$FOUFS
%SZFSESVNZFBSTMJNJUFEXBSSBOUZ
Or visit our Web site at: http://www.lgservice.com.
ZFBSTXBSSBOUZPO%SZFS%SVNJODMVEJOHQBSUTMBCPS
5)*48"33"/5:*4*/-*&60'"/:05)&38"33"/5:&913&4403*.1-*&%*/$-6%*/(8*5)065-*.*5"
5*0/"/:8"33"/5:0'.&3$)"/5"#*-*5:03'*5/&44'03"1"35*$6-"3163104&505)&&95&/5
"/:*.1-*&%8"33"/5:*43&26*3&%#:-"8*5*4-*.*5&%*/%63"5*0/505)&&913&448"33"/5:
1&3*0%"#07&
/&*5)&35)&."/6'"$563&3/03*5464%*453*#65034)"--#&-*"#-&'03"/:*/$*%&/5"-$0/4&
26&/5*"-*/%*3&$541&$*"-0316/*5*7&%"."(&40'"/:/"563&*/$-6%*/(8*5)065-*.*5"5*0/
-0453&7&/6&403130'*5403"/:05)&3%"."(&8)&5)&3#"4&%*/$0/53"$550350305)&3
8*4&. Some states do not allow the exclusion or limitation of incidental or consequential damages or limitations on
how long an implied warranty lasts, so the above exclusion or limitation may not apply to you. This warranty gives
you specific legal rights and you may also have other rights that vary from state to state.
5)*4-*.*5&%8"33"/5:%0&4/05"11-:50
t4FSWJDFUSJQTUPZPVSIPNFUPEFMJWFSQJDLVQBOEPSJOTUBMMUIFQSPEVDUJOTUSVDUPSSFQMBDFIPVTFGVTFTPSDPSSFDU
wiring, or correction of unauthorized repairs.
t%BNBHFTPSPQFSBUJOHQSPCMFNTUIBUSFTVMUGSPNNJTVTFBCVTFPQFSBUJPOPVUTJEFFOWJSPONFOUBMTQFDJöDBUJPOT
or contrary to the requirements of precautions in the Operating Guide, accident, vermin, fire, flood, improper
installation, acts of God, unauthorized modification or alteration, incorrect electrical current or voltage, or commercial use, or use for other than intended purpose.
The cost of repair or replacement under these excluded circumstances shall be borne by the consumer.
$6450.&3*/'03."5*0/$&/5&3/6.#&34
5PPCUBJO$VTUPNFS"TTJTUBODF1SPEVDU
*OGPSNBUJPOPS%FBMFSPS"VUIPSJ[FE4FSWJDF
$FOUFSMPDBUJPO
$BMMIPVSTBEBZEBZTQFS
year), and select the appropriate option from the
menu.
0SWJTJUPVS8FCTJUFBUIUUQXXXMHTFSWJDFDPN
50$0/5"$5-(&-&$530/*$4#:."*-
LG Customer Information Center
10#PY
+BNFT3FDPSE3PBE
)VOUTWJMMF"MBCBNB
ATTN: CIC
Product Registration Information
.PEFM
4FSJBM/VNCFS
%BUFPG1VSDIBTF
The model and serial number can be located on the
rating plate inside the front door.
ENGLISH
-(&-&$530/*$4*/$
-(%3:&3-*.*5&%8"33"/5:64"
56