1
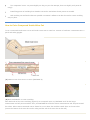
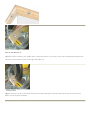
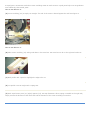
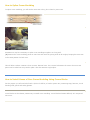
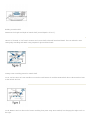
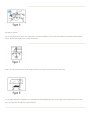
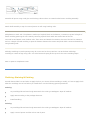
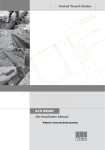
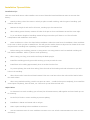
Installation Tips and Hints
Installation Tips
Here are some handy tips to make installing your House of Fara solid wood mouldings as easy as enjoying their
beauty:
Start by making a list of the rooms in which you plan to install moulding, and the types of moulding you’ll
need for each room.
Measure the length of each wall in all rooms, rounding up to the nearest foot.
When making picture frames, measure all sides of the picture for a total distance around the outer edge.
Try to use shorter lengths of moulding instead of longer ones that you’ll have to cut. This will make
transportation and installation much easier.
Store mouldings in a clean, dry place before installation. Within 24 to 48 hours of installation, place mouldings
in the room in which you plan to install them. This will give the wood a chance to adjust to the climate of the room
and prevent the moulding from expanding or contracting after it’s installed.
Before cutting your moulding, practice on scrap pieces. Use scrap pieces to see how stacked moulding will
look before installation. Hold it in place to mark positioning.
When cutting, use long, even strokes and keep the blade upright.
Install the moulding piece by piece while working your way around the room.
Install chair rail moulding approximately 26 to 30 inches from the floor.
To prevent splitting the wood when nailing, blunt the ends of the finishing nails with a hammer or pre-drill
holes in the moulding.
When driving nails, leave the nail head exposed. Then use a nail set to drive the nail until the head is below
the wood surface.
When using stacked moulding, install it one piece at a time — install the first piece completely, then install the
second piece completely, then the third, etc. Then touch up nail holes and end cuts.
Helpful Hints
To determine how much moulding you will need, list all measurements; add together and round total up 10%
for trimming.
Pre-drill 3/32” holes in crown moulding to prevent splitting.
Installation is fastest and easiest with a nail gun.
Stain or paint moulding before installation to save time.
Use an inexpensive piece of crown moulding to practice your cuts. A little experimentation can save you time
and money.
Trim carpenters’ secret: cut pieces slightly too long on your first attempt; then trim slightly until pieces fit
snugly.
Install long pieces of moulding first. Mistake cuts can be used where shorter pieces are needed.
Nail moulding into wall studs whenever possible. Contractor’s adhesive can also be used to ensure moulding
stays in place.
How to Cut a Compound Inside Mitre Cut
To cut a compound inside mitre cut you will need a mitre saw or mitre box, a power or hand saw, a measuring tape, a
pencil and safety goggles.
(A) Measure room from corner to corner (DISTANCE A).
(B) Mark DISTANCE A on crown moulding.
After both ends of the crown moulding (Figure B) are compound mitre cut, DISTANCE A will be the longer
measurement and will point toward the floor, and DISTANCE B will be the shorter measurement and will point toward
the ceiling. When cutting compound mitres, always be sure to place the moulding upside down in the mitre box.
(Picture the bottom of the mitre box as the ceiling and the side of the mitre box as the wall.)
How to Cut Piece # 1:
(C) Place crown moulding (#1) upside down (ceiling side down) in mitre box; push crown moulding tight against the
mitre box. Set mitre box at 45° to the right and make cut.
How to Cut Piece # 2:
(D) Place crown moulding (#2) in mitre box, ceiling side down. Set mitre box at 45° to the left and make cut. Repeat
this process for all inside corners of the room.
(E) Measure the distance between the two crown blocks (#1 and #2).
How to Cut a Compound Outside Mitre Cut
To cut a compound outside mitre cut you will need a mitre saw or mitre box, a power or hand saw, a measuring tape,
a pencil and safety goggles.
How to Cut Piece # 1:
(A) Place crown moulding (#1) upside down (ceiling side down) in mitre box; push crown moulding tight against the
mitre box. Set mitre box at 45° to the right and make cut.
(B) Set mitre box at 45° to the left and slide the moulding through so that the scrap will end up at the left of the
blade. Cut through the moulding.
How to Cut Piece # 2:
(C) Place crown moulding (#2) ceiling side down in mitre box. Set the mitre box at 45° to the right. Keep scrap
moulding to the right of the blade and make cut.
Note: The secret to cutting crown moulding is to make your first cut slightly too long. Then trim the piece as needed
until it fits tightly. This may require several trim cuts.
How to Cope Crown Moulding (For Inside Corners)
To cope Crown Moulding for inside corners, you will need a mitre saw, a coping saw, a mitre box, a pencil and safety
goggles.
A coped joint is sometimes used when crown mouldings meet at inside corners. Coped joints help cover irregularities
more effectively than mitred joints.
How to Cut Piece # 2:
(A) Crown moulding (#2) is simply cut straight. The end of the crown is butted against the wall. See Figure A.
How to Cut Piece # 1:
(B) Place crown moulding (#1) ceiling side down in the mitre box. Set mitre box at 45° to the right and make cut.
(C) Mark profile with a pencil to highlight the edge to be cut.
(D) Cut profile out at an angle with a coping saw.
(E) Push coped crown piece (#1) tightly against (#2). See top illustration. When coping is needed on the right side,
simply reverse the direction of the mitre saw and the direction of the crown moulding in mitre box.
How to Splice Crown Moulding
To splice crown moulding, you will need a mitre saw or box, plus a hand or power saw.
Sometimes it may be neccessary to splice crown mouldings together on a long wall.
(A) Position the crown moulding pieces in mitre box and mitre the joining ends at 45° angles, keeping the mitre saw
in the same position for both cuts.
This will allow overlap, creating a clean, precise, diagonal joint. For a secure fit between the joints, the two crown
pieces can be nailed into a top stud or plate. Glue also assures a tight splice.
How to Install House of Fara Crown Moulding Using Crown Blocks
For this project you will need a drill with a 3/32-inch drill bit, a hand or power saw, measuring tape, hammer, 2-inch
finishing nails, pencil and safety glasses.
Crown blocks are the fastest, easiest way to install crown moulding. Crown blocks eliminate difficult, 45° compound
mitre cuts.
(A) Start at a corner; then work around the room installing the crown moulding and blocks as you come to them.
(B) Drill 3/32” holes in crown blocks. This will prevent splitting.
(C) Position crown blocks (#1 and #2) in opposite corners of the room. Be sure each crown block is pressed tightly
against the ceiling and corner.
(D) Nail pre-drilled crown blocks in place with 2” finish nails.
(E) Measure the distance between the two crown blocks (#1 and #2).
(F) Cut crown moulding (#3 in FIGURE 1) to fit the distance measured between #1 and #2, using simple, straight
cuts.
Note: Be sure not to cut the crown moulding too short…
if the piece is too long, it can always be trimmed.
(G) Nail the crown moulding in place with 2” finish nails. Continue with the same procedure around the room.
How to Create a Mantle
Use the “exploded” view pictured to the left as a reference to build a mantle with House of Fara mouldings. A mantle
consists of three parts: the mantle shelf, the fireplace surround and the pilasters that decorate the fireplace surround.
Build your mantle from either oak or white hardwood mouldings. Many different mantles can be constructed from
combinations of Fara mouldings and blocks. Listed below are several different moulding options that can be used to
create each part of your mantle. The numbers refer to House of Fara items. Choose the moulding options that suit
your own individual tastes.
WHITE HARDWOOD MOULDING OPTIONS
1. HARDWOOD MANTLE SHELF OPTIONS: Use either 3/4” birch plywood or 3/4” board for top
of shelf. Trim 3/4” material with 516, 526, 595, 630. Use any of these crown mouldings to build bottom of shelf: 588,
590, 592
2. FIREPLACE SURROUND OPTIONS: Use 3/4” birch plywood or 3/4” board material. Trim 3/4” surround material with
516, 526, 630.
HARDWOOD PILASTER OPTIONS:
Pilasters are used to decorate the fireplace surround. They are made from 3 pieces: top block, center fluted moulding,
bottom block.
3. TOP BLOCK OPTIONS: R10, R90, R110, R45B
4. CENTER FLUTED MOULDING OPTIONS: 58, 585, 586, 593, 602, 615, 648, 652
5. BOTTOM BLOCK OPTIONS: P255P, P356P, P458B, P356BE
RED OAK MOULDING OPTIONS
6. RED OAK MANTLE SHELF OPTIONS: Use either 3/4” oak plywood or 3/4” oak board for top of shelf. Trim 3/4”
material with oak moulding: 5537, 5538, 9596. Use any of these oak crown mouldings to build bottom of shelf: 9589,
9591.
7. FIREPLACE SURROUND OPTIONS: Use 3/4” oak plywood or 3/4” oak boards. Trim 3/4” surround material with
5537, 5538, 9596.
OAK PILASTER OPTIONS:
Pilasters are used to decorate the fireplace surround. They are made from three pieces: top block, center moulding,
bottom block.
8. TOP BLOCK OPTIONS: R30, R50, R45O
9. CENTER FLUTED MOULDING OPTIONS: 5557, 9587, 9588, 9594, 9604, 9616, 9649, 9651, 9653
10. BOTTOM BLOCK OPTIONS: P255O, P356O, P458O, P356OE
Begin Building your mantle by measuring the area to be enclosed.
Determine size of two surround legs and surround top (legs are typically 5” to 10” wide and top is typically 10” to
16”).
Measure and cut surround pieces using 3/4” plywood or 3/4” board.
Attach surround pieces to wall in correct position using finish nails.
Building a mantle shelf:
Determine the length and depth of mantle shelf (normal depth is 5” to 8”).
Using 3/4” plywood or 3/4” board, measure and cut top shelf to desired length and depth. The trim edges by mitre
cutting edge moulding and attach using carpenter’s glue and finish nails.
Cutting Crown moulding pieces for mantle shelf.
Cut A: Lay long piece of crown moulding in mitre box with bottom of moulding against back fence. Adjust angle of saw
to the left 45° and cut.
Cut B: Measure and cut other end of crown moulding front piece using same method, but changing the angle to 45° to
the right.
End Return Pieces
Cut C (Left end return piece) Lay short piece of crown moulding in mitre box with bottom of moulding against back
fence. Adjust saw angle to 45° to the left and cut.
Next, cut end return piece at a 90° angle so that it will “cap” front piece flush to the back
Cut D (Right end piece) Repeat Cut C, but with saw angle adjusted to 45° to the right. Then with piece flat in mitre
box, cut off at 90° as with the right end piece.
Assemble all pieces using wood glue and finishing nails as shown to create finished crown moulding assembly.
Attach shelf assembly to top of surround pieces on wall using finishing nails.
Add pilasters to each side. The pilaster is made up of a plinth block on the bottom, a rosette on top and a length of
fluted moulding spanning the two. Start by centering a plinth block width-wise at the base of the left
surround leg and attach using finishing nails. Then center and attach the rosette to the top of the left leg. Measure
and cut a length of fluted moulding to span the distance between the rosette and plinth block. Center and attach leg
using finishing nails.
Add edge moulding to inside opening using 45° mitre cuts for the top and 90° cuts at the base. Add edge
moulding to outside of legs using a 90° cut at the base and coping at the top to fit the crown moulding shape.
Stain or paint to complement room.
Finishing: Staining & Painting
Several factors affect how and when to apply finish to your House of Fara mouldings. Usually, it’s best to apply finish
after the mouldings are cut but before you install them. Use the following general procedures:
Staining:
Lay mouldings flat and sand rough areas with 150 to 220 grit sandpaper. Wipe off sawdust.
Apply stain according to the package directions.
Install moulding.
Painting:
Lay mouldings flat and sand rough areas with 150 to 220 grit sandpaper. Wipe off sawdust.
Apply a coat of primer and then a first coat of paint.
Install moulding.
Putty the nail holes and sand putty when dried.
Mask with tape around edges of moulding to protect walls, floor and other moulding or use a paint shield.
Apply another coat of paint. Remove masking tape before paint dries completely (if the position of the
moulding makes masking difficult or makes the moulding hard to reach, you may wish to apply the final coat of
paint before installing).
Staining works well for House of Fara solid oak mouldings to bring out the wood’s natural beauty. If you wish to paint
your mouldings to match room décor, try using House of Fara white hardwood mouldings.