1
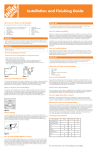
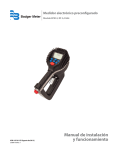
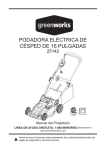
Installation and Finishing Guide
What Tools do I Need to Install Moulding?
Handy Tip:
Here is the basic list of tools you will need to install moulding:
•
•
•
•
•
•
•
•
•
•
•
•
•
Miter Box, Miter Saw, or Compound Miter Saw
Finishing Nails, Nail Set, and a Hammer or
Brad Nailer
Tape Measure
Framing Square
Protractor
Pen and Paper
Utility Knife
Wood Filler and Glue
Ladder
Safety Glasses
Hearing Protection
Level
Clamps
Handy Tip
Using a compound miter saw and a pneumatic nail gun will not only make the installation process
easier, it will also speed up the time required for installation. If you don’t own or want to purchase
these tools, they can be rented at The Home Depot Rental Center. Safety Tip
Always wear eye, ear, and respiratory protection when doing any home improvement project.
Remember safety first. How Much Moulding do I Need?
To determine the amount of moulding needed for your project follow these steps:
1.
2.
3.
4.
Draw a floor plan of your room. (Figure 1)
Measure each wall and note it on your plan.
Also note the placement and size of any doors, windows or openings in the room. It is also recommended that you identify each corner and the angle. (Figure 1.1)
Add all of the wall lengths together to get the amount of moulding you need to purchase. Add 15% for cutting mistakes and waste.
Measure
Outside
How do I Handle Long Walls?
Sometimes it is necessary to span longer lengths than what is available in your local store, when this
happens you will have to splice two lengths of moulding together. This type of joint is called a scarf/
splice joint. A scarf/splice joint will allow one piece to overlap the other section of moulding creating
a longer piece of moulding. The scarf/splice joint creates a vertical seam in the finished installation. It is recommended that you place the scarf/splice joint over a wall stud for additional strength. Install the first piece of moulding against the wall with a 45 degree miter cut on end of the moulding
opposite the corner. Do not nail within three feet of the scarf/splice joint at this time. Measure the next
piece of moulding. The second cut will be the opposite of the moulding currently installed on the wall.
Once the second cut has been made, install the moulding on the wall, placing a nail directly into the
scarf/splice.
How do I Install Moulding?
Install moulding piece by piece working around the room, installing the longest pieces first. Avoid
nailing within two to three inches of the end to avoid splitting. Some hardwood moulding will require
pre-drilling before nailing. If you are hand nailing, be sure to use a nail set to sink the nail heads
slightly below the face of the moulding.
Handy Tip:
If you are right handed, it is easier to install moulding counter-clockwise. If you are left handed, it is easier to install moulding clockwise. This way you can support the moulding with your un-favored hand and drive fasteners with your dominant hand. What Tools do I Need to Finish Moulding?
Outside
Mitre
Inside
Mitre
Moulding
Figure 1
To fix slight gaps in outside corners, fill the gaps with carpenters’ wood glue, and rub the gap
with the side of a utility knife. This will crush the wood fibers to fill the gap. Figure1.1
2
Figure
What Type of Moulding do I Need?
For windows and doors you can use casing, for ceilings use crown, for floors use base, and for walls
use chair rail or panel mould. You can choose from a wide variety of options to suit any style and
every budget. For more tips on selecting or designing with moulding, pick up a copy of our free
“Make an Impression with Moulding” or our free tear pad “How to Shop for Moulding”. •
•
•
•
•
•
Paint or Stain
Drop Cloths
Rags
Wood Putty, Caulk and a Caulk Gun
Brushes
220 Grit Sandpaper
How do I Sand Moulding?
Using a fine grit sanding sponge or 220 grit sandpaper mounted to a sanding block, always sand
with the grain of the wood. Coarser grits of sandpaper or sanding against the grain of the wood will
leave fine gouges and blemishes in the wood. A very light touch is required when sanding moulding.
It is recommended that you sand between each coat of primer or paint. This light sanding will ensure
a strong bond between the coats and give a smoother finish. What are the Basic Cuts for Moulding?
Should I Prime My Moulding?
The most basic cut for moulding is the miter. Most moulding is installed with miter joints that form a 90 degree angle. The first piece of moulding is cut with a 45 degree angle; the second piece of moulding is also cut with a 45 degree forming a tight 90 degree angle. In vertical applications (typically casing) the angles are cut on the face of the moulding. In horizontal applications (typically base, chair rail, crown) the angles are cut against the face of the moulding. (Figure 2) It is only necessary to prime solid pine or unprimed finger joint moulding. Most of the mouldings sold
at The Home Depot come with a factory applied primer. If you are painting solid pine moulding or
unprimed finger joint moulding, we recommend priming with a high quality primer.
How do I Apply Wood Filler or Caulk?
Wood filler or caulk is used to fill nail holes, repair scratches, dents, and uneven joints in miters.
Always use a non-shrinking filler or caulk, follow the manufacturer’s directions to achieve the best
results. For stainable mouldings, use wood filler that closely matches the wood color of your moulding.
When Should I Paint or Stain My Moulding?
Figure 2
What is Coping?
A cope is an inside corner where one piece of the moulding is cut square and butts tight into the
corner. The opposite side is first cut like an inside miter. Then using a coping saw remove the material
from the moulding leaving the profile. (Figure 3) The cope joint will then fit over the square cut moulding on the wall. Coping can be a time consuming process but easily accommodates corners
that are not 90 degrees and is very resistant to shrinkage. Staining or painting moulding before installation is always recommended. If you install your moulding
and then finish it, protect the surrounding areas by using painters tape. Remember to remove the tape
immediately after finishing to prevent the tape from damaging the wall or surrounding trim. Painting is recommended for all pre-primed moulding. It is also advisable to use two coats of paint for outstanding durability and appearance. Mouldings with a more pronounced wood grain or unprimed
surfaces are better suited to staining or varnishing. Staining or varnishing enhances the natural beauty
of the wood. Some types of wood moulding such as hemlock or solid pine can be stained to any
color, while other types of wood moulding such as oak lend to darker stains. Finishing Recommendations
Wood Species
Stain
Varnish
Primed Fiberboard
X
Primed Finger Joint
X
Oak
X
X
Pine
X
X
Hemlock
X
X
X
Raw Finger Joint
Figure 3
How do I End Moulding Without a Corner?
If you need to end moulding without turning a corner or running into a wall, you will need to create
a return. Cut the moulding to length finishing the piece with a miter angle. A return can be created
by taking a scrap piece of moulding and cutting a miter on end of the scrap piece. Then cut straight
down from the face of the moulding, ensuring the blade will meet the edge of the miter cut which
forms a small triangular piece of moulding. Attach the piece with carpenters’ wood glue and secure
the piece until the glue dries with masking tape. Paint
Maple
X
X
Fir
X
X
For more information, visit www.homedepot.com/moulding
Guía de Instalación y Acabado
¿Qué Herramientas Necesito para Instalar Molduras?
Consejo Útil
Esta es la lista básica de herramientas que necesitará para instalar molduras:
•
•
•
•
•
•
•
•
Caja de ingletes, sierra para cortar ingletes o
sierra para ingletes
Clavos para acabado, Set de Clavos, y un
martillo o un martillo neumático Brad
Cinta métrica
Escuadra
Transportador
Pluma y Papel
•
•
•
•
•
Cuchillo para uso general
Relleno para de madera,
masilla y pegamento
Escalera
Gafas de seguridad
Protección para los Oídos
Nivel
Pinzas
Consejo Útil
Usando una sierra para ingletes y una pistola de clavos neumática no sólo hará el proceso de instalación más fácil, sino que también acelerará el tiempo necesario para la instalación. Si no
posee, ni quiere comprar estas herramientas, se pueden alquilar en el Centro de Alquiler de Home
Depot Center.
Advertencia de Seguridad
Use siempre protección para los ojos, oídos y respiración al hacer cualquier proyecto de mejoras
para el hogar. Recuerde la seguridad primero. ¿Cuánta Moldura Necesito?
Para determinar la cantidad de piezas de molduras que necesita para su proyecto siga estos pasos:
1.
2.
3.
4.
Dibuje un plano de su habitación. (Figura 1)
Mida cada pared y tome nota en su plan. También tenga en cuenta la ubicación y el tamaño de todas las puertas, ventanas o aberturas en la habitación. También se recomienda que identifique cada esquina y su ángulo. (Figura 1.1)
Añada todas las longitudes de la pared para obtener la cantidad de piezas de fundición que usted necesita comprar. Añada 15% para errores y los residuos. Measure
Outside
¿Cómo Manejo Paredes Largas?
A veces es necesario abarcar tramos más largos de lo que está disponible en su tienda local, cuando
esto le suceda tendrá que realizar una junta en dos molduras. Este tipo de articulación se denomina
scarf/splice joint. Una scarf/splice joint permitirá que una sola pieza se solape con la otra moldura
creando una pieza más larga de moldura. El scarf/splice joint crea una costura vertical en la instalación terminada. Se recomienda que coloque el scarf/splice joint sobre un montante de pared para
fuerza adicional.
Instale la primera moldura contra la pared con un inglete de 45 grados en el extremo del corte en el
lado opuesto a la esquina. No clave dentro de los tres pies del scarf/splice joint en este momento.
Mida la siguiente pieza de moldura. El segundo corte será el opuesto de la moldura actualmente
instalada en la pared. Una vez que el segundo corte se ha hecho, instale la moldura en la pared,
colocar un clavo directamente en el scarf/splice joint.
¿Cómo Puedo Instalar Molduras?
Instale las molduras pieza por pieza trabajando alrededor de el cuarto, la instalación de las piezas
más larga primeras. Evite clavar un plazo de dos a tres pulgadas del extremo para evitar rajaduras.
Algunas piezas de fundición de madera requerirá la perforación previa antes de clavar. Si usted
esta clavando a mano, asegúrese de usar un juego de clavos para hundir las cabezas del clavo
ligeramente por debajo de la cara de la moldura.
Consejo Útil
Si usted es diestro, es más fácil de instalar piezas de fundición a la izquierda. Si usted es zurdo,
es más fácil para instalar molduras desde el lado derecho. De esta manera usted puede apoyar
la moldura con la mano sin favorecidas e impulsar los sujetadores con su mano dominante.
Outside
Mitre
¿Qué Herramientas Necesito para Terminar las Molduras?
Inside
Mitre
•
•
•
•
•
•
Moulding
Figura 1
Para solucionar las deficiencias leves en las esquinas exteriores, llenar los vacíos con pegamento
de madera de carpintería, y frote la diferencia con el lado de un cuchillo. Esto hará que las fibras
quebradas de madera llenen la brecha.
Figure 1.1
2
Figura
¿Qué Tipo de Moldura Necesito?
Para las ventanas y las puertas se puede utilizar Casing, para techos uso de Crown, para pisos use
Base, y para las paredes use Chair Rail o Panel Mould. Puede elegir entre una amplia variedad de
opciones para cualquier estilo y presupuesto. Para obtener más consejos sobre la selección o el
diseño con piezas de fundición, recoger una copia de nuestro libro gratis “Make and Impression
with Moulding” o la pagina “Como Comprar Molduras”. ¿Cuáles Son los Cortes Básicos para Molduras?
El corte más básico para molduras es el inglete. La mayoría de las molduras se instalan con ingletes
que forman un ángulo de 90 grados. La primera pieza de la moldura se corta con un ángulo de 45
grados, la segunda pieza de la moldura también se corta con un grado de 45 que forman un ángulo
de 90 grados al unirse. En aplicaciones verticales (normalmente el Casing) los ángulos son cortados
en la cara de la moldura. En aplicaciones horizontales (por lo general el Base, Chair Rail, y Crown)
los ángulos se cortan contra la cara de la moldura. (Figura 2) La pintura o laca
Paños
Harapos
Masilla para madera, masilla y una pistola de masilla
Pinceles
Papel de Lija 220
¿Cómo Puedo Lijar la Moldura?
Usando una esponja de lija de grano o lija de grano 220 montado en un bloque de lijar, siempre
con el grano de arena de la madera. Lija de grano más grueso o lijar en contra de la veta de la
madera dejará estrías finas y manchas en la madera. Un toque muy ligero se requiere cuando la
moldura se esta lijado. Se recomienda que la arena entre cada capa de primer o pintura. Este lijado
liviano asegurara una unión fuerte entre las capas y le dará un acabado más fino.
¿Debería de Pintar con Primer Mi Moldura?
Sólo es necesario pintar con primer el pino macizo Primed Finger Joint. La mayoría de las molduras
que se venden en The Home Depot vienen con un Primer aplicado de fábrica. Si usted está pintando
molduras de pino macizo o primado Finger Joint, le recomendamos cebado con una imprimación de
alta calidad. ¿Cómo Puedo Aplicar Relleno para Madera o Masilla?
Madera o masilla de relleno se utiliza para rellenar los agujeros de los clavos, la reparación de
arañazos, abolladuras, y las articulaciones desiguales en ingletes. Siempre use un relleno sin encogimiento o masilla, siga las instrucciones del fabricante para obtener los mejores resultados.
Para molduras tingibles, use relleno de madera que más se ajuste al color de la madera de su moldura.
¿Cuándo Debo Pintar o Teñir Mi Moldura?
Figura 2
¿Qué es el Afrontamiento?
Un frente es una esquina interior en donde se corta un trozo de la moldura cuadrada y queda
justamente apretada en la esquina. El lado opuesto es el primer corte como un inglete interior. Luego,
utiliza una sierra para eliminar el material de la moldura dejando su perfil. (Figura 3) La junta del
afrontamiento se adaptará al corte cuadrado de la moldura en la pared. El afrontamiento puede ser
un proceso que consume tiempo, pero se adapta fácilmente a las esquinas que no son de 90 grados
y es muy resistente a la contracción.
Siempre se recomienda teñir o pintar la moldura antes de la instalación. Si instala la moldura y luego
le da la terminación, proteja las áreas circundantes usando cinta de pintores. Recuerde retirar la
cinta inmediatamente después del acabado para evitar que la cinta dañe la pared o sus alrededores.
Pintar es recomendable para todos las molduras Pre-Primed. También es recomendable utilizar
dos capas de pintura para la durabilidad y la apariencia. Molduras de madera con granos más
pronunciados o superficies sin prima se adaptan mejor a las lacas o barnices. Laca o barniz realza
la belleza natural de la madera. Algunos tipos de madera, como la cicuta o pino macizo se pueden
teñir a cualquier color, mientras que otros tipos de moldeado de madera como el roble prestan a
teñir mas oscuros.
Recomendaciones para el Acabado
Especie de Madera
Laca
Barniz
Fibra de madera imprimadas
X
Finger joint imprimadas
X
Roble
X
X
Pino
X
X
¿Cómo Puedo Terminar Una Moldura Sin Esquina?
Cicuta
X
X
Si usted necesita hacer una terminación a una moldura sin esquina o que no termine en una pared,
usted tendrá que crear un retorno. Corta la moldura a la medida para terminar la pieza con un
ángulo de inglete. El retorno se puede crear tomando un pequeño trozo de la moldura y cortar un inglete a la pieza de sobra. Luego corte hacia abajo de la faz de la moldura, asegurando que la
hoja se reunirá con el borde del corte de inglete, lo cual forma una pequeña pieza triangular de
moldura. Fije la pieza con prensas para madera de carpintería y asegure que el pegamento en la
pieza se seque, manteniendo las piezas juntas con masking tape.
Finger joint común
Figura 3
Pintura
X
Arce
X
X
Abeto
X
X
Para obtener más información, visite www.homedepot.com/moulding