1
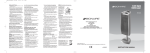
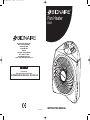
B298IUK02M1.qxd
4/16/02
3:23 PM
Page 2
Fan Heater
B298
Holmes Products (Europe) Ltd.
Unit 14 The Piper Building
Peterborough Road
London SW6 3EF
England
Telephone: +44 20 7384 9810
Fax: +44 20 7471 4600
www.theholmesgroup.com
e-mail: [email protected]
UK ONLY
Please call our
Freephone Customer Service Number
CUSTOMER SERVICE HELPLINE - 0800 052 3615
INSTRUCTION MANUAL
B298IUK02M1
B298IUK02M1.qxd
4/16/02
3:23 PM
Page 4
PLEASE READ AND RETAIN THE
FOLLOWING FOR FUTURE REFERENCE
GENERAL DESCRIPTION
A) Air Inlet Opening
B) Air Outlet Opening
C) Mode Control
D) Thermostat
E) Power Light
E
D
C
B
A
IMPORTANT SAFEGUARDS
Mains connection
• Read these instructions carefully, in conjunction
with the illustrations, before using the heater.
• Before connecting the heater, check that the
voltage indicated on the rating plate corresponds
to the mains voltage in your home / office.
• Avoid the use of an extension cord because it
may cause the heater to overheat.
• Warning. Risk of Fire. Discontinue use if the
outlet or plug become hot to the touch.
Overheating may indicate a worn or damaged
outlet. Consult a qualified electrician for outlet
replacement.
Safe positioning
• Only touch the heater with dry hands
• DO NOT position where it can be touched by
children, especially the very young
• DO NOT position the heater directly under a
power socket
• DO NOT use this heater outdoors
• This heater is NOT intended for use in
bathrooms, laundry areas and other similar
indoor locations NEVER locate heater where it
may fall into the bathtub or other water
container.
• When using the heater, DO NOT place in the
immediate surroundings of a shower or
swimming pool.
• Position the heater in such a manner that the
air flow toward the heater and away from it, is
not obstructed.
• The heater must NOT be covered.
• Allow a safe area around the heater away from
furniture or other objects; at least 50 cm from
the top and sides and 120cm at the front and
back.
• Do not use this heater when it is lying on its
side.
• DO NOT use the heater in rooms with explosive
gas (e.g. petrol) or while using inflammable glue
or solvent (e.g. when gluing or varnishing
parquet floors, PVC etc.)
• This heater is only intended for use on the floor
and should never be positioned on a shelf or
wall mounted.
Safety in use
• Extra caution is necessary when the heater is
used near children or when it is left unattended
• DO NOT insert any objects into the heater
• Keep the mains cord at a safe distance from
the main body of the heater
• Prevent overheating of the heater by keeping
the air inlet and outlet unblocked. DO NOT hang
anything in front of or above the heater.
• If overheating should occur, the built-in
overheating safety device will switch off the
heater.
• DO NOT use aerosols, inflammable substances
or materials sensitive to heat in the flow
of hot air
Servicing
• Should the heater stop working, first check the
fuse in the plug (UK only) or fuse/circuit breaker
at the distribution board is operating, before
contacting the manufacturer or service agent.
• If the supply cord or plug is damaged, it must
be replaced by the manufacturer or its service
agent or a similarly qualified person in order to
avoid hazard.
• The heater contains no user serviceable parts
and should the product suffer damage or
breakdown it must be returned to the
manufacturer or their service agent.
• Should your unit require service, please contact
your dealer. A proof of purchase will be required
by the service centre for all warranty claims.
• We reserve the right to change or modify any
specifications without notice
OPERATING THE HEATER
• Remove the heater from the packaging and
place it in the desired location.
• Unwind the power cord fully and plug the power
supply cord into a convenient electrical outlet.
• Do not position where it can be touched by
children, especially the very young.
• To activate the heater, turn the knob clockwise
to either the
fan position for cool air, l for
heating at low power (1000 W) or ll for heating
at maximum power (2000 W).
THERMOSTAT
When the room has reached the desired
temperature level, the thermostat will maintain the
set temperature level by switching On and Off at
intervals. To find the ideal thermostat setting for
your own comfort, proceed as follows:
• Set the thermostat to the maximum position by
turning the thermostat knob clockwise until it
stops.
• When the desired temperature in the room is
reached, slowly turn the thermostat knob anticlockwise until the heater automatically turns off.
• The thermostat will now automatically maintain
the temperature at the desired level.
ANTI FREEZE SETTING
This heater is equipped with an anti-frost setting.
This position can be used to keep the immediate
area around the heater free from frost.
• Position the heater in the area you want to keep
above freezing.
• Switch the heater ON by selecting I or II
(depending on the room size, possible draught
and expected minimum temperature).
• Turn the thermostat knob anti-clockwise until it
stops. This is the minimum thermostat setting approx +5°C. The heater will automatically
switch On if the temperature in the room drops
below this level.
AUTO SAFETY SHUT OFF
This feature will automatically switch off the heater
in case of accidental overheating. Operation of the
heater can only be resumed when the user has
reset the unit.
To reset the heater
1. Turn the control knob to the 0 position
2. Unplug the heater and wait for 5-10 minutes for
the unit to cool down.
3. After the 5-10 minutes, plug the unit in again
and operate normally.
NOTE: If your heater is fitted with a 13 amp UK
plug, the internal plug fuse may have blown and
may therefore require changing. (See 'Installation
of a Plug')
CLEANING AND MAINTENANCE
• Turn the control knob to the 0 position
• Remove the plug from the wall socket.
• Wait for the heater to cool down sufficiently.
• You may clean the outside of the heater with a
damp cloth. Do NOT allow water to enter into
the appliance. Do NOT use soap or chemicals,
which may damage the housing. Allow sufficient
time to dry before plugging the unit back in the
socket.
• Clean the air inlet and outlet openings regularly
(with normal use at least twice a year) with a
vacuum cleaner.
STORAGE TIPS
If you do not plan to use your heater for an
extended period of time (i.e. during the summer
months), we recommend you to re-pack the unit in
its original packaging or any other dust-free
packaging and store it in a dry and cool place.
THIS PRODUCT IS MANUFACTURED TO
COMPLY WITH THE E.E.C. DIRECTIVES
73/23/EEC, 89/336/EEC and 98/37/EEC.
INSTALLATION OF A PLUG
Please check that the voltage marked on the product
corresponds with your supply voltage. If the plug is
not suitable for the socket outlets in your home, it can
be removed and replaced by a plug of the correct
type. Please refer to "Installation of a plug" below.
This product is fitted with a 13A plug complying to
BS1363. If this plug is unsuitable or needs to be
replaced, please note the following:
The wires in the mains lead are coloured as such:
BROWN
LIVE
BLUE
NEUTRAL
Please note that the colour of these mains wires
may not correspond with the colour markings that
identify the terminals in your plug. Please proceed
as follows:
The BROWN coloured wire must be connected to
the terminal, which is marked with the letter "L" or
is coloured RED.
The BLUE coloured wire must be connected to the
terminal, which is marked with the letter "N" or is
coloured BLACK.
DO NOT CONNECT either of these wires to the
earth terminal in the plug. The earth terminal plug
is marked with the letter "E", or with the earth
symbol,
or coloured GREEN, or GREEN and
YELLOW.
NOTE: If the terminals
in the plug are not
marked or if you are
unsure or in doubt
about the installation of
the plug please contact
a qualified electrician.
If a 13A 3-pin plug is
fitted, it must be an
ASTA approved plug,
conforming to BS1363 standard. Replacement 13
A fuses must be BSI or ASTA BS1362 approved.