Transcript
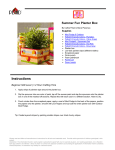
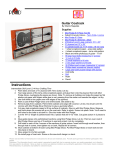
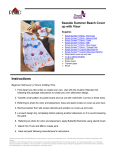
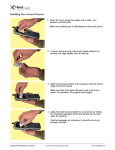
Dad Photo Blocks By Chris Williams Supplies Mod Podge ® 7 Piece Tool Kit Mod Podge ® Papers - Woodland FolkArt® Acrylic Colors – Soft Apple, Warm White Mod Podge ® Gloss Paper 2” Letter Stencils Paintbrush Paper towels 3 3” wood blocks Fine grit sandpaper Craft glue Pencil Ruler Photo copies of your child’s favorite photos Waxed paper Solid color cardstock in color of choice Assorted small buttons gems or ribbon bows Instructions Beginner Skill Level | 30 Minutes Crafting Time 1. Lightly sand all sides of each wood block. Basecoat Soft Apple on all six sides using ¾” flat brush. Allow to dry and reapply. 2. While waiting for basecoat to dry, cut photo copies into 2” squares. Also cut Mod Podge papers into six 3 ¼” squares for each block. 3. Working one side of a block at a time, brush Mod Podge onto the wood surface as well as the back side of the Mod Podge paper using a ¾” flat brush. 4. Center the paper square on the wood block and press in place. Next place a sheet of waxed paper over your papered project surface. Using your Mod Podge squeegee, press and drag the squeegee over the paper from the center towards the edges to remove any excess medium as well as release any air pockets. Remove waxed paper and repeat until each side is papered with the Woodland patterns. Repeat creating all three blocks. 5. Continue using same techniques to adhere photo copies. 6. Using a pencil, trace around Mailbox Stencil letters D A D onto cream colored cardstock and cut out. 7. Add “D A D” cutouts to top of each block using same Mod Podge techniques. (NOTE: If desired, D A D can also be stenciled directly onto patterned papers. Be sure to use contrasting paint colors so letters are defined.) 8. Apply a coat or two of Mod Podge over entire block allowing each application to thoroughly dry before applying next. 9. Using Craft Glue to add small buttons, gems, metal charms or ribbon bows of your choice. Please read and follow all manufacturers’ instructions for all tools and materials used. Provide adult supervision if children participate in this project. Disclaimer: The information found in each project is presented in good faith, but no warranty is given, nor results guaranteed, nor is freedom from any patent to be inferred. Since we have no control over physical conditions surrounding the application of information herein contained, Plaid Enterprises, Inc.disclaims any liability for untoward results.