1
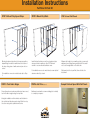
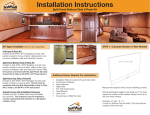
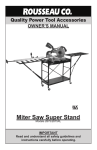
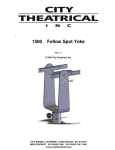
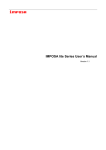
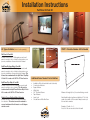
Installation Instructions
Full Panel 2-Pack Kit
Kit Types Available: (Each kit sold separately)
Full Panels
Full Panel 2-Pack Kit
Includes 2 full 49”W x 97”H fiberglass acoustic wall
panels covered in choice of fabric, railing system components, installation roller and instruction manual.
Split Panel Bottom-Only 2-Pack Kit
Includes 2 split 49”W x 32”H fiberglass acoustic wall
panels covered in choice of fabric, railing system components, installation roller and instruction manual. This
kit must be combined with the Split Panel Top-Only
2-Pack Kit to make a full 98”W x 97”H wall section.
Split Panel Top-Only 2-Pack Kit
Includes 2 split 49”W x 65”H fiberglass acoustic wall
panels covered in choice of fabric. This kit must be
combined with the Split Panel Bottom-Only 2-Pack
Kit to make a full 98”W x 97”H wall section.
Outside Corner Rail Installation Extrusion
Includes one 96”L outside corner vinyl rail installation extrusion. This extrusion must be ordered to
connect wall panels that intersect on a 90 degree
outside corner.
Split Panels
STEP 1: Calculate Number of Kits Needed
Top
Bottom
Additional Items Needed For Installation:
•
•
•
•
•
•
•
•
Installation Roller (included with each total order)
Construction Adhesive
Spray Adhesive
Utility Knife
5/8” Flat Head Screws
Tape Measure
Laser Level
Circular Saw or Miter Box Saw
Measure the length (in feet) of each wall being covered.
Add all wall lengths together and divide by 8. The total
equals the number of kits needed. Always round up to
the next whole number.
Example: 24’ wall ÷ 8 = 3.
A total of 3 kits are needed to finish this wall.
Installation Instructions
Full Panel 2-Pack Kit
STEP 2: Mount Polystyrene Strips
STEP 3: Mount Vinyl Rails
STEP 4: Insert Wall Panels
Mount polystyrene strips directly to masonry walls or
drywall using construction adhesive at the bottom of
the drop ceiling, base of walls and every two feet on
center.
Install vinyl rail extrusions over the polystyrene strips
using construction adhesive. Use 5/8” flat head
screws to secure rails until adhesive cures.
Measure the height of your walls and cut your acoustic
wall panels accordingly using a utility knife. Be careful
not to cut through fabric on the front side.
For installation on wood or metal studs, screw vinyl rail
extrusions directly to studs.
Slide panel into the top rail first, then slide into the
bottom rail.
STEP 5: Tuck Fabric Edges
STEP 6: Add Trim (Optional)
Sample Finished Space With Full Panels
Once all panels are in place and adhesives have cured,
tuck in the fabric edges along the vinyl rails.
Add base board and/or crown moulding (not included)
to complete your space.
For installation on wood or metal studs, skip to Step
3.
Using the installation roller included, seat the fabric in
the vertical vinyl rails along each edge. Work from top
to bottom using short up and down strokes.