1
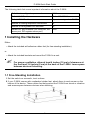
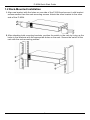
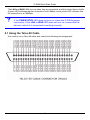
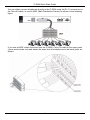
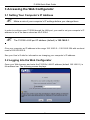
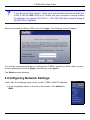
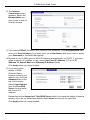
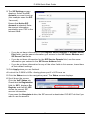
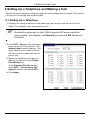
P-2024
VoIP Analog Telephone Adaptor
Quick Start Guide
Version 3.60
7/2007
Edition 1
DEFAULT LOGIN
IP Address http://192.168.5.1
Password
1234
Copyright © 2007. All rights reserved.
P-2024 Quick Start Guide
Overview
Use your P-2024 to make Voice over IP calls using analog phones. Connect analog
telephones to the P-2024, and map each phone port to one or more of the configurable
VoIP (SIP) accounts.
The following figure shows your P-2024 (labeled A) allowing analog telephones to make
and receive calls over the Internet via a network router (B). The ITSP (Internet Telephony
Service Provider) routes calls to and from other VoIP accounts and also PSTN (Public
Switched Telephone Network) lines. C is a computer you connect to the P-2024 for initial
configuration.
This Quick Start Guide shows you how to set up and use the P-2024 by doing the following
things:
• Installing the Hardware
• Making Hardware Connections
• Accessing the Web Configurator
• Configuring Network Settings
• Setting Up A SIP Account
• Setting Up a Telephone and Making a Call
1
P-2024 Quick Start Guide
The following table lists some important information about the P-2024.
Default web configurator password
1234
Default LAN IP address
Static: 192.168.5.1
Default WAN IP address
Dynamic: assigned via DHCP
Number of analog telephone connections
24
Number of configurable SIP accounts
24
Default SIP port numbers (SIP local port, SIP
server port, SIP register server port)
5060
1 Installing the Hardware
Either:
• Attach the included self-adhesive rubber feet (for free-standing installation)
or
• Attach the included brackets and mount the P-2024 in a rack
"
For proper ventilation, allow at least 4 inches (10 cm) of clearance at
the front and 3.4 inches (8 cm) at the back of the P-2024. Leave space
between devices if stacking.
1.1 Free-Standing Installation
1 Set the switch on a smooth, level surface.
2 If your P-2024 comes with unattached rubber feet, attach them to each corner on the
bottom of the device. These rubber feet help protect the P-2024 from shock or vibration
and ensure space between devices when stacking.
2
P-2024 Quick Start Guide
1.2 Rack-Mounted Installation
1 Align one bracket with the holes on one side of the P-2024 and secure it with bracket
screws smaller than the rack-mounting screws. Attach the other bracket to the other
side of the P-2024.
2 After attaching both mounting brackets, position the switch in the rack by lining up the
holes in the brackets with the appropriate holes on the rack. Secure the switch to the
rack with the rack-mounting screws.
3
P-2024 Quick Start Guide
2 Making Hardware Connections
This section describes how to connect the P-2024 to your network and prepare it for
configuration.
Take the following steps to connect the P-2024 to your network:
1 Connect the Telco-50 (RJ-21) cable to the PHONE connector and tighten the retaining
screw.
See Section 2 on page 4 for information on configuring and using the Telco-50 cable to
connect the P-2024 to your telephones or a Main Distribution Frame (MDF).
2 Use an Ethernet cable to connect your computer to the LAN port.
3 Use another Ethernet cable to connect your switch or router to the WAN port.
4 Connect a suitable power source to the AC INPUT power socket using the included
power cable. Turn on the power.
5 Look at the LEDs on the P-2024.
The 1 ~ 24 analog phone port LEDs flash during startup. Once the P-2024 has started up
successfully:
• If an analog phone is connected to a port, the port’s LED blinks when the phone is
off-hook.
• If an analog phone port has a registered SIP account assigned to it, the port’s LED
stays steady on. The LED blinks when a call is incoming on the SIP account, even if
no phone is connected.
The PWR/STATUS LED turns steady on when the P-2024 has started up successfully.
4
P-2024 Quick Start Guide
The LAN and WAN LEDs turn on when they are connected, and blink when there is traffic.
A green LED indicates that the connection is at 10Mbps, and a yellow LED indicates that
the connection is at 100Mbps.
V
If the PWR/STATUS LED does not turn on, check the P-2024’s power
connection. If the LAN or WAN LED does not turn on, ensure that the
device to which it is connected is working correctly.
2.1 Using the Telco-50 Cable
You need to use a Telco-50 cable with exactly the following pin assignments.
5
P-2024 Quick Start Guide
You can either connect telephones directly to the P-2024 using the RJ-11 connectors on
the Telco-50 cable, or use an MDF (Main Distribution Frame), as shown in the following
figure.
If you use an MDF, attach the wires from the P-2024’s Telco-50 cable to the upper ports
(use a punch-down tool) and attach the wires from the telephones to the lower ports, as
shown.
6
P-2024 Quick Start Guide
3 Accessing the Web Configurator
3.1 Setting Your Computer’s IP Address
"
Make a note of your computer’s IP settings before you change them.
In order to configure your P-2024 through the LAN port, you need to set your computer’s IP
address to be in the same subnet as the P-2024.
"
The P-2024’s LAN port IP address (default) is 192.168.5.1.
Give your computer an IP address in the range 192.168.5.2 ~ 192.168.5.254 with a subnet
mask of 255.255.255.0.
See your User’s Guide for information on changing your computer’s IP address.
3.2 Logging Into the Web Configurator
Open your Web browser and enter the P-2024’s LAN IP address (default 192.168.5.1) in
the address bar. The following screen displays.
7
P-2024 Quick Start Guide
V
If you do not see this screen, check your connections and ensure that one
of the P-2024’s LAN LEDs is on. Check that your computer is using a static
IP address in the range 192.168.5.2 ~ 192.168.5.254 with a subnet mask of
255.255.255.0 (default).
Enter the password (default 1234) and click Login. The following screen displays.
It is strongly recommended that you change the P-2024’s password. Enter (and re-enter)
the new password and click Apply. Alternatively, click Ignore.
The Status screen displays.
4 Configuring Network Settings
Next, take the following steps to set up the P-2024’s WAN IP address.
1 In the navigation panel on the left of the screen, click Network >
WAN.
8
P-2024 Quick Start Guide
2 The Internet
Connection screen
appears. Select the
Encapsulation you
were given to use for
Internet access.
3 If you select PPPoE (Point-to-Point Protocol over Ethernet) in the Encapsulation field,
enter your Service Name (if you have one), your User Name, and enter (and re-enter)
your Password in the fields that appear.
4 By default, the P-2024 gets its WAN IP address automatically via DHCP. If you were
given a specific IP address to use, select Use Fixed IP Address. Fill in the IP
Address, IP Subnet Mask and Gateway IP Address fields.
Click Apply when you have finished.
5 If you were given
details of DNS
(Domain Name
System) servers you
want to use, click the
Advanced tab at the
top of the screen.
Select User-Defined
from the First DNS
Server list and enter
the server’s IP
address.
Repeat this for the Second and Third DNS Server fields if you have the details of backup
servers. If you do not have these details, select None from the list for each field.
Click Apply when you have finished.
9
P-2024 Quick Start Guide
6 Click the Status icon in the navigation panel.
The Status screen displays. Check that the WAN Information settings in the Device
Information section are correct.
V
If you configured the P-2024 to get a WAN IP address automatically and
the WAN Information fields are blank, ensure that one of the P-2024’s
WAN port LEDs is on. Check that the DHCP server is available (ping its IP
address from a computer on the network).
5 Setting Up A SIP Account
Next, take the following steps to configure a SIP account on the P-2024.
1 In the navigation panel on the left of the screen, click VoIP > SIP.
10
P-2024 Quick Start Guide
2 The SIP Settings screen
displays. Select the SIP
Account you want to set up
(this example uses the SIP
1 account).
Ensure that Active SIP
Account is selected. Enter
the account information
provided by your ITSP in the
relevant fields.
• If you do not have information for the Register Server Address or Register Server
Port fields, use the same information you entered in the SIP Server Address and
SIP Server Port fields.
• If you do not have information for the SIP Service Domain field, use the same
information you entered in the SIP Server Address field.
• If you do not have information for any of the other fields in this screen, leave them
at their default settings.
3 Click Apply when you are finished.
4 Look at the P-2024’s LEDs. Analog phone port 1’s LED turns on.
5 Click the Status icon in the navigation panel. The Status screen displays.
6 Scroll down the screen.
Click the VoIP Status tab.
Check that the Registration
field for SIP 1 displays On
Register and that the URI
shows the correct SIP
account information.
If you press the Unregister button, the SIP account is deactivated. DO NOT do this if you
want to use the account.
11
P-2024 Quick Start Guide
V
If the SIP account does not register (Not Register displays in the
Registration field and/or the analog phone port 1 LED does not turn on)
check your WAN settings and re-enter the SIP account information. If this
does not help, see Troubleshooting in your User’s Guide or contact your
SIP service provider.
If you want to set up more SIP accounts, follow the steps above selecting a different SIP
Account in the VoIP > SIP > SIP Settings screen.
12
P-2024 Quick Start Guide
6 Setting Up a Telephone and Making a Call
Take the following steps to configure a specific analog telephone to use the SIP account
you set up for incoming and outgoing calls.
6.1 Setting Up a Telephone
1 Connect an analog telephone to the phone port you want to use via the Telco-50
cable. This example uses analog phone port 1.
"
By default a phone port on the P-2024 uses the SIP account with the
same number. For example, the Phone15 port uses the SIP 15 account
by default.
2 Click VoIP > Phone in the navigation
panel on the left of the screen. The
Analog Phone screen displays. This
screen allows you to specify which
SIP accounts you want each phone
port to use.
3 Select the telephone port that you
want to configure from the Phone
Port Settings list.
In the Outgoing Call Use section,
select SIP1. In the Incoming Call
Apply To section, also select SIP1.
4 Click Apply.
13
P-2024 Quick Start Guide
If you set a phone port to use more than one SIP account for outgoing calls - for example,
if you set Phone10 to use SIP9, SIP14 and SIP15 - the following things happen when
you make a call for the first time:
• The P-2024 tries to use the lowest-numbered SIP account (SIP9 in this example).
• If the first SIP account it tries is not registered, the P-2024 tries to use the nextlowest-numbered one (SIP14 in this example).
• If the SIP account is registered, the P-2024 always uses the account for subsequent calls (if you make another call, the P-2024 does not try to use SIP9).
• If the SIP account that the P-2024 is using becomes unregistered, the P-2024 tries
each account in numerical order again until it finds a registered account.
If you set a phone port to use more than one SIP account for incoming calls, you cannot
tell from which account a call comes when the phone rings.
5 Click the Status icon in the navigation panel.
6 The Status screen displays. Scroll
down and click the VoIP Mapping
tab. Check that the SIP1 row displays
an Incoming & Outgoing icon in the
Phone 1 column.
V
If a
icon displays, you can receive incoming calls only. If a
icon
displays, you can make outgoing calls only. If a
icon displays, the SIP
account has failed to register.
14
P-2024 Quick Start Guide
6.2 Making a Call
1 Lift the phone’s receiver. If the phone port is correctly configured, you hear a dial tone
and the 1 analog phone port LED blinks.
2 Dial a number you know can be reached using this SIP account. If the SIP account is
correctly configured, the dial tone changes to the ringing tone.
V
If you experience difficulty using an analog phone when there is another
device (such as an MDF) connected between the phone and the P-2024,
try connecting the phone directly to the Telco-50 cable jack.
Viewing a Product’s Certification(s)
1 Go to www.zyxel.com.
2 Select your product from the drop-down list box on the ZyXEL home
page to go to that product's page.
3 Select the certification you wish to view from this page.
15
P-2024 Quick Start Guide
16