1
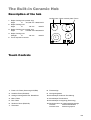
GLASKERAMIKKOCHFELD
GLASKERAMIKHÄLL
GLASKERAMISK KOGESEKTION
KERAAMINEN KEITTOTASO
TABLE VITROCÉRAMIQUE
KERAMISCH KOOKPLATEAU
CERAMIC BUILT---IN HOB
ZKT 662 LN
GEBRAUCHSANWEISUNG
BRUKSANVISNING
BRUGSANVISNING
KÄYTTÖ---JA ASENNUSOHJE
NOTICE D’UTILISATION
GEBRUISKSAANWIJZING
OPERATING INSTRUCTIONS
374 319 212
02.02 dej--es
Dear Customer
GB
Congratulations on your purchase of an Zanussi
glass--ceramic hob. You have thereby chosen in favour of quality and durability.
These operating operations will help you become acquainted with your ceramic hob step--by--step, and
enable you to take optimum advantage of all its features. You should, however, carefully read through the
section «Important Safety Information» before putting the appliance into service for the first time.
We recommend that the operating instructions be kept
near the unit for immediate reference should problems
arise.
This appliance conforms
with EC--Directive 73/23/EEC,
90/683/EEC, 89/336/EEC, 93/68/EEC
145
Content
Important Safety Information . . . . . . .
80
Cleaning after each use . . . . . . . . . . . . . .
Stain removal . . . . . . . . . . . . . . . . . . . . . .
Special problems . . . . . . . . . . . . . . . . . . .
For the user
The Built--in Ceramic Hob . . . . . . . . . .
Description of the hob . . . . . . . . . . . . . . .
Touch Controls . . . . . . . . . . . . . . . . . . . . .
Before the first use . . . . . . . . . . . . . . . .
Cleaning for the first time . . . . . . . . . . . .
Heating up for the first time . . . . . . . . . . .
The Cooking Zone . . . . . . . . . . . . . . . . .
Ceramic cooking surface . . . . . . . . . . . . .
Touch Controls . . . . . . . . . . . . . . . . . . . . .
Residual heat indicator . . . . . . . . . . . . . .
Operation . . . . . . . . . . . . . . . . . . . . . . . . .
Switching the appliance on . . . . . . . . . . .
Switching on the cooking zones . . . . . . .
Selecting the power level . . . . . . . . . . . . .
Switching off the cooking zones . . . . . . .
Switching off the hob . . . . . . . . . . . . . . . .
Over--cooking protection . . . . . . . . . . . . .
Safety cut--out . . . . . . . . . . . . . . . . . . . . . .
Dual--ring cooking zone . . . . . . . . . . .
Selecting the dual--ring cooking zone . .
Switching the dual--ring cooking zone off
Safety lock -- barring the appliance
or the cooking zones . . . . . . . . . . . . . .
Locking the appliance . . . . . . . . . . . . . . .
Locking (barring) the individual
cooking zones . . . . . . . . . . . . . . . . . . . . . .
Boost facility . . . . . . . . . . . . . . . . . . . . .
Selecting the boost facility . . . . . . . . . . . .
Indicating the selected power level . . . .
Changing the Power Level during
the Boost facility . . . . . . . . . . . . . . . . . . . .
Take advantage of the residual heat
by the Boost facility . . . . . . . . . . . . . . . . .
Switching off the Boost facility . . . . . . . .
The Timer Function . . . . . . . . . . . . . . .
82
82
82
83
83
83
83
96
96
For the installer
97
Unpacking and control . . . . . . . . . . . .
98
84
Installation Instructions . . . . . . . . . . .
98
84
84
85
85
86
86
86
87
87
87
88
88
88
89
89
90
90
90
90
91
The Timer Function as an Egg--Timer
93
Setting the egg timer . . . . . . . . . . . . . . . .
Switching the egg timer off . . . . . . . . . . .
93
93
146
First aid for faults . . . . . . . . . . . . . . . . . . .
95
95
95
Technical Data . . . . . . . . . . . . . . . . . . . .
91
91
91
92
Energy consumption . . . . . . . . . . . . . . . . .
Saucepans and frying pans . . . . . . . . . . .
What to do when . . . . . . . . . . . . . . . . . .
95
83
83
84
Switching the Timer function on . . . . . . .
Changing the set cooking time . . . . . . . .
Calling up the current cooking time . . . .
Switching the Timer function off . . . . . . .
The right cooking utensils . . . . . . . . .
Cleaning and care . . . . . . . . . . . . . . . . .
94
94
94
Installing into a kitchen worksurface . . .
Installation dimensions . . . . . . . . . . . . . . .
Installation . . . . . . . . . . . . . . . . . . . . . . . . .
Removing the glass--ceramic hob . . . . .
Electrical connections . . . . . . . . . . . . . . .
98
99
99
100
100
Important Safety Information
Read the operating instructions carefully before
using the unit. Please pay particular attention to
the safety information, which is designated with
.
This will avoid damage, both to persons and the unit.
Keep the operating instructions in a safe place,
and hand them to the next user if necessary.
The unit must only be used in the household and for its
intended purpose. It conforms with international safety
regulations and quality standards. The safety features
incorporated do not always cover all the possible risks
of accident.
Electrical safety
This appliance must only be installed by a qualified electrician. For reasons of electrical safety,
built--in appliances must only be installed into the
standard, matching mounting cabinet or worktop.
Only use the hob when it has been fully installed. This
will prevent you from coming into contact with current-carrying parts.
Also follow the information given in the accompanying
Instructions for Use and for Installation
Damaged hobs with cracks or breakages in the glass
ceramic surface must not be connected to the mains.
For reasons of safety, repairs to the appliance, and in
particular to the current--carrying components, must
only be carried out by qualified electricians or trained
Customer Service technicians. Otherwise, considerable danger could result for the user. In case of malfunction, contact our Customer Service department directly.
If the glass--ceramic hob is to be used in the vicinity of
a radio, TV or other transmitting device, it must first be
clarified whether this could affect its operation.
The appliance is only disconnected from the mains
when the fuse is turned off or the mains connection is
interrupted.
Use and Operation
Prevent small children from touching the glass--ceramic top when in use. As a rule, they should be kept
away from both the hob and from pots and pans.
Children can also burn themselves by pulling pans or
pots off the hob.
The cooking zones heat up quickly when they are turned on. Only turn them on if you have placed a saucepan on the cooking area.
Exercise care when working with a hot hob, or hot pots
or pans. There is always a danger of being burned
The residual heat indicator integrated in the electronics tells you whether a cooking zone is still hot.
In case a pan/pot is left on the cooking zone the residual heat indicator can switch off tough is the cooking
zone still hot from the pan with hot contents.
In the event of a power failure, all settings and displays
will be lost. Be careful, because hot cooking zones will
no longer be indicated by the residual heat indicator.
If you use a socket close to the hob, take care that the
cable of the appliance does not touch the hot surface
of the hob.
Do not store any temperature--sensitive or inflammable materials (such as detergents, spray cans) in the
drawers or the cupboards underneath the built--in hob.
The cooking surface must not be used as a storage or
working area.
Attention! Never look directly into the light from the
halogen cooking zone.
Never leave the hob unattended when working with
oils and fats, due to the danger of fire.
Never use plastic or aluminium foil dishes on the hob.
They melt at high temperatures, and can damage the
glass--ceramic plate.
Neither sugar (solid or liquid) nor plastic should be allowed to come into contact with the hot surface of the
hob.
When the plate cools down, cracks or breakages could
occur in the glass--ceramic plate. If sugar or plastic
should accidentally come into contact with the hot hob,
the latter must not be switched off for any reason, but
the sugar or plastic remnants must be removed with a
scraper while still warm. Protect your hands from
burns.
To avoid scratching the surface of the glass--ceramic
hob, only use pots and pans with flat bases and without
rough edges.
The ceramic hob surface is resistant to extreme temperatures. Neither cold nor heat can harm it. Avoid
dropping anything on the hob. Point impacts, e.g. by
dropping a salt shaker, can cause fissures and cracks.
A defective hob surface could allow food which has
boiled over to penetrate through the hob, and contact
the electrical parts.
If any cracks appear on the hob surface, the hob must
be switched off immediately. Disconnect the appliance
from the mains and inform the service department.
147
Follow the Care and Cleaning instructions for the
glass--ceramic surface. We will accept no liability for
improper use.
After use, check that the appliance is switched off.
Cleaning
No heating element should be switched on while cleaning. Ensure that the cooking areas have cooled down
sufficiently (wait until the residual heat lamp goes out)
so that there is no danger of burning.
Disposal
Please dispose of packing material and any
old appliances according to the relevant regulations. Please observe national and regional regulations and the material designation (material separation, waste collection,
material disposal points).
Always keep the glass--ceramic surface clean.
For reasons of electrical safety, steam and high--pressure cleaning devices must not be used for cleaning
the hob.
STOP
Stop!
This symbol indicates a warning about serious danger of injury. It must always be observed.
Caution!
This symbol indicates information which, if not observed, could lead to danger to persons and/or significant
damage to material. This safety information must always be observed.
Note
This symbol indicates information with important details concerning use. Non--observance could lead to
faults.
148
The Built--in Ceramic Hob
Description of the hob
Cooking zone Glass--ceramic plate Frame
1
Rapid Cooking zone (double--ring)
hilight
Ø
210/120 mm 2200/750 W
2
Rapid Cooking zone
hilight
Ø
3
Rapid Cooking zone (double--ring)
hilight
Ø
170x265 mm 1500/2400 W
4
Rapid Cooking zone
halolight
Ø
5
Touch responsive controls
145 mm
145 mm
1200 W
1200 W
2
1
3
4
5
Touch Controls
1. Power--On--Taste (Steuerung AUS/EIN)
8. Timeranzeige
2. Kochfeld--Taste (EIN/AUS)
9. Verriegelungstaste
3. Anzeige Leistungsstufe bzw. Restwärme
10. Kontrollampe Zweikreis--Zuschaltung
4. Minus--Taste
11. Kontrollampe Timerfunktion
5. Plus--Taste
12. Kontrollampe Verriegelung (Steuerung)
6. Zweikreis--Taste (EIN/AUS)
13. Dezimalpunkt in der Leistungsstufenanzeige
Leuchtet:
Kochzone bedienbar
Leuchtet nicht:
Kochzone gesperrt
7. Timertaste
149
Before the first use
Cleaning for the first
time
The cooking surface should be cleaned before use to
remove any traces of the production process.
Wash the glass--ceramic surface and frame with hot
water and rinsing agent, and wipe dry.
Heating up for the first
time
To check the cooking zones, briefly switch each one
on.
The Cooking Zone
Ceramic cooking
surface
The cooking surface is made of ceramic glass. The
surface is pore--free and also insensitive to rapid changes in temperature. Pots can therefore be moved from
a hot to a cold zone.
When switching on the cooking zone there may be a
brief humming sound from the heaters. This is normal
and disappears when the cooking zone has warmed
up.
Keep all objects and materials which can melt
away from the cooking surface, e.g. plastics,
aluminium foil.
Take care when preparing food or drinks containing sugar. If anything of this nature accidentally comes into
contact with the ceramic surface, it must be scraped
off immediately while still hot and wiped away
cleanly to avoid damage to the surface.
Touch Controls
The hob is operated by the touch controls located at
the front, each of which has its own display.
150
Residual heat indicator
An “H” will light up in the power level indicator if the
temperature of the corresponding cooking zone surface above 60°C. When the cooking zone has been
switched off, the lamp remains on until temperature
falls below 60°C.
Pay attention when a pan/pot is left on the cooking zone that the residual heat indicator can
switch off though is the cooking zone still hot
from the pan with hot contents.
Operation
The touch controls must be pressed for at least
1 second to be activated, which will be indicated
by an acoustic signal.
Switching the
appliance on
3 13
1
1. Press the hob ON/OFF control (1) for at least 1 second.
A horizontal line appears in each power level indicator
(3), and the dot (13) flashes.
The next input must take place within the
next 10 seconds, otherwise the hob will
switch off again.
Switching on the
cooking zones
2
Having switched on the appliance with the hob ON/
OFF control (1), you can now switch on the various
cooking zones within the next 10 seconds.
1. Press the cooking zone control (2) for the required
cooking zone.
«0» lights up on the corresponding power level indicator. At the same time, dot (13) lights up to indicate which cooking zone is active.
2. Select a power level (1--9) using the decrease controls (5/4).
If you selct the power level using the increase
control, the boost facility will be activated (see
pages 66).
5
The increase/decrease controls (5/4) are
equipped with a repeat function. If one of the
keys is continually pressed, the power level will
be increased.
4
13
Only one cooking zone control (2) can be active at a time, that is, only one dot (13) can be
lit up.
151
Selecting the power level
Table
The figures in the following table are intended as a
guide only. The power level required for the cooking
process depends on the quality of the pot and on the
type and quantity of food being cooked.
In order to avoid the fat or juices from meat burning a
small amount of liquid may be added to frying pan/saucepan.
During frying the food should be turned frequently.
If large quantities of meat or fish are being cooked, e.g.
1kg these should be cooked in the oven.
Power level
Cooking process
Examples of use
0
Off
1
Keep warm
Keeping small quantities warm
2
Melting
Chocolate, butter
3--4
Heating
Pre--cooked food, sauces
Gentle simmer
Rice
Simmering
Stocks, cooking of stewes
Power Level
Cooking Process
Boiling
Potatoes, vegetables
Gentle frying
Saute vegetables, browning croutons, frying
7--8
Frying
Eggs, chops, vegetables
8
Frying
Pancakes, fritters, tender cuts of meat
Deep fat frying
Heating fat for deep fat frying, cooking chips, fish etc.
Heating Up
Large quantities of liquids, soups etc.
4
5--6
6--7
7
9
Switching off the
cooking zones
1. The desired cooking zone must be activated, i.e
dot of the corresponding cooking zone must be lit.
2. Using the decrease control (4), run the power level
down to «0».
The power level will be automatically switched off
after a delay of 3 seconds.
To switch off quickly:
1. The desired cooking zone must be activated, i.e
dot of the corresponding cooking zone must be lit.
2. By pressing the increase and decrease controls
(5/4) simultaneously, the cooking zone will be
quickly switched off.
152
5
4
A horizontal line appears in the display when the residual temperature does not exceed 60 °C.
“H“ appears in the display if the residual temperature
is above 60°C (see Residual Heat Indicator).
Try to switch off the cooking zone early, in order to make use of the residual heat.
or
Switching off the hob
The appliance can be switched off at any time using
the hob ON/OFF control (1).
1
Over-- cooking protection
If one or more touch controls are activated for
a period longer than 20 seconds (by a pan, cutlery, overflowing food, etc.) the hob switches
off completely.
Safety cut-- out
If, one or more cooking zones are not switched off, the
safety cut out will be automatically oparated after a set
time (see table below).
Heating stage
Heating time limitation
in hours
1/2
6
3--4
5
5
4
6--8
1.5
9
1.5
Once the safety cut out has been activated, a horizontal line appears in the display if the residual temperature is below 60°C, or «H» is shown if the residual temperature is above 60°C (see Residual Heat Indicator).
1
In order to unlock the safety cut out, switch off the appliance with the hob ON/OFF control (1), and then
switch on again.
153
Dual--ring cooking zone
The front--left and rear--right cooking zones have the
possibility of cooking with only the inner ring (Fig. 4) or
with the outer ring as well (Fig. 5), depending on the
cooking utensil used.
Fig.4
Selecting the dual-- ring
cooking zone
Fig.5
1. The desired dual--ring cooking zone (front--left or
rear--right) must be activated.
The dot of the corresponding cooking zone must
be lit up.
2. Selected the desired power level (1--9).
3. Switch on the second heating ring using the dual-ring key (6).
The control lamp (10) lights up, and the outer ring is
switched on.
Switching the dual-- ring
cooking zone off
1. The desired dual--ring cooking zone (front--left or
rear--right) must be activated.
The dot of the corresponding cooking zone must
be lit up.
2. Press the dual--ring key (6).
The control lamp (10) goes out, and the outer ring is
switched off.
154
2 10
6
Safety lock -- barring the appliance or
the cooking zones
Locking the appliance
9
With the locking control (9), you can completely bar the
use of the hob This function can be used as a child
safety lock.
If you do not switch off the Safety lock before
switching off the hob, the Safety lock will still be
active when you switch on the hob again.
No other control can be operated until you
switch off the Safety lock.
2
Locking (barring) the
individual cooking zones
If you are working with one or more cooking zones, you
can lock each individual cooking zone.
The corresponding cooking zone must be active. The
dot (13) is lit, and a power level is selected.
--
--
By pressing the respective cooking zone control
(2) again, the locking system is activated.
The dot (13) in the power level indicator goes out.
If the cooking zone control (2) is pressed again, the
dot appears, and the cooking zone can again be
used.
The locking system protects the following keys of the
locked cooking zone from unintentional operation:
Keys 4, 5, 6, 7.
3
13
The timer key (7) can be operated, however,
and can be set (see «The Timer Function as an
Egg--timer» chapter), but has no influence on
the barred cooking zone.
155
Boost facility
This facility provides an initial heat boost to the cooking
zone, before its resets to the lower power level selected. The length of the heat boost is dependent on the
power level selected as shown in the table below.
Selecting the boost
facility
1. Press the cooking zone control (2) of the required
cooking zone.
2. Using the increase control (5), select a power level between 1--8. You have 10 seconds in which
to select the correct power level.
After 5 seconds, «A» appears in the power level. The
boost facility has been activated.
The cooking zone will now heat up at power level 9,
and, after the defined time (see Table 1), will switch
down to the selected power level.
Example:
You select power level 6. After 5
seconds, the boost function switches on.
With this setting, the cooking zone will
heat up for 2.5 minutes at power level 9,
and will then switch down to power
level 6.
The automatic heat--up function will not be
activated if you:
=> select a power level using the Minus key (4)
=> select power level 9
Table 1
Power level
Automatic Heat--up function
time in minutes
1
1
2
3
3
4,8
4
6,5
5
8,5
6
2,5
7
3,5
8
4,5
9
------
156
2
Indicating the selected
power level
In order to have the current power level indicated in the
Power Level indicator, briefly press (0.5 secs) the corresponding Cooking zone control (2).
Changing the Power Level during the Boost facility
1. The cooking zone required must be activated.
The dot (13) must be lit in the respective cooking
zone, display.
2. Select another power level using the increase control (5).
13
If the power level is increased using the inrease control
(5), the time that has already expired will be taken into
consideration in the calculation of the new defined time/power level.
Example:
+
5
--
4
You have selected power level 1
(boost--1 minute), and wait 30 seconds.
If you then switch to power level 4
(boost--6.5 minutes), the heat--up time
will continue for 6 minutes (6.50 minus
0.50).
Changing the power level with the decrease
control (4) will switch off the automatic heat--up
function.
Take advantage of
the residual heat by
the Boost facility
For saving energy make use of the residual heat by
continuing cooking on a still hot cooking zone. This
means the time for the boost facility will become shorter depending on the temperature of the still hot cooking zone.
Switching off the Boost
facility
13
As soon as “A“ appears in the Power Level indicator:
1. The cooking zone required must be activated.
The dot (13) must be lit in the respective cooking
zone.
2. Press the decrease control (4).
157
The Timer Function
This function makes cooking easier for you. You don’t
have to remain close to the cooking zone throughout
the whole cooking process: the cooking zone will be
automatically switched off at the selected time.
When no cooking zone has been programmed, the timer function can be used as an «egg--timer» (see
«The Timer Function as an Egg--timer chapter»).
Switching the Timer
function on
1. The desired cooking zone must be activated.
The dot (13) must be lit in the respective cooking
zone.
2. Select a power level between 1--9.
3. Press the Timer key (7).
The timer display (8) now shows «00».
4. Using the increase/decrease controls (5/4), enter
the cooking time desired (01 to 99 minutes).
The Timer function starts automatically after a few seconds.
5
8
The control lamp (11) lights up at each cooking zone
that has been programmed with the timer.
To enter the cooking time more quickly, hold
down either the increase or decrease controls
(5/4) respectively.
Changing the set cooking time
11
7
4
The cooking time can be subsequently changed where
necessary:
1. The desired cooking zone must be activated
The dot (13) must be lit in the respective cooking
zone.
2. Press the Timer key (7).
3. Using the increase/decrease controls (5/4), select
a new cooking time.
To enter the cooking time more quickly, hold
down either the increase/decrease controls
(5/4) respectively.
Calling up the current
cooking time
--
To call up the programmed cooking time remaining
for the respective cooking zone, press the corresponding cooking zone key (2).
158
13
Switching the Timer
function off
When the programmed time
expires . . .
an acoustic signal sounds for 2 minutes, and, at the
same time
11
the control lamp (11) of the timed--out cooking zone
flashes (2 minutes).
--
To switch off the acoustic signal before the 2 minutes has expired, press any key.
The cooking zone is now switched off.
7
. . . or if you want to switch
the timer off early:
1. The desired cooking zone must be activated.
The dot (13) must be lit in the respective cooking
zone.
2. Press the Timer key (7).
3. Using the decrease control (4), run the time down
to «00».
13
The timer function is now switched off, although the
cooking zone remains activated until you switch it off
manually.
To switch off quickly:
1. The desired cooking zone must be activated.
The dot (13) must be lit in the respective cooking
zone.
2. By simultaneously pressing the increase and decrease controls (5/4), the cooking zone is switched
off.
The timer display remains, but is no longer activated.
159
The Timer Function as an Egg-- Timer
The Timer function can be used as an «egg timer», as
long as the timer is not already being used for a cooking zone.
Setting the egg timer
If the appliance is switched
off:
1
1. Press the Power On key (1).
2. Press the Timer key (7).
3. Enter the desired time using the increase--decrease controls (4/5).
If one or more cooking zones
are already in use:
1. Lock all cooking zones (see the «Locking (barring)
individual cooking zones» chapter).
No decimal points (13) should be lit up in any of the
power level indicators (3).
2. Press the Timer key (7).
3
13
3. Enter the desired time using the increase--decrease controls (4/5).
Switching the egg timer off
If the time has already expired...
«00» flashes for 10 seconds,
an acoustic signal sounds for 2 minutes.
--
To switch off the acoustic signal before the 2 minutes has expired, press any key.
...or if you want to switch the
timer off early:
1. Press the Timer key (7).
2. Using the decrease control (4), run the time down
to «00».
The timer function is now switched off.
To switch off quickly:
--
Simultaneously pressing the increase and decrease controls (5/4), the egg timer is switched off.
160
7
The right cooking utensils
Energy consumption
To save energy, you should . . .
--
use only cooking and frying utensils with smooth,
flat bottoms.
--
place pots and pans in position before switching on
the cooking zone.
--
Wherever possible, cover pots and pans with a lid.
--
switch off the cooking zone a few minutes before
the end of the cooking time, in order to make use
of the residual heat.
--
use the residual heat of the cooking zones for keeping food warm or for melting.
--
Position pots and pans centrally on the cooking zones.
Saucepans and frying
pans
Saucepans and frying pans should not be smaller than
the cooking zone, and preferably not more than
10--15 mm larger than the diameter of the cooking
zone.
Always use cooking and frying utensils with smooth,
flat bottoms.
The bottoms should always be clean and dry. Cook
with a lid in place.
Check that the bottoms of utensils are smooth and undamaged; bottoms with burrs and sharp edges will
scratch the ceramic glass surface.
Scratches can also be caused by grains of sand (e.g.
originating from the previous washing of vegetables),
drawn over the cooking surface with the pan, or by
burrs and the rims of pan bottoms.
To avoid scratching or damaging the ceramic cooking
surface, pots and pans should be moved on the plate
by lifting them, and not by sliding.
Utensils with aluminium and copper bottoms can leave
behind metallic discolorations which can only be removed with difficulty or sometimes not at all.
When cold, pan bases normally curve slightly inwards
by approx. 0.1 -- 0.5 mm (are concave). In no case
should they curve outwards (be convex).
Follow any guidelines provided by the saucepan manufacturer. Ensure they are recommended for use on
ceramic hobs.
Check that the appliance is switched off after
use.
161
Cleaning and care
Before cleaning, make sure the hob is cool and disconnected from the power supply.
Never use aggressive or abrasive agents,
such as oven sprays, stain or rust removers,
scouring powder, or sponges with an abrasive
effect.
Special cleaning agents such as Hob Brite and ceramic hob scrapers are available from department
stores, electrical specialist shops, and in drug and
grocery stores.
Cleaning after each use
·
Slight, non--burnt soiling can be wiped off with
a damp cloth.
·
Burnt soiling has to be removed with a scraper.
Afterwards wipe off the ceramic hob with a damp
cloth, and Hob Brite.
Stain removal
·
Light metallic stains (aluminium residues) can
be removed from the cooking zone with a ceramic
hob cleaning agent such as Hob Brite when cool.
·
Sugar solutions, food stuffs with a high sugar
content, plastics, or kitchen foil -- must be removed immediately with a scraper. If this type of
soilage is not removed immediately it can cause irreparable damage to the ceramic surface. When
the surface has cooled wipe over with a damp cloth
and Hob Brite.
·
Before using any detergent or cleaning agent on
the ceramic top, ensure they are recommended by
the manufacturer for use on ceramic hobs.
·
Do not apply any cleaning agents to hot cooking
zones. Ensure any residues are wiped off before
the cooking zones are used again.
Special problems
Special problems
.. if a chemical cleaner proves inadequate
Check whether the use of a scraper is more effective.
.. when darks stains occur
If the use of a scraper and a stainless steel cleaning agent proves
unsuccessful, your decor surface has most likely been abraded by using
unsuitable cleaning agents, or by pan bottoms with a scouring effect.
This will not impair the efficiency of your cooking surface.
.. when metallic discolourations appear on
the cooking zones
Pots and pans with unsuitable bottoms, or unsuitable cleaning agents have
been used. The discolourations can only be removed with considerable
effort, using a ceramic glass or stainless steel cleaning agent.
.. when the surface shows scratches or
impressions
These blemishes, caused by scraping or melted on objects, cannot be
removed. This will not impair the efficiency of your cooking surface.
We accept no liability for improper handling of the ceramic cooking surface!
162
What to do when . . .
First aid for faults
When a fault occurs, it is possible that this is the result of a small error, which you can remedy yourself using the
following notes.
Do not carry out any other work yourself, if the information below does not help your specific problem.
Repairs to the appliance must only be carried out by specialists. Improper repair work can result in considerable danger for the user. If you need repair work carried out, contact your specialist dealer, or our Customer
Service department.
What do I do when . . .
. . . a buzzing noise is heard when a zone is
heating up?
--
Check whether
This is not a fault.
It will stop as the heat increases.
. . . discolorations appears in the cooking zone?
--
. . . the displays all go out except for the ”H” for residual heat?
This is not a result of changes in the material, but is
burned--in remnants that have not been regularly removed. They will have no effect of the function or the
durability of the ceramic hob.
---
. . . the displays suddenly go out?
Check whether
. . . the cooking zones do not function?
Check whether
------
--
the appliance is switched on,
the control lamps are on in the operating field,
the respective cooking zone is switched on,
the cooking zone power level has been set to the
desired cooking--on level,
the fuses in the house installation (fusebox) have
tripped.
If the fuses repeatedly trip, call in an approved
electrician.
the safety cut--out of the cooking zones has been
tripped.
. . . the cooking zones cannot be switched on?
--
----
the operating field is locked,
a time period of more than 10 seconds has expired between the operation of the On/Off key and
switching on the desired cooking zone,
the touch surface is too large
(the finger should only be used lightly)
the touch switch has been partly covered by a
damp cloth or by a liquid.
the operating field has been touched too early following a mains failure (to clear the condition,
switch the fuse out and then in again).
the electricity supply has been temporarily disconnected, or has failed.
. . . after switching off, no «H» for residual heat is displayed ?
Check whether
--
The cooking zone has only been in operation for
a short time, and is therefore not hot enough.
If the cooking zone is hot, please call in an approved electrician, or call our Customer Service department.
. . . one of the cooking zones cannot be switched off
?
Check whether
Check whether
---
the On/Off key has been accidentally operated,
the touch switches are partly covered by a damp
cloth, liquid or something similar.
---
the touch keys are partly covered by a damp cloth
or a liquid.
the corresponding cooking zone key (2) is active,
i.e., the decimal point (13) is lit up.
If you call in Customer Service as a result of one of the
items listed above, or as a result of incorrect operation,
the visit of the Customer Service technician will not be
free of charge, even during the guarantee period.
163
If when switched on the control system can no
longer be operated for any reason or due to a
defect, the local main switch must be opened
or the relevant fuse unscrewed, and Customer
Service informed.
STOP
If any fissures or cracks appear on the hob’s
surface, the hob must be switched off immediately. Disconnect the appliance from the
mains and inform the service department.
Important!
The following details are necessary for the service department:
Type .........................................................................
Model ......................................................................
Product--no. .............................................................
You will find these details under «Technical data».
Technical Data
ZKT 662 LN
length:
572 mm
depth:
502 mm
height:
48 mm
Cut out dimensions: length:
560 mm
depth:
490 mm
Hob dimensions:
Voltage:
Total power:
230 V ~ 50 Hz
7.0 kW
We reserve the right to make technical changes.
164
Prod.Nr. 941 591 721
ZKT 662 LN
Typ: 55GAD47AO 230 V AC 50 Hz
Made in Germany Ser.Nr.: . . . . . . . . . . . .
7,0 kW
Modell
Unpacking and control
Please examine the appliance for any damage sustained during transportation!
If the appliance is damaged contact your retailer before the appliance is connected.
Packing material should be disposed of properly.
Please keep packaging away from children, and dispose of with due regard for the environment.
Installation Instructions
The appliance must only be installed by a qualified electrician.
During installation, and when carrying out service work, the appliance must be separated
from the electrical supply: Remove the fuse, or
switch off circuit breaker.
The general guidelines for the operation of
electrical appliances, the regulations of the responsible electricity--supply company, and the
information in the installation instructions must
be followed exactly.
STOP
Damaged hobs with cracks or breakages in
the glass--ceramic surface must not be connected to the electrical supply.
Installing into a kitchen
worksurface
The electrical safety of the appliance must be
ensured by a correct installation.
Protection against accidental contact with
electrical elements, and the electrical safety
according to the SEV/VDE regulations must
be ensured by the correct installation of the appliance in standardised, matching, mounting
cabinet. This also applies to the metallic lower
casing of the appliance. The latter must not be
freely accessible, even for installations away
from the wall.
Installation cabinets must be installed and secured so that they cannot tip over.
165
Installation dimensions
The opening in the cabinet must correspond to the
standard dimensions. The necessary information can
be found in the dimensional sketch.
·
The separation between the lower surface of the
hob and the parts of the furniture below it must be
at least 20 mm.
·
The lateral separation between the sides of the
hob and the cabinet must be at least 50 mm, and
must be at least 50 mm from the rear panel.
This appliance conforms to Type Y (IEC 335--2--6)
with regard to fire protection. Only appliances of
this type may be installed on one side of adjacent
cabinets or walls.
min. 50 mm
min. 50 mm min. 50 mm
20 mm
20 mm
Fig.1
Installation
1. Cut out the worktop according to the prescribed dimensions (Fig.1). (Saw exactly along the scribed
line.)
2. Fix according to Fig. 2
Position A must be used for screwing--on the catch
springs (Fig.1).
R5
Important: The screw must be driven into the worktop
as illustrated.
Avoid overtightening. Do not use electric or pneumatic
screwdrivers unless they have, adjustable slipping
clutches (set to 1--1.1 Nm).
3. Check the sealing for proper fit and full contact.
4. Place the ceramic hob in the cut--out.
Fig.2
Removing the glass-ceramic hob
8
1. Disconnect the appliance from the electrical supply.
2. Push the hob upwands from underreath.
1 Catch spring
2 Screws
3 Worktop
166
4 Frame
5 Sealing tape
6 Glass ceramic plate
Contrary to the Regulations for House Installations of
the SEV, par. 47330.1, the built--in appliance may be
installed in flammable material. Parts, side panels,
reinforcement rails etc., which protrude into the space
below the cooking zones must be made of inflammable
materials.
Limitation of this space: width 550 mm, height 20 mm
from the underside of the hob, depth 60 mm from behind for a worktop depth of 600 mm. Inflammable walls
and ceilings must be fitted with fire--resistant coatings
above the cooking surface, in accordance with the fire
brigade regulations for the respective area.
Electrical connections
Before connecting the appliance, check that the voltage quoted on the rating plate -- that is, the nominal
voltage of the appliance -- corresponds to the available
mains voltage. The rating plate can be found on the lower housing of the glass--ceramic hob.
The mains connection of the ceramic hob must take
place using the provided connection cable in accordance with the connection diagram (Fig. 3), and must
be carried out so that it is possible to disconnect all poles with a contact opening of at least 3 mm, e.g., using
an LS circuit breaker, earth--leakage circuit breaker, or
fuse.
If the mains connection cable has to be replaced,
a cable with Spare Parts No. 374 3700 00/1 must be
used.
Fig.3
Anschlussleitung Mulde Elektrischer Anschluss
conexión elèctrica
conexiòn artesa
câble de raccordement connexion électrique
• schwarz / negro / noir L1
‚ braun / marrón / brun L2
ƒ
230V~
„ blau / azul / bleu N
… grün--gelb / verde--amarillo
vert-- jaune
PE
Anschlussleitung Mulde Elektrischer Anschluss
conexión elèctrica
conexiòn artesa
câble de raccordement connexion électrique
•
‚
ƒ
„
…
schwarz / negro / noir
L1
braun / marrón / brun
blau / azul / bleu
230V~
N
grün-- gelb / verde-- amarillo
vert-- jaune
PE
Remove any protective films from the cooking surface.
After connecting the electrical supply, all cooking zones should be briefly switched on one
after the other at their maximum power, in order to test whether they are operational.
braun
schwarz
blau
grün/gelb
=
=
=
=
brown
black
blue
green/yellow
brun
noir
bleu
vert/jaune
=
=
=
=
brown
black
blue
green/yellow
marón
negro
azul
verde/amarillo
=
=
=
=
brown
black
blue
green/yellow
167
168