1
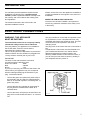
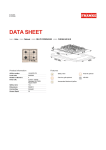
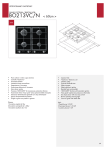
35668-4701
INSTRUCTION BOOKLET
GAS HOB
ZBG 509 SS
2
WARNINGS AND GUIDANCE
It is most important that this instruction book should be retained with the appliance for
future reference. Should the appliance be sold or transferred to another owner, or should
you move house and leave the appliance, always ensure that the book is left with the
appliance in order that the new owner can get to know the functions of the appliance and
the relevant warnings.
These warnings are provided in the interest of safety. You MUST read them carefully
before installing or using the appliance.
•
This appliance is designed to be operated by
adults. Children should not be allowed to tamper
with the controls or play with the product.
•
Any installation and electrical work must be
undertaken by a qualified electrician or competent
person
•
It is dangerous to alter the specifications or alter
the product in any way.
•
Do not use this appliance if it is in contact with
water. Do not operate the appliance with wet
hands.
•
A protective film has been placed over the control
panel of the hob to avoid damage during
transportation. This film must be removed
before using your hob. The protective film is
easily peeled off, but should a small amount of
glue remain on the control panel this can be
removed by rubbing gently with a soft cloth
dampened with white spirit.
•
Unstable or misshapen pans should not be used
on the hob as unstable pans can cause an
accident by tipping or spillage.
•
Never leave the hob unattended when working
with oil and fats because of the danger of fire.
•
Always ensure that the control knobs are in the
'OFF' position when not in use.
•
Never use plastic or aluminium foil dishes on the
hob surface.
•
Hobs became very hot with use and retain their
heat for a long period of time after use. You must
therefore take great care when using the
appliance. Children should be supervised at all
times and should not be allowed to touch the hot
surface or be in the vicinity when in use or until
the appliance has cooled after use. Children also
can injure themselves by pulling pans or pots off
the hob.
•
Always remove any spillage from the surface of
the hob immediately. Do not allow spills to dry and
harden.
•
If you use a saucepan which is smaller than the
heated area of the hob, the handle may become
hot. Please, ensure that you protect your hands
before touching the handle.
•
Certain food, plastic items and areosols can be
affected by heat and should NOT be stored above
or below the hob unit.
•
Under no circumstances should you attempt to
repair the appliance yourself. Repairs carried out
by inexperienced persons may cause injury or
more serious malfunctioning. Refer to your local
Zanussi Service Force Centre. Always insist on
genuine Zanussi spare parts.
•
The cooking zones heat up quickly when they are
turned on. Turn them on only when you have
placed a saucepan onto the cooking area.
•
If you use an electric socket close to the hob,
take care when using an electrical appliance that
the cable does not touch the hot surface of the
hob.
•
Do not leave items on the hob surface. Any item
you place on the hob could be damaged if the
hob is accidentaly turned on.
You safety is of paramount importance.
Therefore, if you are unsure about any of the
meanings of these WARNINGS, contact the
Customer Care Department:
Telephone: 01635 521313
3
CONTENTS
Specifications
Page
4
Installation
Page
5
Electrical Connections
Page
5
Use and Care
Page
6
Operation
Page
7
Maintenance and cleaning
Page
7
Servicing
Page
8
Peace of Mind for 24 Months
Page
9
SPECIFICATIONS
Height (overall):
74 mm. (see drawing)
Depth:
510 mm.
Width:
860 mm.
Automatic Taps Ignition Switches: YES
1 Rapid Burner (Central)
1 Auxiliary Burner (Front/Left)
3 Semirapid Burners (Rear/Left - Rear/Right Front/Right)
824
18
16,5
18
30
Gas Hob Burners:
12
DIMENSIONS
R
860
R = Rapid Burner
A = Auxiliary Burner
SR = Semirapid Burners
4
16,5
SR
A
FO 2006
477
510
SR
SR
74
INSTALLATION
It is mandatory that all operations required for the
installation are carried out by a Competent Gas
Installer (CORGI registered installers normally meet
this criteria), and in accordance with existing rules
and regulations.
The relevant instructions are to be found in the
separate installation manual.
Please, ensure that, once the appliance is installed, it
is easily accessible for the engineer in the event of a
breakdown.
WHEN THE HOB IS FIRST INSTALLED
Once the hob has been installed, it is important to
remove any protective materials, which were put on
in the factory.
ELECTRICAL CONNECTIONS
WARNING: THIS APPLIANCE
MUST BE EARTHED.
The manufacturer declines to accept any liability
should this safety measure not be observed.
If the plug fitted to your appliance is not suitable for
the socket outlet, it must be cut off and the
apprioriate plug must be fitted.
The cut off plug should be disposed of to prevent the
hazard of electric shocks, should it be plugged into a
13 Amp socket in another part of your home.
IMPORTANT
The wires in this mains lead are coloured in
accordance with the following code:
Green and Yellow
- Earth
Blue
- Neutral
Brown
- Live
If you fit you own plug, the colours of the wires in the
mains lead of your appliance may not correspond
with the markings identifying the terminals in your
plug. Proceed as follows:
-
connect the green and yellow wire (earth wire) to
the terminal in the plug which is marked with the
letter 'E' or the earth symbol or coloured green, or
green and yellow;
-
connect the blue wire (neutral) to the terminal in
the plug which is marked with the letter 'N' or
coloured black;
-
connect the brown wire (live) to the terminal in the
plug which is marked with the letter 'L' or coloured
red.
The plug moulded on to the lead incorporates a fuse.
For replacement, use a 3 Amp BS1362 fuse. Only
ASTA/BSI approved fuses should be used. The fuse
cover/carrier must be replaced in the event of
changing a fuse.
The plug must not be used if the fuse cover/carrier is
lost.
A replacement cover/carrier must be obtained from
your local Zanussi Service Force Centre whose
address and telephone number is listed in the
directory toward the back of this instruction book, or
you can find your local service centre by looking in
your telephone directory under 'Z'.
FO 0390
5
USE AND CARE
3
1
2
4
3
5
6
7
8
9
10
3
1. Hob Top
2. Auxiliary Burner
3. Semirapid Burners
4. Rapid Burner
5. Control knob for back left burner (semirapid)
6. Control knob for front left burner (auxiliary)
7. Control knob for central burner (rapid)
8. Ignition pushbutton
9. Control knob for back right burner (semirapid)
10. Control knob for front right burner (semirapid)
6
OPERATION
HOB BURNERS
To light a burner, turn the relevant knob
anticlockwise to maximum position and then
depress the ignition pushbutton marked by a
small electric spark symbol. Then adjust the
flame as required.
To ensure maximum burner efficiency, it is
strongly recommended that you use only
pots and pans with a bottom fitting the size
of the burner used, so that flame will not
spread beyond the bottom of the vessel. It is
also advisable, as soon as a liquid starts
boiling, to turn down the flame so that it will
barely keep the liquid simmering.
IMPORTANT
Be very careful when frying food in hot oil or
fat, as the overheated splashes could easily
ignite.
IMPORTANT
FO 0781
If the control knobs become difficult to turn,
please contact your local Zanussi Service
Centre.
MAINTENANCE AND CLEANING
Before any maintenance or cleaning can be
carried out, you must DISCONNECT the
appliance from the electricity supply.
Cleaning your Gas Hob
The hob is best cleaned whilst it is still
warm, as spillage can be removed more
easily if it is left to cool.
The pan supports and burner crowns can be
lifted off for cleaning. Use hot detergent
water and remove stubborn marks with a
mild paste cleaner. A well moistened soap
impregnated steel wool pad can be used
with caution, if the marks are particularly
diffucult to remove. The burner crown may
loose its matt sueface after several
cleanings but this will no way impair its
function.
After cleaning, be sure to wipe dry with a
soft cloth.
The pan supports are dishwasher proof. If
washing them by hand, take care when
drying as the enamelling process
occasionally leaves rough edges.
7
SERVICING
If you require service or spare parts, contact your
local Zanussi Service Force Centre. Please, carry out
the following checks before contacting your local
Zanussi Service Force Centre.
There is no spark when lighting the gas:
• Check that the unit is plugged in and the electrical
supply is switched on
• Check that the RCCB has not tripped (if fitted)
• Check the mains fuse has not blown
Customer Care
If you have a general enquiry concerning your
Zanussi appliance or for information on our full
appliance range, please contact our customer care
department by letter or telephone as follows:
Customer Care Department
Zanussi Limited
Zanussi House
Hambridge Road
Newbury
Berkshire
RG14 5EP
The gas ring burns unevenly:
• Check the burner cover has been replaced
correctly, e. g. after cleaning
• Check the main nozzle is not blocked and the
burner ring is clear of food particles
If after carrying out the above checks your appliance
is still faulty, contact your local Zanussi Service Force
Centre, whose address and telephone number can
be found in the accompanying customer care booklet,
and also in your local telephone directory under 'Z'.
Please, ensure you give the model and serial number
of the appliance.
In-guarantee customers should ensure that the
above checks have been made as the engineer
will make a charge if the fault is not a mechanical
or electrical breakdown. Please, note that proof of
purchase is required for any in-guarantee service
call.
8
Tel: 01635-521313
PEACE OF MIND FOR 24 MONTHS
Zanussi Standard Guarantee Conditions
This guarantee is in addition to your statutory
and other legal rights.
We, Zanussi Ltd, undertake that, if, within the 24
months of the date of the purchase, this
ZANUSSI appliance or any part thereof is
proved to be defective by any reason only of
faulty workmanship or materials, we will, at our
option, repair or replace the same FREE OF
ANY CHARGE for labour, materials or carriage
on condition that:
* The appliance has been correctly installed
and used only on the gas and electricity
supply stated on the rating plate.
* The appliance has been used for normal
domestic purpose only, and in accordance
with the manufacturer's operating and
maintenance instructions.
* The appliance has not been serviced,
maintained, repaired, taken apart or
tampered with by any person not authorised
by us.
* Damage or calls resulting from transportation,
improper use or neglect, the replacement of
any light bulbs or removable parts of glass or
plastic.
* Costs incurred for calls to put right machines
improperly installed or calls to machines
outside the UK and the Republic of Ireland.
* Appliances found to be in use within a
commercial or similar environment, plus
those which are the subject to rental
agreements.
* Products of Zanussi manufacture which are
NOT marketed by Zanussi Ltd.
EU Countries - The standard guarantee is
applicable but subject to owner's responsibility
and cost to ensure the appliance meets the
standards set by the country to which the
product is taken. The Zanussi Company in the
country concerned will be pleased to advise
further.
Sight of your purchase receipt will be
required by them.
* The appliance is still in the possession of the
original purchaser.
All service work under this guarantee must be
undertaken by a Zanussi Service Force Centre.
Home visits are made between 8.30am and
5.30pm Monday to Friday.
Visit may be available outside these hours in
which case a premium will be charged.
Any appliance or defective part replaced shall
become our property.
EXCLUSIONS
This guarantee does not cover:
9