1
Fgfgd
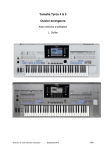
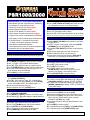
PSR1000/2000
¤¤¤¤¤¤¤¤¤¤¤¤ TOP FEATURES ¤¤¤¤¤¤¤¤¤¤¤¤
• Microphone input with Vocal Harmony (PSR2000)
• Lyric display for song disks with lyrics
• Custom lyric input for User Songs (New)
• Notation display (PSR2000) (New)
• Large Full Dot backlit LCD screen (New)
• “Music Finder” with 500 song selections (New)
• “Organ Flutes” with 8 virtual drawbars (PSR2000)
• High quality Voices including stereo samples (New)
• 3 Intros/Endings + 4 Variations/Fills per style
• “To Host” port for direct hookup to computer
• Pitch Bend and Modulation Wheels
• Groove/Dynamics function for Auto Accompaniment
• Interactive Help in 5 languages (New)
SYSTEM DATA RESET
|
(This will erase any custom settings.)
1) Power on while holding down key furthest to right (C).
PLAYING THE DEMOS
|
1) Press [DEMO] to play songs randomly.
2) Use [BACK] and [NEXT] to select a Demo category.
3) Use ‘1’ [^] and ‘2’ [^] to select different pages.
4) Use [A] – [J] to select an item on a page to demo.
5) Press [START/STOP] in SONG section to stop Demo.
6) From the FUNCTION page, press ‘8’ [v] ‘AUTO’ to
play all Demo items automatically.
7) Press [EXIT] to exit Demo Mode.
PLAYING THE VOICES
|
1) Press a category button in the VOICE section.
(Ex. [PIANO & HARPSI.])
2) Use [A] – [J] to select a Voice. (Ex. ‘GrandPiano’)
3) To layer two Voices, press [EXIT], turn ON [LAYER]
button, press [G] ‘LAYER’, and repeat steps 1 - 2.
4) Play the keys to hear the Voice(s).
5) When finished, turn OFF [LAYER] button.
VIRTUAL ORGAN DRAWBARS (PSR2000)
RTUAL
1) Press [ORGAN FLUTES] in the VOICE section.
2) Press [SOUND CREATOR].
3) Use [BACK] and [NEXT] to select ‘FOOTAGE’ page.
4) Use buttons [1] – [8] under display to adjust drawbars.
PLAYING THE STYLES
|
1) Press a button in STYLE section. (Ex.[POP & ROCK])
2) Use [A] – [J] to select a Style. (Ex. ‘60’sRock 1’)
3) Turn on the [ACMP] button (red LED illuminates).
4) Press [INTRO], then [SYNC START].
5) Play a chord in the left section of the keyboard.
6) Press [ENDING] to finish hearing the Style.
USING “ONE TOUCH” SETTINGS
|
1) Select a Style (see above).
2) The 4 [ONE TOUCH SETTING] buttons will now call
up 4 appropriate Voices for the selected Style.
MUSIC FINDER
|
1) Press [MUSIC FINDER].
2) Use ‘2’ [^] and [v] to select a Song.
3) A Style and Voice is automatically set up for the Song.
NOTE: Custom song titles & setups can also be stored.
VOCAL HARMONY (PSR2000)
|
1) Plug a 250 ohm dynamic mic into MIC./LINE IN jack.
2) Adjust (INPUT VOLUME) knob on back of unit, while
singing into mic.
3) In ‘MIC.’ section of front panel, make sure [VOCAL
HARMONY] is ON, and [TALK] is OFF.
4) Press [VH TYPE SELECT] to select Vocal Harmony
types.
5) Start a Style playing with a chord (see above).
6) While holding the chord, sing into the mic.
7) Adjust Style Volume by first pressing [BALANCE],
then using ‘2’ [^] and [v] to control the Volume.
PLAYING SONGS WITH LYRICS FROM DISK
|
1) Insert a Standard MIDI File (SMF) disk with Lyric data.
2) Press [A] ‘SONG’ button in MAIN screen.
3) Use [A] – [J] to select a Song.
4) Press [B] ‘Lyrics’ button.
5) In ‘SONG’ section of front panel, press
[START/STOP] to start the Song; the Lyrics will
appear in the display in time with the music.
6) Press [START/STOP] to stop the Song.
PART MUTING & VOLUME CONTROL
|
1) Play a Style or Song (see above).
2) To mute / un-mute Parts with buttons [1] – [8], press
[CHANNEL ON/OFF] to display ‘STYLE’ or ‘SONG’.
3) To adjust Part volumes with buttons [1] – [8], press
[MIXING CONSOLE] to display ‘STYLE’ or ‘SONG’ for
‘VOL/VOICE’ page.
SONG RECORDING (Quick Method)
|
In the ‘SONG’ section of the front panel:
1) Press and hold [REC], then press [TOP].
2) Release the buttons, then select a Style and Voice.
3) Press and hold [REC], then press the Track buttons
above it for the Tracks that are to be recorded.
EXAMPLE: [STYLE], [L], or [R].
4) Release the buttons, then play the keyboard to start
recording.
5) Press [REC] to stop recording.
6) To play the Song, press [TOP], then [START/STOP].
7) To stop the Song, press [START/STOP] again.
© 2002 Yamaha Corporation of America, 6600 Orangethorpe Ave., Buena Park CA 90620
02
QS
QSPSR1000/2000
PSR1000/2000/ /2-02
2-
PSR1000/2000 STEP BY STEP PROCEDURES
I. Copying Files from one Floppy Disk to Another Floppy Disk
II. Creating a User Style
III. Data will not Save Properly
IV. Editing Song Track Parameters such as Voice and Volume
V. Enabling an External MIDI Device to Control Keyboard Sections
VI. Factory Reset Procedure
VII. Loading Music Finder Files
VIII. Making Global Settings for Voices
IX. Making Songs Play Continuously
X. Recording and Saving a Song
XI. Recording to PSR1000/2000 Sequencer from External MIDI Source
XII. Saving and Loading Registrations
XIII. Saving User Voice Edits to Registration Memory
XIV. Some Settings are not Storing with the Registrations
XV. Storing Intro and Ending Settings
XVI. Transposing a Song
XVII. Using Lead/Harmony Balance in 'Vocal Harmony Control' on a
PSR2000
I. Copying Files from one Floppy Disk to Another Floppy Disk
IMPORTANT: Commercially available music data is subject to protection by
copyright laws. Copying commercially available data is strictly prohibited, except
for personal use. Some music software is purposely copy-protected and cannot
be copied.
To copy specific files from disk to disk, the files must first be copied from
the ‘source’ floppy disk to the 'USER' page, before it is possible to 'paste'
them to the ‘destination’ floppy disk:
1) Insert the 'source' floppy disk containing the file(s) to be copied. For this
example, the steps for copying Song files will be shown.
2) Press the [A] LCD button to select 'SONG'.
3) Press the [NEXT] button to select the ‘FLOPPY DISK’ page.
4) Press the '3'
LCD button to select 'COPY'. The 'COPY' display will appear.
5) Select the desired Song file(s) using the appropriate LCD button(s).
6) Press the '7'
LCD button to select 'OK'.
7) Press the [BACK] button to select the 'USER' page.
LCD button to execute the 'PASTE' command and paste the
8) Press the '4'
selected Song file(s) to the ‘USER’ page.
9) Eject the ‘source’ floppy disk.
10) Insert the ‘destination’ floppy disk, to which the Song file(s) will be copied.
11) Press the '3'
appear.
LCD button to select 'COPY'. The 'COPY' display will
12) Select the desired Song file(s) using the appropriate LCD button(s).
13) Press the '7'
LCD button to select 'OK'.
14) Press the [NEXT] button to display the 'FLOPPY DISK' page.
LCD button to execute the 'PASTE' command and copy the
15) Press the '4'
Song file(s) to the ‘destination’ floppy disk.
To duplicate entire disks, the ‘DISK TO DISK COPY’ feature may be used:
1) Insert the 'source' floppy disk containing the files to be copied.
2) Press the [FUNCTION] button.
3) Press the [I] ‘UTILITY’ button.
4) Use the [BACK] and [NEXT] buttons to select the ‘DISK’ page in the screen.
5) Press the [F] ‘DISK TO DISK COPY’ button.
6) Press the [G] ‘OK’ button.
7) When prompted on the screen, insert the destination disk.
8) Press the [G] ‘OK’ button. When the screen displays ‘Completed’, the process
is finished.
NOTE: If there is a large amount of data on the disk, the screen may display a
message asking for the source disk again, followed by a repeat of the procedures
in steps 5 – 7.
Owner's Manual, p. 43, 150
II. Creating a User Style
The following procedure describes how to create a User Style from scratch. This
is useful when the PSR1000/2000 does not have a built-in Style which fits the
style of music that the user wants to play. Creating a User Style from scratch is
also useful to create custom drum accompaniments.
A Style can be created completely from scratch by first selecting 'NEW STYLE'
from the 'BASIC' section of 'STYLE CREATOR', then recording to the 8 Auto
Accompaniment Channels (Tracks) for the Style.
NOTE: Yamaha Style Disks (Auto Accompaniments) are available for purchase
online at www.yamahamusicsoft.com. To order by phone, call Music Dispatch at
(800) 637-2852. Ask for the Hal Leonard Music Software Catalog.
Selecting a New Style:
1) Press the [DIGITAL RECORDING] button.
2) Press the [B] 'STYLE CREATOR' button.
3) Press the [C] 'NEW STYLE' button.
4) Press the [B] button and use the toggle buttons beneath the screen to select a
'TEMPO' and a 'BEAT' (meter) for the Style.
EXAMPLE: TEMPO '120' and BEAT '4/4'.
5) Press the [A] button and use the toggle buttons beneath the screen to select
an Auto Accompaniment 'SECTION' and 'PATTERN LENGTH' (amount of
measures) for the Style.
EXAMPLE: SECTION 'MAIN A' and PATTERN LENGTH '1'.
Copying Parts:
If desired, copy Parts from any existing Styles into the 8 different Channels
(Tracks) of the new Style. (If all Parts are to be recorded from scratch, this step
may be skipped.)
1) Press the [NEXT] button to display the 'ASSEMBLY' page in the screen.
2) The [A] - [D] and [F] - [I] buttons correspond to the 8 Parts that make up the
Style (RHYTHM1, RHYTHM2, BASS, CHORD1, CHORD2, PAD, PHRASE1,
and PHRASE2). To select a Part in an existing Style, press one of the [A] - [D]
or [F] - [I] buttons twice; the chosen Part may then be selected from any of the
existing Styles, using the [A] - [J] buttons.
EXAMPLE: The RHYTHM2 Part from the Style, '60'sGtrPop' may be used for the
RHYTHM2 Part in the New Style.
3) Press the [EXIT] button to return to the 'ASSEMBLY' page.
4) Repeat steps 2 - 3 for the remaining 7 Parts of the Style, if desired.
5) Press the [BACK] button to return to the 'BASIC' page.
Recording an original Part onto a Channel from scratch:
1) Press the [F] 'REC CH' button to display the 8 Record Channels in the screen.
2) Select a Channel for recording by simultaneously holding the [F] 'REC CH'
button, while pressing one of the 8 [v] toggle buttons below the screen.
EXAMPLE: The 'RHY2' Channel will display 'REC' in the screen, when selected.
3) Select a Voice or Drum Kit for the Channel by first pressing the [^] toggle
button below it, and then using the [A] - [J] and toggle buttons to make a
selection.
4) Press the [EXIT] button to return to the 'BASIC' screen.
5) Press the black [START/STOP] button in the 'STYLE' section of the front
panel. Recording begins and the Metronome click is heard.
6) Play the desired Part on the keyboard.
7) If a mistake is made while recording a Rhythm Part, hold the [E] 'RHY CLEAR'
button and touch the note corresponding to the Drum Voice which was played
incorrectly; the entire phrase recorded with that Drum Voice will be cleared.
8) When finished, press the black [START/STOP] button again.
9) Repeat steps 2 - 8 to record other Channels.
10) When finished recording all Channels, press the [EXIT] button once to return
to the original 'BASIC' screen view.
Saving the User Style:
1) Press the [I] 'SAVE' button to select a destination for storing the User Style.
2) Use the [BACK] and [NEXT] buttons to display the 'USER' or 'FLOPPY DISK'
page.
3) Press the '6' [v] toggle button to name the User Style.
4) Use the toggle buttons to select the characters for the User Style name.
5) When finished, press the '8' [^] 'OK' toggle button. The User Style is now
saved.
6) Press the [EXIT] button twice to return to the 'MAIN' screen.
Owner's Manual, p. 108-117
III. Data will not Save Properly
The Internal RAM Memory in the PSR1000/2000 is "volatile." Any user-stored
data in this memory location such as Songs, Styles, System Setup data, Music
Database information, etc. must be backed up to floppy disk, if the unit will be
unplugged from an AC outlet for more than a week. If the unit is left unplugged
for over a week, the data may be lost.
Another way that data may be lost, is if the storing procedure for System Setup
data is performed incorrectly; on the PSR1000/2000, if a user changes the
settings in a screen, they must remember to press the [EXIT] button afterward,
before turning OFF the power, or the data is lost.
Owner's Manual, p. 4, 39
IV. Editing Song Track Parameters such as Voice and Volume
Individual Song Track Parameters such as Voice, Volume, Pan, Tempo, etc. can
be changed by selecting the 'MIXING CONSOLE' function from the 'SET UP'
view in 'SONG CREATOR'.
Changing the Voice (for Example) on a Track:
1) Load the Song into the PSR1000/2000.
2) Press the [DIGITAL RECORDING] button.
3) Press the [A] 'SONG CREATOR' button.
4) Use the [BACK] and [NEXT] buttons to display the 'CHANNEL' page.
5) Use the [A] and [B] buttons to display the 'SET UP' view in the screen.
6) Press the [MIXING CONSOLE] button repeatedly to select Channels 1-8 or
Channels 9-16 at the bottom of the screen ('CH1~8' or 'CH9~16' will display at
the top of the screen).
7) Use the [BACK] and [NEXT] buttons to display the 'VOL/VOICE' page.
8) Press the [H] button to select the 'VOICE' section in the screen.
9) Use the [1] - [8] toggle buttons under the screen to select a Track.
10) Select a new Voice for the Track, using the buttons in the 'VOICE' section on
the front panel.
11) Press the [EXIT] button twice to return to the 'SET UP' view.
12) Press the [D] ‘EXECUTE’ button to put the edited parameters into the Song.
Saving the Edited Song:
1) Press the [I] 'SAVE' button.
2) Use the [BACK] and [NEXT] buttons to select the destination (‘USER’ or
‘FLOPPY DISK’).
3) Press the ‘6’ [v] 'SAVE' button.
4) Press the ‘8’ [^] 'OK' button.
5) Press the [F] 'YES' button to overwrite the old Song version with the new one.
Owner's Manual, p. 102-104
V. Enabling an External MIDI Device to Control Keyboard
Sections
The PSR1000/2000 can be configured so that the 'MAIN', 'LAYER' and 'LEFT'
Voice sections can be individually controlled by an external MIDI device. It can
also be configured so that an external MIDI device can control it the same way
it's own keyboard does (controlling whatever sections are active on the front
panel).
1) Press the [FUNCTION] button.
2) Press the [H] 'MIDI' button.
3) Use the [BACK] and [NEXT] buttons to select the 'PRESET' page in the 'MIDI'
screen.
4) Press the [A] 'All Parts' button..
5) Press the [NEXT] button.
6) Press the ‘8’ [^] 'EDIT' button.
7) Use the [BACK] and [NEXT] buttons to select the 'RECEIVE' page in the
'MIDI' screen.
8) Use the [A] '^' or [B] 'v' buttons to select the desired MIDI Channel (the
Channel being transmitted by the external MIDI device) in the screen.
9) Use the Data Dial to select a section to be triggered.
EXAMPLE: 'MAIN', 'LAYER', or 'LEFT'.
NOTE: To control the PSR1000/2000 the same way it's own keyboard does
(controlling whatever sections are active on the front panel), select 'KEYBOARD'.
10) To control ONLY the Auto Accompaniment section (independent of the
keyboard), do the following:
a) Use the [BACK] and [NEXT] buttons to select the 'CHORD DETECT'
page in the 'MIDI' screen.
b) Use the [A] '^', [B] 'v', and [1] - [8] toggle buttons to select 'ON' for the
desired MIDI Channel (the Channel being transmitted by the external
MIDI device) in the screen.
11) Press the [EXIT] button once.
12) Press the [NEXT] button to select the 'USER' page in the 'MIDI' screen.
13) Use the [A] - [J] buttons to select a destination to save the edited MIDI Setup
to.
14) Press the ‘6’ [v] 'SAVE' button.
15) Use the [1] - [8] toggle buttons to name the edited MIDI Setup.
16) Press the ‘8’ [^] 'OK' button to store it.
17) Press the [EXIT] button twice, to return to the 'MAIN' screen.
Owner's Manual, p.147
VI. Factory Reset Procedure
The standard Yamaha factory reset procedure for many PSR Series keyboards
will initialize the PSR1000/2000 System Setup Data, but not other data such as
the MIDI Setup, Music Finder, and User Files/Folders; to do this, further steps
are required (see below).
To Reset System Setup Only to Original Factory Settings:
1) Turn OFF the keyboard.
2) Press and hold down the rightmost white key (C) while turning ON the
keyboard.
3) Once the power is ON, release the key. The keyboard will reinitialize the
System Setup to the original factory settings.
To Reset All or Selected Settings to Original Factory Settings:
WARNING: All user-stored data (Registrations, User Styles, Multipads, User
Voices, User Songs, MIDI settings) will be deleted. If the current settings and
data are not expendable, create a backup before executing the Factory Reset.
This can be done by performing a ''Bulk Dump'' to an external MIDI storage
device or by saving the user-stored data to a floppy disk via the internal disk
drive of the keyboard.
1) Press the [FUNCTION] button.
2) Press the [I] 'UTILITY' button.
3) Use the [BACK] and [NEXT] buttons to display the 'SYSTEM RESET' page in
the screen.
4) Use the [A] - [E] buttons to select the desired data to be reset.
5) Press the ‘1’ [^] 'FACTORY RESET EXECUTE' button.
6) Press the [G] 'YES' button to confirm.
7) Press the [G] 'YES' button again to execute the reset.
Owner's Manual, p. 151
VII. Loading Music Finder Files into a PSR1000/2000
Custom MUSIC FINDER files can be loaded into a PSR1000/2000, to replace the
file containing the original factory selections.
1) If the file is on a floppy disk, insert the floppy disk.
2) Press the [FUNCTION] button.
3) Press the [I] 'UTILITY' button.
4) Use the [BACK] and [NEXT] buttons to display the 'SYSTEM RESET' page.
5) Press the [I] 'MUSIC FINDER' button.
6) Select the new MUSIC FINDER file.
7) Press the [G] Replace button to replace the original MUSIC FINDER records.
8) Press the [MUSIC FINDER] button to display the new selections.
Owner's Manual, p. 69-72
VIII. Making Global Settings for Voices
If Voice settings such as Effects, EQ and Harmony are changed for a Voice,
these settings normally will reset to something else when a different Voice is
chosen. However settings can be made to affect all Voices globally, by editing
the 'VOICE SET' page.
For this example, all Effects will be turned OFF globally for all Voices:
1) Press the [FUNCTION] button.
2) Press the [E] 'REGIST. SEQUENCE / FREEZE / VOICE SET' button.
3) Use the [BACK] and [NEXT] buttons to display the 'VOICE SET' page in the
screen.
4) Use the [A] '^' and [B] 'v' buttons to select a Voice section ('MAIN', 'LAYER', or
'LEFT').
5) Use the '5' [^] and [v] toggle buttons to delete the checkmark from the box
under the word 'EFFECT'.
6) Press the [EXIT] button twice to return to the 'MAIN' screen.
7) If the [DSP] button on the right side of the front panel is ON (red LED
illuminated), press it once to turn it OFF. All Voices in the selected Voice
section will no longer have Effects applied to them.
Owner's Manual, p. 143
IX. Making Songs Play Continuously
In the 'SONG SETTING' screen, the 'Song Chain Play' function can be turned
ON, to automatically play Songs consecutively and continuously.
1) Press and hold the [DIRECT ACCESS] button, then press the [REPEAT]
button.
2) Press the [I] button to select SONG CHAIN PLAY 'ON' in the screen.
Owner's Manual, p. 137
X. Recording and Saving a Song
The PSR1000/2000 can record Songs with up to 16 separate Channels (tracks),
each Channel using a different Voice. There are two different methods for
recording; 'Quick Recording' for recording a Song in one or two takes, and 'Multi
Recording' for recording multiple Channels by as little as one Channel at a time.
Quick Recording
In the ‘SONG’ section of the front panel:
1) Press and hold [REC], then press [TOP] to create a new Song.
2) Release the buttons, then select a Style and Voice.
3) Press and hold [REC], then press the Track buttons above it for the Tracks
(Channels) which are to be recorded.
EXAMPLE: [STYLE], [L], or [R].
4) Release the buttons, then play the keyboard to start recording.
5) Press [REC] to stop recording.
6) To play the Song, press [TOP], then [START/STOP].
7) To stop the Song, press [START/STOP] again.
Multi Recording
In the ‘SONG’ section of the front panel:
1) Press and hold [REC], then press [TOP] to create a new Song.
2) Select a desired Voice or Style to be recorded.
3) To select a Channel for recording, simultaneously hold the [REC] button while
pressing the '1' - '8' [^] or [v] toggle button which corresponds to the desired
Channel in the screen. The selected Channel will display 'REC' in the screen.
4) Select a Part that the Channel will be recording from:
EXAMPLE: The ‘MAIN’ Voice section of the keyboard for Channel 1.
a) Press and hold [REC], then press one of the ‘1’ – ‘8’ [^] or [v] toggle
buttons for the desired Channel.
b) Use the [C] ‘^’ and [D] ‘v’ buttons to select a Part.
5) To record multiple Channels/Parts simultaneously, repeat steps 2 – 4.
6) To start recording, begin playing the keyboard, or press the silver
[START/STOP] button in the ‘SONG’ section of the front panel.
NOTE: When recording Auto Accompaniment Parts from a Style, it is a good idea
to turn ON the [INTRO] button and [SYNC. START] button first (red LED
illuminates on both), and then play the chords for the Style to trigger the
recording. This way the Song will have a more professional sounding
introduction.
7) To stop recording, press the [REC] button. If recording a Style, the
[ENDING/rit.] button can also be used for a professional sounding ending.
8) Play back the recording:
a) Press the [TOP] button.
b) Press the silver [START/STOP] button to start the Song.
c) Press the silver [START/STOP] button again to stop the Song.
9) To record additional Parts, repeat steps 2 – 8.
Saving the Song:
Once a Song has been recorded, it can be saved to the ‘USER’ memory, or to
the ‘FLOPPY DISK’ memory.
1) Press the [A] ‘SONG’ button.
2) Use the [BACK] and [NEXT] buttons to select the 'USER' memory page or the
'FLOPPY DISK' memory page.
3) Press the '6' [v] 'SAVE' button.
4) Use the '1' - '8' [^] and [v] toggle buttons to name the Song.
5) Press the '8' [^] 'OK' button to save the Song to the memory location chosen
in step 2.
Owner's Manual, p. 92-95
XI. Recording to PSR1000/2000 Sequencer from External MIDI
Source
The on-board sequencer of the PSR1000/2000 can be used to record MIDI data
from external sources, such as MIDI bass pedals, keyboards and hardware or
computer-based sequencers. This is done by assigning the desired MIDI Receive
Channels to 'Keyboard' mode.
1) Press the [FUNCTION] button.
2) Press the [H] ‘MIDI’ button.
3) Use the [BACK] and [NEXT] buttons to display the ‘PRESET’ page in the
screen.
4) Press the [A] ‘All Parts’ button.
5) Press the [8^] ‘EDIT’ button.
6) Use the [BACK] and [NEXT] buttons to display the ‘RECEIVE’ page in the
screen.
7) Use the [A] and [B] buttons to select a desired MIDI Channel.
8) Use the ’2’ [^] and ‘2’ [v] buttons to select 'KEYBOARD' for that Channel.
Any MIDI Channels with 'KEYBOARD' selected will receive incoming MIDI data
from an external source, which can be recorded onto a corresponding Track in
the PSR1000/2000 'Song Creator’.
Owner's Manual, p. 147
XII. Saving and Loading Registrations
Registration settings are saved in Banks of 8 to either the internal 'USER'
memory, or the 'FLOPPY DISK' drive. For further organization, ‘Folders’ can be
created and named, then multiple Registration Bank ‘Files’ can be organized
within each Folder. This hierarchical method is similar to that used in Microsoft
Windows; Folders and Files may be moved around using the familiar CUT /
COPY / PASTE / DELETE functions.
Saving Registrations:
1) To save a single front panel setting (Registration) to one of the 8
'REGISTRATION MEMORY' buttons, press and hold the [MEMORY] button,
then press the desired 'REGISTRATION MEMORY' button [1] - [8].
WARNING: These settings are saved into a temporary memory buffer and will be
lost when the unit is turned OFF, unless the following steps are performed.
2) Release the buttons.
3) Repeat steps 1 - 2 for subsequent Registrations (up to 8 total).
4) Press the [EXIT] button twice, to return to the Main screen.
5) Press the [J] 'REGISTRATION BANK' button.
6) Use the [BACK] and [NEXT] buttons to select a permanent memory location
('USER' memory or 'FLOPPY DISK' drive) to store the Registrations into.
7) Registration Banks can be grouped into Folders:
a) If it is desired to organize Registration Banks by first grouping them into
Folders, press the [7 v] 'NEW' button under the Folder icon in the
screen.
1] Use the [1] - [8] toggle buttons under the screen to name the
Folder.
2] Press the [8 ^] 'OK' button to store the Folder into the chosen
memory location.
b) If grouping Registration Banks into Folders is not desired, proceed to
Step 8.
8) Press the [6 v] 'SAVE' button under the screen. This creates a Registration
Bank ‘File’ containing the current 8 Registrations that are stored to the 8
‘REGISTRATION MEMORY’ buttons.
9) Use the [1] - [8] toggle buttons under the screen to name the Registration
Bank ‘File’.
10) Press the [8 ^] 'OK' button to save the Registration Bank ‘File’ into the
chosen memory location.
11) To name the 8 individual Registrations contained in the Registration Bank
‘File’, do the following:
a) Press the [8 ^] 'EDIT' button.
b) Press the [1 v] 'NAME' button.
c) Use the [A] - [D] and [F] - [I] buttons to select the desired Registration.
d) Press the [7 v] 'OK' button.
e) Use the [1] - [8] toggle buttons under the screen to name the
Registration.
f) Press the [8 ^] 'OK' button to store the name.
g) Press the [8 v] button to return to the 'REGISTRATION BANK' screen.
h) Press the [EXIT] button repeatedly to return to the 'MAIN' screen.
Loading Registrations:
NOTE: The ‘REGISTRATION MEMORY’ button settings are cleared whenever
the unit is turned OFF. To load Registrations back in after the unit has been
turned ON (or to select a different Registration Bank), the following procedure
must be performed.
1) Press the [J] 'REGISTRATION BANK' button.
2) Use the [BACK] and [NEXT] buttons to select a memory location ('USER'
or 'FLOPPY DISK') containing the desired Registration Bank ‘File’.
3) Select the desired Registration Bank ‘File’:
a) If Folders were first created, use the [A] - [J] buttons to select the
desired Folder, then the desired Registration Bank ‘File’.
b) If Folders were not created, use the [A] - [J] buttons to directly select
the desired Registration Bank ‘File’.
4) Press the [G] 'YES' button to confirm the choice.
5) The 8 'REGISTRATION MEMORY' buttons will now call up the Registrations
in the selected Bank.
Owner's Manual, p. 84-86
XIII. Saving User Voice Edits to Registration Memory
Unlike previous PSR models, the PSR1000/2000 actually stores the edited
parameter data used to create a User Voice, if that User Voice is stored to one of
the 'REGISTRATION MEMORY' buttons. This is a very useful feature, because if
the user deletes or overwrites the User Voice later on, the 'REGISTRATION
MEMORY' button that it was originally stored to will still call up the sound of the
User Voice; it accomplishes this by applying the edited Voice parameters to the
original Preset Voice that was edited. On previous models, if a User Voice was
deleted that was originally stored to a Registration, it would be gone when the
Registration tried to call it up. This feature also allows the user to delete User
Voices in order to free up more memory, without 'losing them' in the Registration
settings.
NOTE: Because the 'REGISTRATION MEMORY' buttons apply the edited
parameters of the User Voice to the original Preset Voice, the screen will actually
display the original Preset Voice name when a 'REGISTRATION MEMORY'
button using a User Voice is selected (even if the name was edited for the User
Voice). However, when the User Voice is selected directly from the [USER]
'VOICE' button, the screen will display the actual edited name of the User Voice.
XIV. Some Settings are not Storing with the Registrations
Settings that are saved with a Registration can be 'filtered' by the user via the
'REGISTRATION MEMORY CONTENTS' screen. If something is not saving with
a Registration, it is possible that that type of setting has not been selected to be
saved with the Registration Memory. The user should also check the Parameter
Chart on p. 25-30 in the PSR1000/2000 Data List booklet to verify that the
desired settings can be saved with a Registration.
Selecting Settings to be Saved with a Registration:
1) Press the [MEMORY] button to display the 'REGISTRATION MEMORY
CONTENTS' screen.
2) Using the '5' [^] and [v] toggle buttons, select a desired Group of settings.
3) Using the '8' [^] and [v] toggle buttons, put a check mark next to the selected
Group to be saved.
4) Repeat steps 2 - 3 for other desired setting Groups.
5) If something is still not storing with a Registration, check the Parameter Chart
on p. 25-30 in the PSR1000/2000 Data List booklet to make sure that it is a
setting which can be saved with a Registration.
Owner's Manual, p. 84
Data List, p. 25-30
XV. Storing Intro and Ending Settings
Each Preset Style on the PSR1000/2000 has a specific Intro and Ending length
and type. The choices available for the Intro are 'CountIn', '4bar1', or '4bar2'. The
choices available for the Ending are 'Fill&Hit', '2bar', or '4bar'. These variations of
Intro and Ending may be changed temporarily from the front panel, or stored
permanently to User memory or Floppy Disk as a 'User Style'.
NOTE: The Intro and Ending settings are not stored as a Registration parameter,
and therefore cannot be stored to the 'REGISTRATION MEMORY' buttons; they
must be stored with a Style.
Changing Intro and Ending Settings Temporarily:
1) Select a desired Style.
2) From the 'MAIN' screen, press the [E] 'INTRO ENDING' button.
3) Use the [D] button to select the Intro setting.
4) Use the [E] button to select the Ending setting.
5) Press the [EXIT] button to return to the 'MAIN' screen.
Changing Intro and Ending Settings Permanently:
1) Make the desired Intro and Ending settings (see steps above).
2) Press the [DIGITAL RECORDING] button.
3) Press the [B] 'STYLE CREATOR' button.
4) Use the [BACK] and [NEXT] buttons to display the 'ASSEMBLY' page.
5) Press the [J] 'SAVE' button.
6) Use the [BACK] and [NEXT] buttons to select the 'USER' memory page or the
'FLOPPY DISK' page.
7) Press the '7' [v] 'SAVE' button.
8) Use the '1' - '8' [^] and [v] toggle buttons to name the edited Style.
9) Press the '8' [^] 'OK' button to save the Style to the memory location chosen in
step 6.
Owner's Manual, p. 66, 112-113
XVI. Transposing a Song
The 'TRANSPOSE' [-] and [+] buttons on the front panel of the PSR1000/2000
are for transposing the pitch that the keyboard plays.
To "temporarily" transpose the key of a Song, use the 'TUNE' section of the
'MIXING CONSOLE' screen.
To "permanently" transpose the key of a Song (and re-save it), use the
‘CHANNEL TRANSPOSE' feature on the 'CHANNEL' page of the 'SONG
CREATOR' .
Transposing the Pitch of the Keyboard:
1) Use the 'TRANSPOSE' [-] and [+] buttons on the front panel to
transpose the pitch of the keyboard up or down in half-step increments.
Transposing a Song (Temporarily):
1) Select a Song.
2) Press the [MIXING CONSOLE] button to the left of the screen.
3) Use the [BACK] and [NEXT] buttons to select 'TUNE' at the top of the screen.
4) Use the '2' [^] or [v] toggle buttons under 'SONG' in the screen to transpose
the Song up or down in half-step increments.
Transposing a Song (Permanently):
1) Select a Song.
2) Press the [DIGITAL RECORDING] button to the left of the screen.
3) Press the [A] 'SONG CREATOR' button.
4) Use the [BACK] and [NEXT] buttons to select the 'CHANNEL' page in the
screen.
5) Use the [A] and [B] buttons to select 'CHANNEL TRANSPOSE'.
6) Use the toggle buttons below the screen to select the desired transposition
amounts for each Track of the Song.
7) When finished, press the [D] 'EXECUTE' button.
8) When finished, press the [I] 'SAVE' button.
9) Use the [BACK] and [NEXT] buttons to select a permanent memory area
('USER' memory or 'FLOPPY DISK') to store the transposed Song into.
10) Use the [A] - [J] buttons to select a location in the chosen memory area.
11) Press the ‘6’ [v] 'SAVE' button under the screen.
12) Use the [1] - [8] toggle buttons under the screen to name the Song.
13) Press the '8' [^] 'OK' button to save the Song into the chosen memory
location.
Owner's Manual, p. 104
XVII. Using Lead/Harmony Balance in 'Vocal Harmony Control'
on a PSR2000
The Vocal Harmony processor uses two parts for Vocal Harmony effects on the
PSR2000. One part is used to produce the Harmony 1 and Harmony 2 sounds;
the other part is used for the original 'Lead' sound, as well as the 'Gender
change' sound. The 'VOCAL HARMONY CONTROL' section of the
'MICROPHONE SETTING' screen displays a control for balancing between the
Lead ('L') and Harmony ('H') sounds. For effects using harmonization and no
Gender change, this control provides an easy way to mix the Lead level with the
Harmony level, including the ability to hear only the Lead sound or only the
Harmony sound.
However, this control is not as useful on effects which use the Gender change
effect. This is because the Lead sound and Gender change sound are both
coming from the same part of the processor. They will both be heard, therefore,
when the Balance is panned all the way over to the Lead 'L' sound (not just the
Lead sound).
For example, the effect, 'Speedy Mouse' creates a high-pitched, cartoon-like
voice along with the user's original voice. 'Speedy Mouse' uses Gender change
to accomplish this, so panning the Balance control fully to 'L' on the left does not
give the user the Lead sound only; it simply gets rid of the Harmony 1 and
Harmony 2 sounds. To eliminate the Lead sound and get the 'cartoon-like voice'
only, the effect must be edited.
To Hear Effect Only (no Lead) in 'Speedy Mouse' (Example):
1) Press the [VH TYPE SELECT] button.
2) Select the Vocal Harmony Type, 'SpdyMouse'.
3) Press the '8' [^] 'EDIT' toggle button to display the 'VOCAL HARMONY EDIT'
page in the screen.
4) Make the following changes:
HARM GENDER TYPE: AUTO
LEAD GENDER TYPE: OFF
LEAD GENDER DEPTH: -64
UPPER GNDR DEPTH: +63
LOWER GNDR DEPTH: +63
Saving the Edited Effect:
1) Press the [I] 'SAVE' button.
2) Rename the effect, if desired.
3) Press the '8' [^] 'OK' button.
Balance Setting:
1) Press the [MIC. SETTING] button.
2) Press the [J] button to select 'VOCAL HARMONY CONTROL'.
3) Use the '4' [v] toggle button to select 'L<H63' for the Balance ('Bal.') section.
Owner's Manual, p. 130-132