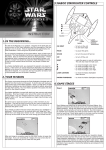
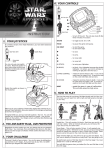
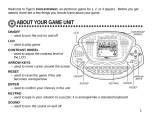
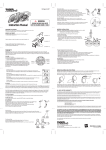
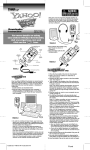
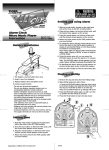
1
Ages 8 & up
INSERT THE BATTERIES
Using a Philips® or standard screwdriver,
loosen the screw on the battery compartment
door on the bottom of the camera and
remove the door.
Insert four (4) AAA batteries, making sure to
align the “+” and “-” signs as indicated inside
the battery compartment.
FOR
Item No. 59118
Item No. 59119
Item No. 59120
INSTRUCTIONS
You’ll have lots of fun with your Yahoo!® Digital Camera, but before you get
started, there are a few things you should know.
This package should include:
1 – Yahoo!® Digital Camera
1 – Camera strap
1 – Computer cable
1 – two-piece monitor stand
1 – Software CD ROM
2 – Instruction manuals (1 - camera, 1 - software)
Minimum system requirements:
Pentium™-class processor
Microsoft® Windows® 95 or 98
32MB RAM
16-bit (or higher) color display
225MB free hard disk space
CD-ROM drive
Mouse
4 AAA
batteries
Replace the battery compartment door and screw.
CAUTION: DOWNLOAD YOUR PHOTOS BEFORE OPENING THE BATTERY
COMPARTMENT! CAMERA MEMORY WILL BE LOST IF POWER IS
INTERRUPTED.
TO ENSURE PROPER FUNCTION :
• Do not mix old and new batteries
• Do not mix alkaline, standard or rechargeable batteries
• Battery installation should be done by an adult
• Non-rechargeable batteries are not to be recharged
• Rechargeable batteries are to be removed from the toy before being charged (If removable)
• Rechargeable batteries are only to be charged under adult supervision (If removable)
• Only batteries of the same or equivalent type as recommended are to be used
• Batteries are to be inserted with the correct polarity
• Exhausted batteries are to be removed from the toy
• The supply terminals are not to be short circuited
NOW YOU’RE READY!
Each camera mode and function will be discussed separately.
COLOR CAM
Your basic color digital camera
ABOUT YOUR CAMERA
Slide the MODE SWITCH to the ON/STANDBY position and press the SHUTTER
BUTTON. You will hear two quick beeps and the LED will light. This lets you
know that the camera is ready to take pictures.
VIEWFINDER
Frame your subject through the VIEWFINDER and press the SHUTTER BUTTON.
If there was enough light, you will hear a high-pitched beep.
If there wasn’t enough light, you will hear a low-pitched beep. To adjust
for this, slide the NIGHT SHOT switch to the ON position and take your
photo again.
LED
NIGHT SHOT
FRONT
BACK
IR FLASH
VIEWFINDER – frame your subject
LED – shows you that the camera is ready
NIGHT SHOT – turns the NITE CAM feature on and off
IR FLASH – lets you take pictures in the dark
If you do not press the SHUTTER BUTTON for one (1) minute, the camera will
automatically go into STANDBY mode to conserve battery power. You will hear
three (3) quick beeps from high- to low-pitched to let you know.
When you are ready to take a picture, press the SHUTTER BUTTON once to
“wake” the camera, then again to take the picture.
NOTE: You must “wake” your camera whenever it goes into STANDBY mode
before you can take a photo.
TO DOWNLOAD YOUR PHOTOS:
Plug one end of the computer cable into the PC PORT on the bottom of the
camera and connect the other end to a 9-pin serial port on your computer.
TOP
MODE SWITCH
SELF-TIMER
SHUTTER BUTTON
BOTTOM
PC PORT
LEG
STAND SOCKET
MODE SWITCH – choose which “CAM” mode you want to use
SELF-TIMER – set the timer and get in the picture
SHUTTER BUTTON – take a picture
PC PORT – attach to PC for downloading
LEG – stand your camera anywhere
STAND SOCKET – attach the monitor stand
ATTACH THE STRAP
Feed the thin part of the strap under the
silver bar on the side of the camera.
Download your photos using the included PhotoImpression™ 2000 software
(see separate manual)
NOTE: If you have performance problems, please close other software
applications.
NITE CAM
Take pictures in low- or no-light settings.
When your camera is in the ON/STANDBY mode, slide the NIGHT SHOT switch
to the ON position. This will activate the infrared flash. Unlike a regular camera,
you will NOT see a flash when you take picture in this mode.
HEY! No RED-EYE!
TO DOWNLOAD YOUR PHOTOS:
Plug one end of the computer cable into the PC PORT on the bottom of the
camera and connect the other end to a 9-pin serial port on your computer.
Feed the woven part of the
strap all the way through the
thin loop and pull to tighten.
Download your photos using the included PhotoImpression™ 2000 software
(see separate manual)
SELF-TIMER
Get in the picture with your friends!
Flip down the leg on the bottom of the
camera and stand the camera on a shelf,
counter or other surface.
Look through the VIEWFINDER
to make sure your friend is framed properly.
Press the SELF-TIMER button. The LED will start to flash.
Press the SHUTTER BUTTON. The camera will beep with each flash of the
LED. You have 10 seconds to get next to your friend before the picture is taken.
You will know the picture has been taken when you hear one long beep and the
LED stops flashing.
If you don’t press the SHUTTER BUTTON, the camera will revert to normal
camera mode in 10 seconds.
SPY CAM
Your own security camera!
Create online photo albums for the pictures you have taken. You can create
many albums and create a special name for each album.
Add photos to your albums with the simple to use photo uploader. Choose from
photos you have taken yourself, photos your friends have sent to you online, or
photos from other places on the Web. You can create a name for each photo
that appears in your album.
Share the fun times. You can invite your friends and family to see your photo
albums. For each album, you choose who has access. You can also keep an
album private so that only you can view it.
Slide the MODE SWITCH to the ALARM position. Press the SHUTTER BUTTON.
The LED will NOT be lit. To turn off SPY CAM feature, press SHUTTER BUTTON.
Send photos to anyone that has an email address. With a few clicks, you can
send an email that points to your favorite photos or send photos you have taken
as online greeting cards.
Slide the NIGHT SHOT switch to the ON position.
Go to Yahoo!® Photos to get started.
Flip down the leg on the bottom of the camera and stand the camera on your
dresser, bookshelf, desk, or wherever you want it stand guard. (You can also
use the monitor stand for this function.)
TO GO TO YAHOO!® PHOTOS using PhotoImpression
Enter PhotoImpression
Click on Get Photos
Click on Yahoo!® Photos
Click on Yahoo!® Photos
Sign up to get started
The motion sensor in the camera will activate the shutter when it senses motion.
The LED will remain dark and the shutter indicator (beep) will remain silent in
this function so your “culprits” won’t know they have been caught.
When the camera buffer is full or when the battery is low, the camera will
automatically – and silently – go into STANDBY mode to conserve battery power.
NOTE: It is advisable to empty the camera buffer before you use the SPY CAM
mode. If the camera buffer is full, the camera will revert to the ON/STANDBY
mode. The LED will blink rather than turn off. If this happens, clear the camera
buffer and try again.
TO DOWNLOAD YOUR PHOTOS:
Plug one end of the computer cable into the PC PORT on the bottom of the
camera and connect the other end to a 9-pin serial port on your computer.
Download your photos using the included PhotoImpression™ 2000 software
(see separate manual)
NET CAM
Talk to your friends online!
NOTE: Pre-arrange a video meeting time with your friends. You will need to
use Microsoft® NetMeeting software. (You should already have this with your
Windows® software. If not, it can be downloaded from the Microsoft® web site.)
For information on how to use Microsoft® NetMeeting, go to the Microsoft® web
site at www.microsoft.com.
THE PHOTO BUFFER
Your camera can take and store 20 color photos. If the photo buffer is full and
you try to take another picture you will here three beeps (high, low, high). You
will need to clear your photo buffer before you can take another photo.
It is recommended that you download and clear your photo buffer before creating
videos. If there are already photos stored in your camera, there will not be
enough memory available for a 10-second video.
You can clear the photo buffer in two ways.
1. Download your photos to your computer. Then, click on the “Clear Pictures”
button in the Yahoo!® Camera Window.
2. Slide the MODE SWITCH to the ALARM position. Press the SELF-TIMER
and the SHUTTER BUTTON simultaneously for three (3) seconds. This will
clear the photo buffer in the camera.
NOTE: THIS WILL CLEAR THE MEMORY EVEN IF YOU HAVE NOT
DOWNLOADED YOUR PHOTOS. IF YOU CLEAR MEMORY WITHOUT
DOWNLOADING, YOUR PHOTOS WILL BE LOST.
CAUTION: To avoid scratching the lens, use only a soft cloth to clean.
90-DAY LIMITED WARRANTY
Tiger Electronics, Ltd. (Tiger) warrants to the original consumer purchaser of this product that the
product will be free from defects in materials or workmanship for 90 days from the date of original
purchase. This warranty does not cover damages resulting from accident, negligence, improper service
or use or other causes not arising out of defects in materials or workmanship.
Plug one end of the computer cable into the PC PORT on the bottom of the
camera and connect the other end to a 9-pin serial port on your computer.
During this 90-day warranty period, the product will either be repaired or replaced (at Tiger’s option)
without charge to the purchaser, when returned with proof of the date of purchase to either the dealer
or to Tiger.
Insert the “ball” portion of the monitor stand into the base.
Next, screw the stand into the bottom of the camera.
Product returned to Tiger without proof of the date of purchase or after the 90-day warranty period
has expired, but prior to one year from the original date of purchase, will be repaired or replaced (at
Tiger’s option) for a service fee of U.S.$41.00. Payments must be by check or money order payable
to Tiger Electronics, Ltd.
The foregoing states the purchaser’s sole and exclusive remedy for any breach of warranty
with respect to the product.
All product returned must be shipped prepaid and insured for loss or damage to:
Tiger Repair Department
1000 N. Butterfield Road, Unit 1023
Vernon Hills, IL 60061, U.S.A.
The product should be carefully packed in the original box or other packing materials sufficient to
avoid damage during shipment. Include a complete written description of the defect, a check if product
is beyond the 90-day warranty period, and your printed name, address and telephone number.
Slide the MODE SWITCH to the VIDEO position.
Run the VideoImpression™ software (see separate manual)
Set the camera and stand on top of your monitor and pivot the camera so that
you are in the frame.
THIS WARRANTY IS IN LIEU OF ALL OTHER WARRANTIES AND NO OTHER REPRESENTATIONS
OR CLAIMS OF ANY NATURE SHALL BE BINDING ON OR OBLIGATE TIGER IN ANY WAY. ANY
IMPLIED WARRANTIES APPLICABLE TO THIS PRODUCT, INCLUDING WARRANTIES OF
MERCHANTABILITY AND FITNESS FOR A PARTICULAR PURPOSE, ARE LIMITED TO THE NINETY
(90) DAY PERIOD DESCRIBED ABOVE. IN NO EVENT WILL TIGER BE LIABLE FOR ANY SPECIAL,
INCIDENTAL, OR CONSEQUENTIAL DAMAGES RESULTING FROM POSSESSION, USE, OR
MALFUNCTION OF THIS TIGER PRODUCT.
VIDEO CAM
Create your own 10-second video!
Some states do not allow limitations as to how long an implied warranty lasts and/or exclusions or
limitations of incidental or consequential damages, so the above limitations and/or exclusions of liability
may not apply to you. This warranty gives you specific rights, and you may also have other rights which
vary from state to state.
Slide the mode switch to the VIDEO position.
For more information about Tiger Electronics, our products and special promotions,
please visit our web site at: www.tigertoys.com
NOTE: IF THERE ARE PHOTOS STORED IN YOUR CAMERA, YOU WILL
HAVE LESS MEMORY AVAILABLE, AND YOUR VIDEO WILL BE SHORTER
THAN 10 SECONDS.
Hold the SHUTTER BUTTON to shoot your video.
Plug one end of the computer cable into the PC PORT on the bottom of the
camera and connect the other end to a 9-pin serial port on your computer.
Run the VideoImpression™ software (see separate manual)
Run the AVI Creator software and
save the file. (see separate manual)
Yahoo!® Photos photos.yahoo.com
Yahoo!® Photos makes sharing your photos fun! Create your own online photo
albums and easily share your photos with family and friends.
Go to Yahoo!® Photos (photos.yahoo.com)
®,TM, & © 2000 Tiger Electronics, Ltd. All rights reserved.
980 Woodlands Parkway, Vernon Hills, Illinois 60061, U.S.A.
www.tigertoys.com.
® 2000 Yahoo! Inc. All rights reserved.
PRINTED IN CHINA
031460001IWTI-02