1
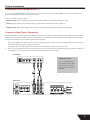
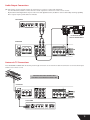
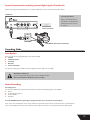
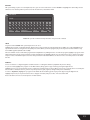
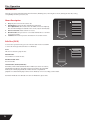
DVDRX160 USER MANUAL Safetyy Instructions DANGER SYMBOL The lightning flash with arrowhead symbol within an equilateral triangle is intended to alert the user to the presence of dangerous voltage in the unit. WARNING SYMBOL The exclamation point within an equilateral triangle is intended to alert the user to the presence of important operation and maintenance (servicing) instructions in the manual accompanying the unit. This symbol indicates there is a dangerous voltage within the HDD+DVD RECORDER, which may have sufficient magnitude to constitute a risk of electric shock if not handled correctly. To avoid the risk of electric shock, do not open the housing at any time. This product incorporates copyright protection technology that is protected by method claims of certain U. S. Patents and other rights owners. Use of this copyright protection technology must be authorised by Macrovision Corporation, and is intended for home and other limited viewing uses only unless otherwise authorised by Macrovision corporation. Reverse engineering or disassembly is prohibited. WARNING To prevent fire or electric shock, do not expose the unit to rain or moisture. Never attempt to open the cabinet, dangerous high voltages are presented in the unit. Refer servicing to qualified service personnel when necessary. MAINTENANCE NOTICE ■ Do not put the unit: near strong magnetic field, somewhere exposed to direct sunlight or near heat radiation equipment (such as a heater), at top of other heat radiation objects, in a place with bad ventilation and much dirt, somewhere subject to vibration and instability, somewhere exposed to moisture or rain. The unit shall be installed in a smooth and dry place with good ventilation. ■ When the unit is moved from a cold place to a warm one, the laser head might collect condensation and the unit might not work normally. In this case, keep the power on for an hour or two (with no disc loaded) before playing normally. ■ Clean the surface of the unit with some neutral detergent. Do not use organic solvents such as alcohol or gasoline. Never polish the unit with sand paper. ■ If the unit is not to be used for a long time, disconnect the power plug from the wall outlet. Note: Do not pull the power cord when you disconnect the unit from the wall outlet. ■ For optimum performance, do not place heavy objects on the unit. CAUTION ■ The unit uses a laser system. To prevent direct exposure to the laser radiation, do not attempt to open the cabinet. Visible laser may radiate when the cabinet is opened or the interlocks are defeated. ■ Do not stare into laser beams. ■ Keep this manual properly for future reference. If the unit requires servicing, please contact the seller or our service centre. ■ No naked flame sources, such as lighted candles, should be placed on the apparatus. ■ Attention should be drawn to environmental aspect of battery disposal. 1 1. READ THIS MANUAL After unpacking this product read the manual carefully and follow all the operating instructions. 2. POWER SOURCES This product should be operated only from the type of power source indicated on the unit. If you are not sure of the type of power supply to your home, consult your product dealer or local power company. 3. GROUNDING OR POLARIZATION If this product is equipped with a polarized alternating current line plug (a plug having one blade wider than the other), it will fit into the outlet only one way. This is a safety feature. If you are unable to insert the plug fully into the outlet, try reversing the plug. If the plug should still fail to fit, contact your electrician to replace your obsolete outlet. Do not defeat the safety purpose of the polarized plug. ¡ If this product is equipped with a threewire grounding type plug, it will only fit into a grounding type power outlet. This is a safety feature. If you are Unable to insert the plug into the outlet, contact your electrician to replace your obsolete outlet. Do not defeat the safety purpose of the grounding type plug. 4. VENTILATION Slots and openings in the cabinet are provided for ventilation and to ensure operation of the product and to protect it from overheating. Do not block or cover these openings. 2 5. HEAT Position the unit away from heat sources such as radiators, heat registers, stoves, or other products (including amplifiers) that produce heat. 6. WATER AND MOISTURE Do not use this product near water such as near a bathtub, wash bowl, kitchen sink, or laundry tub, in a wet basement, near a swimming pool or the like. 7. CLEANING Unplug this product from the A/C outlet before cleaning. Use a damp cloth to clean the unit. Do not use liquid or aerosol cleaners. 8. POWER CORD PROTECTION Power supply cords should be routed so that they are not likely to be walked on or pinched by items placed upon or against them. Pay particular attention to cords at plugs, convenience receptacles, and the point where they exit from the product. 9. OVERLOADING Do not overload wall outlets or extension cords as this can result in a risk of fire or electric shock. 10. LIGHTNING Unplug the unit from the wall outlet during storms to prevent damage from lightning and power surges. 11. OBJECTS AND LIQUIDS Never push objects into this product as that could result in a fire or electric shock. Never spill liquids on the product. 12 .ATTACHMENTS Do not use attachments not recommended by the product manufacturer as they may cause hazards. 13. ACCESSORIES Do not place this product on an unstable platform. The product may fall, causing serious injury or serious damage to the product. 14. DISC TRAY Keep your fingers clear of the disc tray as it is closing. Neglecting to may cause serious personal injury. 15. BURDEN Do not place heavy objects on the product. The object may fall causing serious personal injury and serious damage to the product. 16. DISCS Do not use a cracked, deformed or repaired disc. These discs are easily broken and may cause serious personal injury and product malfunction. 18. SERVICING Do not attempt to service this product yourself as this may expose you to dangerous voltage or other hazards. Refer all servicing to qualified service personnel. 19. REPLACEMENT PARTS Be sure the service technician has used authorized replacement parts. Unauthorized substitutions may result in fire, electric shock, or other hazards. 20. SAFETY CHECK Upon completion of any service or repairs, ask the service technician to perform safety checks to determine that the product is in proper operating condition. 21. BATTERY USAGE Battery leakage may result in bodily injury or damage to the unit. In order to avoid battery problems, please follow These instructions. • Install all batteries correctly, with + and - aligned as marked on the unit. • Do not mix batteries (old/new, carbon/ alkaline, etc.) • Remove batteries when the unit is not used for a long time. 17. DAMAGE REQUIRING SERVICE Unplug the unit from the A/C outlet and refer servicing to qualified service personnel under the following conditions: a. When the power cord or plug is damaged. b. If liquid has been spilled into or objects have fallen into the product. c. If the product has been exposed to rain or water. d. If the product does not operate normally. e. If the product has been dropped or damaged in any way. f. When the product exhibits a distinct change in performance. 3 CONTENTS SAFETY INSTRUCTIONS BASIC INFORMATION 1 6 FEATURES OF THE RECORDER TERMS 6 6 IDENTIFICATION OF CONTROLS REMOTE CONTROL REMOTE CONTROL INSTRUCTIONS SYSTEM CONNECTION CONNECTING THE VIDEO OUTPUT TO YOUR TV COMPOSITE VIDEO TYPICAL CONNECTION SVIDEO CONNECTION COMPONENT VIDEO CONNECTION AUDIO OUTPUT CONNECTIONS ANTENNA & TV CONNECTIONS SYSTEM CONNECTION FOR RECORDING EXTERNAL SIGNALS REAR PANEL SIGNAL INPUT FRONT AV INPUTS VIDEO IN, SVIDEO IN SYSTEM CONNECTION FOR RECORDING EXTERNAL DIGITAL SIGNALS FRONT PANEL RECORDING MODE INTRODUCTION MANUAL RECORDING SELECTING TUNER CHANNEL RECORDING TO DVD OR HDD RECORDING QUALITY ONE TOUCH RECORDING OTR DV DIGITAL VIDEO RECORDING FILE MANAGER R HDDTODVD RECORDING TIMER RECORDING CHAPTER EDITING CHAPTER EDITING MODE MENU DESCRIPTION EXIT THE CHAPTER EDITING HDD EDITING HDD EDIT 8 9 10 11 11 11 12 12 13 13 14 14 15 15 15 15 16 16 16 16 17 17 17 18 20 20 20 20 21 21 DISC OPERATION 24 INTRODUCTION MENU DESCRIPTION EDIT DISC DVD 24 24 24 TITLE EDITING ENTER THE TITLE EDITING MODE 4 25 25 DVD PLAY MODE ENTER THE PLAY MODE MENU DESCRIPTION DISPLAY OSD USB PLAYBACK HDD PLAY MODE 25 25 25 26 28 28 HDD PLAYBACK TIME SHIFT 28 29 SYSTEM SET UP 32 OPERATION INTERFACE AND GENERAL STEPS AUTO CHAPTER MARKER RECORD QUALITY APS AUTO PROGRAM SCAN MODIFY CHANNEL PROGRAM TABLE SET UP MENU VIDEO TV TYPE SET UP MENU AUDIO SET UP MENU LANGUAGE SETUP MENU DATE/TIME SETUP MENU PREFERENCES 32 32 33 33 33 34 35 35 36 37 38 39 BASIC INFORMATION 41 SETUP MENU TIME SHIFT 41 APPENDIX (TROUBLESHOOTING GUIDE) DISC TYPES SUPPORTED RECORDING VIDEO PERFORMANCE AUDIO PERFORMANCE OUTPUT CONNECTIONS INPUT CONNECTIONS PHYSICAL SPECIFICATIONS ATTACHMENT SUPPORTED MEDIA DVD±R SUPPORTED MEDIA DVD±RW 42 43 43 43 43 43 43 43 43 44 44 44 5 Basic Information Features of the Recorder The machine is capable of processing and recording various video signals into high quality DVD disc and HDD, such as the input signals of TV, ordinary disc player and DV. In addition, the machine can be used as a DVD player of excellent performance. It has all the functions of an ordinary DVD player. MULTIPLE SIGNAL INPUT MULTIPLE SIGNAL OUTPUT 1. 2. 3. 4. 5. 6. 1. 2. 3. 4. 5. Composite Video Input S-Video Input Analog Audio Input TV Tuner Input DV Input USB Input Composite Video Output S-Video Output Component Video Output 5.1ch Output Optical/ Coaxial Output MULTIPLE DVD RECORDING QUALITY The machine provides users with 6 recording qualities. The resolution and recording time will vary according to different recording quality and you can decide to make a high quality recording or lower quality with a longer recording time. MULTIPLE RECORDING MODES The machine permits 3 modes of recording such as normal manual recording, timer recording and OTR (One Touch Recording). SIMPLE MENU OPERATION The machine employs a user friendly-friendly menu operation. Most of operations use only several key presses. SUITABLE FOR THE FOLLOWING DISCS The DVDRX160 supports the following discs and file types: DVD, DVD±R/RW, VCD, SVCD, CD-DA, Mixed CD-DA, MPEG4, DIVX, MP3, JPEG multi-format discs. Recording: Single Layer DVD±R and DVD±RW discs. Terms HDD HARD DRIVE DISC & DVD DIGITAL VERSATILE DISC HDD and DVD disc are highly compact devices for storage. Video information is stored in MPEG-II format. Storage capacity on your DVDRX160 is 160GB. DVD±RW DISC DVD±RW disc is also called DVD Rewritable disc. It can be recorded to and rewritten about 1000 times. DVD±R DISC DVD±R disc is also called write-once DVD disc, it can be recorded to only once. The recorded disc can be played on other DVD players only after being finalised, then it can not be recorded to again. ERASING THE DISC Erasing the disc means removing information stored on the DVD or hard disc. COMPATIBILITY FINALISE Compatibility (Finalise) means to process the disc so as to make it compatible with other DVD players. Without this process, the disc can only be played on this machine. This function is relevant to DVD R or DVD-RW discs. 6 RECORDING QUALITY For DVD R/RW disc with the capacity of 4.7GB and HDD disc with capacity of 160GB, there are 6 different recording qualities available to the user with lower qualities allowing for longer recording times. The recording modes available are: 4.7GB DVD 160GB HDD QUALITY SLP (Super Long Play): 6HRS 180HRS LOW EP (Extended Play): 4HRS 120HRS MODERATE LP (Long Play): 3HRS 90HRS NORMAL SP+ (Standard Play Plus): 2½HRS 75HRS GOOD SP 2HRS 60HRS VERY GOOD 1HR 30HRS BEST (Standard Play): HQ (High Quality): TITLE Each different recording is called a “Title.” Titles are assigned a number for easy access and identification. CHAPTERS Each title can contain one or more “Chapters.” And each chapter is numbered so that it can be found easily. TRACKS Music on an audio disc is split up into “Tracks.” Tracks are also numbered for ease of use. MULTIPLE ANGLES FUNCTION Some DVD’s allow certain scenes to be viewed from different angles. This function is available only if it is featured on the DVD you are watching. MULTIPLE LANGUAGES FUNCTION Some DVD’s are recorded in several different languages. The different languages can be accessed by selecting the language menu. SUBTITLE FUNCTION Some DVDs contain subtitles in different languages. By pressing the SUBTITLE key on your remote while watching your DVD, you may cycle through the different subtitles. PROGRESSIVE AND INTERLACED Interlaced picture mode displays only half of the resolution of progressive mode at once. Making progressive scan a better option for compatible televisions. Make sure your television supports Progressive Scan before selecting this option. 7 Identification of Controls Front Panel 1 9 2 10 11 12 12 1. 2. 3. 4. 5. 6. 7. 8. 2 1. 2. 3. 4. 5. 6. 8 14 STANDBY DISC TRAY OPEN/ CLOSE PLAY/ PAUSE DVD HDD/DUB REC SOURCE 1 Rear Panel 13 3 4 5 6 15 9. DV IN 1394 MINI FIREWIRE 10. SVIDEO INPUT 11. COMPOSITE VIDEO INPUT 12. STEREO AUDIO INPUTS 13. USB INPUT 14. DISPLAY 15. IR RECEIVER 3 5 4 6 RF IN RF OUT STEREO AUDIO INPUTS VIDEO INPUT COMPOSITE VIDEO OUTPUT COAXIAL DIGITAL AUDIO OUTPUT 7 7 8 9 7. 5.1CH AUDIO OUTPUT FL, FR, SL, SR, CEN, SW 8. COMPONENT/ PROGRESSIVE SCAN VIDEO OUTPUT 9. SVIDEO OUTPUT 10. OPTICAL DIGITAL AUDIO OUTPUT 7 8 Remote Control 1. 2. STANDBY - Turn the unit on or set the unit to Standby mode. DVD - Press to view or play optical disc content. While in DVD playback, pressing DVD will bring up the DVD menu. 3. HDD/DUB - Press to view HDD title list or the dubbing menu. 4. FILE/USB - Press to enter File Manager 5. DV-Press to select DV IN as input source. 6. TIMER - Access the timer menu for scheduled recording setup. 7. FUNCTION 8 / 9. FWD/REV - Scan in fast reverse or forward on DVD or CD. 10. NUMBER KEYS - Enter numeric values while setting options. 11. SELECT - Select option in menus. Play a disc, chapter or track with some discs. For other discs, press PLAY key. 12. SETUP - Access the on-screen setup Menu for settings adjustment. 13. EDIT - Access the edit menu for DVD + R/RW editing options. 14. OSD - Bring up the on-screen display showing information for the playback session. 15. CH(-/+) - Adjust Channels. 16. VOL(-/+) - Press to turn the volume -/+. 17. ANGLE - Select between multiple angles with DVD discs that support this feature. 18. MUTE - Temporarily cancel audio playback. 19. ZOOM - Press to magnify the screen with DVD JPG or other disc. 20. AUDIO - Select an audio track on DVD disc or other discs. 21. OPEN / CLOSE - Open /Close the disc tray. 22. TV / REC MODE – Switch to TV mode, change between Timeshift and Manual recording modes. 23. SOURCE - Press to select through audio/video input sources. 24. QUALITY- Select the recording quality mode: HQ, SP, SP+, LP, EP, SLP. 25. REC - Press to begin a live recording. 26. PLAY/PAUSE- playback a disc, chapter or track. Press again during playback to pause. Playback or Pause the disc. 27. STOP - Press once to stop playback and hold the last position in memory. Playback can be resumed where it was left off by pressing PLAY. Press twice to clear the last playback position. 28/29. PREV/NEXT - Advance to the next track or play previous track on DVD or other disc. 30. GOTO - To Select your desired time, chapter of the disc to play. 31. ADD/CLEAR - Use to delete characters when entering words, further more, you can use it to program your playback order. 32. MENU - Access DVD or other disc’s menu, and can turn PBC function ON/OFF when playing VCD/SVCD. 33. (UP/DOWN/RIGHT/LEFT)- Use direction keys to highlight the item you desired. 34. RETURN - Resume playback for DVD discs or other discs. 35. SLOW/SORT - During playback, press to scan in slow forward. If in Title list .Press to sort the HDD titles. The Sort can be based on ascending or descending record time, or the sort can be based on title name. The switch cycles through these options. 36. STEP - Step by step playback. 37. SUB-T - Select an available Subtitle. 38. TITLE - Access the title screen on DVD discs, displaying a graphical representation of the recordings and providing easy Navigation. 39. REPEAT - Select to repeat chapter, Title or Disc. 40. A-B RPT - Set the beginning and end points of a section to repeat. 41. PSCAN - Select the video out format for progressive scan mode or Interlace Scan. 42. PAL/NTSC - Set the video system to PAL, NTSC or multi system. 1 2 3 4 5 6 7 8 9 21 22 23 24 25 26 27 28 29 10 30 31 11 12 32 33 13 34 14 15 16 35 36 37 38 39 40 41 42 17 18 19 20 9 Remote Control Instructions Notes: ■ Do not drop the remote controller or leave it in places of high humidity. ■ Do not leave the Infrared receiver exposed to direct sun light or bright light. ■ Do not use new and old batteries together. Try not to use rechargeable batteries. 30º REMOTE CONTROL Your remote control will operate from a 30º angle. However you will always get the best result when you direct the remote to the IR sensor located on the unit. 10 30º System y Connection Connecting the video output to your TV In order to use the DVD Recorder, you’ll need to make a video connection to your TV. The capabilities of your TV and the cables you have on hand will determine the connections you can use. There are 3 possible connection types: - Composite Video: The most widely used connection. This unit includes an A/V cable for Composite Video. - S-Video: A higher quality connection that requires a special S-Video cable and an S-Video capable TV. - Component Video: The highest quality video connection. Supported on high-end TVs and requires a special cable. Composite Video (Typical Connection) This unit ships with a composite video (A/V) cable for connection to TV with a standard video input as shown below . This is the most widely used type of connection. On most TV’s, this connector is coloured yellow, and is normally accompanied by stereo audio inputs, coloured red and white for stereo channels right and left respectively. 1. 2. First, use the supplied A/V cable to connect to the composite video input on your TV, this is normally a yellow coloured connector that matches the video output on the back of this unit. If you wish to hear sound through the TV, connect the red and white stereo audio connections as well. Turn on the TV and DVD recorder and select the AV mode on your television. This is usually done by pressing ‘TV/AV’ or ‘Mode’ on your television remote. Consult your TV manual for further instructions on how to do so. TELEVISION COMPOSITE VIDEO Connect the Yellow Video Lead and the Red and White Audio Leads to the back of your TV, using the supplied AV Cable. DVDRX160 11 S-Video Connection This is a higher quality connection than standard composite video, and requires a special S-Video cable (not included). The S-Video connector is distinguishable by its 4 pins, as shown below. If your TV has an S-Video input jack, it’s recommended that you use this type of connection for better picture quality. SVIDEO CONNECTION 1. Use a S-Video Cable, connecting the S-Video output from your DVDRX160 to the corresponding input on your TV 2. Turn on the unit and select ‘DVD Mode’ 3. On your TV select the S-Video Input. This is normally done by pressing ‘TV/AV’ or ‘MODE’ on the remote. Consult your TV manual for further instructions on how to do so. TELEVISION S DVDRX160 Component Video Connection The highest quality connection, Component video, requires three separate cables for the video connection (red green and blue). Component video can output in two modes: YCrCb (interlaced) and YPrPb (progressive scan). Progressive scan will yield a higher quality image, however, some televisions will not support this mode (consult your manual before attempting to output progressive mode). TELEVISION COMPONENT CONNECTION 1. 2. 3. First, connect a component lead (not included) from the YCb/Pb Cr/Pr terminals on the DVDRX160 to the component input on your TV. If you wish to use progressive scan, ensure that you connect to a YPbPr input. Select the component input on your TV (consult your manual for more information) To switch between interlaced and progressive scan modes, press PSCAN on the remote, then SELECT. DVDRX160 PROGRESSIVE SCAN: RESETTING THE VIDEO OUTPUT If you inadvertently switch the OUTPUT FORMAT setting to PROGRESSIVE while using a standard TV not capable of PSCAN, you will lose video. If this happens, reset the recorder to its default video settings by pressing PSCAN and SELECT on the remote. 12 Audio Output Connections This unit features a variety of audio outputs for connection to a receiver or other audio equipment. - Use the included A/V cable to connect the stereo audio outputs for connection to a TV or stereo receiver. - Optical and Coaxial digital audio outputs send an encoded digital bitstream, suitable for receivers with Dolby decoding capability. These outputs require special cables not included. TELEVISION AV RECEIVER WITH DIGITAL AUDIO INPUT DVDRX160 Antenna & TV Connections Your DVDRX160 is available with an antenna pass through connection. Use an antenna or cable TV connection to connect the RF input and RF out to connect to a TV. ANTENNA OR CABLE CONNECTION WITHOUT PASSTHROUGH CONNECTOR DVDRX160 TELEVISION 13 System Connection for recording external signals (Rear Panel Signal Input) Audio/ Video inputs are provided on the front and back side of your DVDRX160 for connection of outside audio/ video sources such as VCRs, Camcorders, DVD Players etc. External sources must support Composite Video and S-Video or stereo audio to be suitable for recording. COMPOSITE VIDEO INPUT CONNECTION DVD PLAYER, VCR, STB ETC. DVDRX160 FRONT AV Inputs (Video In, S-Video In) DVDRX160 S-VIDEO or COMPOSITE DVD PLAYER, VCR, STB ETC. 14 System Connection for recording external digital signals (Front Panel) When connecting external signals, be sure to switch off the power source of the unit and other devices DVDRX160 DV AND USB INPUTS Refer to the manual of your mini firewire or usb device for further instructions on how to connect USB FLASH DRIVE DV IN/OUT CAMCORDER WITH IEEE1394 OUTPUT Recordingg Mode Introduction There are various external signal inputs in the unit, including ■ S-Video ■ Composite Video ■ TV tuning ■ DV input ■ Stereo audio input You can select any group of audio and video signals from these inputs for recording. INSERTING A NEW DISC Upon inserting a new disc, the unit needs to initialise the disc. Please wait until this is finished to start recording! Manual Recording Recording Source You can select which video input the unit should record from. The following options are available ■ Tuner ■ Front CVBS (Composite) ■ Front S-VIDEO ■ DV Input Press the SOURCE button (repeatedly) to change the video source and select one of the above. Note: If you are recording from a rear source, make sure your audio connections are connected to the rear audio inputs. If you are recording from a front source, make sure your audio connections are connected to the front audio inputs. 15 Selecting Tuner Channel In Tuner Mode: ■ Press the button CH+/- on remote control to select the channel ■ Press the number keys and then press SELECT button to select the channel Recording to DVD or HDD ■ ■ ■ ■ Select recording target drive (DVD or HDD) Press Source button once to switch to manual recording mode, and press DVD or HDD/DUB button to switch between DVD or HDD Record. If you have a recordable media in the tray, you can press REC and start recording (OTR) to DVD. Press Stop to finish recording. To pause the recording, press the PLAY/PAUSE button on the remote control . Press the PLAY/PAUSE button or the REC button to resume recording. Recording will continue until the STOP button on the remote control or the product front panel is pressed. Note: 1. In SOURCE status for Manual Recording, the procedures for recording to common DVDs: (please refer to the illustrations for the positions of OPTICAL DISC and HARD DISC) When the TV displays OPTICAL DISC, press REC button to record to the optical disc; When the TV displays Hard DISC, press DVD button, and then press REC button to record to the optical disc. Recording Quality You can select from up to six record quality settings to define the amount of space you want to use on the DVD/HDD. Higher quality recordings will consume more space and low quality recordings will consume less space on the DVD/HDD. NOTE: Use the QUALITY button to switch between different record quality options. 4.7GB DVD 160GB HDD QUALITY SLP (Super Long Play): 6HRS 180HRS LOW EP (Extended Play): 4HRS 120HRS MODERATE LP (Long Play): 3HRS 90HRS NORMAL SP+ (Standard Play Plus): 2½HRS 75HRS GOOD SP 2HRS 60HRS VERY GOOD 1HR 30HRS BEST (Standard Play): HQ (High Quality): One Touch Recording (OTR) This function enables you to set up the timer during the recording process. Once the scheduled time is reached, the system will stop recording automatically. 1. Enter the Recording Mode and start recording. 2. For desired timer recording, press the REC button once or several times. ■ The recording time will increase by 30 minutes with every press of the REC button. If the scheduled time exceeds the recordable time of the disc, normal recording mode will restore. ■ If the timer recording is paused or stopped, the system will cancel the timer recording process. 16 DV (Digital Video) Recording 1. This unit can perform real-time monitoring and recording for a DV through the IEEE 1394 serial port (DV). ■ Connect the DV to the unit (for details, see System Connection: System Connection for Recording). ■ Switch on the power of the unit. ■ Press the Source button until DV Input is selected. ■ Switch on the Power button of the DV, set it to CAMERA mode, and start monitoring. ■ Press the REC button to start recording. (Other operations is the same as in the Recording Mode) 2. This unit can also record the VCR content of the DV. ■ The connection method is the same as stated in the first 3 steps of step 1 above. ■ Switch on the Power button of the DV unit to enter Playback mode ■ Press the REC button to start recording ■ During the recording process, press the PAUSE button to suspend recording of the unit, and press again to suspend the DV unit. To restore play of the DV unit, press the PLAY button; if you press the REC button, the play of the DV unit and the recording will resume at the same time. While paused the FWD, REV buttons operate the DV; if you press the STOP button, the recording of the unit will stop first, press again to stop the play of the DV. File Manager File manager allows you to browse, play and copy files across the three storage devices (DVD, HDD and USB). Press FILE/USB to enter the file manager. To navigate the file manager, use the arrow keys to select a file or folder. Pressing select on a compatible media file will start playback. Pressing Right on a file will call up the file submenu, with the options as follows: ■ Copy: allows you to copy a file to another destination. Selecting copy brings up the destination window, navigate to select the copy destination. Once you have selected the drive and folder to copy to, press right and select Complete to begin the copy. ■ Delete: will delete the file. Note that some files may be copy protected and unable to delete. ■ Rename: will call up a keyboard to rename the file. Take care to preserve the extension of the file. (xxxx.mp3, xxxx.jpg, etc) ■ Move: similar to copy, however the file is removed from the source directory. ■ Create dir: will create a sub directory in the current directory, enter using the keyboard ■ Select all: selects all the files in the current directory. Any actions, such as copy, move or delete apply to the selected files. ■ Unselect all: unselects all files in directory. Note: pressing add/clear will select/unselect individual files NOTE: ONLY USE A BLANK REWRITABLE DVD DISC, HDD-to-DVD Recording OR A DISC PREVIOUSLY USED ONLY FOR ARCHIVING FROM HDD. 1. Press the HDD/DUB button to enter into the HDD mode. WHEN RECORDING FROM HDD TO DVD±R/W 2. Press ADD/CLEAR to select the titles that you desire to DISC, THERE WILL BE A FLASHING ICON ON copy to DVD. THE UPPER LEFT CORNER OF THE SCREEN TO 3. Press the HDD/DUB button again toto copy the INDICATE THE RECORDING PROCESS. selected files to DVD. File Manager 00:00:00 - HDD ../ 1 kendachi01.flac 2 crossley. No. CH Date Time 001 F-5V 20/09/06 15:19 002 R-COMP 20/09/06 13:42 3 mandms. 003 F-S 4 cocoa_overd. Title Title 1 Title 2 kendachi.flac Operation menu Return Previous menu Select Add SP PAL 22/09/06 10:41 Title 3 Press Add/Clear key to select program(s) File Size: 12MB Modify Date: 27 /03/ 2007 Right Menu 00:38:52 Press Dub key to copy selected program(s) to DVD Play highlighted file Select/Unselect file For other options Press DVD, TV/Video, USB, SETUP or TIMER keys Press Sort key to sort programs by name, date or time 17 Timer Recording You can set up your DVDRX160 to schedule recordings to begin and end at specific times. To do this: 1. Press the TIMER button to enter the timer recording menu, as shown. You can set up to 8 different scheduled recordings at once. 2. In the timer recording menu, use the UP or DOWN buttons to select a record, then press the SELECT button. 3. Set up the input source In the Timer Recording Setup box, select “SOURCE” from the menu and use the UP or DOWN and SELECT buttons to select the source. 4. Record to: You may select hard drive or DVD (Optical Disc) as the destination for the recording. 5. Set Recording Quality: Select Quality from the menu and use the UP or DOWN and SELECT buttons to select the quality value (see Recording Quality for more information). 6. Set up Recording Time: Select ‘Mode’ from the menu and select one of the options in the list: Timer Recording No. Source Quality 7. End 3 4 5 6 Press Select to review a scheduled recording or create a new one, press Functions for other options. Timer Recording Setup Mode CH029 Front S-VIDEO CH028 CH029 Once Date 21/09/06 Start 00:24 End 00:24 Record to Quality My Title Title OK For Once only recordings > Select ONCE and press the SELECT button. The date input editor box will appear on the right. Highlight the box and the SELECT button, then use the number buttons to enter the date in the form of DD/MM/YY, press the SELECT button to confirm. If the input is invalid, the system will prompt an input error message. At the same time, the Date Input Editor Box will be left empty. Please enter the date again. Start 2 Source Weekly: Record Once a Week Daily: Record Daily Monday to Friday Once: Record for one time on the specified date and time Set up Recording Date: For weekly recordings > move the cursor to the right control unit in the row and press the SELECT button to pop up a week list. Select a proper value according to your need. Date 1 Cancel UP/ DOWN or 0~9 to change the value, SELECT to confirm the value. Timer Recording Setup Source CH029 Record to HDD Quality SP Mode Start Once Once Daily Weekly 00:24 End 00:24 Title My Title Date OK Cancel Record expedites only on the date set 18 Record 8. 9. 10. 11. 12. 13. Set up the start time of the recording: In the timer recording set up box, use the arrow buttons and then press the SELECT button to highlight the Start option. Enter a time between 0:00 and 23:59 with the number buttons and press SELECT to confirm. Set up the end time of the recording: Set the recording end time following the instructions above after having highlighted the End option. Set up the record title: Use ▲ or ▼ to change letters and then press the SELECT button to enter it. After completing setup, highlight the OK button and press SELECT. Press the TIMER button to exit the timer recording setup menu. If the system is operating five minutes before the scheduled time for recording, an information box will pop up, prompting you whether to start recording or not. To record, highlight OK and press the SELECT button to confirm. If the information box is left unattended, the unit will automatically record and will continue according to the set schedule. If the system is in standby status, it will enter the recording mode automatically 3 minutes in advance and start recording to schedule. Timer Recording Setup Source CH029 Record to HDD Quality SP Mode Once Date 21/09/06 Start 00:24 End 00:24 My Title Title OK Cancel UP/ DOWN or 0~9 to change the value, SELECT to confirm the value. DELETING A TIMER RECORDING: SELECT ANY TIMER RECORDING ITEM AND PRESS THE ADD/CLEAR BUTTON TO DELETE IT 19 Chapter p Editingg Chapter Editing Mode In DVD mode, press ‘DVD’ to enter the DVD title menu. Select a title and press the RIGHT button to show the Title Menu and select ‘Edit Title’ to enter the Edit Menu. Edit Mode Title : 04/04 Chapter : 01/01 CHAPTER EDITING THE CHAPTER EDITING FUNCTION IS ONLY AVAILABLE ON UNFINALISED DVD±R/W DISCS. Play Menu Description Chapter Marker KEY: 1. Title: The 1st number is the title to be edited; the 2nd is the total number of the titles on the disc. 2. Chapter: The 1st number is the current chapter; the right is the total number of chapters in the title. 3. Play: The function is the same as the Play Mode. 4. Chapter Mark: Split or Combine Chapter function. 5. Hide Chapter: Hide or Show Chapter function. 6. Index Picture: Set current picture for displayed in disc menu. 7. Split Title: Split the title in two at current position. 8. Time: Time Selection Play. Exit the Chapter Editing 1. Press the STOP button to exit this mode. When exiting, please wait while the system writes information to the disc. Hide Chapter Index Picture Split Title Time : 0:00:02 Edit Mode Title : -- Chapter : 01/01 Play Chapter Marker Hide Chapter Index Picture Split Title Time : 0:00:02 20 HDD Editingg HDD Edit In HDD mode editing options for each title are accessed from the Title List menu. Press the RIGHT ARROW to access the popup menu. Note: You can access the Edit Menu whilst recording. While editing an icon appears next to the title in the title list. DELETE If a title is not Protected or Locked, select this option to delete it. Be careful, once deleted, titles cannot be retrieved! HDD No. 001 002 CH Ch034 003 Ch042 Ch042 004 Ch042 005 Ch059 Date Time Title 11/30/99 00:07 Title 1 11/30/99 00:22 Title 2 11/30/99 00:22 Title 4 11/30/99 00:23 Title 3 11/30/99 00:27 Title SBCNNN Play Delete Split Segment Change Index Pic Rename Lock Play the program Protect SPLIT To split a program, select SPLIT and navigate through the program (similar to Playback) and mark a location at which the program will be cut into 2 separate programs. Title Split 0:00:00 2:00:00 0:40:00 You can use all navigation features, (press OSD to bring up the keys on the bottom of the screen, pressing Info again will remove the help information). Note: Split is irreversible. Once the program has been split, the 2 titles can not be put back together. ■ Split screen can only be accessed if the title you want to split is not Protected or Locked. ■ The Return Key will cancel back to HDD title list without splitting ■ Accuracy of Split location is within 0.5 second 21 SEGMENT Segment mode allows you to hide segments from the recording. Such as ad breaks. Segments will be skipped when played back from the Hard Drive and will not be copied to DVD using DUB. Segments can be re-edited. When you enter the Segment Mode the title will automatically start playing. You can use the playback navigation keys to move to anywhere in the title and apply a segment. Segments are defined in Purple. 0:00:00 2:00:00 1:40:00 Keys Function Note Select Mark the Segment Define Your Segments OSD Toggles between: progress bar > help text > title info > no info Return Back to HDD list Clear Clear all Start/ End point Play, FF, FR etc. Navigate within the title Stop Back to the title list All segments must be entered correctly (i.e. there is a segment end for each segment beginning). Otherwise the result will not be saved. Do not save the result Note: Segment mode can only be accessed if the title you want to edit is not protected or locked. Note: Accuracy of segment boundaries is within 0.5 second. CHANGE INDEX PICTURE This option allows you to change the Index Picture displayed for the title in the title screen. You can navigate the program (similar to Playback mode) and when the desired picture is display on the screen press SELECT to change the Index picture. Change Index Picture 0:00:00 2:00:00 0:40:00 Note: This operation is available only if the title is not protected or locked 22 RENAME This option brings up the on-screen keyboard,. Here, you can enter a title name. Use the ARROWs to highlight the desired key, and use SELECT to enter that key. When you have entered the title name, select OK to finish. Title name: TITLE A B C D E F G H I J K 0 1 2 L M N O P Q R S T U V 3 4 5 W X Y Z ( ) - : ? . 6 7 8 9 Space Aa Backspace Clear Exit OK Note: This operation is allowed only if the title is not protected or locked. LOCK Programs can be “locked” with a parental password. To do so: Highlight the program on the HDD title list, bring up the Popup menu by pressing the Right Arrow. Make sure Lock is highlighted (use Up and Down arrows to navigate if needed) and press Select. When you lock a program, the parental password selected in the Setup menu will be applied (default value is 3308). The user will then need to unlock the program before Playback or any Editing function. To unlock a program, highlight a program on the HDD title list, bring up the Popup menu by pressing the Right Arrow. Highlight unlock (use Up and Down arrows to navigate if needed) and press Select. You will be requested to enter the password. A locked title will have a Lock icon next to its index picture on the HDD title list. PROTECT Protect is a feature to safeguard against accidental erasure or editing that allows for playback only and no editing. To protect a title, highlight the program on the HDD title list, bring up the Popup menu by pressing the Right Arrow. Highlight ‘Protect’ (use Up and Down arrows to navigate if needed) and press Select. When you Protect a program, the user can Play the title or Dub it to DVD, but can not perform any edit operations (split, segment, change index picture and delete). In order to Unprotect, highlight the program on the HDD title list and bring up the Popup menu by pressing the Right Arrow. Highlight Unprotect (use Up and Down arrows to navigate if needed) and press Select. A Protected title will have a Safe Box icon next to its index picture on HDD title list. 23 Disc Operation p Introduction DVD disc operations include browsing disc information, finalising a disc, removing disc content, deleting the last title, setting compatibility and write protection, etc. Menu Description 1. 2. 3. 4. 5. 6. Play: Play the content of the current disc. Rename Disc: Rename the disc (default name: MY DVD). Erase Optical Disc: All content in the disc will be removed completely. The disc index will appear as blank on the screen (only for DVD±R/RW). Record a new title: Add a new title to record. Overwrite Disc: An operation on a recorded DVD RW disc to overwrite its previous content. Lock Disc: This function prevents the deletion of recorded content. PAL Play DVD Rename Disc EDIT Erase Optical Disc Record a New Title Overwrite Disc Lock Disc Edit Disc (DVD) To enter Disc operation mode, press UP in the disc title menu. Press RIGHT to enter edit mode (provided the disc is not finalised). PLAY This item is selected to play the disc. RENAME DISC Press SELECT to rename the disc. PAL Play DVD Rename Disc EDIT Record a New Title RECORD A NEW TITLE Record new title. FINALISE DISC DVD±R/DVDRW Remember, until a DVD±R/DVD-RW disc is finalised, it can be recorded to, played back and edited on the DVD recorder, but it will not be compatible with any other DVD player, finalisation makes the disc compatible for playback on standard DVD players. Once a disc is finalised, no more recordings can be added. Remark for Finalisation: It will take some time for finalisation, please wait. 24 Finalize Disc Title Editingg Enter the Title Editing Mode In the DVD Title Display mode, press the RIGHT ARROW to pop up the following dialog box. 1 1 2 1. 2. 3. 4. 5. 6. 3 2 4 3 5 4 Play Title: Play the current title. Edit Title: Enter the Title Editing mode, similar to the Chapter Editing mode. Rename Title: The operation is the same as that for Rename Disc. Erase Title: Delete the current title. Overwrite Title: Record a new title and overwrite the current one. Overwrite Disc: Overwrite Disc Operation. Note: Finalised discs can not be edited DVD Playy Mode Enter the Play Mode Press the DVD button on the remote control to switch to DVD mode. In the DVD Mode, the unit serves as a high quality DVD player. To enter the Play Mode, do as follows. ■ Turn on the TV and switch to AV input status. ■ If the unit is working with other inputs, press the PLAY button to enter the Play Mode. Note: If you insert a disc, the DVDRX160 will start playback automatically. Note: If there is no disc in the drive or an unsupported or seriously damaged disc is inserted, the PLAY button will not function. Menu Description Note: Press the DISPLAY button to show or hide the control bar menu. 25 Display (OSD) While playing DVD, press OSD for menu. 1. MODE: The mode option adjusts the playback modes. The options are: Normal, A-B Repeat, Chapter Repeat, Title Repeat, Program and Random. 2. TRICK: The Trick option gives you your transport options: Play, Prestop, Stop, Pause, Step, Fast Forward x2, Fast Forward x4, Fast Forward x16, Fast Forward x32, Fast Rewind x2, Fast Rewind x4, Fast Rewind x16, Fast Rewind x32, Slow Forward ½, Slow Forward ¼, Slow Forward 1/8, Slow Rewind ½, Slow Rewind ¼, Slow Rewind 1/8. 3. TITLE: Option to skip available titles. 26 4. Chapter: Option to skip available chapters. 5. AUDIO: Adjust to desired audio setting. Note: For options such as Dolby Digital, a compatible audio system must be used). 6. SUBTITLE: Select desired subtitle language (supported by the disc). 7. ANGLE: Select your desired camera angle, if available on disc. 8. T-TIME: Allows you to skip to any point in the title. 27 The GOTO Button The GOTO feature allows you to jump easily to any point on the disc. With GOTO, you can make jumps of time, chapters, and titles. Just cycle through the different steps with the GOTO button and use the number buttons to enter the plact you want to skip to. ■ The following is an example of a DVD playing. The operation of a VCD playback is similar to this case. Note: For Audio CDs, the GOTO function will not work. USB Playback To play files from a USB device; ■ Insert the USB device into the USB drive and the DVDRX160 will automatically detect it and will display the “USB” symbol while loading in the lower right corner of your TV screen. ■ Press the “USB” button on your remote to switch to USB Playback mode. ■ The unit will automatically identify the files on the USB drive. Your DVDRX160 is able to playback the following file formats off of a USB drive: .MP3 audio and .JPG images. ■ Press the ▲ and ▼ and SELECT buttons to select an item to play. ■ Press the ▲ and ▼ and ADD/CLEAR buttons to select the program play mode. Note: In the program play mode, audio files such as .MP3 and picture files such as .JPG cannot be programmed at the same time. That is, if the program includes audio files, the picture files can not be programmed. ■ When playback is finished, you can safely remove the USB drive from your DVDRX160. Note: Do not unplu your USB drive while it is playing! HDD Playy Mode HDD Playback Press the HDD/DUB button to switch to HDD Playback. During HDD playback, the following remote control keys are valid: ZOOM The zoom feature allows you to enlarge an image that is currently displayed on the screen and pan through to specific areas on the zoomed image. There are two zoom levels available (150% + 200%) which will be indicated on the screen. During pause, press the ZOOM button to zoom the image on the screen to 150%. Use the ARROW buttons to pan (select the part of the image you want to zoom in on) Press the ZOOM button again to zoom the image on the screen to 200%. Press the ZOOM button again to return the image on the screen to normal. 28 Time Shift Timeshift allows you to pause and rewind live television. The unit continuously records an hour “buffer,” which can be rewound or paused without missing any of the program. ■ Timeshift only works in TV mode. ■ Timeshifting begins recording only when the unit is switched on. ■ If the unit is paused for 60 minutes, it will automatically resume TV viewing. Remote Control On-Screen Display OSD (pressed once) Timeshifting buffer information, Channel/ Source information, Dubbing Indicator (if dubbing is on-going) - see above diagram OSD (pressed twice) Hot keys and navigation information OSD (pressed three times) Removes all On-Screen Display 1. 2. 3. 4. 5. 6. Pause: Press PLAY/PAUSE button to pause, press PLAY/PAUSE once again to resume to play. Slow Playback: Press SLOW/SORT button for slow motion. Slow motion is not available in LIVE TV viewing. Fast Reverse: Press PREV button to skip back for 5 minutes. Press the LEFT button to fast reverse 10 seconds; Press REV button repeatedly to fast reverse for 1X, 2X, 3X to NORMAL speed. Note: The Fast Reverse function is only available for the programs stored in the timeshift buffer memory of the Hard Disc. Fast Forward: Press NEXT button to fast forward 5 minutes. Press the RIGHT button to fast forward 30 seconds. Press FWD button repeatedly to fast forward for 1X, 2X, 3X to NORMAL speed. Note: The Fast Forward function only works in the pre-recorded buffer, you cannot fast forward LIVE TV. Recording: Press REC button to record to the Hard Disc. Note: Because the programs are stored in buffer memory of the Hard Disc in TIMESHIFT, the programs can only be recorded to the Hard Disc not DVD. Quit: Press DVD button to quit TIMESHIFT mode. 29 When your DVDRX160 is turned on, the system will start in Tuner mode. The timeshift buffer will start recording. If the timeshift buffer mode is set to refresh (See System Setup) and you change channels, the timeshift buffer will be lost. No message will be provided prior to doing so. However if the timeshift buffer is set to “PRESERVE” the time shifting buffer will be maintained. Note: If you change the input source and the video standard is different (NTSC vs PAL), the timeshifting buffer will be erased. During timeshifting, a Timer recording (pre-programmed recording) may come up. As you can not watch one program in Timeshifting and record another channel, the DVDRX160 will ask you to confirm if you want to keep the current channel or proceed with Timer recording. If there is no response, the unit will assume Timer recording should start. The message will appear 2 minutes before the timer recording is due. SAVE In order to save part or all of the timeshifting buffer, two options are available: 1. Save Option 1 While viewing a program using timeshift, press REC, this will mark the start of the segment to be recorded. You can navigate forward and back using the “transport” keys. By pressing REC, you will increase the length of the program you are saving by 30 minutes, up to a mmaximum of 3 hours. Press stop to indicate the end of the segment to record. The save part of the timeshifting buffer will be tagged in RED. 2. Save Option 2 While viewing a program, press Rec and hold down for 3 seconds. This will save the entire Time shifting buffer. If Stop is pressed, the save will terminate at that point in the buffer. Press Stop and hold for 3 seconds if you want to cancel the save operation. Note: You cannot change the channel or source while in the process of saving (the end of the recording segment is either not entered, or in case of a long recording, it has not been reached). Saving has to be manually stopped first (by pressing STOP ). The segment will be Saved on HDD and then channel or source change can be performed. Note: Only one segment in the Time shifting buffer can be identified for Saving. It is not possible to identify multiple segments. Once the segment has been Saved and registered on the Title list, this segment will be removed from the Time shifting buffer. 30 While in Timeshifting mode, you can use the following keys for other operations: Key Function Note HDD HDD Title List Recording Continues DVD Play Disc recording continues unless you want to record to DVD File/USB USB Mode To play slideshow from USB drive or copy from USB to DVD - Recording Continues OSD Display Information List Recording Continues OPEN/CLOSE Open/ Close the disc tray Recording Continues STAND-BY Power Off Recording Stops SETUP Bring up the Set Up Menu Recording Continues TIMER Bring up the Timer Menu Recording Continues PSCAN Change the Video Output mode to Interlaced/ Progressive Scan Recording Stops Note: Timeshift Recording will not record from DV! 31 System y Set Up p Operation Interface and General Steps This section will introduce the menu interface of the System Setup and general operation. 1. Press the SETUP button to enter the System Setup mode. Now the system setup menu will appear on the top of the OSD, as shown in the following chart. 2. Use the ▲ or ▼ buttons to select submenus in the control bar and press the SELECT button to enter. In the submenu, press the arrow buttons and SELECT to navigate the menu. Press the RETURN button to return to the upper level menu. Press the SETUP button to exit the System setup mode 3. Note: System setup is best used with no disc in the drive. Otherwise some settings may become unaccessible. Auto Chapter Marker 1. 2. 3. 32 In the Recording Settings menu, use the arrow buttons to select Automatic Chapter Marker, and press the SELECT button to drop down a menu. Use the ▲ or ▼ buttons to select a value to insert chapter markers at 5min, 10min, 20min or 30min intervals during recording and press the SELECT button to confirm. You can also turn off chapter markers. Press the RETURN button to return to the upper level menu and set up other options. Record Quality 1. 2. 3. In the Recording Settings menu, use the ▲ or ▼ buttons to select the Default Quality of recordings and press the SELECT button to drop down a menu. Use the ▲ or ▼ buttons to select a desired value and press the SELECT button. Press the RETURN button to return to the upper level menu and set up other options. Note: For the differences of the six quality levels; HQ, SP, SP+, LP, EP, and SLP, see RECORDING MODES for reference. 1 APS (Auto Program Scan) Your DVDRX160 has a built-in TV tuner. You can receive TV signals directly from the unit, but first, you must conduct a channel scan to tune in various channels automatically and determine their frequencies. The tuned channels will be saved automatically. Even if the power is off, the saved channel information will not be lost. Press the SETUP button to enter the System Setup mode. Use ▲ or ▼ buttons, highlight APS, select it, and the following menu will be displayed. ■ Select the OK button, then the tuner will start searching through various channel frequencies and add available channels to the system memory. This procedure may take several minutes. ■ When the scan is complete ‘TOTAL CHANNELS FOUND’ will appear on the screen with the number of channels that have been stored to memory. Press the SETUP button on the remote control to exit. Modify Channel 33 If you want to edit the channels stored, select ‘Modify Channel then press SELECT button to confirm,. In the channel edit dailog box, use the ▲ or ▼ button and the SELECT button to select and confirm. The options are as follow : ■ Program Number! Current TV program number ■ Name: You can edit the program name displayed on screen using the ▲ or ▼ button to change the letter and SELECT button. Press the ▲ or ▼ button to move the cursor. ■ Sound Mode: Use the ▲ or ▼ and SELECT buttons to select the local sound mode. ( In Australia use PAL B/G) ■ Search type: You can change the scan mode used during scanning. Frequency scans all frequencies in a manual scan; Channel: scans by preset allocated channel in a manual scan. ■ Frequency: 551.3 MHz. When the search type is set to Channl, this item will be shown as the channel. Press the ◄ or ► button to scan channels manually channel by channel. ■ Channel: CH006. When the serach type is set to ‘Channel’, this item will be shown as the channel. Press the ◄ or ► button to scann channels manually by channel. ■ Fine Tuning: Use the ▲ or ▼ and SELECT buttons to select this item and press the ▲ or ▼ button to tune the frequency lightly. ■ Delete: Press OK delete current program After the channel to information is modified, select OK and press the SELECT button to confirm. Then return to the Channel Scan menu. Program Table If you want to sort the order of various channels: select the Sort-option in program table and operate as follows. • In the dialog box box, press the ▲ or ▼ button to locate the channel to be changed. • Use ► arrow button to access the right dialog box then press SELECT to confirm. • Press the ▲ or ▼ button to move this channel to the desired location. • Press the SELECT button to insert the channel. The original channel at this location will move to the next location. • Repeat as necessary when finished. NOTE: Be sure to connect the antenna properly before the channel scan operation. Please see the Basic Information: System Connection for Recording External Signals for reference. 34 Set Up Menu - Video TV TYPE The unit supports two different television systems. NTSC is the television system that is adopted in the North American region. PAL is the television system this is adopted typically in the rest of the world especially in Europe, and Australasia. 1. 2. 3. In the General Setting menu, select the TV Type item and press the SELECT button to drop down menu. Select PAL or NTSC Press the SELECT button to confirm. Check your TV system first otherwise you may lose picture from the unit. TV DISPLAY 1. Users are able to adjust the TV aspect ratio. 2. Use the UP and DOWN button to select a option. The options are: 16:WS suitable for wide screen TV. 4:3PS (pan+scan) is suitable for a standard TV with ordinary ratio (4:3). When wide screen pictures are played, the left and right margin will be cut and the picture will occupy the entire screen. 4:3 LB (Letterbox) for ordinary TV. When a wide screen picture is played, a black frame will appear at the top and bottom of the TV screen. 3. 1 1 Press the RETURN button to return to the upper level menu and set up other items. NOTE: ■ The playing effect depends on the recorded picture size. Some picture might not be played under the screen format you select. ■ For those discs recorded as 4:3, no matter how the screen format is set, the screen format played is always 4:3. 1 35 VIDEO OUTPUT FORMAT 1. In the General Setting menu, use the ▲ or ▼ button to move the cursor, select the Video Output Format item and press the SELECT button. 2. Select the Progressive or Interlace option for video scan output mode, and press the SELECT button to confirm. This function can do by pressing PSCAN button on the remote controller. NOTE: Only use progressive with a compatible TV. Failure to do so will cause loss of picture. ( If this happens, press ‘PSCAN’) If unsure consult your TV manual. Set Up Menu - Audio DOWN MIX The unit can set the analog audio inputer output at 2-CH or 5.1-CH stereo surround. ■ Enter the play setting menu, use the ▲ or ▼ button to select downmix, and press the SELECT button. Use the ▲ or ▼ button to select 2-CH or 5.1-CH, and press the SELECT button to confirm. NOTE: Only use 5.1 ch if you hav connect to a surround amp via analog cables. S/PDIF OUTPUT This unit has digital audio outputs. You can enjoy better qulity audio through an appropriate amplifier with a digital audio decoder. (such as DOLBY DIGITAL or DTS by connecting a digital cable. Optical or digital coax. 1. Enter the play settings menu, use the ▲ or ▼ button to select SPDIF Output item, and press the SELECT button to drop down a menu. 2. Use the arrow buttons to select an option (RAW, LPCM), and press the SELECT button. 3. Press the RETURN button to return to the upper level menu and set up other items. NOTE: Refer to your amplifiers manual for information on what digital format your amp requires. 36 LPCM OUTPUT The unit can set LPCM96K and LPCM 48K as the audio sampling frequency. NOTE: See your amplifier manual if unsure. Set Up Menu - Language SYSTEM LANGUAGE To satisfy the needs of consumers in different countries, the unit provides various menu language settings. 1. Enter the system setup mode. 2. In the System Setup control bar menu, use the ▲ or ▼ button to move the cursor, select the Language item, and press the SELECT button to enter the Language Settings menu, which contains four items, as shown in the chart. 3. In the Language Setting menu, use the ▲ or ▼ button to select the Language option and press the SELECT button to drop down a menu. Note: Adjusting the system language changes the language used in all the menus. Careful! Do not set to languages you cannot understand. AUDIO LANGUAGE Use the ▲ or ▼ button to select the language you want and press the Select button. If you play DVD disc supporting the selected language, the system will adopt that language as the DVD audio language. If the disc doesn’t support the selected language, the system will adopt the language provided by disc. SUBTITLE LANGUAGE Some DVD discs may contain various subtitle languages. Adjusting this will determine the default subtitle language. Use the ▲ or ▼ button to select the language you want and press the SELECT button ■ Off means no subtitle output. ■ The system will give priority to this setting as the DVD subtitle language. If the DVD played does not support the selected language the DVD default will be displayed. ■ You can change the subtitle language at any time during playback by pressing the subtitle button on the remote. 37 DISC MENU LANGUAGE Use the ▲ or ▼ button to select the language you want and press the SELECT button. ■ The system will give priority to this setting as the DVD menu language. If the DVD played does not support the selected language, the setting will be invalid. ■ You can change the disc menu language at any time during playing. See Play Mode for details. ■ Press the RETURN button to return to the upper level menu and set up other items. NOTE: Any selections made here will override unit settings. Setup Menu - Date/Time DATE TIME SETTING The time and date have to be set before using timer record. There are two ways to set the product clock: AUTO setting and MANUAL setting. Press the SETUP button on the remote control to display the SYSTEM SETUP MENU. Use the CURSOR buttons to highlight Date-Time Setting bar and press the SELECT button. Use the ▲ or ▼ buttons on the remote control to move the highlighted bar to Date-Time setting and press SELECT button to select Auto or Manual. Auto: If a Public Broadcasting Station (ABC channel in Australia) is available in your area, the clock will set itself automatically by tuning to this channel. Manual: If the clock does not automatically set itself, the clock will need to be manual set. 38 PROGRAM If you select Auto in the Date-Time setting optical bar, you must select a Public Broadcasting Station (PBS channel in USA) which is available in your area, the clock will set itself automatically by tuning to this channel DATE DD/MM/YYYY Use the CURSOR buttons of the remote control to select the Date (dd/mm/yyyy) and press the SELECT button to confirm. Enter the correct date in dd/mm/yyyy format (Day/month/Year) using the 0...9 keys. TIMEHH/MM Use the CURSOR button of the remote control to select TIME and press SELECT to confirm. Enter the correct time in hh:mm format (Hour: Minute) using the 0...9 Keys. After the date and time have been entered, press the SETUP buttong on the remote control to exit. SETUP MENU - PREFERENCES PARENTAL LEVEL Setting authorisation level and password of the unit renders some discs which contain restricted content playable only after the password has been entered. This function enables you to restrict play of discs which are not suitable for children. 1. In the Play Setting menu, use the ▲ or ▼ button to move the cursorm select the Parental Level item, and press the SELECT button. 2. Using 0...9 keys enter the password and press the SELECT button. The TV screen will display the dialog box as shown in the right charts. The standard password is 3308. 3. Select the Parental Level list box, and press the SELECT button to drop down a menu as shown in the right chart. 4. Use the or button to select an authorization level (Off, 8: Adult...Safe) and press the SELECT button to confirm. 5. When finished, use arrow buttons to select OK and press the SELECT button. 39 CHANGE PASSWORD 1. Tt modify a password, use arrow button to Change password. Press the SELECT button and a dialog box will pop up as shown in the right chart. 2. Use arrow buttons to select the ‘Enter password here’ box and enter the password with number buttons. 3. Use arrow buttons to select the ‘Input new password’ box, input the new password with the number buttons Then input the new password again with the number buttons in the ‘Input new again’ box 4. Use the arrow buttons to select the OK button. After setting the authorisation level, each time the unit plays a disc of that level, a password is required. If you forget the password, you can enter the default password. RESET TO FACTORY DEFAULT 1. In the General Settings menu, use the ▲ or ▼ button to select the Reset to Factory Default item and press the SELECT button. The OSD will display as follows. 2. Use the ▲ or ▼ button to select OK. 3. Press the SELECT button to restore all default settings. NOTE: If your unit suddenly doesn’t work properly, it is possibly due to incorrect settings. Please try the Reset to Factory Default function to see if the unit restores to its normal working status. SCREEN SAVER When the unit is idle (or without monitored output) for some time, interesting pictures will appear automatically as a screen saver. 1. In the General Settings menu, use the ▲ or ▼ button to move the cursor and select Screen Saver. 2. Press the SELECT button and the Screen Saver item will drop down a list as shown in the chart. 3. Use the ▲ or ▼ button to move the cursor, and select ON or OFF. 4. Press the RETURN button to return to the upper level menu and set up other items. 40 Basic Information SETUP MENU - Time shift HARD DISK INFO Shows the information on HDD size SPACE MANAGEMENT Automatic: When Space Management is ‘Automatic’ and the HDD is full, the system will overwrite unprotected titles in a FIFO (First In First Out) scheme ( the exception is when the title is selected to be dubbed - in which case, the case, the title shall be kept until dubbing is over) When Space Management is set to ‘Manual’ and the HDD is full System displays ‘ The hard disk drive is full. Please erase some programs to perform further recording’ EMPTY HARD DISK Erase all programs on HDD. A message will be shown: ‘All video programs on the hard disk drive will be lost. The system must be restarted continue?’ ERASE OPTICAL DISC Erase all programs on an optical disc. A message will be shown: All video programs on the optical disc will be lost. Continue? OK. No (default) 41 Appendix pp ((Troubleshootingg Guide)) Before contacting service personnel, please check possible causes according to the following instruction. Symptom Possible Cause Remedy No Power 1. Power Supply disconnected; 2. The power of the socket is switched off. 1. Connect to the power supply. 2. Try again or replace the socket with a new one. 3. Switch on the wall switch No Sound 1. Incorrect cable connection. 2. The disc is deformed or dirty; 3. The system is in cable mute status 1. Connect the cable properly. 2. Clean or fix the disc. 3. Press the mute button. No Picture 1. Incorrect cable connection. 2. Incorrect TV mode 3. Unit video-out mode is Progressive but your TV system accepts interlace only 1. Connect the cable properly. 2. Adjust the TV/AV mode (see TV instructions) 3. Press PSCAN to change the mode. No Colour 1. Selection of TV system; 2. Improper colour adjustment; 3. Incorrect video output settings. 1. Change the system by pressing the System button on the remote controller. 2. Readjust the colour. (See TV instructions) 3. Check if the video output settings are correct. Disc can’t be played 1. No disc in the drive. 2. Disc placed incorrectly 3. Moisture has condensed in the unit. 4. Not in play mode. 5. Wrong disc format. 6. Disc is dirty. 1. Insert a disc. 2. Put the disc on the tray properly 3. Leave the unit on for about an hour (without disc) before using it again. 4. Press the play button to switch to play mode. 5. Replace it with a supported disc. 6. Clean the disc with a soft cloth from the centre to the edge. Remote Controller malfunction 1. The remote controller is not directed at the sensor; 2. The distance to receiver is more than 8 metres; 3. Low voltage of the RC batteries; 4. This is an obstacle between the unit and RC. 1. Direct the remote controller at the sensor. 2. Reduce the distance. 3. Replace all the batteries. 4. Remove the obstacle Sudden malfunction 1. Bad disc quality; 2. Press other buttons by mistake; 3. Static from the outside. 1. Wait for 5-10 seconds and the playing will be restored. 2. Operate again. 3. Shut off the unit for 1-2 minutes and turn on again. Picture dividing 1. The selected system is incompatible with the disc ; 1. Set up the correct system (interlaced vs progressive) External signal can’t be recorded 1. Incorrect system connection. 2. No disc or non-recordable disc; 3. The disc has been finalised. 4. There is no free space in the disc. 1. Connect properly. 2. Insert a recordable disc. 3. Change a disc. 4. Change a disc. No monitoring signal 1. Input source incorrect. 2. Wrong video output system. 3. The actual input source is not consistent with the selected one. 1. Select the input source. 2. Switch the video output system. 3. Select a proper input source. 4. When input AV or S-video and there is sound but not picture, please confirm PSCAN mode. Timer recording can’t be done 1. The disc does not meet the requirements. 2. Wrong time settings (System Clock or Recording Time; 1. Replace it with a new DVD±R or DVD±RW disc. 2. Set up the time again. 3. Reset the system. Recording aborted halfway 1. There is no free space on the disc. 2. Bad disc quality. 1. Replace it with a blank disc 2. Replace it with a high quality disc. Only display HELLO on VFD 1. Signal connection between the decoder board and HDD is loose. 2. HDD is damaged. 1. Follow warranty instructions Some DIVX discs can’t be read 1. Reads for a long time 2. Can be read, but can’t be played 3. Can be viewed, but with image defects or disordered subtitle. This player is only compatible with standard MPEG4 discs including those with format of SMI, SRT, SSA, SUB, TXT, etc. And is not compatible with those discs, which are labelled as MPEG4 but actually are in format of Real video or the other proprietary format. ( for example, rm/ ra/ ram/ wmc/ ast, etc) and such discs can only be played on computer with special software. 42 Specifi p cations DISC TYPES SUPPORTED AUDIO PERFORMANCE DA Converter 24bit DVD±RW Playback, Recording AD Converter 16bit DVD±R Playback DVD Linear Sound DVD -Video Recording 48 kHz Sampling 4Hz to 22kHz SVCD Playback 96 kHz Sampling 4Hz to 44kHz CD-Audio Playback Audio CD 4Hz to 20kHz CD-R/RW Playback Signal to Noise Ratio > 90dB MP3 Playback Audio Dynamic Range > 80dB JPEG Playback Harmonic Distortion < 0.001% (W.PEAK) Kodak Playback OUTPUT CONNECTIONS RECORDING Media DVD±R, DVD±RW Component Video Out Diameter 12cm Y Capacity 4.7GB 0.7±0.14Vp -p (75 Ohm), Negative Sync Recording Time Approx. 6 hours Pb/Pr 0.7±0.14Vp-p (75 Ohm) TV Systems NTSC/ PAL S-Video Out Digital Compression MPEG3, MPEG1 Mini DIN 4-Pin (Y = 0.7±0.14 Vp-p C = 0.3± 0.06 Vp-p 75 Ohm) Recording Types Live, Timer Composite Video Out Max Simultaneous Timer Recordings 8 One Pin Jack 1±0.2Vp-p (75 Ω) Coaxial Digital Out Recording Features Pause, Record, Auto-Insert Chapter, Index Screen Navigator, Multi Record Modes One Pin Jack 0.5V+0.1V/-0.2V (75 Ω) Optical Digital Out Standard TOSLINK Connector Analog Audio Out 2.0+0.2/2.0-1.0 VRMS (47K Ω) Editing Features Erase Disc, Show Chapter, Edit Title Name PLAYBACK MP3 & JPG Navigator Fast Forward / Reverse to 32X Slow Motion Playback Repeat Playback ( Chapter / Disc & A-B) Commercial Skip Function 150% or 200% VIDEO PERFORMANCE Resolution 720x480 NTSC, 720x576 PAL in HQ Mode DA Converter 8bit AD Converter 9bit Video Outputs Composite, S-Video, Component Scanning Progressive Scan, Interlaced Laser 650nm INPUT CONNECTIONS S-Video In (FRONT) Mini DIN 4-Pin (75 Ω) Composite Video In (FRONT/ REAR) Cinch, 1Vp-p (75 Ω) Stereo Audio In (FRONT) 1.8VRMS (47K Ω) PHYSICAL Operating Conditions 0° C to 40° C Power Supply ~110V-240V, 50/60HZ Power Consumption 45W Dimensions 55mmX430mmX250mm (HXWXL) Weight 7LBS 43 Attachment Supported Media (DVD±R) RECOMMENDED DVD - R Max Write Speed: 8x DVD + R NOT RECOMMENDED DVD - R Max Write Speed: 8x DVD + R MEDIA SPEED MANUFACTURER ID TDK 4x RICOH JPN TDK 8x RICOH JPN TDK 4x RICOH JPN TDK 8x RICOH JPN MEDIA SPEED MANUFACTURER ID PRINCO 4x PRINCO FUSION 8x YUDEN000 OPTO 4x Op1 FUJIFILM 8x R01 MEDIA SPEED MANUFACTURER ID TDK 2x TDK502SAKUM3 TDK 4x TDK502SAKUM3 TDK 4x W11 TDK 4x W11 MEDIA SPEED MANUFACTURER ID SKC 2x OPTODISC RISHENG 4x OPTODISC IMATION 2.4x OPTODISCW002 RISHENG 4x OPTODISC Supported Media (DVD±RW) RECOMMENDED DVD - R Max Write Speed: 8x DVD + R NOT RECOMMENDED DVD - R Max Write Speed: 8x DVD + R 44 DVDRX160 USER MANUAL