1
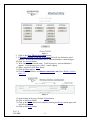
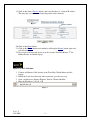
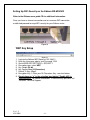
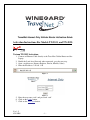
TravelNet Internet Only Cellular Router Activation Guide
Activation Instructions For Models TN-2033, and TN-2055:
Verizon TN-2055 Activation:
1. Connect an Ethernet Cable directly to the TravelNet Cellular Router and the
Laptop.
2. Enable the Local Area Network, when connected, go to the next step.
3. Open a web browser (Internet Explorer, Firefox, Mozilla, Safari)
4. Enter the IP address: 192.168.1.10
Figure 1
Figure 2
5. Enter the user name ‘ctek’ and password ‘ctek’
6. Click on the Login button.
7. Click on the Activation button.
Ver. 1.5
4/21/2009
-1-
Figure 3
8. Click on the Over The Air Activation button.
9. If Network Stability is OK For Activation (if Not Ok for Activation, wait 3
minutes.) If Not OK for Activation for 15 additional minutes, contact Support.
10. Click the Activate button.
11. Wait 3 minutes, then check status. If still in progress, wait an additional 3
minutes. If still in progress or ‘failed’, contact support.
12. When ‘Activated’ click Back button
13. Click the Home button.
14. Go to Interfaces-Wireless and Wireless Connection: and Select ‘Enable’ (refer to
figure 11)
Figure 4
15. At the bottom of the page, click the Update button.
16. Click on the Home button.
17. Click on the Restart button and confirm by clicking the Restart button again, and
wait 30 seconds.
18. Click on the Home button.
Ver. 1.5
4/21/2009
-2-
19. Click on the Status-Wireless button, and verify that there is a Current IP address.
This may take several minutes depending on the carrier network.
Figure 5
20. Click on the Home button.
21. Click on the Restart button and confirm by clicking the Restart button again, and
wait 30 seconds.
22. Do a restart of all network devices in order, first the TravelNet Router, 2nd the
Edimax Router, and finally laptop.
Sprint TN-2033 Activation:
1. Connect an Ethernet Cable directly to the TravelNet Cellular Router and the
Laptop.
2. Enable the Local Area Network, when connected, go to the next step.
3. Open a web browser (Internet Explorer, Firefox, Chrome, Mozilla)
4. Enter the IP address: 192.168.1.10
Figure 6
Ver. 1.5
4/21/2009
-3-
Figure 7
5.
6.
7.
8.
Enter the user name ‘ctek’ and password ‘ctek’
Click the Log In button.
Click on the Activation button.
Click on the Over the Air Activation button
Figure 8
9. If Network Stability is Ok for Activation then go to step 10, if Not Ok, then wait 3
minutes. If still Not Ok, call support.
Figure 9
Ver. 1.5
4/21/2009
-4-
10. Click on the Activate button.
11. Wait 3 minutes, then click the Status button. If still in progress, then wait an
additional 3 minutes. If still in progress or ‘failed’, contact support.
12. When status changes to ‘Activated’ click the Back button.
13. Click on the Home button.
14. Click on the Interfaces-Wireless button and change the Wireless connection type
to ‘Enable’ (refer to fig. 10)
Figure 10
15. At the bottom of the page, click the Update button.
16. Ok, then click the Home button.
17. Click on the Restart button and confirm by clicking the Restart button again, and
wait 30 seconds.
Figure 11
18. Click on the Home button.
19. Click the Status-Wireless button, verify that there is a Current IP address.
20. Click on the Home button.
21. Click on the Restart button and confirm by clicking the Restart button again, and
wait 30 seconds.
22. Do a hard restart of all network devices in order, first the Cellular Router, 2nd the
WiFi Router, and finally laptop.
Ver. 1.5
4/21/2009
-5-
Setting Up WiFi Security on the Edimax BR-6204WG
Refer to the Edimax users guide CD for additional information.
Once you have an internet connection and an unsecure WiFi connection
established proceed to setup WiFi security for your Edimax router.
Figure 12
WEP Key Setup
Figure 13
1.
2.
3.
4.
5.
6.
7.
8.
9.
Log into the Edimax WiFi Router at 192.168.2.1
Enter the Username ‘admin’ and Password ‘1234’
Go to WIRELESS SETTINGS > SECURITY
Encryption type: select WEP
Key Length: 64-bit
Key Format: Hex (10 Characters)
Default Tx Key: Key 1.
Encryption Key 1: Enter your 10 Characters Key- see chart below
Do not place an “x” in the selection box labeled “Enable 802.1x
Authentication” for normal installations. If there are any questions call
TravelNet Technical Support.
Ver. 1.5
4/21/2009
-6-
Figure 14
WEP Key Setup
Parameters Default
Key Length 64-bit
Key Format
Description
You can select the WEP key length for encryption, 64-bit
or 128-bit. Larger WEP key length requires 26
hexadecimal characters.
Use hexadecimal digits (in the "A-F", "a-f" and "0-9"
range) to be the WEP Key.
Examples:
Hexadecimal Digits: 12345abcde or abcdef0123
10. Write key on piece of paper or on Edimax manual and keep in a safe
place with other important documentation.
11. Click on the Apply Button and wait for the System to automatically
Restart. Click OK button and security setup is complete.
12. Call TravelNet Technical Support (877) 475-7771 if there are questions
concerning Apple Computers or if you prefer to use other encryption
methods.
To connect your XP computer to your wireless network
Configuring the Windows XP Wireless Clients (With WEP)
Configuration of the Windows XP wireless clients for WEP key authentication depends
on whether you are using Windows XP with SP2 or Windows XP with SP1 and whether
the wireless network adapter driver supports Wireless Auto Configuration.
Ver. 1.5
4/21/2009
-7-
Wireless Network Adapter Driver Supports Wireless Auto Configuration with
Windows XP with SP2
Use the following procedure to configure Windows XP with SP2 for your infrastructure
mode wireless network when the wireless network adapter supports Wireless Auto
Configuration:
1. When the computer is within range of the wireless router or Access Point (AP)
operating in your home or small business, Windows XP should detect it and
prompt you with a Wireless networks detected message in the notification area
of your taskbar.
2. Click the notification message. If you are not notified, right-click the wireless
network adapter in Network Connections, then click View Available Wireless
Networks. In either case, you should see a Choose a wireless network dialog
box with the name of your wireless network. (If the “TravelNet xxxx” wireless
network is not displayed, it may be necessary to reset the unit by removing its
power plug for 10 seconds, then reinsert the power plug and wait 45 to 60
seconds). Then select the “View Available Wireless Networks” again.
3. Double-click your wireless network name. Windows XP will attempt to connect
to your wireless network.
4. Because Windows XP has not been configured with the WEP key for your
wireless network, the connection attempt will fail and Windows XP will prompt
you with a Wireless Network Connection dialog box. Type the WEP key in
Network key and Confirm network key, and then click Connect.
5. If the status message for your wireless network in the Choose a wireless network
dialog box is Connected, you are done. If the status message for your wireless
network in the Choose a wireless network dialog box is Authentication did not
succeed, click Change the order of preferred networks in the list of Related
tasks. From the Wireless Networks tab of properties of your wireless network
adapter, click the name of your wireless network in Preferred networks, and
then click Properties.
6. In Network Authentication, click WEP.
7. In Network key, type the WEP key as configured on the wireless Access Point
(AP). In Confirm network key, retype the WEP key.
8. Click OK to save changes to the wireless network.
9. Click OK to save changes to the wireless network adapt
To connect your Windows Vista computer to your wireless network
View and connect to available wireless networks
Applies to all editions of Windows Vista.
If you have a mobile PC, you can see a list of available wireless networks, and then
connect to one of those networks, no matter where you are. The wireless networks appear
Ver. 1.5
4/21/2009
-8-
only if your computer has a wireless network adapter installed and the adapter is turned
on.
1. Open Connect to a Network by clicking the Start button
Connect to.
, and then clicking
2. In the Show list, click Wireless.
You'll see a list of the wireless networks currently available. If you do not see a network
listing similar to this example: TravelNet 1234, it may be necessary to reset power on the
WiFi router, wait 45 to 60 seconds and refresh the “View Available Wireless Networks”.
3. Highlight your wireless network choice, then click Connect.
If you don't see the network you want to connect to, click Set up a connection or
network. A list of options will appear that includes manually searching for and connecting
to a network, as well as creating a new network connection.
Some networks require a network security key or passphrase. To connect to one of those
networks, ask the network administrator or the service provider for the key or passphrase.
Enter WEP encryption key in same manner as described on previous page for Windows XP
Whenever possible, you should connect to security-enabled wireless networks. If you
do connect to a network that is not secure, be aware that someone with the right tools
can see everything that you do, including the websites you visit, the documents you
work on, and the user names and passwords that you use.
After you're connected, you can close the Wireless Network Connection
window. Now you're ready to browse the Web wirelessly. You can also create a
wireless network in your home, RV or boat that connects your computers,
printers, cameras, games, and other accessories for easy access and enjoyment.
QUESTIONS? CALL OUR SUPPORT LINE: 877-475-7771 or visit our
website FAQ at http://www.winegard.com
TravelNet
Winegard Company
Ver. 1.5
4/21/2009
-9-
Support: (877) 475-7771
FAX: 847-991-3328
FAX: 847-991-3328
Ver. 1.5
4/21/2009
- 10 -
For Winegard TravelNet Internet Only Models
(TN-2033, TN-2055, TN-2099)
WINEGARD MOBILE PRODUCTS LIMITED WARRANTY
(2 YEARS PARTS)
Winegard Company warrants this product against defects in materials or workmanship for a
period of two (2) years from the date of original purchase. No warranty claim will be honored
unless at the time the claim is made, Customer presents proof of purchase to an authorized
Winegard dealer (to locate the nearest authorized Winegard dealer, contact Winegard Company,
3000 Kirkwood Street, Burlington, Iowa 52601, Telephone 800-288-8094 or visit
www.winegard.com). Customer must provide proof of purchase with a dated sales receipt for the
Winegard product to verify the product is under warranty. If the date of purchase cannot be
verified, the warranty period shall be considered to begin thirty (30) days after the date of
manufacture.
If a defect in material or workmanship is discovered, Customer may take the product to an
authorized Winegard dealer for service. Customer must provide proof of purchase to verify the
product is under warranty.
Alternatively, Customer may ship the product prepaid to Winegard Technical Services (located
at 3111 Kirkwood Street, Burlington, Iowa 52601, Telephone 800-788-4417). Customer must
return the product along with a brief description of the problem and provide Winegard Technical
Services with Customer’s name, address, and phone number. Customer must also provide proof
of purchase to verify the product is under warranty. If the product is returned before the expiration
of the warranty period, Winegard Company will (at its option) either repair or replace the product.
This Limited Warranty does not apply if the product has been damaged, deteriorates,
malfunctions or fails from: improper installation, misuse, abuse, neglect, accident, tampering,
modification of the product as originally manufactured by Winegard in any manner whatsoever,
removing or defacing any serial number, usage not in accordance with product instructions or
acts of nature such as damage caused by wind, lightning, ice or corrosive environments such as
salt spray and acid rain.
RETURN AUTHORIZATION POLICY
A Return Material Authorization (RMA) is required prior to returning any product to Winegard
Company or Winegard Warranty Services under this warranty policy. Please call our Technical
Services Department at 800-788-4417 or send an e-mail to [email protected] to obtain
the RMA number. Please furnish the date of purchase when requesting an RMA number.
Enclose the product in a prepaid package and write the RMA number in large, clear letters on the
outside of the package. To avoid confusion or misunderstanding, a shipment(s) without an RMA
number(s) or an unauthorized return(s) will be refused and returned to Customer freight collect.
WINEGARD COMPANY DOES NOT ASSUME ANY LIABILITIES FOR ANY OTHER
WARRANTIES, EXPRESS OR IMPLIED, MADE BY ANY OTHER PERSON.
Ver. 1.5
4/21/2009
- 11 -
ALL OTHER WARRANTIES WHETHER EXPRESS, IMPLIED OR STATUTORY INCLUDING
WARRANTIES OF FITNESS FOR A PARTICULAR PURPOSE AND MERCHANTABILITY ARE
LIMITED TO THE TWO YEAR PERIOD OF THIS WARRANTY.
In states that do not allow limitations on implied warranties, or the exclusion of limitation of
incidental or consequential damages, the above limitations or exclusions do not apply.
Some states do not allow limitations on how long an implied warranty lasts, or the exclusion of
limitation of incidental or consequential damages, so the above limitations or exclusions may not
apply to you.
This warranty gives Customer specific legal rights. Customer may also have other rights that
may vary from state to state.
For Winegard TravelNet Internet and Phone Models
(TN-2301, TN-2303, TN-2305, TN-2307)
WINEGARD MOBILE PRODUCTS LIMITED WARRANTY
(1 YEAR PARTS)
Winegard Company warrants this product against defects in materials or workmanship for a
period of one (1) year from the date of original purchase. No warranty claim will be honored
unless at the time the claim is made, Customer presents proof of purchase to an authorized
Winegard dealer (to locate the nearest authorized Winegard dealer, contact Winegard Company,
3000 Kirkwood Street, Burlington, Iowa 52601, Telephone 800-288-8094 or visit
www.winegard.com). Customer must provide proof of purchase with a dated sales receipt for the
Winegard product to verify the product is under warranty. If the date of purchase cannot be
verified, the warranty period shall be considered to begin thirty (30) days after the date of
manufacture.
If a defect in material or workmanship is discovered, Customer may take the product to an
authorized Winegard dealer for service. Customer must provide proof of purchase to verify the
product is under warranty.
Alternatively, Customer may ship the product prepaid to Winegard Technical Services (located
at 3111 Kirkwood Street, Burlington, Iowa 52601, Telephone 800-788-4417). Customer must
return the product along with a brief description of the problem and provide Winegard Technical
Services with Customer’s name, address, and phone number. Customer must also provide proof
of purchase to verify the product is under warranty. If the product is returned before the expiration
of the warranty period, Winegard Company will (at its option) either repair or replace the product.
This Limited Warranty does not apply if the product has been damaged, deteriorates,
malfunctions or fails from: improper installation, misuse, abuse, neglect, accident, tampering,
modification of the product as originally manufactured by Winegard in any manner whatsoever,
Ver. 1.5
4/21/2009
- 12 -
removing or defacing any serial number, usage not in accordance with product instructions or
acts of nature such as damage caused by wind, lightning, ice or corrosive environments such as
salt spray and acid rain.
RETURN AUTHORIZATION POLICY
A Return Material Authorization (RMA) is required prior to returning any product to Winegard
Company or Winegard Warranty Services under this warranty policy. Please call our Technical
Services Department at 800-788-4417 or send an e-mail to [email protected] to obtain
the RMA number. Please furnish the date of purchase when requesting an RMA number.
Enclose the product in a prepaid package and write the RMA number in large, clear letters on the
outside of the package. To avoid confusion or misunderstanding, a shipment(s) without an RMA
number(s) or an unauthorized return(s) will be refused and returned to Customer freight collect.
WINEGARD COMPANY DOES NOT ASSUME ANY LIABILITIES FOR ANY OTHER
WARRANTIES, EXPRESS OR IMPLIED, MADE BY ANY OTHER PERSON.
ALL OTHER WARRANTIES WHETHER EXPRESS, IMPLIED OR STATUTORY INCLUDING
WARRANTIES OF FITNESS FOR A PARTICULAR PURPOSE AND MERCHANTABILITY ARE
LIMITED TO THE ONE YEAR PERIOD OF THIS WARRANTY.
In states that do not allow limitations on implied warranties, or the exclusion of limitation of
incidental or consequential damages, the above limitations or exclusions do not apply.
Some states do not allow limitations on how long an implied warranty lasts, or the exclusion of
limitation of incidental or consequential damages, so the above limitations or exclusions may not
apply to you.
This warranty gives Customer specific legal rights. Customer may also have other rights that
may vary from state to state.
Ver. 1.5
4/21/2009
- 13 -