1
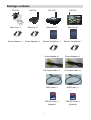
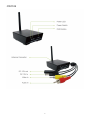
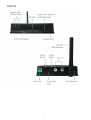
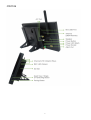
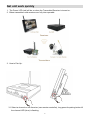
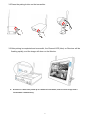
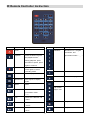
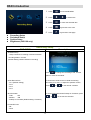
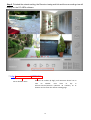
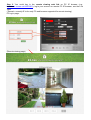
Digital Wireless Series Product
User’s Guide
This User’s Guide is applicable to the following products:
#CW1103 - Digital Wireless Camera
#CW1105 - Digital Wireless Transmitter
#CW1104 - Quad Digital Wireless DVR
#CW1106 - Quad Digital Wireless 7” DVR
Ver.1.1
121029
Table of contents
Package contains ....................................................................................................................... 3
User’s Interfaces ........................................................................................................................ 4
Get unit work quickly .................................................................................................................. 8
Useful Operation Advices......................................................................................................... 10
Recording Duration .................................................................................................................. 10
IR Remote Controller Instruction .............................................................................................. 11
OSD Introduction...................................................................................................................... 12
Software & Hardware Specifications on PC, iPhone, iPad ....................................................... 12
ASP4 (PC Player) User’s Interface........................................................................................... 15
Remote View Steps for CW1104 / CW1106............................................................................. 17
Remote View Steps for iPhone / iPad ...................................................................................... 20
Technical Specification............................................................................................................. 23
Annex1 (Compatible Router list) .............................................................................................. 25
Annex2 (Incompatible Router list) ....................................................................................................... 25
-2-
Package contains
CW1103
CW1105
CW1104
CW1106
Main Unit x1
Main Unit x1
Main Unit x1
Main Unit x1
Power Adapter x 1
Power Adapter x 1
Remote Controller x 1
Remote Controller x 1
Power Adapter x 1
Power Adapter x 1
AV Output Cable x 1
AV Output Cable x 1
USB Cable x 1
USB Cable x 1
2GB SD Card x 1
2GB SD Card x 1
(Optional)
(Optional)
3
User’s Interfaces
CW1103
4
CW1105
5
CW1104
6
CW1106
7
Get unit work quickly
1. The Power LED (red) will be on when the Transmitter/Receiver is turned on.
2. Below transmitters and receivers are fully inter-operable.
3. How to Pair Up:
3.1 Select a channel on the Receiver (use remoter controller), long press the pairing button till
the channel LED (blue) is flashing.
8
3.2 Press the pairing button on the transmitter.
3.3 After pairing is completed and successful, the Channel LED (blue) on Receiver will be
flashing rapidly, and the image will show on the Monitor.
A Receiver is able to be paired up to 4 different Transmitters, and to receive image from 4
Transmitters simultaneously.
9
Operation Advices
1. Once #CW1104 / #CW1106 is powered on and with SD card inserted, recording is factory
preset at motion detection.
It can be reset as continuous recording, having schedule through OSD menu.
For panic recording, please press
2. Press
on the remote controller.
on the remote controller to get into playback menu.
3. For #CW1106- 7’’ DVR, press Hotkey
LED indication; press
4. Press
+
+
+
on remote controller to turn off the
to turn on.
on remote controller to turn off the LCD monitor, press any key to
turn on.
5. There is 10 seconds timer count down when start recording, during count down, no remote
control command would be accepted.
6. Receiver USB plug into PC, the video will stream to PC and can be viewed / recorded with
bundled ASP4 software on PC directly. After streaming the video to PC, the recording setup
on receiver will be no function.
The PC Operation System required Windows XP (SP2) or above.
Hardware Environment: CPU P4 2.0G / RAM 2GB or above.
7. The settings on ASP4 can not be applied on Receiver DVR (CW1104 or CW1106), and vice
versa.
8. Remote View function is supported by bundled ASP4 software; please refer to “Remote
View Quick Guide for CW1104 / CW1106” section. (Page 15)
Recording Duration
Single Channel (full screen) with Audio & Continuous Recording
1GB
4GB
8GB
16GB
32GB
3.95 hr
15.84 hr
31.58 hr
63.26 hr
126.56 hr
Quad-View / 4 Channels with 1CH Audio & Continuous Recording
1GB
4GB
8GB
16GB
32GB
2.91 hr
11.65 hr
23.22 hr
46.56 hr
93.31 hr
10
IR Remote Controller Instruction
Button
Function
Description
Button
Power
Function
Description
Numbers
Numbers 5 to 0, English
characters, and
Playback
punctuation marks “,_.”
Press the button to get to
the playback menu.
During playback, press
the button to pause, press
again to continue.
Panic Record
Start to record manually.
Press again to cancel
Clear
recording mode.
QUAD
SEQUENCE
Quad display mode.
Return to last page
Confirm
Enter
Auto sequence display
mode
MENU
Return
Menu
Up / Down /
CH1
Channel 1 & Number 1 &
Right / Left
punctuation marks
“- / +”
CH2
Channel 2 & Number 2 &
“A B C”
CH3
Channel 3 & Number 3 &
Mute
Key sound off
Lock
Key Lock
“ D E F”
CH4
Channel 4 & Number 4 &
“G H I”
11
OSD Introduction
1. Press
to enter MAIN MENU
2. Press
to select item
3. Press
to enter the selected item
4. Press
to get back to live view
5. Press
to get back to last page
Recording Setup
Peripheral Setup
System Setup
Brightness (CW1106 only)
Recording Setup
OSD MENU
Description
- Schedule Setup
- Setup Continuous recording or Motion Detection
recording Mode in a week.
(Default Setting: Motion Detection recording)
Press
to change the recording mode; exit this
option to save the schedule.
- Audio Record from
To choose the audio source in Quad View during
- CH 1 (Default setting)
Recording /Live view. To adjust the speaker volume,
- CH 2
press
- CH 3
or
on the remote controller.
- CH 4
To choose SD method with Fullstop or Overwrite, press
- SD Information
- Total:
GB
- Remain:
GB
or
- Fullstop or Overwrite (Default setting: Overwrite)
- Format SD Card
- OK
- Close
12
on the remote controller.
Peripheral Setup
OSD MENU
Description
- Buzzer Setup
- Video Loss
Press
- ON
or
to change Buzzer ON / OFF.
Default setting is ON.
- OFF
- Motion Detect
- ON
- OFF
- Buzzer Duration
To setup the Buzzer beep duration time.
- 02 ~ 10 sec
Default setting: 2 seconds.
- Display Setup (TV-out only)
To adjust the display position for TV Out; press
- Left Pos
to move.
- Right Pos
- Up Pos
- Down Pos
System Setup
OSD MENU
Description
- Date/Time Setup
- Display Format
- YYYY-MM-DD
Press
- MM-DD-YYYY
change the format.
to select item, and press
to
- DD-MM-YYYY
- Time Format
- 24 H
- 12 H
-YEAR
Press Number keys to setup the Date/Time directly.
- MONTH
- DAY
- HOUR
- MINUTE
- SECOND
- AV Output (CW1106 only)
Press
- Video Out
to select item, and press
change the option. Press
- LCD
menu.
- TV-out NTSC
- TV-out PAL
13
to
to confirm and exit the
- Audio Out
- Speaker Out (Default setting)
- Line Out
- Channel Sequence Time:
Default setting: 5 seconds.
- 05 ~ 30 sec.
- Factory Default:
- Yes
- Cancel
- Firmware Version
- Vxxxx.xx
Brightness Setup
(CW1106 Only)
OSD MENU
Description
Level 6
To adjust the Brightness for LCD monitor; Level 6 is the
Level 5
brightest. Press
Level 4
to confirm.
Level 3
Level 2
Level 1
14
to select, and press
Software & Hardware Specifications on PC, iPhone, iPad
To use the remote viewing on PC, we highly recommend you to have the following software and
hardware specifications on your PC,
Microsoft® Windows XP, or Windows 7 (.NET Framework 3.5 higher)
Internet Explorer® 8 or higher.
CPU: 2.0GHz or higher (only support x86 and x64)
Memory: 1GB (up)
Display card: Independent display card and support DirectX 9.0 or higher.
To use the remote viewing on iPhone / iPad, we highly recommend you to have the following
software and hardware with your iPhone / iPad,
iPhone 3 or higher
iPad
iOS 4.3 or higher
15
ASP4 (PC Player) User’s Interface
System Setting
Recording Mode
Open file, to search the
Network ON / OFF
recording files
(for remote view)
Snapshot, to save JPG
CH1 Full screen display
picture
CH2 Full screen display
CH3 Full screen display
CH4 Full screen display
Quad-View display
Manual recording during
live view & backup files
during playback
Backwards
Pause
Forwards
Stop
Play
16
Remote Viewing Steps for CW1104 / CW1106
Easy 3 steps to see the Live View remotely:
Step 1. Install the bundled software ASP4 on PC, and highly recommend to change the log-in
User Name / Password (default User Name & Password: Admin / Admin ) in “Network
Setting”. The “ID” means receiver ID number, it would automatically show on the network
setting when you plug-in your USB cable.
** Click OK to complete the setting and protect the data security.
17
Step 2. Finished the network setting, the Remote viewing web link and the surrounding view will
display on the PC ASP4 software.
** http://www.ez-see.net/10001901
Server domain name
Receiver ID number (8 digit), each Receiver device has its
own
ID
number.
User
have
to
key
in
www.ez-see.net/xxxxxxxx (Receiver ID number) on IE
browser and to enter the remote viewing page.
18
Step 3. You could key in the remote viewing web link on PC IE browser (e.g.,
http://www.ez-see.net/10001901), log-in your account on remote PC IE browser, see the Live
View!
(*Remark: currently IE is the only PC web browser supported for remote viewing.)
PC log-in page:
(Remote viewing page)
19
Remote Viewing Steps for iPhone / iPad
Step1. Search “EZ-SEE” app on APP Store.
Step2. Press "add" to create an account as your EZ-SEE ID,
20
Step3. Fill in the ID, User Name and Password (same as the ASP4 network setting) and press
"Save" button which on the upper right corner.
Step4. You would see your ID number on your iPhone / iPad (e.g., 10001901).
My house
21
Step5. Enjoy your live viewing!! In this page, you could check the Quad-viewing or one channel
viewing mode by your desire. On the top of the page, you would see your defined DVR name
(same as your DVR name on ASP4 software network setting).
(Quad-viewing)
22
Technical Specification
General
Channel Pairing
4 Tx to 1 Rx
Operation Frequency Range
2408.625 ~ 2470.5 MHz
Channels hopping
24 channels
Modulation
GFSK, FHSS (digital)
Transmission Range
150M (or longer with high gain antenna)
Transmitter RF output power
15.5 ~ 18.5 dBm
Digital Wireless Camera #CW1103
Resolution / Frame Rate
640x480 @ 30fps
Antenna connection
Fixed type
Antenna gain
1.5 dBi
RF Data Rate
3Mbits /Second
Image Sensor
1/4'' SOC Sensor
Lens
2.5MM
IR LED
8pc
IR Filter
IR 940nm
Power Consumption
12V 135mA (without IR)
12V 245mA (with IR)
Power
12V
Dimensions
ca. 65 x 87 x 175 MM
Operation temperature
0°C ~ 40°C (32°F~ 104°F)
Quad Digital Wireless Recorder #CW1104 / CW#1106
Resolution / Frame Rate
640x480 / Quad View
640x480 @ 30fps per Channel
1CH Recording / 4CH Quad Recording
Antenna connection
SMA Reverse
Antenna gain
3 dBi
Receiving sensitivity
-85 dBm Above
Video compression
MPEG-4
Recording Mode
Schedule Continuous
Schedule Motion
Panic
Trigger by Tx PIR Input (under development)
Recording file format
.SNX (with bundled ASP4 software)
Playback Mode
Listed by Date/Time
Recording Storage
SD Card Fullstop or Overwrite (support up to
32GB)
Alarm Out
1 set (NC or NO)
System Setup
Date / Time Stamp
23
AV Output
Channel Seq. Time
Buzzer Setup
Display Setup
Factory Default
USB connection
Yes, with bundled ASP4 software for Remote
View
Power Consumption
12V 130mA (#CW1104)
12V 280mA (#CW1106)
Power Adapter
12V 1A
Case Dimension
104 x 112 x 28 MM (#CW1104)
190 x 122 x 85 MM (#CW1106)
Operation temperature
0°C ~ 40°C (32°F~ 104°F)
24
Annex1 (Compatible Router list)
The following routers have all been tested and fully compatible with ASP4 software.
Router Manufacturer
BELKIN (F5D8235-4 v2)
D-Link (DI-604)
D-Link (DI-707P)
EDIMAX (BR-6204Wg)
GigaByte (GN-BR02G)
IO DATA(ETX-R)
IO DATA(NP-BBRL)
Lemel (LM-IS6400B)
LevelOne (FBR-1418TX)
LevelOne (WBR-3405TX)
Octtle GW/NAT (SP4220)
SMC (SMCBR14)
SMC (SMCWBRS14-N2-TW)
TP-LINK (TL-R402M)
TP-LINK (TL-R460)
BELKIN (F7D1301 v3)
Corega (CG-BARMX2)
IO DATA(ETG-R)
IO DATA(NP-BBRM)
LINKSYS (BEFSR41W)
NETGEAR (WGR614)
NETGEAR (WNDR3400)
NETGEAR (WNDR3700v2)
TP-LINK (TL-R480T+)
Zonet (ZSR0104B)
ZyXEL (NBG-4115)
ZyXEL (NBG-419N)
3COM (3CRWER100-75)
AboCom (WB02N)
ASUS (RT-N12)
ASUS (Rx3041)
ASUS (Rx3041 v2)
BUFFALO (WZR-HP-G300NH)
BUFFALO (WZR-HP-G300NH2)
D-Link (DI-LB604)
D-Link (DIR-101)
25
DrayTek (Vigor2110)
DrayTek (Vigor2200V/VG)
DrayTek (Vigor2910)
EDIMAX (BR-6228nS)
EDIMAX (BR-6314K)
LINKSYS (E2000)
LINKSYS (WRT150N)
LINKSYS (WRT160NL)
SAPIDO (RB-1802)
SAPIDO (RB-3001)
TP-LINK (TL-WR841N)
ZyXEL (Prestige 334)
Annex2 (Incompatible Router list)
So far, there are two routers may not work with ASP4 software. The routers name are as follow.
Router Manufacturer
AboCom (FSM410)
ASUS (Rx3081)
26
Thank you for purchasing our Quad Digital Wireless Series Products. Please
read this manual before installation.
For customer support, please contact your dealer, and keep your Invoice for
further support.
Do not open/modify the device, as it may cause damage to the unit and
void the Warranty. For internal repairs, consult your dealer or an Authorized
Service Center.
Do not use any accessories other than what comes with the unit otherwise, it
would void the warranty.
Protect from humidity. Do not put it in water and be careful to protect it
from sea water or high humidity environment etc.
Protect from high temperatures
To avoid damage or mis-operation of the device, only use it in the temperature
between 0 ~ +40°C.
Do not bring the device suddenly from a hot to a cold place, or vice versa.
This may cause damaged to the inside of the unit by creating condensation.
EU Environmental Protection
The symbol of crossed-out garbage shows that this product should not be
treated as household waste, and it falls into the category of electric /electronic
equipment for recycling. This electronic device should not be disposed in a
regular trash. We strongly advice you to contact related authorization before
you dispose this product.
27