1
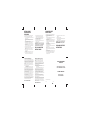
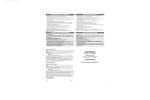
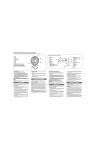
OPERATING INSTRUCTIONS
PRODUCT MAY VARY SLIGHTLY FROM ILLUSTRATIONS
Hook
Front
Grille
Fan
Blade
Rear
Grille
Motor
Shaft
Motor Housing;
keep vents free of
lint and dust.
Inner Pipe
Inner Pipe Stopper
Height Adjustment
Control Collar
Outer Pipe
4 Screws
Blade
Cap
Plastic
Collar
Shaft
Pin
Switch
Box
Base Cap
Clip
INSTRUCCIONES DE FUNCIONAMIENTO
Oscillating
Knob
Switches (Off, Lo, Med and Hi)
(0, I, II, III)
Swivel Joint
Power Supply Cord
ESTE PRODUCTO PUEDE VARIAR LIGERAMENTE DE LAS
ILUSTRACIONES
Tope para detener
el tubo
Tubo exterior
Parrilla
frontal
Aspa
Tapa
Anillo para ajuste de altura
Tapa de la base
Inner Pipe Stopper
(inside Outer Pipe)
Holes
Reborde
Base End Cap
Anillo de
plástico
Clip
Interruptores (Apagado,
Bajo, Mediano, Alto)
(0, I, II, III)
Tope para detener el
tubo interior (dentro del
tubo exterior)
Agujeros
Perilla para
oscilación
Clavija del eje
Cordón
Perilla para fijar
(sostiene la caja del
interruptor en su lugar)
Enchufe polarizado
Tubo
interior
Anillo para ajuste
de altura
Tapa de la barra
Bar A
Unión
giratoria
Caja del
interruptor
Inner Pipe
Height Adjustment
Control Collar
Eje del
motor
Caja del motor;
mantener libre de
pelusas y polvo
Polarized Plug
Flange
Parrilla
trasera
Tubo interior
4 tornillos
Set Knob (holds
Switch Box in place)
Gancho
Barra A
Base End
Cap
Tapa de
la barra
Bar B
Barra B
Base
FIGURE 1
FIGURE 2
Base
FIGURA 1
FIGURA 2
This appliance is for household use and may be plugged into any
120V AC electrical outlet (ordinary household current). Do not use
any other electrical outlet.
NOTE:
This appliance has a polarized plug (one blade is wider than the
other). To reduce the risk of electric shock, this plug is intended to
fit in a polarized outlet only one way. If the plug does not fit fully in
the outlet, reverse the plug. If it still does not fit, contact a qualified
electrician. Do not attempt to defeat this safety feature.
LINE CORD SAFETY TIPS
1. Never pull or yank on cord or the appliance.
2. To insert plug, grasp it firmly and guide it into outlet.
3. To disconnect appliance, grasp plug and remove it from
outlet.
4. Before each use, inspect the line cord for cuts and/or
abrasion marks. If any are found, this indicates that the
appliance should be serviced and the line cord replaced.
Please return it to our Service Department or to an
authorized service representative.
5. Never wrap the cord tightly around the appliance, as this
could place undue stress on the cord where it enters the
appliance and cause it to fray and break.
DO NOT OPERATE APPLIANCE IF THE LINE CORD SHOWS
ANY DAMAGE, OR IF APPLIANCE WORKS INTERMITTENTLY
OR STOPS WORKING ENTIRELY.
IMPORTANT:
During the first few minutes of initial use, you may notice a slight
odor. This is normal and will quickly disappear.
ASSEMBLY INSTRUCTIONS
1. Loosen and remove the four screws from bar A and bar B.
Cross the 2 bars as shown in Fig. 1 and align the four holes
with those on the flange. Secure the flange to the bars with the
four screws. Slide the base cap down over the assembly.
CAUTION: NEVER REMOVE THE SET KNOB WHICH HOLDS
THE SWITCH BOX IN PLACE (See Fig. 2).
2. If necessary, slightly loosen the set knob by turning it
counterclockwise. Slide the switch box down over the inner
pipe and tighten the set knob. Make sure the set knob is tightly
secured.
3. Unscrew the plastic collar from the shaft end of the motor
housing by turning the collar counterclockwise.
4. Mount the rear grille to the motor housing by matching the
3 holes on the rear grille to the 3 round pins on the front of the
motor housing. Push in firmly until the 3 pins protrude through
the 3 holes.
5. Secure the rear grille to the motor housing with the plastic
collar.
6. Insert the blade onto the motor shaft, matching the slot on the
back of the blade with the shaft pin (Fig. 2). Secure blade with
blade cap, turning counterclockwise to tighten.
7. Test blade operation by rotating it with your hand. There should
be no friction with the plastic collar. If blade does not rotate
freely, repeat Steps 4 through 7.
8. Mount the front grille to the rear grille by positioning the hook
on the front grille over the top of the rear grille. Secure the two
grilles with the clips attached to the front grille (Fig. 2).
OPERATING INSTRUCTIONS
1. Place the fan on a safe, flat surface where it cannot fall or be
pulled by the cord.
2. To adjust height, loosen the height adjustment control collar;
adjust to the desired height and retighten.
3. Control the direction of the airflow by firmly holding the switch
box in one hand and pushing the fan grille back to tilt up or by
pushing it forward to tilt down.
4. To make the fan oscillate, push down on the oscillating knob
located on the top of the motor housing. To stop the fan from
oscillating, pull up on the oscillating knob.
5. Plug into an electrical outlet.
6. Choose the desired speed by depressing one of the buttons:
Lo, Med or Hi.
USER MAINTENANCE INSTRUCTIONS
This appliance requires little maintenance and contains no user
serviceable parts. Do not try to fix it yourself. Refer it to qualified
service personnel if servicing is needed.
This fan is permanently lubricated and will not require
additional lubrication for the life of the fan.
TO CLEAN: Before cleaning, turn fan off and unplug from electrical
outlet. Wipe off excess dust with a lint-free cloth. To ensure
adequate air circulation to the motor, keep vents located at the rear
of the motor housing free from dust accumulation. A vacuum
cleaner hose can be used to clean these vents. Do not immerse
your fan in water or any other liquid. Disassemble grilles and blade
(Fig. 2). Grilles and blade may be cleaned with mild soap and
water. Use a soft, slightly damp cloth to wipe the remaining fan
parts. Do not allow water or any other liquid to get into the motor
housing or base. Reassemble fan after grilles and blade have dried
completely. Do not plug fan into electrical outlet until it has been
fully reassembled.
TO STORE: Make sure to disassemble and clean the fan before
storing. Retain the original packaging for the purpose of storing
your fan. Always store fan in a dry place. Never store it while it is
still plugged in. Never wrap the cord tightly around the fan, and
do not put any stress on the cord where it enters the fan, as it
could cause the cord to fray and break.
Este artefacto es para uso doméstico y puede ser enchufado en
cualquier tomacorriente de 120 voltios (corriente ordinaria
doméstica). No use ningún otro tomacorriente eléctrico.
NOTA: Este artefacto tiene un enchufe polarizado (una hoja es más
ancha que la otra). Como medida de seguridad, este enchufe sólo
debe usarse en un tomacorriente polarizado en un solo sentido. Si
no entrara en el tomacorriente, invierta el enchufe y trate
nuevamente. Si aún así no entrara, busque la ayuda de un
electricista calificado. No intente anular este distintivo de seguridad.
SUGERENCIAS PARA SEGURIDAD CON EL CORDON
1. Nunca hale o tire del cordón o del artefacto.
2. Para introducir el enchufe, sujételo firmemente y guíelo
hacia el tomacorriente.
3. Para desconectar el artefacto, sujete el enchufe y retírelo
del tomacorriente.
4. Antes de cada uso, inspeccione el cordón si tiene cortes y/o
raspaduras. Si algo fuera encontrado, esto indica que el
artefacto deberá ser revisado y el cordón deberá ser
reemplazado. Por favor, devuélvalo a nuestro Departamento
de Servicio o a un representante de servicio autorizado.
5. Nunca enrolle el cordón ajustadamente alrededor del
artefacto, ya que esto podría causar una presión excesiva
en el cordón donde éste entra al artefacto y causar
desgaste y rotura.
NO HAGA FUNCIONAR EL ARTEFACTO SI EL CORDON
MUESTRA CUALQUIER DAÑO, O SI EL ARTEFACTO
FUNCIONA INTERMITENTEMENTE O DEJA DE FUNCIONAR
COMPLETAMENTE.
IMPORTANTE:
Durante los primeros minutos de su uso inicial, usted notará un
ligero olor. Esto es normal y desaparecerá rápidamente.
INSTRUCCIONES DE ENSAMBLAJE
1. Afloje y retire los 4 tornillos de las barras A y B. Cruce las
2 barras como se demuestra en Fig. 1 y alinee los 4 agujeros
con aquellos en el reborde. Asegure el reborde a las barras con
los 4 tornillos. Deslice hacia abajo la tapa de la base sobre lo
ensamblado.
PRECAUCION: NUNCA RETIRE LA PERILLA PARA FIJAR, LA
CUAL SOSTIENE EN SU LUGAR LA CAJA DEL INTERRUPTOR
(Ver Fig. 2).
2. Si es necesario, afloje ligeramente la perilla para fijar, dándole
vuelta hacia la izquierda. Deslice la caja del interruptor hacia
abajo sobre el tubo interior y ajuste la perilla para fijar. Asegúrese
que la perilla esté fuertemente asegurada.
3. Desenrosque el anillo de plástico de la parte final del eje del
motor dándole vuelta hacia la izquierda.
4. Fije la parrilla trasera en la caja del motor concordando los
3 agujeros que se encuentran en la parrilla trasera con las
3 clavijas en la parte delantera de la caja del motor. Empuje
firmemente hasta que las 3 clavijas penetren en los 3 agujeros.
5. Fije la parrilla trasera a la caja del motor con el anillo de plástico.
6. Coloque el aspa en el eje de la caja del motor, concordando la
ranura de la parte de atrás del aspa con la clavija del eje (Fig. 2).
Asegure el aspa con la tapa, dándole vuelta hacia la izquierda
para ajustarlo.
7. Pruebe el funcionamiento del aspa rotándolo con su mano.
No debe haber fricción con el anillo de plástico. Si el aspa no
rota libremente, repita los pasos 4 a 7.
8. Fije la parrilla frontal a la trasera posicionando el gancho de la
parrilla frontal en la parte superior de la parrilla trasera. Asegure
las dos parrillas con los clips de la parrilla frontal (Fig. 2).
INSTRUCCIONES DE FUNCIONAMIENTO
1. Coloque el ventilador en una superficie segura y plana donde no
pueda caerse o ser halado por el cordón.
2. Para ajustar la altura afloje el anillo para ajuste de altura;
colóquelo a la altura deseada y ajústelo fuertemente.
3. Controle la dirección del flujo de aire sosteniendo firmemente la
base con una mano y empujando la parilla hacia atrás para
subirla o empujando hacia adelante para bajarla.
4. Para hacer oscilar el ventilador, empuje la perilla para la
oscilación, ubicada en la parte superior del motor, hacia abajo.
Para parar la oscilación del ventilador, tire la perilla para
oscilación hacia arriba.
5. Enchúfelo en un tomacorriente eléctrico.
6. Escoja la velocidad deseada presionando uno de los botones:
Baja, Mediana o Alta.
INSTRUCCIONES DE MANTENIMIENTO
PARA EL USUARIO
Este artefacto requiere poco mantenimiento y no tiene piezas que
puedan ser reparadas. No trate de repararlo usted mismo. Si
necesita reparación remítalo a personas calificadas.
Este ventilador está permanentemente lubricado y no
necesitará lubricación adicional.
PARA LIMPIAR: Antes de limpiarlo, apague el ventilador y
desenchúfelo. Sacuda el exceso de polvo con un paño libre de
pelusas. Para asegurar una circulación adecuada de aire al motor,
mantenga los orificios ubicados en la parte de atrás del motor libre
de acumulación de polvo. Una aspiradora puede ser usada para
limpiar estos orificios. No sumerja el ventilador en agua o cualquier
otro líquido. Desensamble las parrillas y el aspa (Fig. 2). Las parrillas
y el aspa pueden ser limpiadas con agua y jabón. Use un paño
suave ligeramente humedecido para limpiar el resto de las partes
del ventilador. No deje que agua o ningún otro líquido entre en la
caja del motor o la base. Ensamble nuevamente el ventilador
después que las parrillas y el aspa estén completamente secas.
No lo enchufe hasta que no esté completamente ensamblado.
PARA GUARDAR: Asegúrese de desensamblar y limpiar el
ventilador antes de guardarlo. Guarde la envoltura original para
guardar el ventilador. Siempre guárdelo en un lugar seco. Nunca lo
guarde mientras esté enchufado. Nunca enrolle el cordón
ajustadamente en el ventilador y no ponga presión sobre el
cordón en la parte que entra en el ventilador ya que esto podría
ocasionar que el cordón se desgaste y se rompa.
IMPORTANT SAFETY
INSTRUCTIONS
INSTRUCCIONES
IMPORTANTES DE
SEGURIDAD
Cuando esté usando aparatos eléctricos, debe seguir siempre
medidas básicas de seguridad, incluyendo las siguientes:
1. Use el ventilador únicamente para los fines descritos en este
manual de instrucción.
2. Para protegerse contra descargas eléctricas, no sumerja la
unidad, enchufe o cordón en agua o rocíe con cualquier
líquido.
3. Supervise cuidadosamente su manejo cuando este aparato
esté siendo usado por o cerca de niños.
4. Desenchúfelo cuando no esté en uso, cuando mueva el
ventilador de un lado o otro, antes de poner o sacar partes
o antes de limpiarlo.
5. Nunca introduzca los dedos, lápices o cualquier otro objeto
a través de la parrilla cuando el ventilador esté funcionando.
6. Desconecte el ventilador antes de limpiarlo.
7. Asegúrese de que el ventilador esté en una superficie sólida
cuando esté funcionando para evitar el riesgo de que
se caiga.
8. No use el ventilador en la ventana. La lluvia podría causar
un peligro eléctrico.
9. No lo haga funcionar en presencia de explosivos y/o gases
inflamables.
10. No coloque el ventilador o cualquier otra parte cerca de
llamas, utensilios de cocina u otros artefactos calientes.
ADVERTENCIA: Para reducir el riesgo de incendios
o descargas eléctricas, no use este ventilador con
ningún dispositivo para control de velocidad.
THREE YEAR LIMITED WARRANTY
GARANTIA LIMITADA POR TRES AÑOS
This product is warranted to be free from defects in material and
workmanship for a period of three years from the date of purchase.
IMPORTANT: This warranty does not cover damages resulting from
accident, misuse or abuse, lack of reasonable care, the affixing of
any unauthorized attachments, loss of parts, or subjecting the
appliance to other than the specified voltage. (Read directions
carefully.)
If a malfunction occurs, do not use the unit. Simply wrap the unit
securely, and mail postage paid to:
SERVICE CENTER
5980 MIAMI LAKES DRIVE; MIAMI LAKES, FL 33014
To insure prompt service, please include a letter indicating the
specific reason for returning the unit. We will repair or replace it
(at our option) at no charge to you. Please include $10.00 (check or
money order) to cover return postage and handling. California
residents have the option of returning the defective unit to the
original place of purchase, along with proof of purchase, within the
warranty period for replacement.
If the warranty period has expired, or other terms of the warranty
are not met, mail the unit to us as indicated above. A service
charge will be made according to the repairs needed, and the unit
will be returned to you C.O.D.
This warranty gives you specific legal rights, and you may also
have other rights which vary from state to state, e.g., California. No
other express warranty is given. Some states do not allow the
exclusion or limitation of incidental or consequential damages, so
the limitation or exclusion may not apply to you.
Este producto lleva una garantía por defectos en material y
manufactura por un período de tres años desde la fecha de
compra.
IMPORTANTE: Esta garantía no cubre daños resultantes por
accidentes, mal uso o abuso, falta de cuidado, el uso de cualquier
otro aditamento no autorizado, pérdida de piezas o expuesto el
artefacto a cualquier otro voltaje que el especificado. (Lea las
instrucciones cuidadosamente.)
Si ocurriera un mal funcionamiento, no use la unidad. Simplemente,
envuélvala bien asegurada y envíela por correo a:
SERVICE CENTER
5980 MIAMI LAKES DRIVE; MIAMI LAKES, FL 33014
Para asegurar un pronto servicio, por favor incluya una carta
indicando la razón por el retorno de la unidad. Nosotros la
repararemos o reemplazaremos (a nuestra opción) sin cargo para
usted. Por favor incluya $10.00 (cheque o giro postal) para cubrir
los gastos de franqueo. Los residentes de California tienen la
opción de devolver la unidad defectuosa al lugar original de
adquisición, conjuntamente con el comprobante de compra, dentro
del período de la garantía.
Si la garantía ha expirado u otros términos no se ajustan a ella,
envíenos la unidad como se indica arriba. Habrá un cargo por
servicio de acuerdo a la reparación necesaria, y la unidad le será
devuelta contra entrega de pago.
Esta garantía le da específicos derechos legales y usted también
puede tener otros derechos, los cuales varían de estado a estado,
por ejemplo, California. Ninguna otra garantía expresa es dada.
Algunos estados no permiten la exclusión o limitación de daños
casuales o sus consecuencias, por lo tanto la limitación o exclusión
pueden no aplicar a usted.
SAVE THIS FOR YOUR RECORDS
11. No haga funcionar ningún artefacto con el cordón o el
enchufe dañado, después de mal funcionamiento del
artefacto o si se ha caído o dañado de cualquier manera.
12. Para desconectarlo, empuñe el enchufe y retírelo del
tomacorriente. No tire del cordón.
13. Úselo siempre en superficies secas.
14. Este producto es solamente para uso doméstico y no para
uso comercial o industrial.
15. No use el ventilador cerca de cortinas, plantas, tratamientos
para ventanas, etc.
LEA Y GUARDE ESTAS
INSTRUCCIONES
GUARDE PARA REFERENCIA
When using electrical appliances, basic safety precautions should
always be followed, including the following:
1. Use fan only for intended use, as described in instruction
manual.
2. To protect against electrical shock, do not immerse unit, plug,
or cord in water or spray with liquids.
3. Close supervision is necessary when any appliance is used
by or near children.
4. Unplug from outlet when not in use, when moving fan from
one location to another, before putting on or taking off parts
and before cleaning.
5. Never insert fingers, pencils or any other objects through the
grille when fan is running.
6. Disconnect fan before cleaning.
7. Make sure fan is on a stable surface. When operating to avoid
chance of overturning.
8. Do not use fan in a window. Rain may cause an electrical
hazard.
9. Do not operate in the presence of explosive and/or flammable
fumes.
10. Do not place fan or any parts near an open flame, cooking or
other heating appliances.
11. Do not operate any appliance with a damaged cord or plug,
after the appliance malfunctions or has been dropped or
damaged in any manner.
12. To disconnect, grip plug and pull from wall outlet. Never
yank on cord.
13. Always use on a dry surface.
14. This product is intended for household use only and not for
commercial or industrial use.
15. Do not use fan near curtains, plants, window treatments, etc.
WARNING: To reduce the risk of fire or electrical
shock, do not use this fan with any solid-state
speed control device.
READ AND SAVE THESE
INSTRUCTIONS
20" HIGH-PERFORMANCE
STAND FAN
VENTILADOR DE PIE DE 20"
Y CON RENDIMIENTO MÁXIMO
USE AND CARE BOOK
MANUAL DE USO
Y MANTENIMIENTO
Printed in/Impreso en Hong Kong
99/8-27-74E/S
C-201 (UL/GEN)