1
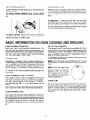
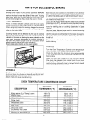
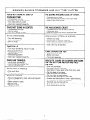
ELECTRIC
RANGES
frrgerator-Freezers.
Ice
Makers.
Dishwashers, Bul~blfl Ovens and Surface Unlls. Ranges, MIcrowave Ovens. Compactors, Room Air Conditroners, Dehumidifiers, AutomatE Washers, Clothes Dryers, freezers, FIefrIp
Your responsibtlirtfes.
l
l
Proper installation
and safe use of your appliance
are your personal
“Use and Care Guide” carefully for important
use and safety information.
responsibilities.
Read this
Installation
You must be sure your appliance
is...
l
installed and leveled
only by a qualified
installer or service technician;
l installed
in a well-ventilated
area protected
from the
weather;
l
properly
connected
to the correct electric
supply and
grounding
(see “Installation
Instructions”).
Proper use
You must be sure your appliance
is..
l used
only for jobs expected
of cooking
appliances
signed for home use:
l used
only by people who can operate it properly;
l
properly
maintained.
de-
Contents
Safety Precautions
Basic Range ..........................................
Child Safety ..........................................
Surface Cooking ..............................
........................................
Oven Cooking
.....................................
Cooking Utensils
Use of Aluminum Foil .................................
lnformatron on Surface Cookrng
Suggestions
for Optimum Cooking Results
Heat Setting Chart ....................................
....................................
Care Information
.......
Basic
.............
Basic Information
on Oven
Cooking/Broiling
..................................
Oven Characteristics
...........................................
Preheating
Copy
Your Model
and Serial Numbers
Serial
Purchase
Serwce
Company
Number
Number
lnstallatlon
Date
and Phone
Number
Oven Controls/Signal
Light ............................
Oven Vent ............................................
Baking Hints .........................................
Roasting Hints ........................................
Broiling Hints .........................................
....................................
Care Information
General Cleaning Chart ................................
4
4 Service Information
Troubleshooting
Chart ...............................
4
.................
If You Need Service or Assistance
....................
1. Before Calling for Assistance
........................
2. If You Need Assistance
5
.............................
3. If You Need Service
5
..........................
4. If You Have a Problem
5
5
6
6
9
10
11
12
.. 13
13
13
13
13
Here
If you need service,
or call with a question,
have this
information
ready:
1. Complete
Model
and Serial
Numbers
from the
nameplate.
2. Purchase or installation
date from your sales slip.
Copy this information
in these spaces. Keep this book,
your warranty, and the sales slip together in a handy place.
Model
1
1
2
2
3
3
NAMEPLATE LOCATION
The nameplate for your appliance
element and reflector pan.
is located under the left front
SAFETY PRECAUTIONS
cad A99 lnstr~~ctions
Before
Using
This
BASIC RANGE SAFETY PRECAUTIONS
We suggest you carefully read this booklet to learn how to properly
range. Wise use means not only efficient use but safe use as well.
CHILD SAFETY
Children MUST BE TAUGHT safe range practices to prevent possible injury. Listed below
are some basic practices we recommend
you
read and follow for safe use of this electric appliance when children are present.
l
l
l
The range should not
be used as a step stool
to cabinets above.
Children should not be
allowed to sit or stand
on any part of the range.
use a range
to heat or warm
a room.
CLEARANCE
Be sure installer has observed all instructions
for minimum clearances
to any combustible
surfaces. These should be in accordance
with
local and national fire codes.
GROUNDING
Be sure appliance
is properly
AVOID SHOCK HAZARD.
Children
should
be
taught that the range is
not a toy. They should
not be allowed to play
with range controls or
other parts of the range.
CAUTION:
Do not store items of interest to
children in cabinets above a range, on the
backguard,
or backsplash
of a range. Children climbing on the range to reach items
could be seriously injured.
and safely use this electric
INSTALLATION
The installation, adjustment and service of this
range must be performed by a qualified installer
or serviceman to insure proper operation and
avoid possible damage or injury.
Do not leave children alone or unsupervised
near the range when range is in use or is still
hot.
Children MUST be taught that the range and
utensils on the range can be hot.
Let hot utensils cool in a safe place, out of
reach of small children.
I
0
NEVER
nge.
I
grounded
to
VENTING
Never block oven vent located under left rear
surface element and reflector pan. Blockage
of the vent prevents proper oven air circulation
and affects baking results
SERVICING
ALWAYS DISCONNECT
range at main range
fuse or circuit breaker before servicing range.
Do not repair or replace any part of this range
unless specifically
recommended
in this book.
All other servicing must be referred to a qualified serviceman.
RANGE LOCATION
When cooking, some parts of your range become warm or hot. Consider this when locating
range in the kitchen. If range is installed near
a window, proper precautions
should be taken
to prevent curtains from blowing over surface
elements creating a FIRE HAZARD.
GREASE
HOT GREASE IS FLAMMABLE.
Avoid letting
grease deposits collect around range, range
hood or’in vent fan. Do not leave can of drippings around range. Let quantities of hot fat,
used for deep fat frying, cool before attempting
to move or handle.
In the event of a grease fire, do not attempt to
move pan. Turn surface element off and cover
pan to extinguish
flame. DO NOT DOUSE
FLAME WITH WATER. Use a dry chemical type
fire extinguisher,
if available, or sprinkle heavily
with baking soda.
SURFACE
COOKING
SAFETY
PRECAUTIONS
AND HINTS
To eliminate the hazard of reaching over hot
surface elements, cabinet storage space should
not be provided over a range. TEMPERATURES
IN STORAGE
AREAS ABOVE THE RANGE
MAY BE UNSAFE FOR STORAGE OF SOME
TYPES OF MATERIALS
SUCH AS VOLATILE
LIQUIDS OR AEROSOL SPRAYS.
If cabinet storage is to be provided, reduce the
hazard by installing
a range hood under the
cabinet that projects a minimum of 6 inches
beyond the bottom of the cabinet.
Use caution when wearing garments made of
flammable
material
to AVOID
CLOTHING
FIRES. Loose fitting or hanging apparel should
never be worn while using the range.
FLAMMABLE
MATERIALS
should
not be
stored in an oven or near the surface element.
BE SURE ALL RANGE PARTS ARE COOL
BEFORE TOUCHING
OR CLEANING THEM.
Never leave a cooking operation
unattended
when using a high heat setting. Boilovers cause
smoking and greasy spillovers MAY IGNITE.
Removable
surface
elements
should
never
be immersed or soaked in water.
Be sure reflector pans are in place. Absence of
these pans during cooking may subject wiring
or component
parts underneath
the cooktop
to damage.
Use DRY sturdy pot holders.
DAMP POT
HOLDERS
MAY
CAUSE
BURNS
FROM
STEAM. Dish towels or other substitutes
are
not recommended
for they may trail across hot
surface elements and ignite or get caught on
range parts.
OVEN @GOKING
SAFETY
PRECAUTIONS
AND HINTS
Do not use the oven as a storage area. Do not
cover or obstruct oven vent located under right
rear surface element and reflector pan.
Use care when opening oven door. Let hot air
or steam escape before removing or replacing
food.
Never reach directly into a hot oven to add or
remove cooking
utensils.
Rather, use DRY
sturdy pot holders and pull oven rack out before
adding or removing utensils. Do not use DAMP
pot holders because they will cause steam
burns. Dish towels or other substitutes are not
recommended
as they may get caught on range
parts or ignite.
Always place oven racks in the desired location
while the oven is cool. If the rack must be moved
while oven is hot, do not let pot holders contact
the hot element in the oven.
DO NOT HEAT AN UNOPENED
GLASS OR
METAL CONTAINER
IN THE OVEN. Pressure
buildup in the container may cause it to burst
and result in serious personal harm or damage
to the range.
HEATING
ELEMENTS
DO NOT TOUCH SURFACE OR OVEN ELEMENTS. The elements may be hot even though
they are dark in color. Areas near the surface
elements or oven interior become hot enough
to cause burns. During and after use, do not
touch or let clothing or other flammable materials contact the elements, areas near the
surface elements, oven walls or oven vent until
these areas have had sufficient time to cool.
2
GENERAL
SAFETY PRECAUTIONS
AND
HINTS FOR COOKING
UTENSILS
Choose pans that have flat bottoms and are
easily grasped with handles that stay cool.
Avoid using pans that are unstable, warped or
easily tipped. Discard pans if handles twist and
cannot be tightened. Pans that are too heavy to
move easily when filled with food may also be
a hazard.
Use only manufacturer’s
recommended
glass,
glass/ceramic,
ceramic earthenware
or other
glazed utensils for use either in the oven or on
the surface elements.
Use a small utensil on the small surface element
and a large utensil on the large surface element
for efficient cooking. Using a small utensil on
the large surface element will expose a portion
of the element to direct contact and MAY
RESULT IN IGNITION OF CLOTHING.
Using
a large utensil on the small surface element
may cause damage to the porcelain-enamel
cooktop.
Always turn pan handles to the side or back of
the range, not out into the room where they
are easily hit or reached by small children.
TO MINIMIZE
BURNS, IGNITION OF FLAMMABLE MATERIALS,
AND SPILLAGE
DUE
TO UNINTENTIONAL
CONTACT
WITH THE
UTENSIL, do not extend handles over adjacent
surface element.
Be sure utensil is large enough to properly
contain food and avoid boilovers. Spillovers
left on the range and allowed to accumulate
MAY IGNITE.
Pan size is especially important in deep fat frying. Be certain pan is large enough to accommodate volume of food that is to be added and for
the bubble action of fat. NEVER LEAVE A DEEP
FAT FRYING OPERATION
UNATTENDED.
Never leave a pan unattended
when using a
high heat setting. Only use a high setting to
bring liquids to a boil or begin cooking, then
REDUCE to a lower setting to continue the
cooking operation.
Never use a high heat setting for extended cooking.
REMEMBER:
Food will not cook any faster
when more than the amount of heat needed to
maintain a gentle boil is used.
PLASTICS
AND AEROSOL
SPRAYS
Many plastics are vulnerable
to heat. Keep
plastics away from parts of the range that may
become warm or hot. Follow manufacturer’s
directions for oven cooking or browning bags.
Many aerosol-type
spray cans are EXPLOSIVE
when exposed to heat and may be highly flammable. Avoid their use or storage near a hot
range.
USE OF ALUMINUM
FOIL
Use aluminum
foil only as instructed
in this
booklet. Improper use may cause damage to
the range, affect cooking results and may result in SHOCK or FIRE HAZARD.
1. Aluminum foil may be used to line reflector
pans located under surface elements. Be
sure foil follows the shape of the pan and
does not extend loosely over the edges.
Press foil firmly around the rim and be sure
it does not touch surface elements or come
in contact with surface element or element
receptacle. Be sure hole in the one reflector
pan located over the oven vent is left opened.
2. Do not place aluminum foil directly on the
oven bottom or directly under a cooking
utensil. A piece of aluminum
foil that is
slightly larger than the cooking utensil can
be placed on the rack directly below the
cooking utensil.
cover an oven rack with
3. Do not completely
foil. This blocks air flow, affects cooking
results and could be a safety hazard.
4. The broiler pan can be lined with foil for ease
of cleaning. If the broiler tray is lined with
foil, cut openings to allow fat to drip into pan
below. The broiler tray is designed to keep
fat from being directly exposed to the broil
element and to keep fat from igniting during
a broiling operation.
THESE SUGGESTIONS
ARE OFFERED FOR
OPTIMUM COOKING RESULTS AND
EFFICIENT USE OF THE SURFACE UNIT
-Fit the size of the pan to the size of the element. Utensils
should not be any more than 2 inches larger than the
element. Surface elements are raised above the porcelain-enamel
cooktop to allow air circulation
and prevent enamel crazing. Utensils which extend beyond the
element or curve and touch the porcelain-enamel
top
may cause heat to build up around the element and
cause damage to the finish.
-Select
sturdy utensils with tight fitting covers. Use flat
bottom pans that make good contact with the element.
Warped pans that do not make good contact with the
element result in uneven cooking and waste energy.
-Always
place a utensil on the surface element before
turning element on.
-Stainless
steel, porcelain,
enamelware,
glass, glass
ceramic and Teflon@-coated
utensils designed for
surface cooking usually heat slowly and conduct heat
poorly if too high a heat setting is selected. If a high
setting is used, food will cook unevenly, scorch or burn.
Aluminum utensilsconduct
heat moreevenlyand
allow
a slightly higher heat setting to be used. Use a lower
setting if the utensil is Teflon@-coated.
-Use a higher heat setting to bring liquid to a boil or to
begin cooking. Then REDUCE to a lower setting to
continue
the cooking operation.
Never leave food
unattended on a high setting. Never let a pan boil dry
for this could damage the utensil and the range.
-Food will not cook any faster when a higher heat setting
is used than that needed to maintain a gentle boil. Remember, water boils at the same temperature whether
boiling gently or vigorously. If a higher setting is used,
excessive spattering will occur and food may burn on
the bottom before it is completely cooked.
SUGGESTED
HEAT SETTING
CHART
‘EAT SETTlNG
TYPE OF COOKlNG OPERATION
7 To bring liquid to a boil, blanch, melt fat, preHigh
heat skillet, bring up pressure in pressure
cooker. NOTE: Follow instructions
in pressure
cooker
Use and Care Book for complete
cooking directions.
ALWAYS REDUCE to a lower heat setting
when liquids boil or food begins to cook.
6 To brown or sear meat, heat fat for deep fat
frying, scald, fast sauteing or frying.
5 To maintain
fast boil for large amounts
liquids, for slower frying or sauteing.
Medium
4 To maintain slow boil for large amounts of
liquids, to continue cooking uncovered foods,
most frying operations, deep fat frying, scalding.
3
To continue cooking covered
boil, stew, braise, steam.
‘2 To maintain
Low
foods,
maintain
boil, poach, steam, simmer.
1 To keep foods
simmer.
warm
before
serving,
poach,
CARE INFORMATION
Be sure the appliance is cool before removing any parts
or cleaning the unit. Any parts removed in the cleaning
should be replaced correctly.
CONTROL
KNOBS
Your appliance is equipped with control knobs that provide an infinite choice of heat settings from LOW (1) to
HIGH (7). The knob can be set either on any of the numbered settings or between the numbered settings.
To operate the control: Push
in and turn knob in either direction to the desired setting. A
red signal light will turn on to
indicate that one or more of the
surface elements are on.
of
To clean the control knobs: 1) Remove knobs by gently
pulling off. On some ranges, if the knobs are loose, spread
control stem slightly with a small screwdriver.
2) Clean
with warm soapy water. 3) Do not use abrasive cleaning
agents for they will scratch the finish and remove markings. 4) Replace knobs.
CQOKTOP
The cooktop is made of porcelain-enamel
which is a glass
material that has been fused to metal. Porcelain-enamel
will crack or chip with misuse.
To clean cooktop: 1) All spillovers, especially acid spillover.?., should be wiped up immediately with a dry cloth.
To prevent possible cracking orchipping
oftheporcelain,
never wipe off a warm or hot surface with a damp cloth.
2) When surface is cool, clean with warm soapy water.
3) Do not use abrasive or caustic cleaning agents on the
porcelain-enamel
finish for they will permanently damage the finish.
SURFACE
ELEMENTS
REFLECTOR
Surface elements are self-cleaning.
Do not immerse elements in water.
To remove surface elements: Raise element WHEN
COOL and carefully pull out and away from the recepta
cle.
PANS
Reflector pans are located under each surface element.
They must be held in plsce whenever the elements are in
use. One reflector pan has a hole in the center for proper
oven venting. This vent is located under the left rear element.
To clean pans: 1) Clean pans after each use with soap
and water. Remove stubborn stains with baking soda
paste and plastic scouring pad. 2) To prevent scratching
the finish, do not use abrasive cleaning agents. 3) Rinse,
dry and replace. Be sure reflector pan with hole in center
is correctly replaced over the oven vent.
To replace elements: Insert the terminals on the element
into the receptacle and guide element into place until
element sits level on reflector pan.
BASIC INFORMATION
OVEN
ON OVEN COOKING
CHARACTERISTICS
SELECTOR
Every oven has its own personal characteristics.
You
may find that the cooking times and temperatures you
were accustomed to with your old range may alter slightly
with your new range. Please expect some differences
with this new range or built-in oven.
Preheating
is necessary only for baking operations;
it
is not necessary to preheat the oven for broiling or roasting. To preheat, turn the Oven Temperature
Control to
the desired temperature and the Selector Control to the
desired setting. Do not select a higher temperature, for
the oven will not preheat any faster. Allow about 10 to
15 minutes for the oven to preheat before placing food
in the oven.
TEMPERATURE
SIGNAL
BAKE
BROIL-Only
the upper oven
element will turn on. Use this
selection
ONLY for broiling.
Poor cooking results will occur
if the Selector Control is left in
this position
for baking or
roasting operations.
CONTROL
Your range or built-in oven is equipped with an Oven
Temperature
Control marked in increments of 100” F.
with dots representing
25 or 50” segments. TO BROIL,
turn the knob past 500 ’ F. to the stop position on the
knob.
For accurate cooking temperatures,
turn the knob to
(but not past and then back) the desired temperature.
OVEN
CONTROL
Your range or built-in oven may be equipped with a Selector Control. This control works together with the Oven
Temperature
Control. The Selector Control selects the
type of operation and the Oven Temperature
Control
selects the oven temperature.
The Selector Control on your range will have two or more
of the following selections:
BAKE-Only
the lower oven element will turn on. Use
this selection for baking, roasting or preheating operations.
PREHEATING
OVEN
AND BROILING
%
0’
F
Cl
OVEN
VENT
The oven vent is located under the left rear surface element and reflector pan. When the oven is in use, thisarea
may feel warm or hot to the touch. The element can be
used for surface cooking. To prevent baking problems,
do not block the vent opening with aluminum or other
materials.
LIGHT
Our ranges are equipped with a Selector Control, the
Oven Signal Light will turn on when the oven is tvrned on.
When the oven reaches the present temperature, the ljght
will automatically
turn off and will cycle on and off as the
oven element cycles on and off to maintain the present
temperature. The light will turn offwhen theoven isturned
off.
5
HINTS FOR SUCCESSFUL
OVEN
BAKING
RACKS
Arrange oven racks in the correct positions BEFORE
the oven is turned on. If using only one rack, position
rack so the food is near the center of the oven. If using
both racks, allow 3 to 4 inches between racks. The racks
should be arranged so they divide the oven in thirds.
PAN PLACEMENT
Allow 2 inches between utensils and the oven walls.
Utensils should not touch each other, or the oven walls.
When using both racks for cooking, stagger the utensils
so one is not directly over another nor touching each
other or the oven walls.
Cooking results will be affected by the use of utensils
that are too large for the oven rack, misplacement
of
utensils in the oven or placing too many utensils on the
oven rack. Incorrect placement of cooking utensils in
the oven will orevent .orooer
oven air circulation
which
.
affects cooking results and oven operation.
Never olace oans directlv . on the oven bottom.
Bake biscuits and cookies on a flat sheet or very shallow
pan. The bottom of an inverted pan may be used. If sheet
or utensil has sides, pale or light browning will occur.
For a crisp crust, use glass or dull, anodized aluminum
pie plates and bread pans.
When baking cakes in glass utensils, lower recommended
temperature by 25” F. and use the recommended cooking
time in the recipe. It is not necessary to lower temperatures for baking pies or cooking casseroles in glass
utensils.
Use level pans. Warped ones result in uneven browning
and poorly shaped products.
Use the size pan recommended
in the recipe. As a general guide, cake pans should be filled only about twothirds full.
Always remove the broiler tray and pan from the oven
before baking.
TIMINGS
Turn the Oven Temperature
Control to the temperature
recommended
in the recipe and preheat the oven.
Check the-food after the minimum time recommended
in the recipe and continue checking at intervals until the
food is done.
Leave the oven door closed until the minimum baking
time given has elapsed, then check food. Do not be a
“peeping Tom.” Opening theoven door frequently during
cooking allows excessive heat to escape which wastes
energy and affects baking results.
lr
UTENSILS
To obtain good baking results, use bright or light colored
aluminum pans for cookies or biscuits and dull or anodized aluminum
pans for pies and breads. Dark pans
absorb heat and cause overbrowning.
6
COMMON
BAKING
PROBLEMS
FOOD NOT DONE AT END OF
COOKING TIME.
AND WHY THEY HAPPEN
PIE BURNS
AROUND
EDGE OF CRUST.
-Temperature
too high.
-Pans touching each other or the oven walls.
-Edge of pie crust too tall.
-Temperature
too low.
-Incorrect
use of aluminum foil.
-Too
many pans on a rack.
-Oven door opened frequently.
CAKE NOT DONE IN CENTER.
PIE HAS SOAKED
-Temperature
too high.
-Pan too small.
-Pan not in center of oven.
-Temperature
too low at start of baking.
-Filling
too juicy.
-Used shiny pans not dark or anodized pan.
CAKE UNDERSIZED.
BROWNING
-Too little leavening.
-Batter
overbeaten.
-Pan too large.
-Temperature
too high.
-Utensils
too large.
-Utensils
are of different materials.
-Oven
racks too close to oven bottom.
-Incorrect
use of aluminum foil.
-Oven vent may be blocked.
CAKE FALLS.
-Too
much shortening,
liquid or sugar.
-Too much leavening.
-Temperature
too low.
-Pan too small.
-Stale baking powder.
-Oven door opened frequently.
IS UNEVEN.
ON TOP.
-Temperature
too high.
-Batter
overmixed.
-Too
much leavening.
BISCUITS, CAKES OR COOKIES ARE DARK
ON THE BOTTOM AND/OR ARE PALE
ON TOP.
flour.
CAKE HIGH IN MIDDLE.
-Too much flour.
-Temperature
too high.
CAKE IS UNEVEN.
-Pans not staggered in oven, are touching
other or the oven walls,
-Batter
uneven in pans.
-Warped
pans.
-Range
not level.
PATTERN
CAKE CRACKS
CAKE HAS TUNNELS.
-Not enough shortening.
-0vermixing
after adding
-Used all-purpose
flour.
CRUST.
each
-Oven
not preheated.
-Too
many pans on one rack.
-Used dark or heavy pans rather than shiny pans.
-Pan too deep or too large.
-Used
incorrect rack position.
-Pan too close to oven bottom.
-Cookie
sheet too large for oven rack.
-Uneven
heat distribution
in oven-pans
blocking
air circulation
or oven vent blocked.
-Incorrect
use of aluminum foil.
-Oven door not closed tightly or opened too frequently.
-Oven temperature too low.
1
HINTS FOR SUCCESSFUL
Roasting is the cooking of tender cuts of meat with dry
heat. No water is added nor is the cooking utensil
covered. Searing is unnecessary. If desired, season meat
with salt and pepper.
Check weight of meat and place meat fat-side-up on a
rack in a shallow roasting pan.
Place bottom oven rack in oneof the two bottom positions
before oven is turned on. preheating is unnecessary for
roasting meats.
Meats are roasted at 325°F. except tenderloin
(425” F.)
and smaller poultry (375 to 400°F.). Turn the Oven
Temperature
Control to the desired temperature.
Cooking time is determined by the weight of the meat
and the desired doneness. Use the chart given below
as a guide in determining cooking times. The most accurate way is with a meat thermometer.
Insert thermometer
so the tip is in the center of the thickest part of the meat
and is not touching bone or fat,
ROASTING
CUT OF MEAT
BEEF
Standing Rib
APPROXIMATE
WEIGHT
ROASTING
After cooking, remove meat from oven and let stand 15
to 20 minutes for easier carving. Rare or medium rare
meats should be removed from the oven when the internal temperature is 5 to 10’ less than the final desired
temperature for meat will continue to cook slightly while
standing.
Frozen meat may be cooked in the same way as fresh
meat if the meat is thawed first. It is also possible, however, to cook meat from the frozen state. Follow the same
roasting instructions
but increase cooking time approximately 10 to 25 minutes per pound. When using frozen
packaged
meat, follow
package directions.
Frozen
poultry should always be thawed before cooking except
when package directions recommend cooking from the
frozen state such as for frozen turkey rolls. DO NOT
REFREEZE MEATS THAT HAVE NOT BEEN COOKED
FIRST.
GUIDE
INTERNAL
TEMP.
COOKING
TEMP.
TIME
6 to 8-lbs.
140” F. (rare)
160°F. (medium)
170” F. (well done)
300-325” F.
23 to 25 min./lb.
27 to 30 min./lb.
32 to 35 min./lb.
4 to 6-lbs.
140” F. (rare)
160” F. (medium)
170” F. (well done)
300-325” F.
26 to 32 min./lb,
34 to 38 min./lb.
40 to 42 min./lb.
5 to 7-lbs.
140” F. (rare)
160°F. (medium)
170” F. (well done)
300-325” F.
350” F.
18 to 20 min./lb.
20 to 22 min./lb.
22 to 24 min./lb.
4 to 6 Ibs.
140”
160”
170”
140”
425” F.
2 to 3 Ibs.
140” F. (rare)
425” F.
45 to 60 minutes
(total time)
45 to 50 minutes
(total time)
140 - 170°F.
140 - 170°F.
325-350” F.
35 to 40 min./lb.
30 to 35 min./lb.
Rolled Rump
(High quality)
PORK LOIN
Center
Half
3 to 4-lbs.
6 to 8-lbs.
4 to 6-lbs.
150 - 170” F.
325-350” F.
25 to 30 min./lb.
3 to 5-lbs.
5 to 7-lbs.
170” F.
17CPF
325” F.
325” F..
LAMB, LEG
5 to 9-lbs.
30
35
20
25
30
Rolled Rib
Rib Eye
Tenderloin,
4 to 6-lbs.
Whole
Sirloin Tip
(high quality)
F. (rare)
F. (medium)
F (well done)
F. (rare)
140°F.
160” F.
170 - 180°F.
325” F.
32 min./lb.
38 min./lb.
48 min./lb.
to
to
to
to
to
35
40
25
30
35
min./lb.
min./lb.
min./lb.
min./lb.
min./lb.
HINTS FOR SUCCESSFUL
Before broiling, trim excess fat to prevent excessivespattering and cut slashes around the outer edges of the meat
to prevent the meat from curling during cooking.
Food must be placed on the broiler tray in the broiler pan
to allow fat to drip to the pan below. The broiler tray
MUST ALWAYS be used with the broiler pan. Fat may
become hot enough to ignite if directly exposed to the
element.
Place food on a cold, ungreased broiler tray. Be sure
OVEN TEMP CONTROL is set on a temperature
in the
BROIL section of the control to activate the Broil Element. The Broil Element will cycle on and off when broiling for longer periods of time.
The broiler pan can be lined with aluminum foil for ease
of cleaning. If the broiler tray is lined with foil, cut open-
BROILING
ings to allow fat to drip to pan below. The broiler tray is
designed to keep fat from being directly exposed to the
element to eliminate possible fire hazards.
Place food on rack in the position as suggested in the
chart below. If food is placed too close to the element,
overbrowning
and smoking may occur. Broiling is always
done with the door opened to the broil “stop” position
(opened about 4 inches).
Never leave a soiled broiler tray and pan in the oven after
broiling. Drippings might become hot enough to ignite
if exposed directly to the element.
The use of disposable broiler pans is NOT recommended
for they do not provide the separate broiler tray.
BROILING
GUIDE
BEEF PATTIES
%-inch thick
l-inch
thick
*Rack position
element.
1 is the position
*‘Preheat broil element
food in oven.
closest to the broil
9
5 minutes
before
placing
CARE INFORMATION
-
BROILER
Be sure the range is cool before removing parts for cleaning. After removing any part, be sure it is correctly replaced.
STANDARD
PORCELAIN-ENAMEL
OVEN
The oven is made of porcelain-enamel
which Is a glass
material that has been fused to metal. Porcelain-enamel
will crack or chip with misuse.
To clean oven: 1) All spillovers, especially acid spillovers,
should be wiped up immediately with a dry cloth. To prevent possible cracking or chipping of the porcelain, never
wipe off a warm or hot surface with a damp cloth. 2) Clean
oven walls, bottom and door with soap and water. The
oven bottom is easily accessible for cleaning by raising
the lower bakeelement when element is cool. 3) Stubborn
soil is removed with cleansing powders, plastic pads or
a paste made of baking soda and water. Do not use metallic soap-filled scouring pads or other abrasive scouring
pads for they will scratch the surface. Commercial oven
cleaners can be used but follow manufacturer’s
directions
COMMERCIAL
TRAY AND PAN
Remove tray and pan from oven after use. Cool, then pour
off grease and place a warm soapy cloth over tray and
pan. Let soak to loosen soil then wash in hot soapy water.
A soap-filled scouring pan can be used to remove stubborn soil or clean tray and pan in the dishwasher if desired.
LOWER STORAGE
DRAWER
The lower storage drawer, on models so equipped, is
designed for storage of the broiler tray and pan as well
as other cooking utensils. NEVER store flammable materials in the storage drawer.
To remove drawer: Pull out to the first stop position.
Lift front of drawer up and pull out to the second stop.
Lift and pull drawer away from range until drawer is free
of range. Remove the drawer to easily clean floor under
the range.
OVEN CLEANER
When using oven cleaners, carefully follow manufacturer’s directions.
Wear rubber gloves to protect your
hands for the oven cleaner is caustic.
Never use oven cleaners on exterior finish or trim parts
of a range. These parts will be permanently damaged by
the cleaner. Do not apply oven cleaner to Bake or Broil
elements or to the electrical hook-up. These parts may be
permanently
damaged if exposed to oven cleaners. Use
oven cleaners on standard porcelain-enamel
lined ovens
ONLY.
After using oven cleaner, rinse oven wallsand thermostat
sensing device, located at the top of oven, with a mild
solution of vinegar and water.
OVEN RACKS
All ovens are equipped with two oven racks with a safety
“lock-stop”
position to keep racks from coming completely out of the oven when adding or removing food.
To remove rack: Be sure rack is cool. Pull rack out to
the “lock-stop”
position, tilt up and continue pulling
until the rack is released.
To replace rack: Place rack on rack supports, tilt up and
push to rear of oven. Pull rack out to “lock-stop”
position
to be sure rack has been properly replaced.
To clean racks: Wash with soapy water. Remove stubborn soil with cleansing powder or a soap-filled scouring
pad. Rinse, dry and correctly replace rack in the oven.
10
To replace drawer: Fit rollers on drawer into tracks on
range. Lift up and push drawer past stop positions until
drawer closes.
LEVELING
LEGS
The range can be leveled on uneven floors by adjusting
the leveling leg screws in the bottom of the range. Leveling legs are located in the four corners of the range. Remove storage drawer and adjust as necessary with a
screwdriver.
GENERAL
BE SURE ALL PARTS OF THE RANGE
BE SURE ALL PARTS ARE REPLACED
Broiler
Mild detergent
knobs
& water.
End panels,
polyester
Soap 8 water.
Metal finishesAluminum-backguard
base, control panel.
Chrome & stainless
steel-trim
parts
Soap 8 water.
Paste of baking soda
8 water.
Oven racks
Soap & water.
Cleansing powders &
plastic pads.
Soap filled scouring pad
Mild soap 8. water.
Porcelain enamelExterior finishes
Porcelain-Oven
Reflector
finish
Pans
Soap & water.
Cleansing powders
plastic pads.
Commercial oven
Cleaner
&
Soap 8 water.
Paste of baking soda &
water.
Plastic scouring pad.
Surface & Oven Element5
Vinyl finishes
Door handle
Backguard trim
CHART
ARE COOL BEFORE
CORRECTLY.
Soap 8 water.
Plastic scouring pad.
Soap filled scouring pad.
tray & pan
Control
CLEANING
Soap & water.
11
CLEANING.
AFTER CLEANlNG
Remove from the broiler after use. Allow to cool
then pour off grease. Place soapy cloth over tray
and pan; let soak to loosen soil. Wash in warm soapy
water. Use soap filled scouring
pad to remove
stubborn soil. Clean in dishwasher if desired.
To remove knobs, for cleaning, gently pull forward.
Wash in mild detergent
and water. Do not use
abrasive cleaning agents. They will scratch finish
and remove markings. Rinse, dry and replace.
Wash with soap and warm water. Do not use abrasive cleaning
materials. They will scratch finish.
Do not use oven cleaners.
Wash with soap and warm water. Remove stubborn
soil with paste of baking soda and water. Do not use
abrasive or caustic agents. They will damage the
finish. To restore luster on brushed chrome apply
small amount of mineral oil and let stand 5 minutes.
Remove excess oil with a clean cloth.
Clean with soapy water. Remove stubborn
soil
with cleansing powder or soap filled scouring pad.
Rinse and dry.
Porcelain enamel is glass fused on metal. It may
crack or chip with misuse. Clean with soap and
water when parts are cool. All spillovers, especially
acid spillovers,
should be wiped up immediately
with a dry cloth. When surface is cool, clean with
warm soapy water. NEVER WIPE OFF A WARM
OR HOT ENAMEL SURFACE WITH A DAMP
CLOTH.
THIS MAY CAUSE CRACKING
AND
CHIPPING. Never use abrasive or caustic cleaning
agents on exterior finish of range.
Wipe acid stains immediately with a dry cloth. Clean
oven walls and bottom with soap and water. Stubborn soil is removed with cleansing powders or
plastic pad. Do not use metallic cleaning pads.
They will scratch the surface. Commercial
oven
cleaners can be used but follow manufacturer’s
directions.
Clean pans after each use with soap and water.
Remove stubborn stains with baking soda paste
and plastic scouring pad. To prevent scratching
the finish, do not use abrasive cleaning agents.
Rinse, dry and replace. One reflector pan has hole
in center for oven venting. Be sure it is correctly
replaced to allow proper oven venting.
Elements are self-cleaning.
,Soil will burn off as
elements are used.
Never use abrasive or caustic cleaning agents on
vinyl finish of range.
TRQUBLESHQOTIN
Surface or oven
elements fail to
turn on.
a. Range not connected
power supply.
b. Defective
to
element.
a. Connect range to wall outlet,
circuit breaker or fuse box.
b. Have serviceman
Oven does not
turn on.
a. Range not connected
power supply.
to
Oven Temperature
seems inaccurate
-Food takes too
long/cooks too
fast.
-Pale browning.
-0verbrowned.
-Overdone
on outside/underdone
in center.
a. Oven was not preheated.
b. SELECTOR CONTROL left
on PREHEAT.
c. Incorrect rack position.
d. Incorrect use of aluminum.
e. Reflector pan incorrectly
replaced over oven vent.
f. Oven incorrectly
calibrated.
g. Used incorrect type of
utensils.
h. Oven thermostat sensing
device slipped out of
the holding clips.
NOTES
12
check
replace element.
a. Connect range to wall outlet,
circuit breaker or fuse box.
check
a. Preheat oven 10 to 15 minutes.
b. Turn control to BAKE once oven
preheats.
c. Refer to Oven Cooking Section, page 6.
d. Refer to section on foil, page 3.
e. Refer to page 6 for correct
positioning
of pans.
f. Have serviceman check oven calibration..
g. Refer to Oven Cooking Section,
page 6.
h. Reinsert device securely into
clips.
If you need service or assistance, we suggest
you follow these four steps:
1
l
3
Before calling for assistance.. .
Performance
problems
often result from little things y’ou
can find and fix yourself without tools of any kind.
If nothing operates:
l Is the appliance
correctly
wired to or plugged
into a live
circuit
with the proper
voltage?
[See “Installation
Instructions”.)
l Have you checked
the fuse or circuit-breaker
box?
If surface elements will not operate:
l Have you checked
the main fuse or circuit-breaker
box?
l Are surface
units plugged
in all the way?
l Do the control
knobs turn?
If surface element
control knob or knobs will not turn:
l Did you push in before
trying to turn?
If the oven will not operate:
l Is the Oven
Selector Control turned to a setting (BAKE or
BROIL]?
l Is the Oven Temperature
Control turned to a temperature
setting?
If cooking
results aren’t what you expect:
l Is the appliance
level?
l Are you using utensils recommended
on pages 8 and 9?
l If baking,
have you allowed 1% to 2 inches (4-5 cm) on all
sides of the pans for air circulation?
l Have you preheated
the oven as the recipe calls for?
l Are the utensils the size called
for in the recipe?
l Are you following
a tested recipe from a reliable source?
See pages 6 through 9 for more information on cooking problems and how to solve them.
2
l
Ifyouneedassistance”...
Call the Whlrlpool COOL-LINE” service
phone number. Dial free from:
Contlnental U.S. . . . . . . . . . . . . . . . . . . . . . . .
Michigan . . . . . . . . . . . . . . . . . . . . . . . . . . . . .
Alaska & Hawall . . . . . . . . . . . . . . . . . . . . . .
and talk with one of our trained Consultants.
can instruct you in how to obtain satisfactory
your appliance
or, if service is necessary,
qualified
service company
in your area.
assistance
tele-
(800) 253-1301
(800) 632-2243
(800) 253-1121
The Consultant
operation
from
recommend
a
l
Ifyou need service*...
FRANCHISED
SERVICE
Whirlpool
has a nationwide
network of franchised
TECHCAREE Service Companies.
TECH-CARE service technicians
are trained to fulfill the product warranty and provide afterwarranty
service, anywhere
in the United States. To locate
TECH-CARE services in your area, call our COOL-LINE service
assistance
telephone
number (see Step 2) or look in your
telephone
directory
Yellow Pages under:
APPLIANCES-HOUSEHOLOMAJOR-SERVICE & REPAIR
WHIRLPOOL APPLIANCES
FRANCHISED TECH-CARE SERVICE
SERVICE COMPAiWES
XYZ SERVICE CO
123 Maple
999.9999
ELECTRICAL APPLIANCESMAJOR-REPAIRING & PARTS
OR WHIRLPOOL APPLIANCES
FRANCHISED TECH-CARE SERVICE
SERVICE
COMPAMES
XYZ SERVICE CO
123 Maple
999.9999
WASHING MACHINE:RDRYERS
& IRONERS-SERViCING
WHIRLPOOL APLIANCES
FRANCHISED TECH-CARE SERVICE
SERVICE
COMPASIES
XYZ SERVICE CO
123 Maple
999-9999
4
l
If you have a problem*.
..
Call our COOL-LINE service assistance telephone
(see Step 2) and talk with one of our Consultants,
prefer, write to:
Mr. Guy Turner, Vice President
Whirlpool Corporation
Administrative
Center
2000 US-33 North
Benton Harbor, Ml 49022
AIf you must call or write, please provide:
model
serial number, date of purchase,
and a complete
tion of the problem.
This information
is needed
in
better respond to your request for assistance.
0
FSP
R
number
or if you
number,
descriporder to
FSP is a registered
trademark
of Whirlpool
Corporation
quality parts. Look forthis symbol ofquality
whenever
need a replacement
part for your Whirlpool
appliance.
replacement
parts wll fli right and work right,, because
are made to the same exacting
specificahons
used to
every new Whirlpool
appliance.
for
you
FSP
they
build
Making
Part
Refrigerator-Freezers.
No
87807OIOB-039-017-99
your world
a little easier
Prlnted
In U.S.A
Ice Makers, Dishwashers, Built-In Ovens and Surface Units. Ranges, MIcrowave Ovens, Compactors, Room Air Conditioners, Dehumidlflers, Automatic Washers, Clothes Dryers, Freezers, Rt