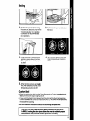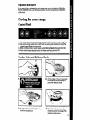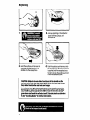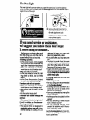
1
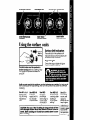
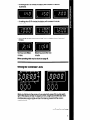
.
Yaw Ovens. Trash Compaclors. Room Air Condltloners
Oehumldlllers
.
Aulomallc Washers. Clothes Drvers. Freezers. Relrieerator-Freez-
Contents
Page
16
17
17
17
Page
Before You Use Your Range ...
Important
Safety Instructions.
Parts and Features
...........
Using Your Range .............
2
3
4
5
Using the Surface Units ......
Optional Canning Kit ........
Electronic MEALTIMER*Clock
Setting the Electronic Clock
Using the Electronic
Minute Timer ..............
Using the Oven Controls .....
Baking ....................
Broiling ...................
Using the Electronic
Automatic MEALTIMER*
Clock ....................
OtherOperating Hints .......
OvenVent ..................
5
6
6
7
B
9
9
11
Storage Drawer .............
Optional Rotisserie ..........
Carlng
for Your Range
........
Control Panel ...............
Surface Units and
Reflector Bowls ............
Lift-Up Cooktop .............
Oven Door ..................
Continuous-Cleaning
Oven
Cleaning Chart .............
Oven Light ..................
17
19
19
19
21
22
If You Need Service or
Assistance
...................
12
15
15
22
1. Before Calling for
Assistance. ...............
2. If You Need Assistance ....
3. If You Need Service .......
4. If You Have a Problem .....
22
23
23
23
‘Tmk.
01986 Whirlpool Corporation
Before you use your range
Read this Use & Care Guide
information.
You are personally
l
l
l
l
l
l
Guide
for important
safety
for:
Reading and following all safety precautions in this Use 8 Care Guide and the
Cooking Guide.
Installing the range where it is protected from the elements, and on a floor
strong enough to support its weight.
Properly connecting the range to electrical supply and grounding. (See
“Installation Instructions:‘)
Making sure the range is not used by anyone unable to operate it properly.
Properly maintaining the range.
Using the range only for jobs expected of a home range.
See “Cooking
2
responsible
and The Cooking
Guide”
for important
safety
and use information.
IMPORTANT
SAFETY INSTRUCTIONS
1. DO NOT allow children to use or
2.
3.
4.
5.
6. KEEPpan handles turned in, but not
play with any part of the range, or
leave them unattended near it.
They could be burned or injured.
DO NOT store things children
might want above the range.
7.
Children could be burned or
injured while climbing on it.
DO NOT allow anyone to touch
hot surface units or heating ele8.
ments. Dark colored units and elements can still be hot enough to
burn severely.
KEEPchildren away from the
range when it is on. The cooktop
9.
and oven walls, racks and door
can get hot enough to cause
burns.
DO NOT use theange
to heat a 10.
room. Persons In the room could
be burned or Injured, or a flre
could start.
over another surface unit to avoid
burns, injury and to help prevent the
utensil from being pushed off the surface units.
DO NOT use water on grease fires.
The fire will spread. Cover fire with
large lid or smother with baking
soda or salt.
DO NOT wear loose or hanging garments when using the range. They
could ignite if they touch a hot surface unit or heating element and
you could be burned.
DO NOT heat unopened containers.
They could explode. The hot contents could burn and container parttcles could cause injury.
When adding or removing
food, MAKE SUREto open the
oven door all the way to
prevent burns.
l FOR YOUR SAFm.
DO NOT STOREOR USE GASOLINE OR OTHER FLAMMABLE VAPORS AND LIQUIDS
IN THE VICINITY OF THIS OR ANY OTHER APPLIANCE. THEY COULD IGNITE
CAIJSING EXPCOSION AND/OR FIRE.
- SAW THESE INSTRUCTIONS
Copy your Model and Serial Numbers here
If you need service, or call wlth a questlon, have this lnformatlon
Model and Serial
Numbers (from plate just behind
Model Number
the oven door].
2. Purchase date from sales slip.
Serial Number
Copy thts informatlon in these
spaces. Keep this book, your
Purchase Date
warranty and sales slip together in
the Literature Pac.
ready:
1. Comdete
Sewke
Company/Phone
Number
-
SIGNAL
LIGHT
CO~RGb
NNOB
CONTROLPANEL\
RUG.fN
SURFACEUNft
/
LfTERATURtPAC
lm HIown)
“Trnk.
4
w
P
BROIL
ElEMENr
MOVABLE
AfR-Mw
OVEN DOOR
OVEN LIGHT SWITCH
SURFACEUNIT INDICATORS
OVEN SELECTOR
Using the surface units
Surface
Unit Indicators
The solid dot in the surface unit
indicator shows which surface unit
is turned on by that knob.
Signal Light
One of the signal lights will glow
when a surface unit is on.
Control knobs
before turning
must be pushed
in
them to a setting. They
can be set anywhere between HI
and OFF.
Until you get used to the settings, use the following as a guide. For best results,
start cooking at the high settings; then turn the control knob down to continue
cooking.
Use HI to start
foods cooking; to bring
liquids to a
boil.
Use MED-HI
to hold a
rapid boil; to
fry chicken
or pancakes.
Use MED
for gravy,
puddings
and icing; to
cook large
amounts of
veaetables.
Use MED-LO
to keep food
cooking after
starting it
on a higher
setting.
CAUTION: The use of the HI sefflng for long periods of time
can damage surface units and discolor ohrome reflector
bowls. Start cooklng on HI and turn control down to contfnue cooklng.
I
Use LO to
keep food
warm until
ready to
serve. Set the
heat higher
or lower
within the LO
band to keep
food at the
temperature
you want.
5
Use only flat-bottomed utensils for best cooking results and to prevent damage
to the cooktop. Specialty items with rounded or ridged bottoms (woks, ridged
bottom canners or tea keffles) are not recommended.
See the “Cooking
Optional
Guide”
for important
Canning Kit
utensil
information.
(Part NO. 242905)
The large diameter of most water-bath or pressure canners combined with
high heat settings for long periods of time can shorten the life of regular surface
units and cause damage to the cooktop.
If you plan to use the cooktop for canning, we recommend the installation
of a Canning Kit. Order the kit from your Whirlpool Dealer or Tech-Care’ Service
Company.
See the “Cooking
Guide”
The Electronic
for important
MEALTIMER*
canning
informatfon.
Clock
The Electronic MEALTIMER’ Clock handles many different types of functions.
The following operating hints may be helpful when using the clock:
l The numbers on the display
change rapidly when turning the Set Knob.
l When setting the Time-f-Day
Clock, the display shows hours and minutes.
Twenty-five minutes past
six o’clock.
l
Forty-five minutes past
twelve o’clock.
When using the Min/Sec Timer, the display shows minutes and seconds in the
following sequence.
- For settings from 1-59 seconds, each second will show in the display.
- For settings from l-10 minutes, the display will increase in 10 second
increments.
- For settings from IO-99 minutes, the display will increase in 1 minute
increments.
l
When using the Bake Hours and/or Stop Time, the display shows hours and
minutes.
Two-hours and fifteenminutes.
Other operating
Eleven-hours and fifty-nine
minutes.
hints may be found
on page
15.
When you first plug in the range or if your electricity goes off for a while, each
light in the display will flash in sequence. Then, 4 eights and the Min/Sec Timer
and Bake Hours signal lights will flash. The flashing means that the clock is
ready to be set.
conttnued
on nexl page
1. Push in and hold both the Min/Sec
Timer Button and the Bake Hours
Button. “0:OO” will show in the
Display and the Signal Lights will
go off.
Using the Electronic
2. Turn the Set Knob to set the right
time of day.Turning the knob
clockwise increases the numbers, while turning the knob
counter-clockwise
decreases
the numbersThe display will
show the time you set in hours
and minutes.
Minute Timer
The Minute Timer does not start or stop the oven. It works like a kitchen timer.
it can be set in minutes and seconds up to 99 minutes. You will hear beeps
when the set time is up.
1. Push In the MirVSecTimer Button.
The Signal Light will come on
and the Display will show “0:OO”.
2. Turn the Set Knob until the desired time shows in the Display.
Turning the knob clockwise increases the numbers, while turning the knob counterclockwise
decreases the numbers.
3. After sefflng the nme you want,
release the Min/Sec Timer Button.
The Signal Light will stay on and
the Display will start counting
down in seconds.
When the ffme is up, you will
hear a beeping sound. Push the
Min/Sec Timer Button to stop the
beeping. (The beeping will automatically stop after%2 minutes.)
Using the Oven Controls
Baking
Rack(s) should be placed so
the top of the food will be centered in the oven. Always leave
at least IYz to 2 inches (4-5 cm]
between the sides of the pan
and the oven walls and other
pans. For more information, see
the “Cooking Guide:’
1. Position the rack(s) properly
before turning on the oven. To
change mck position, lifi rack at
front and pull out.
2. Set Oven Selector to BAKE.
3. Set Oven Temperature Control to
the baking temperature you Want.
The Oven Signal Light will come on.
The oven is preheated when the
Oven Signal Light first goes off.
I
4. Put food in the oven. Note: Oven
5. When baking is done, turn both
the Oven Temperature Control
and the Oven Selector to OFF
During baking, the elements will turn on and off to keep the oven temperature
at the setting. The Oven Signal Light will turn on and off with the elements.
racks, wails and door will be
hot.
The top element
Adjusting
helps heat
during
the Oven Temperature
baking,
but does not turn red.
Control
Does your oven seem hotter or colder than your old oven? The temperature
of your old oven may have shifted gradually without your noticing the change.
Your new oven is properly adjusted to provide accurate temperatures. But when
comparing to your old oven, the new design may give you different results.
If after using the oven for a period of time, you are not satisfied with the
temperature settings, they con be adjusted by following these steps:
1. Pull the Oven Temperature
2. Loosen the locking screws inside
the control knob. Note the posi-
Control straight off.
tion of the notches.
I
3.
10
I
To lower the temperature,
move
a notch closer to LO.Each notch
equals aboutlO”F (X2).
4. To raise the temperature,
move a
notch closer to HI. Each notch
equals aboutlO”F (5°C).
Tighten
replace
the locking
the control
screw and
knob.
Broiling
1. Position the rack before turning
the oven on. See broil chat-t in the
“Cooking Guide” or a reliable
cookbook for recommended
rack positions.
3. Close the door to the Broil Stop
position, (open about 4 inches,
10.2 cm). The door will stay open
by itself.
2. Put the broiler pan and food on
the rack.
4. Set the Oven Selector and the
Oven Temperature Control to
BROIL.
5. When broiling is done, turn both
the Oven Selector and the Oven
Temperature Control to OFF.
Custom
l
l
Broil
If food is cooking too fast, turn the Oven Temperature Control counterclockwise until the Oven Signal Light goes off.
If you want the food to broil slower from the start, set the Oven Temperature
Control between 150” and 325°F (65.5 and 142°C). The lower the temperature,
the slower the cooking.
The Oven Selector
must be on BROIL for all broiling
temperatures.
CAUTION: The door must be partly open whenever the oven is set
to BROIL. Leaving the door open allows the oven to malntaln proper
temperatures and prevents window glass from cmcking.
11
Using the Electronic
Automatic
MEALTIMER*
Clock
The electronic MEALTIMER’ Clock is designed to turn the oven on and off at times
you set, even if you are not around.
Automatic baking is ideal for foods which do not require a preheated oven such
as meats and casseroles, Do not use the automatic
cycle for cakes, cookies,
etc...undercooklng
will result.
To start baklng now and shut off automatically:
1. Position the oven rack(s) properly,
and place the food in the oven.
3. Set Oven Selector on TIMED BAKE.
5. Set the clock for the length of
baklng tlme you want: Push in
the Bake Hours Button and turn
the Set Knob until the length of
baking time you want shows in
the Display.This example shows
2 hours,15 minutes. Bake Hours
can be set for up toll hours, 59
minutes.
12
‘Tmk.
2. Make sure the clock
is set to the
right time of day.
4. Set the Oven Temperature Control
on the baking temperature you
want.
6. The Bake Hours Signal Light will
stay on and the StopTime Signal
Light will flash.The Oven Signal
Light and Auto Oven Light will
come on. The Display will count
down In mlnutes.
If you want to
see Stop Time, push the Stop
Time Button. Push the Bake Hours
Button to see baking time again.
7. When the baklng flme Is complete, you will hear a beeping
sound. Push the Bake Hours Button to stop the beeping or the
beeping will stop automatically
afterl-2 minutesTurn the Oven
Selector and Oven Temperature
Control to OFF
Delay
start and automatic
8.
To stop the oven before the
programmed
time, push in the
Bake Hours Button and turn the
Set Knob counterclockwise until
the Display shows “0:OO”.The Display will return to the time of day
Turn the Oven Selector and Oven
Temperature Control to OFF
shut-off:
1. Position the oven rack(s) properly, and place the food in the oven.
2. Make
sure the clock
Is set to the rlghf time of day.
3. Set the Oven Selector on TIMED BAKE.
4. Set the Temperature Control on the baking temperature
5. Set the clock for the ffme of
day you want the food to be
done (StopTime):
Push in the
Stop Time Button, then turn the Set
Knob until the time of day you
want the food to be done shows
on the Display This example
shows six o’clock.
you want.
6. The Display will show the time
you set. The Stop Time Signal
Light will stay on-The Bake Hours
Signal Light will flash.
7. Set the clock
baklng
for fhe length of
flme you want: Push in
the Bake Hours Button and turn
the Set Knob until the length of
baking time you want shows in
the Display.This example shows
2 hours, 15 minutes. Bake Hours
can be set for up toll hours, 59
minutes.
9. The clock automatically calculates the time to turn the oven on.
At that time, the Oven Signal
Light and Auto Oven Light will
come on and the oven will heat.
This example shows the oven on
at 45 minutes past 3 o’clock.
11.
To stop the oven before fhe
preset ffme: Push in the Bake
Hours Button and turn the Set
Knob counterclockwise until
the Display shows “0:OO”.
Turn the Oven Selector and
Oven Temperature Control to
OFF.
14
8. The Bake Hours Signal Light will
stay on and the Stop Time Signal
Light will flash. If you wanffo see
the StopTime, push the Stop
Time Button. Push the Bake Hours
Button to see the baking time
again.
10. When baking is complete the
oven will shut off automatically.
You will hear a beeping sound.
Push the Bake Hours Button to
stop the beeping. [The beeping
will stop automatically in t-2
minutes.]
Turn the Oven Selector and the
Oven Temperature Control to OFF.
Other Operating
l
l
l
Hints
If you want to check what you have programmed, press the button for the
function you want to check. The display will show what you have programmed
for that function.
If you want to check the time of day, press the Min/Sec Timer and Bake Hours
Buttons. The display will show the time of day
A rapidly flashing signal light indicates an error in programming. Cancel any
entries and begin again.
The Oven Vent
The oven vent is located under the
right rear surface unit. When the oven is
on, hot air and moisture escape from
the oven through this vent. Poor baking
can result if this vent is blocked. When
using the oven, do not use oversized
pans or other items that might block
the oven vent.
The Storage Drawer
The storage drawer is for storing pots and pans
Use care when handllng
Removing
the drawer.
the storage
drawer
1. Pull drawer straight out to the
first stop. Lift front and pull out to
the second stop.
Replacing
the storage
2. Lift back slightly and%e
all the way out.
drawer
drawer
1. Fit ends of drawer slidTrails into
the drawer guides on both sides
of opening.
2. Lift drawer front and push in until
metal stops on drawer slide
rails clear white stops on drawer
guides. Lift drawer front again
to clear second stop and slide
drawer closed.
Use & Care Guide storage
Store this booklet, along with your
“Cooking Guide:’ sales slip and
warranty in the Literature Pat, inside
the storage drawer.
Optional
Rotisserie
If you would like a rotisserie for your lower oven, you can order a kit [Port No.
RCK-81/2429B5) from your Whirlpool Dealer. The kit includes easy installation
instructions.
Caring for your range
Control Panel
1. First make sure the control knobs are set to OFF,then pull knobs straight off.
2. Use warm soapy water and a soft cloth, or spray glass cleaner, to wlpe the
control panel. Rinse and wipe dry.
3. Wash control knobs in warm soapy water. Do not soak. Rinse well and dry.
4. Push control knobs straight back on. Make sure they paint to OFF.
Surface Units and Reflector Bowls
2. Lift the edge of the unit, opposite
the receptacle, just enough to
clear the reflector bowl.
3. Pull the surface unit straight away
from the receptacle.
4. Lift out the reflector bowl. See
Cleaning Chart on page 21for
cleaning instructions.
Replacing
2. Line up opening in the reflector
bowl with the surface unit
receptacle.
3. Hold the surface unit as level as
possible with the terminal just
started into the receptacle.
4. Push the surface unit terminal into
the receptacle. When the terminal
is pushed into the receptacle as
far as it will go, the surface unit will
fit into the reflector bowl.
CAUTION: Reflector bowls reflect heat back to the utensils on the
surface unlts. They also help catch spills. When they are kept clean,
they refleot heat better and look new longer.
If a reflector bowl gets dlsoolored, some of the utensils may not be
flat enough, or some may be too large for the surface unit. In either
Case, some of the heat that’s meant to go Into or around a ulensll
goes down and heats the reflector bowl. This extra heat can discolor
R. See “Cooklng Qulde” for furlher Information.
Lift-Up Cooktop
1.
Lifl front of cooktop
at center and
swing-up the support rod.
2. Carefully lower the cooktop
the support rod.
onto
CAUTION: Do not drop the
cooktop. Damage can
resull to the poroelaln and
the cooktop tmme.
3. Wipe with warm soapy water.
Use soapy steel-wool pad on
stubborn spots,
The Oven Door
Removing the oven door will help make it easier to clean the oven.
Open the door to the first stop
position.
2. Hold the door at both sides and lift
it at the same angle
It Is In.
fit the bottom corners
of the door over the ends of the
hinges.
Push the door down evenly. The
door will close only when it is on
the hinges correctly.
3. To replace,
The Continuous-Cleaning
Oven
Standard oven walls are coated with smooth porcelain-enamel. Your continuous-cleaning oven walls are coated with a special, rougher porcelain-enams
A fat spatter beads up on the smooth surface, but spreads out on the rougher
surface. The bead of fat chars and turns black. The spread-out fat gradually
burns away at medium to high baking temperatures
(SO”-475°F 176”-231°C)
so the oven can return to a presentably clean condition.
Using Foil
Using foil on the oven bottom is recommended to catch sugar and starchy
spills from pies and casseroles. It must be used properly. Cut foil from a roll of
heavy-dutyl&inch
(45 cm] aluminum foil, or buy a foil kit (Part No. 241430)
from your Whirlpool Appliance dealer.
Lift the cool bake element slightly
to llff the feet off the oven
bottom.
bake element sdall
solidly on the foil.
CAUTION: Do not let foil touch the bake element.
element. Make sure foil Is flat on the oven bottom
bake element.
feet rest
It could damage
the
and away from the
Hand Cleaning
WINDOW - Keep clean with hot
sudsy water. Use a plastic scouring pad for stubborn spots. Rinse
RACKS - Use soapy steel-wool
pad for best cleaning results.
Rinse well.
20
with
hot soapy water. Use a steel-wool
pad or plastic scouring pad for
stubborn spots. Rinse well.
WALLS AND DOOR-Wash
Cleaning
Tips
1. The oven window and
racks are not coated.
Clean them by hand.
2. The oven door does not get as hot as the walls. Some hand cleaning
needed.
may be
3. If you do more broiling than baking, hand cleaning may be needed.
4. Use aluminum foil on the oven bottom according to instructions. Spillovers do
not burn away and may stain the bottom.
Cleaning Chart
PART
WHAT TO USE
Exterior
surfaces
Soft cloth and warm soapy
water.
Nylon or plastic scouring
pad for stubborn spots.
HOW TO CLEAN
l
l
l
Surface units
No cleaning
required.
l
l
Chrome
retlector
bowls
Broiler pan
and arld
Control knobs
Control panel
Automatic dishwasher or
warm, soapy water and
plastic scrubbing pad.
Warm, soapy water or steel
wool
Wipe off regularly when codktop and
lower oven are cool.
Do not allow tood oontalnlng acids
(such as vinegar, tomato, lemon
Juice or milk) to remain on surface.
Acids will remove the glOUy flnlrh.
Do not use abrarlve or harsh
cleansers.
Spatters or spills will burn off.
Do not Immerse In water.
Wash with other cooking utensils.
0 Clean frequently.
l Do not use abmslve
or harsh
cleansers.
l
l
Wash wlth other cooking utenslls.
Dad.
Warm, soapy water and
sofl cloth.
Warm, soapy water or
spray glass cleaner.
Oven racks
Warm, soapy water or
soapy steel wool pads.
Oven door
glass
Spray glass cleaner;
Warm, soapy water or
plastic scrubbing pad.
l
l
l
l
Wash, rinse and dry Well.
Do not soak.
Wash, rinse and dry well.
Follow dlrections provided
cleaner.
wlth
0 Wash, rlnse and dry. Use soapy steel
wool pads for stubborn areas.
l
l
l
Make sure oven Is cool.
Follow dlrectlons provlded with
cleaner.
Wash rlnse and dry well wlth a soft
cloth.
ContlnuousCleanlng Oven
Warm, soapy water or
l Clean stubborn spots or stalns.
soapy scrubbing pad.
Rinse well wlth water.
Heavy-duty aluminum foil l Place strip of aluminum roll on the
or order a foil kit (Part No.
bottom of the oven to catch spillovers.
241430) from your Whirlpool l Do not use commercial CleanetS.
dealer or TECH-CARE@service company.
Most fat spatters on the Contlnuous-Cleanlng
porcelain-enamel
interior surface gmdually
reduce
to a presentably
clean condltlon
during normal
baking or roastlna oDerailons.
The Oven Light
The oven light will come on when you open the oven door. To turn the light on
when the oven door is closed, push the Oven Light switch on the console. Push it
again to turn off the light.
Remove the light bulb from its
socket. Replace the bulb with a
40-watt appliance bulb.
Turn the power back on at the
main power supply.
If you need service or assistance,
we suggest you follow these four steps:
1, Before calling for assistance...
Performance problems often result
from lltlte thlngs you can flnd and Hx
yourself wlthout tools of any kind.
Ii nctthlng operates:
l Is the power supply
cord plugged
Into a llve clrcult wlth the proper voltage? (See “lnstallatlon Instructtonsl’)
l Have you checked
your home’s
main fuses or clrcuii breaker box?
If the oven will not operate:
0 Is the Oven Selector turned to a settlng (BAKE or BROIL, but not TIMED
BAKE]?
l Is the Oven Temperature
Control
turned to a temperature setting?
Ii surface unlts will not operate:
l Have you checked
your home’s
maln fuses or clrcult breaker box?
l Are surface unlts plugged
In all the
way?
l Do the control knobs turn?
If surface unlf control knob(s) will
not turn:
l Dld you push In before trying lo turn?
If roll Is vlslble on ContlnuousCleanlng oven flnlsh:
l The special
flnlsh is deslgned to
gradually reduce oven roll during
normal baking or roasting. It Is not
22
designed to keep your oven spotless, only presentably clean.
l If you broil often, you may see oven
soll.
l The door Is cooler
than the oven
walls. Soil will be more vlslble on the
door than other areas In the oven.
See page 20 for how to clean.
l Sugar and starchy spills may leave
stains. See page 20 tar hand cleaning tips. Keep toll on oven bottom to
catch these spills.
If cooklng results are not what you
expected:
l Is the range level?
l Are you using pans recommended
in the Cooklng Guide?
l If baking, have you allowed
WZto 2
inches (4-5 cm) on all sides of the
pans for alr circulation?
l Have you preheated
the oven as the
recipe calls fo0
l Are the pans the size called for In the
recipe?
l Are you following
a tested recipe
from a reliable source?
l Do the
cooking
utensils have
smooth, flat bottoms and fit the surface unit being used?
See the Cooklng Gulde for more information on cooking problems and
how to solve them.
2.
If you need
assistance*...
4.
Call WhIrlpool COOL-LINE@ service assistance telephone number.
Dial tree from:
Contlnental U.S. . (800) 253-1301
Mlchlgan . . . . . . . . (800) 632-2243
Alaska 81 Hawall (800) 253-1121
and talk with one of our trained Consultants. The Consultants can instruct
you in how to obtain satisfactory operation from your appliance or, if sefvice is necessary,
recommend
a
qualified service company in your
area.
3.
If you need service*...
Whirlpool
has
a nationwide
network of franTECHchised
CARE@ Service
Companies.
TECH-CARE service technicians
are trained to fulfill the product warranty and provide after-warranty
service, anywhere in the United States.
To locate TECH-CARE service in your
area, call our COOL-LINE service assistance telephone number [see Step
2) or look in your telephone directory
Yellow Pages under:
SERVICP
X”l SEWICI CO
123 Ylpk
COMPAN,ES
If you have a
problem*...
Call our COOL-LINE service assistance
telephone number [see Step 2) and
talk with one of our Consultants, or if
you prefer, write to:
Mr. Robert Stanley
Division Vice President
Whirlpool Corporation
2000 US-33, North
Benton Harbor, Ml 49022
‘If you must call or write, please provide: model number, serial number,
date of purchase, and a complete
description of the problem. This information is needed in order to better
respond
to your request
for
assistance.
FSP is a registered
trademark
ot Whirlpool
Corporatlon
tar
quality ports. Look for thls
symbol of quality whenever
FSP
you need a replacement
part
@ for your Whlrlpool
appliance.
FSP replacement
parts
will tit rlght and work right. because
they are
made to the same exacting
speclflcatlons
used to build every new Whlrlpool oppllance.
0
SER”,CPCOMPAN,ES
X”7 SERVICE CO
mua@,
m4ggg
999.9999
OR
SERVlCE
XVI SERVICE to
123 Maple
COA,P.N,ES
9999999
23
Whirlpool
A
Home
/Apphances
Making your world a little easier.
Part No. 313294
01986 Whirlpool Corporation
nallc Washers Clothes Dryers Freezers. Relrlgerator-Freezers
Printed in U.S.A.
Ice Makers. Dishwashers. Built-In Ovens and Surlace Un~ls. Ranges. hllcrob