1
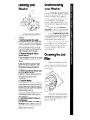
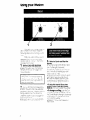
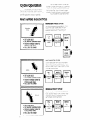
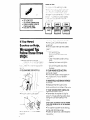
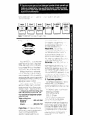
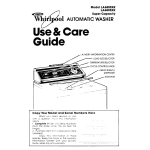
Model
Regular
Whirlpool
LA6400XK
Capacity
AUTOMATIC WASHER
Use & Care
Guide
LAUNDRY INFORMATION
/
CENTER
LOAD SIZE SELECTOR
TEMPERATURE SELECTOR
1
-.
/---
Copy
your Model
---
and Serial Plumbers
here
---.-
--__
i
-_
Before using
your Washer
Please reac this booklet
to be
sure your washer IS ~r>stalled and used
properly
It WIII help You get the best
results and longes
I fe your washer was
designed
to grve
You are personally
responslble for maklng sure that your
washer...
Is rnstalled by a qualrfred
rnstaller
Is properly
rnstalled and leveled
on a
floor that can suppart the weight.’
l Is connected
to the rrght kind of outlet,
electric
supply, water supply and dram
l Is properly
electrrcallv
grounded
’
l Is used
only for jobs normally
expected
of home automatic
washers
l Is properly
maintarnea
l Is protected
from the weather
l Is not run by children
or anyone
unable to operate
it properly.
Remove the Consumer
Buy
Gurde label
It WIII be easier to remove
befbre the washer IS used
You may want to wipe out the
basket with a damp cloth before using
to remove dust from storing or shipping
l
l
SPECIAL INSTRUCTIONS: See the
laundry
Guide for tlps on detergents, other laundry alds and
instructions
for washing special
items.
‘See the lnstallat~on
lnstructrons
complete
information
for
1
CAUTION: Store laundry detergent and additives
in a cool, dry
place where children
can’t
reach them.
Contents
Before Using Your Washer
Loading Your Washer
Understanding
Your Washer
Cleaning
the Lint Filter.
Using Your Washer
Water Levels and Load Sizes
Important
Detergent
Information
Liquid Fabric Softener Dispenser
For a Pre-Wash
For Rinsing Only
For Spinning Only
Cycle Operation
PERMANENT PRESS
KNITS GENTLE
REGULAR HEAVY
SOAKCYCLE
If You Need
1
2
3
Service
or Help
Before Calling
for Service
If You Need Service
If You Have a Problem
7
7
a
a
a
loading
Washer
your
For best washing results and
energy savings, sort the laundry
carefully.
1. Sort the laundry
into loads.
l
Group the laundry into loads that
can be washed and dried together.
See the Laundry Guide for information and samples of typical
loads.
l Try to mix large
and small items for
best movement
in the washer.
2. Measure Detergent;
Add to
Washer Basket.
l
See detergent
informatior)
on page
6 and in Section IV of the Laundry
Guide.
l
Add dry bleach or water conditioner (not fabric softener) if used.
Follow the package
directions
carefully.
3. Dilute liquid Bleach Before Adding to the Washer Basket.
l
See the “Laundry Aids” section of
the Laundry Guide for more
information.
4. load the Washer.
l
Spread the load evenly. (Don’t put
all the towels on one side and a few
wash cloths on the other.) An unbalanced load can cause the washer to
shake during spinning.
l
Load without packing
so items can
move freely for best cleaning
and
least wrinkling.
5. Add Diluted Fabric Softener to
the Dispenser.
. DO NOT ADD FABRIC SOFTENER TO
THE WASH. Fabric softeners
can combine with soap or detergent
to make
greasy stains on fabrics.
Understanding
your Washer
This automatic
washer has cycle
settings with different
agitation
and spin
speeds for different
fabric types. For
example,
the REGULAR HEAVY Cycle
has high agitation
and high spin
speeds
The PERMANENT PRESS Cycle,
has high agitation
speeds, but low spin
speeds
The washer has a LOAD SIZE
SELECTOR that lets you adjust the water
level to match the size of the load.
It has a TEMPERATURE SELECTOR.
You can select the wash and rinse water
temperatures
best for the amount
of
so11 and fabric type in each load.
Sections In this Use & Cure Guide
go into detail on the “what and why”
of each setting. Read this and ihe Laundry Guide carefully
to get ihe best
cleaning
results
Cleaning
Filter
the lint
Water runs through the lint filter
whenever
the washer agitates
Check
often to make sure it’s clean and filtering at its best
To remove
it for cleaning,
press
the release and pull straight out Instructions for cleaning
are printed on the
bottom
of the filter.
it
Using your Washer
Your auto ria!,c .zasher IS easv to
use To make it ever, easier read the
followlng
steps tx?forti \lorting
\zur first
loaa
Start your :Jasher atter yc~ put n
detergent,
the 1, ‘aa ar a ~r,y o’her
laundry ads ac~:;~,Ging *< ~nformatior~
on page 3 and r?age ’
1.
Set the LOAD SIZE SELECTOR.
l Select
the wa’er 1ev2 +i73t matches
the size of the IOXY SF= cage 5 for
more informatic
IMPORTANT
sure the load
2.
F Y the best cleaning
YIS err-)ugrj
water
for
Set the TEMPERATURE SELECTOR.
Match the wash and rinse water terrperatures
to the type :)f faorics and solIs
being washed
I See ‘he ixtructicns
under the washer lld and :x- poge 14 I-#
your Laundw GMX
l Be sure to use 3 co.tj
rinse for PERMA
NEN’ PRESS and I(NlTC GENTLE Cycles
l
3. Select
Washer.
a Cycle
and Start the
l Push the Cycle
Control Knob In and
turn it to the right (clockwise).
l Stop
when the pointer IS on the number ol minutes of washing
you want
in the cycle you want.
l Instructions
for which cycles to use for
each fabric type are under the lid.
l To start the washer,
pull the Cycle
Control Knob out. When the cycle IS
over, the washer will stop
l To stop
the washer at any time
during a cycle, push the Control
Knob in. Pull It out to restart the washer
l To change
a setting, push the Con-
trol Knob In to stop the washer. Then turn
the Control Knob to the right (clockwise]
to the setting you want Pull the knob
out to start the washer
l Pages
&II show what happens
In
each cvcle
Water levels
load Sizes
and
The LOAD SIZE SELECTOR lets you
control the amount
of water that fills
the washer The water level can be set
for extra small, medrum or full loads.
WATER LEVELS
Setting
EX SMALL
MEDIUM
LARGE
.Approximate
match
size.
Gallons/liters
99 375
13.5 511
169 640
fill wrth load
To save water and energy,
the water level to the load
For the best clearrng
results, the
load should move freely I? the water
Watch for rollover
An Item (like a sock]
should srnk in the mrddle and come
up later on the outside
Be sure to read pages 11 13 In
your Laundry Guide
You will find more
rnformation
on loading
and load sizes
usually based on soft water and
washers with normal-size
tubs Use
Important
Detergent
Information
more
Detergents
and soaps clean
by loosening
SOII. and by holding
it In
the water so It drains away
If not
enough
detergent
is used, soil and
lint can settle back on the items in
the loud
SOAP works best in soft water
(O-4 grains hardness)
In harder water.
both the wash and rinse water should
be softened.
Use enough
soap to
make about 11)~to 2 inches (3 8 to 5 5
cm] of suds
DETERGENT works in hard or
soft water
Package
directions
are
detergent...
1 for hard water
2 for heavy greasy or
01ly soils
3. If the detergent
IS low
phosphate
4 for cold-water
washes
DETERGENT SUDS. There are
high, normal and low sudsing powdered detergents.
If the recommended
amount
of detergent
makes
too much suds, switch to a lower
sudsing brand. DO NOT REDUCE THE
AMOUNT
of detergent.
Use the followlng
chart as
beginning
suggestions
for powdered
and liquid detergent
amounts
See
your laundry Guide for more information (pages 14-22).
WATER HARDNESS
Powdered
Detergents
Low Suds
Normal
Suds
High Suds
IN GRAINS
O-4 Grains
4-10 Grains
lo-20 Grains
3.4cup (175 mL)
1’4 cups (250-300
l’~-l’lz
114 cups (300 ml)
mL1
134 cups (425 mL)
2-2’4 cups
2 cups (475 ml]
(475-525 ml]
2’~ cups (600 ml]
l-l’ 4 cups
cups
(300-350 mL)
(300-350 mL)
No phosphate
Liquid
Detergents
- Follow
package
recommendations
-
‘4 to 1 cup (60 to 250 ml), depending
on the brand
amount of soil. Follow package
recommendations.
* These recommendations
do not apply...
l
In areas where phosphates
are banned.
l
In areas with laws limiting (by weight or percentage]
of detergent
used in a wash load.
and
the amount
Liquid Fabric
Softener Dispenser
The dispenser
for llquld fabric
softener fits over the, top of the agitator
The dispenser
WIII k 31d enough diluted
fabric softener for one deep rinse
l After
adding
the jetergeni
and the
load, fii the dlspen;er
over the top of the
agitator
cap
l ‘he
washer WII! fill, agitcte
fo7 “AC
minutes, soak for eight mlrJtes
7Jl+ate
for two more, and trien drai? cr’j spir
[See SOAK CYCLE descrlD+ior3’ unge
10 )
After filling, the washer may
before starting to agitate.
l
pause
For Rinsing Only
Your washer can be set to rinse
only Use the setting for an extra rinse or
for laundry that only needs a rirse ard
spin
PERMANENT
PRESS
Full Mark
FolIowIng
directions
on the bottle,
add the correct
arr>ouni of fabric softener Use a cup with a pouring spout
to avold dripping
any on the load
l
IMPOf?TANT: Add enough hot or
warm water to fill the dispenser
to
the FULL mark.
l
l
Diluted fabric softener
~111be added
just before the washer starts filling for the
rinse. NOTE: Do not stop the washer
during the first spin (when the wash
water IS spinning
out] If you do, the fabrlc softener
WIII be added
to the wet,
soapy load This can cause stains
l Clean
the dispenser
after each use
with warm wafer only. Detergent
can
make softeners
sticky and lumpy.
For a Pre Wash
Use this setting for a shorter SOAK
CYCLE (no rinse). Use enough
detergent
for a single wash. Add the load
l Set the LOAD SIZE SELECTOR.
l Set wash
water temperature.
l Push the Cycle
Control Knob in and
turn it to the 12-minute
mark in the SOAK
CYCLE
Pull the Control
washer
l
Knob
out to start ihe
There is a doi just after the numPERMANENT PRESS, REGULAR
and KNITS GENTLE If YOU push lr
Cycle Control Knob, turn the
to one of those dots and pull the
Knob out, the washer iz/lli fill,
drain and spin.
If you want high agitation
and
spin. use the dot In REGULAR HEAVY If
you want low agitation
and spin, use ihe
dot in KNITS GENTLE Use the dot in PERMANENT PRESS if you want high
agltatlon
and a low-speed
spin
bers in
HEAVY
on the
pointer
Control
agitate,
For Spinning
Only
To set the washer so it drains and
spins water out of the load, push in or’
the Control Knob, turn the dial to the
right (clockwlse)
so the pointer IS touchy
ing the bar just before OFF in any cycle
REGULAR
The washer will drain, spin out
water and stop If you want a low-spee
spin, use the bar on PERMANENT PRESS
or KNITS GENTLE, All the other cycle
settings have a high-speed
spin.
Cycle
Operation
Your washer has four cycles on
the Cycle Control Dial Each cycle IS
designed
to match the fabric type with
pre-set agitation
and spin speeds
The numbers rn each cycle are
for the qumber of minutes you want tne
washer to agitate
before It drains and
fills for the rinse. vou WIII want longer
agitation
times for heavily soiled loads
You choose the wash and rinse
WHAT HAPPENS IN EACHCYCLE:
PERMANENT PRESS CYCLE
xl
PERMANENT
PRESS
Use for permanent
press fabrics
CCC
lng of the wash water and Ioh spur
speeds help prevent tqe setting of
wrinkles
I
SET LOAD SIZE
SET WATER TEMPERATURES
. PUSH IN KNOB, TURN TO
CYCLE AND TIME
l
PULL OUT TO START
l
l
KNITS GENTLE CYCLE
Use for delicate
items and washable
synthetic
knits such as polyester
nylon,
acrylic
Wash nylon hose or panty hose
in a net laundry bag
KNITS
GENTLE
a
. SET LOAD SIZE
. SET WATER TEMPERATURES
. PUSH IN KNOB, TURN TO
CYCLE AND TIME
l
PULL OUT TO START
REGULAR HEAVY CYCLE
REGULAR
HENY
I
. SET LOAD SIZE
. SET WATER TEMPERATURES
. PUSH IN KNOB, TURN TO
CYCLE AND TIME
. PULL OUT TO START
a
Use for sturdy white and colorfast
cottons, and for heavy work clothes
High
agltatlon
and spin speeds are preset for best cleaning
results
water
temperatures
you want
wltt7 the
TEMPERATURE SELECTOR.
You set the amount
of water
fills the tub witt- the LOAD SIZE
that
SELECTOR.
NOTE: You may notlce that some
of the SPIN’ cycles have SPRAY RINSES.
Cold
NOTE
water
A’tiavs
IS sprayed
splnnlng
;oad to help rinse and remove
detergert
residue
I! you Turn io 3 cycie
sni st0:’ tne
Lz/osiler Dut chmge
you: TIP
Dush c
on +,qe Cycie Conlro’
Knob ;,?c: +br7
to t!le roan: ‘c!ockvdse)
to the sett/qy yoci
~013: Y,“ler; Du! I?odt
on the
use COLD
RIYSE WATER for Kpits and
Delicate
items
SOAK CYCLE
‘III? cbc~e IS riot for washing
rt soaks
ag totes splhs out the water and stops
-IC r nse I ;Ise It for starned
yellowed
grew or neoL#rly sorled laundry
with a
de’ergent
or pre-soak
product
Chlorrne
bleach
f uanted
should be added
t? the cycle LOL use after the SOAK
&Ye
IS ‘over
. SET LOAD SIZE
SET WATER TEMPERATURE
. PUSH IN KNOB, TURN TO
CYCLE AND TIME
. PULL OUT TO START
l
If You Need
Service or Help,
We suggest You
Follow These Three
Steps:
1 Before
calling
for service
,..
Prot3ems
t,,
‘lf’c?
+mgs
t I,‘15
Check
d
set ~172
I-- j:li‘ietrrnes
causec
.:orrect without
yc
1 .ar’
for
this 15’ beUs
you call
IF YOUR WASHER DOES NOT FILL:
Are the water supply hoses kinked7
Is the Cycle Control Knob set and
pulled out?
l Are the water
inlet hose filter screens
clean?
To check the screens’
~ Turn off the faucets.
~ Remove hoses and check the
screens
- Clean the screens under runntng
water
- Replace
the hoses and ttghten
connections.
~ Turn on the faucets and check
the leaks
l
l
IF YOUR WASHER DOES NOT SPIN:
Is the lid closed?
Is the power supply cord plugged
l Is a fuse blown
or crrcuit-breaker
tripped’
l
l
In7
IF WASHER FILLS AND DRAINS WITHOUT
RUNNING:
l Make
sure that the Cycle Control
Knob IS pointing
to a number tn the cycle.
l
l
Is tie power su;~o ;/ cord plugged
Are both water +oucets open?
in:
IF YOUR WASHER STOPS DURING THE
PERMANENT PRESS CYCLE.
Remember,
the washer WIII stop for
about 1% minutes after the p&cl
drain
durtng the cool-down
pertod tn this
cycle.
l
MAKE SURE THE DRAIN HOSE IS HIGHER
THAN THE WATER LEVEL IN THE WASHER.
IF IT ISN’T...
The washer may seem to be draining
during wash and rinse cycles.
l Water
can siphon out (See Installation
Instructions
]
l
l 1s c fuse blowr
triproe
10
or fcrrcurttbreaker
2. If you need
service
:
If your WHlRLPOO_
obollance
ever
needs servrce any,-<, here #I the United
States, help is just cl phor,e call away
to your nearest Wh rlpool franchised
TECH-CAREservrc e representative
Whrrlpool
marntcl’ns
3 natronwrde
network
of franchised
TECH-CARE service companies
tc fulfrl! v3ur warranty
and provide
after- niarronty
service and
maintenance
to keep your WHIRLPOOL
appllonce
in peak condrtron
You’ll find your nearest TECH-CARE
service company
l,sted ir your local
telephone
book Yelow Pages under
Washers
DrYers ~ ?eparrrng
or Servlcing. Should you not find a listing, dial
free, the Whirlpool
COOL-LINE” service assistance
telephone
number
(800) 253-1301.
When calling from:
(800) 632-2243
Michigan
Alaska &
Hawaii
(800) 253-l 121
It you move...To
rnoke sure that your
appliance
IS correctly
installed
and to
insure its continued
satisfactory
operation,
please telephone
your
’ LJ -” /
nearest TECtKARE
I service
for irstallatror
or to get the nc;- I-. +
qualrfred
rnstaller. (Installat~or
_ -- i.
of c(Jurse, be pad by you ]
Helpful hints...You can help . 8,
TECl-CARE
service representat
.F ,: \sfoh faster service if you include
+-Irnoael and serial number of your
opplrance
when requesting
ser i IC
krsc: retarn your sales slip ant:
:‘)c:rmI k
to verify your warranty
status
Remember...Your
TECH-ZAPE
\?ri
e
representative
IS specially
trainee
r me
expert reparrrng
and servicing
:f , 3~’
WHIRLPOOL appliances
He carI n7el~
you marntain
the quality
8orrgrrlo ly butIt
irto your WHIRLPOOL appliance
So why
not take the time, now, to look up his
telephone
number and jot it down rr the
space provided
on the oover
3. If you have
a problem
:
Call Whirlpool
Corporatron
1r8Berton
Harbor at the COOL-LINE
service
assistance
telephone
number [see Step
2) or write
Mr Stephen E Upton, ?/Ice PresiderIt
Whrrlpool
Corporation
Admlnlstratlve
Center
2000 U S 33 North
Benton Harbor, Michigan
49022
If you must colt or wrrte, please
provide
your name, address,
telephone
number, type of apprrance,
brand, model, serial number, date of
purchase,
the dealer’s
name, and a
complete
descrrptron
of the problem
This Information
IS needed
in order to
better respond
to your request for
assistance
11
Whirlpool
‘~‘v”,“k&T,,-‘N
p,-]r’ :qo ”1fj2’51?
PrInted II? II S A