1
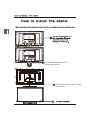
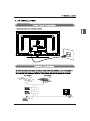
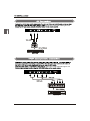
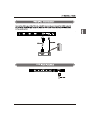
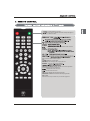
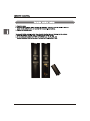
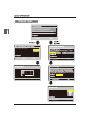
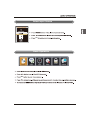
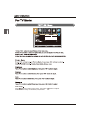
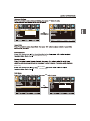
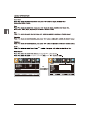
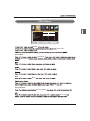
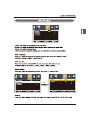
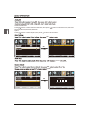
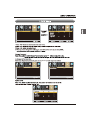
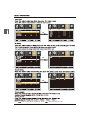
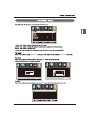
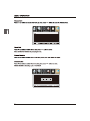
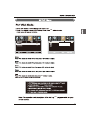
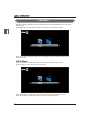
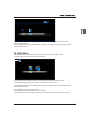
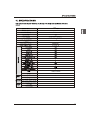
USER’S MANUAL MANUEL DE L’UTILISATEUR MANUAL DEL USUARIO DWM55F1Y2 VGA(PC)Connection USB Port Function HDMI&Coaxial Connection USB Menu 91.6 0.5 Fix the stand support to the TV using 6 pcs screws. Fix the base stand to the TV using 6pcs screws. MENU Button 6.INPUT Button POWER Button blue 1.TV ANTENNA Terminal 2.PC AUDIO IN Jack 3.VGA IN Jack 4.HDMI IN Jack 5.Headphone Jack 6.USB 7.Coax OUTJack 8.COMPONENT/VIDEO IN and AUDIO IN Jack Audio left is white,and Audio right is red. Audio left is white,and Audio right is red. USB COAXIAL Turn the LED TV on or off. Press once to disable the audio and press again to enable the audio. P.MODE S.MODE SLEEP Press to adjust between available audio channel. SOURCE S OK INFO Displays Press to set the closed caption. V-CHIP Switch to V-CHIP input. CH.LIST Press to display the TV program list. ASPECT OK Allows you to navigate the on-screen menus and adjust the system settings to your preference. Displays the main TV menu. Exit the main TV menu. FAV Press to diaplay the favourite program list. ADD/ERASE Add/Erase channel to favourite program list. FAV+ FAVPress these two keys to switch to your favourite programs. h s and OK HOME Power On Mode Use the Up and Down arrows on your remote control to select power on mode. Home optimizes the video settings for Energy Star qualification. Do you want to set Home mode(Energy saving)? Yes No and OK: Next OK: Next :Select OK Retail Power On Mode OK Use the Up and Down arrows on your remote control to select power on mode. Retail optimizes the video settings for use on a retail showroom floor or demo environment. OK Do you want to set Retail mode? Yes :Select No OK: Next Home Mode (Energy Saving) : Select Home Mode to maximize energy efficiency.Please note if you select Home Mode the picture will be darker. This mode meets the requirements of Energy Star Qualification. Retail Mode : Select Retail Mode if you would like your picture to be brighter. At times this mode may use more energy to operate the Volume/Sound Mode and the Picture Mode. In this setting, the power consumption may possibly exceed the limited requirement of the Energy Star Qualification. Energy Star is a set of power-saving guidelines issued by the U.S. Environmental Protection Agency(EPA). Energy Star is a joint program of the U.S. Environmental Protection Agency and the U.S. Department of Energy helping us all save money and protect the environment through energy efficient products and practices. The ON-MODE Power under Home Mode should be less than 91.6 W. The SLEEP-MODE Power should be less than 0.5 W. OK Use the Up and Down arrows on your remote control to select the channel scan type. / YPbPr YPbPr/AV OK OK OK s Menu:Quit OK YPbPr/AV HDMI1 HDMI2 HDMI3 VGA USB OK Select Input Source INPUT SOURCE YPbPr/AV HDMI1 HDMI2 HDMI3 VGA USB OK Basic Operation Lock OK Lock Neutral Color Temp Press button to select Color Temp. ,then press Available color Temp. mode:Warm,Cool,Neutral. button to adjust. OK Lock Lock OK MFC Level Medium Neutral Off,Weak,Medium,Strong. MFC Level MFC Level Off,Low, Medium High. OK Lock Lock Custom Color Hue MFC Level Color Space Medium OK Saturation Brightness Reset Red OK OK the option you want press Lock Lock MFC Level Color Space Medium OK AUDIO Menu Lock Sound Mode Standard Bass Treble Balance MTS Digital Audio Output Surround Mode AVL Stereo PCM On On Audio Audio menu. Sound Mode Sound Mode Sound Mode MTS MTS RAW Surround Mode Surround Mode On or Off TIME Menu Lock Sleep Timer Sleep Timer Lock OK Lock OK Advanced Selection Option Service1 Advanced Selection Press button to select Advance Selection,then press button to select Service1,Service2 Service3,Service4,Service5,Service6. Option Press button to select Option,then press button enter submenu. OK Lock Lock OK select OK (0000) Lock Lock OK Enter Password Press ‘OK’ to confirm Lock Lock Change Password On OK Block Unrated Off 0-9 OK a sub menu will 8899 Lock Lock 0-9 0-9 Lock Block Unrated Off Lock YPbPr/AV OK Block Unrated Off HDMI1 HDMI2 HDMI3 VGA USB Unlock Unlock Unlock Unlock Unlock Unlock Unlock Lock Lock OK Block Unrated N/A Off Lock Lock OK Block Unrated Off Block Unrated Press button to select Block Unrated,then press button to select On or Off. Lock Signal Type Air Signal Type Signal Type Signal Type OK Lock Lock OK Lock Channel Name OK OK Lock Channel Name OK OK OK Lock 28 Setup OK Lock Lock 30 OK AUDIO are 29 USB Menu Note:Before operating Media menu,Plug in USB device,then press SOURCE button to set the Input Source to USB. Press / button to select USB in the Source menu,then press OK button to enter. M-JPEG Press ◄ / ► button to select the option you want to adjust in the main Media menu,then press OK button to enter. JPEG Menu Press ◄ / ► button to select JPEG in the main menu,then press OK button to enter. Press Exit button to return back to the previous menu. M-JPEG Press ◄ / ► button to select drive disk you want to watch,then press OK button to enter. Press ◄ / ► button to select Return option to go back to the previous menu. 30 Press ◄ / ► button to select the file you want to watch in the file selecting menu,then press OK button to display picture. When highlighting the option you select,the file information will appear on the right and Picture will be previewed in the center. M-JPEG Menu Press ◄ / ► button to select M-JPEG in the main menu,then press OK button to enter. Press EXIT button to return back to the previous menu. M-JPEG Press ◄ / ► button to select drive disk you want to watch,then press OK button to enter. Press ◄ / ► button to select Return option to go back to the previous menu. When highlighting the option you select,the file information will appear on the right and Movie will be previewed in the center. Press OK button to play the selected movie. Press display button to show select menu in the bottom. Press ◄ / ► button to select menu in the bottom you want to run,then press OK button to operate. 31 32 54.6 LED 1920x1080 160 ATSC/NTSC 8 JPEG, M-JPEG 1259 x 290 x 808 mm 1259 x 97 x 742 mm 20.5 28.5 33 www.westinghousedigital.com S/N: Westinghouse Digital, LLC Orange, CA SE-UM-5503-1301