1
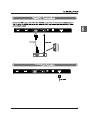
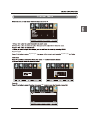
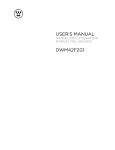
VGA(PC) Connection
USB Port Function
Audio
USB Menu
1
2
90.9W
3
Lay the TV face-down on a flat, cushioned
surface to avoid damaging or scratching.
Fix the stand support to the TV using
the 6pcs provided screws.
B-M4X14 6pcs
Fix the cover to the column using 1pcs
provided screw
ST3X8 1pcs
Fix the base stand to the TV using
the 6 pcs provided screws.
ST4X16 6pcs
4
Complete Installation
5
6
7
SOURCE
Blue when TV is powered on.
Red when TV is powered off.
Headphone: Connect a stereo headphone for private listening.
Optical Output: Connect a digital sound system to this jack.
and Audio
and Audio
LINE OUT: Analog audio output
9.
9
7
8
RF IN
LINE OUT
PC IN
Y/VIDEO
Pb
Pr
HDMI1
HDMI3
HDMI2
VGA PC AUDIO
5V
USB
500mA
PC IN
HDMI3
HDMI2
8
VGA PC AUDIO
5V
USB
500mA
9
Y/VIDEO
Y/VIDEO
10
Pb
Pr
Pb
HDMI1
Pr
HDMI1
PC IN
VGA PC AUDIO
HDMI3
HDMI2
RF IN
LINE OUT
5V
USB
500mA
USB
PC IN
VGA PC AUDIO
HDMI3
HDMI2
RF IN
LINE OUT
5V
USB
500mA
11
PC IN
Y/VIDEO
12
Pb
Pr
HDMI1
HDMI3
HDMI2
VGA PC AUDIO
RF
IN
LINE OUT
5V
USB
500mA
Turn the LED TV on or off.
Press once to disable the audio and press again to
enable the audio.
P.MODE
S.MODE
Press to adjust between available audio channel.
SLEEP
SOURCE
S
OK
INFO Displays
Press to set the closed caption.
V-CHIP Switch to V-CHIP input.
CH.LIST Press to display TV program list.
ASPECT
ok
Allows you to navigate the on -screen menus and adjust the
system settings to your preference.
Displays the main TV menu.
Exit the main TV menu.
Press to display the favourite program list.
ADD/ERASE Add/Erase channel to favourite program list.
FAV
FAV+ FAVPress these two keys to switch to your favourite program.
13
14
OK
Left,Right
,
Left,Right
90.9
15
OK
,
YPbPr
YPbPr/AV
OK
s
OK
Antenna RF Warning
Notice:Westinghouse Electronics does not recommend using the RF
Antenna input as your cable or satellite connection because it will
provide poor video quality to your HDTV.Use a different connection
for optimum conditions.If you do not have a cable box that provides
an HD quality signal,we recommend that you call your cable provider
for an upgrade.Otherwise,select Proceed.
Exit Setup
Proceed
Go Back
Menu: Skip DTV
OK
YPbPr/AV
OK
16
Select Input Source
YPbPr/AV
HDMI1
HDMI2
HDMI3
VGA
USB
ok
Basic Operation
Lock
ok
17
Picture Menu
Lock
Normal
Color Temperature
Color Temperature,
18
ok
Lock
Lock
ok
Normal
Off,Weak,Medium,Strong.
ok
Lock
Lock
Custom
Color
Red
HUE
ok
Saturation
Brightness
Reset
19
ok
ok
the option you want
Lock
Lock
ok
20
press
Audio Menu
Lock
Sound Mode
Standard
Bass
Treble
Balance
MTS
Stereo
Digital Audio Ouput
PCM
Surround Mode
On
On
AVL
Audio
Audio menu.
Sound Mode
Sound Mode
Sound Mode
MTS
Press
button to select MTS, then press
button to adjust.
Surround Mode
Surround Mode
21
Time Menu
Lock
Sleep Timer
Sleep Time
22
Setup Menu
Lock
OK
Digital CC
23
OK
Lock
Lock
ok
ok
(0000)
Lock
Lock
ok
Enter Password
Press "OK" to confirm
24
Lock Menu
Lock
Lock
ok
ok
a sub menu will
8899
Lock
Lock
Lock
25
Lock
YPbPr/AV
HDMI1
ok
HDMI2
HDMI3
VGA
USB
Lock
Lock
ok
Lock
Lock
ok
26
Channel Menu
Lock
Air
Signal Type
Signal Type
Signal Type
ok
Lock
Lock
ok
Lock
ok
27
ok
Lock
ok
ok
ok
Lock
28
Setup Menu
Setup
ok
Lock
Lock
3
ok
AUDIO
are
29
USB Menu
Note:Before operating Media menu,Plu in USB device,then press SOURCE button to set
the Input Source to USB.
Press
button to select USB in the Source menu,then press OK button to enter.
M-JPEG
Press
button to select the option you want to adjust in the main Media menu, then press
OK button to enter.
Press
button to select JPEG in the main menu,then press OK button to enter.
Press Exit button to return back to the previous menu.
M-JPEG
Press
Press
30
button to select drive disk you want to watch, then press OK button to enter.
button to select Return option to go back to the previous menu.
Press
button to select the file you want to watch in the file selecting menu, then press OK
button to display picture.
When highlighting the option you select, the file information will appear on the right and picture will be
previewed in the center.
Press
button to select M-JPEG in the main menu, then press OK button to enter.
Press Exit button to return back to the previous menu.
M-JPEG
Press
Press
button to select drive disk you want to watch, then press OK button to enter.
button to select Return option to go back to the previous menu.
When highlighting the option you select, the file information will appear on the right and Movie will be
previewed in the center.
Press OK button to play the selected movie.
Press display button to show select menu in the bottom.
Press
button to select menu in the bottom you want to run, then press OK button to operate.
31
32
55
LED
1920 x 1080
AC 100~240V 50/60Hz
110
ATSC/NTSC M
8
OPTICAL-OUT
JPEG,M-JPEG
LINE OUT
1251x310x803mm
1251x83x738mm
18.15
23.5
33