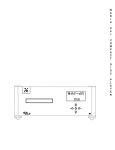
1
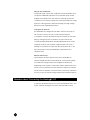
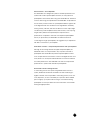
W A D I A 3 0 1 Wadia 301 Compact Disc Player C O M P A C T D I S C Owner’s Manual P L A Y E R Safety Precautions_______________ To get the best performance from your Wadia 301 CD Player, and for your own safety, please read and follow these important safety instructions: • Never place the Wadia 301 CD Player near heat sources such as radiators, fireplaces, stoves, or other appliances that produce heat. Avoid placing the Wadia 301 CD Player where it will be subject to direct sunlight or low temperatures. • This product is equipped with a three-prong IEC power cord that includes an earth ground connection. To prevent shock hazard, all three connectors must always be used. If your electrical outlets will not accept this type of plug, an adapter may be purchased. If an adapter is necessary, be sure it is an approved type and that it is used properly, supplying an earth ground. • AC extension cords are not recommended for use with this product. If an extension cord must be used, be sure it is an approved type and has sufficient current carrying capacity for this product. • Before cleaning the Wadia 301 CD Player, always disconnect the power supply cord. Use a soft cloth and, if necessary, dampen with clean water or mild cleaning agent. Never apply water, or any other cleaner, directly to the chassis. • If you smell smoke or an abnormal smell, immediately unplug the Wadia 301 CD Player from the power supply and contact your Wadia dealer. • Never attempt to service the Wadia 301 CD Player beyond what is described in this Owner’s Manual. Qualified service personnel should perform all repairs. • Unplug unit if it becomes wet. • Do not open unit when attached to AC outlet; dangerous voltages and laser radiation may be encountered. • Replace fuse only with the exact type originally included: 100 volt: 1 amp Slo-Blo (1 fuse) 120 volt: 1 amp Slo-Blo (1 fuse) 220 volt: 1/2 amp Slo-Blo (2 fuses) 240 volt: 1/2 amp Slo-Blo (2 fuses) 2 Contents ______________________ Safety Precautions 2 Introduction 4 A Brief History of Wadia Wadia 301 CD Design Philosophy 4 5 Installation 7 Unpacking The Accessory Kit Installing Batteries In Remote Control Installing Cone Feet Choosing a Location for the Wadia 301 CD 7 7 7 8 8 Connections 9 Connecting to AC Power Questions about Connecting the Wadia 301 CD Bypassing the Wadia Digital Volume Control Connecting Directly to an Amplifier Connecting to a Preamplifier Adjusting the Maximum Output Voltage Infrared Input and Pass-through Optional Digital Inputs Digital Output Choosing a Digital Cable Connecting to the Digital Inputs or Output Operation 9 10 12 12 12 13 14 14 14 15 15 16 Front Panel Display and Controls Remote Control Operation Commands Appendices 16 17 18 21 Trouble shooting DigiMaster Software License Agreement Environmental Care 21 21 21 Warranty 22 Specifications 23 3 Introduction ____________________ All of us at Wadia would like to offer thanks and congratulations to you for purchasing the Wadia 301 Compact Disc Player. We sincerely believe that your Wadia 301 CD is an intelligent purchase decision that will bring you many years of musical pleasure and satisfaction. While every new owner is anxious to begin listening, we encourage you to take a few minutes to read this manual and familiarize yourself with the full capabilities of the Wadia 301 CD. To reduce the risk of injury or damage to your Wadia 301 CD, please read the safety instructions on the first page of this manual. In addition, please pay particular attention to the sections of this manual where the symbol at left is shown. A Brief History of Wadia Wadia was originally founded in 1988, making it one of the first highend audio companies dedicated to digital audio. Wadia was formed by a group of telecommunications engineers from the Minneapolisbased 3M Corporation who were committed to using advanced digital technology to improve the performance of digital audio equipment. Wadia’s first product, the Wadia 2000 Decoding Computer, was a breakthrough in that it proved the viability of Compact Disc as a musically involving format. Wadia has continued to develop new methods and technology and each successive product has resulted in a new standard of performance for digital audio decoding. Here is an abbreviated list of the technological innovations Wadia engineers pioneered: 4 • Patented DigiMaster™ up-sampling algorithm, optimized for extracting maximum musical information from digital-audio data stream. • First company to apply glass fiber optics to home audio. • Direct-Connect™ system to connect digital audio products directly to amplifier. • ClockLink™ proprietary jitter-reduction technology. • Swift-Current™ zero-feedback current to voltage converter. Wadia’s digital expertise and record of accomplishment exceed those of any audio company, but technology alone does not guarantee musical performance. Wadia designs are born of a delicate balance of technology shaped by a passion for music. Wadia is proud to introduce the Wadia 301 CD Player, a breakthrough in sonic performance and value, and a strong evidence of our dedication to music reproduction. Wadia 301 CD Design Philosophy The Wadia 301 Compact Disc player is the first of Wadia’s new 3 – series, a range of products that set a new standard for performance, aesthetics, and value. The Wadia 301 CD has received the benefit of over 12 years and thousands of hours of development that have resulted in the Wadia legacy. Viewed this way, the Wadia 301 CD is one of the most outstanding values in the world of high-end music reproduction. Wadia Digital Volume Control with Direct-Connect™ The Digital Volume Control and Direct-Connect circuitry perform the 5 Swift Current I-V Converter The Wadia 301 CD is the first Compact Disc player in this price range to use Wadia’s patented Swift Current technology. This proprietary, custom-fabricated integrated circuit performs the sonically critical current-to-voltage conversion with no negative feedback, resulting in demonstrably superior sound quality. The Music Comes First As with all Wadia products, the Wadia 301 CD is the result of a design philosophy that bridges the gap between the traditional engineering and empirical approach to audio design. That is, Wadia engineers are guided equally by advanced measurement techniques and extensive listening during the development process. The result is performance that exceeds the expectations of even the most demanding listener. 6 Installation ____________________ This section includes information on how to unpack and position your Wadia 301 CD. Unpacking After carefully unpacking your Wadia 301 CD, inspect for any shipping damage and call your dealer immediately if any is found. Do not plug your Wadia 301 CD into any outlet if you find shipping damage. Please save all packing materials so the unit can be easily and safely shipped if the need arises. The Accessory Kit Included in the carton, you will find an accessory kit that contains the following: • AC power cord • Remote Control • Two type-AAA batteries • Three cone feet and flat metal discs • One BNC-to-RCA adapter Installing Batteries In Remote Control The Wadia 301 CD remote control requires two batteries, which you will find in the accessory kit. To install the batteries, unscrew the battery cover on the back of the remote. Insert the batteries as indicated on the battery holders, and replace the cover. 7 Installing Cone Feet The Wadia 301 CD is equipped with three cone feet that screw into inserts in the bottom panel. These feet will improve performance by reducing vibration. If the Wadia 301 CD is sitting on a shelf that can be damaged by the sharp feet, place the steel discs under each foot to protect the shelf surface. Choosing a Location for the Wadia 301 CD The sound quality of all high-performance digital and analog components can be degraded by vibration. Although the Wadia 301 CD uses some of the most advanced noise-reduction circuitry available, it too will benefit from any efforts taken to reduce vibration. For best performance, place the Wadia 301 CD on a solid, nonresonant shelf that will minimize vibration. 8 Connections ____________________ This section provides instructions to connect the Wadia 301 CD to the rest of your music system. Below is an illustration of the Wadia 301 CD rear panel, showing all inputs and outputs. Digital inputs (Optional) (page 14) IR pass through (page 14) IN 1 IN 2 IN 3 ANALOG OUTPUT RIGHT AC inlet and power switch (page 9) IN 4 LEFT IR IN R L IR OUT DIGITAL OUTPUT DESIGNED & MANUFACTURED IN THE U.S.A. Analog outputs (page 10) Digital output (page 14) Maximum Output Level Adjustment (page 13) Avoid allowing static shocks to be applied to the inputs or outputs. To prevent static shocks, touch any grounded surface, such as the chassis of a component that is plugged into an AC socket, before connecting or removing a cable. It is unlikely that a static shock will damage the unit, but it may cause the Wadia 301 CD circuitry to lock-up (see Trouble Shooting in Appendices). Inputs and outputs can be safely connected to the Wadia 301 CD: • When the AC power is switched off OR • When the unit is in Relay-Mute mode (See Mute in Operation) Connecting to AC Power Check to make sure your Wadia 301 CD has been manufactured for operation at your AC line voltage. Attempting to use your Wadia 301 CD at any voltage other than specified on the rear of the unit may cause damage that is not covered by Wadia’s warranty. 9 Using AC Line Conditioners Of the wide range of power line conditioners currently available, some can provide substantial improvement in sound while others actually degrade sonic performance. Use caution in selecting a power line conditioner for your system. In particular, avoid using inexpensive “surge protectors”. Although these can prevent damage from high voltage spikes, they often degrade performance. Leaving the AC power on The Wadia 301 CD is designed to be able to have the AC power on with no harm or wear to the unit. To reduce wear and power consumption, all motors and laser circuitry turn off when the unit stops playing. Leaving the power on allows the circuitry to remain at a constant operating temperature, providing better performance and longer life. However, there is always a slight increase in risk of fire or damage to any electrical component when the power is left on. We leave the decision to leave the Wadia 301 CD powered to the individual owner. Break-in and warm-up Careful listeners will notice that the sound of the Wadia 301 CD improves steadily after the unit is powered-up. A new unit will undergo more dramatic changes when power is applied for the first time. Depending on the resolution of the system and the attentiveness of the listener, you may find that the sound continues to improve over the first several weeks of operation. If the power is disconnected for a period of an hour or more, the unit will undergo similar but less dramatic break-in. Questions about Connecting the Wadia 301 CD To help you decide the best way to connect the Wadia 301 CD to your system, read the following list of question asked by Wadia owners: 10 Direct-Connect™ or Pre-Amplifier? The Wadia 301 CD is designed to produce excellent performance in systems with or without preamplifiers. However, in many systems a preamplifier is unnecessary when using your Wadia 301 CD. The Direct Connect technology incorporated into the Wadia 301 CD provides all the necessary control functions of a preamplifier while the signal is still in the digital domain. This avoids the sonic degradation caused by analog circuitry, switches, and wire. The Direct-Connect output stage can drive any power amplifier and any interconnects, even very long lengths. Many listeners are surprised by the improvement in performance compared to even the most expensive preamplifiers. Even if you purchased your Wadia 301 CD with the intention of connecting it through a preamplifier, we suggest that you experiment with direct connection to your amplifier. Does Direct-Connect™ compromise performance with a preamplifier? Although we encourage listeners to bypass their preamplifier, the Wadia 301 CD is not compromised in any way when used with a preamplifier. The Wadia 301 CD performs all preamplifier functions such as input selection and volume control in the digital domain. As a result, there is no circuitry associated with Direct-Connect that affects the audio performance. The Wadia 301 CD offers uncompromised performance in systems with and without preamplifiers. How should I connect Analog Sources? To use analog sources in a system using Wadia’s Direct Connect system, Wadia has introduced the Wadia 130 and 150 Analog-toDigital converters. Now it is possible to use analog sources, such as a tuner, tape deck, or even a turntable (in conjunction with a suitable phono stage) in your system without using a conventional analog preamplifier. Consult your dealer for more information on the Wadia Analog-to-Digital products. 11 Bypassing the Wadia Digital Volume Control Strictly speaking, the Wadia Digital Volume Control cannot be bypassed, because it is not in the analog signal path to begin with. Unlike conventional volume controls, there is absolutely no circuitry in the analog signal path of the Wadia Digital Volume Control -- no passive parts, switch contacts, resistors, or even circuit board traces. The Wadia Digital Volume Control operates in the digital domain; it comprises one computer-programming step in the Wadia’s digital filter algorithm. Even this program step cannot be bypassed, because it performs the important function of preventing the digital signal from exceeding the maximum level that can be processed by the digital to analog converter chips. If you are connecting the Wadia 301 CD to a preamplifier or amplifier with a volume control, you can set the Wadia 301 CD volume control to the maximum level (99). Connecting Directly to an Amplifier To connect your Wadia 301 CD to a power amplifier, ensure that your power amplifier is turned off, and then connect your analog interconnects from the Wadia 301 CD balanced or unbalanced analog outputs to the amplifier’s inputs. Connecting to a Preamplifier To connect the Wadia 301 CD, simply connect the balanced or unbalanced analog outputs from the Wadia 301 CD to a pair of linelevel inputs on the preamplifier. When using a preamplifier, turn the Wadia 301 CD volume control to its maximum volume (99). 12 Adjusting the Maximum Output Voltage The Maximum Output Voltage is the output voltage when the volume control is set to maximum setting (99). The Maximum Output Voltage is factory set to 4.0 V on the balanced output and 2.0 V on the unbalanced output. You can adjust the Maximum Output Voltage on the Wadia 301 CD to match your system by setting the two small switches on the rear panel as shown in the table below. 13 Infrared Input and Pass-through The Wadia 301 CD is equipped with a pair of 1/8" mini-plug infrared (IR) pass-through jacks. The IR pass-through jacks can be used with an IR receiver/transmitter system to send remote control commands directly to the Wadia 301 CD. This may be useful for example, if the Wadia 301 CD is located outside the field of view of your listening position. Optional Digital Inputs Digital inputs are available as an option on the Wadia 301 CD. The digital inputs allow you to connect other digital sources and receive the benefits of Wadia’s decoding performance. The Wadia 301 CD Digital Input card has the following inputs: Input 1: Glass-fiber optical Input 2: Coaxial with BNC connector Input 3: Coaxial with BNC connector Input 4: Plastic-optical TOSLINK All inputs automatically adjust to any of the standard digital-audio data-rates from 32 to 96 kHz. Digital Output The Wadia 301 CD is equipped with one digital output to allow the internal CD transport to feed another component, such as a digital recording device. The digital output is a S/PDIF signal on a high-quality BNC jack. 14 Choosing a Digital Cable For maximum performance we recommend using an ST glass-optical cable, which can be purchased from your Wadia dealer, for any digital audio connections. Wadia Digital was the first company to use glass fiber-optic data-transmission in digital audio and we believe that it offers the best performance of all the available options. Based on our experience, here is a list of digital interface methods in descending order of performance: 1. ST-type Glass optical (as implemented by Wadia, with high quality glass-optical cable) 2. AES/EBU using XLR connector 3. Coaxial S/PDIF cable using BNC connector 4. Coaxial S/PDIF cable using RCA connector 5. TOSLINK plastic-optical cable The quality of any of these transmission methods depends on the quality of the cable and the sophistication of the transmitter and receiver. For example, a high-quality coaxial S/PDIF cable can outperform a low-quality AES/EBU cable. A high-quality AES/EBU cable may outperform a poorly implemented glass-optical system If you are using a coaxial S/PDIF connection, we recommend having the cable terminated with a BNC connector. This will provide higher performance than an RCA connector. Your Wadia 301 CD input kit comes with an RCA/BNC adapter that can be used for experimentation between different types of coaxial S/PDIF cables. Again, we highly recommend that you take advantage of your dealer’s experience and, most importantly, trust your ears. Connecting to the Digital Inputs or Output To connect to either the digital inputs or output of the Wadia 301 CD, simply connect the appropriate digital input or output to the outboard component. 15 Operation ______________________ This section describes how to operate the Wadia 301 CD. Note: When loading a disc, place it on the loading tray with the printed label facing down. Front Panel Display and Controls Below is an illustration of the Wadia 301 CD front panel display and controls. Refer to the table on page 17 for information on each control. Display CD PLAYER OPEN/CLOSE 16 Front Panel Controls Remote Control Below is an illustration of the Wadia 301 CD remote control. Refer to the table on the following page for information about each command. STOP PAUSE PLAY PGM 17 Operation Commands Shown below is a table of all the controls on the front panel and the remote to operate your Wadia 301 CD. Refer to the page number noted for more information about each command. Command Description Control Location Open/Close Open or close loading drawer Front panel and remote 18 Play To begin playing disc Front panel and remote 18 Stop Stop playing Front panel and remote 18 Pause Pause playing Front panel and remote 18 Skip forward Move to next track Front panel and remote 19 Front panel and remote 19 Front panel and remote 19 Front panel and remote 19 Skip back Skip back (repeated) Volume Up/Down Icon Move to beginning of current track Move to beginning of previous tracks Increase or decrease playback level Page Mute Mute output Remote only 19 Input Select internal CD transport or external digital inputs Remote only 20 Invert Invert output 180º Remote only 20 Repeat Repeat tracks, disc or program Remote only 20 1-10 (key pad) Select tracks or program Remote only 20 >10 Select tracks with track numbers greater than ten. Remote only 20 Program Used to create program Remote only 20 OPEN/CLOSE Pressing the OPEN/CLOSE key causes the disc-loading drawer to either open or close. You can also close the drawer by gently pushing on the drawer front, or by pressing PLAY or SKIP FORWARD. PLAY Pressing PLAY causes the unit to begin playing. If the drawer is open, pressing PLAY will close the drawer before playing begins. STOP Pressing STOP causes the disc to stop playing. PAUSE Pressing PAUSE suspends playing until play is pressed, or until pause is pressed again. Playing will resume at the same point on the CD where the pause button was pressed. 18 SKIP FORWARD/SKIP BACK Pressing these keys skips to the next or previous track. SKIP FORWARD always moves to the next track. However, the function of the SKIP BACK key is different. If a CD is playing, pressing SKIP BACK once will return to the beginning of the current track. Pressing SKIP BACK repeatedly will select the previous tracks. If the CD is not playing, then pressing SKIP BACK will move to the previous track. VOLUME UP/DOWN Pressing these keys increases or decreases volume by 0.5 dB for each time the key is pressed. The two-digit LED on the front panel indicates the volume level, with a range of 0-99. When the volume is set to zero the output is muted. Volume level of 01 is –50dB from maximum output, and each successive step increases the output by ½ dB until maximum output is reached and the display indicates 99. MUTE The Wadia 301 CD has two mute modes that are automatically implemented under different circumstances. 1. Software Mute: When the MUTE key is pressed on the remote control, the Wadia 301 CD DSP engine transmits a stream of zero signal-level samples to the DAC section, which results in zero output. 2. Relay Mute: The Wadia 301 CD has mute relay connected between the positive and negative outputs. When this relay is engaged, it connects the positive output to the negative output, reducing the output to zero. This relay, which produces an audible click when it engages or disengages, is not in the music signal path. The mute relay is engaged under any of the following three conditions: • Each time the Wadia 301 CD power switch is turned on. • When the Wadia 301 CD detects AC input level below its minimum operating range. • When the volume control is set to zero AND the MUTE key on the remote control is pressed. When the Wadia 301 CD is in either software or relay mute, the Mute indicator on the front panel will illuminate. Note that the CD will continue playing even when the output is muted. 19 INPUT The Wadia 301 CD can be configured with four optional digital inputs (See section on Optional Inputs). Each time the INPUT key is pressed, the next input is selected. For example, if you are listening to the internal CD drive, and you press the INPUT, Input 1 will be selected. Press it again, and Input 2 will be selected and so on. After Input 4, the list will begin again with the internal CD drive. INVERT Pressing the INVERT key on the remote control will cause the Wadia 301 CD to invert phase; pressing it again will switch the phase back to normal. When the phase is inverted, the INVERT indicator on the front panel will illuminate. REPEAT Pressing this button once will cause the current track to repeat continuously. Pressing the REPEAT key a second time will repeat the entire disc or program continuously. Pressing it a third time will stop repeating. The repeat mode is indicated by the front panel display. PROGRAM The PROGRAM key can be used to create a program to play tracks on a disc in any order you choose. Follow these steps to create a program: 1. While the unit is stopped, use the SKIP keys to select the first track in the program. 2. Press the PROGRAM key to enter that track into the program 3. Repeat until all desired tracks are entered. 4. Press PLAY to hear the tracks in the program order 5. Opening the disc loading drawer or turning the power off will erase the program. Direct Access Keypad Use the direct access keypad to move directly to any track on the disc. For track numbers greater than 10, use the >10 key to set the first digit and then one of the number keys for the second digit. 20 Appendices _____________________ Trouble Shooting If the Wadia 301 CD experiences a powerful static shock or sudden AC surge, it is possible to “lock-up” the computer circuitry. A locked-up computer may result in erratic display, no output, and no response to remote commands. If your Wadia 301 CD should lock-up, unplug the AC cord. Wait at least 30 seconds before plugging the unit in again. If the unit still does not operate normally, contact your dealer. DigiMaster Software License Agreement The DigiMaster software is copyrighted and patented and is the property of Wadia. Title to Licensed Software is not transferred to the customer. The customer is granted a nonexclusive license to use the Licensed Software on a single CD Player basis. The Licensed Software cannot be shared among multiple CD Players. Each CD Player must have its own separately Licensed Software. At the sole discretion of Wadia, the customer may be provided with updates of the Licensed Software. Wadia retains the right to provide the Licensed Software updates for a fee. The customer may refuse to accept such Licensed Software updates. Environmental Care Wadia Digital makes every effort to minimize our environmental impact. We greatly appreciate it when our customers join our efforts. Please dispose of batteries and packing material in a manner that is environmentally responsible. 21 Warranty _____________________ This Warranty covers the Wadia 301 CD Player. Wadia, warrants that this product shall be free from defects in materials and workmanship for: one year for the player mechanism’s mechanical structure and associated electronics, and five years for all other parts of the product (excluding batteries). The warranty period begins at the date of sale and is subject to the following requirements and understandings: • The product must not have been modified in any manner whatsoever, or the warranty is immediately voided. • The product must not have been stored in a humid, damp environment; nor subjected to weather, water, or salt spray. • During the warranty period Wadia will repair the Wadia 301 CD to working order, or, at the discretion of Wadia, replace a unit with a similar available product. Wadia shall not, under any circumstances, be liable for any incidental or consequential damages arising from the loss of property or other damage or losses due to the failure of a Wadia 301 Compact Disc player. Wadia will not pay for loss of use or inconvenience caused by the failure of a Wadia 301 Compact Disc player, nor for damage caused to other audio components caused by the failure of the Wadia 301 Compact Disc Player within the limits allowed by State Law. All repairs performed after the warranty period has expired will be billed to the owner and will carry a 90-day warranty on parts and labor. The customer is responsible for shipping charges for all repairs, warranty or non-warranty, shipped to Wadia. Wadia will pay return shipping to the customer or dealer (within the United States) for all warranty repairs. Wadia will not cover special shipping methods or services. All service must be performed by Wadia or an authorized service facility. This product is only warranted in the country of original sale. 22 Specifications ___________________ Pickup Mechanism:.................................................... Pioneer Stable Platter Decoding Software: ................................................... DigiMaster upsampling algorithm Digital Processing Capability .................................... 24 Bits Digital Volume Control Range.................................... 50 dB in one-hundred 1/2 dB steps Analog Outputs .......................................................... 1 pair of Balanced (XLR); 1 pair of Unbalanced (RCA). Both can be used simultaneously. The balanced outputs use the standard audio pin configuration: pin 1 is ground, pin 2 is positive, and pin 3 is negative. Digital Output............................................................. 1 - S/PDIF (BNC) Digital Inputs (Optional).............................................. 1 - Glass Fiber-Optic (ST); 2 - S/PDIF (BNC); 1 - Plastic Optical (Toslink). Output Impedance.................................................... 75 ohms Power Consumption ................................................... 18 watts Weight........................................................................ 18 lbs.; 22 lbs. including carton Dimensions ................................................................ Width: Depth: Height: with tiptoes: without tiptoes 17.2” 16“ (43.7 cm) (40.6 cm) 4.7” 3.9 (11.9 cm) (9.9 cm) 2001 Wadia Subject to change without notice. 23 795 Highland Drive Ann Arbor MI 48108 734.975.4217 tel 734.975.4299 fax www.wadia.com