1
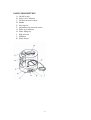
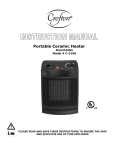
ULTRASONIC HUMIDIFIER OWNER’S MANUAL Model HM- 852 Item # 3158 INTRODUCTION Thank you for purchasing our Crofton Ultrasonic Humidifier. Each unit has been manufactured to ensure safety and reliability. Before using for the first time, please read the instructions carefully, and keep them for further reference. WARNING! READ AND SAVE THESE INSTRUCTIONS. Failure to follow all the instructions listed below may result in electric shock, fire and/or serious personal injury. IMPORTANT SAFEGUARDS 1. Do not carry humidifier by handle when water tank is full. 2. Always have water in the water tank when operating the unit. 3. Use only clean, cool tap water to fill the tank (softened or distilled water is recommended, if tap water is hard). 4. To avoid white dust, you may use distilled water. 5. Be sure that the filling cap of the tank is firmly tightened. 6. Always have the mist direction nozzle and the mist chamber in place while the unit is operating. Rotate the mist direction nozzle so it aims away from children, walls and furniture. 7. Use only a 110-120V AC outlet. 8. Never operate the unit with a damaged cord or plug. 9. Always place the unit on a flat, level surface away from direct sunlight. Keep the cord away from heated surfaces and areas where it could be walked on or tripped over. 10. Unplug the unit when not in use and whenever you clean or move the unit. 11. Do not add medication of any type into the nozzle, base or water tank. Do not cover any openings on the unit or insert objects into any openings. 12. The unit should not be left unattended in closed rooms as the air could become saturated and leave condensation on walls or furniture. Always leave the room door partly open. 13. When cleaning the inside of the unit, keep water away from the air outlet. The exterior may be wiped with a damp cloth, except the electrical controls, when the unit is off. (Any part may be wiped with a damp cloth when the unit is unplugged.) 14. Do not tilt or tip the unit or attempt to empty or fill it while it is in operation. 15. Do not use a detergent to clean any parts of the unit that contain water. Detergent film dissolved in the water supply can interfere with the output of the unit. SAVE THESE INSTRUCTIONS --2-- PARTS DESCRIPTION A. B. C. D. E. F. G. H. I. J. K. On/Off switch Power “ON” indicator Variable moisture control Handle Non slip feet Adjustable mist direction nozzle Water level indicator Water filling cap Plug and cord Nebulizer Water Sensor --3-- OPERATIONS AND USE 1. Carefully remove the humidifier from the carton and take off all the protective wrapping. 2. Place on a smooth level surface. 3. Remove the blue water tank from the base of the unit. 4. Turn it upside-down, and turn the filling cap counter-clockwise (left). 5. Fill the water tank with clean, cool tap water or distilled water and fasten the filling cap by turning it clockwise (right). 6. Place the water tank back on the base of the unit, and allow the water to fill the reservoir in the base for a few minutes. 7. Turn on the unit by pressing the On/Off switch. The power on indicator will illuminate. 8. Adjust the mist intensity by adjusting the variable moisture control left and right until the desired amount of cool mist comes out of the nozzle. 9. Adjust the mist nozzle away from walls and furniture. Note: The humidifier will stop working and automatically give an alarm when the water tank is empty. --4-- MAINTENANCE AND CLEANING Before any cleaning operation, switch the apparatus off and unplug it. 1. Always unplug the unit before cleaning. 2. Drain and clean before storing. 3. The exterior of the unit may be cleaned by wiping with a damp cloth and buffing with a dry cloth. (Apart from the electrical controls when the unit is off, any part of the humidifier may be wiped with a soft damp cloth and buffed with a dry cloth, ensuring the unit is unplugged.) 4. There may be some lime deposits in the nebulizer, particular in areas with hard water. Overcome this drawback by cleaning the nebulizer with water and vinegar on a soft cloth regularly, as follows: A. Dampen a cloth with vinegar and wipe the nebulizer gently, until the lime deposits disappear completely. B. Rub down with a dry cloth and remove remains of humidity. C. Do not rub the nebulizer with solid objects. D. Do not clean with chemical products. 5. Clean the inside of the water tank at least once a week, as follows: A. Fill the tank with clean water adding a few drops of bleach or a similar disinfectant. Close the tank completely with its cap and shake forcibly. B. Rinse thoroughly. Note: Water accumulated over long periods may create bacteria and mildew (fungus). 6. Clean all the humidifier parts and then dry them well before storing the apparatus in its box. 7. With each change of water the use is recommended of the brush included, to remove dust and any lime remains on the nebulizer. 8. Do not place the nebulizer directly under the tap 9. Never immerse the unit in water or let water enter the air outlet or any other openings. 10. Water must not get inside the base part; should that happen, take it to an authorized service center before using it again. STORING YOUR HUMIDIFIER Save the box for off-season storage. Make sure the tank, reservoir and all parts are thoroughly dry before storing. If water is left in the unit during storage, it may harden and leave deposits that can prevent the unit from operating properly. Leave the water tank loose to prevent the water cap and gasket from sticking together. This will prolong the life of the gasket. --5-- A NOTE ABOUT HUMIDITY It is best to keep the humidity level at about 30-50 percent of relative humidity. The comfort level of humidity will vary from room to room and with changing room conditions. In cold weather, windows and even some walls may fog or develop frost from excessive indoor humidity. If this occurs, reduce the mist intensity setting to avoid damage from condensed water dripping on windowsills. Too much humidity in the room may allow moisture to accumulate on surfaces where bacteria and fungi can grow. Moisture that gathers may also damage furniture and walls, especially wallpaper. To eliminate excessive humidity, especially in small rooms, leave the room door open and adjust the mist intensity control setting. TECHNICAL SPECIFICATIONS 120V ~ 60Hz, 0.24A Water Tank Capacity : 2 Gallons Water-Output Capacity : 2.3 Gallons per day at 70° F --6-- LIMITED WARRANTY Item # 3158 Thank you for purchasing a top quality Crofton product. This Ultrasonic Humidifier was tested and meets our stringent quality standards. This product is warranted to be free from manufacturing defects in original materials, including original parts, and workmanship until January 17th, 2006 or 1 year with proof of purchase. The warranty is void if the defect is due to accidental damage, misuse, abuse, neglect, improper repair or alteration by unauthorized persons or failure to follow operation instructions provided with the product. This warranty does not apply to commercial use. This warranty is non-transferable and applies only to the original purchaser and does not extend to subsequent owners of the product. Liability under this warranty is limited to repair, replacement or refund. In no event shall liability exceed the purchase price paid by the purchaser of the product. Under no circumstances shall there be liability for any loss, direct, indirect, incidental, special or consequential damage arising out of or in connection with use of this product. This warranty is valid only in the United States of America. This warranty gives you specific legal rights. However you may have other rights that vary from State to State. Some States do not allow limitation on implied warranties or exclusion of consequential damages therefore these restrictions may not apply to you. In case you find the product to be defective please send it within the warranty period to our service center. To avoid transport damages please send the product in the original packaging. In return you will receive either your repaired item, a new product or a refund. Please fill out the Warranty Card and send it together with the product and purchase receipt. To arrange pick-up of the defective item please call our service center: Schenker International Inc. Tel: 1-888-367-7373 (Business hours Mon-Fri 09:00am - 04:00pm CT) Website: http://www.wk-usa.com Wachsmuth & Krogmann, Inc. 123 Sivert Court, Bensenville, IL 60106, USA --7--