1
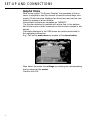
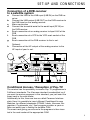
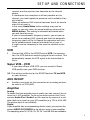
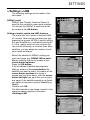
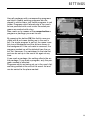
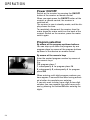
ENGLISH
DIGITAL * DIGITAL * DIGITAL
TRIAX DVB 63S/65S
Users Manual
TRIAX
1
I NT RODUCTION
Safety Instructions
For your own safety, please read the Safety Instructions carefully before putting your new receiver into operation.
The manufacturer is not liable for damage caused by unauthorised
handling or by non-compliance with the safety instructions.
Do not place anything on top of the equipment as this would cover
the ventilation slots allowing the heat to escape.
Don’t ever open the receiver ! You might expose yourself to an electric shock. Repairs must only be carried out by authorised personnel.
Empty batteries from the remote control must not be thrown into the
household rubbish, but must be correctly disposed (handed in to the
retailer, special waste).
Interruption of Operation:
In case of lightning storms or stop of operations of some length the
receiver should be disconnected from the mains.
In the following cases, you should switch off the receiver and consult
an expert:
• the power supply cable or the power supply socket is damaged
• the receiver has been exposed to moisture, or liquids have penetrated
• in case of major maloperation
• in case of heavy exterior damage.
2
CONTENTS
Contents ...................................................................................... 3
Set-up and connections ............................................................ 4
Connection of a DVB-receiver to a satellite system ..................... 5
Conditional Access ...................................................................... 5
Operation of TRIAX SR 50/55 via RC65 ....................................... 6
Mains connection ......................................................................... 6
Outdoor unit ................................................................................. 6
Connection ................................................................................... 6
Setting of UHF-output channel .................................................... 8
VCR / Super VHS-VCR ................................................................ 9
AUX IN/OUT ................................................................................. 9
Amplifier ....................................................................................... 9
Serial port /USB ......................................................................... 10
Modem ....................................................................................... 10
TRIAX-Link ................................................................................. 10
Setting ........................................................................................ 11
OSD-language selection ............................................................ 11
Basis setting ............................................................................... 12
Installation ................................................................................ 14
Program search .......................................................................... 18
Resetting factory pre-setting ..................................................... 21
System configuration ................................................................. 22
Change of basic programming ................................................... 22
Setting up/deleting programs in the user list ............................. 22
Sorting of programs ................................................................... 24
Locking of programs .................................................................. 25
Alteration of PIN ......................................................................... 26
Cancellation of program lock of specific programs ................... 26
Update of software .................................................................... 27
Operation .................................................................................. 28
Program selection ...................................................................... 28
Info-box ...................................................................................... 29
Volume control ........................................................................... 30
Selection of another language ................................................... 30
Switch between tv/radio ............................................................ 31
Back to previous program .......................................................... 31
Display time and programinfo .................................................... 31
Other program information / Transponderinfo ........................... 31
Videotext .................................................................................... 32
EPG ............................................................................................ 32
Timer .......................................................................................... 33
Trouble shooting ........................................................................ 34
Technical terms .......................................................................... 35
Technical specifications ............................................................. 37
3
SET-UP AND CONNECTIONS
Helpful Hints
With the so-called “On Screen Display” the operation of the receiver is simplified, and the number of remote control keys minimised. All functions are displayed on the screen and can be controlled by means of a few buttons.
Connected functions are compiled as “MENUS”.
The function selected is marked with a blue line. In the bottom
half of the screen a short comment on the function marked is displayed.
Concepts displayed in the OSD menu are printed extra bold in
this operating instruction.
E.g.: Call up the main menu by means of the menu button.
Now select the menu line settings by marking the corresponding
line by means of the cursor.
Confirm with OK.
4
SET-UP AND CONNECTIONS
Connection of a DVB-receiver
to a satellite system
a.
b.
c.
d.
e.
f.
g.
h.
Connect the LNB to the LNB-input (LNB IN) on the DVB-receiver
Connect the LNB-output (LNB OUT) on the DVB-receiver to
the LNB-input on the analog receiver
Mains connection
Connect the terrestrial aerial to the aerial input (RF IN) on
the DVB-receiver
Scart-connection of an analog receiver to Input AUX of the
DVB
Scart-connection of a VCR to the VCR-scart-socket of the
DVB
Scart-connection of the DVB-receiver to the tv-set.
Optional:
Connection of the HF-output of the analog receiver to the
HF-input of your tv-set.
Analog receiver
d
TV
TV
AERIAL
a
AERIAL
e
b
g
VORSICHT!
ELEKTROSCHOK-GEFAHR
NICHT ÖFFNEN!
CAUTION!
RISK OF ELECTRIC SHOCK
DO NOT OPEN!
PARALLEL PORT
AERIAL
DC 13/18V
MAX 0,4 A
AUX IN/OUT
SERIAL PORT
RECEIVER 2
TV
TELEPHONE
USB
TV
AUDIO OUT
DOLBY DIGITAL/PCM R
AC 230 V
50 Hz
MAX 30 VA
L
POWER
ON/OFF
VCR
c
f
HI-FI system
VIDEO
AUDIO IN
Digital
R
L
AERIAL
Conditional Access / Reception of Pay-TV
The receiver has the possibility to receive Pay-TV programmes in
3 different standards. The Viaccess standard is embedded, so if
you want to receive programs in this standard, you just insert the
smart card in the card reader.
Additionally to this, there are two so-called Common Interface
slots. Here it is possible to insert different Conditional Access
Modules, for different standards (CONAX, Irdeto, Viaccess, Nagravision, Cryptoworks, etc.) Your program provider or your retailer can assist you in finding the suitable CAM.
The smart card giving you access to the programs is then inserted in the card reader of the appropriate CAM.
5
SET-UP AND CONNECTIONS
Operation of TRIAX SR50/SR55 via RC65
The standard remote control for TRIAX DVB65S is RC65. This
RC65 has the option to operate the analogue receivers TRIAX
SR50 and SR55. The factory programming of RC65 is to be a single mode RC for DVB63S/65S only, ie the button SAT2 has no
function. By pressing "OK" at the same time as pressing "SAT2",
RC65 turns into a dual mode RC.
SAT1: Operation of TRIAX DVB63S/65S
SAT2: Operation of TRIAX SR50/55
RC65 can be re-programmed to a single mode unit by pressing
"OK" at the same time as "SAT1".
Connection
The following indications a b c etc. refer to the drawing on page 5
Mains connection
The receiver must not be connected to the mains until the receiver has been completely connected to the corresponding components. This ensures that you do not damage the receiver or other
components.
Outdoor Unit
Connection of one receiver
a.
Connect the LNB-input of the receiver by means of a suitable coaxial cable to your ODU-LNB. Please also note chapter 5 “Installation”.
Connection of an extra receiver to a single reception system
b
If an extra receiver is to be connected to a single reception
system (e.g. analog receiver or ADR-receiver), you can connect the LNB-input of the extra receiver to the LNB-output
of the DVB-receiver by means of a suitable coaxial cable.
To provide the extra receiver with satellite signals,
your DVB-receiver must be in the “Stand By” mode.
If the DVB-receiver is switched on, this will take
over the LNB-control with priority.
6
SET-UP AND CONNECTIONS
Connection to a TV set
By means of a SCART cable:
To have the best possible picture quality you should connect receiver and tv by means of a SCART cable.
Procedure:
g
Connect receiver (SCART-socket tv) and tv (SCART-socket)
by means of a SCART-cable. If your tv is equipped accordingly, this will automatically shift to AV and thus to satellite
reception when switching on the receiver.
By means of a HF cable:
If your tv is not provided with a SCART-socket, the receiver must
be connected to the aerial input of the tv. When using this type of
connection, the sound can only be reproduced in mono.
To connect HF cable, proceed as follows:
h
Connect the receiver (HF-output) with a suitable tv-connection cable to the aerial input of the tv. The cable coming
from the terrestrial aerial is connected to the Input terrestrial aerial of the receiver.
c
Having made all connections, you connect the receiver by
means of the power supply cable delivered with the receiver
to a 230V/50 Hz wall outlet. Now switch on the receiver by
pressing the “standby” or “Numeric” buttons.
Now tune in your tv to the transmitter channel of the receiver. Select a free program place on the tv and set it to channel 38 (see the user manual of the tv, if necessary).
If you don't get a clear picture on channel 38, this or an
adjacent channel could already be occupied by a program
which you receive by means of the aerial. You can check
this by disconnecting for a very short time the aerial cable
from the connector Input terrestrial aerial of the receiver. If
you thus for a short time get a clear picture, you should set
another transmitter channel in the range 21 to 61 for the receiver.
7
SET-UP AND CONNECTIONS
Setting of the UHF-output channel
Follow this procedure:
Call up the main menu by means of the menu button.
Main menu > Settings
Now select the menu line Settings, by marking the corresponding line by means of the cursor.
Confirm with OK.
This produces the sub-menu Settings.
Now mark the menu line Audio/Video by means of the
cursor.
Confirm with OK.
The sub-menu Audio/Video appears.
> Settings > Audio/Video
Now select the menu line UHF-output channel, by marking
it by means of the cursor.
Set your tv to a free UHF-channel between 21 and 61.
Enter the new output channel on your receiver by means of
the numeric keys.
The new UHF-channel is now shown in the display of the
8
SET-UP AND CONNECTIONS
receiver, and the receiver now transmits on the channel
shown.
If interference-free reception is still not possible on this
channel, you must repeat the procdure until a suitable channel is found.
When an optimum UHF-channel has been found, be sure to
store this on your tv.
In the menu Audio/Video further settings may now be
made, or you may return to normal mode by means of the
MENU-button. This setting is automatically stored when
you exit from the menu.
If your tv has automatic frequency search, you set your receiver to an arbitrary UHF-channel and start the automatic
frequency search of the tv. Repeat the procedure until you
find a suitable output channel and store this on your tv.
It might now be necessary to fine-tune the channel on the
tv-set.
VCR
f
Connect the VCR to the SCART-socket VCR. On reproduction, the VCR delivers a switching signal to the receiver. This
automatically causes the VCR signal to be transmitted to
the tv.
Super VHS - VCR
If you have a Super VHS-VCR, you can record in SuperVHS-quality from your DVB-receiver.
NB: This setting is effective for the SCART-sockets TV and VCR
on your receiver.
AUX IN/OUT
e
Auxiliary connector for the connection of an analog receiver,
an extra tv or VCR (AV2).
Amplifier
Analog
To obtain the best possible sound quality you can connect the receiver to a HiFi-amplifier. To do so you must connect the Cinchsockets Audio R and Audio L on the receiver by means of a suitable cable to an input on your HiFi-amplifier (e.g. CD or AUX; NB:
The phono input is not suitable!).
Digital
If your amplifier has a corresponding electric input, you connect the
socket AUDIO OUT DIGITAL to the electric input of your amplifier.
The sampling rates 16, 22,05, 24, 32, 44,1 and 48 KHz are available.
9
SET-UP AND CONNECTIONS
Serial port RS 232
The RS 232-port is used to update the software and preprogramming via PC.
USB
The Universal Serial Bus connector is intended for high-speed
data transfer, for example between the receiver and a PC. In case
the satellite receiver is used in connection with “Internet-via-satellite”, this connection is used as data transfer to the PC.
Modem
Your TRIAX DVB 65S has a build-in telephone modem. The modem is designed for connection to the analogue public switched
telephone network (PSTN).
The Modem control is part of the application control of your satellite receiver. The user has no direct access to the modem.
The modem will be used from the application automatically, as
result of user actions via remote control in dialog with the OnScreen-Display, e.g. for ordering of Pay-Per-View services,
Home-Shopping or other software controlled applications.
The modem will never start a call if the telephone line is in use.
(Off hook detection).
The modem interrupts a connection immediately, after detecting
a second telephone device becomes active at the same line,
when connected.
Installation:
Disconnect the receiver from the mains before connecting the
modem. Connect the modem plug of the receiver via the standard telephone line with the telephone plug at the wall outlet. Connect the receiver to the mains again.
NOTE! TRIAX DVB 63S has no build-in modem.
TRIAX-link
With TRIAX DVB 63S/65S you can extend the operation also to
include operation from another room. The only thing you need is
a simple TRIAX-link receiver.
From the RF output a coax cable is installed feeding the signal
into another room. In this room you connect to the TRIAX-link receiver and then to the TV set in this room.
Via the remote control it is now possible to operate the receiver,
although it is placed in the other room.
10
SETTINGS
Settings
When you have connected your new receiver and put it into
service, you can optimise the receiver to your own needs.
OSD-language
Under this menu you can set the menu language according
to your own choice to the languages German, English,
French, Italian, Turkish, Norwegian, Finnish, Danish, Swedish and Spanish.
To change the OSD-language, proceed as follows:
Call up the main menu by means of the menu-button
Now select the menu line OSD-language, by marking it by
means of the cursor.
Confirm with OK.
The sub-menu OSD-language appears.
Mark the language preferred by means of the cursor. The
cursor buttons up/down move the cursor one line up or
down respectively, the cursor buttons left/right turn to
next or previous page, respectively.
11
SETTINGS
Store by pressing OK.
The back-button takes you back to the main menu.
Basic setting
In order to optimise the DVB-receiver you can set it to your
own needs.
Call up the main menu by pressing menu.
Mark the line settings by means of the cursor.
Confirm by pressing OK.
Now the sub-menu Settings appears.
Main menu > settings
Other basic settings
Now mark the line basic setting by means of the cursor.
Confirm with OK.
The menu basic setting (basis) appears.
With the cursor buttons up/down you can move the cursor
within the menu. When selecting a menu, you must observe the
screen insertions.
12
SETTINGS
Settings > Basis
Parental lock:
Your receiver is provided with a parental
lock. Programs locked (see page 25) can
thus only be set after entering a 4-digit PINNo. On this line you can set or cancel the
parental lock by means of the OK-button.
Time difference GMT (hrs.):
Your receiver is provided with a timer, being
synchronised via satellite reception according to Greenwich Mean Time. You just have
to correct the time by means of the OK-button in accordance with your local time. For
Germany this is + 1 hour, during summertime +2 hours. The time is displayed in
standby in the display of the receiver.
Country:
This function automatically switches from
summer to winter time. In the line country
you enter your country of residence by
means of OK. As this information is not being transmitted at present by all program
providers, you should for the time being let
the setting none remain in this line.
Settings > Audio/Video
Aspect ratio tv:
By means of the OK-button you can set to
4:3 or 16:9. in accordance with the aspect
ratio of your tv. This function automatically
adapts the aspect ratio to your tv.
Language (audio and subtitle):
On this line your preferred languaged is set
by means of the OK-button. This function
automatically sets to this language, if transmitted.
13
SETTINGS
Settings > Basis
UHF-output channel
See page 7.
SCART-mode:
In this line set by means of the OK-button in accordance with your tv FBAS, RGB or S-VHS. For
standard-tv you let the setting RGB remain.
Subtitling:
In this line set by means of the OK-button you
can select subtitle on or off.
Installation
When you have set your receiver according to
your individual requirements, you must if required
now set the receiver in accordance with your aerial. In the factory your receiver was preprogrammed to ASTRA and EUTELSAT with universal
LNB (see chapter Technical Terms). After putting
the receiver into operation, these programs will be
received on a corresponding receiver system
without further settings.
If you also want to receive from other satellites, or
want to use another LNB, you set your receiver to
the data required as follows:
Press menu to enter the main menu.
Mark with the cursor-button the line settings.
Confirm by pressing OK.
Now the menu settings appear.
Mark the line LNB-settings by means of the cursor-button up/down.
Now the menu LNB appears.
14
SETTINGS
> Settings > LNB
The following settings can be made in this
sub-menu:
DiSEqC on/off
DiSEqC (see Chapter Technical Terms) is
used for the control of major aerial systems.
On this line the DiSEqC is switched on/off
by means of the OK-button.
Setting of matrix switch and LNB-features
The menu lists the 4 switch criteria of DiSEqC-control. Your receiver has been pre-programmed to receive ASTRA in switch setting
A/A and EutelSat in a multiswitch setting B/
A. If the matrix switch of your receiver system is built differently, or receives from other
satellites, you can adapt the receiver to suit
your needs as follows:
Select the satellite or DiSEqC-setting you
want to change (e.g. DiSEqC AB/no satellite) by marking this line by means of the
cursor-button up/down.
Press the OK-button.
A list of different satellites now appears.
Mark by means of the cursor-button the
satellite you want to select. By means of the
cursor-button up/down the cursor is
moved one line up or down, with the cursorbutton left/right you go to the next or previous page. If the satellite wanted is not listed,
you select a free place, marked UserX (e.g.
User1).
Confirm with OK.
The field marked is now being inserted in the
place previously marked in the menu
>Settings>LNB.
15
SETTINGS
> Settings > LNB
Now edit the menu > Settings > LNB until the
indications of this menu correspond the indications of your receiver. Set no satellite for the
switch criteria not required.
Additional Settings
Having set the matrix-switch of your DVB-receiver
of your receiver system, you must now test and if
necessary correct the additional settings of your
receiver system.
To do this, mark in the line Check LNB proceed
for the satellite you want to test.
Confirm with OK.
The menu >LNB>Check now appears with indication of the DiSEqC-setting selected (e.g. A/B).
LNB-setting
LOF low band:
LOF (local oscillator frequency) is the frequency at
which an LNB transforms the frequency received
to the so-called 1st intermediate frequency which
can then be received by the receiver. LNBs work
with 2 LOFs in order to be able to transform the
total reception range from 10.7 to 11.8 GHz (lowband) and 11.7 to 12.75 GHz (high band). Enter
your LNB low-band LOF-frequency in this line by
means of the numeric keys.
( Is usually indicated on the LNB )
LOF high band
Enter your LNB high-band LOF frequency in this
line by means of the numeric keys.
Switching LOF low/high:
Enter in this line by means of the numeric keys
the frequency at which your LNB switches from
low-band to high-band.
16
SETTINGS
Test-Transponder
The following sub-entries of this menu only have
to be entered if you want to test a satellite signal
from a satellite (User 1 to 17) which has been entered by yourself.
Transponder frequency:
Enter in this line by means of the numeric keys a
frequency at which digital programs are being
transmitted.
Polarisation:
Enter in this line by means of the OK-button the
polarisation level (horizontal or vertical), at which
the program wanted is transmitted.
Symbol rate:
The symbol rate describes the number of data
transmitted per second, e.g. 27000 (27000 symbols per second). Enter the corresponding symbol
rate by means of the numeric keys.
FEC-rate:
With FEC the error bit correction is set in accordance with the value of the selected transponder.
Enter the corresponding FEC by means of the
OK-button. It may be 1/2, 2/3, 3/4, 5/6, 7/8 or
AUTO.
Signal:
This line displays the signal strength if you have
stated the correct indications of the test transponder.
red bar:
Poor reception, no digital reception possible.
yellow bar:
good reception
green bar:
very fine reception
17
SETTINGS
Program search
As already mentioned, your receiver has been
pre-programmed for the reception from the satellites ASTRA and EUTELSAT. You have several options for program search in order to be able to receive new programs or programs from other satellites. After the search, your screen will display
the number of programmes found by your receiver, and how many of these are new. New programs appear in red colour in the program list,
and can then be entered into the user’s list acc. to
Change of Basic Programming.
First call up the sub-menu Search to start the
program search.
Call up the main menu by means of the menubutton
Main menu > search > all
Activation of the function all will cause search of
all satellites and transponders set. New programs
are displayed in red colour in the program list.
Select the menu line all by marking it up by
means of the cursor-button.
Confirm with OK.
Start search appears on the screen.
Press the OK-button to start the search.
You can exit from the function by pressing the
OK-button. The search may last for more than 15
minutes. Please also note the on-screen display.
18
SETTINGS
Search > Satellite
Under this menu item you can make a search for
a special satellite. In that case all other satellites
are not being searched.
Select the menu line satellite by marking it by
means of the cursor-button.
Confirm with OK.
Start search appears on the screen.
However, first you have to select the satellite
which you want to search. For this purpose, press
the button OK.
A menu window with the four satellite positions
now appears.
Mark up the satellite wanted by means of the cursor-button.
Press the button OK to start the search.
By pressing the button OK you can exit from the
function. The search may last for more than 15
minutes. Please also note the screen insertions.
Search > Transponder
Under this menu item you can search a transponder (see Technical Terms) of programs. To do
this, it is necessary to enter the transponder data.
Select the menu line Transponder by marking it
by means of the cursor-button.
Confirm with OK.
The menu > search > transponder appears.
Satellite
Select in this line the satellite of the transponder
wanted.
Mark up the line by means of the cursor buttons.
Confirm with OK.
Transponder frequency:
Enter the frequency wanted in this line by means
of the numeric keys.
Polarisation:
Enter in this line by means of the OK-button the
polarisation level (horisontal or vertical), at which
the program wanted is transmitted.
19
SETTINGS
Symbol rate:
The symbol rate describes the number of data
transmitted per second, e.g. 27000 (27000 symbols per second). Enter the corresponding symbol
rate by means of the numeric keys.
When you have completed all enterings, you start
searching by marking up the line start search in
red colour and confirm by pressing the OK-button. Please also note the screen insertions.
Search > Program
If a program cannot be found by means of the
search method described above, it may be necessary that for this program a program-specific
service-ID-number is entered. In that case call up
the menu > Search > program. The menu differs
from the menu transponder alone by the submenu Service ID.
Proceed as described in > Search > Transponder,
fill in the Service-ID-No. by means of the
numeric keys.
20
SETTINGS
Resetting factory pre-setting
Delete all program memory
You can reset the factory pre-set LNB-setting at
any time. If the program list is out of date due to
changes by the program providers, you all also
delete completely and then make a new search.
Call up the main menu by means of the menubutton.
Now select the menu line settings by marking it
red by means of the cursor-button.
Confirm with OK.
The sub-menu > settings now appears.
Main menu > settings
Mark up the menu line factory pre-settings by
means of the cursor-button.
Confirm with OK.
The sub-menu > factory pre-settings now appear.
Activate factory pre-setting
This function will reset the programming pre-set
in the factory, and your own settings will be deleted.
Delete all programs
This function deletes all program memory.
Mark up the line wanted by means of the cursorbutton.
Confirm with OK.
Please also note the on-screen display.
21
SETTINGS
System configuration
This sub-menu displays the specific data of the
equipment.
Mark up this line in the sub-menu Settings by
means of the cursor-button.
Confirm with OK.
The back-button or the menu-button will allow
you to exit from the menu.
Change of basic programming
If you are not satisfied with the pre-programming
of your receiver you can change the program list
to suit your needs. This function is also needed
for sorting the programs after searching. For this
purpose, please note the following:
Your receiver has two program lists: The user’s list
and the total list.
The user’s list lists the programs which you can
call up by means of the numeric keys and the
program buttons up/down.
The total list lists all programs, the pre-programmed programs and all programs which can
be received after searching. New programs are
displayed in red colour in this list after searching
and can then be transferred from the total list to
the user’s list.
Setting up/deleting programs
in the user’s list
In order to set up or delete programs in the user’s
list, proceed as follows:
Call up the main menu by pressing the menubutton.
Mark up with the cursor-button the line tv-programs to record tv-programs, or radioprograms
to record radioprograms.
Confirm with OK.
The sub-menu > Programs now appears.
Mark up the line Select by means of the cursorbutton.
Confirm with OK.
Now the menu > Programs > select appears.
22
SETTINGS
Here all packages with corresponding programs
are listed. Already existing programs are displayed in white colour, just found programs in red
colour. Programs which already are in the user’s
list are provided with a red cross. Encoded programs are marked with a key.
Now, mark up by means of the cursor-button a
program or package you want to edit.
By pressing the button OK this field is now provided with a red cross (setting up in the user’s
list). If a single program is set up, the menu insertion turns transparent and the picture shown in
the background. If the red cross is removed, the
program marked up will be deleted from the user’s list. However, it is maintained in the total list
and can be set up in the user’s list again at any
time.
If you mark a package, the setting affects the entire package. If you mark a program, only the program marked is affected.
Programs which are being set up in the user’s list,
are being added at the end of the user’s list and
can be sorted to the place wanted.
23
SETTINGS
Sorting of programs
To sort the user’s program list to suit your needs,
proceed as follows:
Call up the main menu by means of the menubutton.
Now mark up the line tv-programs by means of
the cursor-button to sort tv-programs, or radio
programs to sort radio programs.
Confirm with OK.
Now the sub-menu > Programs appears.
Mark up the line sort by means of the cursorbutton..
Confirm with OK.
Now the user’s program list appears.
By means of the cursor-button mark up the program you want to place in another place of the
list.
Confirm with OK.
Now you can move the program marked up by
means of the cursor-button to the place in the
program list where you want to place it. Or by
means of the numeric keys enter the program
place to which you want to set the program. The
program place is displayed in the menu.
By pressing the OK-button the program is placed
in the place marked up.
Repeat this procedure until the program list is in
accordance with your wishes.
By pressing the menu-button you will get back to
normal mode.
24
SETTINGS
Locking of programs
If you wish so, you can lock programs. A locked
program will not be displayed on the screen, until
after setting the program you have entered your
personal PIN-number. Once this number has been
entered, the lock will remain cancelled until the
receiver is switched off again (Standby)
To lock a program, proceed as follows:
Call up the main menu by pressing the menubutton. By means of the cursor-button mark up
the line tv-programs to lock tv-programs, or radio programs to lock radio programs.
Confirm with OK.
Now the sub-menu > Programs appears.
Markup the line lock by means of the cursor-button.
Confirm with OK.
Now the user’s program list appears.
Mark up by means of the cursor-button the program you want to lock.
Confirm with OK.
The program is now provided with a red cross.
Repeat this procedure, until you have locked the
programs wanted.
By pressing the menu-button you go back to
normal mode.
To activate the parental lock you must enter your
personal PIN-number in the following sub-menu
Change PIN and then as described on page 13
(Parental lock) activate the parental lock.
EPG
The programs to be a part of the EPG function
(max. 30) are to be marked. They are marked in
the very same way as in the operation described
above.
Hereafter program information from exactly those
programs is shown when activating the “i-button”,
if these information’s are transmitted by the provider.
25
SETTINGS
Change of PIN
The PIN-number has been factory pre-set at
0000. To activate the program lock you must in
stead of the factory pre-setting enter your personal PIN-number.
NB ! Do not forget the PIN-number. In case, however, that you should forget it, please contact your
tv-retailer !
To change the PIN-number, proceed as follows:
Mark up the line Change PIN by means of the
cursor-button.
Confirm by pressing the OK-button.
Now enter the wanted new PIN-number by means
of the numeric keys.
Repeat the entering.
By pressing the OK-button you go back to the
menu settings.
Cancellation of the program lock
of specific programs
Having entered your personal PIN-number to call
up the menu, you proceed as described on page
25 and remove the red crosses by means of the
OK-button. In this way the program lock of specific programs can be cancelled again.
26
SETTINGS
Software
TRIAX A/S has the right of ownership of the software.
As the owner of DVB 63S/65S you have the right
to apply the software for this equipment.
No kind of re-engineering or copying of the software for other purposes must be made without a
written permission from TRIAX A/S.
TRIAX A/S reserves the right to alter the software
at any time.
Update of software
TRIAX DVB 63S/65S can currently be upgraded
with new software made available by TRIAX. The
entire operation of the receiver is part of this software. The majority of the features are obtained
through this software.
The update can take place in different ways:
1. Via the TRIAX web site: www.triax.dk
2. Via download from satellite
Update via PC
Your TRIAX DVB 63S/65S can be updated with
the latest software from the TRIAX web site. Here
you will find necessary instruction too.
Download via satellite
TRIAX provides the latest software via the satellite
5 dgr. east. This in practice means that you have
to have reception possibility of signals from this
position in order to make use of this facility.
Please note that the menu’s and part of the operation can change after an update.
27
OPERATION
Power ON/OFF
Switch on the receiver by pressing the ON/OFF
button of the receiver or remote control.
When you again press the ON/OFF button of the
receiver or remote control, the receiver is
switched off.
The receiver is now in standby mode, and the display shows the time.
To completely disconnect the receiver from the
mains press the mains switch on the back of the
receiver. Switch on the receiver, press the mains
switch again.
Program selection
By means of the program up/down-buttons.
You can step up or down the programs by one
program place by means of the program buttons
up/down of the receiver or remote control.
By means of the numeric keys
Enter the wanted program number by means of
the numeric keys.
E.g.
1for program place 1
1, subsequently 4 for program place 14
2, subsequently 3, subsequently 4 for program
place 234
When entering multi-digit program numbers you
have approx. 3 seconds time after having activated a button to complete your entering.
If you only want to enter a one-digit or two-digit
number, you can expedite the switch-over process by pressing the button OK after entering the
digits.
28
OPERATION
By means of the program list:
Press the List-button. A program list now appears.
In tv-mode only tv-programs appear, and in radiomode only radio programs. The actually set program appears in blue colour. Now you can mark up
red the program wanted by means of the cursorbutton. By pressing the OK-button, the program
now selected is set up. The cursor-buttons up/
down move the cursor to the next/previous line of
the text. The cursor-buttons left/right move to top/
bottom, respectively, of the page.
Calling up locked programs
If a program with parental lock is called up, the
message PIN-number appears on the screen.
Enter your PIN-number by means of the numeric
keys. Now the program wanted is set up. In order to
facilitate the operation, this PIN-number is only asked
once in an operational phase. The parental lock is
only activated again after a new start of the receiver.
Infobox
After each change of programs, a infobox will appear for a short while displaying the program
place and program name. Moreover, features
such as e.g. TxT for video text, 16/9 for 16/9
transmissions or A/B for different audio channels
(e.g. multi-lingual movies or different radio transmitters).
Survey of Icons
Video text
Mono channel 1
Dolby AC-3
Mono channel 2
TV format
Subtitling
Multi-lingual (audio)
Scrambled program
29
OPERATION
Volume control
You can control the volume of your receiver. This
facilitates the use of the receiver as in this way
you have all important functions in your remote
control and thus only seldom have to use the remove control of your tv.
Adjust the volume of your receiver by means of
the button Volume + to be louder and by the button Volume - to be weaker.
By pressing the button Mute the sound is
switched off/on respectively by again pressing
this button.
Selection of another language
If a transmission is multi-lingual, you can set to
another language.
Press Selection of language-button "A/B".
A list of the actually transmitted languages now
appears on the screen.
Mark up the language preferred by means of the
cursor-button.
Confirm with OK.
Now you will receive the transmission in the language set up. However, after a program change
the receiver will reset to the pre-programmed language.
You can also receive mono transmissions with
your receiver. You can switch between audio
channel MONO1 and MONO2 by means of the
button A/B. Multilingual, press A/B, select “Multilingual” and press OK. Selecting Mono 2 on the
same “Multilingual”, press A/B and A/B.
Selecting other subtitles
If a program transmit subtitles in several languages it is possible to changes to another language.
By pressing the “red” button a list with the transmitted languages appear on the screen.
By means of the cursor-button , select the language and confirm with OK-button.
30
OPERATION
Switch between tv/radio
Besides tv-programs, the pre-programming also
includes radio programes. In this case the tv-picture is not displayed, but only the name of the
program.
Switch-over to radio reception by means of the
button tv/radio.
The receiver now switches over to the radio program you listened to last.
When you press the button tv/radio again, you
switch over to the tv-program you watched last.
Back to the previos program
When you press the back-button of the remote
control, you go back to the program you watched
last.
If you press the button again, you go to the program you watched before.
Display time and program info
This function displays program information on the
program switched on, if such data are transmitted
by the program provider.
Press the OK-button to see information on the
program switched on.
By pressing OK-button again you get information’s about the NEXT transmission.
Pressing OK-button a third time the display disappears.
In the lower half of the picture the present time,
name of the present program and transmission,
indicating start and stop time, now appears.
Other program information
By pressing the Yellow-button you will get additional program information, if transmitted. By
pressing the OK-button during this display, you
will get hints on the next transmission.
To stop this display, press the Yellow-button
again.
Transponder-Info
When you press the Green-button you will get
data on the transponder set up.
Press the Green-button again to stop the display.
31
OPERATION
Video text
If transmitted, the video text is displayed on your
tv. Use the remote control of your tv to operate
video text. In case of disturbances on your tv, like
e.g. interference of video text and picture, you
must set your receiver to CVBS-operation.
(Settings>Audio/Video, SCART mode).
EPG
When pressing “i” on your Remote Control, the
EPG appears on the screen. You will then get a
list of all the programs being transmitted at the
actual time. This list is called the NOW-list. By
pressing “>” and “<” on the RC you get this
cross-channel list showing the programs transmitted at another time of the day. With “>” you go
forward in time, and with “<” you go backwards.
The EPG list contains programs from different
program providers. Exactly which of the providers
you want to be included in this list can be defined
in a separate menu.
Updating of EPG
The EPG is automatically updated twice a day, at
5 a.m. and 5 p.m. on these programs witch is
chosen in the EPG list. The display shows “EPLd”
when updating EPG.
Manuel updating of EPG can be done this way.
The receiver must be switch on , press the standby-button , the display now shows “ - - - - “ for 3
sec. In this period you can press the “ i “ button
and the updating of EPG will start. To stop EPG
updating press the standby-button .
NOTE:
It can take about 2 min. before the receiver goes
in standby mode, dependent on how many EPG
data to be stored. Some provider only transmit
NOW and NEXT information’s. These programs
can only be included in the EPG by selecting the
program for more than 5 sec.
Survey
Besides the information concerning transmissions
from different program providers – but within the
very same time frame, you can get a complete
32
OPERATION
survey of the program of today on the different
channels too. Press ”green” to recall this survey.
Booking by means of EPG
In all EPG menu’s, you can book any program
shown just by means of moving the cursor to the
program and pressing ”OK”. If the program is currently transmitted the receiver will immediately
tune to the program. If the program is transmitted
at a later time, the program is being ”booked”, i.e.
the receiver will automatically tune to the program
once the transmission starts.
Timer by means of EPG
Your receiver is equipped with as well the ”program booking function” as described above, as a
Timer function if for example you want to record
the transmission on a video tape. The difference
between those two functions is whether you actually want to see the program or you want it recorded.
You can mark any program just by means of
moving the cursor to the program and pressing
”red-button”. If the program is currently transmitted the receiver will immediately tune to the program. If the program is transmitted at a later time,
the program is being marked, i.e. the receiver will
automatically tune to the program once the transmission starts. A receiver in “record-mode” can
be stopped by pressing the standby-button.
Operation
The Timer function is selected via the button ”yellow” New Timer. In the timer menu you enter in
the first line the date and the start and stop time.
If it is a one-time recording or something you
want repeeded is entered in the first line too.
In the second line ( status ) you enter whether you
actually want to see the program Noted down
(Booking) , or you want the program recorded on
video tape (VCR). You also program whether it
concerns a TV or a radio program.
In the lower line the desired program is entered.
By pressing the OK-button the channel list appears.
Select the program and confirm with OK
33
TROUBLE SHOOTING
When all the data are entered, you just confirm by
activating the ”accept function” (yellow).
Now your receiver automatically starts on the desired time and tunes to the desired program.
Trouble Shooting
What is the problem
Corrective action
Check mains cable and sockets
No picture, no sound, display on Short-circuit in LNB-supply
Defective or no cable connection
Defective LNB
Wrong ODU set up
ODU set up incorrectly
Switch off the receiver, repair the
short-circuit, switch on the receiver
Check all cable connections
Replace the LNB
Set correct ODU up
Set up the ODU again
In the picture small square
boxes (small bricks) arise
periodically.
Periodically the receiver switches to still image - no sound.
Periodically the screen turns
black, "No signal" is displayed
Heavy rain or snow
Remove snow from ODU
ODU incorrectly set up
The dish is too small in the
place of reception
There is an obstacle between dish
and satellite (e.g. a tree)
Set up ODU correctly
Use a larger dish
Install the dish in a place
with a clear view.
Sound OK, no picture
Set to a radio program
Switch to TV
Picture and sound disturbed in
programs which were OK before
ODU placed incorrectly
or defective
Program transferrred to another
transponder
Program no longer being
transferred
Check ODU
Make a search
(see "Installation")
Set to wrong mode
Set mode to SAT1
Remote control does not work
34
What might the reason be
No picture, no sound, no display No mains voltage
None
TECHNICAL TERMS
Aerial cable:
Connecting cable between the modulator of the satellite receiver and the aerial
input of the tv, as an alternative if there
is no SCART-socket.
AV: see SCART
Coaxial cable:
Connecting cable between LNB and
satellite receiver, for the transmission of
signals received and power supply of
the LNB.
Data compression/MPEG1/MPEG2
For the transmission of the present tvstandard (625 lines and 50 Hz image
replication frequency) there is a digital
data quantity of 216 Mbit/s. This would
require band widths which are not available, neither terrestrially nor for satellites. Therefore a reduction of the data
quantity is made through data reduction. In Europe MPEG-2 has been determined as a universal standard of
data compression. MPEG2 is an extension of MPEG1.
Deemphasis:
Adaptation of the audio frequencies to
the transmitter signal, determined by
the transmission parameters of the satellite.
DiSEqC
Digital Satellite Equipment Control: A
digitalt control signal for the control of
the DiSEqC-compatible components of
the ODU via the coaxial cable.
DVB
Digital Video Broadcastning: a digital,
universal transmission technique for
picture, graphics, sound and text. Also
for all kinds of data and in any possible
and suitable quality.
Frequency:
Physical quantity, states number of oscillations per second, measured in
Hertz (Hz).
Frequency range:
a)
Satellite and LNB, respectively:
11 GHz range from 10,70 GHz to 11,70
GHz
12 GHz range from 11,70 to 12,75 GHz
b)
Receiver: IF or 1.MF 950 to 2150
MHz
Frequency unit / Description / Oscillations per second
1 Hz
1 Hertz
1
1 kHz 1 Kilohertz 1.000 Hz
1 MHz 1 Megahertz 1.000.000 Hz
1 GHz 1 Gigahertz 1.000.000.000 Hz
Intermediate Frequency (IF):
The frequency range radiated from the
satellite cannot be transmitted through
a cable and is therefore converted by
the LNB in the IF range from 950 to
2150 MHz. In this way transmission and
processing in the receiver is made possible.
1. IF = Intermediate frequency.
LNB/LNC (Low Noise Blockconverter):
Receiver unit in the focal point of the
dish, converts the frequency range of
the satellite to the IF of the receiver.
LOF:
Local oscillator frequency, statement in
MHz or GHz, depending on LNB and
frequency range received.
Reception frequency of the receiver =
the transmitter frenquency of the satellite - LOF.
Modulation with 22 KHz
For universal LNB to switch to high frequency range.
35
TECHNICAL TERMS
Modulator
Circuit in the satellite receiver or the
VCR, for connection to the tv by means
of an aerial cable.
Mode
determines whether a mono or stereo
program is received.
Satellite receiver:
The signals received and converted by
the LNB cannot be processed by the tv.
In the satellite receiver they are processed in such a way that at its outputs
there are audio and video signals (AV)
which are transmitted to the tv.
Multifeed:
ODU, consisting of a dish and several
LNBs for the reception from several satellites.
SCART:
Connector at tv-sets, VCRs, satellite receivers and other entertainment electronics for the transmission of audio
(sound) and video (picture) signals (AV).
ODU (OutDoor Unit):
The equipment installed outside, consisting of parabolic/offset dish and one
or more LNBs for the reception from
one or several satellites.
Transponder:
Processes one or several programs at
the satellite, viz. reception of data from
the earth station, amplification and reradiation to the earth.
Parabolic Dish:
Parabolically shaped dish of metal or
covered with plastic for collimation of
the electromagnetic waves radiated
from the satellite, in a focal point..
Universal LNB:
Designation for a three-band LNB. For
reception of the areas FFS (10,70 11,70 GHz), BBS (11,70 - 12,50 GHz)
and FFS High Band (12,50 - 12,75
GHz). The total area is divided into two
bands:
Low Band: 10,70 - 11,80 GHz; LOF
9750 MHz
High Band: 11,70 - 12,75 GHz; LOF
10600 MHz
Polarisation level:
For optimum utilisation of the frequency
ranges available, satellites transmit adjacent programs with opposite polarisation (horizontal and vertical or turning to
the left or to the right). For the reception
Power Supply:
of both polarisation levels two single
LNBs are supplied with power through
LNBs or one V/H-LNB are required.
the coaxial cable, the receiver delivering
a voltage of 14 or 18 Volt.
Receiver: see satellite receiver
Satellite:
Name of the satellite, usually with name
and position in the orbit,
ASTRA
19° East
EUTELSAT 13° East
36
Viacces
Digital coding system.
TECHNICAL SPECIFICATIONS
DBS-Tuner
Input frequency range
Input level range
Noise level
DBS tuner input
Input impedance
Output for 1. IF
Output impedance
IF-wideband tuner
AFC-capture bandwidth
Demodulation
Symbol rate
Viterbi rates:
Roll-off Factor
Demultiplexing:
Demultiplexing
Video decoding:
Video:
Video standard
Active picture surface
Picture aspect ratio
Picture material 16:9
Audio:
Audio compression
Audio mode
Sampling frequencies
Audio parameter:
Output level L/R
Output impedance
THD
Cross-talk
Dynamic range
Audio parameter:
Input level /l/r
Input impedance
Audio parameter:
Output level
Sampling frequencies
Video parameter input:
Input level FBAS
Input level RED
Input level GREEN
Input level BLUE
Teletext filter
Entering of teletext data
TV SCART:
Output:
VCR-SCART:
Input:
Output:
950 ... 2150 MHz
-65 dBm ... -25 dBm
12 dB max.
F-connector
75 Ohm
950…2150 MHz (loop-through)
75 Ohm
36 MHz
+/- 3 MHz
Shaped QPSK
2 ... 45 Mbauds, SCPC compatible FEC Viterbi and ReedSolomon
1/2, 2/3, 3/4, 5/6, 7/8, automatic adaptation
35%
Acc. to ISO 13818-1
MPEH-2 and MPEG-1 compatible
Up to MP@ML (main profile @ main level)
PAL / 25 Hz
720 Pixel x 576 lines
4 : 3 / 16 : 9
Automatic adaptation to 16:9 tv (via SCART)
Letterbox filtering for 4:3 tv
MPEG-1 & MPEG-2 Layer I and II
Dual (main/sub), stereo
32 kHz, 44.1 kHz, 48 kHz, 16 kHz, 22.05 kHz, 24 kHz
Output analog
0.5 r.m.s. (nominal)
600 Ohm
> 80 dB (1 kHz)
< - 65 dB
> 85 dB
Input analog
0,5 V r.m.s. (nominal)
> 40 kOhm
Output digital / electrical (SP/DIF):
0,5 V ss at 75 Ohm
32 kHz, 44.1 kHz, 48 kHz via Cinch socket
1 Vs-s +/- 0.3 dB at 75 Ohm
0,7 Vs-s+/-0.1Vp-p at 75 Ohm
0,7 Vs-s+/-0.1Vp-p at 75 Ohm
0,7 Vs-s+/-0.1Vp-p at 75 Ohm
acc. to ETS 300 472 standard
(CVBS) acc. to ITU-R BT.653.2 lines: 6-22 and 320-335
CVBS with RGB or only CVBS or only S-VHS-switchable
CVBS with RGB or S-VHS
CVBS or S-VHS
37
TECHNICAL SPECIFICATIONS
AUX-SCART:
Input
Output:
Serial port RS 232:
Type
Bitrate
Connector
Function
USB port:
Type:
Bitrate
CVBS and RGB
CVBS
RS 232, bi-directional
38 kBit/s max.
D-SUB-connector, 9-pole
Update f. operating software
Bulk Modus (quasi DMA): 2,5 Mbit/s
Generic EP (Interrupt): 0,4 Mbit/s
Connector
USB-Connector B-Type
Function
Data transmission between IRD and PC
Modem:
TS1-V32bis
Type:
The integrated modem supports the standard
ITU-T: V 32bis (14400 bit/s).
Modem approval:
The modem is approved according the European
Telecommunications Standards Institute (ETSI): TBR21,
January 1998
EG201121 Advisory Notes
The European Telecommunications Standards Institute is recognised according to
Council Directive 83/189/EEC of 28 March 1983 laying down a procedure for the provision of information in the field of technical standards and regulations.
The harmonised standard referred to above has been produced according to a Mandate issued in accordance with the relevant procedures of Directive 83/189/EEC.
PLL-modulator:
Output frequency range
Aerial indput
Input impedance
Output level
Output impedance
LNB power supply:
LNB current
LNB voltage vertical
LNB voltage horizontal
UHF, channel 21 to 61
47 ... 862 MHz
75 Ohm
70 dBµV +/- 3 bD
75 Ohm
400 mA max.; short-circuit proof
<14,0 V without load, 11,5 V at 400 mA
<20 V without load, > 17,5 V at 400 mA
LNB switch-off in standby
22 kHz-modulation
22 kHz +/- 2 kHz, amplitude 0.6 V +/- 0.2 V
Program memory/satellite positions:
Program number favorite list tv:
999 tv-programs (P1 to P999)
Program number favorite list radio: 999 radio programs (r1 to r999)
Program number:
Package list tv/radio
A total of 4000 programs available in package list
Number of active
max. 4 (DiSEqC 1.0, SAT POSITION /
satellite positions:
SAT OPTION)
Total number
For each of the 32 satellite positions
of satellite positions 32
a transponder (home-transponder) is stored. This transponder makes it possible to make automatic program
search on the different satellite positions.
38
TECHNICAL SPECIFICATIONS
Remote control system:
Sub-system addresse
Modulation frequency:
Infrared wave length
Power supply:
Power input:
Input voltage:
RC-5
8 (SAT 1)
36 kHz
950 nm
Mains connection
<29 W (in operation, horizontal polarisation / 400 mA LNB current)
<20 W (in operation, without LNB)
< 3 W (standby)
180 V…250 V / 50 Hz A/C
General
Ambient temperature:
Air humidity
Dimensions: (wxdxh)
Weight:
+15° ... +35°C
< 80%
370 mm x 270 mm x 65 mm
2,2 kg
39
IN T RO D U CT ION
Telephone
line
LNBindput
Aerial
input
Connector to
analogue RX
Connector
to TV
Safety Instructions
VORSICHT!
ELEKTROSCHOK-GEFAHR
NICHT ÖFFNEN!
CAUTION!
RISK OF ELECTRIC SHOCK
DO NOT OPEN!
PARALLEL PORT
AERIAL
DC 13/18V
MAX 0,4 A
SERIAL PORT
TELEPHONE
USB
RECEIVER 2
LNBoutput
TV
AUX IN/OUT
Serial
port
Parallel
port
(option)
TV
AUDIO OUT
DOLBY DIGITAL/PCM R
USB
port
AC 230 V
50 Hz
MAX 30 VA
L
To aerial Optical
Digital/
input on output
analog
the TV (optional) audio output
VCR
Connector
to VCR
230 volt
mains
For your own safety, please read the Safety Instructions carefully before putting your new receiver into operation.
The manufacturer is not liable for damage caused by unauthorised
handling or by non-compliance with the safety instructions.
Do not place anything on top of the equipment as this would cover
the ventilation slots allowing the heat to escape.
Don’t ever open the receiver ! You might expose yourself to an electric shock. Repairs must only be carried out by authorised personnel.
POWER
ON/OFF
on/off
mains
switch
Empty batteries from the remote control must not be thrown into the
household rubbish, but must be correctly disposed (handed in to the
retailer, special waste).
Interruption of Operation:
On/off
Mute
Teletext stop
back
Numeric
buttons
SAT/Terr.TV
Program list
RED
YELLOW
Program +/cursor
op/down
OK
Input voltage:
RC-5
8 (SAT 1)
36 kHz
950 nm
Mains connection
<29 W (in operation, horizontal polarisation / 400 mA LNB current)
<20 W (in operation, without LNB)
< 3 W (standby)
180 V…250 V / 50 Hz A/C
General
Ambient temperature:
Air humidity
Dimensions: (wxdxh)
Weight:
+15° ... +35°C
< 80%
370 mm x 270 mm x 65 mm
2,2 kg
Volume +/cursor
left/right
BLUE
GREEN
EPG
OK
TV/Radio
Menu
SAT1 mode =
TRIAX DVB65/63
Remote control system:
Sub-system addresse
Modulation frequency:
Infrared wave length
Power supply:
Power input:
In case of lightning storms or stop of operations of some length the
receiver should be disconnected from the mains.
In the following cases, you should switch off the receiver and consult
an expert:
• the power supply cable or the power supply socket is damaged
• the receiver has been exposed to moisture, or liquids have penetrated
• in case of major maloperation
• in case of heavy exterior damage.
Teletext
Teletext size
Language set.
TECHNICAL SPECIFICATIONS
SAT2 mode =
TRIAX SR55/50
2
39