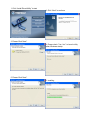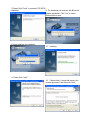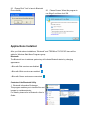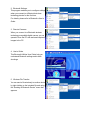
1
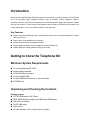
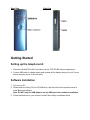
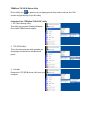
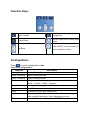
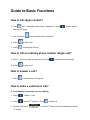
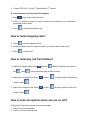
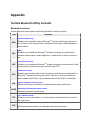
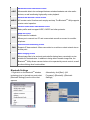
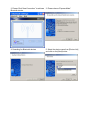
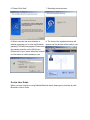
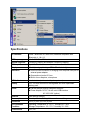
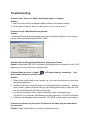
Federal Communication Commission Interference Statement This equipment has been tested and found to comply with the limits for a Class B digital device, pursuant to Part 15 of the FCC Rules. These limits are designed to provide reasonable protection against harmful interference in a residential installation. This equipment generates, uses and can radiate radio frequency energy and, if not installed and used in accordance with the instructions, may cause harmful interference to radio communications. However, there is no guarantee that interference will not occur in a particular installation. If this equipment does cause harmful interference to radio or television reception, which can be determined by turning the equipment off and on, the user is encouraged to try to correct the interference by one of the following measures: - Reorient or relocate the receiving antenna. Increase the separation between the equipment and receiver. Connect the equipment into an outlet on a circuit different from that to which the receiver is connected. - Consult the dealer or an experienced radio/TV technician for help. FCC Caution: Any changes or modifications not expressly approved by the party responsible for compliance could void the user's authority to operate this equipment. This device complies with Part 15 of the FCC Rules. Operation is subject to the following two conditions: (1) This device may not cause harmful interference, and (2) this device must accept any interference received, including interference that may cause undesired operation. IMPORTANT NOTE: FCC Radiation Exposure Statement: This equipment complies with FCC radiation exposure limits set forth for an uncontrolled environment. This device complies with FCC RF Exposure limits set forth for an uncontrolled environment, under 47 CFR 2.1093 paragraph (d)(2). This transmitter must not be co-located or operating in conjunction with any other antenna or transmitter. This equipment has been SAR-evaluated for use in laptops (notebooks) with side slot configuration. Table Contents Introduction......................................................................................................... 4 Getting to know the Telephone Kit...................................................................... 4 Minimum System Requirements ....................................................................................... 4 Unpacking and Checking the Contents............................................................................. 4 Identifying Components..................................................................................................... 5 Getting Started ................................................................................................... 6 Setting up the telephone kit............................................................................................... 6 Software Installation .......................................................................................................... 6 Appliactions Installed....................................................................................................... 11 Exploring the Telephone kit Menu .................................................................... 14 Icons shown on the Handset........................................................................................... 14 Function Keys:................................................................................................................. 15 Configurations ................................................................................................................. 15 Guide to Basic Functions.................................................................................. 16 How to call skype contact?.............................................................................................. 16 How to call an ordinary phone number (skype out)? ...................................................... 16 How to answer a call? ..................................................................................................... 16 How to make a conference call? ..................................................................................... 16 How to redial outgoing calls? .......................................................................................... 17 How to redial any call from History?................................................................................ 17 How to mute microphone when you are on call? ............................................................ 17 Appendix .......................................................................................................... 18 Toshiba Bluetooth Utility Contents .................................................................................. 18 Specifications................................................................................................................... 22 Troubleshooting............................................................................................................... 23 Introduction Welcome to the VoIP Bluetooth Phone Kit manual. In this manual, you will learn how to use this Phone Kit to do all popular Skype standard functions, such as Contacts, History, SkypeOut, SkypeIn, Conference Call etc. This Phone kit enables you to make and receive Skype calls anywhere, without being in front of the PC. With a long life rechargeable Lithium battery, this Phone kit can sustain up to 6 hours talking time, so you don’t need to speak in rush every time. Key Features Support long range Bluetooth class 1 standard that reaches up to 100 meters distance in outdoor clean environment. Feature easy of use graphical user interface. Support long life Lithium rechargeable battery. Support advanced power down management to extend battery life. Support USB-port charging while traveling on the road. Getting to know the Telephone Kit Minimum System Requirements PC running Windows XP, 2000 Skype software installed At least 400 MHz processor At least 128 MB RAM At least 50MB free disk space on your hard drive CD-ROM drive Unpacking and Checking the Contents Packing content TVP-SP1B Bluetooth VoIP Phone TBW-104UB Advanced High Power Bluetooth USB Adapter 700 mAh Li-on battery 1m/3ft. USB cable Quick Guide CD (with software, driver, utility and user’s guide) Identifying Components TBW-104UB TVP-SP1B Front View TVP-SP1B Back View Side View Getting Started Setting up the telephone kit 1. Place the included 700 mAh Li-on battery into the TVP-SP1B’s battery compartment 2. Connect USB cable to charge battery pack (please let the battery charge for a full 6 hours before using the phone for the first time) Software Installation 1. Turn on your PC 2. Please insert the Utility CD into CD-ROM drive, and then follow the instruction below to install Bluetooth software. Note: DO NOT plug the USB Adapter into the USB port before software installation 3. Follow the directions on your screen to install Phone Utility and Adapter driver. 1. Click “Install Driver/Utility” to start 2. Click “Next” to continue 3. Please Click “Next”. 4. Please check “Yes, I do.” to launch utility when Windows startup. 5. Please Click “Next”. 6. Installing 7. Please Click “Finish” to complete TVP-SP1B installation. 8. The installation will continue with Bluetooth adapter installation. Click “Yes” to install Bluetooth driver now. 9. Select language for installation 10. Installing 11. Please Click “Next” 12. Please check “I accept the terms in the license agreement” and then click “Next”. 13. Please Click “Install” to start installation. 14. Please choose “I accept” and then click “OK” 15. Installation will ask you plug Bluetooth Device into USB port, please plug TBW-104UB 16. Windows will continue installating into USB port then click “OK” to continue automatically 17. Click “Finish” to complete installation. 18. Please click “Yes” to restart your computer. 19. After the Computer is rebooted, Double click on the Bluetooth VoIP Phone icon and Click “Search” 21. Setup Utility is searching for Bluetooth Phones 20. Prepare for pairing. Please turn on CleraSky Bluetooth Phone 22. Select your Bluetooth Phone. (Please check the MAC address to select the right one. Please remove the battery to find MAC address label) 23. Please click “OK” to finish bluetooth device pairing. 24. Please Click “OK” to finish pairing process. 25. Please Click “Yes” to launch Bluetooth Phone Ustility 26. Please Choose “Allow this program to use Skype” and then click “OK. Appliactions Installed After you finish above installations, “Bluetooth” and “TRENDnet TVP-SP1B” items will be added to Windows Start Menu Programs group. Bluetooth The Bluetooth icon in windows system tray will indicate Bluetooth status by changing appearance. y Blue with Red: services are disabled. y Blue with White: services are enabled. y Blue with Green: services are connected. Contents of the Bluetooth Utility 1. Bluetooth Information Exchanger: This program enables you to transfer files and images to a wireless device. For details, please refer to Bluetooth->User’s Guide. 2. Bluetooth Settings: This program enables you to configure settings when you connect to a Bluetooth wireless technology device for the first time. For details, please refer to Bluetooth->User’s Guide. 3. Remote Cameras When you connect to a Bluetooth wireless technology-compatible digital camera, you ca operate it from the PC side and send captured images to the PC. 4. User’s Guide: This Bluetooth Utilities User Guide help you understand Bluetooth settings and trouble shootings. 5. Wireless File Transfer: You can send a file wirelessly to another device by right-clicking on the intended file and using the “Sending to Bluetooth Device” menu that appears. TRENDnet TVP-SP1B Phone Utility Phone Utility icon ( ) in system tray can display phone utility version and has one “Exit” function by right-clicking to quit this utility. Contents of the “TRENDnet TVP-SP1B” Utility 1. BT Phone Setting Utility: This utility help you pair Clearsky Bluetooth Phone with USB bluetooth adapter. 2. TVP-SP1B Utility: This is the main program which enables you doing skype functions from this Bluetooth phone. 3. Uninstall: Remove the TVP-SP1B phone utility from your computer. Exploring the Telephone kit Menu Icons shown on the Handset Icon Meaning Icon Meaning A: Mode Homepage Contacts Ringing Configuration Configuration´Status Configuration´History Call with contacts B: Volume Volume 0 n=1~9 C: My Status Online Away Not Available Do Not Disturb SkypeMe Offline Invisible D: Battery Status Battery Full (The black area reduces as the battery runs low) Battery Empty Charging Battery Full (while charging) E: Contact’s Status Online Away Not Available Do Not Disturb Skypeme Offline Skype out account Function Keys: Sync Contacts Configuration Cancel, Back Off-hook, Make a call, Answer a call, Redial Up/Down Power ON/OFF, On-hook (hand-up) End a call, Back to Home Configurations Press to enter configuration mode Function in configurations Functions Descriptions History´Missed Display Missed call lists History ´Incoming Display Incoming call lists History ´Outgoing Display Outgoing call lists Status Change my status. Status options: “Online”, “Away”, “N/A”, “Not Disturb”, “Invisible”, “Offline”, “Skypeme” Skype Credit Showing how many skype out credits you have Ringtone Select Ring tones Pairing Let Bluetooth Phone enter Pairing Mode Headset Enter Headset Mode. Bluetooth Phone acts as a headset to support audio over MSN Messenger, Yahoo Messenger and more F/W Version Showing F/W version installed in your TVP-SP1B Guide to Basic Functions How to call skype contact? 1. Press 3 sec. ´Wait until phone shows “Clearsky on”´press to sync contact lists with PC skype 2. Use List button to scroll up/down the contact lists 3. Press to start a call. 4. Press to disconnect this call How to call an ordinary phone number (skype out)? 1. Enter “+”+phone number you want to call. (Press 2. Press to delete an incorrect digit) to start a call. How to answer a call? 1. Press to answer any incoming call. How to make a conference call? A. invite another contact when you are chatting 1. Press ´ Make 1st call 2. Press to invite 2nd contact ´ Press 3. Choose “CON CALL” 1st contact to place call to invite 2nd contact to join this conference call with 4. Choose “P2P CALL” to hold 1st call and talk to 2nd contact. B. invite contacts and conference them together 1. Press to go to the contact list menu. 2. Press “*” to mark the contact you want to include in this conference call. (Conference participants (max 4+host) 3. Press to start this conference call How to redial outgoing calls? 1. Press to show outgoing call lists. 2. Select the contact (from the outgoing call list) you want to dial to make a call. 3. Press to make a call How to redial any call from History? 1. Redial from Missed Calls: Press dial. (press ´History ´Missed´Choose one contact to to cancel this action and go back to home) 2. Redial from Incoming Calls: Press ´ History ´Incoming Calls´Choose one contact to dial. 3. Redial from Outgoing Calls: Press ´ History ´Outgoing Calls´Choose one contact to dial. How to mute microphone when you are on call? During a call, if you wish to speak to someone privately 1. Press”4” to mute microphone. 2. Press “6” to unmute microphone Appendix Toshiba Bluetooth Utility Contents Bluetooth Functions Toshiba Bluetooth stack supports the following Bluetooth functions (profiles) Term Definition DUN Dial-Up Networking Enables you to establish a dial-up BluetoothTM wireless technology connection to the Internet or other networks with a wireless modem station, mobile telephone, or similar device. FAX FAX Enables you to establish a BluetoothTM wireless technology connection with a wireless modem station, mobile telephone, or similar device to send or receive a fax. LAP LAN Access Profile Enables you to establish a BluetoothTM wireless technology connection with a LAN access point to access the services of a LAN using PPP. SPP Serial Port Profile Enables communication with a device through a virtual serial port configured for a BluetoothTM wireless technology connection. This can be used for printers and printer adapters with PDAs, using a different method from HCRP or ActiveSync. HID Human Interface Device Profile Allows connections to wireless mice, keyboards and other input devices. HCRP FTP Hardcopy Cable Replacement Profile Enables printing with a printer driver. File Transfer Profile Enables you to browse folders on a wireless device and transfer files to and from the local device. OPP Object Push Profile Allows business card data to be exchanged with a wireless device. A2DP Advanced Audio Distribution Profile Allows audio data to be exchanged between wireless headsets and other audio devices, as well as allowing high-quality music playback. Audio/Video Remote Control Profile AVRCP A/V remote control functions such as play and stop. The BluetoothTM Utility supports remote control operation. GAVDP HSP Generic Audio/Video Distribution Profile Basic profile used to support A2DP, AVRCP and other protocols. Head Set Profile Profile used for headsets. Allows you to connect to a PC and communicate as well as connect to a mobile telephone. PAN BIP Personal Area Networking Profile Supports IP base network. Allows connection to an ad-hoc or wired network via an access point. Basic Imaging Profile Allows image files to be sent and received after having been converted to a size suitable for the destination. In addition to being able to transfer image files, the BluetoothTM Utility allows camera shutters to be operated by remote control, as well as other offering other functionalities. Bluetooth Settings 1. Right-click on the BluetoothTM wireless technology icon in the task tray, and select Alternatively, click [Start]→[All Programs]→[Bluetooth]→[Bluetooth [Bluetooth Settings] from the menu that appears. Settings]. 2. Please Click “New Connection” to add new Bluetooth device. 3. Please choose “Express Mode” 4. Searching for Bluetooth devices 5. Select the device name from [Device List] and click on the [Next] button. 6. Please Click “Next” 7. Searching remote devices 8. When a service has been detected, a 9. The icons of the registered devices will window prompting you to enter the Bluetooth appear and the devices will be ready to use. passkey (PIN code) may appear. Please enter the passkey and click on the [OK] button. Please refer to your device instruction manual for information on which passkey to use. On-line User Guide When you have troubles in using Toshiba Bluetooth stack, please get on-line help by click Bluetooth->User’s Guide Specifications RF Standard Class 1 Bluetooth v2.0 with EDR, backward compatible with Bluetooth v1.1 & v1.2 RF Frequency 2.4~2.4835 GHz, ISM band Spread Spectrum Frequency Hopping and Adaptive Frequency Hopping RF Output Power Up to 17 dBm Display 96 x 64 pixel, graphical type STN LCD with back light Interfaces One mini-USB connector for charging from computer USB port or external power adapter One earphone jack at 2.5 mm Built-in mono-earpiece, microphone LED Indicator Handset status (active, standby, sleep, etc.…) Battery 3.6V 700 mAh Lithium-ion rechargeable and user replaceable battery pack Power Can be charged through computer USB port Power Adapter: DC 5V, 1A with mini-USB interface AC 100~240V (option) Antenna One internal antenna Consumption Standby: 60+ hrs, Talking: 6+ hrs continuous talking Dimension 143.5 (L) x 45 (W) x 22 (D) mm Environmental Condition Operating Temperature: 0 ~50° C , Humidity:10 ~ 90% Certifications FCC, CE Storage Temperature: -20 ~70° C, Humidity:10 ~ 90% Troubleshooting Problem: Press “Power on” button, but nothing happen, no display Solution: 1. Make sure the included rechargeable battery is fitted in the handset correctly. 2. Please press “Power on” button for about 3 sec. until you see an icons. Problem: Pop up a Bluetooth Security window Solution: 1. Bluetooth PIN should be self-assigned when pairing with Bluetooth phone. If this window pop up, please input default Bluetooth PIN: “0000”. Question: How to distinguish standby mode and power-off mode Answer: Please check LED, if LED not blinking, Bluetooth phone is in power-off mode. If LED blinks every 5 seconds, Phone is in standby mode. Problem: When you press “contact” ( ), LCD keeps showing “connecting…” and phone cannot connect to your PC skype. Solution: 1. Please check the Bluetooth icons in system tray. You must wait until this icon turn to blue with green appearance. 2. If the Bluetooth icons is blue with green, but LCD keeps showing “connecting…” when you press “contact”, please quit phone utility, by right-clicking phone utility icon and click “Exit” and then launch Bluetooth VoIP Phone utility again. 3. If you cannot quit phone utility by right-clicking phone utility icon, please press “Ctrl-Alt-Del” to run Windows Task Manager and then disconnect “TVP-SP1B” application 4. If Windows Task Manager cannot disconnect “TVP-SP1B”, please restart your computer. Problem: No response on your phone (LCD stuck in the same page no matter which key you enter). Solution: Please remove battery to restart your Bluetooth phone. Problem: PC music plays in Bluetooth phone Solution: When you finish installation, system default audio device will be set to Bluetooth wave. If you want to change back to PC original default audio device, please go to SettingsÆControl PanelÆSounds and Audio DevicesÆAudio to choose default device. Problem: Why can I just invite one contact to join my current call? Solution: If you need to hold a conference call with more than 2 contacts, please choose contacts first and then make a conference call. For “join” function, our phone just allow one participant to join current call. Problem: Another ringer during my conversation Solution: This means another incoming call is waiting for your response. You can answer this call and hold current one by pressing “off-hook” or reject this incoming call by pressing “on-hook” Question: What’s the time period before the phone goes into standby mode? Answer: 3 minutes Problem: One warning sound made by Bluetooth phone Solution: This might be “low battery warning” signal. Please check your battery icon to see when it shows “no”. Please use the included USB cable to charge Bluetooth phone. Limited Warranty TRENDware warrants its products against defects in material and workmanship, under normal use and service, for the following lengths of time from the date of purchase. TVP-SP1BK – 2 Years Warranty If a product does not operate as warranted above during the applicable warranty period, TRENDware shall, at its option and expense, repair the defective product or part, deliver to customer an equivalent product or part to replace the defective item, or refund to customer the purchase price paid for the defective product. All products that are replaced will become the property of TRENDware. Replacement products may be new or reconditioned. TRENDware shall not be responsible for any software, firmware, information, or memory data of customer contained in, stored on, or integrated with any products returned to TRENDware pursuant to any warranty. There are no user serviceable parts inside the product. unauthorized service center. Do not remove or attempt to service the product by any This warranty is voided if (i) the product has been modified or repaired by any unauthorized service center, (ii) the product was subject to accident, abuse, or improper use (iii) the product was subject to conditions more severe than those specified in the manual. Warranty service may be obtained by contacting TRENDware office within the applicable warranty period for a Return Material Authorization (RMA) number, accompanied by a copy of the dated proof of the purchase. Products returned to TRENDware must be pre-authorized by TRENDware with RMA number marked on the outside of the package, and sent prepaid, insured and packaged appropriately for safe shipment. WARRANTIES EXCLUSIVE: IF THE TRENDWARE PRODUCT DOES NOT OPERATE AS WARRANTED ABOVE, THE CUSTOMER’S SOLE REMEDY SHALL BE, AT TRENDWARE’S OPTION, REPAIR OR REPLACEMENT. THE FOREGOING WARRANTIES AND REMEDIES ARE EXCLUSIVE AND ARE IN LIEU OF ALL OTHER WARRANTIES, EXPRESSED OR IMPLIED, EITHER IN FACT OR BY OPERATION OF LAW, STATUTORY OR OTHERWISE, INCLUDING WARRANTIES OF MERCHANTABILITY AND FITNESS FOR A PARTICULAR PURPOSE. TRENDWARE NEITHER ASSUMES NOR AUTHORIZES ANY OTHER PERSON TO ASSUME FOR IT ANY OTHER LIABILITY IN CONNECTION WITH THE SALE, INSTALLATION MAINTENANCE OR USE OF TRENDWARE’S PRODUCTS. TRENDWARE SHALL NOT BE LIABLE UNDER THIS WARRANTY IF ITS TESTING AND EXAMINATION DISCLOSE THAT THE ALLEGED DEFECT IN THE PRODUCT DOES NOT EXIST OR WAS CAUSED BY CUSTOMER’S OR ANY THIRD PERSON’S MISUSE, NEGLECT, IMPROPER INSTALLATION OR TESTING, UNAUTHORIZED ATTEMPTS TO REPAIR OR MODIFY, OR ANY OTHER CAUSE BEYOND THE RANGE OF THE INTENDED USE, OR BY ACCIDENT, FIRE, LIGHTNING, OR OTHER HAZARD. LIMITATION OF LIABILITY: TO THE FULL EXTENT ALLOWED BY LAW TRENDWARE ALSO EXCLUDES FOR ITSELF AND ITS SUPPLIERS ANY LIABILITY, WHETHER BASED IN CONTRACT OR TORT (INCLUDING NEGLIGENCE), FOR INCIDENTAL, CONSEQUENTIAL, INDIRECT, SPECIAL, OR PUNITIVE DAMAGES OF ANY KIND, OR FOR LOSS OF REVENUE OR PROFITS, LOSS OF BUSINESS, LOSS OF INFORMATION OR DATE, OR OTHER FINANCIAL LOSS ARISING OUT OF OR IN CONNECTION WITH THE SALE, INSTALLATION, MAINTENANCE, USE, PERFORMANCE, FAILURE, OR INTERRUPTION OF THE POSSIBILITY OF SUCH DAMAGES, AND LIMITS ITS LIABILITY TO REPAIR, REPLACEMENT, OR REFUND OF THE PURCHASE PRICE PAID, AT TRENDWARE’S OPTION. THIS DISCLAIMER OF LIABILITY FOR DAMAGES WILL NOT BE AFFECTED IF ANY REMEDY PROVIDED HEREIN SHALL FAIL OF ITS ESSENTIAL PURPOSE. Governing Law: This Limited Warranty shall be governed by the laws of the state of California. AC/DC Power Adapter, Cooling Fan, and Power Supply carry 1 Year Warranty