1
E
USB
Introduction
SAFETY PRECAUTIONS
English
This symbol is intended to alert the user
of the presence of uninsulated 'dangerous
voltage' within the product' s enclosure
that may be of sufficient magnitude to
constitute a risk of electric shock to people.
The exclamation point within an equilateral triangle is intended to alert the user
to the presence of important operating and
maintenance (servicing) instructions in the
literature accompanying the appliance.
The symbol for CLASS II (Double
Insulation)
CAUTION: VISIBLE LASER RADIATION WHEN
OPEN. DO NOT STARE INTO BEAM.
WARNING:
TO REDUCE THE RISK OF FIRE OR ELECTRIC SHOCK, DO NOT EXPOSE THIS APPLIANCE TO
RAIN OR MOISTURE. DANGEROUS HIGH VOLTAGES ARE PRESENT INSIDE THE ENCLOSURE.
DO NOT OPEN THE CABINET. REFER SERVICING TO QUALIFIED PERSONNEL ONLY.
CAUTION:
PLEASE READ AND OBSERVE ALL WARNINGS AND INSTRUCTIONS GIVEN IN THIS OWNER' S
MANUAL AND THOSE MARKED ON THE UNIT. RETAIN THIS BOOKLET FOR FUTURE REFERENCE.
CAUTION:
USE OF ANY CONTROLS, ADJUSTMENTS, OR PROCEDURES OTHER THAN THOSE SPECIFIED
HEREIN MAY RESULT IN HAZARDOUS RADIATION EXPOSURE.
Changes or modifications made to this equipment, not expressly approved by Toshiba, or parties
authorized by Toshiba, could void the user' s authority to operate the equipment.
IMPORTANT SAFETY INSTRUCTIONS
This unit has been designed and manufactured to assure personal safety. Improper use can result in electric shock
or fire hazard. The safeguards incorporated in this unit will protect you if you observe the following procedures for
installation, use and servicing. This unit is fully transistorized and does not contain any parts that can be repaired by the
user. DO NOT REMOVE THE CABINET COVER, OR YOU MAY BE EXPOSED TO DANGEROUS VOLTAGE. REFER
SERVICING TO QUALIFIED SERVICE PERSONNEL ONLY.
1.
2.
3.
4.
5.
6.
7.
8.
9.
Read these instructions.
Keep these instructions.
Read all warnings.
Follow all instructions.
Do not use this appliance near water.
Clean only with dry cloth.
Do not block any ventilation openings. Install in accordance with the manufacturer’s instructions.
Do not install near any heat sources such as radiators, heat registers, stoves, or other apparatus (including
amplifiers) that produce heat.
Protect the power cord from being walked on or pinched particularly at plugs, convenience receptacles, and the
point where they exit from the apparatus.
10. Only use attachments/accessories specified by the manufacturer.
11. Use only with the cart, stand, tripod, bracket, or table specified by the manufacturer, or sold with the apparatus. When a cart is used, use caution when moving the cart/apparatus combination
to avoid injury from tip-over.
12. Unplug this apparatus during lightning storms or when unused for long periods of time.
13. Refer all servicing to qualified service personnel. Servicing is required when the apparatus has been damaged in
any way, such as power-supply cord or plug is damaged, liquid has been spilled or objects have fallen into the
apparatus, the apparatus has been exposed to rain or moisture, does not operate normally, or has been dropped.
14. Do not overload wall outlets; extension cords, or integral convenience receptacles as this can result in a risk of fire
or electric shock.
15. Apparatus shall not be exposed to dripping or splashing and no objects filled with liquids, such as vases, shall be
placed on the apparatus.
16. Keep your fingers well clear of the disc tray as it is closing. Neglecting to do so may cause serious personal injury.
17. Do not place a heavy object on or step on the apparatus. The object may fall, causing serious personal injury and
serious damage to the apparatus.
18. Do not use a cracked , deformed, or repaired disc. These discs are easily broken and may cause serious personal
injury and apparatus malfunction.
19. If the apparatus should smoke or smell, immediately disconnect the power cord from the wall outlet. Wait until the
smoke or smell stops, then ask your dealer for a check and repair. Neglecting to do so may cause fire.
20. While it is thundering, do not touch the connecting cables or the apparatus.
SOME DOS AND DON'TS ON THE SAFE USE OF EQUIPMENT
This equipment has been designed and manufactured to meet international safety standards but, like any electrical
equipment, care must be taken if you are to obtain the best results and safety is to be assured. So, please read the
points below for your own safety. They are of a general nature, intended to help you with all your electronic consumer
products and some points may not apply to the goods you have just purchased.
DO read the operating instructions before you attempt to use the equipment.
DO ensure that all electrical connections (including the mains plug, extension leads and inter- connections between
the pieces of equipment) are properly made and in accordance with the manufacturer's instructions. Switch off and
withdraw the mains plug before making or changing connections.
DO consult your dealer if you are ever in doubt about the installation, operation or safety of your equipment.
DO be careful with glass panels or doors on equipment.
DON'T remove any fixed cover as this may expose dangerous voltages.
DON'T obstruct the ventilation openings of the equipment with items such as newspapers, tablecloths, curtains, etc. Overheating will cause damage and shorten the life of the equipment.
DON'T allow electrical equipment to be exposed to dripping or splashing, or objects filled with liquids, such as vases,
to be placed on the equipment.
DON'T place hot objects or naked flame sources such as lighted candles or nightlights on, or close to equipment. High
temperatures can melt plastic and lead to fires.
DON'T use makeshift stands and NEVER fix legs with wood screws - to ensure complete safety always fit the
manufacturer's approved stand or legs with the fixings provided according to the instructions.
DON'T listen to headphones at high volume, as such use can permanently damage your hearing.
DON'T leave equipment switched on when it is unattended unless it is specifically stated that it is designed for
unattended operation or has a stand-by mode. Switch off using the switch on the equipment and make sure that
your family know how to do this. Special arrangements may need to be made for infirm or handicapped people.
DON'T continue to operate the equipment if you are in any doubt about it working normally, or if it is damaged in any
way - switch off, withdraw the mains plug and consult your dealer.
ABOVE ALL
-NEVER let anyone especially children push anything into holes, slots or any other
opening in the case - this could result in a fatal electrical shock;
-NEVER guess or take chances with electrical equipment of any kind
-it is better to be safe than sorry!
English
Introduction
Introduction
English
CAUTION:
This Digital Video Disc Player employs a Laser System.
To ensure proper use of this product, please read this owner’s manual carefully and retain for future reference
Should the unit require maintenance, contact an authorized service location.
Use of controls or adjustments or performance of procedures other than those specified herein may result in
hazardous radiation exposure.
To prevent direct exposure to laser beam, do not try to open the enclosure.
Visible and invisible laser radiation when open and interlocks defeated.
DO NOT STARE INTO BEAM.
CAUTION: These servicing instructions are for use by qualified service personnel only. To reduce the risk of
electric shock do not perform any servicing other than that contained in the operating instructions unless you are
qualified to do so.
Be aware that this equipment is still powered when in standby mode. To disconnect this equipment completely from the
mains power, pull out the power plug from the wall outlet.
Environmental Information
All unnecessary packaging has been omitted. The packaging has been made easy to separate into three materials;
cardboard (box), polystyrene foam (buffer) and polyethylene (bags, protective foam sheet).
Your DVD player consists of materials which can be recycled and reused if disassembled by a specialised company.
Please observe the local regulations regarding the disposal of packaging materials, exhausted batteries and old
equipment.
LASER
Type
Semiconductor laser
InGaAIP(DVD)
AIGaAs(CD)
Wave length 657 nm(DVD)
790 nm(CD)
Output Power 5.5 mW(DVD)
7.0 mW(VCD/CD)
Beam divergence 60 degrees
Where the MAINS plug or an appliance coupler is used as the disconnect device, the disconnect device shall remain
readily operable.
In the spaces provided below, record the Model and Serial No. located on the rear panel of your DVD video player.
Model No.
Serial No.
Retain this information for future reference.
WARNING:
RISK OF ELECTRIC SHOCK!
Never attempt to service this product yourself.
Opening and removing the covers may expose you
to dangerous voltage or other hazards. Failure to
follow this WARNING may result in death or serious
injury. Refer all servicing not specified in this manual
to a Toshiba Authorized Service Center.
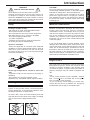
Setup
Finding a suitable location
-Place the set on a flat, hard and stable surface.
-Do not place the set on a carpet.
-Do not position the set on top of other equipment
that might heat it up (e.g., receiver or amplifier).
-Do not put anything under the set
(e.g.CDs, magazines).
-Install this unit near the AC outlet and where the
AC power plug can be reached easily.
Space for ventilation
-Place the apparatus in a location with adequate
ventilation to prevent internal heat build up. Allow at
least 10 cm (4.0'') clearance from the rear and the
top of the set and 5 cm (2.0'') from the left and right
to prevent overheating.
CAUTION!
Do not use solvents such as benzene, thinner,
commercially available cleaners, or anti-static sprays
intended for analog discs. Since the optical unit
(laser) of the DVD system operates at a higher
power than regular DVD or CD players, cleaning
CDs intended for DVD or CD players may damage
the optical unit (laser). Therefore, refrain from using
a cleaning CD.
Moisture Condensation
10cm (4.0")
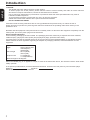
Region Codes
This DVD player is designed to support the Region
Management System. Check the regional code
number on the disc package. If the number does
not match the player' s region number (see table on
page 5), the player may be unable to playback the
disc.
Tips:
-It may not be possible to play CD-R/RW , DVD+R/
RW , or DVD +R DL in all cases due to the type of
disc or condition of the recording.
-If you are having trouble playing a certain disc,
remove the disc and try a different one. Improperly
formatted disc will not play on this DVD Player.
5cm (2.0")
Avoid high temperatures, moisture, water and
dust
-Apparatus shall not be exposed to dripping or
splashing.
-Do not place any sources of danger on the
apparatus (e.g., liquid filled objects, lighted candles).
Cleaning discs
Some problems occur because the disc inside the
system is dirty (frozen picture, sound disruptions,
picture distortions). To avoid these problems, discs
should be cleaned on a regular basis.
To clean a disc, use a micro fibre cleaning cloth and
wipe the disc from the center to the edge in a straight
line. Do not touch the playback side of the
disc.
If you use the DVD player in such a situation, it may
damage discs and internal parts. Remove the disc,
connect the power cord of the DVD player to the wall
outlet, turn on the DVD player, and leave it for two or
three hours. After two or three hours, the DVD player
will have warmed up and evaporated any moisture.
Keep the DVD player connected to the wall outlet
and moisture condensation will seldom occur.
5cm (2.0")
10cm (4.0")
Moisture condensation damages the DVD player.
Please read the following carefully. Moisture
condensation occurs, for example, when you pour a
cold drink into a glass on a warm day. Drops of water
form on the outside of the glass. In the same way,
moisture may condense on the optical pick-up lens
inside this unit, one of the most crucial internal parts
of the DVD player.
English
Introduction
Introduction
Region
English
U.S.A. and
Canada regions
U.K.,
Europe regions and
Japan
Asia Pacific,
Taiwan, Korea
Discs that can
be played
ALL
ALL
EU Conformity Statement
1
“This product is marked with “CE” and complies therefore
with the applicable harmonized European standards
listed under the Low Voltage Directive 2006/95/EC and
the EMC Directive 2004/108/EC.”
2
Responsible for CE-marking is TOSHIBA INFORMATION
SYSTEMS (U.K.) LTD, Toshiba Court, Weybridge
Business Park, Addlestone Road, Weybridge,Surrey,
KT15 2UL, United Kingdom.
ALL
3
Australia,
New Zealand,
Latin America
ALL
4
Russia and
India regions
ALL
5
China, Calcos Islands,
Walls and Futuna
Islands
ALL
6
This item incorporates copy protection
technology that is protected by U.S. patents
and other intellectual property rights of
Rovi Corporation. Reverse engineering and
disassembly are prohibited.
Notes on copyright
The unauthorized recording, use, distribution, or revision
of television programs, videotapes, DVDs and other
materials, is prohibited under the Copyright Laws of the
United States and other countries, and may subject you
to civil and/or criminal liability.
Following information is only for EUmember States:
The use of the symbol indicates that this
product may not be treated as household
waste. By ensuring this product is disposed
of correctly, you will help prevent potential
negative consequences for the environment
and human health, which could otherwise be
caused by inappropriate waste handling of
this product. For more detailed information
about recycling of this product, please
contact your local city office, your household
waste disposal service or the shop where you
purchased the product.
Following information is only valid EUmember States:
Pb,Hg,Cd Disposal of batteries and/or accumulators
The crossed out wheeled dust bin symbol
indicates that batteries and/or accumulators
must be collected and disposed of separately
from household waste.
If the battery or accumulator contains more
than the specified values of lead (Pb),
mercury (Hg), and/or cadmium (Cd) defined
in the Battery Directive (2006/66/EC), then
the chemical symbols for lead (Pb), mercury
(Hg) and/or cadmium (Cd) will appear below
the crossed out wheeled dust bin symbol.
By participating in separate collection of
batteries, you will help to assure the proper
disposal of products and batteries and
thus help to prevent potential negative
consequences for the environment and
human health.
For more detailed information about the
collection and recycling programmes available
in your country, please contact your local city
office or the shop where you purchased the
product.
In conformity with the EEE Regulation
Introduction
Introduction
SAFETY PRECAUTIONS
IMPORTANT SAFETY INSTRUCTIONS
Setup
Cleaning discs
Moisture Condensation
Region Codes
Table of Contents
Connections
Connecting to television
Connecting to a Stereo System
Connecting to a Digital AV Receiver
Connecting the power cord
Product Overview
Front and Rear panels
Remote Control
Getting Started
1
1-3
4
4
4
4-5
6
7
8
8
9
10
11
Inserting Batteries
Finding your viewing channel
Setting up Progressive Scan feature
Setting the language
.
12
12
12-13
13
Playable discs
13-14
Playback from Disc
Playback Feature
Starting disc playback
Basic playback control
Operations for video playback (DVD/VCD/SVCD) Selecting various repeat functions
Viewing the disc playback Information
Special DVD Features
Special VCD and SVCD Features
®
Playing a DivX Disc
Playing MP3/JPEG/Kodak picture CD
MP3 Converter
Playing USB Flash Memory
DVD Menu Options
Using the Language setup menu
Using the Video setup menu
Using the Audio setup menu
Using the Rating setup menu
Using the Misc (Miscellaneous) setup menu
Tray Lock
Others
Specifications
Troubleshooting
Glossary
English
Table of Contents
14
14-15
15
15-16
16
16
16-17
17
17-18
18-19
19
19-20
20-21
21-22
22
23
23
24
25-26
27
Connections
Connecting to television
Using Component Video Jacks(Y, PB, PR)
English
IMPORTANT!
– You only need to make one video connection
from the following options, depending on the
capabilities of your television.
– Connect the DVD player directly to the
television.
Using SCART socket
A Use the scart cable to connect the DVD SCART OUT
to the corresponding scart input socket on the TV
(cable not supplied).
If your DVD player will not be connected to a Stereo
System or AV Receiver to hear better sound, scart is
enough for both audio and video connections.
IMPORTANT!
-The progressive scan video quality is only
possible when using Y, PB, PR and a progressive
scan TV is required.
A Use the component video cables (green/blue/red) to
connect the DVD player' s Y, PB, PR jacks to the
corresponding Component video input jacks (or
labelled as Y, Pb, Pr) on the TV (cable not supplied).
B Use the audio cables (white/red) to connect AUDIO
OUT (L/R) jacks of the DVD player to the
corresponding AUDIO IN jacks on the TV (cable not
supplied).
C Proceed to page 12 for detailed Progressive Scan set
up.
Using Composite Video Jack(CVBS)
A Use the composite video cable (yellow) to connect
the DVD player' s VIDEO (CVBS) jack to the video
input jack (or labelled as A/V in, Video In or
Composite) on the TV (cable not supplied).
To hear the sound of this DVD player through your
TV, use the audio cables (white/red) to connect
AUDIO OUT (L/R) jacks of the DVD player to
corresponding AUDIO IN jacks on the TV (cable not
supplied).
Helpful hint: Before making or changing any connections, make sure that all the devices are
disconnected from the power outlet.
Connections
Connecting to a Stereo System
Connecting to a Digital AV Receiver
English
Stereo System with Left/Right Audio In Jacks
A Select one of the video connections (CVBS VIDEO
IN, SCART IN or COMPONENT VIDEO IN)
depending on the options available on your TV.
B Use the audio cables (white/red) to connect AUDIO
OUT (L/R) jacks of the DVD Player to the
corresponding AUDIO IN jacks on the stereo system
(cable not supplied).
Receiver has a PCM, Dolby Digital or MPEG
decoder
A Select one of the video connections (CVBS VIDEO
IN, SCART IN or COMPONENT VIDEO IN)
depending on the options available on your TV.
B Connect the COAXIAL jack of the DVD player to the
corresponding Digital Audio In jack on your Receiver
(cable not supplied).
C Set the DVD Player' s Digital Output to PCM or All
depending on the capabilities of your Receiver (see
page 21 {Digital Output}).
Tip:
-If the audio format of the Digital Output does not
match the capabilities of your receiver, the receiver
will produce a strong, distorted sound or no sound at
all.
Helpful hint: Before making or changing any connections, make sure that all the devices are
disconnected from the power outlet.
Connections
English
Connecting the power cord
After everything is connected properly, plug in the AC
power cord to the power outlet.
Never make or change any connections with the
power switched on.
Helpful hint: Before making or changing any connections, make sure that all the devices are
disconnected from the power outlet.
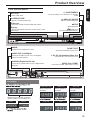
Product Overview
Front and Rear panels
English
I/2 ON/STANDBY
- Turns the player on or switches it to standby
mode
Disc tray
- Place a disc here
çOPEN/CLOSE
- Opens or closes the disc tray
B/X PLAY/ PAUSE
- Starts or pauses playback
IR Sensor
- Points the remote control towards this sensor
Display
- Shows information about the current status of the
DVD Player
STOP
- Stops playback
(USB) jack
- Input for USB flash memory.
USB
MAINS ~
- Connects to a standard AC outlet
SCART OUT
AUDIO OUT (Left/Right)
- Connects to Audio input of a TV, an amplifier,
receiver or stereo system
- Connects to SCART input of a TV
Y, PB, PR Component Video Out
- Connects to Y, PB, PR input of a TV
COAXIAL(Digital audio out)
- Connects to coaxial Audio input of a digital audio
equipment
VIDEO Out (CVBS)
- Connects to CVBS Video input of a TV
DVD display
DVD video disc
•During playback:
Example
VIDEO CD
•During playback:
Example
Audio CD
•During playback:
Example
Multifunctional indicator (indicates
operating status or messages, etc.)
No disc
Bad disc
Power Off
Open
Loading
10
Product Overview
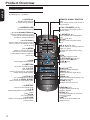
Remote Control
English
See the page in [ ] for details.
[ 16 ]DISPLAY
-Displays information on
TV screen during playback
[ 14 ]OPEN/CLOSE
-Open/close the disc tray
[ 15, 16, 22 ]Number Buttons
-Selects numbered items in a menu
-Press to enter track/chapter/title
numbers or password directly
[ 15 ]+10 button
-Press to enter number greater than 9
-Press +10 button repeatedly to select
10,20,30...etc
[ 15, 16 ]MENU
-Enters or exits the disc menu
-Switches on or off the Playback
Control (PBC) mode (for VCD 2.0 /
SVCD only)
[ 13 ]OK
-Acknowledge menu selection
[ 17 ]RETURN
-To go back to previous menu
[ 16, 18 ]TITLE
-Show title menu
-Press to view a page of 9 thumbnail
images during JPEG playback
[ 15 ]F.R & F.F
-Do a forward/reverse search
[ 14, 16, 17 ]PREV & NEXT
-Skip to previous / next chapter /track
[ 15 ]REPEAT
-Selects various repeat mode
[ 16 ]A-B
-Repeats playback from point A to B on
a disc
[ 15 ]SLOW
-Do a slow forward
[ 15 ]CLEAR
-Delete the mistyped entries or cancel
some functions
11
REMOTE SIGNAL EMITTER
[ 12 ]
-Point remote control to the sensor on
the front panel
2ON / STANDBY[ 12, 14 ]
-To switch the DVD player to ON or
standby mode
T - SEARCH[ 16 ]
-Start playback from a designated
point
SETUP[ 12, 19 ]
-Enters or exits the system setup
menu
[ 15, 17, 18 ]
-Cursor buttons for moving to the left
/ right / up / down
-To rotate the JPEG picture during
playback
STEP
-Play video frame by frame
PLAY/PAUSE [ 14, 15 ]
-Starts or pauses playback
STOP [ 15 ]
-Stops play
SUBTITLE[ 16 ]
-To access subtitle language
ANGLE[ 16 ]
-Switch the camera angle during
playback
AUDIO[ 16 ]
-Selects an audio setting (DVD) or an
audio channel (VCD)
ZOOM[ 15, 18 ]
-Enlarge a picture on the TV
RANDOM [ 17 ]
-Toggles between Normal and
Random playback
PROG[ 15 ]
-To program playback or cancel the
program playback
USB[ 19 ]
-To call up the DISC/USB mode
selection menu.
Getting Started
Inserting Batteries
A Open the battery compartment.
B Insert two batteries type R03 or AAA, following the
indications (+ / - ) inside the compartment.
C Close the cover.
CAUTION:
- Never throw batteries into a fire.
- The batteries shall not be exposed to excessive heat
such as sunshine, fire or the like.
Note:
- Be sure to use AAA size batteries.
- Dispose of batteries in a designated disposal area.
- Batteries should always be disposed of with the
environment in mind. Always dispose of batteries in
accordance with applicable laws and regulations.
- If the remote control does not operate correctly, or if
the operating range becomes reduced, replace batteries
with new ones.
- When necessary to replace batteries in the remote
control, always replace both batteries with new ones.
Never mix battery types or use new and used batteries
in combination.
- Always remove batteries from remote control if they
are dead or if the remote control is not to be used for an
extended period of time. This will prevent battery acid
from leaking into the battery compartment.
Using the Remote Control to Operate
the System
Usually these channels are between the lowest
and highest channels and may be called FRONT,
A/V IN or VIDEO. See your TV' s manual for more
details.
Or, you may go to channel 1 on your TV, then
press the Channel down button repeatedly until you
see the Video In channel.
Or, the TV remote control may have a button that
chooses different video modes.
C If you are using external equipment, (such as
audio system or receiver), turn it on and select the
appropriate input source for the DVD player output.
Refer to the equipment user’s manual for detail.
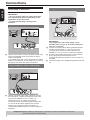
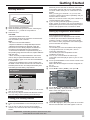
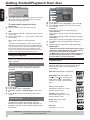
Setting up Progressive Scan feature
(For Progressive Scan TV only)
Before you start...
-Ensure that you have connected this DVD player
to a progressive scan TV using the Y, PB, PR
connection (see page 7).
-Ensure that you have completed the basic
installation and set up.
Turn on your TV and select the video input
connected to the DVD player (refer to your TV user
manual).
Press 2ON/STANDBY on the remote control to turn
on the DVD player.
The blue DVD background screen will appear on
the TV.
Press SETUP.
Press / to select { Video }, then press .
A
B
C
D
The progressive scan display twice the number
of frames per seconds than interlaced scanning
(ordinary normal TV system). With nearly double
the number of lines, progressive scan offers higher
picture resolution and quality.
USB
30
Within about 6m (19 feet)
DISPLAY
1
2
4
5
7
8
+10
0
ON/STANDBY
3
6
9
A Aim the Remote Control directly at the remote sensor
(IR) on the front panel.
B Do not put any objects between the Remote Control
and DVD Player while operating the DVD Player.
T-SEARCH
MENU
SETUP
Aspect Ratio
: 4:3
View Mode
: Auto Fit
Video
TV System
: PAL
Video Out
Component
Audio
Smart Picture
RGB
JPEG Interval
P-Scan
Rating
30
OPEN/CLOSE
Language
Misc
E Press / to select { Video Out }, then press .
F Select { P- Scan }, then press OK to confirm.
The menu will appear on the TV.
OK
F.R
STEP
REPEAT
F.F
PREV
PLAY/PAUSE
A-B
SUBTITLE ANGLE
NEXT
STOP
SLOW
CLEAR
AUDIO
ZOOM
RANDOM PROG
Finding your viewing channel
S E -R 0268
A Press I/2ON/STANDBY on the DVD player to turn it
on.
B Turn on the TV and set it to the correct Video-In
channel. You should see the blue DVD background
screen.
Video Out
TITLE
RETURN
Activating Progressive Scan 1. Ensure
your TV supports Progressive Mode
2. If there is a distorted picture on the
TV, wait 15 seconds for automatic
recover
Yes
No
G Press to highlight { Yes } and press OK to confirm.
The reconfirmation menu will appear on the TV.
Helpful hint: Press to go back to previous menu item.
Press SETUP to exit the menu item.
12
English
Getting Started/Playback from disc
Video Out
OSD language
: English
Subtitle
: Auto
Video
DivX Subtitle
: Standard
Audio
DVD Menu
Language
English
Confirm again to use new setting
14 seconds
Audio
Yes
No
H Press to highlight { Yes } and press OK to confirm.
The setup is now completed and you can start
enjoying the high quality picture.
To deactivate Progressive Scan
manually:
A Wait for 15 seconds for the auto recovery.
OR
A Press OPEN/CLOSE ç on the DVD player to open
the disc tray.
B Press number button ' 1 ' on the remote control for a
few seconds.
The DVD background screen appears.
Tip:
-There are some progressive scan TVs and HighDefinition TVs that are not fully compatible with this
unit, resulting in the unnatural picture when playing
back a DVD VIDEO disc in the progressive scan
mode. In such a case, turn off the progressive scan
feature on both the DVD player and your TV.
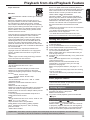
Setting the language
Choose your desired On-Screen Display(OSD)language
where available.
On-Screen Display (OSD) Language
The On-screen language for the system setup menu
will remain as you set it, regardless of various disc
languages.
Rating
English
French
German
Polish
Hungarian
Misc
Portuguese
A Press SETUP.
B Press / to select { Language }, then press .
C Press / to highlight one of the options below,
then press .
{ Subtitle }
Select this to change the subtitle language.
{ DivX Subtitle }
Select this to change the DivX® subtitle language.
{ Audio }
Select this to change the disc soundtrack language.
{ DVD Menu }
Select this to change the language of the disc menu.
D Use / to select a language and press OK to
confirm.
E Repeat steps C - D for other language settings.
IMPORTANT!
- DVD discs and players are designed with regional
restrictions. Before playing a disc, make sure the
disc is for the same zone as your player.
- If ' 'appears on the TV screen when a button is
pressed, it means the function is not available on
the current disc or at the current time.
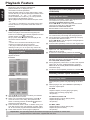
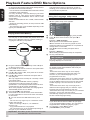
Playable discs
Using this DVD player, you can playback on the
following discs. Some of these discs may be
incompatible.
DVD Video disc(Digital Versatile Disc)
Language
Video
OSD language
English
Subtitle
Français
DivX Subtitle
Audio
Audio
DVD Menu
Deutsch
: English
Polski
: English
Hungarian
: English
Português
Rating
DVD+R/RW (DVD Recordable / Rewritable), DVD+R DL (Dual layer) of
DVD Video format or Audio/Video
formats (e.g., MP3, JPEG and DivX®
files).
Misc
A Press SETUP.
B Press / to select { Language }.
C Press to highlight { OSD language }, then press
.
D Press / to select a language and press OK to
confirm.
CD-R (CD-Recordable)
Audio/Video formats (e.g., MP3,
JPEG and DivX® files).
Audio CD (Compact Disc
Digital Audio)
Subtitle, DivX Subtitle, Audio and DVD
Menu language
You can choose your own preferred language or
soundtrack from Subtitle, DivX Subtitle, Audio and
DVD Menu languages. If the language selected is not
available on the disc, the disc’s default language will be
used instead.
13
CD-RW (CD-Rewritable)
Audio/Video formats (e.g., MP3,
JPEG and DivX® files).
Video CD
(Formats 1.0, 1.1, 2.0)
Helpful hint: Press to go back to previous menu item.
Press SETUP to exit the menu item.
Super Video CD
DivX ® is a digital video format created by DivX,Inc.
This is an official DivX Certified device that plays DivX
video. Visit www.divx.com for more information and
software tools to convert your files into DivX video.
-ABOUT DIVX VIDEO-ON-DEMAND:
MP3-Disc
This DivX Certified ® device must be registered in
order to play DivX Video-on-Demand (VOD) content.
To generate the registration code, locate the DivX
VOD section in the device setup menu. Go to
vod.divx.com with this code to complete the registration process and learn more about DivX VOD.
Tips:
– Maximum 100 sessions for CD and 10 multi border
for DVD are supported.
– For DVD-R and DVD-RW multi border, only
finalized disc can be supported.
– For DVD+R and DVD+RW multi border, both
finalized and unfinalized disc cannot be supported.
is a trademark of DVD Format/Logo Licensing
Corporation.
Because of problems and errors that can occur
during the creation of DVD and CD software and/or
the manufacture of DVD and CD discs, Toshiba
cannot assure that this DVD player will successfully
play every disc bearing the DVD and CD logos. If you
happen to experience any difficulty playing a DVD
and/or CD disc on this DVD player, please contact
Toshiba Customer Service.
This DVD player requires discs/recordings to meet
certain technical standards in order to achieve
optimal playback quality. There are many different
types of recordable disc formats (including CD-R
containing MP3 files). Not all recordable discs will
operate or produce optimal playback quality. The
technical criteria set forth in this owner's manual are
meant only as a guide. Use of CD-RW for MP3 files is
not recommended.
You must obtain any required permission from
copyright owners to download or use copyrighted
content. Toshiba cannot and does not grant such
permission.
Tip:
- MPEG Layer-3 audio coding technology licensed
from Fraunhofer IIS and Thomson.
Supported Formats
MP3 tracks
-The file extensions have to be '.mp3 '.
-ISO format.
-Maximum 8 characters display for folder name.
-Maximum 15 characters display for file name.
-Supported sampling frequencies & corresponding
bit-rates;
32kHz, 64-320 kbps
44.1kHz, 48kHz 80-320 kbps
JPEG/Pictures
-The file extensions have to be '.JPG' or '.JPEG'.
-JPEG/ISO format.
-Maximum of 5760×3840 resolution can be
supported.
-Maximum file size: 5 Mbytes.
-Maximum of 500 files and 200 folders are supported.
-When the number of files(or folders) reaches the
maximum limit, the rest of the files(or folders) cannot
be displayed.
-It can only display DCF-standard still pictures or
JPEG pictures such as TIFF.
DivX®
-The file extensions have to be '.DIVX', '.XVID' or '.AVI'.
-����
DivX® 3.11, 4.x, 5.x and 6.0.
-Q-pel accurate motion compensation.
Global Motion Compensation (GMC) playback.
-DivX® Certified to play DivX® video, including
premium content.
-ABOUT DIVX VIDEO:
Starting disc playback
A Turn on the TV and select the video input connected
to the DVD player.
B Press 2ON/STANDBY to turn on the DVD player.
C Press OPEN/CLOSE to open the disc tray.
D Place a disc onto the disc tray with the label facing
up, then press OPEN/CLOSE.
For double-sided discs, load the side which you
want to play facing up.
E Playback may start automatically. If not, press PLAY/
PAUSE
.
If a disc menu appears on the TV, see page 15
'Using the disc menu'.
If the parental control was activated for the
inserted disc, you have to enter your four-digit
password, see page 22.
For more playback features, see pages 14 - 19.
Tips:
- Do not overturn the DVD player while disc loading,
playing or ejecting.
- Do not close the disc tray manually if the power is
switched off.
Basic playback control
Unless otherwise stated, all operations described are
based on Remote Control use.
Pausing playback
A During playback, press PLAY/PAUSE
to pause
playback and display a still picture.
Sound will be muted.
B To resume normal playback, press PLAY/PAUSE
again.
Skipping chapter/track
Press PREV
/ NEXT
to go to the previous
or next chapter/track during playback.
When PREV
is pressed after the 5 seconds
of playback, playback will start from the beginning
of the current chapter/track. If you press the button
within the 5 seconds, playback will start from the
Helpful hint: Some discs cannot be played on this DVD player due to the configuration and characteristics
of the disc, or due to the condition of recording and authorizing software.
14
English
Playback from disc/Playback Feature
Playback Feature
English
beginning of the preceding chapter/track.
Press DISPLAY to display the disc
information for title/chapter/track.
Use Number buttons to enter valid chapter / track
number directly. For the track/chapter numbers which
are greater than "9", use "+10" button. Each
press increases the number by 10. Then press the
second digit of track/Chapter number.
The playback skips to the selected chapter / track.
Tip:
- For VCD 2.0 / SVCD discs, accessing tracks using
number buttons is not possible if the PBC mode is
turned on.
Stopping playback
A During playback, press STOP .
The DVD player memorises the stopped point.
Press PLAY/ PAUSE
to resume playback from the
location where you stopped playback.
If you press STOP again, the DVD player will
cancel the resume function.
Tips:
- Screen saver will start automatically if the disc
playback is stopped for about 2 minutes.
- The player will automatically switch to Power
Standby mode if you do not press any buttons for
about 22 minutes after the disc has stopped playing.
Program playback
During playback, press PROG, then the OSD will
appear as below:
For VCD:
Depending on the disc, a menu may appear on the
TV screen once you load in the disc.
To select a playback feature or item
Use /// or number buttons on the remote
control, then press OK to start playback.
To access or remove the menu.
Press MENU on the remote control.
This function allows you to enlarge the picture on the
TV screen and to pan through the enlarged picture.
A
B
During playback, press ZOOM repeatedly to display
the picture with different scales.
Use /// to pan through the enlarged picture.
Playback will continue.
Press ZOOM repeatedly to return to the original size.
4
Track 2
5
6
Track 3
7
8
Track 4
9
10
11
12
13
14
15
16
Track 5
Track 6
Play
Clear
Clear All
Slow Motion
A Press SLOW during playback to select the required
speed: 1/2, 1/4, 1/8( forward only ).
Sound will be muted.
B To return to normal speed, press PLAY/ PAUSE .
2
3
Zooming In
1
Using the disc menu
Program
Track 1
Operations for video playback (DVD/
VCD/SVCD)
Forward/ Reverse Searching
You can fast forward or fast reverse a disc during
playback and select a desired search speed.
For DVD,VCD, SVCD,CD, MP3
A During playback, press F.R/ F.F to select the required
speed: X2, X8, X30, X100(backward or forward).
Sound will be muted (DVD/VCD/SVCD/MP3) or
intermittent (CD).
B To return to normal speed, press PLAY / PAUSE
.
Selecting various repeat functions
For DVD:
Program
Title 1
1
2
3
4
Title 2
5
6
Title 3
7
8
Title 4
9
10
11
12
13
14
15
16
Play
Clear
Clear All
A Use the / and OK button to select your desired
title/chapter/track in the list.
B When you have finished programming, press to
move the cursor to the 'Play', then press the OK
button or directly press PLAY/PAUSE
button to
start the program playback.
C Press CLEAR or select ' Clear ' to delete one by one from last chosen track / title /chapter or select 'Clear
All' to clear all the programmed tracks/titles/chapters.
D Press STOP twice to cancel program playback.
Repeat play mode
The repeat play options vary depending on the disc
type.
A While playing a disc, press REPEAT repeatedly to
choose a repeat option.
For DVD
-Repeat Chapter (currently playing chapter)
-Repeat Title (currently playing title)
-Off (cancel)
For Video CD, Audio CD
-Repeat Single (currently playing track)
-Repeat All (entire disc)
-Off (cancel)
For MP3, JPEG
-Repeat Single (currently playing file)
-Repeat All (current folder)
-Off (cancel)
Helpful hint:The operating features described here might not be possible for certain discs.
Always refer to the instructions supplied with the discs.
15
Tip:
-For VCD2.0/SVCD discs, repeat playback is not
possible if the PBC mode is turned on.
Repeating a section within a title/track
You can repeat the playback of a specific segment
within a title or track. To do this, you must mark the
start and end of the segment you want.
A While playing a disc, press A - B at your chosen
starting point.
B Press A - B again at your chosen end point.
The section will now repeat continuously.
C To exit the sequence, press A - B.
Viewing the disc playback Information
You can view the disc information (such as current
title/chapter/track number, total playing time or
remaining time on the disc) without interrupting the
disc playback.
A During playback, press DISPLAY repeatedly on the
remote control.
The available disc information appears on the TV
screen with the following sequence.
(DVD)
DVD Video
Time
(DVD)
Time
00:03:33/01:24:46 Title
(DVD)
Title 1/1
Chapter
(DVD)
Chapter 2/8
Audio
(DVD)
Audio 1/1
D 5.1Ch Eng Subtitle
Subtitle
1/8 Eng
(DVD)
Angle
Angle
1/4
(DVD)
(VCD)
VCD2.0
Time
(VCD)
Time
00:03:33/00:05:00 Track
Track
3/24
(VCD PBC OFF)
OR
Time
Time
00:03:33/00:05:00 (VCD PBC ON)
PBC On
(VCD PBC ON)
DivX 3.11
Time
Time
Track
Track
Audio
Subtitle Off
(DivX )
®
00:01:33/02:05:00 (DivX )
(DivX®)
(DivX®)
(DivX®)
1/2
Audio
Subtitle
®
1/1 MP3 2 Ch
Title/Chapter/Track/Time selection
A Press T-SEARCH, then press / to select
{ Time }, { Title }, { Chapter } or { Track }.
For VCD:
PBC OFF
Track
---
Time
--:--:--
(desired time of the current track)
Disc Time
--:--:--
(desired time of the disc)
For DVD:
Title
Chapter
Time
------:--:--
(desired time of the disc)
B Use the number buttons ( 0-9 ) to input a valid
number or time("0" cannot be input as the first
number). (This function only apply to DVD/VCD/CD/
SVCD.)
C Press OK to confirm.
The playback skips to the selected title/chapter/
track/time.
Angle
When {Angle} information appears on the screen,
press ANGLE button on the remote control
repeatedly to switch between different angles.
Playback will go to the selected angle.
Special DVD Features
Playing a Title
A Press TITLE.
The disc title menu appears on the TV screen.
B Use /// or number buttons (0-9) to select a
play option.
C Press OK to confirm.
Changing the Audio Language
For DVD:
Press AUDIO repeatedly to select different audio
languages.
Changing the Audio Channel
For VCD:
Press AUDIO to select the available audio channels
provided by the disc (Left, Right, Mix, Stereo).
Subtitles
Press SUBTITLE repeatedly to select different
subtitle languages.
Special VCD and SVCD Features
For VCD with Playback Control ( PBC ) feature (version 2.0 only)
Press MENU to toggle between ' PBC On ' and '
PBC Off '.
If you select ' PBC On ', the disc menu ( if
available ) will appear on the TV.
Use the number buttons ( 0-9 ) to select a play
option.
Press PREV
/ NEXT
to go to the previous
or next track.
When PREV
is pressed after the 5 seconds
of playback, playback will start from the beginning of
the current track. If you press the button within the 5
seconds, playback will start from the beginning of the
preceding track.
Helpful hint:The operating features described here might not be possible for certain discs.
Always refer to the instructions supplied with the discs.
16
English
Playback Feature
Playback Feature
English
During playback, pressing RETURN will return to
the menu screen (if PBC is on).
If you want to skip the index menu and playback
directly from the beginning.
Press MENU on the remote control to turn the PBC
off.
Playing a DivX® Disc
This DVD player supports the DivX® movie playback
that you download from your computer onto a CDR/RW or DVD+R/RW (see pages 13-14 for more
information).
Load a DivX® disc.
The data disc menu appears on the TV screen.
Press / to select the folder and press OK to
open the folder.
Press / to select a file.
Press OK to confirm.
Press SUBTITLE on the remote control will turn
on or off the subtitle.
If multilingual subtitles are embedded on the DivX®
disc, pressing SUBTITLE will change the subtitle
language during playback.
Tips:
–Subtitle files with the following filename extensions
(.srt, .smi, .sub, .ssa, .txt, .ass) are supported but do
not appear on the file navigation menu.
–The subtitle filename (.sub) has to be saved under
the same filename as the movie (.avi) in the same
folder.
[For example, Folder A: abc.avi and abc.sub]
Playing MP3/JPEG/ Kodak picture CD
A
B
C
D
IMPORTANT!
You have to turn on your TV and set to
the correct Video In channel. (See page
12, ‘ Finding your viewing channel ‘ ).
General Operation
A Load a disc.
The disc reading time may exceed 30 seconds
due to the complexity of the directory/file
configuration.
The data disc menu and ID3 (MP3) information
(including at least title, singer and album) appears
on the TV screen.
Filter
B Press / to select the folder and press OK to
open the folder.
C Press / to select a track/file.
D Press OK to confirm.
Tips:
- If you highlight on a jpeg file, a preview will appear.
- During MP3 playback, the LED will display the
elapsed time of the current playback.
- During JPEG playback, the LED will display the file
number.
Playback Selection
Press PLAY/PAUSE
repeatedly to pause/
resume playback.
For MP3
Within the first 5 seconds, press PREV
to go
back to the previous track.
After the first 5 seconds of playback, press PREV
to go back to the beginning of current track.
During playback, press
/
to access fast
forward or fast reverse with the required speed: X2,
X8, X30, X100.
Play modes for DivX® /MP3/Audio
A
B
C
D
E
CD/JPEG
You are able to modify the play modes through the
toolkit which appears on the right of below picture
on the screen. Press / to navigate between the
windows and / buttons to select files/ tracks or
play mode items. Then press OK . Please refer to
below steps to playback files /tracks in the Program
View list:
Select Edit Mode in the toolkit then press OK to
start edit mode.
Select a file/track or more files/tracks you want in the
original view list.
Select Add To Program in the toolkit then press
OK. ' √ ' will disappear from screen. It means that the
files/tracks you have selected already added into the
Program View list.
Select Program View in the toolkit then press OK to
open the file/track in the Program View list that you
already selected in step B.
Press PLAY / PAUSE
to playback all files/tracks
in the Program View list.
Filter
The Toolkit has the following play mode items:
Filter ( Audio/Photo/Video ): Sets file filters
(Filter is not applicable to Audio CD.)
Repeat (Off/Single/ All):
Off:
Resumes normal playback
Single:Repeats the current track/file.
All:
Repeats all files on the current folder or all tracks on the disc.
Mode(Normal/Random)
This mode can also be toggled by using RANDOM
button.
Normal: Resumes normal playback
Random: Playbacks track/file in random order.
During MP3/CD-DA/JPEG /DivX® files playback;
- If Repeat All (or Repeat Off) and Random are
selected, all the tracks will be played randomly and
endlessly.
- If Repeat Single is selected, Random cannot be
Helpful hint:The operating features described here might not be possible for certain discs.
Always refer to the instructions supplied with the discs.
17
During playback, you can;
/ NEXT
to select the
Press PREV
previous/next track/file in the current folder.
selected and vice versa..
Edit Mode: Program operation works only when
Edit Mode is selected. After finished storing the files/
tracks you want into the Program View list, select
“Edit Mode” again and press OK to release edit
mode.
Program View: To view tracks/files in the
Program View list. It is disabled if the Program View
list is empty.
Add To Program: Add files/tracks to the Program
View list. It is disabled if Edit Mode is not selected.
(The maximum number of files/tracks can be added
is 30.)
Browser View: To view files/tracks in the Original
View list.
Clear Program: Delete the files/tracks in the
Program View list.
Select a file/track or more you want to delete in
stop mode.' √ ' will appear besides the deleted file/
track. Select Clear Program and then press OK . It
is disabled if Edit mode is not selected.
Preview ( JPEG)
During playback, press TITLE to view a page of 9
thumbnail images.
Use / / / to select an image.
Press OK to view the selected image in full-screen
and subsequent images will be displayed one after
another automatically. See page 21 for JPEG Interval
setting.
/ NEXT
to view the previous
Press PREV
or next thumbnail screen.
Zoom picture ( JPEG)
During playback, press ZOOM repeatedly to
display the picture with different scales.
Use / / / to view the zoomed picture.
Rotate picture (JPEG)
During playback, press / / / to rotate the
picture on the TV screen.
/ : flip the picture vertically by 180º
: rotate the picture anti-clockwise by 90º
: rotate the picture clockwise by 90º
Tip:
- It may not be possible to play certain MP3/JPEG
disc due to the configuration and characteristics of
the disc or condition of the recording.
MP3 Converter
MP3 converter helps you to convert the tracks in
Audio CD to MP3 into an USB device.
When playing a CD disc, make sure there is an USB
device properly connected to the player.
Stop
Contents
Track01
Track02
Track03
Track04
Track05
Track06
Track07
Track08
Convert
Destination:
Select all
Speed
: Normal
A vailable space:
0 MB
Size of selected:
0MB
SACD,CD-G, DTS CDs and Copy-protected CDs
cannot be converted to MP3.
A
B
C
D
E
F
G
Some copy-controlled CDs cannot be converted to
MP3.
Use / / / in remote control to select
“Convert” button on the screen, then press OK. The
play state changes to STOP, and there will be toolkit
for MP3 converter which appears on the right of
below picture on the screen. You are able to convert
CDA to MP3 through the toolkit. Press / to
navigate between the windows and / buttons to
select tracks or convert mode items, then press OK .
Select Destination in the toolkit then press OK.
Then there will appear a list of devices, select a USB
device which you want to convert MP3 to and then
press OK. It will take a few seconds to identify the
USB device.
Select a track or more tracks you want to convert
in the original view list. '√ ' will appear in front of the
track(s) for your selection.
The second item of the toolkit is “Select all” if no
tracks have been selected or “Unselect all” if you
have choose one or more tracks. Select “Select
all” in the toolkit then press OK to select all tracks
to convert .Select “Unselect all” to clear all the
tracks you have chosen and then press OK, '√ ' will
disappear from screen. It means that the tracks
you have selected already been removed from the
converting list.
Select Speed in the toolkit then press OK to choose
the converting speed.
Select Quality in the toolkit then press OK to select
the quality of the converted MP3.
Select Create ID3 in the toolkit then press OK to
create or not to create ID3 with the converted MP3. It
can be selected only if the CD with CD TEXT in it.
Select “Converting start” then press OK to start the
converting.
In "Convert" mode, you can use / / /
in remote control to select "Contents" to return to
normal play mode toolkit to select tracks for playback
(see page 17). You cannot select "Contents" when
"Converting start" is in progress.
Speed (Normal/High)
Normal: Convert the track in a speed of playing
it and player will play the track which is being
converted while converting;
High: For High speed it will not play the converting
track but it converts faster.
Quality (Best/High/Medium/Low)
Best: The converted MP3(s) with the biggest transfer
bit rate and the biggest size.
High: The converted MP3(s) with the bigger transfer
bit rate and the bigger size.
Medium: The converted MP3(s) with the normal
transfer bit rate and the normal size.
Low: The converted MP3(s) with the smallest
transfer bit rate and the smallest size.
Create ID3 (On/Off)
On: Create ID3 with the converted MP3.
Off: Does not create ID3 with the converted MP3.
Tips:
-The player can only support up to 500 files or 198 folders.
If there are more than 500 files or 198 folders total in disc
and USB as a result of this converting, converting will
be stopped and a message “Too many files or folders in
device!” will appear on the screen.
(The total number of files in the CD which user would like
Helpful hint:The operating features described here might not be possible for certain discs.
Always refer to the instructions supplied with the discs.
18
English
Playback Feature
Playback Feature/DVD Menu Options
English
to convert and the number of files which already stored in
the USB should be less than 500 files.)
- You can find the converted MP3 files in the folder named
“CONVERT” in the USB device; For every converting, a new sub directory by the name
between “000” to “196” will be created. Software will
search for an empty slot between “000” to “196” to create
the new folder.
If there are other folders in disc or USB, it will be smaller
than 196.
- During the converting process, do not pull out the USB
flash memory .
- The connection may not be available depending on the
type of your USB flash drive.
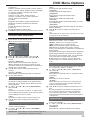
This DVD Player setup is carried out via the TV,
enabling you to customise the DVD player to suit
your particular requirement.
Using the Language setup menu
A Press SETUP on the remote control.
The system setup menu appears.
OSD language
: English
Language
Subtitle
Video
Audio
:Off
DivX Subtitle
:Standard
Audio
: English
DVD Menu
: English
Rating
Playing USB Flash Memory
Misc
You can play or view the data files (JPEG, DivX® and
MP3) in the USB flash memory. However, editing or
copying the data file is not possible.
USB
USB
B Press / to select {Language }, then press .
C Press / to select an item, then press to
access.
Example: { OSD language }
The options for the selected item appears.
If the selection in the menu is greyed out, that
means the feature is not available or not possible to
change at the current state.
D Use / to select a setting and press OK to
confirm.
Example: { English }
The setting is selected and setup is completed.
E To exit, press SETUP.
OSD Language
This menu contains various language options for the
language displayed on the screen. These menus contain various language options
for Subtitle, Audio and DVD Menu which may be
recorded on the DVD.
Tips:
-Some DVD video discs may be set to display
subtitles in a different language other than your
selection. A prior subtitle language may be
programmed on the disc.
-Some DVD video discs allow you to change subtitle
selections only via the disc menu. If this is the case,
press the MENU button and choose the appropriate
subtitle language from the selection on the disc
menu.
-Some DVD video discs may not be played in a
different audio language that you selected. A prior
language may be programmed on the disc.
-Some DVD discs may not include your pre-selected
language . In this case, the DVD player
automatically displays disc menus consistent with
the disc’s initial language setting.
Subtitle/Audio/DVD Menu
A Plug the USB flash memory directly to the USB jack
on the front of this unit.
B Press USB on the remote control to call up the DISC/
USB mode selection menu.
C Use / to select “USB”, then press OK to access
the data in the drive.
D Use / to select a desired file and press OK to
start playback.
It only supports FAT format (FAT 12/16/32). It does
not support NTFS.
The maximum USB flash memory capacity
supported is according to FAT32 file system
specification. It cannot playback files whose file size
exceed the FAT 32 file system specification.
For more playback information, see ‘Playing MP3/
JPEG/Kodak picture CD’ for details.
E Press STOP x to stop playback.
F6Press USB on the remote control, then select DISC
by using OK button to exit from the menu and switch
to disc mode.
You can remove the USB flash memory now.
Tips:
- The unit can only support up to a maximum of 200
folders and 500 files.
- When connecting USB jack , use USB flash
memory only.
- Copy-protected files are not playable.
- The connection may not be available depending on
the type of your USB flash memory.
Helpful hint: Press to go back to previous menu item.
Press SETUP to exit the menu item.
19
DivX® Subtitle
If your DivX® files include a subtitle file (see page
17 for the supported file formats), you may select a
supported DivX® subtitle language by region.
A In ‘Language’, press / to select
{ DivX Subtitle }, then press .
{ Standard }
Albanian, Danish, Dutch, English, Finnish, French,
Gaelic, German, Italian, Kurdish (Latin), Norwegian,
Portuguese, Spanish, Swedish and Turkish.
{ Central European }
Albanian, Croat, Czech, Dutch, English,
German, Hungarian, Irish, Polish, Romanian,
Slovak, Slovene and Sorbian.
{ Cyrillic }
Bulgarian, Belorussian, English, Macedonian,
Moldavian, Russian, Serbian and Ukrainian.
{ Greek }
English and Modern Greek only.
{ Hebrew }
English and Modern Hebrew only.
B Use / to select a setting and press OK to confirm.
Using the Video setup menu
TV System
A Press SETUP on the remote control.
The system setup menu appears.
Aspect Ratio
View Mode
: Auto Fit
Video
TV System
: PAL
Video Out
Audio
: 4:3
4:3
Language
{ Fill }
Fill the screen with decoded image.
{ Original }
Display image as its original size.
{ Height Fit }
Fit the screen height with image height.
{ Width Fit }
Fit the screen width with image width.
{ Auto Fit }
Automatically display the decoded image on screen
at a suitable size.
{ Pan Scan }
Automatically display decoded image on full screen
without distortion.
B Use / to select a setting and press OK to
confirm.
Tip:
-Depending on the type of disc, you may not be able
to view the mode as selected.
:RGB
Smart Picture
: Standard
JPEG Interval
: 5 Seconds
Rating
Misc
B Press / to select { Video }, then press
C Press / to select an item, then press to
access.
Example: { Video Out }
The options for the selected item appears.
If the selection in the menu is greyed out, that
means the feature is not available or not possible to
change at the current state.
D Use / to select a setting and press OK to
confirm.
Example: { P-Scan }
The setting is selected and setup is completed.
E To exit, press SETUP.
Aspect Ratio
The picture shape can be adjusted to fit your TV and
the format must be available on the playback disc.
Otherwise, the TV display will not affect the picture
during playback.
A In ' Video ', press / to select {Aspect Ratio },
then press .
{ 4:3 }
Select this if you have a normal TV. A 'wide-screen'
source display with black bars on the top and bottom
will be displayed on the TV screen.
B
Use view mode to scale an image that fits to the TV
screen's width and height.
A In ' Video ', press / to select { View Mode },
then press .
Video Out
The video output of the DVD player can be selected
as “Component”, “RGB” or “P-Scan”.
A In ' Video ', press / to select { Video Out }, then press .
{ Component }
Select this for composite video or component video
connection.
{ RGB }
Select this for Scart connection.
{ P-Scan }
Select this when you connect your DVD player to
your TV, which has component video inputs that
supports progressive scan.
B Use / to select a setting and press OK to confirm.
If the progressive scan feature is activated but
the connected TV does not support progressive
scan, press number button “1” with the disc tray
opened to set the video output of the DVD player to
“Component”.
{ 16:9 }
Select this for wide-screen TV (frame ratio 16:9).
Use / to select a setting and press OK to
confirm.
View Mode
The video standard of the DVD player output can be
selected from “NTSC”, “PAL” or “Multi”.
{ NTSC }: Select if your TV system is NTSC.
{ PAL }: Select if your TV system is PAL.
{ Multi }: The DVD video player automatically
identifies PAL or NTSC video system of a disc.
Connect a multisystem TV (PAL/NTSC compatible) to
view a picture.
A playback picture may be distorted when detected a
signal change between PAL and NTSC on the disc.
For the case of Progressive mode, your multisystem
TV must be able to support 525p and 625p.
With the disc tray opened, you can also press
number button “3” to switch between “NTSC” and
“PAL”.
Smart Picture
This DVD player provides four predefined sets of picture color settings.
A In ' Video ', press / to select {Smart Picture },
then press .
{ Standard }
Select this for a preset standard picture setting.
Helpful hint: Press to go back to previous menu item.
Press SETUP to exit the menu item.
20
English
DVD Menu Options
DVD Menu Options
English
{ Vivid }
Select this to make the picture brighter.
{ Cool }
Select this to make the picture softer.
{ Personal }
Select this to personalize your picture color by
adjusting the brightness, contrast, tint and color
(saturation).
B Use / to select a setting and press OK to
confirm.
C If you select { Personal }, then proceed to steps
D~G.
The setup menu appears.
0
Brightness
0
Contrast
0
Tint
0
Color
Close
D Press / to highlight one of the following options.
Brightness
Increase the value to brighten the picture or vice
versa. Choose zero (0) for average setting.
Contrast
Increase the value to sharpen the picture or vice
versa. Choose zero (0) to balance the contrast.
Tint
Increase the value to darken the picture or vice
versa. Choose zero (0) for average setting.
Color
Increase the value to enhance the colour in your
picture or vice versa. Choose zero (0) to balance the
colour.
E Press / to adjust the setting that best suits
your personal preference.
F Repeat steps D~ E to adjust your picture
preference.
G Press / to select 'Close' and press OK to
confirm.
JPEG Interval
You can continuously playback all JPEG files
automatically. Set “JPEG Interval” to “5 Seconds”,
“10 Seconds” or “15 Seconds”.
A In ' Video ', press / to select { JPEG Interval }, then press .
{ Off }
Plays back one file at a time.
{ 5 Seconds }
Plays back images in the form of a slide show at 5
seconds intervals.
{ 10 Seconds }
Plays back images in the form of a slide show at 10
seconds intervals
{ 15 Seconds }
Plays back images in the form of a slide show at 15
seconds intervals
B Use / to select a setting and press OK to
confirm.
Helpful hint: Press to go back to previous menu item.
Press SETUP to exit the menu item.
21
Using the Audio setup menu
A Press SETUP on the remote control.
The system setup menu appears.
: All
Language
Digital Output
Night Mode
: Off
Video
Down Sampling
: On
3D Effects
: Off
Audio
Rating
Misc
B Press / to select { Audio }, then press .
C Press / to select an item, then press to
access.
Example: { Night Mode }
The options for the selected item appears.
If the selection in the menu is greyed out, that
means the feature is not available or not possible to
change at the current state.
D Use / to select a setting and press OK to
confirm.
Example: { On }
The setting is selected and setup is completed.
E To exit, press SETUP.
Digital Output
Night Mode
Select this if you connect to a multichannel decoder/
receiver.
A In 'Audio', press / to select { Digital Output },
then press .
{ Off }
To deactivate the digital audio output. For example, if
you use the AUDIO OUT jacks to connect to a TV or
stereo system.
{ PCM }
Select this if the connected device is not capable of
decoding multichannel audio. The DVD player will
convert the Dolby Digital signal to PCM (Pulse Code
Modulation).
{ All }
Select this if the connected device has a built-in
multichannel decoder that supports one of the multichannel audio format (Dolby Digital, DTS).
B Use / to select a setting and press OK to
confirm. Tip:
-When playing MPEG, MP3 and set Digital Output to
{All}, the player will output PCM signals.
This mode optimizes playback of sound at low
volume. High volume outputs will be softened and
low volume outputs are brought upward to an audible
level.
A In ' Audio', press / to select { Night Mode },
then press .
{ Off }
Turns off night mode feature. Select this to enjoy the
surround sound with its full dynamic range.
{ On }
Select this to set low volume output. This feature
is only available for movie discs with Dolby Digital
mode.
B Use / to select a setting and press OK to
confirm.
Down Sampling
A
You can enable and disable the digital signal for
better sound output quality.
In 'Audio', press / to select { Down
Sampling }, then press .
{ Off }
If your amplifier / decoder is compatible with 96 KHz
PCM, select “ Off “ . Sound is sampled at 96 KHz.
{ On }
If your amplifier / decoder is not compatible with 96
KHz PCM, select “ On “ . Sound recorded at 96 KHz
is down sampled to 48 KHz.
B Use / to select a setting and press OK to
confirm.
Tip:
- When playing back disc with copyright protection,
the sound will be down sampled to 48 KHz even
when you select Down Sampling off.
3D Effects
To obtain expansive virtual surround sound effects
from two speakers, set 3D Effects to on. This
enhancement sounds only output from the Analogue
AUDIO OUT (L / R) jacks of the DVD player.
A In 'Audio', press / to select { 3D Effects }, then
press .You can set to { Off } or { On }.
B Use / to select a setting and press OK to
confirm.
Tip:
- Only effective in playback of a DVD Video disc with
Dolby Digital 5.1 bitstream.
Using the Rating setup menu
A Press SETUP on the remote control.
The system setup menu appears.
Language
Parental control
A
B
C
D
: 8.Adult
Set Password
Video
Audio
Rating
Misc
Press / to select {Rating }, then press .
Press / to select an item, then press to
access.
Example: { Parental control }
The options for the selected item appears.
If the selection in the menu is greyed out, that
means the feature is not available or not possible to
change at the current state.
D Use / to select a setting and press OK to
confirm.
Example: { 8. Adult }
The setting is selected and setup is completed.
E To exit, press SETUP.
Rating Level settings
B
C
Depending on the DVD, you may be asked to
change the parental level while playing the disc. The
rating levels are from 1 to 8 and are country
dependent. You can prohibit the playing of certain
discs that are not suitable for your children, or have
certain discs played with alternative scenes.
In ' Rating ', press / to select {Parental control },
then press .
Use the number buttons to enter the four-digit
password, then press OK.(See ‘Changing the
Password’ on this page.)
Press OK again to list the parental level.
{ 1.Kid Safe }
Suitable for children.
{ 2. G }
General Audience; recommended as acceptable for
viewers of all ages.
{ 3. PG }
Parental Guidance suggested.
{ 4. PG-13 }
Unsuitable for children under 13.
{ 5. PG-R }
Parental Guidance Recommended.
{ 6. R }
Restricted; under 17 requires accompanying parent
or adult guardian.
{ 7. NC-17 }
No one under 17 admitted.
{ 8. Adult }
DVD softwares of any grades (adult/general/children)
can be played back. Should be viewed only by adults
due to graphic sexual material, violence or language.
Use / to select a rating level and press OK to
confirm.
Select { 8.Adult } to disable parental level and
allow all discs to play.
DVDs that are rated higher than the level you
selected will not play unless you enter your four-digit
password.
Tips:
-This feature will not limit viewing if the disc
manufacturer did not code the disc.
-VCD, SVCD, CD have no level indication, so
parental control has no effect on these type of discs.
This also applies to most illegal DVDs.
-Some DVDs are not coded with a rating though the
movie rating may be printed on the disc cover. The
rating level feature does not prohibit play of such
discs.
Changing the Password
You need to enter your four-digit password to play a
prohibited disc or if prompted for a password.
A In 'Rating', press / to select {Set Password },
then press OK.
You will be prompted to enter your four-digit
password.
Enter Password
B Use the number buttons ( 0-9 ) to enter the four-digit
password, then press OK.
When doing this for the first time, enter the default
password '0000 '.
If you forget your old four-digit password, enter the
default password ' 0000'.
C Press OK again to enter the new four-digit password.
The new four-digit password will now take effect.
Enter New Password
D Press OK to confirm.
Helpful hint: Press to go back to previous menu item.
Press SETUP to exit the menu item.
22
English
DVD Menu Options
DVD Menu Options
English
Using the Misc (Miscellaneous) setup
menu
A Press SETUP on the remote control.
The system setup menu appears.
Use Default Settings
Language
DivX Registration
Video
DivX Deregistration
Audio
Rating
Misc
Press / to select { Misc }, then press .
Press / to select an item, then press OK to
access.
Example: { Use Default Settings }
The options for the selected item appears.
If the selection in the menu is greyed out, that
means the feature is not available or not possible to
change at the current state.
D Use / to select a setting and press OK to
confirm.
Example: { No }
The setting is selected and setup is completed.
E To exit, press SETUP.
Restoring to original settings
Setting the { Use Default Settings } function will reset
all options and your personal settings to the factory
defaults, except your password and rating level.
A In 'Misc', press / to select { Use Default
Settings }, then press OK.
The menu will appear.
B
C
- Time search feature is available during DivX® movie
playback.
®
DivX Deregistration
®
DivX deregistration code is used for deregistering
the DVD player from the DivX® VOD service through
the DivX® website.
For more information, visit website:
www.divx.com/vod.
About how to obtain DivX® deregistration code and
DivX® registration code, pls see below:
A The “DivX Registration” should be selectable and
the “DivX Deregistration” is grayed out before the
DVD player is registered. You can select “DivX
Registration” and press OK on remote control to get
the 10-character DivX VOD Registration Code and
register the DVD player at http://www.divx.com/vod;
B The “DivX Registration” is grayed out and the “DivX
Deregistration” is selectable when the DVD player
is registered for the first time. You can select “DivX
Deregistration” to get the 8-character deregistration
code, then deregister the DVD player at
http://www.divx.com/vod;
C Both “DivX Registration” and “DivX Deregistration”
are selectable when the DVD player is deregistered
(not the first time registered or not registered). You
can select “DivX Registration” to get the 10-character
DivX VOD Registration Code or select “DivX
Deregistration” to get the 8-character deregistration
code, then use the code to register/deregister the
DVD player at http://www.divx.com/vod.
Tray Lock
Use Default Settings
Use Default Settings
Yes
No
{ Yes }
Select this to reset to factory default settings.
{ No }
Select this to close the menu.
Use / to select a setting and press OK to
confirm.
C To exit, press SETUP.
B
®
DivX Registration
®
DivX registration code allows you to rent and
®
purchase movies using the DivX VOD service from
the internet.
For more information, visit website:
www.divx.com/vod.
A In ‘Misc’, press / to select { DivX Registration },
then press OK.
The registration code will appear.
B Use the registration code to rent or purchase the
®
movies from DivX VOD.
Registration service at www.divx.com/vod.
Follow the instructions and download the movie
from your computer onto a CD-R/RW or DVD+R/RW
for playback on this DVD player.
Tips:
- All the downloaded movies from DivX® Registration
can only be played back on this DVD player.
23
Press SETUP button, then press the number button
"2006" in sequence to lock the tray.
All functionality of the player and playback remain
the same except for the OPEN/CLOSE button.
After the tray is locked, "Tray Lock Is On" will
appear on the screen when OPEN/CLOSE is
pressed.
To unlock the tray, just follow the same procedure
as above.
Specifications
English
DVD Player/Outputs/Supplied Accessories
DVD Player
Power supply
110 V - 240 V AC, 50/60 Hz
Power Consumption
12W ( standby :<1W )
Net weight
1.48 kg
External dismensions
430 X 43 X 209 mm (W/H/D)
Signal System
PAL, NTSC
Laser
Semiconductor laser, wavelength 657/790 nm
Frequency range
DVD linear sound : 48 kHz sampling 4 Hz to 22 kHz
96 kHz sampling 4 Hz to 44 kHz
Signal-to-noise ratio
More than 90 dB
Audio dynamic range
More than 80 dB
Harmonic distortion
Less than -65 dB
Wow and flutter
Below measurable level [less than + 0.001 % ( W.PEAK )]
Operating conditions
Temperature : 5 C to 35 C Operation status :Horizontal
O
O
Outputs
Video output
1.0 V ( p-p ), 75 Ω, pin jack x 1
Video output (SCART) 1.0 V ( p-p ), 75 Ω, SCART socket x 1
Component video output
(Y) 1.0 V (p-p), 75 Ω, pin jack x 1
(P B)/(P R) 700 mV (p-p), 75 Ω, pin jack x 2
Audio output (SCART)
2.0 V (rms), 10K Ω, SCART socket x 1
Audio output (COAXIAL DIGITAL)
0.5 V (p-p), 75 Ω, pin jack x 1
Audio output (ANALOG)
2.0 V (rms), 10K Ω, pin jacks (L/R) x 1
Supplied Accessories
Remote control(SE-R0335)
OPEN/CLOSE
DISPLAY
1
2
4
5
7
8
+10
0
ON/STANDBY
3
6
9
T-SEARCH
MENU
Batteries(AAA)
SETUP
OK
TITLE
RETURN
F.R
STEP
REPEAT
F.F
RANDOM
PREV
PLAY/PAUSE
A-B
SUBTITLE ANGLE
NEXT
STOP
SLOW
CLEAR
AUDIO
ZOOM
PROG
S E -R 0268
The model complies with the above specifications.
Designs and specifications are subject to change without notice.
This model may not be compatible with features and /or specifications that may be added in the future.
24
Troubleshooting
English
WARNING
Under no circumstances should you try to repair the DVD player yourself, as this will invalidate the
warranty. Do not open the DVD player as there is a risk of electric shock.
If a fault occurs, first check the points listed below before taking the DVD player for repair. If you are unable
to remedy a problem by following these guides, consult your dealer or TOSHIBA for help.
Problem
Solution
No power
-Check if the AC power cord is properly connected.
-Press the I/2ON/STANDBY on the front of the DVD player
to turn on the power.
No picture
-Refer to your TV' s manual for correct Video In channel
selection. Change the TV channel until you see the DVD
screen.
-Check if the TV is switched on.
-If the progressive scan feature is activated but the connected
TV does not support progressive signals or the cables are
not connected accordingly. See pages 12-13 for proper
progressive scan set up or deactivate the progressive scan
feature as follow:
1) Press OPEN/CLOSE on the DVD Player. 2) When the disc tray is opened, press number button'1'on
the remote control for a few seconds.
Distorted picture
-Sometimes a small amount of picture distortion may
appear depending on the disc being played back. This is not
a malfunction.
Picture clipped
-May be caused by View Mode Setting (see page 20). Set to
Original for normal viewing.
Completely distorted picture or
black /white picture with DVD.
-Connect DVD Player directly to the TV.
-Make sure the disc is compatible with the DVD player.
-Ensure that the DVD Player's setting is set to match that of
the disc and your TV.
No sound / distorted sound
-Adjust the volume.
-Check that the speakers are connected correctly.
No audio at digital output
-Check the digital connections.
-Check if your receiver can decode MPEG-2 or DTS and if not,
please make sure the digital output is set to PCM.
-Check if the audio format of the selected audio language
matches your receiver capabilities.
No sound and picture
-Check that the cable is connected to the correct device (See
Connecting to television).
Disc cannot be played
-The DVD+R/RW must be finalized and in Video mode
format.
-Ensure the disc label is facing up.
-Check if the disc is defective by trying another disc.
-Wrong region code.
Picture freezes momentarily during playback
-Check the disc for fingerprint/scratches and clean with a soft
cloth wiping from centre to edge.
No return to start-up screen when disc is removed
-Reset the unit by switching the player off, then on again.
The player does not respond to the Remote Control
-Aim the Remote Control directly at the sensor on the front of
the player.
-Reduce the distance to the player.
-Replace the batteries in Remote Control.
-Re-insert the batteries with their polarities(+/- signs)as
indicated.
Buttons do not work
25
-To completely reset the player, unplug the AC cord from AC
outlet for 5-10 seconds.
Troubleshooting
Solution
-Operations may not be permitted by the disc.
Refer to the instructions of the disc jacket.
DVD Player cannot read CDs /DVDs
-Use a commonly available cleaning CD/DVD to clean
the lens before sending the DVD Player for repair.
Menu items cannot be selected
-Press STOP twice before selecting system setup
menu.
-Depending on the disc availability,some menu items
cannot be selected.
Unable to select Progressive Scan on/off
-Ensure that the output of the Video Out signal is
switch to P-Scan/Component.
26
English
Problem
Player does not respond to some operating
commands during playback.
Glossary
English
Analogue audio:
An electrical signal that directly
represents sound. In contrast,
digital audio can also be an electrical
signal, but is an indirect
representation of sound. See also
Digital audio.
Aspect ratio:
The width of a TV screen relative to
it is height. Conventional TVs are 4:3
(i.e., the screen is almost square).
Widescreen models are 16:9 (the
screen is almost twice as wide as its
height)
AUDIO OUT jacks:
Jacks on the back of the DVD System
that send audio to another system (TV,
Stereo, etc.)
Bit rate:
The amount of data used to hold a
given length of music; measured in
kilobits per seconds, or kbps. Or, the
speed at which you record.Generally,
the higher the bit rate, or the higher the
recording speed, the better the sound
quality. However, higher bit rates use
more space on a disc.
Chapter:
Just as a book is split up into
several chapters, a title on a DVD
disc is usually divided into chapters.
See also Title.
Digital audio:
An indirect representation of sound
using numbers. During recording,
the sound is measured at discrete
intervals (44, 100 times a second
for CD audio) by an analogue-to
-digital converter, generating a
stream of numbers. On playback, a
digital-to-analogue converter
generates an analogue signal based on
these numbers. See also
Sampling frequency and Analogue
audio.
Disc menu:
A screen display prepared for
allowing of selection of images, sound,
subtitle, multi-angles etc. recorded on
the DVD.
27
DivX®:
DivX® is a codec (compression/decompression) that can compress
images to a very small amount of data.
Dolby® Digital:
A system developed by Dolby
Laboratories that compresses
digital sound. It works with stereo
(2ch) or multi-channel audio.
®
DTS :
(Digital Theater System)
DTS is a Multi-channel surround
sound system, but it is different from
Dolby Digital. DTS format was developed by Digital Theater Systems, Inc.
JPEG:
(Joint Photographic Experts Group)
JPEG is a method of compressing
still image files. You can copy JPEG
files on CD-RW / R or DVD+R / RW
discs from a computer and play back
the files on this unit.
MP3:
(MPEG Audio Layer 3)
MP3 is a method of compressing
files. You can copy MP3 files on
CD-RW / R or DVD+R / RW discs from
a computer and play back the files on
this unit.
Multichannel:
DVD is specified to have each sound
track constitute one sound field. Multichannel refers to a structure of sound
tracks having three or more channels.
Parental control:
A function of the DVD to limit playback
of the disc by the age of the users
according to the limitation level in each
country. The limitation varies from disc
to disc; when it is activated, playback
will be prohibited if the software’s level
is higher than the user-set level.
PBC (Video CD only):
(Playback Control)
This function enables you to play
back interactive software using a
menu screen. See also Title.
Progressive scan:
It displays all the horizontal lines of
a picture at one time, as a signal
frame. This system can convert
the interlaced video from DVD into
progressive format for connection to
a progressive display. It dramatically
increases the vertical resolution.
PCM:
(Pulse Code Modulation)
PCM is a format that converts audio
into digital data. It is mainly used for
Audio CDs and DAT. This unit can
play back sounds as realistic as
possible by converting even compressed Dolby Digital and MPEG
audio to PCM.
Region code:
Regions associate discs and players
with particular areas of the world.
This unit will only play back discs
that have compatible region codes.
You can find the region code of your
unit by looking on the rear panel.
Some discs are compatible with
more than one region (or all regions).
Sampling frequency:
The rate at which sound is measured
by a specified interval to turn it into
digital audio data. The number of
samples in one second is defined as
the sampling frequency. The higher
the rate is, the better the possible
sound quality.
Title:
(DVD)
A collection of chapters on a DVD.
See also chapter.
(Video CD)
The contents of a Video CD. When
playing back a Video CD with the
PBC function, the title menu will
appear automatically.
Track:
Audio CDs and Video CDs use
tracks to divide the contents of a
disc. The DVD equivalent is called a
chapter. See also Chapter.