1
OGATECH OG-S60/TWIN/
TRIPLE/QUATTRO
USER GUIDE / HANDLEIDING / MANUEL D’UTILISATEUR
GEBRAUCHSANWEISUNG / MANUAL DE USUARIO
MANUAL DO UTILIZADOR / INSTRUKCJA OBSUGI
V 1.2
Important
To use ‘Caller ID’ (display caller), this service has to be activated on your phone line.
Normally you need a separate subscription from your telephone company to activate this
function. If you don’t have the Caller ID function on your phone line, the incoming
telephone numbers will NOT be shown on the display of your telephone.
Belangrijk
Om de ‘Nummerweergave’ te kunnen gebruiken, moet deze dienst geactiveerd zijn op uw
telefoonlijn. Om deze dienst te activeren, hebt U hiervoor meestal een apart abonnement van uw
telefoonmaatschappij nodig. Indien U geen nummerweergavefunctie hebt op uw telefoonlijn,
zullen de inkomende telefoonnummers NIET op de display van uw toestel verschijnen.
Important
Pour utiliser la fonction ‘Caller ID/Clip’ (affichage de l’appelant), ce service doit être activé sur votre
ligne téléphonique. Généralement, vous avez besoin d’un abonnement séparé de votre
compagnie de téléphone pour activer cette fonction. Si vous n’avez pas la fonction
‘Caller ID - Affichage Appelant’ sur votre ligne téléphonique, les numéros de téléphone entrants
n’apparaîtront PAS sur l’écran de votre téléphone.
Wichtig
Zur Verwendung der ‘Rufnummernanzeige’ muss dieser Dienst erst für Ihre Telefonleitung
freigegeben werden. Zur Aktivierung dieser Dienstleistung benötigen Sie meistens ein
separates Abonnement Ihrer Telefongesellschaft.Wenn Sie für Ihre Telefonleitung keine
Rufnummernanzeigefunktion haben, erscheinen die eingehenden Telefonnummern
NICHT im Display Ihres Gerätes.
Importante
Para poder usar la función “Identificación de llamadas,este servicio tiene que estar dado de alta
en su línea telefónica. Normalmente es necesario abonarse a dicho serviciopara que la compañía
telefónica active esta función. Si su línea telefónica no dispone de la funciónIdentificación de
llamadas, la pantalla del aparato no mostrará los números de teléfono de las llamadas entrantes.
Importante
Para utilizar a função "ID Chamador" (visualizar Chamador), este serviço terá de ser activado na
sua linha telefónica. Normalmente necessita de subscrever este serviço, à parte, com o seu
operador de telecomunicações, para poder activar esta função. Se não tiver contratado este
serviço a função ID do Chamador não estará disponível e por isso os números de telefone das
chamadas entrantes não aparecerão no seu telefone.
Uwaga
Aby urzdzenie prezentowao numer przychodzcy, niezbdna jest usuga prezentacji numeru.
Usug t naley aktywowa u lokalnego operatora telekomunikacyjnego. Jeeli usuga
prezentacji numeru nie jest wczona, numery przychodzcych pocze nie bd prezentowane.
This product is in compliance with the essential requirements and other relevant provisions of the R&TTE directive 1999/5/EC.
The Declaration of conformity can be found on :
http://www.topcom.net/support/cedeclarations.php
UK
The features described in this manual are published with reservation to
modifications.
NL
De in deze handleiding beschreven mogelijkheden worden gepubliceerd onder
voorbehoud van wijzigingen.
F
Les possibilités décrites dans ce manuel sont publiées sous réserve de
modifications.
D
Die in dieser Bedienungsanleitung umschriebenen Möglichkeiten, werden
vorbehaltlich Änderungen publiziert.
ES
Las características descritas en este manual pueden ser objeto de futuras
modificaciones.
PT
As características descritas neste manual são publicadas sob reserva de
modificação.
PL
Waciwoci opisane w niniejszej instrukcji obsugi s publikowane z zatrzeeniem
prawa wprowadzenia zmian.
UK
To be connected to the public analogue telephone network.
NL
Geschikt voor aansluiting op het openbare analoog geschakelde telefoonnetwerk.
F
Il est destiné à être raccordé au réseau de télécommunication public.
D
Kompatibel für den analogen Telefonanschluss.
ES
Conexión a la red telefónica analógica
PT
Para efectuar a ligação com a rede pública analógica.
PL
Do podczenia do publicznej analogowej sieci telefonicznej.
OGATECH OG-S60/TWIN/TRIPLE/QUATTRO
English
1
Description of telephone
13
1.1
1.2
1.3
1.4
Handset and base OGATECH OG-S60
Charger OGATECH OG-S60
Display
Handset indicator (LED)
13
14
14
15
2
Telephone installation
15
2.1
2.2
Connections
Rechargeable batteries
15
16
3
Using the telephone
16
3.1
3.2
3.3
3.4
3.5
3.6
3.7
3.8
3.9
3.10
3.11
3.12
3.13
3.14
3.15
Setting menu language
Handset ON/OFF
Receiving a call
Making an external call
Making an internal call
Internal call transfer
Conference Call
Display of call duration
Microphone mute
Pause Key
Caller Identification
Redial memory
Calling from the phonebook
Using the alphanumerical keypad
Using the menu
16
16
17
17
17
17
17
17
17
18
18
19
19
19
20
4
Personalisation
20
4.1
4.2
4.3
4.4
4.5
4.6
4.7
4.8
4.9
4.10
4.11
4.12
4.13
Adjusting the ring volume
Choosing the ring melody
Speaker volume during call
Activation / Deactivation of beeps
Handset name
Changing the PIN code
Setting the dialling mode
Flash time duration
Automatic answer
Reset
Keypad lock
Setting the time
Setting the alarm
20
20
21
21
21
22
22
22
23
23
23
24
24
5
Advanced functions
24
5.1
5.2
Phonebook
Searching a handset from the base
24
25
6
Managing multiple handsets
26
6.1
6.2
6.3
6.4
Setting up an additional handset
Removing a handset
Setting up a handset on another base
Selecting a base
26
27
27
27
7
Troubleshooting
27
4
OGATECH OG-S60/TWIN/TRIPLE/QUATTRO
OGATECH OG-S60/TWIN/TRIPLE/QUATTRO
8
Warranty
28
8.1
8.2
8.3
Warranty period
Warranty handling
Warranty exclusions
28
28
28
9
Technical characteristics
29
Nederlands
1
Beschrijving van de telefoon
31
1.1
1.2
1.3
1.4
Handset en basis OGATECH OG-S60
Oplader OGATECH OG-S60
Display
Handsetindicator (LED)
31
32
32
33
2
Telefooninstallatie
33
2.1
2.2
Aansluitingen
Herlaadbare batterijen
33
34
3
De telefoon gebruiken
34
3.1
3.2
3.3
3.4
3.5
3.6
3.7
3.8
3.9
3.10
3.11
3.12
3.13
3.14
3.15
Menutaal kiezen
Handset AAN/UIT
Oproepen ontvangen
Een externe oproep
Een interne oproep (INT)
Interne oproep doorschakelen
Conferentiegesprek
Tonen van de gespreksduur
Microfoon uitschakelen (Mute)
Pauzetoets
Identificatie van de beller
Herkies-geheugen
Bellen vanuit het telefoonboek
Het alfanumerieke toetsenbord gebruiken
Het menu gebruiken
34
34
35
35
35
35
35
35
36
36
36
37
37
38
38
4
Personalisering
38
4.1
4.2
4.3
4.4
4.5
4.6
4.7
4.8
4.9
4.10
4.11
4.12
4.13
Belvolume aanpassen
Belmelodie kiezen
Luidsprekervolume tijdens oproep
Bieptonen activeren/desactiveren
Naam van de handset wijzigen
De PIN-code wijzigen
De kiesmodus instellen
Flashtijd instellen
Automatisch opnemen
Reset
Vergrendeling toetsenbord
Klok instellen
Alarm instellen
38
39
40
40
40
40
41
41
41
41
42
43
43
5
Geavanceerde functies
43
5.1
5.2
Telefoonboek
Een intern toestel zoeken via het basistoestel
43
44
OGATECH OG-S60/TWIN/TRIPLE/QUATTRO
5
OGATECH OG-S60/TWIN/TRIPLE/QUATTRO
6
Gebruik van meerdere handsets
45
6.1
6.2
6.3
6.4
Een bijkomende handset registreren
Een handset verwijderen
Een handset installeren op een ander basistoestel
Een basistoestel selecteren
45
46
46
46
7
8
Problemen verhelpen
Garantie
47
47
8.1
8.2
8.3
Garantieperiode
Afwikkeling van garantieclaims
Garantiebeperkingen
47
47
48
9
Technische kenmerken
48
Français
1
Description du telephone
50
1.1
1.2
1.3
1.4
Combiné et base OGATECH OG-S60
Chargeur OGATECH OG-S60
Display
Indicateur du combine (LED)
50
51
51
52
2
Installation du téléphone
52
2.1
2.2
Connexions
Piles rechargeables
52
53
3
Utilisation du téléphone
53
3.1
3.2
3.3
3.4
3.5
3.6
3.7
3.8
3.9
3.10
3.11
3.12
3.13
3.14
3.15
Choix de la langue du menu
Combine ON/OFF
Recevoir un appel
Proceder a un appel externe
Proceder a un appel interne
Transfert interne d'un appel
Conference call
Affichage de la duree de l'appel
Coupure du son du microphone
Touche pause
Identification de l'appelant
Memoire de recomposition de numeros
Appeler depuis le répertoire téléphonique
Utilisation du clavier alphanumérique
Utilisation du menu
53
53
54
54
54
54
54
54
55
55
55
56
56
56
57
4
Personalisation
57
4.1
4.2
4.3
4.4
4.5
4.6
4.7
4.8
4.9
4.10
Reglage du volume du haut-parleur
Choix de la mélodie de la sonnerie
Volume du haut-parleur en cours d’appel
Activation/desactivation des bips
Designation des combinés
Modifier le code PIN
Reglage du mode de composition des numéros
Durée de la fonction Flash Time
Réponse automatique
Remise à zero
57
58
58
59
59
59
60
60
60
60
6
OGATECH OG-S60/TWIN/TRIPLE/QUATTRO
OGATECH OG-S60/TWIN/TRIPLE/QUATTRO
4.11
4.12
4.13
Verrouillage clavier
Régler l’heure
Régler l’alarme
61
62
62
5
Fonctions de pointe
62
5.1
5.2
Répertoire téléphonique
Rechercher un combiné a partir d'une base
62
63
6
Gestion de plusieurs combines
64
6.1
6.2
6.3
6.4
Installer un combiné supplémentaire
Eliminer un combiné
Installer un combiné sur une autre base
Sélectionner une base
64
65
65
65
7
8
Trouble shooting
Garantie
66
66
8.1
8.2
8.3
Période de garantie
Traitement de la garantie
Exclusions de garantie
66
66
67
9
Caracteristiques techniques
67
Deutsch
1
Tasten/LED
69
1.1
1.2
1.3
1.4
Handapparat und Basisstation OGATECH OG-S60
Ladegerät OGATECH OG-S60
Display
Handgerät-Anzeige (LED)
69
70
70
71
2
Installation des telefons
71
2.1
2.2
Anschlüsse
Wiederaufladbare Batterien
71
72
3
Verwendung des Telefons
72
3.1
3.2
3.3
3.4
3.5
3.6
3.7
3.8
3.9
3.10
3.11
3.12
3.13
3.14
3.15
Wahl der Menüsprache
Handgerät AN/AUS
Einen Anruf annehmen
Extern Telefonieren
Intern Telefonieren
Internes Weiterleiten eines externen Anrufs
Konferenzschaltung
Anzeige der Gesprächsdauer
Stummschaltung (mute)
Pausentaste
Rufnummernanzeige
Wahlwiederholungsspeicher
Eine Nummer aus dem Telefonbuch anrufen
Verwendung der alphanumerischen Tastatur
Verwendung des Menüs
72
73
73
73
73
73
73
74
74
74
74
75
75
76
76
4
Persönliche Einstellungen
76
4.1
4.2
4.3
Einstellen der Klingellautstärke
Auswahl der Klingelmelodie
Lautsprecherlautstärke während eines Anrufs
76
77
78
OGATECH OG-S60/TWIN/TRIPLE/QUATTRO
7
OGATECH OG-S60/TWIN/TRIPLE/QUATTRO
4.4
4.5
4.6
4.7
4.8
4.9
4.10
4.11
4.12
4.13
Aktivieren/Deaktivieren von Pieptönen
Handgerät einen Namen geben
Den PIN-Code ändern
Den Wählmodus einstellen
Flash-Zeit
Automatisches annehmen
Reset
Die Tastensperre
Uhr einstellen
Alarm einstellen
78
78
79
79
79
80
80
81
81
81
5
Weitere Funktionen
82
5.1
5.2
Telefonbuch
Handgerät von der Basisstation aus suchen (Paging)
82
83
6
Mehrere Handgeräte verwalten
83
6.1
6.2
6.3
6.4
Ein zusätzliches Handgerät einstellen
Handgerät entfernen
Handgerät an einer anderen Basisstation anmelden
Basisstation auswählen
83
84
84
85
7
8
Problemlösung
Garantie
85
86
8.1
8.2
8.3
Garantiezeit
Abwicklung des Garantiefalles
Garantieausschlüsse
86
86
86
9
Technische Daten
87
Español
1
Descripción del teléfono
89
1.1
1.2
1.3
1.4
Microteléfono y base OGATECH OG-S60
Cargador OGATECH OG-S60
Pantalla
Indicador luminoso del portátil (LED)
89
90
90
91
2
Instalación del teléfono
91
2.1
2.2
Conexiones
Baterías recargables
91
92
3
Uso del teléfono
92
3.1
3.2
3.3
3.4
3.5
3.6
3.7
3.8
3.9
3.10
3.11
3.12
Seleccionar el idioma del menú
Encender y apagar la unidad portátil
Contestar llamadas
Hacer llamadas externas
Hacer llamadas internas
Transferir llamadas internas
Llamada a tres
Visualizar la duración de la llamada
Función secreto
Tecla pausa
Identificación del número llamante
Memoria de rellamada
92
92
93
93
93
93
93
93
93
94
94
95
8
OGATECH OG-S60/TWIN/TRIPLE/QUATTRO
OGATECH OG-S60/TWIN/TRIPLE/QUATTRO
3.13
3.14
3.15
Marcar desde la agenda
Uso del teclado alfanumérico
Uso del menú
95
95
96
4
Personalización
96
4.1
4.2
4.3
4.4
4.5
4.6
4.7
4.8
4.9
4.10
4.11
4.12
4.13
Ajuste de volumen de llamada
Seleccionar la melodía del timbre
Durante la llamada
Activar y desactivar los tonos de aviso
Identificar las unidades portátiles
Cambiar el código PIN
Seleccionar el tipo de marcación
Duración del intervalo de la apertura temporizada (función de la tecla)
Descolgado automático
Reinicio
Bloqueo de teclado
Poner la hora
Poner la alarma
96
96
97
97
97
98
98
98
99
99
99
100
100
5
Funciones avanzadas
100
5.1
5.2
Agenda
Localizar la unidad portátil desde la base
100
102
6
Uso de múltiples unidades portátiles
102
6.1
6.2
6.3
6.4
Añadir otra unidad portátil
Quitar una unidad portátil
Asignar una unidad portátil a otra base
Seleccionar la base
102
103
103
103
7
8
Solución de problemas
Garantia
104
104
8.1
8.2
8.3
Periodo de garantía
Tratamiento de la garantía
Exclusiones de la garantía
104
104
105
9
Especificaciones técnicas
105
Português
1
Descrição do telefone
107
1.1
1.2
1.3
1.4
Terminal & base OGATECH OG-S60
Carregador OGATECH OG-S60
Ecrã
Indicador do Terminal (LED)
107
108
108
109
2
Instalação do Telefone
109
2.1
2.2
Ligações
Baterias Recarregáveis
109
110
3
Uso do telefone
110
3.1
3.2
3.3
3.4
3.5
Config. Menu idiomas (language)
Terminal LIGADO/DESLIGADO (ON/OFF)
Receber uma chamada
Realizar uma chamada externa
Realizar uma chamada interna
110
110
111
111
111
OGATECH OG-S60/TWIN/TRIPLE/QUATTRO
9
OGATECH OG-S60/TWIN/TRIPLE/QUATTRO
3.6
3.7
3.8
3.9
3.10
3.11
3.12
3.13
3.14
3.15
Transferência chamada interna
Chamada Conferência
Ecrã de duração de chamada
Microfone mute
Tecla Pausa
Identificação Chamada
Memória Remarcar
Chamar desde a lista telef
Utilizar o teclado alfanumérico
Utilizar o menu
111
111
111
111
112
112
113
113
113
114
4
Personalizar
114
4.1
4.2
4.3
4.4
4.5
4.6
4.7
4.8
4.9
4.10
4.11
4.12
4.13
Ajustar o volume toque
Escolher a melodia do toque
Volume altifalante durante chamada
Activação / Desactivação dos toques
Nome Terminal
Modificar o código PIN
Configurar o modo marcar
Duração tempo flash
Atendimento automático (Automatic answer)
Reset
Bloquear teclado
Config. a hora
Config. o despertador
114
114
115
115
116
116
116
116
117
117
117
118
118
5
Funções Avançadas
118
5.1
5.2
Lista telef.
Procurar um terminal desde a base
118
120
6
Manejar vários terminais
120
6.1
6.2
6.3
6.4
Programar um terminal adicional
Retirar o terminal
Config. um terminal em outra base
Seleccionar uma base
120
121
121
121
7
8
Resolução de Problemas
Garantia
122
122
8.1
8.2
8.3
Período de garantia
Modo de funcionamento da garantia
Excluído da garantia
122
122
123
9
Características Técnicas
123
Polski
10
Opis telefonu
125
10.1
10.2
10.3
10.4
Suchawka i aparat bazowy OGATECH OG-S60
adowarka OGATECH OG-S60
Wywietlacz
Wska
nik suchawki (LED)
125
126
126
127
11
Monta telefonu
127
11.1
11.2
Poczenia
Akumulatory (baterie adowalne)
127
128
10
OGATECH OG-S60/TWIN/TRIPLE/QUATTRO
OGATECH OG-S60/TWIN/TRIPLE/QUATTRO
12
Uywanie telefonu
128
12.1
12.2
12.3
12.4
12.5
12.6
12.7
12.8
12.9
12.10
12.11
12.12
12.13
12.14
12.15
Ustawienie jzyka menu
WCZENIE/WYCZENIE suchawki
Odebranie poczenia
Wykonanie poczenia zewntrznego
Wykonanie poczenia wewntrznego
Wewntrzne przekazanie poczenia
Poczenie konferencyjne
Wywietlanie czasu trwania poczenia
Wyciszenie mikrofonu
Przycisk pauzy
Identyfikacja rozmówcy
Pami ponownego wybierania
Poczenie z numerem zapisanym w ksice telefonicznej
Uywanie klawiatury alfanumerycznej
Korzystanie z menu
128
128
129
129
129
129
129
129
129
130
130
131
131
131
132
13
Ustawienia indywidualne
132
13.1
13.2
13.3
13.4
13.5
13.6
13.7
13.8
13.9
13.10
13.11
13.12
13.13
Dostosowanie gonoci dzwonka
Wybór melodii dzwonka
Poziom gonoci podczas poczenia
Wczenie / wyczenie d
wików klawiatury
Nazwa suchawki
Zmiana kodu PIN
Ustawienie trybu wybierania
Przecznik czasu Flash
Automatyczne odebranie poczenia
Zresetowanie aparatu
Blokada klawiatury
Ustawienie zegara
Ustawienia budzika
132
133
133
133
134
134
134
135
135
135
136
136
137
14
Funkcje zaawansowane
137
14.1
14.2
Ksika telefoniczna
Wyszukanie suchawki za pomoc aparatu bazowego
137
138
15
Zarzdzanie wieloma suchawkami
138
15.1
15.2
15.3
15.4
Przyczenie dodatkowej suchawki
Wyrejestrowanie/kasowanie suchawki
Rejestracja suchawki w innym aparacie bazowym
Wybór aparatu bazowego
138
139
139
140
16
17
Rozwizywanie problemów
Gwarancja
140
141
17.1
17.2
17.3
Okres gwarancji
Obsuga gwarancji
Wyjtki od gwarancji
141
141
141
18
Dane techniczne
141
OGATECH OG-S60/TWIN/TRIPLE/QUATTRO
11
OGATECH OG-S60/TWIN/TRIPLE/QUATTRO
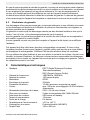
Safety Instructions
•
•
•
•
•
•
•
•
•
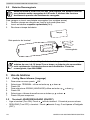
Only use the charger plug supplied. Do not use other chargers, as this may damage the
battery cells.
Only insert rechargeable batteries of the same type. Never use ordinary, nonrechargeable batteries. Insert rechargeable batteries so they connect to the right poles
(indicated in the battery compartment of the handset).
Do not touch the charger and plug contacts with sharp or metal objects.
The operation of some medical devices may be affected.
The handset may cause an unpleasant buzzing sound in hearing aids.
Do not place the basic unit in a damp room or at a distance of less than 1.5 m away from
a water source. Keep water away from the handset.
Do not use the telephone in environments where there is a risk of explosions.
Dispose of the batteries and maintain the telephone in an environment-friendly manner.
As this telephone cannot be used in case of a power cut, you should use a mainsindependent telephone for emergency calls, e.g. a mobile phone.
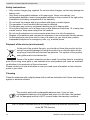
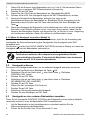
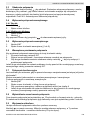
Disposal of the device (environment)
At the end of the product lifecycle, you should not throw this product into the
normal household garbage but bring the product to a collection point for the
recycling of electrical and electronic equipments. The symbol on the product,
user guide and/or box indicate this.
Some of the product materials can be re-used if you bring them to a recycling
point. By re-using some parts or raw materials from used products you make an important
contribution to the protection of the environment.
Please contact your local authorities in case you need more information on the collection
points in your area.
Cleaning
Clean the telephone with a slightly damp cloth or with an anti-static cloth. Never use cleaning
agents or abrasive solvents.
This product works with rechargeable batteries only. If you put nonrechargeable batteries in the handset and place it on the base, the handset
will be damaged and this in NOT covered under the warranty conditions.
The CE symbol indicates that the unit complies with the essential requirements
of the R&TTE directive.
12
OGATECH OG-S60/TWIN/TRIPLE/QUATTRO
OGATECH OG-S60/TWIN/TRIPLE/QUATTRO
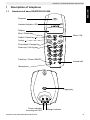
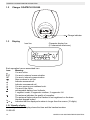
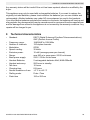
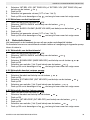
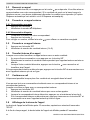
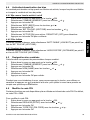
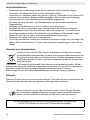
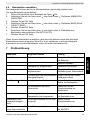
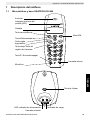
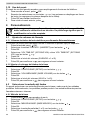
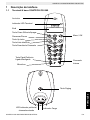
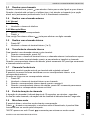
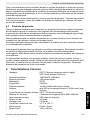
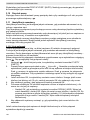
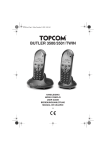
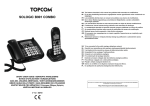
1.1
Description of telephone
ENGLISH
1
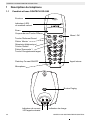
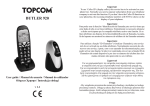
Handset and base OGATECH OG-S60
Earpiece
Handset indicator LED
Display
Mute / Delete key
Menu / OK
Redial / Pause key
Up key
Phonebook / Escape key
Down key / Call log key
Flash key / Power ON/OFF
Internal call
Microphone
Paging key
OG-S60
Power indicator
Incoming call LED
OGATECH OG-S60/TWIN/TRIPLE/QUATTRO
Charge indicator
13
OGATECH OG-S60/TWIN/TRIPLE/QUATTRO
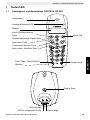
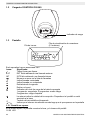
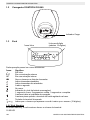
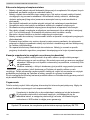
1.2
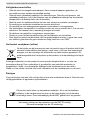
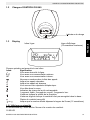
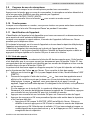
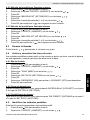
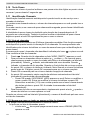
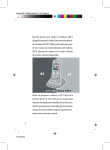
Charger OGATECH OG-S60
Charge indicator
OG-S60
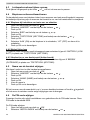
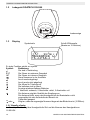
1.3
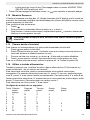
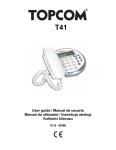
Display
Icon line
Character display line
(12 characters maximum)
Each operation has an associated icon
Icon:
Meaning:
You are online
EXT
You are in external communication
INT
You are in internal communication
New numbers in call list
Indicate answered call
Indicate unanswered call
You are opening your address book.
You are in the menu.
rechargeable battery level indicator
1 segment: weak, 2 segments: medium, 3 segments: full.
The antenna indicates the quality of reception.
The antenna flashes when the handset is not registered on the base.
Handset keypad locked
or
Indicates that the displayed number is longer than the screen (12 digits)
1.3.1 Standby display
In standby mode, the display shows the time and the handset number:
12-05 HS1
14
OGATECH OG-S60/TWIN/TRIPLE/QUATTRO
OGATECH OG-S60/TWIN/TRIPLE/QUATTRO
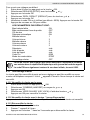
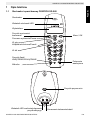
1.4
Handset indicator (LED)
2
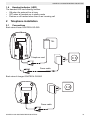
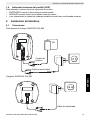
2.1
ENGLISH
The handset LED has following function:
• ON when the external line is busy
• OFF when all handset are in stanby mode
• Flashes on all handset when there is an incoming call
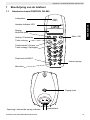
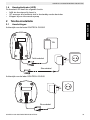
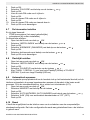
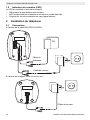
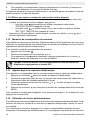
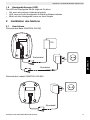
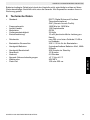
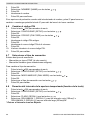
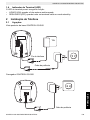
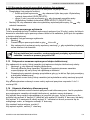
Telephone installation
Connections
Back view of base OGATECH OG-S60
TEL
Telephone cord
Power cable
Back view of charger OGATECH OG-S60
Power cable
OGATECH OG-S60/TWIN/TRIPLE/QUATTRO
15
OGATECH OG-S60/TWIN/TRIPLE/QUATTRO
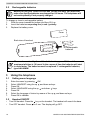
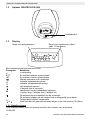
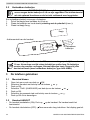
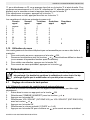
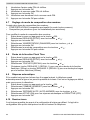
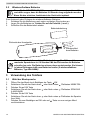
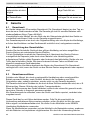
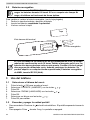
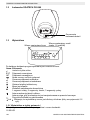
2.2
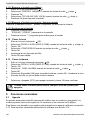
Rechargeable batteries
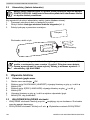
Before you use your OGATECH OG-S60 for the first time, you must first
make sure that the batteries are charged for 6-8 hours. The telephone will
not work optimally if not properly charged.
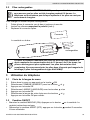
To change or insert a rechargeable battery:
1.
Slide the cover towards the bottom and then lift it up.
2.
Insert the batteries respecting the (+ and -) polarity.
3.
Replace the battery cover.
Cover
Back view of hand-set
+
-
-
+ Rechargeable
OG-S60
batteries
The maximum standby time of the batteries is approx. 200 h and the
maximum talk time is 10 hours! In the course of time the batteries will start
to drain faster. The batteries must be replaced. 2 rechargeable batteries,
type AAA NiMH!
3
3.1
1.
2.
3.
4.
5.
6.
7.
3.2
•
•
16
Using the telephone
Setting menu language
Enter the menu by pressing /OK
Select HANDSET using the up and down keys
Press OK
Select LANGUAGE using the up and down keys
Press OK
Select the language of choice by means of the up and down
Press OK to validate
keys.
Handset ON/OFF
Turn ON handset: Press the key on the handset. The handset will search the base.
Turn OFF handset: Press for 3 sec. The display will go OFF.
OGATECH OG-S60/TWIN/TRIPLE/QUATTRO
OGATECH OG-S60/TWIN/TRIPLE/QUATTRO
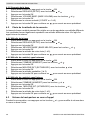
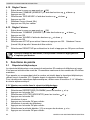
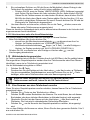
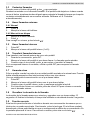
Receiving a call
When the handset rings, press to answer. You are then connected to your correspondent.
If the hand-set is on the base when the telephone rings, you just need to pick up the handset to answer the call (if the option autoanswer is activated: See 4.9. Automatic answer).
3.4
Making an external call
3.4.1 Normal
1.
Press
2.
Enter telephone number
3.4.2 Block dialling
1.
Dial your correspondents number
2.
Press
To correct a number use the
key to delete an entered digit
3.5
1.
2.
3.6
Making an internal call
Press INT
Enter the number of the internal handset (1 to 5)
Internal call transfer
When you want to transfer an external call to another handset:
1.
During a conversation, press INT
2.
Select the number of the internal handset, the external caller is put on hold.
3.
When the other handset picks up, press to hang up and transfer the call.
If the internal corespondent does not pick-up, press INT again to reconnect to the external
caller on line.
3.7
Conference Call
Only possible when more than one handset are registered to the base!!
You can converse simultaneously with an internal correspondent and an external
correspondent.
When you are on line with an external correspondent:
1.
Press INT
2.
Enter the number of the internal handset that you want to call
3.
When the internal correspondent picks- up, press and hold #
4.
If the internal correspondent does not answer, press INT again to reconnect to the
external correspondent on-line.
3.8
Display of call duration
The call duration is displayed after 15 seconds, in minutes - seconds.
At the end of each call, the total call duration is displayed for 5 seconds.
3.9
Microphone mute
It is possible to mute the microphone during a conversation.
Press
during the conversation, the microphone is then deactivated, you can talk freely
without being heard by the calling party.
“MUTE” is displayed. Press
again to return to normal mode.
OGATECH OG-S60/TWIN/TRIPLE/QUATTRO
17
ENGLISH
3.3
OGATECH OG-S60/TWIN/TRIPLE/QUATTRO
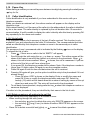
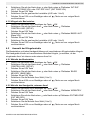
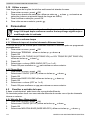
3.10 Pause Key
When dialling a number you can add a pause between two digits by pressing the redail/pause
key for 2s.
3.11 Caller Identification
Caller identification is only available if you have subscribed to this service with your
telephone operator.
When you receive an external call, the callers number will appear on the display as the
telephone rings.
If the network sends it, or if the name of the caller is in the address book, the caller is identified
by his or her name. The caller identity is replaced by the call duration after 15 seconds in
communication. It is still possible to display the caller’s identity after this time by pressing OKkey repeatedly for the name and number.
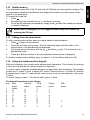
3.11.1 List of calls
Your telephone keeps a list in memory of the last 40 calls received. This function is only
available if your are subscribed to the caller ID information. The correspondents that have
called are identified by their telephone number or name in the same way as in caller
identification.
The presence of new / unanswered calls is indicated by the flashing
-icon on the display.
To consult the list of calls:
1.
Press
. If there are no calls in the list ‘EMPTY’ will appear.
2.
Scroll through the calls using the up or down
arrows. The callers names will be
shown if the name is send by the network or is stored in the phonebook. When is
shown, this call is been aswered. When is shown, the call is unaswered. If you are
at the end of the list you will hear a beep tone.
3.
If you press OK, the telephone number will be shown. Note: if the telephone number is
longer than 12 digits, press OK again to see the complete number.
4.
Press OK again to see the time and date when the call is received
5.
Pressing OK again will give you the option to add this entry in the phonebook if it’s not
already stored:
– Press OK when ‘ADD’ is shown on the display. Enter or modify the name and
press OK. Enter or modify the telephonenumber and press OK. Select the
melody (1-5) which will be heard when this number is calling by means of the up/
down keys and press OK. The entry will be stored in the phonebook.
6.
To call back a correspondent, simply press the key when their telephone number or
name are displayed.
If a caller is in the phonebook, they are identified by their name in the list of calls.
3.11.2 Delete an entry or all entries in the call list
You can delete each entry separately or all entries at ones:
• When scrolling through the calls, press:
– the mute key
short to delete this entry only. DELETE appears on the screen.
– the mute key
long (2 sec.) to delete all entries: DELETE ALL appears on the
screen.
• Press OK to delete current/all entr(y)(ies), or to cancel the delete operation.
18
OGATECH OG-S60/TWIN/TRIPLE/QUATTRO
OGATECH OG-S60/TWIN/TRIPLE/QUATTRO
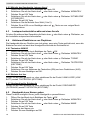
Your telephone keeps a list of the 10 last calls (of 32 digits) you have made in memory; The
correspondents called are identified by their telephone number or by their name if they
appear in the phonebook.
To consult the redial list:
1.
Press
2.
Scroll through the calls with the up and down arrows.
3.
To call by the selected correspondent, simply press when their telephone number
or name is displayed.
When name is displayed, you can toggle between name and number by
pressing the OK key!
3.13 Calling from the phonebook
To call a correspondent whose name you have saved in the phonebook:
1.
Press to enter the phonebook
2.
Press the first letter of the name. The first name that starts with this letter or the
nearest letter in the alphabet will be displayed.
3.
Go through the list of names with the up and down keys. The list scrolls in an
alphabetical order.
4.
Press to dial the number of the correspondent whose name is displayed.
To see the number before dialling, carry out steps 1 to 3 from before and press Ok.
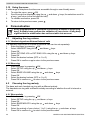
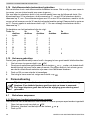
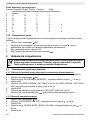
3.14 Using the alphanumerical keypad
With your telephone you can also enter alphanumeric characters. This is useful for entering
a name into the phonebook, giving a name to a hand-set, …
To select a letter, press the corresponding key as many times as is necessary. For example
to select an ‘A’, press ‘2’ once, to select a ‘B’, press ‘2’ twice and so on. To select ‘A’ and then
B consecutively, select ‘A’, wait until the cursor moves on to the next character, then press
‘2’ twice.
To select a space, press 1. To select a dash, press ‘1’ twice.
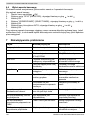
The keypad characters are as follows:
Key First
Second
Third
press
press
press
1
space
1
2
A
B
C
3
D
E
F
4
G
H
I
5
J
K
L
6
M
N
O
7
P
Q
R
8
T
U
V
9
W
X
Y
OGATECH OG-S60/TWIN/TRIPLE/QUATTRO
Fourth
press
2
3
4
5
6
S
8
Z
Fifth
press
7
9
19
ENGLISH
3.12 Redial memory
OGATECH OG-S60/TWIN/TRIPLE/QUATTRO
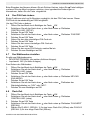
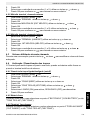
3.15 Using the menu
A wide range of telephone functions are accessible through a user friendly menu.
1.
To enter the menu, press /OK
2.
Scroll through the selections using the up and down keys, the selections scroll in
a loop ( you return to the first after the last).
3.
To validate a selection, press OK
4.
To return to the previous menu, press
4
Personalisation
Every programmation is confirmed at the end by a double or single long
beep. A double beep confirms the validation of your choice. A long beep
signifies that the modification has not been taken into account.
4.1
Adjusting the ring volume
4.1.1 Handset ringvolume External/internal calls
The handset ringvolume for internal or external calls can be set separately:
1.
Enter the menu by pressing /OK
2.
Select HANDSET using the up and down keys
3.
Press OK
4.
Select INT RING VOL or EXT RING VOL using the up and down keys
5.
Press OK
6.
Select the desired volume (OFF or 1 to 5 )
7.
Press OK to confirm or to return to the previous menu.
4.1.2 Base ring
1.
Enter the menu by pressing /OK
2.
Select SETUP using the up and down keys
3.
Press OK
4.
Select BASE VOLUME using the up and down keys
5.
Press OK
6.
Select the desired volume (OFF or 1 to 5 )
7.
Press OK to confirm or to return to the previous menu.
4.2
Choosing the ring melody
The base and each handset can ring with a different melody.
The handsets can ring with a different melody according to whether the call is internal or
external.
4.2.1 Base melody
1.
Enter the menu by pressing /OK
2.
Select SETUP using the up and down keys
3.
Press OK
4.
Select BASE MELODY using the up and down keys
5.
Press OK
6.
Select the melody of your choice ( 1 to 5 ) using the up and down
7.
Press OK to confirm or to return to the previous menu.
20
keys
OGATECH OG-S60/TWIN/TRIPLE/QUATTRO
4.2.2 Handset melody, external call
1.
Enter the menu by pressing /OK
2.
Select HANDSET using the up and down keys
3.
Press OK
4.
Select EXT MELODY using the up and down keys
5.
Press OK
6.
Select the melody of your choice ( 1 to 5 ) using the up and down
7.
Press OK to confirm or to return to the previous menu.
4.2.3 Handset melody, internal call
1.
Enter the menu by pressing /OK
2.
Select HANDSET using the up and down keys
3.
Press OK
4.
Select INT MELODY using the up and down keys
5.
Press OK
6.
Select the melody of your choice ( 1 to 5) using the up and down
7.
Press OK to confirm or to return to the previous menu.
4.3
keys
keys
Speaker volume during call
During conversation, press the up
4.4
ENGLISH
OGATECH OG-S60/TWIN/TRIPLE/QUATTRO
or down
key to change the volume accordingly.
Activation / Deactivation of beeps
The handsets can emit beeptone when a key is pressed, when the batteries are low or when
the handset is out of range.
4.4.1 Key pressed beeptone on/off
1.
Enter the menu by pressing /OK
2.
Select HANDSET using the up and down keys
3.
Press OK
4.
Select BEEP using the up and down keys
5.
Press OK
6.
Select KEYTONE using the up and down keys
7.
Press OK
8.
Select ON to activate, OFF to deactivate
9.
Press OK to confirm.
4.4.2 Low battery
Proceed as before, but select at point 6 "LOW BATTERY" instead of "KEYTONE".
4.4.3 Handset out of range
Proceed as before, but select at point 6 "OUT RANGE" instead of “KEYTONE".
4.5
Handset name
This function allows you to personalise each handset.
1.
Enter the menu by pressing /OK
2.
Select HANDSET using the up and down keys
3.
Press OK
4.
Select NAME using the up and down keys
OGATECH OG-S60/TWIN/TRIPLE/QUATTRO
21
OGATECH OG-S60/TWIN/TRIPLE/QUATTRO
5.
Press OK
6.
Enter the name
7.
Press OK to validate
While entering the name, press ‘c’ to delete a character and press and hold
menu without taking any modifications into account.
4.6
to exit the
Changing the PIN code
Certain functions are only available to users who know the PIN code. By default this is PIN
code = 0000.
To change the PIN code:
1.
Enter the menu by pressing /OK
2.
Select SETUP using the up and down keys
3.
Press OK
4.
Select PIN CODE using the up and down keys
5.
Press OK
6.
Enter the old 4 figure PIN code.
7.
Press OK
8.
Enter the new 4 figure PIN code
9.
Press OK
10. Enter the new PIN code a second time
11. Press OK to validate
4.7
Setting the dialling mode
There are two types of dialling mode:
• DTMF/Tone dialling (the most common)
• Pulse dialling ( for older installations )
To change the dialling mode:
1.
Enter the menu by pressing /OK
2.
Select setup using the up and down keys
3.
Press OK
4.
Select DIAL MODE using the up and down keys
5.
Press OK
6.
Select the dialling mode using the up and down keys
7.
Press OK to validate
4.8
1.
2.
3.
4.
5.
22
Flash time duration
Enter the menu by pressing /OK
Select SETUP using the up and down keys
Press OK
Select RECALL using the up and down keys
Choose RECALL 1 for short flash time (100ms) or RECALL 2 for long flash time
(250ms)
OGATECH OG-S60/TWIN/TRIPLE/QUATTRO
OGATECH OG-S60/TWIN/TRIPLE/QUATTRO
Automatic answer
When there is a incoming call and the handset in on the base, the phone automatically takes
the line when lifted. This is the default setting, but can be set OFF:
1.
Enter the menu by pressing /OK
2.
Select HANDSET using the up and down keys
3.
Press OK
4.
Select AUTO ANSWER using the up and down keys
5.
Select ON (for automatic answer) or OFF
6.
Press OK
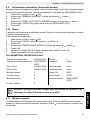
4.10 Reset
It is possible to return the phone to the original default configuration. This is the configuration
which was installed when you first received the telephone.
To return to default settings:
1.
Enter the menu by pressing /OK
2.
Select SETUP using the up and down keys
3.
Press OK
4.
Select DEFAULT using the up and down keys
5.
Press OK
6.
Enter the 4 digit PIN code (default =0000). Press OK.
7.
Press again OK to validate
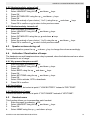
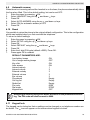
DEFAULT PARAMETERS ARE:
Low battery beeps
Out of range warning beeps
Key click
Auto answer
Internal melody
Internal volume
External melody
External volume
Ear volume
Phonebook
Call log list
Redial list
Pin code
Dial mode
Keypad lock
ON
OFF
ON
ON
1
3
3
3
3
Empty
Empty
Empty
0000
DTMF
OFF
Returning to default settings will delete all entries in the phonebook and call
log. The PIN code will also be reset to 0000.
4.11 Keypad lock
The keypad can be locked so that no settings can be changed or no telephone number can
be dialed. The -icon will appear on the screen when keypad is locked.
OGATECH OG-S60/TWIN/TRIPLE/QUATTRO
23
ENGLISH
4.9
OGATECH OG-S60/TWIN/TRIPLE/QUATTRO
4.11.1 Locking the keypad by Menu
1.
Enter the menu by pressing /OK
2.
Select HANDSET using the up and down keys
3.
Press OK
4.
Select KEY LOCK? using the up and down keys
5.
Press OK to lock the keypad
4.11.2 Locking the keypad by the *-key (quick lock)
Press and hold the ‘*’-key for 3 seconds. The keypad will be locked.
4.11.3 Unlock the keypad
1.
Press any key
2.
PRESS * will appear on the screen
3.
Press the ‘*’ key within 3 seconds to unlock the keypad
4.12 Setting the time
1.
2.
3.
4.
5.
6.
7.
Enter the menu by pressing /OK
Select HANDSET using the up and down keys
Press OK
Select CLOCK SET using the up and down keys
Press OK
Enter the time (24h format).
Press OK to validate
4.13 Setting the alarm
1.
2.
3.
4.
5.
6.
Or
7.
Enter the menu by pressing /OK
Select HANDSET using the up and down keys
Press OK
Select ALARM SET using the up and down keys
Press OK
Select ON to turn On the alarm and press OK. Enter the time (24h format) when the
alarm must be activate.
Select OFF to turn off the alarm and press OK to confirm.
When the alarm goes off you can press any handset key to turn it off.
5
5.1
Advanced functions
Phonebook
The Phonebook allows you to memorise 50 telephone numbers and names. You can enter
names of up to 12 characters length and numbers of up to 20 digits length.
To call a correspondent whose number is stored in the phonebook, refer to the section 3.14.
To enter alphanumerical characters, refer to the section 3.15.
24
OGATECH OG-S60/TWIN/TRIPLE/QUATTRO
OGATECH OG-S60/TWIN/TRIPLE/QUATTRO
ENGLISH
5.1.1 Add an entry into the phonebook
1.
Enter the menu by pressing /OK
2.
Select PHONE BOOK using the up and down keys
3.
Press OK
4.
Select ADD ENTRY using the up and down keys
5.
Press OK
6.
Enter the name
7.
Press OK to validate.
8.
Enter the telephone number
9.
Press OK to validate
10. Select the desired melody (1-5) by means of the up/down key
11. Press OK to Validate
5.1.2 Modify a name or number
To modify a number in the phonebook:
1.
Enter the menu by pressing /OK
2.
Select PHONE BOOK using the up and down keys
3.
Press OK
4.
Select MODIFY ENTRY using the up and down keys
5.
Press OK
6.
Move through the list of names with the up and down keys. The list scrolls in
alphabetical order.
7.
Press OK when you find the name to modify
8.
Use the ‘
’ key to go back and enter the new name
9.
Press OK to validate
10. Enter the new telephone number
11. Press OK to validate
Warning! If you enter the Phonebook first with the key and modify a
telephone number with the
key, the modification will be taken into
account only for this call and will not be stored in the phonebook!
5.1.3 Deleting an entry
To delete an entry:
1.
Enter the menu by pressing /OK
2.
Select PHONE BOOK using the up and down keys
3.
Press OK
4.
Select DELETE ENTRY using the up and down keys
5.
Press OK
6.
Move through the list of names using the up and down
alphabetical order.
7.
Press OK when you find the name you wish to delete
8.
CONFIRM appears, press OK to confirm or to stop.
5.2
keys the list scrolls in
Searching a handset from the base
When the paging button on the base is pressed all the handsets will ring. This ringing will
help you locate a lost handset. By simply pressing one of the handset keys the ringing stops.
OGATECH OG-S60/TWIN/TRIPLE/QUATTRO
25
OGATECH OG-S60/TWIN/TRIPLE/QUATTRO
6
6.1
Managing multiple handsets
Setting up an additional handset
You only need to register a 2nd handset in case your 2nd handset does
not link with the base anymore or when you have bought a new one!!!
You can register new handsets on the base if these handsets support the DECT GAP
protocol.
The base can support a maximum of 5 handsets. If you already have 5 handsets, and you
wish to add another one or change one handset, you must first delete a handset, then
associate the new handset.
To register any handset, the base must be put into a special registration mode:
1.
Press and hold the paging key of the base for 6 seconds.
2.
The base will then emit a beeptone. The base is now ready to register a new handset.
You have 90 seconds after pressing the button to register a new handset.
After putting the base into registration mode, start the procedure on the new handset:
6.1.1 If your additional handset is a OGATECH OG-S60
3.
Enter the menu by pressing /OK
4.
Select REGISTER using the up and down keys
5.
Press OK
6.
Select REG BASE using the up and down keys
7.
Enter a base number ( from 1 to 4 ). The flashing numbers are already in use.
8.
Enter the Base PIN code (0000 by default )
9.
Press OK. The handset will start searching for the DECT base
10. If the handset has located the base, it will display the base identification number,
validate the base registration by pressing OK or stop by pressing .
11. If the handset does not locate the base, it will return to the standby mode after a few
seconds.
12. Try again by changing the base number and check that you are not in a environment
where there is interference. Move closer to the base.
6.1.2 If your handset is another model
After starting the registration procedure on the base, refer to the handset manual to find out
how to register the handset. The handset must be GAP compatible.
The icon and the text "NOT REG" flashes on the display when the handset is not
associated with the base.
When a handset is associated with a base, it is attributed a handset number by the base. It
is this number that is displayed on the handset after the name and must be used for internal
calls.
DECT GAP Profile only guarentees that basic calling-functions will work
correctly between different brands/types. There’s a possibility that
certain services (like CLIP) will not work correctly.
26
OGATECH OG-S60/TWIN/TRIPLE/QUATTRO
OGATECH OG-S60/TWIN/TRIPLE/QUATTRO
6.2
Removing a handset
6.3
ENGLISH
You can remove a handset with a base to allow another handset to be registered
1.
Enter the menu by pressing /OK
2.
Select SETUP using the up and down keys
3.
Press OK
4.
Select DEL HANDSET using the up and down keys
5.
Press OK
6.
Enter the 4 digit base PIN code
7.
Press OK
8.
Select the handset to be removed
9.
Press OK to validate
Setting up a handset on another base
If you want to use a OGATECH OG-S60 handset with a base of another model. The base
must be GAP compatible.
1.
To put the base in registration mode, refer to the base user manual.
2.
Carry out operations 3 to 10 from the paragraph 6.1.
6.4
Selecting a base
The handsets can be registered up to 4 bases simultaneously.
To select a base:
1.
Enter the menu by pressing /OK
2.
Select REGISTER using the up and down keys
3.
Press OK
4.
Select SELECT BASE using the up and down keys
5.
Press OK
6.
Select a base or select AUTO using the up and down
7.
Press OK
keys
When selecting the base, the currect selected base in indicated by a blinking base number.
If you select ‘Auto’ the handset will automatically search for another base when you are out
of range!
7
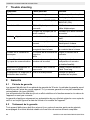
Troubleshooting
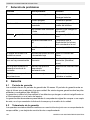
Symptom
Possible cause
Solution
No display
Batteries uncharged
Check the position of the
batteries
Recharge the batteries
No tone
Handset turned OFF
Turn ON the handset
Telephone cord badly
connected
Check the telephone cord
connection
The line is occupied by
another handset
Wait until the other handset
hangs up
OGATECH OG-S60/TWIN/TRIPLE/QUATTRO
27
OGATECH OG-S60/TWIN/TRIPLE/QUATTRO
The icon
flashes
Handset out of range
Bring the handset closer to
the base
The base has no power
supply
Check the mains connection
to the base
The handset is not registered Register the handset on the
on the base
base
Base or handset do not ring
The ringing volume is zero or Adjust the ringing volume
low
Tone is good, but there is no The dialling mode is wrong
communication
Adjust the dialling mode
(pulse/tone)
Not possible to transfer a call The FLASH time is too short Set the unit to Long Flash
on PABX
time
Telephone does not react to
pressing the keys
8
8.1
Manipulation error
Remove the batteries and put
them back in place
Warranty
Warranty period
The device has a 24-month warranty period. The warranty period starts on the day the new
unit is purchased. There is no warranty on standard or rechargeable batteries (AA/AAA type).
Consumables or defects causing a negligible effect on operation or value of the equipment
are not covered.
The warranty has to be proven by presentation of the original or copy of the purchase receipt,
on which the date of purchase and the unit-model are indicated.
8.2
Warranty handling
A faulty unit needs to be returned to an authorized service centre including a valid purchase
note and a filled in service card.
If the unit develops a fault during the warranty period, the service center will repair any
defects caused by material or manufacturing faults free of charge, by either repairing or
exchanging the faulty units or parts of the faulty units. In case of replacement, colour and
model can be different from the original purchased unit.
The initial purchase date shall determine the start of the warranty period. The warranty period
is not extended if the unit is exchanged or repaired by the service centre.
8.3
Warranty exclusions
Damage or defects caused by incorrect treatment or operation and damage resulting from
use of non-original parts or accessories are not covered by the warranty.
Cordless phones are designed to work with rechargeable batteries only. The damage caused
by the use of non-rechargeable batteries is not covered under warranty.
The warranty does not cover damage caused by outside factors, such as lightning, water and
fire, nor any damage caused during transportation.
No warranty can be claimed if the serial number on the units has been changed, removed or
rendered illegible.
28
OGATECH OG-S60/TWIN/TRIPLE/QUATTRO
Any warranty claims will be invalid if the unit has been repaired, altered or modified by the
buyer.
This appliance may only be used with rechargeable batteries. If you want to replace the
originally included batteries, please check whether the batteries you use are suitable and
rechargeable. Alkaline batteries may under NO circumstances be used in the handsets.
If you use Alkaline batteries and place the handset on the basis, the batteries will heat up and
may explode. Any damage which may be caused cannot be recovered from the manufacturer
and the damage thus caused to the appliance is not covered by the warranty conditions. Any
repairs will be charged to you.
9
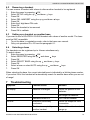
Technical characteristics
•
Standard:
•
•
•
•
•
•
•
•
•
•
•
•
•
•
Frequency range:
Number of channels:
Modulation:
Speech coding:
Emission power:
Range:
Base power supply:
Handset Batteries:
Handset autonomy:
Talk time:
Charging time:
Normal conditions of use:
Dialling mode:
Flash time
DECT (Digital Enhanced Cordless Telecommunications)
GAP (Generic Access Profile)
1880 MHZ to 1900 MHz
120 duplex channels
GFSK
32 kbit/s
10 mW (average power per channel)
max 300 m in open space /10-50 m inhouse
230 V / 50 Hz for the base
2 rechargeable batteries AAA, NiMh 550mAh
200 hours in standby
10 hours
6-8 hours
+5 °C to +45 °C
Pulse / Tone
100 or 250 ms
OGATECH OG-S60/TWIN/TRIPLE/QUATTRO
29
ENGLISH
OGATECH OG-S60/TWIN/TRIPLE/QUATTRO
OGATECH OG-S60/TWIN/TRIPLE/QUATTRO
Veiligheidsvoorschriften
•
•
•
•
•
•
•
•
•
Gebruik enkel de meegeleverde adapter. Geen vreemde adapters gebruiken, de
accucellen kunnen hierdoor beschadigd worden.
Gebruik enkel oplaadbare batterijen van hetzelfde type. Gebruik nooit gewone, niet
oplaadbare batterijen. Let bij het plaatsen van de oplaadbare batterijen op de polariteit
(aangeduid in de batterijruimte van de handset).
Raak de laad- en stekkercontacten niet aan met scherpe en metalen voorwerpen.
De werking van medische toestellen kan worden beïnvloed.
De handset kan een onaangenaam gezoem veroorzaken in hoorapparaten.
Het basisstation niet opstellen in vochtige ruimten en niet op minder dan 1,5 m van een
waterbron. De handset niet in aanraking brengen met water.
De telefoon niet gebruiken in explosieve omgevingen.
Ontdoe u op een milieuvriendelijke wijze van de batterijen en de telefoon.
Daar bij stroomuitval met dit toestel niet kan getelefoneerd worden, in geval van nood
een telefoon gebruiken die geen netstroom nodig heeft bvb. een GSM.
Het toestel verwijderen (milieu)
Op het einde van de levenscyclus van het product mag u dit product niet bij het
normale huishoudelijke afval gooien, maar moet u het naar een inzamelpunt
brengen voor de recyclage van elektrische en elektronische apparatuur. Dit
wordt aangeduid door het symbool op het product, in de handleiding en/of op de
doos.
Sommige materialen van het product kunnen worden hergebruikt als u ze naar een
inzamelpunt brengt. Door onderdelen of grondstoffen van gebruikte producten te
hergebruiken, levert u een belangrijke bijdrage tot de bescherming van het milieu.
Wend u tot uw lokale overheid voor meer informatie over de inzamelpunten in uw buurt.
Reinigen
Veeg de telefoon met een licht vochtig doek of met een antistatische doek af. Gebruik nooit
reinigingsmiddelen of agressieve oplosmiddelen.
Dit product werkt alleen op herlaadbare batterijen. Als u niet herlaadbare
batterijen in de handset stopt en deze op de basis plaatst, zal de handset
beschadigd raken. Deze beschadiging wordt NIET gedekt door de garantie.
Het toestel voldoet aan de basiseisen van de R&TTE-richtlijn.
Dit wordt bevestigd door de CE-markering.
30
OGATECH OG-S60/TWIN/TRIPLE/QUATTRO
OGATECH OG-S60/TWIN/TRIPLE/QUATTRO
1
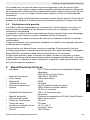
1.1
Beschrijving van de telefoon
Handset en basis OGATECH OG-S60
Luidspreker
NEDERLANDS
Handset indicator LED
Display
Mute/Wis-toets
Menu / OK
Herkies / Pauzetoets
Toets omhoog
Telefoonboek / Escape
Toets omlaag / Oproeplijst
Flash-toets AAN/UIT
Interne oproep
Microfoon
Paging-toets
OG-S60
Spanning / inkomende oproep indicator
OGATECH OG-S60/TWIN/TRIPLE/QUATTRO
Laadindicator
31
OGATECH OG-S60/TWIN/TRIPLE/QUATTRO
1.2
Oplader OGATECH OG-S60
Laadindicator
OG-S60
1.3
Display
Regel voor pictogrammen
Regel voor karakters en cijfers
(max. 12 karakters)
Elke handeling heeft zijn bijhorend icoon
Pictogram:
Betekenis:
In verbinding
EXT
Er vindt een externe oproep plaats
INT
Er vindt een interne oproep plaats
Nieuwe nummers in de oproeplijst
Indicatie beantwoorde oproep
Indicatie onbeantwoorde oproep
Het adresboek openen
U bevindt zich in het menu.
Laadniveau van de herlaadbare batterijen
1 blokje: laag, 2 blokjes: half, 3 blokjes: vol
De antenne toont de kwaliteit van de ontvangst.
De antenne knippert als de handset niet is aangemeld op de basis.
Toetsenbord handset vergrendeld
of
Geeft aan dat het getoonde nummer langer is dan het scherm (12 cijfers)
1.3.1 Standby-scherm
In de standby-modus toont het scherm de tijd en het nummer van de handset:
12-05 HS1
32
OGATECH OG-S60/TWIN/TRIPLE/QUATTRO
OGATECH OG-S60/TWIN/TRIPLE/QUATTRO
1.4
Handsetindicator (LED)
De handset-LED heeft de volgende functie:
• AAN als de externe lijn bezet is
• UIT wanneer alle handsets zich in de standby-modus bevinden
• Knippert bij een inkomende oproep
2.1
Telefooninstallatie
Aansluitingen
NEDERLANDS
2
Achterzijde van de basis OGATECH OG-S60
TEL
Telefoonkabel
Stroomkabel
Achterzijde van de lader OGATECH OG-S60
Stroomkabel
OGATECH OG-S60/TWIN/TRIPLE/QUATTRO
33
OGATECH OG-S60/TWIN/TRIPLE/QUATTRO
2.2
Herlaadbare batterijen
Vooraleer u uw OGATECH OG-S60 de eerste keer gaat gebruiken, moet u
ervoor zorgen dat de batterijen 6 à 8 uur zijn opgeladen. Het telefoontoestel
zal niet optimaal functioneren als het niet voldoende werd opgeladen.
Een oplaadbare batterij vervangen of plaatsen:
1.
Schuif het kapje naar beneden en til het op.
2.
Plaats de batterijen en houd daarbij rekening met de polariteit (+ en -).
3.
Plaats het kapje terug.
Kapje
Achteraanzicht van de handset
+
-
-
OG-S60
+ Oplaadbare
batterijen
De batterijen gaan telkens zo’n 200 uur mee en de gesprekstijd is maximaal
10 uur. Na verloop van tijd raken de battrijen sneller leeg. De batterijen
moeten dan worden vervangen. Nieuwe batterijen kunt u kopen bij elke
doe-het-zelf-zaak (twee herlaadbare batterijen, type AAA NiMH).
3
3.1
1.
2.
3.
4.
5.
6.
7.
3.2
•
•
34
De telefoon gebruiken
Menutaal kiezen
Open het menu met een druk op /OK.
Selecteer Handset met behulp van de toetsen en .
Druk op OK.
Selecteer ‘TAAL’ (LANGUAGE) met behulp van de toetsen en
Druk op OK.
Selecteer de gewenste taal met behulp van de toetsen en .
Druk op OK om te bevestigen.
.
Handset AAN/UIT
De handset inschakelen (ON): Druk op
op de handset. De handset zoekt het
basistoestel.
De handset uitschakelen (OFF): Twee seconden lang indrukken. Het display gaat uit.
OGATECH OG-S60/TWIN/TRIPLE/QUATTRO
OGATECH OG-S60/TWIN/TRIPLE/QUATTRO
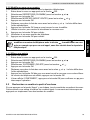
3.3
Oproepen ontvangen
Als de handset belt, druk dan op om de oproep te beantwoorden. U bent nu verbonden
met de persoon aan de andere kant van de lijn. Als de handset in het basistoestel staat op
het moment dat de telefoon rinkelt, hoeft u enkel de handset uit het basistoestel te nemen
om de oproep te beantwoorden (als de optie automatisch beantwoorden ingeschakeld
werd: zie 4.9)
Een externe oproep
NEDERLANDS
3.4
3.4.1 Normale nummering:
1.
Druk op
2.
Telefoonnummer ingeven
3.4.2 Blokkiezen:
1.
Druk het nummer van uw correspondent.
2.
Druk op
Als u een nummer wilt corrigeren, gebruik dan de toets
3.5
1.
2.
3.6
om een ingevoerd cijfer te wissen.
Een interne oproep (INT)
Druk op INT toets
Voer het nummer van het interne toestel in (1 tot 5)
Interne oproep doorschakelen
Een externe oproep doorschakelen naar een andere handset:
1.
Druk op INT tijdens een gesprek
2.
Selecteer het nummer van het interne toestel, de externe beller wordt in de
"wachtstand" geplaatst.
3.
Als het andere interne toestel reageert, drukt u op om de oproep door te schakelen.
Als de interne correspondent niet opneemt, drukt dan opnieuw op INT om terug te schakelen
naar de externe beller.
3.7
Conferentiegesprek
Conferentiegesprekken zijn enkel mogelijk wanneer meer dan één handset werd
geregistreerd op het basistoestel.
U kunt gelijktijdig met een interne en een externe correspondent spreken.
U bent in gesprek met een externe correspondent:
1.
Druk op INT
2.
Voer het nummer in van de interne telefoon die u wilt oproepen
3.
Zodra de interne correspondent opneemt, # indrukken en vasthouden
4.
Als de interne correspondent de oproep niet beantwoordt, druk dan nogmaals op INT
om weer over te schakelen naar de externe correspondent die aan de lijn is.μ
3.8
Tonen van de gespreksduur
De gespreksduur wordt getoond na 15 seconden (eerst de minuten,
dan de seconden): “00-20”
Aan het einde van elk gesprek wordt de totale gespreksduur getoond gedurende vijf
seconden.
OGATECH OG-S60/TWIN/TRIPLE/QUATTRO
35
OGATECH OG-S60/TWIN/TRIPLE/QUATTRO
3.9
Microfoon uitschakelen (Mute)
Het is mogelijk om de microfoon tijdens een gesprek uit te schakelen.
Druk op
tijdens het gesprek. De microfoon wordt gedesactiveerd en u kunt vrij spreken
zonder dat de persoon aan de andere kant van de lijn u kan horen.
U krijgt “PRIVE (MUTE)” te zien.
Druk op
om terug te keren naar de normale modus.
3.10 Pauzetoets
Wanneer u een nummer belt, kunt u een pauze inlassen tussen twee cijfers door gedurende
twee seconden op de redial-/pauzeertoets
te drukken.
3.11 Identificatie van de beller
De belleridentificatie is maar beschikbaar als u bij uw telefoonmaatschappij een abonnement
heeft op deze dienst.
Als u een externe oproep ontvangt, verschijnt het nummer van de beller op het scherm
wanneer de telefoon rinkelt.
Als de netwerk ook de naam verstuurt of wanneer de naam van de beller in het adresboek is
opgenomen, zal de beller worden geïdentificeerd aan de hand van zijn of haar naam.
Eerst wordt de identiteit van de beller getoond, na 15 seconden krijgt u de gespreksduur te
zien. Na deze tijd is het nog steeds mogelijk om de identiteit van de beller weer op het scherm
te brengen: druk hiertoe herhaaldelijk op de toets OK voor de naam en het nummer.
3.11.1 Lijst van oproepen
Uw telefoon houdt een lijst bij in het geheugen van de laatste 40 ontvangen oproepen. Deze
functie is alleen beschikbaar wanneer u een abonnement nam op de dienst voor
belleridentificatie. De correspondenten die hebben gebeld, worden geïdentificeerd aan de
hand van hun telefoonnummer of hun naam, op dezelfde manier zoals dat bij het
belleridentificatiesysteem gebeurt.
Als er nieuwe/onbeantwoorde oproepen zijn, dan wordt dit in het scherm aangeduid door het
knipperende pictogram
. De lijst van de oproepen raadpleegt u als volgt:
1.
Druk op
. Als de lijst geen oproepen bevat, krijgt u ‘LEEG’ (EMPTY) te zien.
2.
De oproepen kunt u doorbladeren met behulp van de pijltjestoetsen of . De
namen van de bellers worden getoond als de naam door het netwerk werd
doorgestuurd of in het telefoonboek is opgeslagen. Als u het einde van de lijst heeft
bereikt, krijgt u een bieptoon te horen.
3.
Als u op OK drukt, wordt het telefoonnummer getoond. Opmerking: Als het
telefoonnummer langer is dan 12 cijfers, druk dan nogmaals op OK om het volledige
nummer te zien.
4.
Druk opnieuw op OK om op het scherm te brengen wanneer (tijdstip en datum) de
oproep werd ontvangen.
5.
Drukt u nogmaals op OK, dan krijgt u de mogelijkheid om deze beller te wissen of hem
toe te voegen aan het telefoonboek als dit nummer nog niet werd opgeslagen:
– Druk OK wanneer ‘TOEVOEGEN’ (ADD) verschijnt op het scherm. Geef de
naam in of wijzig hem en druk op OK. Geef het telefoonnummer in of wijzig het
en druk op OK. Selecteer de beltoon (1-5) die u wilt horen wanneer u van dit
36
OGATECH OG-S60/TWIN/TRIPLE/QUATTRO
OGATECH OG-S60/TWIN/TRIPLE/QUATTRO
3.11.2 Een nummer of alle nummers uit de oproeplijst wissen
U kunt elk nummer apart of alle nummers in één keer wissen:
• Scroll door de oproepen en druk:
– de mute-toets
om alleen dit nummer te wissen. Op het scherm verschijnt
‘WISSEN’ (DELETE).
– de mute-toets
(2 sec.) om alle nummers te wissen. Op het scherm verschijnt
‘ALLE WISSEN’ (DELETE ALL).
• Druk op OK om het huidige/alle nummer(s) te wissen, of op
om de wisopdracht te
annuleren.
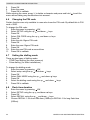
3.12 Herkies-geheugen
Uw telefoon houdt een lijst bij van de 10 laatste oproepen (van telkens 32 cijfers) die u deed.
Als ze opgenomen zijn in het telefoonboek, worden de gebelde correspondenten
geïdentificeerd aan de hand van hun telefoonnummer of hun naam.
De herkies-lijst opent u als volgt:
1.
Druk op
2.
U kunt de oproepen doorbladeren met behulp van de pijltjestoetsen en .
3.
Om de geselecteerde correspondent op te bellen, druk u gewoon op zodra hun
telefoonnummer of naam wordt getoond.
Als de naam wordt getoond, kunt u heen en weer schakelen tussen de naam
en het nummer met behulp van de OK-toets.
3.13 Bellen vanuit het telefoonboek
Een correspondent bellen wiens naam u in het telefoonboek heeft opgeslagen, doet u als
volgt:
1.
Druk op om het telefoonboek te openen
2.
Voer de eerste letter van de naam in. De eerste naam die begint met deze letter of
met de dichtstbijzijnde letter van het alfabet wordt nu getoond.
3.
Doorloop de lijst met behulp van de toetsen en . De lijst wordt weergegeven in
alfabetische volgorde.
4.
Druk op om het nummer te kiezen van de correspondent wiens naam wordt
getoond.
Om het nummer te zien vooraleer u de oproep daadwerkelijk doet, voert u de vermelde
stappen 1 tot 3 uit en drukt u op OK. Nu verschijnt het nummer. Met behulp van de toets kunt
u het wijzigen vooraleer u belt.
OGATECH OG-S60/TWIN/TRIPLE/QUATTRO
37
NEDERLANDS
nummer een oproep krijgt via de of -toetsen en druk op OK. De gegevens
worden opgeslagen in het telefoonboek.
6.
Om een correspondent terug te bellen, drukt u gewoon op de toets als hun
telefoonnummer of naam op het scherm verschijnen.
Als een beller in het telefoonboek is opgenomen, wordt hij geïdentificeerd aan de hand van
zijn naam in de lijst van onbeantwoorde oproepen.
OGATECH OG-S60/TWIN/TRIPLE/QUATTRO
3.14 Het alfanumerieke toetsenbord gebruiken
Met uw telefoon kunt u ook alfanumerieke karakters invoeren. Dat is nuttig om een naam in
te voeren, om een intern toestel een naam te geven, …
Om een letter te selecteren drukt u het vereiste aantal keren op de bijhorende toets. Om
bijvoorbeeld een 'A' te selecteren, drukt eenmaal op '2', om een 'B' te selecteren drukt u
tweemaal op '2', enz. Om achtereenvolgens een 'A' en een 'B' te selecteren, wacht u tot de
cursor na het invoeren van de 'A' naar het volgende karakter springt. Daarna drukt u opnieuw
op '2'. Om een spatie te selecteren drukt u op '1'. Om een streepje te selecteren drukt u
tweemaal op '1'.
De karakters van het toetsenbord zijn als volgt:
Toets 1x
2x
3x
drukken
drukken
drukken
1
spatie
1
2
A
B
C
3
D
E
F
4
G
H
I
5
J
K
L
6
M
N
O
7
P
Q
R
8
T
U
V
9
W
X
Y
4x
drukken
2
3
4
5
6
S
8
Z
5x
drukken
7
9
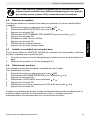
3.15 Het menu gebruiken
Dankzij een gebruiksvriendelijk menu heeft u toegang tot een groot aantal telefoonfuncties.
1.
Om het menu te openen drukt u op /OK
2.
Doorloop de selectiemogelijkheden met de toetsen en , zodra u de laatste heeft
bereikt springt het menu weer naar de eerste. De pijltjes rechts in het scherm geven
aan dat er verschillende selecties zijn waar u kunt doorheen bladeren.
3.
Druk op OK om een selectie te bevestigen.
4.
Om terug te keren naar het vorige menu drukt u op
4
Personalisering
Bij elke programmatie hoort u aan het einde een enkele of dubbele lange
bieptoon. Een dubbele bieptoon geeft aan dat uw keuze is aanvaard.
Een lange bieptoon geeft aan dat met de wijziging geen rekening werd
gehouden.
4.1
Belvolume aanpassen
4.1.1 Belvolume handset externe/interne oproepen
Het belvolume van de handset kan voor interne of externe oproepen apart worden ingesteld:
1.
Open het menu met een druk op /OK
2.
Selecteer ‘Handset’ met behulp van de toetsen en
3.
Druk op OK
38
OGATECH OG-S60/TWIN/TRIPLE/QUATTRO
OGATECH OG-S60/TWIN/TRIPLE/QUATTRO
4.
5.
6.
7.
Selecteer ‘INT BEL VOL’ (INT RING VOL) of ‘EXT BEL VOL’ (EXT RING VOL) met
behulp van de toetsen en
Druk op OK
Selecteer het gewenste volume (‘UIT’ of van 1 tot 5).
Druk op OK om te bevestigen of op
om terug te keren naar het vorige menu.
4.2
NEDERLANDS
4.1.2 Belvolume van het basistoestel
1.
Open het menu met een druk op /OK
2.
Selecteer ‘INSTELLINGEN’ met behulp van de toetsen en
3.
Druk op OK
4.
Selecteer ‘BASIS VOLUME’ (BASE VOLUME) met behulp van de toetsen en
5.
Druk op OK
6.
Selecteer het gewenste volume (‘UIT’ of van 1 tot 5)
7.
Druk op OK om te bevestigen of op
om terug te keren naar het vorige menu
Belmelodie kiezen
Het basistoestel en de handsets kunnen elk een ander melodiegeluid hebben.
De handsets kunnen een verschillende melodie hebben al naargelang de ingaande oproep
intern of extern is.
4.2.1 Belmelodie van het basistoestel
1.
Open het menu met een druk op /OK
2.
Selecteer ‘INSTELLINGEN’ met behulp van de toetsen en
3.
Druk op OK
4.
Selecteer ‘BS MELODIE’ (BASE MELODY) met behulp van de toetsen en
5.
Druk op OK
6.
Selecteer een melodie (1 tot 5) met behulp van de toetsen en
7.
Druk op OK om te bevestigen of op
om terug te keren naar het vorige menu
4.2.2 Belmelodie handset, externe oproep
1.
Open het menu met een druk op /OK
2.
Selecteer Handset met behulp van de toetsen en
3.
Druk op OK
4.
Selecteer ‘EXT MELODIE’ (EXT MELODY) met behulp van de toetsen en
5.
Druk op OK
6.
Selecteer een melodie (1 tot 5) met behulp van de toetsen en
7.
Druk op OK om te bevestigen of op
om terug te keren naar het vorige menu.
4.2.3 Belmelodie handset, interne oproep
1.
Open het menu met een druk op /OK
2.
Selecteer Handset met behulp van de toetsen en
3.
Druk op OK
4.
Selecteer ‘INT MELODIE’ (INT MELODY) met behulp van de toetsen en
5.
Druk op OK
6.
Selecteer een melodie (1 tot 5) met behulp van de toetsen en
7.
Druk op OK om te bevestigen of op
om terug te keren naar het vorige menu.
OGATECH OG-S60/TWIN/TRIPLE/QUATTRO
39
OGATECH OG-S60/TWIN/TRIPLE/QUATTRO
4.3
Luidsprekervolume tijdens oproep
Druk tijdens het gesprek op de toets
4.4
of
om het volume aan te passen.
Bieptonen activeren/desactiveren
De handsets kunnen een bieptoon laten horen wanneer een toets wordt ingedrukt, wanneer
de batterijen bijna leeg zijn en wanneer het toestel te ver van het basistoestel is verwijderd.
4.4.1 Bieptoon bij indrukken van toets aan- en uitzetten
1.
Open het menu met een druk op /OK
2.
Selecteer ‘HANDSET’ met behulp van de toetsen en
3.
Druk op OK
4.
Selecteer ‘BIEP’ met behulp van de toetsen en .
5.
Druk op OK
6.
Selecteer ‘TOETSTOON’ (KEYTONE) met behulp van de toetsen en .
7.
Druk op OK.
8.
Selecteer ‘AAN’ (ON) om de bieptoon in te schakelen, ‘UIT’ (OFF) om hem uit te
schakelen.
9.
Druk op OK om te bevestigen.
4.4.2 Batterij bijna leeg
Ga tewerk zoals hierboven wordt uiteengezet maar selecteer bij punt 6 ‘BATTERIJ’ (LOW
BATT) in plaats van ‘TOETSTOON’ (KEYTONE).
4.4.3 Handset te ver van basistoestel (buiten bereik)
Ga te werk zoals hierboven wordt uiteengezet maar selecteer bij punt 6 ‘BEREIK’
(OUTRANGE) in plaats van ‘TOETSTOON’ (KEYTONE).
4.5
Naam van de handset wijzigen
Met deze functie kunt u elke handset personaliseren.
1.
Open het menu met een druk op /OK.
2.
Selecteer ‘HANDSET’ met behulp van de toetsen en .
3.
Druk op OK.
4.
Selecteer ‘NAAM’ (NAME) met behulp van de toetsen en
5.
Druk op OK.
6.
Voer de naam in
7.
Druk op OK om te bevestigen.
.
Bij het invoeren van de naam drukt u op ‘c’ om een karakter te wissen of houdt u
om het menu te verlaten zonder enige wijzigingen aan te brengen.
4.6
ingedrukt
De PIN-code wijzigen
Sommige functies zijn enkel beschikbaar voor gebruikers die de PIN-code kennen. Deze
PIN-code is standaard 0000.
De PIN-code wijzigen:
1.
Open het menu met een druk op /OK
2.
Selecteer ‘INSTELLINGEN’ met behulp van de toetsen
40
en
OGATECH OG-S60/TWIN/TRIPLE/QUATTRO
OGATECH OG-S60/TWIN/TRIPLE/QUATTRO
4.7
Druk op OK.
Selecteer ‘PIN-CODE’ met behulp van de toetsen
Druk op OK.
Voer de oude PIN-code van 4 cijfers in.
Druk op OK.
Voer de nieuwe PIN-code van 4 cijfers in.
Druk op OK.
Voer de nieuwe PIN-code een tweede keer in.
Druk op OK om te bevestigen.
en
De kiesmodus instellen
Er zijn twee kiesmodi:
• DTMF/toonsysteem (het meest gebruikelijke)
• pulssysteem (bij oudere installaties)
De kiesmodus wijzigen:
1.
Open het menu met een druk op /OK
2.
Selecteer ‘INSTELLINGEN’ met behulp van de toetsen en
3.
Druk op OK.
4.
Selecteer ‘KIESMODE’ (DIALMODE) met behulp van de toetsen
5.
Druk op OK.
6.
Selecteer de kiesmodus met behulp van de toetsen en
7.
Druk op OK om te bevestigen.
4.8
1.
2.
3.
4.
5.
4.9
NEDERLANDS
3.
4.
5.
6.
7.
8.
9.
10.
11.
en
Flashtijd instellen
Open het menu met een druk op /OK
Selecteer ‘INSTELLINGEN’ met behulp van de toetsen en
Druk op OK.
Selecteer ‘FLASHTIJD’ met behulp van de toetsen en .
Kies ‘FLASH 1’ (RECALL 1) voor een korte Flashtijd (100ms) of ‘FLASH 2’
(RECALL 2) voor een lange Flashtijd (250 ms)
Automatisch opnemen
Als een ingaande oproep plaatsvindt en de handset zich op het basistoestel bevindt, zal de
telefoon automatisch de oproep beantwoorden wanneer de handset uit de basis wordt
genomen. Dit is de standaardinstelling, die u echter kunt uitschakelen (UIT):
1.
Open het menu met een druk op /OK
2.
Selecteer HANDSET met behulp van de toetsen en
3.
Druk op OK.
4.
Selecteer ‘AUTO ANTWDEN’ (AUTO ANSWER) met behulp van de toetsen en
5.
Selecteer ‘AAN’ (ON) voor automatisch beantwoorden of ‘UIT’ (OFF).
6.
Druk op OK.
4.10 Reset
U heeft de mogelijkheid om de telefoon weer om te schakelen naar de oorspronkelijke
standaardconfiguratie. Dat is de configuratie die reeds was geïnstalleerd toen u de telefoon
in gebruik nam.
OGATECH OG-S60/TWIN/TRIPLE/QUATTRO
41
OGATECH OG-S60/TWIN/TRIPLE/QUATTRO
Terugkeren naar de standaardinstellingen doet u als volgt:
1.
Open het menu met een druk op /OK
2.
Selecteer ‘INSTELLINGEN’ met behulp van de toetsen en
3.
Druk op OK
4.
Selecteer ‘RESET’ (DEFAULT) met behulp van de toetsen en
5.
Druk op OK
6.
Voer de PIN-code van vier cijfers in (standaard =0000).
7.
Druk op OK om te bevestigen.
DEFAULT PARAMETERS ZIJN:
Pieptonen batterij zwak
AAN
Pieptonen buiten bereik
UIT
Toetsklik
AAN
Auto beantwoorden
AAN
Beltoon interne oproep
1
Volume interne oproep
3
Beltoon externe oproep
3
Volume externe oproep
3
Volume ontvangst
3
Telefoonboek
Leeg
Oproeplijst
Leeg
Lijst nummerherhaling
Leeg
Pincode
0000
Inbelmodus
DTMF
Vergrendeling toetsenbord UIT
Als u terugkeert naar de standaardinstellingen, wist u hiermee alle
informatie in het telefoonboek en de oproeplijst. Tegelijk wordt de PINcode teruggezet naar 0000.
4.11 Vergrendeling toetsenbord
Het toetsenbord kan worden vergrendeld om te vermijden dat er instellingen worden
gewijzigd of telefoonnummers worden gevormd. Het -pictogram verschijnt op het scherm
wanneer het toetsenbord is vergrendeld.
4.11.1 Het toetsenbord vergrendelen via Menu
1.
Druk op /OK om het menu te openen
2.
Selecteer HANDSET met behulp van de up en down -toetsen
3.
Druk op OK
4.
Selecteer ‘KLAVIER VERG?’ (KEY LOCK?) met behulp van de up
down -toetsen
5.
Druk op OK om het toetsenbord te vergrendelen
en
4.11.2 Het toetsenbord via de *-toets vergrendelen (snelle vergrendeling)
Houd ’*’-toets 3 seconden ingedrukt. Het toetsenbord is nu vergrendeld.
42
OGATECH OG-S60/TWIN/TRIPLE/QUATTRO
OGATECH OG-S60/TWIN/TRIPLE/QUATTRO
4.11.3 Het toetsenbord ontgrendelen
1.
Druk op een willekeurige toets
2.
Op het scherm verschijnt DRUK *
3.
Druk binnen de 3 seconden op de ’*’ toets om het toetsenbord te ontgrendelen
1.
2.
3.
4.
5.
6.
7.
Open het menu met een druk op /OK
Selecteer HANDSET met behulp van de toetsen
en
Druk op OK.
Selecteer ‘TIJD INSTELL’ (Clock Set) met behulp van de toetsen
Druk op OK.
Geeft de huidige tijd in (24 uur formaat).
Druk op OK.
NEDERLANDS
4.12 Klok instellen
en
4.13 Alarm instellen
1.
2.
3.
4.
5.
6.
OF
7.
Open het menu met een druk op /OK
Selecteer HANDSET met behulp van de toetsen
en
Druk op OK.
Selecteer ‘ALARM INST’ (ALARM SET) met behulp van de toetsen
en
Druk op OK.
Selecteer ‘AAN’ (ON) om het alarm in te schakelen en druk op OK. Geeft de tijd
(24 uur formaat) in wanneer het alarm moet geactiveerd worden.
Selecteer ‘UIT’ (OFF) om het alarm uit te schakelen en druk op OK.
Je kan het alarm signaal stoppen door op eender welke handset toets te
drukken.
5
5.1
Geavanceerde functies
Telefoonboek
Met behulp van het telefoonboek kunnen 50 telefoonnummers en namen worden
opgeslagen. U kunt namen invoeren die tot 12 karakters lang zijn. Nummers mogen max. 20
cijfers lang zijn.
Om een correspondent op te bellen die in het telefoonboek is opgeslagen, wordt verwezen
naar hoofdstuk 3.14.
Om alfanumerieke karakters in te voeren verwijzen we naar hoofdstuk 3.15.
5.1.1 Een correspondent toevoegen aan het telefoonboek
1.
Open het menu met een druk op /OK
2.
Selecteer ‘TELEFOONBOEK’ (PHONEBK) met behulp van de toetsen
3.
Druk op OK
4.
Selecteer ‘TOEVOEGEN’ (Add) met behulp van de toetsen en
5.
Druk op OK
6.
Voer de naam in
OGATECH OG-S60/TWIN/TRIPLE/QUATTRO
en
43
OGATECH OG-S60/TWIN/TRIPLE/QUATTRO
7.
8.
9.
10.
11.
Druk OK om te bevestigen.
Voer het telefoonnummer in
Druk op OK om te bevestigen
Selecteer de gewenste beltoon (1-5) met behulp van de
Druk op OK om te bevestigen
en
-toetsen
5.1.2 Een naam of nummer wijzigen
Een nummer in het telefoonboek wijzigen:
1.
Open het menu met een druk op /OK
2.
Selecteer ‘TELEFOONBOEK’ (PHONEBK) met behulp van de toetsen en
3.
Druk op OK.
4.
Selecteer ‘EDITEREN’ (MODIFY) met behulp van de toetsen en
5.
Druk op OK.
6.
Doorloop de namenlijst met behulp van de toetsen en . De lijst wordt
weergegeven in alfabetische volgorde.
7.
Druk op OK als u de naam heeft gevonden die u wilt wijzigen.
8.
Gebruik de toets om terug te gaan en de nieuwe naam in te voeren.
9.
Druk op OK om te bevestigen.
10. Voer het nieuwe telefoonnummer in.
11. Druk op OK om te bevestigen.
Als u het telefoonboek eerst opent met de toets en een telefoonnummer
wijzigt met de toets
, zal de wijziging enkel voor deze oproep gelden,
maar niet in het telefoonboek worden opgeslagen.
5.1.3 Een correspondent wissen
Correspondenten wissen:
1.
Open het menu met een druk op /OK
2.
Selecteer ‘TELEFOONBOEK’ (PHONEBK) met behulp van de toetsen en
3.
Druk op OK.
4.
Selecteer ‘WISSEN’ (DELETE) met behulp van de toetsen en
5.
Druk op OK.
6.
Doorloop de namenlijst met behulp van behulp van de toetsen en . De lijst wordt
weergegeven in alfabetische volgorde.
7.
Druk op OK als u de naam heeft gevonden die u wilt wissen.
8.
Het telefoonnummer wordt getoond. Druk op OK.
9.
‘CONFIRMEREN?’ (CONFIRM) verschijnt. Druk op OK om te bevestigen of op
om het wissen te stoppen.
5.2
Een intern toestel zoeken via het basistoestel
Als de Paging-toets op het basistoestel wordt ingedrukt, beginnen alle handsets te
rinkelen. Dankzij het belsignaal kunt u de verloren handset lokaliseren. U stopt het belsignaal
door op een van de toetsen van de handset te drukken.
44
OGATECH OG-S60/TWIN/TRIPLE/QUATTRO
OGATECH OG-S60/TWIN/TRIPLE/QUATTRO
6
6.1
Gebruik van meerdere handsets
Een bijkomende handset registreren
U kunt nieuwe handsets toevoegen aan het basistoestel op voorwaarde dat deze handsets
met het DECT-GAP-protocol werken.
Het basistoestel kan maximaal met vijf handsets werken. Als u reeds vijf handsets heeft en
u er meer wilt toevoegen of een toestel wilt vervangen, moet u eerst een handset wissen en
het nieuwe vervolgens toevoegen.
Om een handset te kunnen registreren, moet het basistoestel eerst in de speciale
registratiemodus worden gezet:
Eerst zet u het basistoestel in de registratiemodus, daarna start u de procedure bij de nieuwe
handset:
1.
Houd de Paging-toets van het basistoestel 6 seconden lang ingedrukt.
2.
Het basistoestel geeft dan een pieptoon. Het basistoestel is nu klaar om een nieuwe
handset te registreren. Na het indrukken van de knop heeft u 90 seconden tijd om een
nieuwe handset te registreren.
6.1.1 Als de bijkomende handset een OGATECH OG-S60 is
3.
Open het menu met een druk op /OK
4.
Selecteer ‘AANMELDEN’ (REGISTER) met behulp van de toetsen en
5.
Druk op OK
6.
Selecteer ‘BS AANMELDEN’ (REGISTER) met behulp van de up en down toetsen
7.
Voer het nummer van een basistoestel in (1 tot 4). Nummers die knipperen zijn reeds
in gebruik op andere DECT-basistoestellen.
8.
Voer de PIN-code van het basistoestel in (standaard: 0000).
9.
Druk op OK. De handset zoekt nu naar het DECT-basistoestel.
10. Als de handset het basistoestel heeft gelokaliseerd, wordt het identificatienummer van
het basistoestel getoond. De registratie bij het basistoestel bevestigt u met een druk
op OK. Stoppen is mogelijk met een druk op de toets .
11. Als de handset het basistoestel niet lokaliseert, keert het na enkele seconden
automatisch terug naar de standbymodus. Probeer het nogmaals door het nummer
van het basistoestel te wijzigen en te controleren of er zich in de omgeving geen
interferentiebronnen bevinden. Ga dichter bij het basistoestel staan.
6.1.2 Uw handset is een ander model
Nadat u de registratieprocedure heeft gestart bij het basisstation, registreert u de handset
(zie in de handleiding van de handset). De handset moet GAP-compatibel zijn.
Het pictogram en de tekst ‘NT AANG’ (NOT REG) knipperen in het scherm als de handset
niet op het basistoestel is geregistreerd. Als een handset op een basistoestel wordt
geregistreerd, kent het basistoestel een handset nummer toe. Dit nummer verschijnt op de
handset na de naam en moet worden gebruik voor interne oproepen.
OGATECH OG-S60/TWIN/TRIPLE/QUATTRO
45
NEDERLANDS
U moet enkel de 2de handset registreren indien deze niet is gelinkt met de
basis of wanneer u een nieuwe heeft aangekocht.
OGATECH OG-S60/TWIN/TRIPLE/QUATTRO
Het DECT GAP protocol zorgt ervoor dat verschillende DECT systemen
met elkaar kunnen werken. Enkel de basisfuncties zijn echter mogelijk,
zoals telefoneren,... Speciale functies zoals CLIP,... worden in de meeste
gevallen niet ondersteund.
6.2
Een handset verwijderen
U kunt een handset verwijderen van een basistoestel om een andere handset te registreren.
1.
Open het menu met een druk op /OK
2.
Selecteer ‘INSTELLINGEN’ met behulp van de toetsen en
3.
Druk op OK
4.
Selecteer ‘HS VERWIJDER’ (DEL HS) met behulp van de toetsen en
5.
Druk op OK.
6.
Voer de viercijferige PIN-code van het basistoestel in.
7.
Druk op OK.
8.
Selecteer het interne toestel dat moet worden verwijderd.
9.
Druk op OK om te bevestigen.
6.3
Een handset installeren op een ander basistoestel
Wanneer u een OGATECH OG-S60 wilt gebruiken met het basistoestel van een ander
model, moet het basistoestel GAP-compatibel zijn.
1.
Zie de gebruikershandleiding van het basistoestel voor het activeren van de
registratiemodus.
2.
Voer de stappen 3 tot 10 uit die in de paragraaf 6.1 worden beschreven.
6.4
Een basistoestel selecteren
De handsets kunnen bij maximaal vier basistoestellen geregistreerd zijn.
Een basistoestel selecteren:
1.
Open het menu met een druk op /OK
2.
Selecteer ‘AANMELDEN’ met behulp van de toetsen en
3.
Druk op OK
4.
Selecteer ‘BASIS SELECT’ (SEL BASE) met behulp van de toetsen en
5.
Druk op OK
6.
Selecteer een basistoestel of kies AUTO met behulp van de toetsen en
7.
Druk op OK.
Wanneer u het basisstation selecteert, knippert het basisnummer van het geselecteerde
basisstation. Als u ‘Auto’ selecteert, zal de handset automatisch naar een ander basistoestel
zoeken als u uit het zendbereik bent.
46
OGATECH OG-S60/TWIN/TRIPLE/QUATTRO
OGATECH OG-S60/TWIN/TRIPLE/QUATTRO
7
Problemen verhelpen
Symptoom
Mogelijke oorzaak
Oplossing
Geen scherm
Batterijen niet opgeladen
Controleer de positie van de
batterijen
Handset uitgeschakeld (OFF)
Handset inschakelen (ON)
Telefoonkabel verkeerd
aangesloten
Controleer de aansluiting van
de telefoonkabel
Geen kiestoon
De lijn wordt gebruikt door een Wacht tot de andere handset
andere handset
het gesprek beëindigt
Het pictogram knippert
Handset buiten bereik
Breng de handset dichter bij
het basistoestel
Het basistoestel krijgt geen
stroom.
Controleer de netaansluiting
van het basistoestel
De handset is niet geregistreerd Registreer de handset bij het
bij het basistoestel
basistoestel
Het basistoestel of de
handset geven geen
belsignaal
Er is geen belsignaal of de
beltoon is nauwelijks hoorbaar
Belvolume aanpassen
Er is kiestoon, maar men Verkeerd kiessysteem
kan geen nummer
vormen
Kiessysteem aanpassen (puls/
toon).
In PABX kunnen geen
oproepen worden
doorgeschakeld
Schakel het toestel om naar de
Long Flash-tijd.
De FLASH-tijd is te kort
De telefoon reageert niet Manipulatiefout
op toetsindrukken
8
8.1
Verwijder de batterijen en
plaats ze weer in het toestel
Garantie
Garantieperiode
Op deze toestellen wordt een garantie van 36 maanden verleend. De garantieperiode gaat
in op de dag waarop het nieuwe toestel wordt gekocht. Er is geen garantie op standaard of
oplaadbare batterijen (type AA/AAA).
Kleine onderdelen of defecten die een verwaarloosbaar effect hebben op de werking of
waarde van het toestel zijn niet gedekt door de garantie.
De garantie moet worden bewezen door voorlegging van het originele aankoopbewijs of
kopie waarop de datum van aankoop en het toesteltype staat.
8.2
Afwikkeling van garantieclaims
Een defect toestel moet, samen met een geldig aankoopbewijs en een ingevulde
onderhoudskaart, worden teruggestuurd naar een erkende hersteldienst.
OGATECH OG-S60/TWIN/TRIPLE/QUATTRO
47
NEDERLANDS
Herlaad de batterijen
OGATECH OG-S60/TWIN/TRIPLE/QUATTRO
Als het toestel tijdens de garantieperiode een defect vertoont, zal de hersteldienst eventuele
defecten te wijten aan materiaal- of productiefouten gratis herstellen, door defecte toestellen
of onderdelen van defecte toestellen ofwel te herstellen ofwel te vervangen. In het geval dat
het toestel wordt vervangen, kan de kleur en het model verschillend zijn van het
oorspronkelijk gekochte toestel.
De oorspronkelijke aankoopdatum is bepalend voor het begin van de garantieperiode. De
garantieperiode wordt niet verlengd als het toestel wordt vervangen of hersteld door de
hersteldienst.
8.3
Garantiebeperkingen
Schade of defecten te wijten aan onoordeelkundig gebruik of bediening en schade te wijten
aan het gebruik van niet-originele onderdelen of accessoires worden niet gedekt door de
garantie.
De garantie dekt geen schade te wijten aan externe factoren, zoals bliksem, water en brand,
noch enige transportschade.
Er kan geen garantie worden ingeroepen als het serienummer op het toestel is gewijzigd,
verwijderd of onleesbaar gemaakt. Garantieclaims zijn ongeldig indien het toestel hersteld,
gewijzigd of aangepast werd door de koper.
Dit toestel mag uitsluitend gebruikt worden met herlaadbare batterijen. Indien U de
meegeleverde batterijen wenst te vervangen moet U nagaan of de gebruikte batterijen wel
geschikt en herlaadbaar zijn. In GEEN enkel geval mogen Alkaline batterijen in de handsets
gebruikt worden.
Indien U Alkaline batterijen gebruikt en de handset op de basis plaatst, dan zullen deze
batterijen opwarmen en mogelijk exploderen. Eventuele schade die hierdoor ontstaat is niet
verhaalbaar op de fabrikant en tevens is de schade aan het toestel niet gedekt door de
garantievoorwaarden. Eventuele herstelkosten zullen U aangerekend worden.
9
Technische kenmerken
•
Standaard:
•
•
•
•
•
•
Frequentieband:
Aantal kanalen:
Modulatie:
Codering:
Zendvermogen:
Bereik:
•
•
Voeding basistoestel:
Handsetbatterijen:
•
•
•
•
Autonomie basistoestel:
Gesprekstijd:
Laadduur:
Normale gebruiksomstandigheden:
48
DECT (Digital Enhanced Cordless Tele
communications)
GAP (Generic Access Profile)
1880 MHZ tot 1900 MHz
120 duplexkanalen
GFSK
32 kbit/s
10 mW (gemiddeld vermogen per kanaal)
max. 300 m in openlucht / 10- 50 m
binnenshuis
230 V / 50 Hz
2 oplaadbare batterijen AAA, NiMh
550mAh
200 uur in standby
10 uur
6-8 uur
+5 °C tot +45 °C
OGATECH OG-S60/TWIN/TRIPLE/QUATTRO
OGATECH OG-S60/TWIN/TRIPLE/QUATTRO
•
•
•
•
•
•
•
•
•
Utilisez uniquement l’adaptateur fourni à la livraison. Ne pas utiliser des adaptateurs
étrangers, les cellules de charge pourraient être endommagées.
Installez uniquement des batteries rechargeables du même type. N'utilisez en aucun
cas des batteries normales non rechargeables. Placez correctement les pôles des
batteries rechargeables (comme indiqué dans le compartiment à batteries du combiné).
Ne touchez pas les contacts des chargeurs et des prises à l'aide d'objets contendants et
métalliques.
Le fonctionnement des appareils médicaux peut être perturbé.
Le combiné peut provoquer des grésillements désagréables dans des écouteurs.
Ne pas placer le poste de base dans une pièce humide ou à moins de 1,5 m d'un point
d'eau. Le combiné ne peut être en contact avec l'eau.
N'utilisez pas le téléphone dans un endroit où une explosion est susceptible de se
produire.
Respectez les directives relatives à la mise en décharge et au retraitement des batteries
et du téléphone.
Etant donné qu'il n'est pas possible d'utiliser le téléphone pendant une panne
d'électricité, employez un téléphone indépendant de l'alimentation sur secteur, par
exemple un téléphone portable, pour tout appel d'urgence.
Mise au rebut de l’appareil (environnement)
Au terme du cycle de vie de ce produit, vous ne devez pas jeter le produit dans
les déchets ménagers ordinaires mais le déposer dans un point de collecte pour
le recyclage des équipements électriques et électroniques. Le symbole sur ce
produit, guide d’utilisation et / ou boîte indique ceci.
Certains matériaux du produit peuvent être réutilisés si vous les déposez dans
un point de recyclage. En réutilisant certaines pièces ou matières premières
des produits usagés, vous apportez une contribution importante à la protection de
l’environnement.
Veuillez contacter vos autorités locales pour toute information supplémentaire sur les points
de collecte dans votre région.
Entretien
Frottez le téléphone avec un chiffon légèrement humide ou avec un linge antistatique.
N'utilisez jamais de produits détergents ou agressifs.
Ce produit fonctionnement uniquement avec des piles rechargeables. Si
vous mettez des piles non rechargeables dans le combiné et si vous le
placez sur la base, le combiné sera endommagé et ceci ne sera PAS
couvert par la garantie.
La conformité de l’appareil avec les exigences fondamentales de la directive
européenne R&TTE relative aux terminaux, est confirmée par le label CE.
OGATECH OG-S60/TWIN/TRIPLE/QUATTRO
49
FRANÇAIS
Consignes de sécurité
OGATECH OG-S60/TWIN/TRIPLE/QUATTRO
1
1.1
Description du telephone
Combiné et base OGATECH OG-S60
Ecouteur
Indicateur (LED)
du combiné manuel
Ecran
Coupure de son/Touche 'Effacer
Menu / OK
Touche 'Reformer/Pause'
Flèche ‘Monter’
Répertoire téléphonique /
Touche 'Quitter'
Flèche 'Descendre' /
Touche' Enregistrement appel
Appel interne
Flash key Courant ON/OFF
Microphone
Bouton Paging
OG-S60
Indicateur de courant
LED appels entrants
50
Indicateur de charge
OGATECH OG-S60/TWIN/TRIPLE/QUATTRO
OGATECH OG-S60/TWIN/TRIPLE/QUATTRO
1.2
Chargeur OGATECH OG-S60
Indicateur de charge
OG-S60
Display
Icône Ligne
Ligne d'affichage
(12 caractères maximum)
Chaque opération est associée à une icône.
Icône:
Signification:
Vous avez decroché la ligne.
EXT
Vous avez une communication externe.
INT
Vous avez une communication interne.
Nouveaux numéros dans la liste des appels.
Indique les appels répondus
Indique les appels en absence
Vous ouvrez votre répertoire téléphonique.
Vous êtes dans le menu.
Indicateur de niveau de la pile rechargeable.
1 segment: faible, 2 segments: moyen, 3 segments: bon.
L'antenne indique la qualité de la réception.
L'antenne clignote lorsque le combiné n'est pas enregistré dans la base..
Clavier du combiné verrouillé
ou
Indique que le numéro affiché dépasse la largeur de l'écran (12 caractères).
1.3.1 Affichage en stand-by
En mode stand-by, l'écran affiche l’heure et le numéro du combiné:
12-05 HS1
OGATECH OG-S60/TWIN/TRIPLE/QUATTRO
51
FRANÇAIS
1.3
OGATECH OG-S60/TWIN/TRIPLE/QUATTRO
1.4
Indicateur du combine (LED)
Le LED du combiné a la fonction suivante:
• ON lorsque la ligne externe est occupée.
• OFF lorsque tous les combinés se trouvent en mode stand-by.
• Clignote sur tous les combinés en cas d'appel entrant.
2
2.1
Installation du téléphone
Connexions
Á l’arrière de la base OGATECH OG-S60
TEL
Câble du
téléphone
Câble de courant
Á l’arrière du chargeur OGATECH OG-S60
Câble de courant
52
OGATECH OG-S60/TWIN/TRIPLE/QUATTRO
OGATECH OG-S60/TWIN/TRIPLE/QUATTRO
2.2
Piles rechargeables
Avant d'utiliser votre OGATECH OG-S60 pour la première fois, vous devez
vous assurer que les piles ont été chargées pendant 6-8 heures. Le
téléphone ne fonctionnera pas de façon optimale si les piles ne sont pas
correctement chargées.
Pour changer ou insérer les piles rechargeables:
1.
Faites glisser le couvercle vers le bas et soulevez-le ensuite.
2.
Insérez les piles en respectant la polarité (+ et -).
3.
Replacez le couvercle à piles.
Couvercle
Le combiné vu de dos
FRANÇAIS
+
-
+ Piles
OG-S60
rechargeables
La durée d'utilisation maximale des piles est d'environ 200 heures et la
durée maximale de communication est de 10 heures! Au fil du temps, les
piles se déchargeront plus rapidement. Les piles doivent alors être
remplacées. Vous pouvez acheter les piles dans n'importe quel magasin de
bricolage (2 piles rechargeables du type AAA NiMH)!
3
3.1
1.
2.
3.
4.
5.
6.
7.
3.2
•
•
Utilisation du téléphone
Choix de la langue du menu
Entrez dans le menu en appuyant sur la touche /OK
Sélectionnez COMBINE (HANDSET) avec les touches
Appuyez sur la touche OK
Sélectionnez LANGUE (LANGUAGE) avec les touches
Appuyez sur la touche OK
Sélectionnez la langue de votre choix avec les touches
Appuyez sur la touche OK pour valider
et
et
et
Combine ON/OFF
Brancher le combiné MARCHE (ON): Appuyez sur le bouton
combiné recherchera sa base.
Débrancher le combine ARRET (OFF): appuyez sur la touche
L'écran s'éteindra.
OGATECH OG-S60/TWIN/TRIPLE/QUATTRO
sur le combiné. Le
pendant 2 secondes.
53
OGATECH OG-S60/TWIN/TRIPLE/QUATTRO
3.3
Recevoir un appel
Lorsque le combiné sonne, vous appuyez sur la touche pour répondre. Vous êtes alors en
communication avec votre correspondant. Si le combiné est posé sur la base lorsque le
téléphone sonne, vous devez simplement décrocher le combiné pour répondre (si l'option
'Reponse automatique' est activée: voir 4.9 Reponse automatique).
3.4
Proceder a un appel externe
3.4.1 Numerotation normale:
1.
Appuyez sur la touche
2.
Introduisez le numéro de téléphone.
3.4.2 Numerotation bloquée:
1.
Composez le numéro de votre correspondant.
2.
Appuyez sur la touche
Pour corriger un numéro, utilisez la touche
pour effacer un caractère enregistré.
3.5
1.
2.
3.6
Proceder a un appel interne
Appuyez sur la touche INT.
Introduisez le numéro du combiné interne (1 à 5).
Transfert interne d'un appel
Lorsque vous voulez transférer un appel externe vers un autre combiné:
1.
Au cours d'une conversation, vous appuyez sur la touche INT.
2.
Sélectionnez le numéro du combiné interne pendant que l'appelant externe est mis en
attente.
3.
Lorsque l'autre combiné décroche, appuyez sur la touche pour raccrocher et
transférer ainsi l'appel.
Si le correspondant interne ne décroche pas, appuyez sur la touche INT et reconnectez-vous
avec l'appelant externe qui est en ligne.
3.7
Conference call
Uniquement possible lorsque plus d'un combiné est enregistré dans la base!!
Vous pouvez tenir une conversation simultanée avec un correspondant interne et un
correspondant externe.
Lorsque vous êtes en ligne avec un correspondant externe:
1.
Appuyez sur la touche INT.
2.
Introduisez le numéro du combiné interne que vous voulez appeler.
3.
Lorsque le correspondant interne décroche, appuyez sur et maintenez la touche #.
4.
Si le correspondant interne ne décroche pas, appuyez à nouveau sur la touche INT et
reconnectez-vous avec l'appelant externe qui est en ligne.
3.8
Affichage de la duree de l'appel
La durée de l'appel est affichée après 15 secondes, exprimée en minutes & secondes:
"00-20".
A la fin de chaque appel, la durée totale de l'appel est affichée pendant 5 secondes.
54
OGATECH OG-S60/TWIN/TRIPLE/QUATTRO
OGATECH OG-S60/TWIN/TRIPLE/QUATTRO
3.9
Coupure du son du microphone
Il est possible de couper le son du microphone pendant une conversation.
Appuyez sur la touche
en cours de conversation, le microphone est alors désactivé et
vous pouvez parler librement sans être entendu par l'appelant.
L'écran affiche ‘MICRO COUPE’ (MUTE).
Appuyez une nouvelle fois sur la touche
pour revenir au mode normal.
3.10 Touche pause
Lorsque vous composez un numéro, vous pouvez insérer une pause entre deux caractères
en appuyant sur la touche 'Recomposer/Pause'
pendant 2 secondes.
L'identification de l'appelant n'est disponible que si vous avez souscrit un abonnement en ce
sens auprès de votre opérateur téléphonique.
Lorsque vous recevez un appel externe, le numéro de l'appelant s'affichera sur l'écran
pendant que le téléphone sonne.
Si le réseau le transmet, ou si le nom de l'appelant se trouve dans le répertoire téléphonique,
l'appelant sera identifié par son nom.
L'identité de l'appelant est remplacée par la durée de l'appel après 15 secondes de
communication. Il est toujours possible d'afficher l'identité de l'appelant après ce délai en
appuyant de façon répétée sur la touche OK pour le nom et le numéro.
3.11.1 Liste des appels
Votre téléphone conserve en mémoire la liste des 40 derniers appels reçus. Cette fonction
n'est disponible que si vous avez souscrit un abonnement pour la fonction 'Caller ID'. Les
correspondants qui ont appelé sont identifiés par leur numéro de téléphone et leur nom de
la même façon que pour la fonction 'Caller ID'.
La présence de nouveaux appels ou d'appels auxquels il n'a pas été répondu est indiquée
par le clignotement de l'icône
sur l'écran. Pour consulter la liste des appels:
1.
Appuyez sur la touche
. S'il n'y a pas d'appels dans la liste, l'écran affichera 'VIDE’
(EMPTY).
2.
Parcourez les appels à l'aide des touches ou . Les noms des appelants seront
affichés s'ils ont été envoyés par le réseau ou s'ils sont stockés dans le répertoire
téléphonique. Lorsque apparaît, vous avez répondu à cet appel. Lorsque
apparaît, l’appel est resté sans réponse. En atteignant la fin de la liste, vous percevrez
un bip sonore.
3.
Si vous appuyez sur la touche OK, le numéro de téléphone est affiché à l’écran.
Remarque: si le numéro de téléphone dépasse la capacité de 12 caractères, appuyez
une nouvelle fois sur la touche OK pour voir la totalité du numéro.
4.
Appuyez une nouvelle fois sur la touche OK pour voir l'heure et la date de l'appel.
5.
Appuyer de nouveau sur OK vous permettra d’ajouter cette entrée dans le répertoire
si ce n’est pas déjà fait :
– Appuyez sur OK lorsque ’AJOUTER’ (ADD) est affiché à l’écran . Entrez ou
modifiez le nom et appuyez sur OK. Entrez ou modifiez le numéro de téléphone
et appuyez sur OK. Sélectionnez la mélodie (1-5) qui sera entendue lorsque ce
numéro appelle au moyen des boutons ou et appuyez sur OK. L’entrée sera
enregistrée dans le répertoire.
OGATECH OG-S60/TWIN/TRIPLE/QUATTRO
55
FRANÇAIS
3.11 Identification de l'appelant
OGATECH OG-S60/TWIN/TRIPLE/QUATTRO
6.
Pour rappeler un correspondant, appuyez simplement sur la touche lorsque son
numéro de téléphone ou son nom est affiché à l'écran.
Si l'appelant est dans le répertoire téléphonique, il est identifié par son nom dans la liste des
appels auxquels il n'a pas été répondu.
3.11.2 Effacer une entrée ou toutes les entrées dans la liste d’appels
Vous pouvez effacer chaque entrée séparément ou toutes les entrées en une seule fois :
• Lorsque vous parcourez la liste d’appels, appuyez sur :
– le bouton mute
brièvement pour effacer uniquement cette entrée.
‘EFFACER’ (DELETE) apparaît à l’écran.
– le bouton mute
un certain temps (2 sec.) pour effacer toutes les entrées :
‘EFF TOUT’ (DELETE ALL) apparaît à l’écran.
• Appuyez sur OK pour effacer l’entrée actuelle ou toutes les entrées, ou sur
pour
annuler l’opération d’effacement.
3.12 Memoire de recomposition de numeros
Votre téléphone conserve une liste des 10 derniers appels (de 32 caractères) que vous avez
effectués; les correspondants sont identifiés par leur numéro de téléphone ou leur nom s'ils
apparaissent dans le répertoire téléphonique.
Pour consulter la liste de recomposition des numéros:
1.
Appuyez sur la touche
.
2.
Parcourez les appels avec les touches et .
3.
Pour appeler le correspondant sélectionné, appuyez simplement sur la touche
lorsque le numéro de téléphone ou le nom est affiché.
Lorsque le nom est affiché, vous pouvez passer du nom au numéro de
téléphone en appuyant sur la touche OK!
3.13 Appeler depuis le répertoire téléphonique
Pour appeler un correspondant dont le nom est conservé dans le répertoire téléphonique:
1.
Appuyez sur la touche pour avoir accès au répertoire téléphonique.
2.
Introduisez la première lettre du nom. Le premier nom commençant par cette lettre ou
la prochaine lettre de l'alphabet apparaîtra à l'écran.
3.
Parcourez la liste de noms avec les touches et . La liste est parcourue dans
l'ordre alphabétique.
4.
Appuyez sur la touche pour composer le numéro du correspondant dont le nom est
affiché.
Pour consulter le numéro avant d'appeler, vous reprenez les étapes 1 à 3 ci-dessus et vous
appuyez sur la touche OK.
3.14 Utilisation du clavier alphanumérique
Votre téléphone vous permet également d'introduire des caractères alphanumériques. Cette
fonction est utile pour introduire un nom dans le répertoire téléphonique, donner un nom à
un combiné,...
Pour sélectionner une lettre, appuyez sur la touche correspondante autant de fois que
nécessaire. Par exemple: pour sélectionner un 'A', vous appuyez une seule fois sur la touche
56
OGATECH OG-S60/TWIN/TRIPLE/QUATTRO
OGATECH OG-S60/TWIN/TRIPLE/QUATTRO
'2', pour sélectionner un 'B', vous appuyez deux fois sur la touche '2' et ainsi de suite. Pour
composer successivement un 'A' et un 'B', sélectionnez 'A', attendez que le curseur se soit
déplacé vers le caractère suivant et appuyez deux fois sur la touche '2'.
Pour sélectionner un espace, appuyez sur la touche '1'.
Pour sélectionner un trait, appuyez deux fois sur la touche '1'.
Cinquième
appui
7
9
3.15 Utilisation du menu
Une vaste gamme de fonctions téléphoniques est accessible par un menu très facile à
manipuler.
1.
Pour avoir accès au menu, appuyez sur la touche /OK.
2.
Parcourez les sélections avec les touches et . Les sélections défilent en boucle
(vous revenez à la première fonction après la dernière).
3.
Pour valider une sélection, appuyez sur la touche OK
4.
Pour revenir au menu précédent, appuyez sur la touche
4
Personalisation
Toute programmation est confirmée à la fin par un double bip ou par un seul
bip prolongé. Un double bip confirme la validation de votre choix. Un bip
prolongé signifie que la modification n'a pas été prise en compte.
4.1
Reglage du volume du haut-parleur
4.1.1 Volume de sonnerie du combiné appels externes/internes
Le volume de sonnerie du combiné pour les appels externes/internes peut être réglé
séparément :
1.
Entrez dans le menu en appuyant sur la touche /OK
2.
Sélectionnez COMBINE (HANDSET) avec les touches et
3.
Appuyez sur la touche OK
4.
Sélectionnez ‘VOL SON INT’ (INT RING VOL) ou ‘VOL SON EXT’ (EXT RING VOL)
avec les touches et
5.
Appuyez sur la touche OK
6.
Sélectionnez le volume souhaité (‘COUPE’ ou 1 à 5)
7.
Appuyez sur la touche OK pour confirmer ou
pour revenir au menu précédent
OGATECH OG-S60/TWIN/TRIPLE/QUATTRO
57
FRANÇAIS
Les caractères du clavier se présentent comme suit:
Premier
Second
Troisième
Quatrième
appui
appui
appui
appui
1
espace
1
2
A
B
C
2
3
D
E
F
3
4
G
H
I
4
5
J
K
L
5
6
M
N
O
6
7
P
Q
R
S
8
T
U
V
8
9
W
X
Y
Z
OGATECH OG-S60/TWIN/TRIPLE/QUATTRO
4.1.2 Sonnerie de la base
1.
Entrez dans le menu en appuyant sur la touche /OK
2.
Sélectionnez REGLAGE (SETUP) avec les touches et
3.
Appuyez sur la touche OK
4.
Sélectionnez ‘VOLUME BASE’ (BASE VOLUME) avec les touches et
5.
Appuyez sur la touche OK
6.
Sélectionnez le volume souhaité (‘COUPE’ ou 1 à 5)
7.
Appuyez sur la touche OK pour confirmer ou
pour revenir au menu précédent.
4.2
Choix de la mélodie de la sonnerie
La base et chaque combiné peuvent être réglés en vue de reproduire une mélodie différente.
Les combinés peuvent également reproduire une mélodie différente selon s'il s'agit d'un
appel interne ou externe.
4.2.1 Mélodie de la base
1.
Entrez dans le menu en appuyant sur la touche /OK
2.
Sélectionnez REGLAGE (SETUP) avec les touches et
3.
Appuyez sur la touche OK
4.
Sélectionnez ‘MELODIE BASE’ (BASE MELODY) avec les touches et
5.
Appuyez sur la touche OK
6.
Sélectionnez la mélodie de votre choix (1 à 5)
7.
Appuyez sur la touche OK pour confirmer ou
pour revenir au menu précédent.
4.2.2 Mélodie du combiné, appel exterene
1.
Entrez dans le menu en appuyant sur la touche /OK
2.
Sélectionnez COMBINE (HANDSET) avec les touches et
3.
Appuyez sur la touche OK
4.
Sélectionnez MELODIE EXT. (EXT MELODY) avec les touches et
5.
Appuyez sur la touche OK
6.
Sélectionnez la mélodie souhaitée (1 à 5)
7.
Appuyez sur la touche OK pour confirmer ou
pour revenir au menu précédent.
4.2.3 Mélodie du combiné, appel interne
1.
Entrez dans le menu en appuyant sur la touche /OK
2.
Sélectionnez COMBINE (HANDSET) avec les touches et
3.
Appuyez sur la touche OK
4.
Sélectionnez ‘MELODIE INT’ (INT MELODY) avec les touches et
5.
Appuyez sur la touche OK
6.
Sélectionnez la mélodie de votre choix (1 à 5)
7.
Appuyez sur la touche OK pour confirmer ou
pour revenir au menu précédent.
4.3
Volume du haut-parleur en cours d’appel
Pendant la conversation, vous appuyez sur les touches
un sens ou dans l'autre.
58
et
pour modifier le volume dans
OGATECH OG-S60/TWIN/TRIPLE/QUATTRO
OGATECH OG-S60/TWIN/TRIPLE/QUATTRO
4.4
Activation/desactivation des bips
Le combiné peut émettre un bip quand une touche est activée, lorsque les piles sont faibles
ou lorsque le combiné est hors de portée.
4.4.2 Piles faibles
Procédez comme ci-dessus, mais sélectionnez ‘BATT FAIBLE’ (LOW BATT) au point 6 au
lieu de ‘BIP TOUCHE’ (KEYTONE).
4.4.3 Combiné hors de portée
Procédez comme ci-dessus, mais sélectionnez ‘HORS PORTEE’ (OUTRANGE) au point 6
au lieu de ‘BIP TOUCHE’ (KEYTONE).
4.5
Designation des combinés
Cette fonction vous permet de personnaliser chaque combiné.
1.
Entrez dans le menu en appuyant sur la touche /OK
2.
Sélectionnez COMBINE (HANDSET) avec les touches et
3.
Appuyez sur la touche OK
4.
Sélectionnez NOM (NAME) avec les touches et
5.
Appuyez sur la touche OK
6.
Introduisez le nom
7.
Appuyez sur la touche OK pour valider
Pendant que vous introduisez le nom, vous pouvez appuyer la touche pour effacer un
caractère et appuyez sur & maintenir la touche pour quitter le menu sans prendre en
compte une quelconque modification.
4.6
Modifier le code PIN
Certaines fonctions ne sont disponibles qu'aux utilisateurs informés du code PIN. Par défaut,
ce code PIN = 0000.
Pour modifier le code PIN:
1.
Entrez dans le menu en appuyant sur la touche /OK.
2.
Sélectionnez REGLAGE (SETUP) avec les touches et
3.
Appuyez sur la touche OK.
4.
Sélectionnez ‘CODE PIN‘ (PIN CODE) avec les touches
5.
Appuyez sur la touche OK.
OGATECH OG-S60/TWIN/TRIPLE/QUATTRO
.
et
.
59
FRANÇAIS
4.4.1 Bip sonore ‘touche activée’ on/off
1.
Entrez dans le menu en appuyant sur la touche /OK
2.
Sélectionnez COMBINE (HANDSET) avec les touches et
3.
Appuyez sur la touche OK
4.
Sélectionnez ‘BIPS’ (BEEP) avec les touches et
5.
Appuyez sur la touche OK
6.
Sélectionnez ‘BIP TOUCHE’ (KEYTONE) avec les touches et
7.
Appuyez sur la touche OK
8.
Sélectionnez ‘ACTIVE’(ON) pour activer, ‘DESACTIVE’ (OFF) pour désactiver
9.
Appuyez sur la touche OK pour confirmer.
OGATECH OG-S60/TWIN/TRIPLE/QUATTRO
6.
7.
8.
9.
10.
11.
4.7
Introduisez l'ancien code PIN à 4 chiffres.
Appuyez sur la touche OK.
Introduisez le nouveau code PIN à 4 chiffres.
Appuyez sur la touche OK.
Introduisez une deuxième fois le nouveau code PIN.
Appuyez sur la touche OK pour valider.
Reglage du mode de composition des numéros
Il existe deux types de composition des numéros:
• DTMF/FREQ VOCALE composition par tonalité (le mode le plus commun)
• Composition par pulsations (pour les installations plus anciennes)
Pour modifier le mode de composition des numéros:
1.
Entrez dans le menu en appuyant sur la touche /OK.
2.
Sélectionnez REGLAGE (SETUP) avec les touches et .
3.
Appuyez sur la touche OK.
4.
Sélectionnez ‘NUMEROTATION’ (DIALMODE) avec les touches
5.
Appuyez sur la touche OK.
6.
Sélectionnez le mode de composition avec les touches et .
7.
Appuyez sur la touche OK pour valider.
4.8
1.
2.
3.
4.
5.
4.9
et
.
Durée de la fonction Flash Time
Entrez dans le menu en appuyant sur la touche /OK.
Sélectionnez REGLAGE (SETUP) avec les touches et .
Appuyez sur la touche OK.
Sélectionnez TOUCHE R (RECALL) avec les touches et .
Choisissez touche ‘REGLAGE 1’ (RECALL 1) pour une brève durée de la fonction
flash time (100ms) ou touche ‘REGLAGE 2’ (RECALL 2) pour une durée plus longue
pour la fonction flash time (250ms).
Réponse automatique
Si le combiné est posé sur la base lors d'un appel entrant, le téléphone prend
automatiquement la ligne si on prend le portable de la base. Ceci est un réglage par défaut,
mais vous pouvez le désactiver:
1.
Entrez dans le menu en appuyant sur la touche /OK.
2.
Sélectionnez COMBINE (HANDSET) avec les touches et
3.
Appuyez sur la touche OK.
4.
Sélectionnez ‘REPONSE AUTO’ (AUTO ANSWER) avec les touches et
5.
Sélectionnez ACTIVE (ON) pour une réponse automatique ou DESACTIVE (OFF).
6.
Appuyez sur la touche OK.
4.10 Remise à zero
Il est toujours possible de revenir à la configuration d'origine par défaut. Il s'agit de la
configuration telle qu'elle était prévue lors de la livraison du téléphone.
60
OGATECH OG-S60/TWIN/TRIPLE/QUATTRO
OGATECH OG-S60/TWIN/TRIPLE/QUATTRO
Pour revenir aux réglages par défaut:
1.
Entrez dans le menu en appuyant sur la touche /OK.
2.
Sélectionnez REGLAGE (SETUP) avec les touches et .
3.
Appuyez sur la touche OK.
4.
Sélectionnez ‘REGL. DEFAUT’ (DEFAULT) avec les touches et .
5.
Appuyez sur la touche OK.
6.
Introduisez le code PIN en 4 chiffres (par défaut = 0000). Appuyez sur la touche OK.
7.
Appuyez de nouveau sur OK pour valider
FRANÇAIS
LES PARAMÈTRES PAR DÉFAUT SONT :
Bips batterie faible
ON
Bips avertissement hors de portée
OFF
Clic bouton
ON
Réponse automatique
ON
Mélodie interne
1
Volume interne
3
Mélodie externe
3
Volume externe
3
Volume écouteur
3
Répertoire
vide
Liste d’appels
vide
Liste de rappel
vide
Code Pin
0000
Mode de numérotation
DTMF
Verrouillage clavier
OFF
Le fait de revenir aux réglages par défaut entraînera l'effacement de toutes
vos entrées dans le répertoire téléphonique et le journal de bord des appels.
Le code PIN sera également restauré à sa valeur initiale, à savoir 0000.
4.11 Verrouillage clavier
Le clavier peut être verrouillé de sorte qu’aucun réglage ne peut être modifié ou aucun
numéro de téléphone composé. L’icône
apparaît à l’écran à l’écran lorsque le clavier est
verrouillé.
4.11.1 Verrouiller le clavier par le menu
1.
Entrez dans le menu en appuyant sur /OK
2.
Sélectionnez ‘COMBINE (HANDSET) au moyen de ou
3.
Appuyez sur OK
4.
Sélectionnez ‘VERR CLAVIER’ (KEY LOCK) à l’aide des boutons
5.
Appuyez sur OK pour verrouiller le clavier
et
4.11.2 Verrouiller le clavier avec le bouton * (verrouillage rapide)
Appuyez et maintenez enfoncé le bouton ’*’ pendant 3 secondes. Le clavier est verrouillé.
4.11.3 Déverrouiller le clavier
1.
Appuyez n’importe quelle touche
2.
Presser ‘*’ apparaît à l’écran
3.
Appuyez sur le bouton ’*’ dans les 3 secondes pour déverrouiller le clavier
OGATECH OG-S60/TWIN/TRIPLE/QUATTRO
61
OGATECH OG-S60/TWIN/TRIPLE/QUATTRO
4.12 Régler l’heure
1.
2.
3.
4.
5.
6.
7.
Entrez dans le menu en appuyant sur /OK
Sélectionnez COMBINÉ (HANDSET) à l’aide des boutons up et down
Appuyez sur OK
Sélectionnez ‘REG HEURE’ à l’aide des boutons up et down
Appuyez sur OK
Saisissez l’heure (format 24h).
Appuyez sur OK pour valider
4.13 Régler l’alarme
1.
2.
3.
4.
5.
6.
Ou
7.
Entrez dans le menu en appuyant sur /OK
Sélectionnez ‘COMBINÉ’ (HANDSET) à l’aide des boutons up et down
Appuyez sur OK
Sélectionnez ‘ALARM’ à l’aide des boutons up et down
Appuyez sur OK
Sélectionnez ACTIVE pour activer l’alarme et appuyez sur OK. Saisissez l’heure
(format 24h) à laquelle l’alarme doit être activée.
Sélectionnez DESACTIVE pour désactiver le réveil et appuyez sur OK pour confirmer.
Lorsque l’alarme se déclenche, vous pouvez l’arrêter en appuyant sur
n’importe quel bouton.
5
5.1
Fonctions de pointe
Répertoire téléphonique
Le répertoire téléphonique vous permet de mémoriser 50 numéros de téléphone et noms.
Vous pouvez introduire des noms de 12 caractères maximum et des numéros de 20 chiffres
maximum.
Pour appeler un correspondant dont le numéro est stocké dans le répertoire téléphonique,
référez-vous à la section 3.13 “Appeler depuis le répertoire téléphonique”.
Pour introduire des caractères alphanumériques, référez-vous à la section 3.14 “Utilisation
du clavier alphanumérique”.
5.1.1 Ajouter une entrée dans le répertoire téléphonique
1.
Entrez dans le menu en appuyant sur la touche /OK.
2.
Sélectionnez REPERTOIRE (PHONEBK) avec les touches et .
3.
Appuyez sur la touche OK.
4.
Sélectionnez AJOUTER (ADD ENTRY) avec les touches et .
5.
Appuyez sur la touche OK.
6.
Introduisez le nom.
7.
Appuyez sur la touche OK pour valider.
8.
Introduisez le numéro de téléphone.
9.
Appuyez sur la touche OK pour valider.
10. Sélectionnez la mélodie désirée (1-5) au moyen des boutons et .
11. Appuyez sur la touche OK pour valider.
62
OGATECH OG-S60/TWIN/TRIPLE/QUATTRO
OGATECH OG-S60/TWIN/TRIPLE/QUATTRO
Si vous entrez dans le répertoire téléphonique avec la touche et si vous
modifiez un numéro de téléphone avec la touche , la modification ne sera
prise en compte que pour ce seul appel, sans être stocké dans le répertoire
téléphonique!
5.1.3 Effacer une entrée
Pour effacer une entrée:
1.
Entrez dans le menu en appuyant sur la touche /OK.
2.
Sélectionnez REPERTOIRE (PHONEBK) avec les touches et
3.
Appuyez sur la touche OK.
4.
Sélectionnez ‘SUPPRIMER’ (DELETE) avec les touches et .
5.
Appuyez sur la touche OK.
6.
Déplacez-vous dans la liste des noms avec les touches et . La liste défile dans
l'ordre alphabétique.
7.
Appuyez sur la touche OK dès que vous avez trouvé le nom que vous voulez effacer.
8.
Le numéro de téléphone est affiché, appuyez sur la touche OK.
9.
L'écran affiche ‘CONFIRMER?’, appuyez sur la touche OK pour confirmer ou
pour
interrompre l'opération.
5.2
Rechercher un combiné a partir d'une base
Si vous appuyez sur la touche 'Appel' sur la base, tous les combinés se mettront à sonner.
Cette sonnerie vous aidera à localiser un combiné égaré. La sonnerie est interrompue en
appuyant sur simplement l'une des touches du combiné.
OGATECH OG-S60/TWIN/TRIPLE/QUATTRO
63
FRANÇAIS
5.1.2 Modifier un nom ou un numéro
Pour modifier un nom ou un numéro dans le répertoire téléphonique:
1.
Entrez dans le menu en appuyant sur la touche /OK.
2.
Sélectionnez REPERTOIRE (PHONEBK) avec les touches et .
3.
Appuyez sur la touche OK.
4.
Sélectionnez MODIFIER (MODIFY ENTRY) avec les touches et .
5.
Appuyez sur la touche OK.
6.
Déplacez-vous dans la liste de noms avec les touches et . La liste défile dans
l'ordre alphabétique.
7.
Appuyez sur la touche OK lorsque vous trouvez le nom à modifier.
8.
Utilisez la touche pour reculer et introduisez le nouveau nom.
9.
Appuyez sur la touche OK pour valider.
10. Introduisez le nouveau numéro de téléphone.
11. Appuyez sur la touche OK pour valider.
OGATECH OG-S60/TWIN/TRIPLE/QUATTRO
6
6.1
Gestion de plusieurs combines
Installer un combiné supplémentaire
Vous devez seulement enregistrer un 2ième combiné en cas ou le
combiné n’a plus de liaison avec la base ou si vous avez acheté un
nouveau combiné!!!
Vous pouvez enregistrer de nouveaux combinés dans la base si ces combinés soutiennent
le protocole DECT GAP.
La base peut soutenir un maximum de 5 combinés. Si vous disposez déjà de 5 combinés et
si vous souhaitez ajouter ou remplacer un combiné, vous devrez d'abord effacer un combiné
avant d'associer le nouveau combiné à la base.
1.
2.
Appuyez sur et maintenez la touché sur la base pendant 6 secondes.
La base émettra alors un bip. La base est maintenant prête pour l'enregistrement d'un
nouveau combiné. Vous disposez de 90 secondes après avoir activé le bouton pour
enregistrer un nouveau combiné.
Pour enregistrer un combiné, la base doit être placée en mode d'enregistrement
Après avoir placé la base en mode d'enregistrement, vous lancez la procédure sur le
nouveau combiné:
6.1.1 Si votre combiné supplémenteire est un OGATECH OG-S60
3.
Entrez dans le menu en appuyant sur la touche /OK.
4.
Sélectionnez ‘DECLARER’ (REGISTER) avec les touches et .
5.
Appuyez sur la touche OK.
6.
Sélectionnez ‘DECL. BASE’ (REG BASE) à l’aide des boutons et
7.
Introduisez un numéro de base (de 1 à 4). Les numéros clignotants sont déjà utilisés
par d'autres bases DECT.
8.
Introduisez le code PIN de la base (0000 par défaut).
9.
Appuyez sur la touche OK. Le combiné se mettra à la recherche de la base DECT.
10. Dès que le combiné aura localisé la base, il affichera le numéro d'identification de la
base. Validez l'enregistrement de la base en appuyant sur la touche OK ou
interrompez l'opération en appuyant sur la touche .
11. Si le combiné ne localise pas la base, il retournera en mode stand-by après quelques
secondes. Essayez encore une fois en modifiant le numéro de la base et en vérifiant
si vous ne vous trouvez pas dans un environnement générant des interférences.
Rapprochez-vous de la base.
6.1.2 Si votre combiné est d’un autre modèle
Après avoir lancé la procédure d'enregistrement sur la base, référez-vous au mode d'emploi
du combiné pour découvrir comment vous devez l'enregistrer. Le combiné doit être
compatible avec le protocole GAP.
L'icône et le texte ‘PAS DECLARE’ (NOT REG) clignotent sur l'écran lorsque le combiné
n'a pas été associé à la base. Lorsqu'un combiné a été associé à une base, il se voit attribuer
un numéro de combiné par la base. C'est ce numéro qui est affiché sur le combiné derrière
le nom et qu'on devra utiliser pour les appels internes.
64
OGATECH OG-S60/TWIN/TRIPLE/QUATTRO
OGATECH OG-S60/TWIN/TRIPLE/QUATTRO
‘DECT GAP PROFILE’ garantie seulement que les fonctions de bases
fonctionnent correctement entre différents marques/types. Il est possible
que certains service (comme CLIP) ne marchent pas correctement.
Eliminer un combiné
Vous pouvez éliminer un combiné d'une base pour permettre à un autre combiné d'être
enregistré:
1.
Entrez dans le menu en appuyant sur la touche /OK.
2.
Sélectionnez REGLAGE (SETUP) avec les touches et .
3.
Appuyez sur la touche OK.
4.
Sélectionnez ‘SUPP COMBINE’ (DEL HANDSET) avec les touches et .
5.
Appuyez sur la touche OK.
6.
Introduisez le code PIN en 4 chiffres.
7.
Appuyez sur la touche OK.
8.
Sélectionnez le combiné à éliminer.
9.
Appuyez sur la touche OK pour valider.
6.3
Installer un combiné sur une autre base
Si vous voulez utiliser un OGATECH OG-S60 avec une base d'un autre modèle, cette base
doit être compatible avec le protocole GAP.
1.
Pour placer la base en mode d'enregistrement, référez-vous au mode d'emploi de la
base.
2.
Effectuez les opérations 3 à 10 du paragraphe 6.1.
6.4
Sélectionner une base
Les combinés peuvent être enregistrés simultanément sur 4 bases.
Pour sélectionner une base:
1.
Entrez dans le menu en appuyant sur la touche /OK.
2.
Sélectionnez DECLARER (REGISTER) avec les touches et .
3.
Appuyez sur la touche OK.
4.
Sélectionnez ‘CHOIX BASE’ avec les touches et .
5.
Appuyez sur la touche OK.
6.
Sélectionnez une base ou sélectionnez AUTO avec les touches et
7.
Appuyez sur la touche OK.
.
Lorsque vous sélectionnez la base, la base actuellement sélectionnée est indiquée par un
numéro de base clignotant. Si vous sélectionnez 'Auto', le combiné cherchera
automatiquement une autre base dès que vous êtes hors de portée!
OGATECH OG-S60/TWIN/TRIPLE/QUATTRO
65
FRANÇAIS
6.2
OGATECH OG-S60/TWIN/TRIPLE/QUATTRO
7
Trouble shooting
Symptôme
Cause possible
Solution
Pas d'écran
Piles non-chargées
Vérifiez la position des piles.
combiné sur ARRET (OFF)
Branchez le combiné
MARCHE (ON).
Câble téléphonique mal
connecté
Vérifiez la connexion du
câble téléphonique.
La ligne est occupée par un
autre combiné
Attendez que l'autre combiné
raccroche.
combiné hors de portée
Rapprochez le combiné de la
base.
La base ne reçoit pas de
courant
Vérifiez les connexions
électriques à la base.
Le combiné n'est pas
enregistré dans la base
Procédez à l'enregistrement
du combiné dans la base.
Rechargez les piles.
Pas de tonalité
L'icône
clignote
La base ou le combiné ne
sonne pas
Le volume de la sonnerie est Réglez le volume de la
coupé ou
sonnerie.
faible
La tonalité est bonne, mais il Le mode de composition du
n'y a pas de communication numéro est incorrect
Réglez le mode de
composition du numéro
(pulsation/tonalité).
Impossible de transférer un
appel vers le PABX
Placez l'unité en mode de
Flash Time long.
La fonction Flash Time est
trop courte
Le téléphone ne réagit pas à Erreur de manipulation
l'activation des touches
8
8.1
Enlevez les piles et
remettez-les en place.
Garantie
Période de garantie
Les appareil bénéficient d'une période de garantie de 36 mois. La période de garantie prend
effet le jour de l'achat du nouvel appareil. Il n'y a aucune garantie sur les piles standard ou
rechargeables (de type AA/AAA).
Les accessoires et les défauts qui ont un effet nuisible sur le fonctionnement ou la valeur de
l'appareil ne sont pas couverts.
La garantie s'applique uniquement sur présentation du reçu d'achat original ou une copie de
celui-ci sur lequel figurent la date de l'achat et le modèle de l'appareil.
8.2
Traitement de la garantie
Tout appareil défectueux doit être retourné à un centre de service après-vente autorisé,
accompagné d'un ticket d'achat valable et d'une fiche de service dûment complétée.
66
OGATECH OG-S60/TWIN/TRIPLE/QUATTRO
OGATECH OG-S60/TWIN/TRIPLE/QUATTRO
En cas de panne pendant la période de garantie, le centre de service après-vente réparera
gratuitement les dysfonctionnements dus à un vice de matière ou de fabrication, en réparant
ou en remplaçant les appareils ou les pièces défectueux. En cas de remplacement, la
couleur et le modèle peuvent être différents de ceux de l'appareil acheté initialement.
La date d'achat initiale détermine le début de la période de garantie. La période de garantie
n'est pas prolongée si l'appareil est remplacé ou réparé par le centre de service après-vente.
Exclusions de garantie
Les dommages et les pannes causés par un mauvais traitement ou une utilisation incorrecte
et les dommages qui résultent de l'utilisation de pièces et d'accessoires non originaux ne
sont pas couverts par la garantie.
La garantie ne couvre pas les dommages causés par des éléments extérieurs tels que la
foudre, l'eau et le feu, ni les dommages provoqués par le transport.
Aucune garantie ne pourra être invoquée si le numéro de série indiqué sur les appareils a
été modifié, supprimé ou rendu illisible.
Aucune garantie ne peut non plus être invoquée si l'appareil a été réparé ou modifié par
l'acheteur.
Cet appareil doit être utilisé avec des piles rechargeables uniquement. Si vous voulez
remplacer les piles fournies avec l'appareil, veuillez vérifier que les piles que vous utilisez
sont adaptées et rechargeables. N'utilisez PAS de piles alcalines dans les combinés.
Si vous utilisez des piles alcalines et que vous placez le combiné sur la base, les piles vont
chauffer et risquent d'exploser. Le fabricant ne sera pas tenu responsable des dommages
provoqués et ceux causés sur l'appareil ne seront pas pris en charge par la garantie. Toutes
les réparations seront à vos frais.
9
Caracteristiques techniques
•
Standard:
•
•
•
•
•
•
Gamma de fréquences:
Nombre de canaux:
Modulation:
Encodage de la parole:
Puissance d’émission:
Portée:
•
•
•
•
•
•
•
•
Alimentation électrique de la base:
Piles pour le combiné:
Autonomie du combiné:
Temps de conversation:
Durée de la charge:
Température de l'environnement:
Composition du numéro:
Temps Flash
OGATECH OG-S60/TWIN/TRIPLE/QUATTRO
DECT (Digital Enhanced Cordless
Telecommunications)
GAP (Generic Access Profile)
1880 MHZ à 1900 MHz
120 canaux duplex
GFSK
32 kbit/s
10 mW (puissance moyenne par canal)
max. 300 m en zone dégagée /10-50 à l'intérieur
d'immeubles
230 V / 50 Hz pour la base
2 piles rechargeables AAA, NiMh 550mAh
200 heures en standby
10 heures
6-8 heures
+5°C to +45 °C
Pulsation/tonalité (IMV/MFV)
100 ou 250 ms
67
FRANÇAIS
8.3
OGATECH OG-S60/TWIN/TRIPLE/QUATTRO
Sicherheitshinweise
•
•
•
•
•
•
•
•
•
Verwenden Sie nur das mitgelieferte Steckernetzgerät. Keine fremden Adapter
verwenden, die Akkuzellen können sonst beschädigt werden.
Legen Sie nur, aufladbare Akkus des gleichen Typs ein. Verwenden Sie auf keinen Fall
normale nicht aufladbare Batterien.Wiederaufladbare Akkus richtig gepolt einlegen
(Hinweisschild ist in den Akkufächern des Mobilteils angebracht).
Berühren Sie nicht die Lade- und Steckerkontakte mit spitzen oder metallischen
Gegenständen.
Medizinische Geräte können in ihrer Funktion beeinflusst werden.
Das Mobilteil kann in Hörgeräten einen unangenehmen Brummton verursachen.
Die Basisstation nicht in feuchten Räumen und nicht weniger als 1,5 m entfernt von
einer Wasserstelle aufstellen. Das Mobilteil nicht mit Wasser in Berührung bringen.
Nutzen Sie das Telefon nicht in explosionsgefährdeten Umgebungen.
Entsorgen Sie Akkus und Telefon umweltgerecht.
Da bei Stromausfall das Telefonieren mit diesem Gerät nicht möglich ist, verwenden Sie
bitte im Falle eines Notrufes ein Telefon, dass Netzstrom unabhängig ist, also z.B. ein
Handy.
Hinweise zum Umweltschutz
Dieses Produkt darf am Ende seiner Lebensdauer nicht über den normalen
Haushaltsabfall entsorgt werden, sondern muss an einem Sammelpunkt für das
Recycling von elektrischen und elektronischen Geräten abgegeben werden.
Das Symbol auf dem Produkt, der Gebrauchsanleitung oder der Verpackung
weist darauf hin.
Die Werkstoffe sind gemäß ihrer Kennzeichnung wiederverwertbar. Mit der
Wiederverwendung, der stofflichen Verwertung oder anderen Formen der Verwertung von
Altgeräten leisten Sie einen wichtigen Beitrag zum Schutze unserer Umwelt.
Bitte erfragen Sie bei der Gemeindeverwaltung die zuständige Entsorgungsstelle.
Reinigen
Wischen Sie das Telefon mit einem leicht feuchtigen Tuch oder mit einem Antistatiktuch ab.
Niemals Reinigungsmittel oder gar aggressive Lösungsmittel verwenden.
Dieses Gerät darf nur mit Akkus betrieben werden. Wenn Sie das Mobilteil
mit nicht wiederaufladbaren Batterien bestücken und es auf die Basisstation
stellen, wird das Mobilteil beschädigt und fällt nicht unter die Garantie.
Die Übereinstimmung des Gerätes mit den grundlegenden Anforderungen
der R&TTE-Directive ist durch das CE-Kennzeichen bestätigt.
68
OGATECH OG-S60/TWIN/TRIPLE/QUATTRO
OGATECH OG-S60/TWIN/TRIPLE/QUATTRO
1
1.1
Tasten/LED
Handapparat und Basisstation OGATECH OG-S60
Hörmuschel
Handgerät Anzeige-LED
Display
Lösch-/StummschaltungTaste
Menu / OK
Wahlwiederholungs-/Pausentaste
Nach-oben-Taste
Telefonbuch-/Escape-Taste
Flash-Taste / Taste AN/AUS
DEUTSCH
Nach-unten / Anrufliste-Taste
Interner Anruf
Mikrofon
Paging-Taste
OG-S60
Stromanzeige
LED für eingehende Anrufe
OGATECH OG-S60/TWIN/TRIPLE/QUATTRO
Ladeanzeige
69
OGATECH OG-S60/TWIN/TRIPLE/QUATTRO
1.2
Ladegerät OGATECH OG-S60
Ladeanzeige
OG-S60
1.3
Display
Symbolzeile
Schrift-/Ziffernzeile.
(Maximum 12 Zeichen)
Zu jeder Funktion gehört ein Symbol
Symbol:
Bedeutung:
Sie sind in Verbindung
EXT
Sie führen ein externes Gespräch
INT
Sie führen ein internes Gespräch
Neue Nummern in der Anrufliste
Anruf wurde abgefragt
Anruf wurde nicht abgefragt
Sie öffnen Ihr Telefonbuch.
Sie befinden sich im Menü.
Anzeige wiederaufladbare Batterien
1 Abschnitt: schwach, 2 Abschnitte: mittel, 3 Abschnitte: voll
Die Antenne zeigt die Qualität des Empfangs an.
Die Antenne blinkt, wenn das Handgerät bei der Basisstation nicht
angemeldet ist oder Außerhalb des Bereich ist.
Tastenfeld gesperrt
oder
Zeigt an, dass die angezeigte Nummer länger als der Bildschirm ist (12 Ziffern)
1.3.1 Standby display
Im Stand-by-Modus zeigt das Handgerät die Zeit und die Nummer des Handgeräte an:
12-05 HS4
70
OGATECH OG-S60/TWIN/TRIPLE/QUATTRO
OGATECH OG-S60/TWIN/TRIPLE/QUATTRO
1.4
Handgerät-Anzeige (LED)
Das LED des Handgeräte hat die folgende Funktion:
• AN, wenn eine externe Verbindung besteht
• AUS, wenn sich alle Handgeräte im Stand-by-Modus befinden
• Blinkt auf allen Handgeräte, wenn ein Anruf eingeht
2
2.1
Installation des telefons
Anschlüsse
Rückseite des Base OGATECH OG-S60
TEL
DEUTSCH
Telefonkabel
Stromkabel
Rückseite des Ladeteil OGATECH OG-S60
Stromkabel
OGATECH OG-S60/TWIN/TRIPLE/QUATTRO
71
OGATECH OG-S60/TWIN/TRIPLE/QUATTRO
2.2
Wiederaufladbare Batterien
Bevor Sie Ihr OGATECH OG-S60 zum ersten Mal verwenden, müssen Sie
erst dafür sorgen, dass die Batterien 6-8 Stunden lang aufgeladen werden.
Wenn Sie das nicht tun, funktioniert das Gerät nicht optimal.
Zum Austausch oder Einlegen der wiederaufladbaren Batterien:
1.
Schieben Sie die Abdeckung nach unten und heben Sie sie dann an.
2.
Legen Sie die Batterien ein. Achten Sie auf die Polarität (+ und -).
3.
Schließen Sie das Batteriefach wieder.
Batterieabdeckung
Rückseite des Handgeräts
-
+
-
OG-S60
+ Wiederauflad
bare Batterien
Die maximale Funktionszeit der Batterien ist ungefähr 200h und die
maximale Sprechdauer ist 10 Stunden! Mit der Zeit werden die Batterien
schneller leer sein. Die Batterien müssen dann ersetzt werden. Sie können
in jedem Elektrogeschäft neue Batterien kaufen (2 wiederaufladbare
Batterien, Typ AAA NiMH)!
3
3.1
1.
2.
3.
4.
5.
6.
7.
72
Verwendung des Telefons
Wahl der Menüsprache
Öffnen Sie das Menü durch Betätigen der Taste /OK
Selektieren Sie mit den Nach-oben- oder Nach-unten- Pfeiltasten MOBILTEIL
Drücken Sie auf OK Taste
Selektieren Sie mit den Nach-oben- oder Nach-unten- Pfeiltasten SPRACHE
(LANGUAGE)
Drücken Sie auf OK Taste
Selektieren Sie mit den Nach-oben- oder Nach-unten- Pfeiltasten die Sprache
Ihrer Wahl.
Drücken Sie zum Bestätigen auf OK oder auf -Taste um zum vorigen Menü
zurückzukehren
OGATECH OG-S60/TWIN/TRIPLE/QUATTRO
OGATECH OG-S60/TWIN/TRIPLE/QUATTRO
3.2
•
•
3.3
Handgerät AN/AUS
Handgerät anschalten: Drücken Sie die Taste am Handapparat. Das Handgerät sucht
die Basisstation.
Handgerät ausschalten: Drücken Sie 2 Sekunden lang. Das Display geht AUS.
Einen Anruf annehmen
Wenn das Handgerät klingelt, drücken Sie um den Anruf anzunehmen. Sie sind dann mit
Ihrem Anrufer verbunden. Wenn sich das Handgerät auf der Basisstation befindet und das
Telefon klingelt, müssen Sie nur das Handgerät aufnehmen, um den Anruf anzunehmen
(wenn die Option Automatisches Annehmen eingeschaltet ist: Siehe 4.9).
3.4
Extern Telefonieren
3.4.1 Normales Wählen:
1.
Drücken Sie
2.
Geben Sie die Telefonnummer ein
3.4.2 Blockwählen:
1.
Wählen Sie die Nummer
2.
Drücken Sie
Zum Korrigieren der Nummer verwenden Sie die Taste
löschen.
1.
2.
3.6
Intern Telefonieren
Drücken Sie INT Taste
Geben Sie die Nummer des internen Handgeräte ein (1 bis 5)
Internes Weiterleiten eines externen Anrufs
Wenn Sie einen externen Anruf zu einem anderen Handgerät weiterschalten möchten:
1.
Drücken Sie während eines Gesprächs INT Taste
2.
Wählen Sie die Nummer des internen Handgeräte, der externe Anrufer ist dann in der
Warteschleife.
3.
Wenn das andere Handgerät annimmt, drücken Sie zum Auflegen und übertragen
so den Anruf.
Wenn der interne Gesprächspartner nicht annimmt, drücken Sie erneut INT, um den
externen Anrufer wieder zu übernehmen.
3.7
Konferenzschaltung
Nur möglich, wenn mehr als ein Handgerät auf der Basisstation angemeldet ist!!
Sie können gleichzeitig mit einem internen und einem externen Gesprächspartner sprechen.
Wenn Sie mit einem externen Anrufer verbunden sind:
1.
Drücken Sie INT Taste
2.
Geben Sie die Nummer des internen Handgeräte ein, das Sie anrufen möchten
3.
Wenn der interne Gesprächspartner aufnimmt, betätigen Sie die Taste # und lassen
Sie sie eingedrückt
4.
Wenn der interne Gesprächspartner nicht aufnimmt, drücken Sie erneut INT, um den
externen Anrufer wieder zu übernehmen.
OGATECH OG-S60/TWIN/TRIPLE/QUATTRO
73
DEUTSCH
3.5
um eine eingegebene Ziffer zu
OGATECH OG-S60/TWIN/TRIPLE/QUATTRO
3.8
Anzeige der Gesprächsdauer
Die Gesprächsdaueranzeige wird nach 15 Sekunden in Minuten – Sekunden angezeigt:
“00-20”
Am Ende jedes Anrufs wird 5 Sekunden lang die Gesamtanrufdauer angezeigt.
3.9
Stummschaltung (mute)
Es ist möglich, das Mikrofon während eines Gesprächs auszuschalten.
Wenn Sie während des Gesprächs Taste
betätigen, wird das Mikrofon deaktiviert und
Sie können frei sprechen ohne, dass Sie von dem Gesprächspartner am anderen Ende
gehört werden.
Es wird STUMM (MUTE) angezeigt.
Drücken Sie
erneut um zum normalen Modus zurückzukehren.
3.10 Pausentaste
Wenn Sie eine Nummer eingeben, können Sie eine Pause zwischen zwei Ziffern einfügen,
indem Sie 2 Sekunden lang die Wahlwiederholungs-/Pausentaste
drücken.
3.11 Rufnummernanzeige
Die Rufnummernanzeige ist nur verfügbar, wenn Sie diesen Service (CLIP) bei Ihrem
Telefonanbieter abonniert haben.
Wenn Sie einen externen Anruf erhalten, erscheint die Telefonnummer des Anrufers im
Display, wenn das Telefon klingelt.
Der Anrufer kann mit seinem Namen identifiziert werden, wenn das Netzwerk diesen
mitschickt oder der Anrufer im Telefonbuch gespeichert ist.
Die Rufnummernanzeige wird nach 15 Sekunden von der Gesprächsdaueranzeige ersetzt.
Die Rufnummernanzeige (Name und Telefonnummer) kann nach dieser Zeit durch
mehrmaliges Betätigen der OK-Taste aktiviert werden.
3.11.1 Anrufliste
Ihr Telefon speichert eine Liste der 40 zuletzt eingegangenen Anrufe. Diese Funktion ist nur
erhältlich, wenn Sie die Rufnummernanzeige abonniert haben. Die eingegangenen Anrufe
werden über ihre Telefonnummer oder ihren Namen in der selben Art und Weise wie bei der
Rufnummernanzeige identifiziert.
Das Vorhandensein von neuen/nicht angenommenen Anrufen wird durch das blinkende
-Symbol im Display angezeigt. Zum Befragen der Anrufliste:
1.
Drücken Sie
. Wenn keine Anrufe in der Liste gespeichert sind, erscheint LEER
(EMPTY).
2.
Durchsuchen Sie die Einträge mit den Nach-oben- oder Nach-unten- Pfeiltasten.
Die Namen der Anrufer werden angezeigt, wenn der Name vom Netzwerk
mitgeschickt wurde oder im Telefonbuch gespeichert ist. Wenn dies angezeigt wird,
wurde der Anruf abgefragt. Wenn dies angezeigt wird, wurde der Anruf nicht
abgefragt. Wenn Sie das Ende der Liste erreicht haben, hören Sie einen Piepton.
3.
Wenn Sie OK drücken, wird die Telefonnummer angezeigt. Beachten Sie: wenn die
Telefonnummer länger als 12 Ziffern ist, müssen Sie nochmals auf OK drücken, um
die vollständige Nummer angezeigt zu bekommen.
4.
Drücken Sie erneut OK um Zeit und Datum des eingehenden Anrufs angezeigt zu
bekommen.
74
OGATECH OG-S60/TWIN/TRIPLE/QUATTRO
OGATECH OG-S60/TWIN/TRIPLE/QUATTRO
5.
Ein nochmaliges Drücken von OK gibt Ihnen die Möglichkeit, diesen Eintrag in das
Telefonbuch zu speichern, sofern er nicht schon enthalten ist:
– Drücken Sie OK, wenn im Display ’HINZUFUEGEN’ (ADD) (Addieren) angezeigt
wird. Geben Sie den Namen ein oder verändern Sie ihn, dann drücken Sie OK.
Geben Sie die Telefonnummer ein oder ändern Sie diese, dann drücken Sie OK.
Mit Hilfe der Nach-oben-/Nach-unten-Tasten wählen Sie den Anrufton (1-5) aus,
der ertönt, sobald diese Rufnummer Sie anruft. Danach drücken Sie OK und der
Eintrag wird im Telefonbuch abgespeichert.
6.
Um einen Anrufer zurückzurufen, müssen Sie nur die Taste drücken, wenn sein
Name oder seine Telefonnummer angezeigt wird.
Wenn ein Anrufer im Adressbuch steht, wird er anhand seines Namens in der Liste der nicht
angenommenen Anrufe identifiziert.
3.11.2 Löschen eines oder aller Anruflisteneinträge
Sie können jeden Eintrag einzeln oder alle Einträge auf einmal löschen:
• Beim Durchblättern der Anrufe drücken Sie:
– einmal kurz die Mikrofonstummschaltetaste
, um diesen einen Anruf zu
löschen. Im Display erscheint nun ‘LÖSCHEN’ (DELETE).
– die Mikrofonstummschaltetaste
länger ( ca. 2 Sek.) , um alle Einträge zu
löschen: Im Display erscheint nun ‘ALLE LÖSCHEN’ (DELETE ALL).
• Drücken Sie OK, um diesen bzw. alle Einträge zu löschen oder
, um den
Löschvorgang abzubrechen.
Ihr Telefon speichert eine Liste der 10 letzten Anrufe (mit 20 Ziffern), die Sie getätigt haben;
Die angerufenen Gesprächspartner werden über ihre Telefonnummer oder ihren Namen
identifiziert, wenn sie im Telefonbuch gespeichert sind.
Um die Wahlwiederholungsliste zu öffnen:
1.
Drücken Sie
Taste
2.
Durchsuchen Sie die Einträge mit den Nach-oben- oder Nach-unten- Pfeiltasten.
3.
Um den ausgewählten Gesprächspartner anzurufen müssen Sie nur die Taste
betätigen, wenn seine Telefonnummer oder sein Name angezeigt wird.
Wenn der Name angezeigt wird können Sie zwischen Namen und
Telefonnummer wechseln, indem Sie die OK-Taste drücken!
3.13 Eine Nummer aus dem Telefonbuch anrufen
Wenn Sie einen Gesprächspartner anrufen möchten, dessen Namen Sie im Telefonbuch
gespeichert haben:
1.
Drücken Sie Taste um das Telefonbuch zu öffnen
2.
Drücken Sie den ersten Buchstaben des Namens. Der erste Name, der mit diesem
Buchstaben oder dem nächsten Buchstaben im Alphabet beginnt, wird angezeigt.
3.
Überlaufen Sie die Liste der Namen mit den Nach-oben- oder Nach-untenPfeiltasten. Die Liste wird in alphabetischer Reihenfolge überlaufen.
4.
Drücken Sie um die Nummer des Gesprächspartners zu wählen, die angezeigt
wird.
Um vor dem Wählen die Nummer zu sehen, führen Sie die oben genannten Schritte 1 bis 3
aus und drücken Ok.
OGATECH OG-S60/TWIN/TRIPLE/QUATTRO
75
DEUTSCH
3.12 Wahlwiederholungsspeicher
OGATECH OG-S60/TWIN/TRIPLE/QUATTRO
3.14 Verwendung der alphanumerischen Tastatur
Sie können mit Ihrem Telefon ebenfalls alphanumerische Zeichen eingeben. Das wird
benötigt zum Eingeben von Namen in das Adressbuch, zum Eingeben eines Namens für ein
Handgerät, …
Zur Auswahl eines Buchstabens drücken Sie die entsprechende Taste so oft, wie notwendig.
So müssen Sie zum Eingeben von ‘A’ einmal die Taste ‘2’ drücken, zum Eingeben von ‘B’
zweimal die Taste ‘2’ drücken und so weiter. Um ‘A’ und dann B nacheinander einzugeben,
selektieren Sie erst ‘A’, warten dann, bis der Cursor auf die nächste Stelle springt und
drücken dann zweimal ‘2’. Zum Einfügen eines Leerzeichens drücken Sie 1. Um einen Strich
einzufügen, drücken Sie zweimal ‘1’.
Die folgenden Zeichen sind auf der Tastatur verfügbar:
Erstes
Zweites
Drittes
Viertes
Drücken
Drücken
Drücken
Drücken
1
Leerzeichen 1
2
A
B
C
2
3
D
E
F
3
4
G
H
I
4
5
J
K
L
5
6
M
N
O
6
7
P
Q
R
S
8
T
U
V
8
9
W
X
Y
Z
Fünftes
Drücken
7
9
3.15 Verwendung des Menüs
Mit unserem benutzerfreundlichen Menü sind viele Telefonfunktionen zugänglich.
1.
Zum Öffnen des Menüs drücken Sie /OK Taste
2.
Durchsuchen Sie die Auswahlmöglichkeiten durch Verwendung der Nach-obenoder Nach-unten- Pfeiltasten, die Auswahlmöglichkeiten bewegen sich in einer
Schleife (Sie kehren nach der letzten zur ersten zurück).
3.
Um eine Auswahl zu bestätigen, drücken Sie OK Taste
4.
Um zum vorigen Menü zurückzukehren, drücken Sie
.
4
Persönliche Einstellungen
Jede Programmierung wird am Ende mit einem doppelten oder einzelnen
langen Piepton bestätigt. Ein doppelter Piepton bestätigt die Gültigkeit
Ihrer Wahl. Ein langer Piepton bedeutet, dass die Änderung nicht gültig ist.
4.1
Einstellen der Klingellautstärke
4.1.1 Handapparate- Klingellautstärke Externe/Interne Anrufe
Die Klingellautstärke des Handapparats bei externen und internen Anrufen kann
unterschiedlich eingestellt werden:
1.
Öffnen Sie das Menü durch Betätigen der Taste /OK
2.
Selektieren Sie mit den Nach-oben- oder Nach-unten- Pfeiltasten ‘MOBILTEIL’
3.
Drücken Sie auf OK Taste
76
OGATECH OG-S60/TWIN/TRIPLE/QUATTRO
OGATECH OG-S60/TWIN/TRIPLE/QUATTRO
4.
5.
6.
7.
Selektieren Sie mit den Nach-oben- oder Nach-unten- Pfeiltasten ‘INT RUF
LAUT’ (INT RING VOL) oder ‘EXT RUF LAUT’ (EXT RING VOL)
Drücken Sie auf OK Taste
Selektieren Sie die gewünschte Lautstärke (AUS oder 1 bis 5)
Drücken Sie auf OK um zu Bestätigen oder auf
Taste um zum vorigen Menü
zurückzukehren.
4.1.2 Klingeln der Basisstation
1.
Öffnen Sie das Menü durch Betätigen der Taste /OK
2.
Selektieren Sie mit den Nach-oben- oder Nach-unten- Pfeiltasten
‘EINSTELLUNG’ (SETUP)
3.
Drücken Sie auf OK Taste
4.
Selektieren Sie mit den Nach-oben- oder Nach-unten- Pfeiltasten BASIS LAUT
(Base VOL)
5.
Drücken Sie auf OK Taste
6.
Selektieren Sie die gewünschte Lautstärke (AUS oder 1 bis 5)
7.
Drücken Sie auf OK um zu Bestätigen oder auf
Taste um zum vorigen Menü
zurückzukehren.
4.2
Auswahl der Klingelmelodie
Die Basisstation und jedes Handgerät können mit verschiedenen Klingelmelodien klingeln.
Die Handgeräte können mit verschiedenen Melodien klingeln, je nachdem, ob der
eingehende Anruf ein interner oder externer Anruf ist.
DEUTSCH
4.2.1 Melodie der Basisstation
1.
Öffnen Sie das Menü durch Betätigen der Taste /OK
2.
Selektieren Sie mit den Nach-oben- oder Nach-unten- Pfeiltasten
‘EINSTELLUNG’ (SETUP)
3.
Drücken Sie auf OK Taste
4.
Selektieren Sie mit den Nach-oben- oder Nach-unten- Pfeiltasten ‘BASIS
MELODY’ (BASE MEL)
5.
Drücken Sie auf OK Taste
6.
Selektieren Sie die Melodie Ihrer Wahl (1 bis 5)
7.
Drücken Sie auf OK um zu Bestätigen oder auf
Taste um zum vorigen Menü
zurückzukehren.
4.2.2 Melodie des Handgeräte, externer Anruf
1.
Öffnen Sie das Menü durch Betätigen der Taste /OK
2.
Selektieren Sie mit den Nach-oben- oder Nach-unten- Pfeiltasten ‘MOBILTEIL‘
3.
Drücken Sie auf OK Taste
4.
Selektieren Sie mit den Nach-oben- oder Nach-unten- Pfeiltasten ‘EXT MELODIE’
(EXT MELODY)
5.
Drücken Sie auf OK Taste
6.
Selektieren Sie die Melodie Ihrer Wahl (1 bis 5)
7.
Drücken Sie auf OK um zu Bestätigen oder auf
Taste um zum vorigen Menü
zurückzukehren.
OGATECH OG-S60/TWIN/TRIPLE/QUATTRO
77
OGATECH OG-S60/TWIN/TRIPLE/QUATTRO
4.2.3 Melodie des Handgeräte, interner Anruf
1.
Öffnen Sie das Menü durch Betätigen der Taste OK
2.
Selektieren Sie mit den Nach-oben- oder Nach-unten- Pfeiltasten ‘MOBILTEIL‘
3.
Drücken Sie auf OK Taste
4.
Selektieren Sie mit den Nach-oben- oder Nach-unten- Pfeiltasten ‘INT MELODIE’
(INT MELODY)
5.
Drücken Sie auf OK Taste
6.
Selektieren Sie die Melodie Ihrer Wahl (1 bis 5)
7.
Drücken Sie auf OK um zu Bestätigen oder auf
Taste um zum vorigen Menü
zurückzukehren.
4.3
Lautsprecherlautstärke während eines Anrufs
Drücken Sie während des Gesprächs die Nach-obendie Lautstärke entsprechend einzustellen.
4.4
oder Nach-unten-
Pfeiltasten, um
Aktivieren/Deaktivieren von Pieptönen
Die Handgeräte können Pieptöne von sich geben, wenn eine Taste gedrückt wird, wenn die
Batterien leer sind und wenn das Handgerät außerhalb der Reichweite ist.
4.4.1 Tastenton AN/AUS
1.
Öffnen Sie das Menü durch Betätigen der Taste /OK
2.
Selektieren Sie mit den Nach-oben- oder Nach-unten- Pfeiltasten ‘MOBILTEIL’
3.
Drücken Sie auf OK Taste
4.
Selektieren Sie mit den Nach-oben- oder Nach-unten- Pfeiltasten ‘TOENE’
5.
Drücken Sie auf OK Taste
6.
Selektieren Sie mit den Nach-oben- oder Nach-unten- Pfeiltasten ‘TASTENTON’
(KEYTONE)
7.
Drücken Sie auf OK Taste
8.
Selektieren Sie zum Aktivieren der Tastentöne (EIN) und zum Deaktivieren (AUS)
9.
Drücken Sie zum Bestätigen auf OK.
4.4.2 Batterie fast leer
Gehen Sie wie oben genannt vor, aber selektieren Sie bei Punkt 6 ‘AKKU LEER’ (LOW
BATT) anstatt ‘TASTENTON’ (KEYTONE).
4.4.3 Handgerät außer Reichweite
Gehen Sie wie oben genannt vor, aber selektieren Sie bei Punkt 6 ‘REICHWEITE’
(OUTRANGE) anstatt TASTENTON (KEYTONE)".
4.5
Handgerät einen Namen geben
Diese Funktion ermöglicht Ihnen, jedes Handgerät zu personifizieren.
1.
Öffnen Sie das Menü durch Betätigen der Taste /OK
2.
Selektieren Sie mit den Nach-oben- oder Nach-unten- Pfeiltasten ‘MOBILTEIL’
3.
Drücken Sie auf OK Taste
4.
Selektieren Sie mit den Nach-oben- oder Nach-unten- Pfeiltasten NAME
5.
Drücken Sie auf OK Taste
6.
Geben Sie den Namen ein
7.
Drücken Sie zum Bestätigen auf OK
78
OGATECH OG-S60/TWIN/TRIPLE/QUATTRO
OGATECH OG-S60/TWIN/TRIPLE/QUATTRO
Beim Eingeben des Namens können Sie ein Zeichen löschen, indem Sie Taste betätigen
und wenn Sie das Menü verlassen möchten, ohne irgendwelche Änderungen zu
übernehmen, halten Sie die Taste eingedrückt.
4.6
Den PIN-Code ändern
Einige Funktionen sind nur für Benutzer zugänglich, die den PIN-Code kennen. Dieser
PIN-Code ist standardmäßig auf 0000 eingestellt.
Um den PIN-Code zu ändern:
1.
Öffnen Sie das Menü durch Betätigen der Taste /OK
2.
Selektieren Sie mit den Nach-oben- oder Nach-unten‘EINSTELLUNG’ (SETUP)
3.
Drücken Sie auf OK Taste
4.
Selektieren Sie mit den Nach-oben- oder Nach-unten5.
Drücken Sie auf OK Taste
6.
Geben Sie den alten vierstelligen PIN-Code ein.
7.
Drücken Sie auf OK Taste
8.
Geben Sie den neuen vierstelligen PIN-Code ein
9.
Drücken Sie auf OK Taste
10. Geben Sie den neuen PIN-Code ein zweites Mal ein
11. Drücken Sie zum Bestätigen auf OK
4.7
Pfeiltasten
Pfeiltasten ‘PINCODE’
Den Wählmodus einstellen
Zum Ändern des Wählmodus:
1.
Öffnen Sie das Menü durch Betätigen der Taste /OK
2.
Selektieren Sie mit den Nach-oben- oder Nach-unten‘EINSTELLUNG’ (setup)
3.
Drücken Sie auf OK Taste
4.
Selektieren Sie mit den Nach-oben- oder Nach-unten(DIALMODE)
5.
Drücken Sie auf OK Taste
6.
Selektieren Sie mit den Nach-oben- oder Nach-untenWahlmöglichkeiten nur “IWV” oder “MFV”.
7.
Drücken Sie zum Bestätigen auf OK
4.8
1.
2.
3.
4.
5.
DEUTSCH
Es gibt zwei Wählmodusarten:
• MFV/DTMF/TONWAHL (die meisten üblichen Anlagen)
• Impulswahl IWV (für ältere Anlagen)
Pfeiltasten
Pfeiltasten MFV-IWV
Pfeiltasten den
Flash-Zeit
Öffnen Sie das Menü durch Betätigen der Taste /OK
Selektieren Sie mit den Nach-oben- oder Nach-unten- Pfeiltasten
‘EINSTELLUNG’ (setup)
Drücken Sie auf OK Taste
Selektieren Sie mit den Nach-oben- oder Nach-unten- Pfeiltasten ‘FLASHZEIT’
(RECALL)
Wählen Sie FLASH 1 (RECALL 1) für eine kurze Flash-Zeit (100ms) oder FLASH 2
(RECALL 2) für eine lange Flash-Zeit (250ms)
OGATECH OG-S60/TWIN/TRIPLE/QUATTRO
79
OGATECH OG-S60/TWIN/TRIPLE/QUATTRO
4.9
Automatisches annehmen
Wenn ein Anruf eingeht und das Handgerät sich auf der Basisstation befindet, nimmt das
Telefon automatisch den Anruf an. Das ist die Standardeinstellung. Sie kann aber auch
ausgeschaltet werden:
1.
Öffnen Sie das Menü durch Betätigen der Taste /OK
2.
Selektieren Sie mit den Nach-oben- oder Nach-unten- Pfeiltasten ‘MOBILTEIL’
3.
Drücken Sie auf OK Taste
4.
Selektieren Sie mit den Nach-oben- oder Nach-unten- Pfeiltasten ‘AUTO
ANNAHME’ (Auto ans)
5.
Selektieren Sie EIN (ON) (für automatisches Annehmen) oder AUS (OFF)
6.
Drücken Sie auf OK Taste
4.10 Reset
Es ist möglich das Telefon in die Standardkonfiguration zurückzusetzen. Das ist die
Konfiguration, die installiert war, als Sie das Telefon erworben haben.
Zum Zurücksetzen der Standardeinstellungen:
1.
Öffnen Sie das Menü durch Betätigen der Taste /OK
2.
Selektieren Sie mit den Nach-oben- oder Nach-unten- Pfeiltasten
‘EINSTELLUNG’ (SETUP)
3.
Drücken Sie auf OK Taste
4.
Selektieren Sie mit den Nach-oben- oder Nach-unten- Pfeiltasten ‘WERKEINST’
(DEFAULT)
5.
Drücken Sie auf OK Taste
6.
Geben Sie den vierstelligen PIN-Code ein (Standard =0000). Drücken Sie OK.
7.
Drücken Sie noch einmal OK zum Bestätigen
DIE WERKSEINSTELLUNGEN SIND:
Batterie schwach Piepton
Außer Reichweite Warnpiepton
Tastenton
Automatische Anrufbeantwortung
Anrufton intern
Lautstärke intern
Anrufton extern
Lautstärke extern
Hörerlautstärke
Telefonbuch
Anrufliste
Wahlwiederholungsliste
Pin Nummer
Wahlverfahren
Tastensperre
AN
AUS
AN
AN
1
3
3
3
3
leer
leer
leer
0000
MFV
AUS
Zurücksetzen zu den Standardeinstellungen löscht alle Einträge im
Telefonbuch und im Gesprächsprotokoll. Auch der PIN-Code wird wieder
auf 0000 eingestellt.
80
OGATECH OG-S60/TWIN/TRIPLE/QUATTRO
OGATECH OG-S60/TWIN/TRIPLE/QUATTRO
4.11 Die Tastensperre
Das Tastenfeld kann gesperrt werden, um zu verhindern, dass Einstellungen verändert oder
Rufnummern gewählt werden. Das - Symbol erscheint im Display, wenn das Tastenfeld
gesperrt ist.
4.11.1 Sperren des Tastenfelds im Menü
1.
Rufen Sie das Menü mit der Taste /OK auf
2.
Blättern Sie mit Hilfe der Hoch und Runter -Tasten bis zu ‘MOBILTEIL’
(Handappart)
3.
Drücken Sie OK
4.
Wählen Sie ‘TASTENSPERRE’ (KEY LOCK) mit Hilfe der Hoch und
Runter -Tasten
5.
Drücken Sie OK, um das Tastenfeld zu sperren
4.11.2 Sperren des Tastenfelds mit der *-Taste (Schnellsperrung)
Drücken und halten Sie die ’*’-Taste für 3 Sekunden gedrückt. Das Tastenfeld ist gesperrt.
4.11.3 Entsperren des Tastenfelds
1.
Drücken Sie irgendeine Taste
2.
Im Display erscheint ‘* DRUECKEN’ (PRESS *)
3.
Drücken Sie die ’*’- Taste innerhalb von 3 Sekunden Kurz, um das Tastenfeld zu
entsperren
1.
2.
3.
4.
5.
6.
7.
Öffnen Sie das Menü indem Sie auf /OK drücken
Selektieren Sie MOBILTEIL mithilfe der Tasten und .
Drücken Sie auf OK.
Selektieren Sie ’UHR EINST’ (Clock Set) mithilfe der Tasten
Drücken Sie auf OK.
Geben Sie die aktuelle Zeit ein (24-Stunden-Format).
Drücken Sie auf OK.
und
DEUTSCH
4.12 Uhr einstellen
.
4.13 Alarm einstellen
1.
2.
3.
4.
5.
6.
Öffnen Sie das Menü indem Sie auf /OK drücken
Selektieren Sie MOBILTEIL mithilfe der Tasten und .
Drücken Sie auf OK.
Selektieren Sie ’WECKER EINS’ (ALARM SET) mithilfe der Tasten und .
Drücken Sie auf OK.
Selektieren Sie ’EIN’ (ON) um den Alarm einzuschalten und drücken Sie auf OK.
Geben Sie die Zeit (24-Stunden-Format) ein, wenn der Alarm aktiviert werden muss.
AUS
7.
Selektieren Sie ’AUS’ (OFF) um den Alarm auszuschalten und drücken Sie auf OK.
Sie können das Alarmsignal stoppen, indem Sie eine beliebige Taste
drücken.
OGATECH OG-S60/TWIN/TRIPLE/QUATTRO
81
OGATECH OG-S60/TWIN/TRIPLE/QUATTRO
5
5.1
Weitere Funktionen
Telefonbuch
Im Telefonbuch können Sie 50 Telefonnummern und Namen speichern. Sie können Namen
mit bis zu 12 Zeichen Länge und Nummern mit bis zu 20 Ziffern Länge eingeben.
Um einen Gesprächspartner anzurufen, dessen Nummer im Telefonbuch gespeichert ist,
siehe Abschnitt 3.13 “Eine Nummer aus dem Telefonbuch anrufen”.
Um alphanumerische Zeichen einzugeben, siehe Verwendung der alphanumerischen
Tastatur 3.14 “Verwendung der alphanumerischen Tastatur”.
5.1.1 Einen Eintrag ins Telefonbuch einfügen
1.
Öffnen Sie das Menü durch Betätigen der Taste /OK
2.
Selektieren Sie mit den Nach-oben- oder Nach-unten- Pfeiltasten
‘TELEFONBUCH’ (PHONEBOOK)
3.
Drücken Sie auf OK Taste
4.
Selektieren Sie mit den Nach-oben- oder Nach-unten- Pfeiltasten
‘HINZUFUEGEN’ (ADD)
5.
Drücken Sie auf OK Taste
6.
Geben Sie den Namen ein
7.
Drücken Sie zum Bestätigen auf OK Taste.
8.
Geben Sie die Telefonnummer ein
9.
Drücken Sie zum Bestätigen auf OK Taste.
10. Wählen Sie den gewünschten Anrufton(1-5) mit Hilfe der Nach-oben- und Nachunten-Tasten /
11. Drücken Sie zum Bestätigen auf OK Taste.
5.1.2 Einen Namen oder eine Nummer ändern
Zum Ändern einer Nummer im Telefonbuch:
1.
Öffnen Sie das Menü durch Betätigen der Taste /OK
2.
Selektieren Sie mit den Nach-oben- oder Nach-unten- Pfeiltasten
‘TELEFONBUCH’ (PHONEBOOK)
3.
Drücken Sie auf OK Taste
4.
Selektieren Sie mit den Nach-oben- oder Nach-unten- Pfeiltasten AENDERN
(MODIFY ENTRY)
5.
Drücken Sie auf OK Taste
6.
Durchlaufen Sie die Namensliste mit den Nach-oben- oder Nach-untenPfeiltasten. Die Liste scrollt in alphanumerischer Reihenfolge.
7.
Drücken Sie auf OK, wenn Sie den zu ändernden Namen gefunden haben
8.
Verwenden Sie die Taste um zurückzugehen und den neuen Namen einzugeben
9.
Drücken Sie zum Bestätigen auf OK Taste
10. Geben Sie die neue Telefonnummer ein1
11. Drücken Sie zum Bestätigen auf OK
Wenn Sie das Adressbuch erst mit der -Taste öffnen und mit der -Taste
eine Telefonnummer ändern, gilt die Änderung nur für diesen Anruf und
wird nicht im Telefonbuch gespeichert!
82
OGATECH OG-S60/TWIN/TRIPLE/QUATTRO
OGATECH OG-S60/TWIN/TRIPLE/QUATTRO
5.1.3 Einen Eintrag löschen
Zum Löschen eines Eintrags:
1.
Öffnen Sie das Menü durch Betätigen der Taste /OK
2.
Selektieren Sie mit den Nach-oben- oder Nach-unten- Pfeiltasten
‘TELEFONBUCH’ (PHONEBOOK)
3.
Drücken Sie auf OK Taste
4.
Selektieren Sie mit den Nach-oben- oder Nach-unten- Pfeiltasten LOESCHEN
(DELETE)
5.
Drücken Sie auf OK Taste
6.
Bewegen Sie sich mit den Nach-oben- oder Nach-unten- Pfeiltasten durch die
Liste der Namen, die Liste scrollt in alphabetischer Reihenfolge.
7.
Drücken Sie auf OK, wenn sie den zu löschenden Namen finden
8.
Die Telefonnummer wird angezeigt, drücken Sie OK
5.2
Handgerät von der Basisstation aus suchen (Paging)
Wenn die Paging-Taste auf der Basisstation gedrückt wird, klingeln alle Handgeräte.
Dieser Klingelton hilft Ihnen ein verlorenes Handgerät zu orten. Drücken Sie eine der Tasten
des Handgeräte, um das Klingeln zu beenden.
6.1
Mehrere Handgeräte verwalten
Ein zusätzliches Handgerät einstellen
Das zweite Handgerät müssen Sie nur registrieren lassen, wenn dieses
nicht verbunden ist mit dem Basisteil oder wenn Sie ein neues Handgerät
angekauft haben.
Sie können neue Handgeräte auf der Basisstation anmelden, wenn diese Handgeräte das
DECT GAP-Protokoll unterstützen.
Die Basisstation kann maximal 5 Handgeräte verwalten. Wenn Sie bereits 5 Handgeräte
haben und ein anderes hinzufügen möchten oder eines austauschen möchten, müssen Sie
erst ein Handgerät löschen und dann das neue Handgerät anmelden.
Um ein Handgerät anzumelden muss die Basisstation in einen speziellen Anmeldemodus
geschaltet werden:
1.
Betätigen Sie die Paging-Taste der Basisstation und halten Sie sie 6 Sekunden
lang gedrückt.
2.
Die Basisstation erzeugt dann einen Piepton. Jetzt ist die Basisstation zum Anmelden
eines neuen Handgeräte bereit. Nach Eindrücken der Taste haben Sie 90 Sekunden
Zeit um ein neues Handgerät anzumelden.
Nachdem sich die Basisstation im Anmeldemodus befindet, beginnen Sie mit dem Verfahren
auf dem neuen Handgerät:
6.1.1 Wenn Ihr zusätzliches Handgerät ein OGATECH OG-S60
3.
Öffnen Sie das Menü durch Betätigen der Taste /OK
4.
Selektieren Sie mit den Nach-oben- oder Nach-unten- Pfeiltasten ANMELDEN
(Register)
5.
Drücken Sie auf OK Taste
6.
Wählen Sie ‘BASIS ANMELD’ (REG BASE) mit Hilfe der Nach-oben- und Nachunten -Tasten
OGATECH OG-S60/TWIN/TRIPLE/QUATTRO
83
DEUTSCH
6
OGATECH OG-S60/TWIN/TRIPLE/QUATTRO
7.
8.
9.
10.
11.
12.
Geben Sie die Nummer einer Basisstation ein (von 1 bis 4). Die blinkenden Zahlen
sind bereits von anderen DECT-Basiseinheiten in Benutzung
Drücken Sie auf OK Taste
Geben Sie den PIN-Code der Basisstation ein (Standardmäßig 0000)
Drücken Sie auf OK. Das Handgerät beginnt die DECT-Basisstation zu suchen
Wenn das Handgerät die Basisstation gefunden hat, zeigt es die
Identifikationsnummer der Basisstation an. Bestätigen Sie die Anmeldung auf der
Basisstation durch Drücken der OK-Taste oder beenden Sie durch Betätigen der
Taste .
Wenn das Handgerät die Basisstation nicht lokalisieren kann, kehrt es nach einigen
Sekunden in den Stand-by-Modus zurück. Versuchen Sie es erneut, indem Sie die
Nummer der Basisstation ändern und überprüfen Sie, ob Sie sich in einer Umgebung
mit Interferenzen befinden. Gehen Sie dichter an die Basisstation heran.
6.1.2 Wenn Ihr Handgerät ein anderes Modell ist
Nach Starten des Anmeldeverfahrens auf der Basisstation, siehe für die Anmeldung des
Handgeräte die Gebrauchsanweisung des Handgeräte. Das Handgerät muss GAPkompatibel sein.
Das Symbol und der Text ‘NICHT ANGEM’ (NOT REG) leuchtet im Display auf, wenn das
Handgerät nicht mit der Basisstation verbunden ist.
Der DECT/GAP-Standard garantiert nur die Basisfunktionen des
Telefonierens zwischen den entsprechend ausgestatteten Geräten
unterschiedlicher Hersteller. Es besteht die Möglichkeit, dass bestimmte
Dienste wie z.B. CLIP nicht korrekt arbeiten.
6.2
Handgerät entfernen
Sie können ein Handgerät abmelden, um ein anderes Handgerät anmelden zu können
1.
Öffnen Sie das Menü durch Betätigen der Taste /OK
2.
Selektieren Sie mit den Nach-oben- oder Nach-unten- Pfeiltasten
‘EINSTELLUNG’ (setup)
3.
Drücken Sie auf OK Taste
4.
Selektieren Sie mit den Nach-oben- oder Nach-unten- Pfeiltasten
‘MT-ABMELDEN’ (DEL HANDSET)
5.
Drücken Sie auf OK Taste
6.
Geben Sie den vierstelligen PIN-Code ein
7.
Drücken Sie auf OK Taste
8.
Selektieren Sie das abzumeldende Handgerät
9.
Drücken Sie zum Bestätigen auf OK Taste
6.3
Handgerät an einer anderen Basisstation anmelden
Wenn Sie ein Handgerät OGATECH OG-S60 an der Basisstation eines anderen Modells
verwenden möchten, muss die Basisstation GAP-kompatibel sein.
1.
Um die Basisstation in den Anmeldemodus zu schalten beachten Sie die
Gebrauchsanweisung der Basisstation.
2.
Führen Sie die Schritte 3 bis 10 aus Abschnitt 6.1 aus.
84
OGATECH OG-S60/TWIN/TRIPLE/QUATTRO
OGATECH OG-S60/TWIN/TRIPLE/QUATTRO
6.4
Basisstation auswählen
Die Handgeräte können bei bis zu 4 Basisstationen gleichzeitig registriert sein.
Um eine Basisstation auszuwählen:
1.
Öffnen Sie das Menü durch Betätigen der Taste /OK
2.
Selektieren Sie mit den Nach-oben- oder Nach-unten- Pfeiltasten ANMELDEN
(REGISTER)
3.
Drücken Sie auf OK Taste
4.
Selektieren Sie mit den Nach-oben- oder Nach-unten- Pfeiltasten BASIS WAHL
(SELECT BASE)
5.
Drücken Sie auf OK Taste
6.
Selektieren Sie mit den Nach-oben- oder Nach-unten- Pfeiltasten eine
Basisstation oder selektieren Sie AUTO (AUTO)
7.
Drücken Sie auf OK Taste
Wenn Sie eine Basisstation auswählen, wird Ihnen die aktuelle durch eine blinkende
Basisstationsnummer angezeigt. Wenn Sie ‘Auto’ selektieren, sucht das Handgerät
automatisch eine andere Basisstation, wenn Sie außer Reichweite sind!
Problemlösung
Anzeichen
Mögliche Ursache
Lösung
Kein Display
Batterien nicht geladen
Überprüfen Sie die Position
der Batterien
Batterien aufladen
Kein Ton
Handgerät ist ausgeschaltet
Handgerät einschalten
Telefonkabel schlecht
angeschlossen
Überprüfen Sie die
Verbindung des Telefonkabels
Die Leitung ist von einem anderen Warten Sie bis das andere
Handgerät besetzt
Handgerät auflegt
Das Symbol
blinkt
Basisstation oder
Handgerät klingeln
nicht
Handgerät außer Reichweite
Gehen Sie mit dem Handgerät
dichter zur Basisstation
Die Basisstation hat keine
Stromzufuhr
Überprüfen Sie die
Stromverbindung zur
Basisstation
Das Handgerät ist bei der
Basisstation nicht angemeldet
Melden Sie das Handgerät bei
der Basisstation an
Die Klingellautstärke ist null oder
zu gering
Stellen Sie die
Klingellautstärke ein
Ton ist gut, aber es gibt Der Wählmodus ist falsch
keine Kommunikation
OGATECH OG-S60/TWIN/TRIPLE/QUATTRO
Stellen Sie den Wählmodus
ein IWV/MFV
85
DEUTSCH
7
OGATECH OG-S60/TWIN/TRIPLE/QUATTRO
Ein Anruf auf PABX
weiterzuleiten ist nicht
möglich
Die FLASH-Zeit ist zu kurz
Stellen Sie die Einheit auf
lange Flash-Zeit ein
Telefon reagiert nicht
auf Tastendrücke
Bedienfehler
Entfernen Sie die Batterien
und legen Sie sie erneut ein
8
8.1
Garantie
Garantiezeit
die Geräte haben eine 36-monatige Garantiezeit. Die Garantiezeit beginnt an dem Tag, an
dem das neue Gerät erworben wurde. Die Garantie gilt nicht für normale Batterien oder
wiederaufladbare Akkus (Typen AA/AAA).
Verschleißteile oder Mängel, die den Wert oder die Gebrauchstauglichkeit des Geräts nur
unerheblich beeinflussen, sind von der Garantie ausgeschlossen.
Der Garantieanspruch muss durch den Originalkaufbeleg oder eine Kopie des Kaufbelegs,
auf dem das Kaufdatum und das Gerätemodell ersichtlich sind, nachgewiesen werden.
8.2
Abwicklung des Garantiefalles
Senden Sie das fehlerhafte Gerät mit dem gültigen Kaufbeleg und einer ausgefüllten
Service-Karte an ein autorisiertes Service-Zentrum.
Tritt ein Gerätefehler innerhalb der Garantiezeit auf, übernimmt das Service-Zentrum
unentgeltlich die Reparatur jedes durch einen Material- oder Herstellungsfehler
aufgetretenen Defekts mittels Reparatur oder Austausch des fehlerhaften Geräts oder von
Teilen des fehlerhaften Geräts. Bei einem Austausch können Farbe und Modell vom
eigentlich erworbenen Gerät abweichen.
Das ursprüngliche Kaufdatum bestimmt den Beginn der Garantiezeit. Die Garantiezeit
verlängert sich nicht, wenn das Gerät von das Service-Zentren ausgetauscht oder repariert
wird.
8.3
Garantieausschlüsse
Schäden oder Mängel, die durch unsachgemäße Handhabung oder unsachgemäßen
Betrieb verursacht werden, sowie Defekte, die durch die Verwendung von NichtOriginalteilen oder -zubehör entstehen, werden nicht von der Garantie abgedeckt.
Die Garantie deckt keine Schäden ab, die durch äußere Einflüsse entstanden sind, wie z. B.
Blitzeinschlag, Wasser, Brände oder jegliche Transportschäden.
Wenn die Seriennummer des Geräts verändert, entfernt oder unleserlich gemacht wurde,
kann keine Garantie in Anspruch genommen werden.
Alle Garantieansprüche erlöschen, wenn das Gerät vom Käufer repariert, verändert oder
umgebaut wurde.
Dieses Gerät darf nur mit Akkus betrieben werden. Falls Sie die ursprünglich im
Lieferumfang enthaltenen Akkus ersetzen möchten, prüfen Sie bitte, ob sich die neuen
Akkus eignen und wiederaufladbar sind. Sie dürfen in den Mobilteilen unter KEINEN
Umständen Alkalibatterien verwenden.
Wenn Sie Alkalibatterien verwenden und das Mobilteil in die Basisstation setzen, erwärmen
sich die Batterien und explodieren möglicherweise. Ein durch die Verwendung falscher
86
OGATECH OG-S60/TWIN/TRIPLE/QUATTRO
OGATECH OG-S60/TWIN/TRIPLE/QUATTRO
Batterien bedingter Defekt wird durch den Hersteller nicht entschädigt und das auf diese
Weise beschädigte Gerät fällt nicht unter die Garantie. Alle Reparaturen werden Ihnen in
Rechnung gestellt.
Technische Daten
•
Standard:
•
•
•
•
•
Frequenzbereich:
Anzahl Kanäle:
Modulation:
Codiergeschwindigkeit:
Emissionsleistung:
•
Reichweite:
•
•
Basisstation Stromzufuhr:
Handgerät Batterien:
•
•
•
•
•
•
Handgerät Bereitschaft:
Sprechzeit:
Ladezeit:
Normale Gebrauchsbedingungen:
Wählmodus:
Flash-Zeit
OGATECH OG-S60/TWIN/TRIPLE/QUATTRO
DECT (Digital Enhanced Cordless
Telecommunications)
GAP (Generic Access Profile)
1880 Mhz bis 1900 Mhz
120 Duplexkanäle
GFSK
32 kbit/s
10 mW (durchschnittliche Leistung pro
Kanal)
max 300 m im freien Gelände /10-50 m
im Gebäude
230 V / 50 Hz für die Basisstation
2 wiederaufladbare Batterien AAA, NiMh
550mAh
200 Stunden im Stand-by
10 Stunden
6-8 Stunden
+5 °C bis +45 °C
IWV/MFV
100 oder 250 ms
87
DEUTSCH
9
OGATECH OG-S60/TWIN/TRIPLE/QUATTRO
Instrucciones de seguridad
•
•
•
•
•
•
•
•
•
Use sólo el conector del cargador suministrado. No utilice otros cargadores para evitar
dañar los elementos de la batería.
Use sólo baterías recargables del mismo tipo, y nunca baterías ordinarias (salinas) o no
recargables. Instale las baterías recargables respetando la polaridad (indicada en el
compartimiento de baterías del microteléfono).
No toque el cargador ni los contactos con objetos puntiagudos o metálicos.
Los teléfonos inalámbricos pueden interferir con el funcionamiento de algunos aparatos
médicos.
El microteléfono puede generar un zumbido desagradable en los audífonos para
sordos.
No coloque la unidad base en lugares húmedos ni a menos de 1’5 m de una fuente de
agua. Proteja el microteléfono del agua.
No use el teléfono en ambientes donde existan riesgo de explosiones.
Deshágase de las baterías y conserve el teléfono de forma respetuosa con el ambiente.
Puesto que los teléfonos inalámbricos no funcionan cuando falla el suministro eléctrico,
es recomendable disponer de un teléfono fijo convencional o móvil para poder realizar
llamadas de emergencia en estos casos.
Eliminación del aparato (medio ambiente)
Al final del ciclo de vida del producto, no debe tirar este producto en la basura
normal de casa sino llevar el producto a un punto de recogida para reciclaje de
equipos eléctricos y electrónicos. El símbolo en el producto, la guía de usuario
y/o la caja indican esto.
Alguno de los materiales del producto se pueden reutilizar si los lleva a un punto
de reciclaje. Reutilizando algunas piezas o materias primas de productos
usados puede hacer una contribución importante a la protección del medio ambiente.
Por favor contacte con las autoridades locales en caso de que necesite más información
sobre los puntos de recogida de su zona.
Conservación
Para limpiar el teléfono use un paño ligeramente húmedo o un trapo antiestático.
Nunca use detergentes o disolventes abrasivos.
Este producto solo funciona con pilas recargables. Si pone pilas no
recargables en el terminal y lo pone en la base, el terminal se dañará, lo
que NO está incluido en la garantía.
El sello CE corrobora la conformidad del equipo con los requerimientos
básicos de la directiva R&TTE.
88
OGATECH OG-S60/TWIN/TRIPLE/QUATTRO
OGATECH OG-S60/TWIN/TRIPLE/QUATTRO
1
1.1
Descripción del teléfono
Microteléfono y base OGATECH OG-S60
Auricular
Indicador luminoso del
portátil (LED)
Pantalla
Tecla secreto/Borrar
Menú/OK
Tecla Rellamada/pausa
Tecla arriba
Agenda/Esc
Tecla abajo/Tecla del
registro de llamadas
Tecla R / Encender/apagar
Llamada interna
ESPAÑOL
Micrófono
Tecla de Hojear
OG-S60
LED indicador de alimentación
Llamada entrante
OGATECH OG-S60/TWIN/TRIPLE/QUATTRO
Indicador de carga
89
OGATECH OG-S60/TWIN/TRIPLE/QUATTRO
1.2
Cargador OGATECH OG-S60
Indicador de carga
OG-S60
1.3
Pantalla
Fila de iconos
Fila de visualización de caracteres
(12 máximo)
Each operation has an associated icon
Icono:
Significado:
Tomar línea para llamar
EXT
EXT Está realizando una llamada externa
INT
INT Está realizando una llamada interna
Números nuevos en la lista de llamadas
Indica llamada contestada
Indica llamada no contestada
Está abriendo la agenda.
Está en el menú.
Indicador del nivel de carga de la batería recargale
1 segmento: carga baja, 2 segmentos: media carga
3 segmentos: carga completa
La antena indica la calidad de la recepción. Parpadea si el portátil no está
asociado a la base
Teclado del microteléfono bloqueado
o
Indica que el número visualizado es más largo que el que aparece en la pantalla
1.3.1 Pantalla en reposo
En el modo reposo, la pantalla muestra la hora y el número del portátil:
12-05 HS1
90
OGATECH OG-S60/TWIN/TRIPLE/QUATTRO
OGATECH OG-S60/TWIN/TRIPLE/QUATTRO
1.4
Indicador luminoso del portátil (LED)
Este indicador luminoso tiene las siguientes funciones:
• ENCENDIDO cuando la línea externa está ocupada
• APAGADO cuando todos los portátiles están en reposo
• Luce intermitente en todas las unidades portátiles cuando hay una llamada entrante
2
2.1
Instalación del teléfono
Conexiones
Vista trasera de la base OGATECH OG-S60
TEL
Cordón del
teléfono
Cable de electricidad
ESPAÑOL
Cargador OGATECH OG-S60
Cable de electricidad
OGATECH OG-S60/TWIN/TRIPLE/QUATTRO
91
OGATECH OG-S60/TWIN/TRIPLE/QUATTRO
2.2
Baterías recargables
Antes de usar el OGATECH OG-S60 por primera vez es necesario dejar
cargar las baterías durante 6-8 horas. Si no se respeta este tiempo de
carga, el teléfono no funcionará de forma óptima.
Para cambiar o instalar la batería recargable: (ver la hoja plegada)
1.
Deslice la tapa hacia abajo y después levántela.
2.
Inserte las baterías respetando la polaridad.
3.
Vuelva a colocar la tapa.
Tapa
Vista trasera del terminal
-
+
-
OG-S60
+ Pilas recargables
El ciclo de trabajo de las baterías es de aproximadamente 200h y el tiempo
máximo de conversación es de 10 horas. Debido al desgaste por el uso, las
baterías irán descargándose cada vez más pronto. Cuando el ciclo de carga/
descarga resulte demasiado corto, deberán cambiarse las baterías. Se
pueden adquirir en cualquier tienda especializada (2 baterías recargables
de NiMH, tamaño IEC-R3 (AAA).
3
3.1
1.
2.
3.
4.
5.
6.
7.
3.2
•
•
92
Uso del teléfono
Seleccionar el idioma del menú
Pulse la tecla
/OK para acceder al menú.
Seleccione ‘PORTATIL’ (HANDSET) con las teclas
Pulse OK.
Seleccione ‘IDIOMA’ (LANGUAGE) con las teclas
Pulse OK.
Seleccione un idioma con las teclas y .
Pulse OK para validar.
y
y
.
.
Encender y apagar la unidad portátil
Para encenderla: Presionar la tecla del microteléfono. El portátil empezará a buscar la
base.
Para apagarla: Pulse durante 2 seg. La pantalla se apagará.
OGATECH OG-S60/TWIN/TRIPLE/QUATTRO
OGATECH OG-S60/TWIN/TRIPLE/QUATTRO
3.3
Contestar llamadas
Cuando suene el timbre del portátil, pulse para contestar.
Quedará conectado con el abonado llamante. Si el portátil está alojado en la base cuando
suene el timbre, simplemente descuélguelo para contestar la llamada (siempre que la opción
contestar automáticamente se encuentre activada: Refiérase a 4.9. Contestar
automáticamente).
3.4
Hacer llamadas externas
3.4.1 Normal
1.
Pulse
2.
Marque el número del teléfono.
3.4.2 Marcación en bloque
1.
Marque el número deseado
2.
Pulse
Para corregir un número, pulse la tecla
3.5
1.
2.
3.6
.
Hacer llamadas internas
Pulse INT
Marque el número del portátil interno (1 al 5).
Transferir llamadas internas
Para transferir una llamada externa de uno a otro portátil:
1.
Durante la conversación, pulse INT.
2.
Marque el número del portátil al que desee llamar. La llamada queda retenida.
3.
Cuando cojan el otro portátil, pulse para colgar y transferir la llamada.
Si el corresponsal interno no contesta, vuelva a pulsar INT para recuperar la llamada
externa.
Llamada a tres
Sólo es posible cuando hay más de una unidad portátil asociada a la misma base. Permite
hablar simultáneamente a dos interlocutores interno con otro externo.
Una vez establecida la comunicación con el que desee hablar.
1.
Pulse INT.
2.
Marque el número del portátil interno con el que desee hablar.
3.
Cuando cojan el portátil interno, pulse y mantenga oprimida la tecla #.
4.
Si el interlocutor interno no contesta, pulse de nuevo INT para volverse a conectar
con el abonado externo.
3.8
Visualizar la duración de la llamada
La duración de la llamada aparece en minutos y segundos una vez transcurridos 15
segundos. Al finalizar la llamada, el tiempo total utilizado se visualizará durante 5 segundos.
3.9
Función secreto
Esta función permite silenciar el micrófono durante una conversación de manera que su
interlocutor no pueda escucharle. Para hacerlo, pulse la tecla
. El micrófono quedará
desactivado y ahora podrá hablar sin que su corresponsal se entere de su conversación. En
la pantalla aparecerá el icono. Para volverlo a activar, pulse otra vez la tecla
.
OGATECH OG-S60/TWIN/TRIPLE/QUATTRO
93
ESPAÑOL
3.7
OGATECH OG-S60/TWIN/TRIPLE/QUATTRO
3.10 Tecla pausa
Permite añadir una pausa entre dos dígitos. Cuando se está marcando un número
telefónico, pulsar la tecla rellamada/pausa
durante 2 segundos.
3.11 Identificación del número llamante
Esta función sólo está disponible si la ha contratado con su proveedor de servicios
telefónicos. Cuando reiba una llamada externa, el número del abonado llamante aparecerá
en la pantalla. Si la compañía telefónica lo envía, o si el número de teléfono del interlocutor
está en la agenda, el nombre del llamante aparecerá en la pantalla en vez del número. La
duración de la llamada sustituirá a la identidad del llamante transcurridos 15 segundos
después de la conexión. Si desea volver a visualizar el nombre del llamante durante este
intervalo, pulse repetidamente la tecla OK para que aparezca el nombre y el número.
3.11.1 Lista de llamadas
El teléfono guarda una lista en su memoria de las últimas 40 llamadas recibidas. Esta función
sólo está disponible si usted dispone de identificación del número llamante. Los abonados
que han llamado se identifican mediante su número de teléfono o nombre igual que el la
identificación del número llamante.
La presencia de llamadas nuevas o sin contestar se notifica mediante el icono
intermitente en la pantalla. Para consultar la lista de llamadas:
1.
Pulse
. Si no existen llamadas en la lista, aparecerá ‘VACIO’ (EMPTY) en la
pantalla.
2.
Desplácese por la lista de llamadas usando las teclas o . Los nombres de los
llamantes aparecerán en la pantalla si la compañía telefónica los envía o si están
almacenados en la agenda. Cuando aparece, se está respondiendo a esta
llamada. Cuando aparece, no se responde a la llamada. Cuando llegue al final de
la lista, escuchará un bip.
3.
Si pulsa OK, se visualizará el número del teléfono; si éste tiene más de 12 dígitos,
vuelva a pulsar OK para verlo completo.
4.
Pulse de nuevo OK para ver la hora y la fecha en que se recibió la llamada.
5.
Presionando OK otra vez le dará la opción de añadir esta entrada en el directorio si
todavía no está almacenado:
– Presionar OK cuando aparezca ’AÑADIR’ (ADD) en la pantalla. Introducir o
modificar el nombre y presionar OK. Introducir o modificar el número de teléfono
y presionar OK. Seleccionar la melodía (1-5) que se oirá cuando llame el número
por medio de las teclas de subir/bajar y presionar OK. La entrada se almacenará
en el directorio.
6.
Para volver a llamar al abonado en cuestión, simplemente pukse . Si un abonado
está en la agenda, se identificará por su nombre en la lista de llamadas.
3.11.2 Borrar todas las entradas de la lista de llamadas
Puede borrar cada entrada por separado o todas las entradas de una vez:
• Cuando se desplace por las llamadas, presionar:
– la tecla mudo
brevemente para borrar solo esta entrada. BORRAR
(DELETE) aparece en la pantalla.
– la tecla mudo
largo (2 seg.) para borrar todas las entradas: BORRAR TODO
(DELETE ALL) aparece en la pantalla.
• Presionar OK para borrar la entrada(s) actual/todas, o
para cancelar la operación de
borrar.
94
OGATECH OG-S60/TWIN/TRIPLE/QUATTRO
OGATECH OG-S60/TWIN/TRIPLE/QUATTRO
3.12 Memoria de rellamada
El teléfono guarda en la memoria una lista de las últimas 10 llamadas (de 32 dígitos)
realizadass. Los abonados llamados quedan identificados por su número telefónico o el
nombre si están en la agenda.
Para consultar la lista de rellamadas:.
1.
Pulse la tecla
.
2.
Desplácese por la lista de llamadas con las flechas o .
3.
Pulse la tecla para marcar el número que aparece en la pantalla.
Cuando aparezca el número, podrá conmutar entre el nombre y el
número pulsando la tecla OK.
3.13 Marcar desde la agenda
Para llamar a un abonado cuyo nombre se encuentre guardado en la agenda:
1.
Pulse para entrar en la agenda.
2.
Pulse la primera letra del nombre. La pantalla mostrará el primer nombre que empiece
con esa letra o la más próxima en el abecedario.
3.
Examine la lista de números guardados con las teclas o . Los nombres se
desplegarán en orden alfabético.
4.
Pulse para marcar el número del abonado que aparece en la pantalla.
Para visualizar el número antes de marcarlo, siga los pasos 1 a 3 anteriores y pulse OK.
Este teléfono también permite añadir caracteres alfanuméricos, lo cual resulta útil para
introducir nombres en la agenda, identificar unidades portátiles, etc. Para seleccionar una
letra, pulse la tecla correspondiente tantas
veces como sea necesario hasta que aparezca el carácter deseado. Por ejemplo, para
seleccionar la letra “A”, pulse una vez la tecla ‘2', para la ‘B’, dos veces la tecla ‘2', etc. Para
seleccionar la letra ‘A’ y luego la ‘B’ de forma consecutiva, seleccione la ‘A’, espere unos
segundos hasta que el cursor pase al siguiente carácter y entonces pulse dos veces
la tecla ‘2'. Para seleccionar un espacio, pulse una vez la tecla ‘1'. Para seleccionar un guión,
pulse la tecla ‘1' dos veces.
Los caracteres del teclado son los siguientes:
Tecla
Primera
Segunda
Tercera
pulsación
pulsación
pulsación
1
espacio
1
2
A
B
C
3
D
E
F
4
G
H
I
5
J
K
L
6
M
N
Ñ
7
P
Q
R
8
T
U
V
9
W
X
Y
OGATECH OG-S60/TWIN/TRIPLE/QUATTRO
Cuarta
pulsación
2
3
4
5
O
S
8
Z
Quinta
pulsación
6
7
9
95
ESPAÑOL
3.14 Uso del teclado alfanumérico
OGATECH OG-S60/TWIN/TRIPLE/QUATTRO
3.15 Uso del menú
El menú de uso fácil permite acceder a una amplia gama de funciones del teléfono.
1.
Para acceder al menú, pulse /OK.
2.
Examine las selecciones con las teclas
o . Las opciones se despliegan en forma
de bucle (se regresaa a la primera después de la última).
3.
Pulse OK para validar la selección.
4.
Para volver al menú anterior, pulse
4
Personalización
Cada programación se confirma al terminar con un bip doble o sencillo. El
doble confirma la validación de su elección. Un pitido largo significa que la
modificación no ha sido aceptada.
4.1
Ajuste de volumen de llamada
4.1.1 Volumen de timbre del microteléfono para llamadas Externas/internas
El volumen de timbre para llamadas internas o externas se pueden fijar por separado:
1.
Pulse la tecla de menú, /OK.
2.
Seleccione la unidad ‘PORTATIL’ (HANDSET) con las teclas
o
3.
Pulse OK.
4.
Seleccione ‘VOL TIMB INT’ (INT RING VOL) o bien ‘VOL TIMB EXT’ (EXT RING
VOL) con las teclas
o
5.
Press OK
6.
Seleccione el nivel del volumen (SILENCIO o 1 al 5).
7.
Pulse OK para confirmar o
para regresar al menú anterior.
4.1.2 Ajustar el volumen del timbre de la base
1.
Pulse la tecla /OK para acceder al menú.
2.
Seleccione ‘CONFIGURAR’ (SETUP) con las teclas y
3.
Pulse OK.
4.
Seleccione ‘VOLUMEN BASE’ (BASE VOLUME) con las teclas
5.
Pulse OK.
6.
Seleccione el nivel del volumen (NULO o 1 al 5).
7.
Pulse OK para confirmar o
para regresar al menú anterior.
4.2
y
Seleccionar la melodía del timbre
Se puede seleccionar una melodía diferente para la base y cada una de las unidades
portátiles. Adicionalmente, los portátiles pueden producir una melodía diferente para las
llamadas externas o internas.
4.2.1 Melodía de la base
1.
Pulse la tecla /OK para acceder al menú.
2.
Seleccione ‘CONFIGURAR’ (SETUP) con las teclas y
3.
Pulse OK.
4.
Seleccione ‘MELODIA BASE’ (BASE MELODY) con las teclas
5.
Pulse OK.
6.
Seleccione la melodía preferida (1 a 5) con las teclas y
7.
Pulse OK para confirmar o
para regresar al menú anterior.
96
y
OGATECH OG-S60/TWIN/TRIPLE/QUATTRO
OGATECH OG-S60/TWIN/TRIPLE/QUATTRO
4.2.2 Melodía del portátil para llamadas externas
1.
Pulse la tecla /OK para acceder al menú.
2.
Seleccione la unidad ‘PORTATIL’ (HANDSET) con las teclas y
3.
Pulse OK.
4.
Seleccione ‘MELODIA EXT’ (EXT MELODY) con las teclas y
5.
Pulse OK.
6.
Seleccione la melodía preferida (1 a 5) con las teclas y
7.
Pulse OK para confirmar o
para regresar al menú anterior.
4.2.3 Melodía del portátil para llamadas internas
1.
Pulse la tecla /OK para acceder al menú.
2.
Seleccione ‘PORTATIL’ (HANDSET) con las teclas y
3.
Pulse OK.
4.
Seleccione ‘MELODIA INT’ (INT MELODY) con las teclas y
5.
Pulse OK.
6.
Seleccione la melodía preferida (1 a 5) con las teclas y
7.
Pulse OK para confirmar o
para regresar al menú anterior.
4.3
Durante la llamada
Pulse la tecla
4.4
o
para ajustar el volumen a su gusto.
Activar y desactivar los tonos de aviso
4.4.1 Bip del teclado
1.
Pulse la tecla /OK para acceder al menú.
2.
Seleccione ‘PORTATIL’ (HANDSET) con las teclas y
3.
Pulse OK.
4.
Seleccione ‘TONO’ (BEEP) con las teclas y
5.
Pulse OK.
6.
Seleccione ‘BIP TECLA’ (KEYTONE) con las teclas y
7.
Pulse OK.
8.
Seleccione ‘ENCENDIDO’ (ON) para activar u ‘APAGADO’ (OFF) para desactivar.
9.
Pulse OK para confirmar.
4.4.2 Carga de batería baja
Repita los pasos anteriores, pero seleccionando ‘BATERIA BAJA’ (LOW BATT) en el paso
6 en lugar de ‘BIP TECLA’ (KEYTONE).
4.4.3 Portátil fuera de alcance
Igual que en el caso anterior, pero seleccionando ‘SIN COBERT’ (OUTRANG) en el paso 6
en lugar de ‘BIP TECLA’ (KEYTONE).
4.5
Identificar las unidades portátiles
Esta función permite personalizar cada unidad portátil.
1.
Pulse la tecla /OK para acceder al menú.
2.
Seleccione ‘PORTATIL’ (HANDSET) con las teclas
OGATECH OG-S60/TWIN/TRIPLE/QUATTRO
y
97
ESPAÑOL
Las unidades portátiles pueden emitir un bip cuando se pulsa una tecla, cuando la batería
se está agotando y cuando está fuera del alcance de la base.
OGATECH OG-S60/TWIN/TRIPLE/QUATTRO
3.
4.
5.
6.
7.
Pulse OK.
Seleccione ‘NOMBRE’ (NAME) con las teclas
Pulse OK.
Introduzca el nombre.
Pulse OK para confirmar.
y
Si se equivoca de pulsación cuando esté introduciendo el nombre, pulse /C para borrar un
carácter o mantenga oprimida la tecla /C para salir del menú sin hacer cambios.
4.6
1.
2.
3.
4.
5.
6.
7.
8.
9.
10.
11.
4.7
Cambiar el código PIN
Pulse la tecla /OK para acceder al menú.
Seleccione ‘CONFIGURAR’ (SETUP) con las teclas y
Pulse OK.
Seleccione ‘CODIGO’ (PIN CODE) con las teclas y
Pulse OK.
Introduzca el código PIN antiguo.
Pulse OK.
Introduzca el nuevo código PIN de 4 números.
Pulse OK.
Vuelva a introducir el nuevo código PIN.
Pulse OK para validar.
Seleccionar el tipo de marcación
Existen dos tipos de marcación:
• Marcación por tonos DTMF (el más común)
• Marcación decádica (para instalaciones antiguas)
Para cambiar el tipo de marcación:
1.
Pulse la tecla /OK para acceder al menú.
2.
Seleccione ‘CONFIGURAR’ (SETUP) con las teclas y
3.
Pulse OK.
4.
Seleccione ‘MODO MARCAR’ (DIAL MODE) con las teclas
5.
Pulse OK.
6.
Seleccione el tipo de marcación con las teclas y
7.
Pulse OK para validar.
4.8
y
Duración del intervalo de la apertura temporizada (función de la tecla)
1.
2.
3.
4.
5.
Pulse la tecla /OK para acceder al menú.
Seleccione ‘CONFIGURAR’ (SETUP) con las teclas y
Pulse OK.
Seleccione ‘FLASH’ (RECALL) con las teclas y
Seleccione ‘RELLAMADA 1’ (RECALL 1) para un intervalo corto (100ms)* o
‘RELLAMADA 2’ (RECALL 2) para un intervalo largo (250ms)OK.
* Este es el intervalo usual en España.
98
OGATECH OG-S60/TWIN/TRIPLE/QUATTRO
OGATECH OG-S60/TWIN/TRIPLE/QUATTRO
4.9
Descolgado automático
Cuando se recibe una llamada y el portátil está colgado en su base, la llamada se acepta
automáticamente al descolgarlo. Esta es la configuración predeterminada, que se puede
desactivar.
1.
Pulse la tecla /OK para acceder al menú.
2.
Seleccione ‘PORTATIL’ (HANDSET) con las teclas y
3.
Pulse OK.
4.
Seleccione ‘RESP AUTOM’ (AUTO ANS) con las teclas y
5.
Seleccione ‘ENCENDIDO’ (ON) (activado) para descolgar automáticamente u
‘APAGADO’ (OFF) (desactivado)
6.
Pulse OK.
4.10 Reinicio
Se puede restablecer la configuración original del teléfono para dejarlo igual que cuando se
recibió.
Para restablecer los valores de fábrica:
1.
Pulse la tecla /OK para acceder al menú.
2.
Seleccione ‘CONFIGURAR’ (SETUP) con las teclas y
3.
Pulse OK.
4.
Seleccione ‘BORRAR’ (DEFAULT) con las teclas y
5.
Pulse OK.
6.
Introduzca el código PIN de 4 dígitos (código predeterminado = 0000). Pulse OK.
7.
Presionar OK otra vez para validar
LOS PARAMETROS POR DEFECTO SON:
Contestador automático
Melodía interna
Volumen interno
Melodía externa
Volumen externo
ENCENDIDO Volumen en la oreja
APAGADO
Directorio
3
Vacío
ENCENDIDO Lista de Registro de
llamadas
ENCENDIDO Lista de volver a marcar
1
Código Pin
3
Modo Marcar
3
Bloqueo de teclado
3
Vacía
Vacía
0000
DTMF
APAGADO
ESPAÑOL
Pitidos de batería baja
Pitidos de aviso de fuera de
cobertura
Pulsar tecla
Al restablecer los valores de fábrica se borran todas las entradas de la
agenda y del registro de llamadas. El código PIN también vuelve a su valor
original, 0000.
4.11 Bloqueo de teclado
El teclado se puede bloquear para que no se pueda cambiar ningún ajuste o no se pueda
marcar ningún número de teléfono. El icono -aparecerá en la pantalla cuando el teclado
esté bloqueado.
OGATECH OG-S60/TWIN/TRIPLE/QUATTRO
99
OGATECH OG-S60/TWIN/TRIPLE/QUATTRO
4.11.1 Bloquear el teclado con el Menú
1.
Entrar en el menú presionando /OK
2.
Seleccionar ‘PORTATIL’ (HANDSET) usando las teclas de subir y bajar
3.
Presionar OK
4.
Seleccionar ‘TECL BLOQ’ (KEY LOCK) usando la teclas de subir y bajar
5.
Presionar OK para bloquear el teclado
4.11.2 Bloquear el teclado con la tecla-* (bloqueo rápido)
Presionar y mantener la tecla ’*’ durante 3 segundos. Se bloqueará el teclado.
4.11.3 Desbloquear el teclado
1.
Presionar cualquier tecla
2.
‘TECLEAR *’ (PRESS *) aparecerá en la pantalla
3.
Presionar la tecla ’*’ 3 segundos para desbloquear el teclado
4.12 Poner la hora
1.
2.
3.
4.
5.
6.
7.
Entre en el menú tecleando /OK
Seleccione FECHA Y HORA (DATE & TIME) usando las teclas de subir
Teclee OK
Seleccione ‘CONFIG RELOJ’usando las teclas de subir y bajar
Teclee OK
Introduzca la hora (formato de 24h).
Teclee OK para validar
y bajar
4.13 Poner la alarma
1.
2.
3.
4.
5.
6.
O
7.
Entre en el menú tecleando (pressing) /OK
Seleccione FECHA Y HORA (DATE & TIME) usando las teclas de subir y bajar
Teclee OK
Seleccione ‘CONF. ALARMA’ usando las teclas de subir y bajar
Teclee OK
Seleccione Encendido (ON) para encender la alarma y teclee OK. Introduzca la hora
(formato de 24h) en que se debe activar la alarma.
Seleccione Apagado (OFF) para apagar la alarma y teclee OK para confirmar
Cuando suena la alarma puede teclear cualquier tecla del portátil para
apagarla.
5
5.1
Funciones avanzadas
Agenda
Se pueden almacenar hasta 50 números del teléfono con su nombre en la agenda. Los
nombres pueden tener una longitud de 12 caracteres y los números de 20 dígitos.
Para llamar a un abonado cuyo nombre esté guardado en la agenda, refiérase a la sección
3.13. Para introducir caracteres alfanuméricos, refiérase a la sección 3.14.
100
OGATECH OG-S60/TWIN/TRIPLE/QUATTRO
OGATECH OG-S60/TWIN/TRIPLE/QUATTRO
5.1.1 Añadir entradas a la agenda
1.
Pulse la tecla /OK para acceder al menú.
2.
Seleccione ‘AGENDA’ (PHONE BOOK) con las teclas y
3.
Pulse OK.
4.
Seleccione ‘AÑADIR’ (ADD ENTRY) con las teclas y
5.
Pulse OK.
6.
Introduzca el nombre.
7.
Pulse OK para validar.
8.
Introduzca el número del teléfono.
9.
Pulse OK para validar.
10. Seleccionar la melodía deseada (1-5) por medio de la tecla de subir/bajar
11. Pulse OK para validar
/
5.1.2 Modificar nombres o números
Para modificar un número de la agenda:
1.
Pulse la tecla /OK para acceder al menú.
2.
Seleccione ‘AGENDA’ (PHONE BOOK) con las teclas y
3.
Pulse OK.
4.
Seleccione ‘MODIFICAR’ (MODIFY ENTRY) con las teclas y
5.
Pulse OK.
6.
Examine la lista de nombres con las teclas y . La lista se despliega en orden
alfabético.
7.
Cuando aparezca el nombre que desee modificar, pulse OK.
8.
Para volver atrás e introducir el nuevo nombre, pulse
9.
Pulse OK para validar.
10. Introduzca el nuevo número telefónico.
11. Pulse OK para validar.
Si accede primero a la agenda con la tecla y modifica un número de
teléfono con la tecla
, dicha modificación sólo afectará a la llamada en
curso y no se guardará en la agenda
OGATECH OG-S60/TWIN/TRIPLE/QUATTRO
ESPAÑOL
5.1.3 Borrar una entrada
Para eliminar una entrada de la agenda:
1.
Pulse la tecla /OK para acceder al menú.
2.
Seleccione ‘AGENDA’ (PHONE BOOK) con las teclas y
3.
Pulse OK.
4.
Seleccione ‘BORRAR’ (DELETE ENTRY) con las teclas y
5.
Pulse OK.
6.
Examine la lista de nombres con las teclas y . La lista se despliega en orden
alfabético.
7.
Cuando aparezca el nombre que desee borrar, pulse OK.
8.
Cuando aparezca el número de teléfono, pulse OK.
9.
La pantalla mostrará CONFIRM?. Pulse OK para confirmar o
para detener.
101
OGATECH OG-S60/TWIN/TRIPLE/QUATTRO
5.2
Localizar la unidad portátil desde la base
Cuando se pulsa el botón localizar en la base, suenan todas las unidades portátiles. Este
sonido le ayudará a localizar un portátil extraviado. El sonido se detiene pulsando cualquiera
de las teclas del portátil.
6
6.1
Uso de múltiples unidades portátiles
Añadir otra unidad portátil
Se pueden asociar nuevas unidades portátiles a la base siempre que soporten el protocolo
DECT GAP.
La base de este teléfono acepta un máximo de 5 portátiles. Si ya cuenta con 5 portátiles y
desea añadir más, antes deberá desasociar alguno de los ya configurados para añadir el
nuevo. Para asociar cualquier portátil es necesario activar una función especial de registro
en la base:
1.
Pulse y mantenga oprimido el botón localizar en la base durante 6 segundos.
2.
La base emitirá un sonido de bip y quedará preparada para registrar la nueva unidad
portátil. Dispone de 90 segundos para registrarla después de haber pulsado el botón.
Una vez seleccionada en la base la función asociar, inicie el procedimiento desde el
nuevo portátil.
6.1.1 si la unidad portátil adicional es un OGATECH OG-S60
3.
Pulse la tecla /OK para acceder al menú.
4.
Seleccione ‘INSTALAR’ (REGISTER) con las teclas y .
5.
Pulse OK.
6.
Seleccionar ‘INSTAL BASE’ (REG BASE) usando las teclas de subir y bajar
7.
Introduzca el número de la base (del 1 al 4). Los números que aparecen intermitentes
ya han sido asignados.
8.
Introduzca el código PIN de la BASE (el código predeterminado es el 0000).
9.
Pulse OK. El portátil empezará a buscar la base DECT.
10. Una vez el portátil haya localizado la base, mostrará el número de identificación de la
base. Pulse OK para validar el registro con la base o anúlelo pulsando .
11. Si el portátil no puede localizar la base, regresará al estado de reposo transcurridos
unos segundos. Vuelva a intentarlo cambiando el número de la base y compruebe
que no se encuentre en un entorno donde existan interferencias. Acérquese a la
base.
6.1.2 si la unidad portátil es de otro modelo
Después de iniciar el procedimiento de registro con la base, refiérase al manual del portátil
para averiguar cómo se asocia. La unidad portátil deberá ser compatible con el protocolo
GAP.
El icono y el texto NO ASOC aparece intermitente en la pantalla si el portátil no está
asociado a la base. Cuando un portátil está asociado a una base, ésta le asigna un número,
que es el que aparece en la pantalla del portátil después del nombre y el que hay que marcar
para las llamadas internas.
102
OGATECH OG-S60/TWIN/TRIPLE/QUATTRO
OGATECH OG-S60/TWIN/TRIPLE/QUATTRO
El Perfil DECT GAP solo garantiza que funcionarán correctamente las
funciones de llamada básicas entre diferentes marcas/tipos. Hay una
posibilidad de que ciertos servicios (como CLIP) no funcionen
correctamente.
6.2
Quitar una unidad portátil
Se puede desasociar una unidad portátil de una base para poder asociar otro portátil
mediante el siguiente procedimiento:
1.
Pulse la tecla /OK para acceder al menú.
2.
Seleccione ‘CONFIGURAR’ (SETUP) con las teclas y
3.
Pulse OK.
4.
Seleccione ‘DESINST PORT’ (DEL HANDSET) con las teclas y
5.
Pulse OK.
6.
Introduzca el código PIN de 4 dígitos de la base.
7.
Pulse OK.
8.
Seleccione el portátil que quiera desasociar.
9.
Pulse OK para validar.
6.3
Asignar una unidad portátil a otra base
Si desea usar una unidad portátil OGATECH OG-S60 con la base de otro modelo, ésta
deberá ser compatible con el protocolo GAP.
1.
Para activar la función asociar de la base, refiérase al manual de uso de la base.
2.
Ejecute los pasos 3 a 10 descritos en el párrafo 6.1.
Seleccionar la base
Las unidades portátiles se pueden asociar simultáneamente con hasta 4 bases diferentes.
Para seleccionar una base:
1.
Pulse la tecla /OK para acceder al menú.
2.
Seleccione ‘INSTALAR’ (REGISTER) con las teclas y
3.
Pulse OK.
4.
Seleccione ‘SELECC BASE’ (SELECT BASE) con las teclas y
5.
Pulse OK.
6.
Seleccione la base o AUTO con las teclas y
7.
Pulse OK.
Cuando se seleccione la base, se indicará la base seleccionada actualmente parpadeando
el número de la base. Si se elige ‘AUTOMATICO’, el portátil buscará automáticamente otra
base cuando esté fuera de alcance!
OGATECH OG-S60/TWIN/TRIPLE/QUATTRO
103
ESPAÑOL
6.4
OGATECH OG-S60/TWIN/TRIPLE/QUATTRO
7
Solución de problemas
Síntoma
Causa probable
Solución
Pantalla en blanco
Baterías descargadas
Comprobar posición
Recargar baterías
Portátil apagado
Encienda el portátil
Cordón del teléfono mal
conectado
Comprobar la conexión del
cordón del teléfono
Sin tono de línea
Otro portátil está utilizando Esperar a que cuelgue el
la línea
otro portátil
El icono
parpadea
El timbre de la base o el
portátil no suena
Portátil fuera de alcance
Acerque el portátil a la
base
está desconectada de la
red
Compruebe que la
alimentación de la base
esté conectada a la red
Portátil no asociado a la
base
Asocie el portátil a la base
Volumen del timbre en cero Ajuste el volumen del
o demasiado bajo
timbre
El tono de línea es correcto Tipo de marcación
pero no hay comunicación incorrecto
Cambie el tipo de
marcación (decádica /
tonos)
No se puede transferir la
llamada a través de la
centralita
Intervalo de apertura
temporizada
demasiado corto
Seleccione el intervalo más
largo
El teléfono no responde a
las pulsaciones
Error de manejo
Quite las baterías y
vuélvalas a instalar.
8
8.1
Garantia
Periodo de garantía
Las unidades tienen un período de garantía de 24 meses. El período de garantía entra en
vigor el día en que se adquiere la nueva unidad. No existe ninguna garantía sobre las pilas
estándar o recargables (tipo AA/AAA).
La garantía no cubre los consumibles ni los defectos que tengan un efecto insignificante en
el funcionamiento o en el valor del equipo.
La garantía debe demostrarse presentando el comprobante original de compra o una copia
de este, en el que constarán la fecha de la compra y el modelo de la unidad.
8.2
Tratamiento de la garantía
Los aparatos averiados deberán remitirse a un servicio técnico junto con un comprobante de
compra válido y una tarjeta de servicio técnico cumplimentada.
104
OGATECH OG-S60/TWIN/TRIPLE/QUATTRO
OGATECH OG-S60/TWIN/TRIPLE/QUATTRO
Si la unidad tiene una avería durante el período de garantía, centro de servicio oficial
repararán sin cargo alguno cualquier avería causada por defectos de material o fabricación,
ya sea reparando o sustituyendo las unidades defectuosas o partes de las mismas. En caso
de sustitución, el color y el modelo pueden variar respecto a los de la unidad adquirida
inicialmente.
La fecha de compra inicial determinará el comienzo del período de garantía. El período de
garantía no se ampliará si centros de servicio autorizados sustituyen o reparan la unidad.
8.3
Exclusiones de la garantía
Los daños o defectos ocasionados por un tratamiento o funcionamiento incorrectos, así
como los daños resultantes del uso de piezas o accesorios no originales, no estarán
cubiertos por esta garantía.
La garantía no cubre los daños ocasionados por factores externos tales como relámpagos,
agua o fuego como tampoco los daños causados durante el transporte.
La garantía no será válida si el número de serie de las unidades se cambia, se elimina o
resulta ilegible.
Cualquier reclamación de la garantía se invalidará si la unidad ha sido reparada, alterada o
modificada por el comprador.
Esta aplicación solo debe utilizarse con pilas recargables. Si desea sustituir las pilas
incluidas originalmente, compruebe que las pilas que utilice sean adecuadas y recargables.
Bajo NINGUNA circunstancia debe utilizar pilas alcalinas en los terminales.
Si utiliza pilas alcalinas y pone el terminal en la base, las pilas se calentarán y podrían
explotar. Los daños que ello pueda causar no podrán recuperarse del fabricante, y los daños
ocasionados en el aparato no están cubiertos por la garantía. Usted deberá hacerse cargo
del coste de cualquier reparación.
Especificaciones técnicas
•
Normativa:
•
•
•
•
•
•
Gama de frecuencias
Nº de canales
Modulación
Codificación de voz
Potencia de transmisión
Alcance
•
Suministro de alimentación
•
•
•
•
•
•
•
Baterías del portátil
Autonomía del portátil
Tiempo en conversación
Tiempo de carga
Condiciones normales de uso
Tipo de marcación
Tecla R
OGATECH OG-S60/TWIN/TRIPLE/QUATTRO
DECT (Telecomunicaciones Inalámbricas Digitales
Mejoradas)
GAP (Generic Access Profile)
1880 Mhz a 1900 MHz
120 canales dúplex
GFSK
32 Kbits/s
10 mW (potencia media por canal)
300 m máximo en espacio abierto
10-50 m en interiores
230 V / 50 Hz para la base
de la base
2 baterías recargables tipo R3 (AAA), Nimh 550mAh
200 horas en reposo
10 horas
6-8 horas
+5 ºC a +45 ºC
Decádica / Tonos
100 o 250ms
105
ESPAÑOL
9
OGATECH OG-S60/TWIN/TRIPLE/QUATTRO
Instruções de segurança
•
•
•
•
•
•
•
•
•
Utilize apenas o carregador aprovado pelo fabricante. Se utiliza outros carregadores,
pode ser perigoso para as baterias.
Só introduzir baterias do mesmo tipo.Jamais utilize baterias que não podam ser
recarregadas. Utilize baterias que podam ser recarregadas e que liguem com os pólos
correctos (indicados no compartimento da bateria do handset).
Não toque o carregador com objectos de metal.
A operação de dispositivos médicos podem ser afectados.
O handset pode causar um som desagradáve e interferèncias.
Mantenha a base do telefone a uma distância mínima de1.5 m duma fonte de água.
Não utilize o telefone em ambientes com risco de explosão.
Entregar as baterias num espaço autorizado para recolha de residuos e mantenha o
telefone de maneira ecológica.
Este telefone não se pode utilizar em caso de corte de electricidade, e deverá ter un
telefone celular em caso de emergência.
Colocação do dispositivo (ambiente)
No final do ciclo de vida do produto, o mesmo não deve ser deitado fora no lixo
normal da morada, o produto deve ser levado a um ponto de recolha para a
reciclagem de equipamentos eléctricos e electrónicos. Isto está indicado no
símbolo no produto, manual do utilizador e/ou na caixa do mesmo.
Alguns dos materiais do produto podem ser reutilizados, quando enviados ao
ponto de reciclagem. Reutilizar algumas partes ou matéria prima dos produtos
usados, é uma importante contribuição para proteger o ambiente.
Por favor, entrar em contacto com as autoridades locais, para maiores informações sobre os
pontos de recolha da sua cidade.
Limpeza
Limpe o telefone com um pano macio anti-estático ou levemente humedecido.
Não utilize detergentes ou líquidos abrasivos.
Este produto trabalha apenas com baterias recarregáveis. Se colocar
baterias não recarregáveis no portátil e o colocar sobre a base, este ficará
danificado. Estes danos não são cobertos pelas condições da garantia.
O símbolo CE indica que esta unidade cumpre com os requisitos essenciais
da directiva R&TTE.
106
OGATECH OG-S60/TWIN/TRIPLE/QUATTRO
OGATECH OG-S60/TWIN/TRIPLE/QUATTRO
1
1.1
Descrição do telefone
Terminal & base OGATECH OG-S60
Auricular
Indicador LED Terminal
Ecrã
Tecla Cham Silêncio/Apagar
Menu / OK
Remarcar/Pausa
Tecla Up tecla
Tecla Lista telef/Sair
Tecla Down/tecla Chamada
Tecla Flash/Potência
Ligado/Desligado
Chamada
Interna
Microfone
PORTUGUÊS
Tecla Paging
OG-S60
LED indicador potência/
chamada entrada
OGATECH OG-S60/TWIN/TRIPLE/QUATTRO
Indicador Carga
107
OGATECH OG-S60/TWIN/TRIPLE/QUATTRO
1.2
Carregador OGATECH OG-S60
Indicador Carga
OG-S60
1.3
Ecrã
Ícone linha
Linha ecrã dígito
(máximo 12 dígitos)
Cada operação possui um ícone relacionado
Ícone:
Significa:
Em linha
EXT
Em comunicação externa
INT
Em comunicação interna
Novos números na lista de chamadas
Indica chamadas atendidas
Indica chamadas não atendidas
A abrir a agenda.
No menu.
indicador do nível de bateria recarregável
1 segmento: fraca, 2 segmentos: média, 3 segmentos: completa.
A antena indica a qualidade da recepção.
A antena pisca quando o terminal não está registado na base.
Teclado do terminal bloqueado
ou
Indica que o número que aparece no ecrã é maior que o mesmo (12 dígitos)
1.3.1 Ecrã Stand-by
No modo stand-by, o ecrã mostra a hora e o número do terminal:
12-05 HS1
108
OGATECH OG-S60/TWIN/TRIPLE/QUATTRO
OGATECH OG-S60/TWIN/TRIPLE/QUATTRO
1.4
Indicador do Terminal (LED)
O LED do terminal possui a seguinte função:
• LIGADO (ON) quando a linha externa está ocupada
• DESLIGADO (OFF) quando todos os terminais estão no modo stand-by
2
2.1
Instalação do Telefone
Ligações
Vista posterior da base OGATECH OG-S60
TEL
Fio do telefone
Cabo de potência
PORTUGUÊS
Carregador OGATECH OG-S60
Cabo de potência
OGATECH OG-S60/TWIN/TRIPLE/QUATTRO
109
OGATECH OG-S60/TWIN/TRIPLE/QUATTRO
2.2
Baterias Recarregáveis
Antes de utilizar o OGATECH OG-S60 pela primeira vez, primeiro verificar
se as baterias estão carregadas de 6-8 horas. O telefone não funciona
devidamente quando não devidamente carregado.
Para carregar ou inserir uma bateria recarregável (ver a página anexa):
1.
Deslizar a tampa em direcção ao fundo e logo puxar para cima.
2.
Inserir as baterias respeitar a polaridade(+ e -) .
3.
Recolocar a tampa da bateria.
Tampa
Vista posterior do terminal
+
-
+ Pilhas
OG-S60
recarregáveis
O tempo máximo de stand-by das baterias é de aprox. 200 horas e o tempo
máximo de uso é de 10 horas! Com o tempo, as baterias são consumidas
mais rapidamente. As baterias devem ser substituídas. 2 baterias
recarregáveis, tipo AAA NiMH!
3
3.1
1.
2.
3.
4.
5.
6.
7.
3.2
•
•
110
Uso do telefone
Config. Menu idiomas (language)
Para entrar no menu premir /OK
Seleccionar TERMINAL utilizar as teclas up e down
Premir OK
Para seleccionar IDIOMA (LANGUAGE) utilizar as teclas up
Premir OK
Seleccionar o idioma de escolha com as teclas up e down
Premir OK para comprovar
e down
.
Terminal LIGADO/DESLIGADO (ON/OFF)
Ligar o terminal (Turn ON): Premir a tecla do terminal . O terminal procura a base.
DESLIGAR (Turn OFF) o terminal : Premir durante 3 seg. O ecrã passa a Desligado
(OFF).
OGATECH OG-S60/TWIN/TRIPLE/QUATTRO
OGATECH OG-S60/TWIN/TRIPLE/QUATTRO
3.3
Receber uma chamada
Quando o terminal toca, premir para atender. Assim para a estar ligado a quem chama.
Quando o terminal está na base e o telefone toca, é só atender a chamada (se a opção
atend. auto (autoanswer) está activada: Ver 4.9. Atendimento automático.
3.4
Realizar uma chamada externa
3.4.1 Normal
1.
Premir
2.
Introduzir o número do telefone
3.4.2 Marcação Bloco
1.
Marcar o número correspondente
2.
Premir
Para corrigir um número utilizar a
tecla para eliminar um dígito marcado
3.5
1.
2.
3.6
Realizar uma chamada interna
Premir INT
Introduzir o número do terminal interno (1 a 5)
Transferência chamada interna
Para transferir uma chamada externa a outro terminal:
1.
Durante a conversação, premir INT
2.
Seleccionar o número do terminal interno, a chamada externa é colocada em espera.
3.
Quando o outro terminal atende, premir para atender e transferir a chamada.
Quando o correspondente interno não atende, premir novamente INT para ligar novamente
a chamada externa na linha.
3.7
Chamada Conferência
Somente é possível quando mais de um terminal está registado na base!!
É possível conversar de forma simultânea com um correspondente interno e um
correspondente externo.
Quando em linha com um correspondente externo:
1.
Premir INT
2.
Introduzir o número do terminal interno a ser chamado
3.
Quando o correspondente interno atende, premir e manter #
4.
Quando o correspondente interno não atende, premir INT novamente para marcar
novamente o correspondente externo em linha.
3.8
Ecrã de duração de chamada
3.9
PORTUGUÊS
A duração de chamada é indicada depois de 15 segundos, em minutos - segundos.
Ao final de cada chamada, a duração total da chamada é indicada durante 5 segundos.
Microfone mute
É possível deixar o microfone mudo durante a conversação.
Premir
durante a conversação, o microfone então é desactivado, é possível falar
livremente sem ser ouvido pela outra parte.
"MUTE" aparece no ecrã. Premir
novamente para retornar ao modo normal.
OGATECH OG-S60/TWIN/TRIPLE/QUATTRO
111
OGATECH OG-S60/TWIN/TRIPLE/QUATTRO
3.10 Tecla Pausa
Ao marcar um número é possível adicionar uma pausa entre dois dígitos ao premir a tecla
remarcar / pausa durante 2 segundos
.
3.11 Identificação Chamada
Identificação chamada somente está disponível quando inscrito a este serviço com o
operador de telefone.
Ao receber uma chamada externa, o número da chamada aparece no ecrã quando toca o
telefone.
Se a rede o envia, ou se o nome de quem chama está na agenda, quem chama é identificado
com o nome.
A identidade de quem chama é substituído pela duração de chamada depois de 15
segundos em comunicação. Também é possível mostrar a identidade de quem chama
depois ao premir a tecla OK repetidamente para o nome e número.
3.11.1 Lista de chamadas
O telefone guarda na memória as 40 últimas chamadas recebidas. Esta função somente
está disponível quando inscrito à informação ID de chamada. Os correspondentes são
identificados pelo número de telefone ou nome da mesma forma que na identificação de
quem chama.
A presença de novas / chamadas não atendidas é indicada pelo ícone
- a piscar no ecrã.
Para consultar a lista de chamadas:
1.
Premir
. Quando não há chamadas na lista ’VAZIA’ (’EMPTY’) aparece no ecrã.
2.
Para procurar as chamadas utilizar as setas up ou down . Os nome de quem
chama aparece quando o nome é enviado pela rede ou é armazenado na lista telef
(phonebook). Quando indicado, esta chamada está a ser atendida. Quando
indicado, a chamada não foi atendida. Quando no final da lista há um toque sonoro.
3.
Ao premir OK, o número do telefone é indicado. Nota: Quando o número de telefone
possui mais de 12 dígitos, premir OK novamente para ver o número completo.
4.
Premir OK novamente para ver a hora e data de recepção da chamada
5.
Ao premir OK novamente, existe a opção de adicionar esta entrada na lista telef
(phonebook) quando ainda não armazenada:
– Premir OK quando ’ADICIONAR’ (ADD) aparece no ecrã. Entrar ou modificar o
nome e premir OK. Entrar ou modificar o número de telefone e premir OK.
Seleccionar a melodia (1-10) a ser ouvida quando esse número chama através
das teclas up/down e premir OK. A entrada é armazenada na lista telef
(phonebook).
6.
Para chamar de volta um correspondente, simplesmente premir a tecla quando o
número de telefone ou nome aparece no ecrã.
Quando um número está na lista telef (phonebook), o mesmo é identificado pelo seu nome
na lista de chamadas.
3.11.2 Apagar um nome ou todos os nomes na lista de chamadas
Para apagar cada nome separadamente ou todos os nomes:
• Ao procurar na lista de chamadas, premir:
– a tecla mute
breve para apagar somente esse nome. APAGAR (DELETE)
aparece no ecrã.
112
OGATECH OG-S60/TWIN/TRIPLE/QUATTRO
OGATECH OG-S60/TWIN/TRIPLE/QUATTRO
–
•
a tecla mute
longa (2 seg.) Para apagar todos os nomes: APAGAR TUDO
(DELETE ALL) aparece no ecrã.
Premir OK para apagar actual/todos nomes, ou
para cancelar a operação apagar.
3.12 Memória Remarcar
O telefone armazena uma lista das 10 últimas chamadas (de 32 dígitos) que foi criada na
memória; As chamadas recebidas são identificadas pelo número de telefone ou pelo nome
quando aparecem na lista telef.
Para consultar a lista de remarcar:
1.
Premir
2.
Para procurar as chamadas utilizar as setas up e down
3.
Para chamar o número seleccionado, simplesmente premir quando o número de
telefone ou nome aparece no ecrã.
Quando indicado o nome no ecrã, escolher entre nome e número ao premir
a tecla OK!
3.13 Chamar desde a lista telef
Para chamar um correspondente cujo nome está armazenado na lista telef:
1.
Premir para entrar na lista telef
2.
Premir a primeira letra do nome. O primeiro nome que começa com essa letra ou a
letra mais próxima no alfabeto aparece no ecrã.
3.
Procurar na lista com a seta up e down . A lista está em ordem alfabética.
4.
Premir para marcar o número correspondente cujo nome aparece no ecrã.
Para ver o número antes de marcar, realizar os passos de 1 a 3 antes de premir OK.
3.14 Utilizar o teclado alfanumérico
Também é possível com o telefone introduzir dígitos alfanuméricos. É útil introduzir um
nome na lista telef., dar um nome a um terminal, ...
Para seleccionar uma letra, premir a correspondente tecla quantas vezes sejam
necessárias. Por exemplo para seleccionar uma ’A’, premir ’2’ uma vez, para seleccionar
uma ’B’, premir ’2’ duas vezes e assim sucessivamente. Para seleccionar ’A’ e então B de
forma consecutiva, seleccionar ’A’, esperar até que o cursor passe ao próximo dígito, então
premir ’2’ duas vezes. Para seleccionar um espaço, premir 1.
Para seleccionar um hífen, premir ’1’ duas vezes.
OGATECH OG-S60/TWIN/TRIPLE/QUATTRO
Quarto
premir
2
3
4
5
O
S
8
Z
Quinto
premir
PORTUGUÊS
Os dígitos do teclado são os seguintes:
Tecla Primeiro
Segundo
Terceiro
premir
premir
premir
1
espaço
1
2
A
B
C
3
D
E
F
4
G
H
I
5
J
K
L
6
M
N
Ñ
7
P
Q
R
8
T
U
V
9
W
X
Y
6
7
9
113
OGATECH OG-S60/TWIN/TRIPLE/QUATTRO
3.15 Utilizar o menu
Uma ampla gama de funções do telefone está acessível através do menu.
1.
Para entrar no menu, premir /OK
2.
Para mover através das selecções utilizar as setas up e down , ao terminar as
selecções (retorno ao primeiro depois de chegar ao último).
3.
Para confirmar a selecção, premir OK
4.
Para voltar ao menu anterior, premir
4
Personalizar
Toda programação é confirmada ao final com um duplo ou simples toque
longo. Um toque duplo confirma a escolha. Um toque longo significa que a
modificação não foi realizada.
4.1
Ajustar o volume toque
4.1.1 Volume do toque do terminal chamadas Externas/internas
O volume do toque do terminal para chamadas internas ou externas pode ser programado
separadamente:
1.
Para entrar no menu, premir /OK
2.
Seleccionar TERMINAL utilizar as teclas up e down
3.
Premir OK
4.
Seleccionar VOL TOQUE IN (INT RING VOL) ou VOL TOQUE EX (EXT RING VOL)
utilizar as teclas up e down
5.
Premir OK
6.
Seleccionar o volume (DESLIGADO (OFF) ou 1 a 5 )
7.
Premir OK para confirmar ou
para retornar ao menu anterior.
4.1.2 Toque Base
1.
Para entrar no menu, premir /OK
2.
Seleccionar CONFIG. (SETUP) utilizar as teclas up e down
3.
Premir OK
4.
Seleccionar BASE VOLUME utilizar as teclas up e down
5.
Premir OK
6.
Seleccionar o volume (OFF ou 1 a 5)
7.
Premir OK para confirmar ou
para retornar ao menu anterior.
4.2
Escolher a melodia do toque
A base e cada terminal pode tocar com uma melodia diferente.
Os terminais podem tocar com uma melodia diferente de acordo com o tipo de chamada
interna ou externa.
4.2.1 Melodia Base (Base melody)
1.
Para entrar no menu, premir /OK
2.
Seleccionar CONFIG (SETUP) utilizar as teclas up e down
3.
Premir OK
4.
Seleccionar MELODIA BASE (BASE MELODY) utilizar as teclas up
114
e down
OGATECH OG-S60/TWIN/TRIPLE/QUATTRO
OGATECH OG-S60/TWIN/TRIPLE/QUATTRO
5.
6.
7.
Premir OK
Seleccionar a melodia de sua escolha ( 1 a 5 ) utilizar as teclas up
Premir OK para confirmar ou
para retornar ao menu anterior.
e down
4.2.2 Melodia terminal, chamada externa
1.
Para entrar no menu, premir /OK
2.
Seleccionar TERMINAL utilizar as teclas up e down
3.
Premir OK
4.
Seleccionar MELODIA EX (EXT MELODY) utilizar as teclas up e down
5.
Premir OK
6.
Seleccionar a melodia de sua escolha ( 1 a 5) utilizar as teclas up e down
7.
Premir OK para confirmar ou
para retornar ao menu anterior.
4.2.3 Melodia terminal, chamada interna
1.
para entrar no menu, premir /OK
2.
Seleccionar TERMINAL (HANDSET) utilizar as teclas up e down
3.
Premir OK
4.
Seleccionar INT MELODIA (MELODY) utilizar as teclas up e down
5.
Premir OK
6.
Seleccionar a melodia de sua escolha ( 1 a 5) utilizar as teclas up e down
7.
Premir OK para confirmar ou
para retornar ao menu anterior.
4.3
Volume altifalante durante chamada
Durante uma conversação, premir a tecla up
adequada.
4.4
ou down
para modificar o volume de forma
Activação / Desactivação dos toques
O Terminal pode emitir toques ao premir uma tecla, quando as baterias estão fracas ou
quando o terminal está fora de alcance.
4.4.2 Bateria fraca
Proceder como antes, mas seleccionar no ponto 6 "BAT FRACA" ("LOW BATTERY") e não
"TONS TECLAS" ("KEYTONE").
4.4.3 Terminal fora alcance
Realizar os mesmos passos anteriores, porém seleccionar no ponto 6 "FORA ALCANCE"
("OUT RANGE") e não "TONS TECLAS" ("KEYTONE").
OGATECH OG-S60/TWIN/TRIPLE/QUATTRO
115
PORTUGUÊS
4.4.1 Premir tecla toque ligado/desligado (on/off)
1.
Para entrar no menu, premir /OK
2.
Seleccionar TERMINAL utilizar as teclas up e down
3.
Premir OK
4.
Seleccionar TOQUE (BEEP) utilizar as teclas up e down
5.
Premir OK
6.
Seleccionar TONS TECLAS (KEYTONE) utilizar as teclas up e down
7.
Premir OK
8.
Seleccionar LIGADO (ON) para activar, DESLIGADO (OFF) para desactivar
9.
Premir OK para confirmar.
OGATECH OG-S60/TWIN/TRIPLE/QUATTRO
4.5
Nome Terminal
Esta função permite personalizar cada Terminal.
1.
Para entrar no menu, premir /OK
2.
Seleccionar TERMINAL utilizar as teclas up e down
3.
Premir OK
4.
Seleccionar NOME (NAME) utilizar as teclas up e down
5.
Premir OK
6.
Introduzir o nome
7.
Premir OK para confirmar
Durante a introdução do nome, premir ’c’ para apagar um dígito e premir e manter
sair do menu sem considerar qualquer modificação.
4.6
para
Modificar o código PIN
Certas funções apenas estão disponíveis para os utilizadores que conhecem o código PIN.
Por defeito, este código PIN é = 0000.
Para modificar o código PIN:
1.
Para entrar no menu, premir /OK
2.
Seleccionar CONFIG (SETUP) utilizar as teclas up e down
3.
Premir OK
4.
Seleccionar CÓDIGO PIN (PIN CODE) utilizar as teclas up e down
5.
Premir OK
6.
Introduzir os antigos 4 dígitos do código PIN.
7.
Premir OK
8.
Introduzir os novos 4 dígitos do código PIN
9.
Premir OK
10. Introduzir o novo código PIN por segunda vez
11. Premir OK para confirmar
4.7
Configurar o modo marcar
Há dois tipos de modo marcar:
• DTMF/marcação por toque (o mais comum)
• Pulsar marcar ( para instalações antigas )
Para modificar o modo marcar:
1.
Para entrar no menu, premir /OK
2.
Seleccionar configurar, utilizar as teclas up e down
3.
Premir OK
4.
Seleccionar MODO MARC. (DIAL MODE) utilizar as teclas up
5.
Premir OK
6.
Seleccionar o modo marcar, utilizar as teclas up e down
7.
Premir OK para confirmar
4.8
1.
2.
3.
4.
5.
116
e down
Duração tempo flash
Para entrar no menu, premir /OK
Seleccionar CONFIG. utilizar as teclas up e down
Premir OK
Seleccionar CHAMAR NOVO (RECALL) (R) utilizar as teclas up e down
Seleccionar CHAMAR NOVO 1 (RECALL 1) para tempo de flash curto (100ms) ou
RECALL 2 para tempo flash longo (250ms)
OGATECH OG-S60/TWIN/TRIPLE/QUATTRO
OGATECH OG-S60/TWIN/TRIPLE/QUATTRO
4.9
Atendimento automático (Automatic answer)
Quando há uma chamada de entrada e o terminal está na base, o telefone automaticamente
aceita a linha quando atendido. Esta é a predefinição, mas pode ser DESLIGADA (OFF):
1.
Para entrar no menu, premir /OK
2.
Seleccionar TERMINAL (HANDSET) utilizar as teclas up e down
3.
Premir OK
4.
Seleccionar ATEND. AUTO (AUTO ANSWER) utilizar as teclas up e down
5.
Seleccionar LIGADO (ON) (para atend. auto) ou DESLIGADO (OFF)
6.
Premir OK
4.10 Reset
É possível para retornar à predefinição original. Esta é a configuração instalada ao receber
o telefone por primeira vez.
Para retornar à predefinição:
1.
Para entrar no menu, premir /OK
2.
Seleccionar CONFIG. utilizar as teclas up e down
3.
Premir OK
4.
Seleccionar PREDEFINIÇÃO (DEFAULT) utilizar as teclas up e down
5.
Premir OK
6.
Introduzir o código PIN de 4 dígitos (predefinição =0000). Premir OK
7.
Premir novamente OK para confirmar
OS PARÂMETROS PREDEFINIDOS SÃO:
Toques de bateria fraca
LIGADO (ON)
Volume
3
Toques de aviso fora alcance
DESLIGADO
(OFF)
Lista telef.
Vazia
Tecla clique
LIGADO (ON)
Lista chamada
Vazia
Atend. Auto
LIGADO (ON)
Lista Remarcar
Vazia
Melodia Interna
1
Código Pin
0000
Volume Interno
3
Modo Marcar
DTMF
Melodia Externa
3
Bloqueio teclado
DESLIGADO
(OFF)
Volume Externo
3
4.11 Bloquear teclado
O teclado pode ser bloqueado assim nenhuma config. Pode ser modificada ou nenhum
número de telefone pode ser marcado. Aparece o ícone no ecrã quando o teclado está
bloqueado.
OGATECH OG-S60/TWIN/TRIPLE/QUATTRO
117
PORTUGUÊS
Retornar à config pré-definida, apagar todas as entradas na lista telef. e de
chamadas. O código PIN também volta a ser 0000.
OGATECH OG-S60/TWIN/TRIPLE/QUATTRO
4.11.1 Bloquear o teclado pelo Menu
1.
Para entrar no menu, premir /OK
2.
Seleccionar TERMINAL (HANDSET) utilizar as teclas up e down
3.
Premir OK
4.
Seleccionar TEC. BLOQ (KEY LOCK)? utilizar as teclas up e down
5.
Premir OK para bloquear o teclado
4.11.2 Bloquear o teclado com a tecla * (bloqueio rápido)
Premir e manter a tecla ’*’ durante 3 segundos. O teclado é bloqueado.
4.11.3 Desbloquear o teclado
1.
Premir qualquer tecla
2.
PREMIR (PRESS) * aparece no ecrã
3.
Premir a tecla ’*’ durante 3 segundos para desbloquear o teclado
4.12 Config. a hora
1.
2.
3.
4.
5.
6.
7.
Para entrar no menu, premir /OK
Seleccionar DATA E HORA (DATE & TIME) utilizar as teclas up e down
Premir OK
Seleccionar CONFIG RELÓGIO (CLOCK SET) utilizar as teclas up e down
Premir OK
Introduzir a hora (formato 24 horas).
Premir OK para confirmar
4.13 Config. o despertador
1.
2.
3.
4.
5.
6.
Ou
7.
Para entrar no menu, premir /OK
Seleccionar DATA E HORA (DATE & TIME) utilizar as teclas up e down
Premir OK
Seleccionar ACERTAR DESP (SET ALARM) utilizar as teclas up e down
Premir OK
Seleccionar LIGADO (ON) para ligar o despertador e premir OK. Introduzir a hora
(formato 24 horas) quando o despertador deve ser activado.
Seleccionar DESLIGADO (OFF) para desligar o despertador e premir OK para
confirmar.
Quando o despertador deva ser desligado, premir qualquer tecla do
terminal para desligar
5
5.1
Funções Avançadas
Lista telef.
A lista telef. Permite registar 50 números de telefone e nomes. Podem ser introduzidos
nomes de até 12 dígitos de longitude e números de até 20 dígitos.
Para chamar a um número armazenado na lista telel., consultar o item 3.14.
Para introduzir dígitos alfanuméricos, consultar o item 3.15.
118
OGATECH OG-S60/TWIN/TRIPLE/QUATTRO
OGATECH OG-S60/TWIN/TRIPLE/QUATTRO
5.1.1 Adicionar um nome na lista telef.
1.
Para entrar no menu, premir /OK
2.
Seleccionar LISTA TELEF. utilizar as teclas up e down
3.
Premir OK
4.
Seleccionar ADIC. NOME (ADD ENTRY) utilizar as teclas up
5.
Premir OK
6.
Introduzir o nome
7.
Premir OK para confirmar.
8.
Introduzir o número do telefone
9.
Premir OK para confirmar
10. Seleccionar a melodia desejada (1-5) com as teclas up/down
11. Premir OK para confirmar
e down
5.1.2 Modificar um nome ou número
Para modificar um número na lista telef.:
1.
Para entrar no menu, premir /OK
2.
Seleccionar LISTA TELEF (PHONE BOOK) utilizar as teclas up e down
3.
Premir OK
4.
Seleccionar MODIF. NOME (MODIFY ENTRY) utilizar as teclas up e down
5.
Premir OK
6.
Para procurar na lista de nomes utilizar as teclas up e down . A lista está em
ordem alfabética.
7.
Premir OK ao encontrar o nome a ser modificado
8.
Utilizar a tecla ’ ’ para retornar e introduzir o novo nome
9.
Premir OK para confirmar
10. Introduzir o novo número de telefone
11. Premir OK para confirmar
Aviso! Ao entrar primeiro na lista telef. Com a tecla e modificar um número
de telefone com a tecla , a modificação sera somente para essa chamada
e não será armazenada na lista telef!
OGATECH OG-S60/TWIN/TRIPLE/QUATTRO
PORTUGUÊS
5.1.3 Apagar um nome
Para apagar um nome:
1.
Para entrar no menu, premir /OK
2.
Seleccionar LISTA TELEF (PHONE BOOK) utilizar as teclas up e down
3.
Premir OK
4.
Seleccionar APAGAR NOME (DELETE ENTRY) utilizar as teclas up e down
5.
Premir OK
6.
Para procurar na lista de nomes utilizar as teclas up e down a lista está em
ordem alfabética.
7.
Premir OK ao encontrar o nome a ser apagado
8.
Aparece CONFIRMAR (CONFIRM), premir OK para confirmar ou
para parar.
119
OGATECH OG-S60/TWIN/TRIPLE/QUATTRO
5.2
Procurar um terminal desde a base
Quando o botão procurar da base está premido todos os terminais tocam. O som ajuda a
encontrar um terminal perdido. Simplesmente ao premir uma das teclas do terminal o som
é interrompido.
6
6.1
Manejar vários terminais
Programar um terminal adicional
Apenas é necessário registar um Segundo terminal no caso de que o 2º
terminal não tenha mais ligação com a base ou quando comprado um
novo!!!
É possível registar novos terminais na base quando estes terminais possuem o protocolo
DECT GAP.
A base pode ter no máximo 5 terminais. Caso já existam 5 terminais, para adicionar um outro
ou modificar um terminal, primeiro apagar um terminal, então associar o novo terminal.
Para registar qualquer terminal, a base deve estar num modo especial de registo:
1.
Premir e manter a tecla paging da base durante 6 segundos.
2.
A base então emite um toque. A base agora está pronta para registar um novo
terminal. Há 90 segundos depois de premir o botão, para registar um novo terminal.
Depois colocar a base no modo registo, iniciar o procedimento no novo terminal:
6.1.1 Caso o terminal adicional seja um OGATECH OG-S60
3.
Para entrar no menu, premir /OK
4.
Seleccionar REGISTO (REGISTER) utilizar as teclas up e down
5.
Premir OK
6.
Seleccionar REGIST. BASE (REG BASE) utilizar as teclas up e down
7.
Introduzir o número duma base ( de 1 a 4 ). Os números a piscar já estão em uso.
8.
Introduzir o código PIN da Base (0000 predefinição )
9.
Premir OK. O terminal começa a procurar uma base DECT
10. Quando o terminal localiza a base, o mesmo indica o número de identificação da
base, para confirmar o registo da base, premir OK ou parar ao premir .
11. Se o terminal não localiza a base, retorna ao modo stand-by depois de alguns
segundos.
12. Tentar novamente, trocar o número da base e verificar se no ambiente não há
interferências . Aproximar-se da base.
6.1.2 Caso o terminal seja de outro modelo
Após iniciar o procedimento de registo na base, consultar o manual do terminal para saber
como registar o terminal. O terminal deve ser compatível GAP.
O ícone e o texto "NÃO REGIST" ("NOT REG") aparecem no ecrã quando o terminal não
está associado à base.
Quando um terminal está associado a uma base, é atribuído um número de terminal por
base. Esse número aparece no ecrã do terminal depois do nome e deve ser utilizado para
chamadas internas.
120
OGATECH OG-S60/TWIN/TRIPLE/QUATTRO
OGATECH OG-S60/TWIN/TRIPLE/QUATTRO
Perfil DECT GAP somente garante que as funções de chamada básicas
funcionem correctamente entre diferentes marcas/tipos. Há a
possibilidade de que certos serviços (como CLIPE) não funcionem de
forma correcta.
6.2
Retirar o terminal
Para remover um terminal com um base para permitir que outro terminal seja registado
1.
Para entrar no menu premir /OK
2.
Seleccionar CONFIG (SETUP) utilizar as teclas up e down
3.
Premir OK
4.
Seleccionar APAGAR TERM (DEL HANDSET) utilizar as teclas up e down
5.
Premir OK
6.
Enter o código PIN de 4 dígitos da base
7.
Premir OK
8.
Seleccionar o terminal a ser retirado
9.
Premir OK para confirmar
6.3
Config. um terminal em outra base
Para utilizar um terminal OGATECH OG S-60 com uma base de outro modelo. A base deve
ser compatível GAP.
1.
Para colocar a base no modo registo, consultar o manual do utilizador.
2.
Realizar as operações de 3 a 10 do item 6.1.
6.4
Seleccionar uma base
PORTUGUÊS
Os terminais podem ser regitados em até 4 bases simultaneamente.
Para seleccionar uma base:
1.
Para entrar no menu, premir /OK
2.
Seleccionar REGISTO (REGISTER) utilizar as teclas up e down
3.
Premir OK
4.
Seleccionar SELEC BASE (SELLECT BASE) utilizar as teclas up e down
5.
Premir OK
6.
Seleccionar uma base ou seleccionar AUTO utilizar as teclas up e down
7.
Premir OK
Ao seleccionar a base, a base actual seleccionada é indicada por um número a piscar na
base. Ao seleccionar ’Auto’ o terminal automaticamente procura uma outra base quando for
a de alcance!
OGATECH OG-S60/TWIN/TRIPLE/QUATTRO
121
OGATECH OG-S60/TWIN/TRIPLE/QUATTRO
7
Resolução de Problemas
Problema
Possível causa
Solução
Nenhum ecrã
Baterias sem carga
Verificar a posição das
baterias
Recarregar as baterias
Terminal desligado (OFF)
Sem toque
O ícone
Ligar (ON) o terminal
Fio do telefone mal colocado Verificar a ligação do fio do
telefone
flashes
A linha está ocupada por
outro terminal
Esperar até que o outro
terminal termine
Terminal fora de alcance
Colocar o terminal mais
próximo à base
A base não possui corrente
Verificar as principais
ligações à base
O terminal não está registado Registar o terminal na base
na base
A base ou o terminal não
tocam
O volume é zero ou baixo
Ajustar o volume de toque
O toque é bom, mas não há
comunicação
O modo marcar é incorrecto
Ajustar o modo marcar
(pulsar/toque)
Não é possível transferir uma O tempo de FLASH é muito
chamada pelo PABX
curto
Config. a unidade para
tempo de Flash Longo
As teclas do telefone não
funcionam
Retirar as baterias e colocar
novamente no local
8
8.1
Erro manipulação
Garantia
Período de garantia
As unidades têm um período de garantia de 24 meses. O período de garantia entra em efeito
a partir da data de compra da unidade. Não há nenhuma garantia em baterias padrão ou
recarregáveis (tipo de AA/AAA).
Consumíveis e defeitos que causem um efeito negligenciável sobre o funcionamento ou o
valor do equipamento não se encontram cobertos por esta garantia.
A prova de garantia terá de ser dada com a apresentação da respectiva confirmação de
compra, ou uma cópia da mesma, no qual aparecem indicados a data de compra bem como
o modelo da unidade.
8.2
Modo de funcionamento da garantia
Uma unidade defeituosa necessita de ser devolvida aos serviços centrais juntamente com
uma nota de compra válida e um cartão de assistência ao cliente devidamente preenchido.
122
OGATECH OG-S60/TWIN/TRIPLE/QUATTRO
OGATECH OG-S60/TWIN/TRIPLE/QUATTRO
Caso a unidade desenvolva um defeito durante o período de garantia, a centro de serviços
oficialmente por ela designado reparará qualquer defeito derivado de material ou falhas de
fabrico, reparando ou substituindo as unidades ou as peças defeituosas, sem qualquer custo
adicional. No caso de substituição, a cor e o modelo poderão ser diferentes dos da unidade
adquirida originalmente.
A data inicial de compra determinará o início do período de garantia. O período de garantia
não será prolongado no caso da unidade ser trocada ou reparada por qualquer dos seus
centros de reparação.
8.3
Excluído da garantia
Danos ou defeitos causados pelo tratamento ou operação incorrectos e danos resultantes
da utilização de peças ou acessórios não originais não são abrangidos pela garantia.
A garantia não cobre danos causados por factores externos, como relâmpagos, água e fogo,
nem quaisquer danos causados durante o transporte.
Não se poderá reclamar os direitos de garantia se o número de série que se encontra na
unidade tiver sido alterado, retirado ou tornado ilegível
Qualquer reclamação de garantia não será válida se a unidade tiver sido reparada, alterada
ou modificada pelo comprador.
Este dispositivo apenas deve ser utilizado com pilhas recarregáveis. Se pretende substituir
as pilhas incluídas originalmente, verifique se as pilhas novas são adequadas e
recarregáveis. NÃO devem utilizar-se pilhas alcalinas nos terminais portáteis, em quaisquer
circunstâncias.
Se utilizar pilhas alcalinas nos terminais portáteis, estas irão aquecer quando colocar o
portátil na base e poderão explodir. Qualquer dano causado não poderá ser recuperado pelo
fabricante, e como tal não se encontra coberto pelas condições da garantia. Quaisquer
despesas de reparação ser-lhe-ão facturadas.
•
•
•
•
•
•
•
•
•
•
•
•
•
•
•
Características Técnicas
Standard:
DECT (Telecomunicações sem fio digital)
GAP (Perfil Acesso Genérico)
Alcance frequência:
1880 MHZ a 1900 MHz
Número de canais:
120 canais duplos
Modulação:
GFSK
Cógido fala:
32 kbit/s
Potência emissão:
10 mW (média potência por canal)
Alcance:
máx 300 m em espaços abertos /10-50m máx. local
fechado
Fornecimento de energia da base: 230 V / 50 Hz para a base
Baterias do Terminal:
2 baterias recarregáveis AAA, NiMh 550mAh
Autonomia do terminal:
200 horas em stand-by
Tempo de uso:
10 horas
Carregar hora:
6-8 horas
Condições normais de uso:
+5 °C a +45 °C
Modo marcar:
Pulsar / Toque
Tempo Flash
100 ou 250 ms
OGATECH OG-S60/TWIN/TRIPLE/QUATTRO
123
PORTUGUÊS
9
OGATECH OG-S60/TWIN/TRIPLE/QUATTRO
Zalecenia dotyczce bezpieczestwa
•
•
•
•
•
•
•
•
•
•
Naley uywa jedynie wtyczki adowarki doczonej do urzdzenia. Nie uywa innych
adowarek, poniewa mog one uszkodzi baterie.
Naley uywa akumulatorów tego samego typu. Nie wolno uywa zwykych baterii,
nie dajcych si ponownie naadowa. Akumulatorki naley umieci, zachowujc
uoenie polaryzacji biegunów (oznaczone wewntrz komory na akumulatorki w
suchawce).
Nie dotyka adowarki ani styków wtyczki ostrymi lub metalowymi przedmiotami.
Urzdzenie moe mie wpyw na dziaanie niektórych urzdze medycznych.
Suchawka moe powodowa nieprzyjemne brzczenie w aparatach suchowych.
Nie naley uywa urzdzenia w wilgotnym pomieszczeniu lub w odlegoci mniejszej
ni 1,5 m od róda wody. Suchawka nie powinna mie kontaktu z wod.
Nie wolno uywa telefonu w strefach zagroonych wybuchem.
Naley usuwa akumulatory i konserwowa telefon w sposób i w miejscach przyjaznych
dla rodowiska.
Poniewa tego telefonu nie mona uywa w razie przerwy zasilania, do wykonania
pocze w nagych wypadkach naley uy telefonu niezalenego od sieci elektrycznej,
np. telefonu komórkowego.
Ten aparat telefoniczny dziaa dziki akumulatorom. Naley je usuwa w sposób
przyjazny rodowisku zgodnie z przepisami obowizujcymi w kraju uywania aparatu.
Kasacja urzdzenia (ze wzgldu na ochron rodowiska)
Zuyty produkt naley zanie do punktu odbioru sprztu elektrycznego i
elektronicznego w celu recyklingu. Nie naley wyrzuca go razem ze zwykymi
odpadami. Wskazuje na to symbol umieszczony na produkcie, w instrukcji i/lub
na opakowaniu.
Niektóre materiay, z których zbudowany jest produkt mog zosta ponownie
wykorzystane, jeeli dostarcz go Pastwo do punktu odbioru w celu
recyklingu. Dziki ponownemu wykorzystaniu niektórych czci lub surowców ze zuytych
produktów przyczyniaj si Pastwo w istotny sposób do ochrony rodowiska.
W celu zasignicia informacji na temat punktów odbioru w Pastwa okolicy prosimy zwróci
si do wadz lokalnych.
Czyszczenie
Telefon naley czyci lekko wilgotn ciereczk lub ciereczk antystatyczn. Nigdy nie
uywa rodków czyszczcych ani rozpuszczalników.
Urzdzenie to dziaa tylko z akumulatorkami nadajcymi si do adowania.
W przypadku woenia do suchawki zwykych, nienadajcych si do
adowania baterii, a nastpnie pooenia jej na bazie, suchawka ulegnie
uszkodzeniu i NIE bedzie to objte przez gwarancj.
Symbol CE oznacza, e urzdzenie spenia istotne wymogi dyrektywy R&TTE.
124
OGATECH OG-S60/TWIN/TRIPLE/QUATTRO
OGATECH OG-S60/TWIN/TRIPLE/QUATTRO
1.1
Opis telefonu
Suchawka i aparat bazowy OGATECH OG-S60
POLSKI
1
Suchawka
Wska
nik suchawki LED
Wywietlacz
Przycisk wyciszenia/
kasowania
Menu / OK
Ponowne wybieranie/Pauza
W gór
Ksika telefoniczna/Powrót
W dó
Przycisk flash /
WCZENIE/WYCZANIE
Poczenie
wewntrzne
Mikrofon
Przycisk przywo.ania
OG-S60
Wska
nik LED zasilania/poczenia
przychodzcego
OGATECH OG-S60/TWIN/TRIPLE/QUATTRO
Oznaczenie adowania baterii
125
OGATECH OG-S60/TWIN/TRIPLE/QUATTRO
1.2
adowarka OGATECH OG-S60
Oznaczenie
adowania baterii
OG-S60
1.3
Wywietlacz
Wiersz zawierajcy ikony
Wiersz zawierajcy znaki
(maks. 12 znaków)
Do kadego dziaania przyporzdkowana jest okrelona ikona.
Ikona: Znaczenie:
Jeste w trybie online
EXT Poczenie zewntrzne
INT
Poczenie wewntrzne
Nowe numery na licie pocze
Oznacza poczenie odebrane
Oznacza poczenie nieodebrane
Otwiera ksik telefoniczn.
Menu jest otwarte.
Wska
nik naadowania akumulatora
1 segment: saby, 2 segmenty: redni, 3 segmenty: peny.
Antena wskazuje jako odbioru.
Antena miga, gdy suchawka nie jest zarejestrowana w aparacie bazowym.
Przyciski suchawki s zablokowane
lub Wskazuje, e wywietlany numer jest duszy ni ekran (który ma pojemno 12
cyfr)
1.3.1 Wywietlacz w trybie gotowoci
W trybie gotowoci wywietlana jest godzina i numer suchawki:
12-05 HS1
126
OGATECH OG-S60/TWIN/TRIPLE/QUATTRO
OGATECH OG-S60/TWIN/TRIPLE/QUATTRO
1.4
Wskanik suchawki (LED)
2
2.1
POLSKI
Dioda LED suchawki ma nastpujce funkcje:
• jest WCZONA, gdy linia zewntrzna jest zajta
• jest WYCZONA, gdy suchawka jest w trybie gotowoci
• Miga na wszystkich suchawkach przy poczeniu przychodzcym
Monta telefonu
Poczenia
Aparat bazowy, widok z tyu OGATECH OG-S60
TEL
Kabel
telefoniczny
Kabel zasilania
adowarka OGATECH OG-S60
Kabel zasilania
OGATECH OG-S60/TWIN/TRIPLE/QUATTRO
127
OGATECH OG-S60/TWIN/TRIPLE/QUATTRO
2.2
Akumulatory (baterie adowalne)
Baterie naley adowa przez 6-8 godzin przed pierwszym uyciem aparatu
OGATECH OG-S60. Jeeli baterie nie zostan waciwie naadowane telefon
nie bdzie dziaa prawidowo.
Aby wymieni lub woy akumulatory naley (patrz skadana strona):
1.
Przesun pokryw do dou a nastpnie j unie.
2.
Woy baterie stosujc waciwe uoenie biegunów (+ i -).
3.
Zaoy pokryw z powrotem na miejsce.
Pokrywa
Suchawka, widok z tyu
-
+
-
OG-S60
+ Akumulatory
Maksymalna wytrzymao baterii w trybie gotowoci wynosi okoo 200
godzin, a maksymalny czas rozmów 10 godzin! Z biegiem czasu baterie
zaczn wyczerpywa si coraz szybciej. Naley je wówczas wymieni. 2
akumulatory, typ AAA NiMH!
3
3.1
1.
2.
3.
4.
5.
6.
7.
3.2
•
•
128
Uywanie telefonu
Ustawienie jzyka menu
Otwórz menu naciskajc /OK
Wybierz opcj SUCHAWKA (HANDSET) uywajc klawiszy w gór i w dó
Nacinij OK
Wybierz opcj JZYK (LANGUAGE) uywajc klawiszy w gór i w dó
Nacinij OK
Uywajc klawiszy w gór i w dó wybierz odpowiedni jzyk
Nacinij OK, aby potwierdzi
W
CZENIE/WY
CZENIE suchawki
WCZANIE suchawki: Nacinij przycisk znajdujcy si na suchawce. Suchawka
poszuka aparatu bazowego.
WYCZANIE suchawki: Wcinij na 3 sek. . Wywietlacz zostanie WYCZONY.
OGATECH OG-S60/TWIN/TRIPLE/QUATTRO
OGATECH OG-S60/TWIN/TRIPLE/QUATTRO
3.3
Odebranie poczenia
3.4
POLSKI
Gdy suchawka dzwoni wcinij , aby odebra. Zostaniesz wówczas poczony z osob
dzwonic. Aby odebra, gdy telefon dzwoni a suchawka znajduje si na aparacie
bazowym, naley podnie suchawk (jeeli wczona jest opcja automatycznej
odpowiedzi: Patrz 4.9. Automatyczne odebranie poczenia)
Wykonanie poczenia zewntrznego
3.4.1 Zwyke
1.
Nacinij
2.
Wpisz numer telefonu
3.4.2 Wybieranie blokowe
1.
Wpisz numer
2.
Nacinij
Aby poprawi numer uyj przycisku
3.5
1.
2.
3.6
do skasowania wpisanej cyfry.
Wykonanie poczenia wewntrznego
Nacinij INT
Wpisz numer suchawki wewntrznej (1 do 5).
Wewntrzne przekazanie poczenia
Aby przekaza poczenie zewntrzne do innej suchawki naley:
1.
W czasie rozmowy nacisn INT
2.
Wybra numer suchawki - rozmówca wówczas oczekuje na poczenie.
3.
Gdy druga suchawka zostanie odebrana naley nacisn , aby si rozczy i
przekierowa poczenie.
Jeeli druga suchawka nie zostanie odebrana, to aby powróci do oczekujcego rozmówcy
zewntrznego naley ponownie nacisn INT.
3.7
Poczenie konferencyjne
Jest moliwe tylko wówczas, gdy w aparacie bazowym zarejestrowana jest wicej ni jedna
suchawka!!
Mona rozmawia jednoczenie z rozmówc wewntrznym i zewntrznym.
Podczas poczenia z rozmówc zewntrznym:
1.
Nacinij INT
2.
Wpisz numer suchawki, z któr chcesz si poczy
3.
Gdy rozmówca wewntrzny odbierze poczenie wcinij na chwil #
4.
Jeeli druga suchawka nie zostanie odebrana, to aby powróci do oczekujcego
rozmówcy zewntrznego naley ponownie nacisn INT.
3.8
Wywietlanie czasu trwania poczenia
Czas trwania poczenia jest wywietlany po 15 sekundach w formacie minuty - sekundy.
Po zakoczeniu kadego poczenia jego cakowity czas jest wywietlany przez 5 sekund.
3.9
Wyciszenie mikrofonu
Istnieje moliwo wyczenia mikrofonu podczas rozmowy.
Nacinij
w czasie rozmowy. Mikrofon zostaje wówczas wyczony, a Ty moesz
rozmawia swobodnie - rozmówca telefoniczny Ci nie syszy.
OGATECH OG-S60/TWIN/TRIPLE/QUATTRO
129
OGATECH OG-S60/TWIN/TRIPLE/QUATTRO
Wywietlany jest komunikat “ROZ. WYCISZ.” (MUTE). Nacinij ponownie
do normalnego trybu rozmowy.
3.10
, aby powróci
Przycisk pauzy
Wpisujc numer mona wstawi pauz pomidzy dwie cyfry naciskajc na 2 sek. przycisk
ponownego wybierania/pauzy
.
3.11
Identyfikacja rozmówcy
Identyfikacja rozmówcy jest dostpna jedynie wówczas, gdy posiadasz abonament na t
usug u operatora sieci.
Przy zewntrznym poczeniu przychodzcym numer osoby dzwonicej bdzie wywietlany
gdy zadzwoni telefon.
Jeeli sie telefoniczna przesya nazwisko osoby dzwonicej, lub jeeli jest ono zapisane w
ksice telefonicznej, to zostanie ono wywietlone.
Po 15 sekundach rozmowy identyfikacja rozmówcy zostaje zastpiona przez okrelenie
czasu trwania poczenia. Nadal mona jednak wywietli identyfikacj rozmówcy
naciskajc kilka razy przycisk OK.
3.11.1 Lista pocze
Telefon wyposaony jest w list, na której zapisano 40 ostatnio otrzymanych pocze.
Funkcja ta jest dostpna jedynie wówczas, gdy posiadasz abonament na identyfikacj
rozmówcy. Osoby dzwonice s identyfikowane tak samo jak przy identyfikacji rozmówcy poprzez numer telefonu lub nazwisko.
Nowe poczenia lub poczenie nieodebrane sygnalizowane s na wywietlaczu migajc
ikon
. Aby przegldn list pocze naley:
1.
Nacisn
. Jeeli lista jest pusta, to wywietlony zostanie komunikat ‘PUSTY’
(EMPTY).
2.
Przewi list za pomoc strzaek w gór lub w dó . Nazwiska rozmówców bd
wywietlane, jeeli s przesyane przez sie lub s zapisane w ksice telefonicznej.
Znak oznacza, e poczenie zostao odebrane. Znak oznacza, e poczenie
nie zostao odebrane. Przy wywietleniu ostatniego wpisu w listy rozlegnie si sygna
d
wikowy.
3.
Jeeli wciniesz OK, to wywietlony zostanie numer telefonu. Uwaga: jeeli numer
telefonu jest duszy ni 12 cyfr, nacinij ponownie OK, aby zobaczy cay numer.
4.
Aby zobaczy godzin i dat poczenia nacinij ponownie OK.
5.
Ponowne nacinicie OK umoliwi zapisanie numeru w ksice telefonicznej, o ile
numer ten nie jest ju zapisany:
– Nacinij OK, gdy wywietlony zostanie komunikat ‘DODAJj’ (ADD). Wpisz lub
zmie nazwisko i nacinij OK. Wpisz lub zmie numer telefonu i nacinij OK. Za
pomoc przycisków w gór/w dó wybierz melodi (1-5), która bdzie oznajmiaa
poczenie z tego numeru i nacinij OK. Wpis zostanie zapisany w ksice
telefonicznej.
6.
Aby oddzwoni wystarczy nacisn , gdy wywietlany jest numer telefonu lub
nazwisko.
Jeeli osoba dzwonica jest wpisana do ksiki telefonicznej to w licie pocze
wywietlane bdzie jej nazwisko.
130
OGATECH OG-S60/TWIN/TRIPLE/QUATTRO
OGATECH OG-S60/TWIN/TRIPLE/QUATTRO
3.12
POLSKI
3.11.2 Kasowanie wpisu lub wszystkich wpisów z listy pocze
Poczenia mona kasowa pojedynczo lub wszystkie za jednym razem:
• Przegldajc list pocze nacinij:
– krótko przycisk wyciszenia
, aby skasowa tylko dany wpis. Wywietlony
zostanie komunikat USU (DELETE).
– dugo (2 sek.) przycisk wyciszenia
, aby skasowa wszystkie wpisy:
Wywietlony zostanie komunikat USU WSZYST. (DELETE ALL).
• Nacinij OK, aby skasowa obecnie wywietlany wpis/wszystkie wpisy, lub
, aby
odwoa kasowanie.
Pami ponownego wybierania
Telefon przechowuje list 10 ostatnio wykonanych pocze (po 32 cyfry); osoby, do których
dzwoniono okrelone s za pomoc numeru telefonu lub nazwiska, jeeli jest ono wpisane
w ksice telefonicznej.
Aby sprawdzi list ponownego wybierania:
1.
Nacinij
2.
Przewi list za pomoc strzaek w gór lub w dó .
3.
Aby zadzwoni do wybranej osoby wystarczy nacisn , gdy wywietlany bdzie jej
numer telefonu lub nazwisko.
Gdy wywietlane jest nazwisko, mona przecza pomidzy wywietlaniem
nazwiska i numeru za pomoc przycisku OK!
3.13
Poczenie z numerem zapisanym w ksice telefonicznej
Aby zadzwoni do osoby, której nazwisko jest wpisane w ksice telefonicznej naley:
1.
Nacisn , aby otworzy ksik telefoniczn
2.
Wcisn pierwsz liter nazwiska. Wywietlone zostanie pierwsze nazwisko
rozpoczynajce si na t liter lub najblisz w alfabecie.
3.
Przewin spis nazwisk uywajc przycisków w gór i w dó . Spis jest przewijany
w kolejnoci alfabetycznej.
4.
Aby wybra numer osoby, której nazwisko jest wywietlane naley nacisn przycisk
.
Aby przed wybraniem zobaczy numer naley wykona powysze czynnoci 1 do 3 i
nacisn OK.
3.14
Uywanie klawiatury alfanumerycznej
W niniejszym telefonie mona równie wpisywa znaki alfanumeryczne. Jest to przydatne
przy wpisywaniu nazwiska do ksiki telefonicznej, nadaniu nazwy suchawce, ...
Aby wybra liter nacinij odpowiadajcy jej przycisk tyle razy, ile jest to konieczne. Na
przykad, aby wybra ‘A’ nacinij ‘2’ jeden raz, aby wybra ‘B’ nacinij ‘2’ dwa razy i tak dalej.
Aby wybra ‘A’ a nastpnie B naley wybra ‘A’, odczeka a kursor przesunie si do
nastpnego znaku, a nastpnie nacisn ‘2’ dwa razy.
Aby zostawi wolne miejsce, nacinij 1.
Aby wpisa mylnik, nacinij ‘1’ dwa razy.
OGATECH OG-S60/TWIN/TRIPLE/QUATTRO
131
OGATECH OG-S60/TWIN/TRIPLE/QUATTRO
Znaki klawiatury s nastpujce:
Przycisk Pierwsze Drugie Trzecie Czwarte
Pite
nacinicienacinicienacinicienacinicienacinicie
1
spacja
1
2
A
B
C
2
3
D
E
F
3
4
G
H
I
4
5
J
K
L
5
6
M
N
Ñ
O
6
7
P
Q
R
S
7
8
T
U
V
8
9
W
X
Y
Z
9
3.15
Korzystanie z menu
Poprzez przyjazne dla uytkownika menu ma si dostp do szerokiego wachlarza funkcji
telefonu.
1.
Otwórz menu naciskajc /OK
2.
Opcje mona przeglda za pomoc przycisków w gór i w dó . Opcje
wywietlane s w kóko (po ostatniej wywietlana jest pierwsza).
3.
Aby potwierdzi wybór, nacinij OK
4.
Aby powróci do poprzedniego menu nacinij
4
Ustawienia indywidualne
Kade nowe ustawienie jest potwierdzane na kocu podwójnym lub jednym
dugim sygnaem dwikowym. Podwójny sygna potwierdza Twój wybór.
Dugi sygna oznacza, i zmiana nie zostaa uwzgldniona.
4.1
Dostosowanie gonoci dzwonka
4.1.1 Gono suchawki przy poczeniach zewntrznych/wewntrznych
Mona ustawi róne gonoci dzwonka dla pocze wewntrznych lub zewntrznych:
1.
Otwórz menu naciskajc /OK.
2.
Wybierz opcj SUCHAWKA (HANDSET), uywajc klawiszy w gór i w dó
3.
Nacinij OK
4.
Wybierz "G. WEW. DZWON." (INT RING VOL) lub "G. ZEW. DZWON." (EXT RING
VOL) za pomoc przycisków w gór lub w dó
5.
Nacinij OK
6.
Wybierz odpowiedni poziom gonoci ("WYCZ" (OFF) lub 1 do 5)
7.
Nacinij OK, aby potwierdzi lub
, aby powróci do poprzedniego menu.
4.1.2 Dzwonek aparatu bazowego
1.
Otwórz menu naciskajc /OK
2.
Wybierz "USTAWIENIA" (SETUP), uywajc klawiszy w gór i w dó
3.
Nacinij OK
4.
Wybierz opcj “GON. BAZY” (BASE VOLUME), uywajc klawiszy w gór
dó
5.
Nacinij OK
132
iw
OGATECH OG-S60/TWIN/TRIPLE/QUATTRO
OGATECH OG-S60/TWIN/TRIPLE/QUATTRO
4.2
Wybierz odpowiedni poziom gonoci ("WYCZ" (OFF) lub 1 do 5)
Nacinij OK, aby potwierdzi lub
, aby powróci do poprzedniego menu.
Wybór melodii dzwonka
Aparat bazowy i kada suchawka mog mie róne melodie dzwonka.
Suchawka moe mie róne melodie w zalenoci od tego, czy poczenie jest zewntrzne
czy zewntrzne.
4.2.1 Dzwonek aparatu bazowego
1.
Otwórz menu naciskajc /OK.
2.
Wybierz "USTAWIENIA" (SETUP), uywajc klawiszy w gór i w dó
3.
Nacinij OK
4.
Wybierz "DZWON. BAZY" (BASE MELODY), uywajc klawiszy w gór i w dó
5.
Nacinij OK
6.
Wybierz melodi (1 do 5), uywajc przycisków w gór i w dó
7.
Nacinij OK, aby potwierdzi lub
, aby powróci do poprzedniego menu.
4.2.2 Dzwonek suchawki, poczenie zewntrzne
1.
Otwórz menu naciskajc /OK
2.
Wybierz opcj “SUCHAWKA” (HANDSET), uywajc klawiszy w gór i w dó
3.
Nacinij OK
4.
Wybierz "ZEW. DZWONEK" (EXT MELODY), uywajc klawiszy w gór i w dó
5.
Nacinij OK
6.
Wybierz melodi (1 do 5) uywajc przycisków w gór i w dó
7.
Nacinij OK, aby potwierdzi lub
, aby powróci do poprzedniego menu.
4.2.3 Dzwonek suchawki, poczenie wewntrzne
1.
Otwórz menu naciskajc /OK
2.
Wybierz opcj "SUCHAWKA" (HANDSET), uywajc klawiszy w gór i w dó
3.
Nacinij OK
4.
Wybierz "WEW. DZWONEK" (INT VOLUME), uywajc klawiszy w gór i w dó
5.
Nacinij OK
6.
Wybierz melodi (1 do 5) uywajc przycisków w gór i w dó
7.
Nacinij OK, aby potwierdzi lub
, aby powróci do poprzedniego menu.
4.3
Poziom gonoci podczas poczenia
Aby zmieni poziom gonoci w czasie rozmowy naciskaj odpowiednio przycisk w gór
lub w dó
4.4
Wczenie / wyczenie dwików klawiatury
Suchawki mog emitowa d
wik za kadym naciniciem dowolnego przycisku, lub gdy
baterie s niemal rozadowane, albo gdy suchawka jest poza zasigiem.
4.4.1 Wczanie/wyczanie dwiku przycisków
1.
Otwórz menu naciskajc /OK
2.
Wybierz opcj “SUCHAWKA” (HANDSET) uywajc klawiszy w gór
3.
Nacinij OK
4.
Wybierz opcj "DZWIK" (BEEP), uywajc klawiszy w gór i w dó
OGATECH OG-S60/TWIN/TRIPLE/QUATTRO
i w dó
133
POLSKI
6.
7.
OGATECH OG-S60/TWIN/TRIPLE/QUATTRO
5.
6.
7.
8.
9.
Nacinij OK
Wybierz opcj "DZWIK PRZYC." (KEYTONE), uywajc klawiszy w gór i w dó
Nacinij OK
Wybierz "WCZ" (ON), aby wczy lub "WYCZ" (OFF), aby wyczy d
wik
Nacinij OK, aby potwierdzi.
4.4.2 Niemal rozadowana bateria
Wykonaj powysze czynnoci, ale w punkcie 6 zamiast "DZWIK PRZYC." (KEYTONE)
wybierz "BATERIA ROZ." (LOW BATT).
4.4.3 Suchawka jest poza zasigiem
Wykonaj powysze czynnoci, ale w punkcie 6 zamiast "DZWIK PRZYC." (KEYTONE)
wybierz "POZA ZASIG." (OUT RANGE).
4.5
Nazwa suchawki
Ta funkcja umoliwia nadanie osobistego charakteru kadej suchawce.
1.
Otwórz menu naciskajc /OK
2.
Wybierz opcj “SUCHAWKA” (HANDSET), uywajc klawiszy w gór i w dó
3.
Nacinij OK
4.
Wybierz opcj "NAZWA" (NAME), uywajc klawiszy w gór i w dó
5.
Nacinij OK
6.
Wpisz nazw
7.
Nacinij OK, aby potwierdzi
Wpisujc nazw nacinij ‘c’, aby skasowa znak lub nacinij i przytrzymaj wcinity , aby
wyj z menu bez zapisywania jakichkolwiek zmian.
4.6
Zmiana kodu PIN
Pewne funkcje dostpne s wycznie dla uytkowników, którzy znaj kod PIN. Fabryczny
kod PIN to = 0000.
Aby zmieni kod PIN:
1.
Otwórz menu naciskajc /OK
2.
Wybierz "USTAWIENIA" (SETUP), uywajc klawiszy w gór i w dó
3.
Nacinij OK
4.
Wybierz "KOD PIN" (PIN CODE), uywajc klawiszy w gór i w dó
5.
Nacinij OK
6.
Wpisz poprzedni 4-cyfrowy kod PIN
7.
Nacinij OK
8.
Wpisz nowy 4-cyfrowy kod PIN
9.
Nacinij OK
10. Wprowad
nowy kod PIN po raz drugi
11. Nacinij OK, aby potwierdzi.
4.7
Ustawienie trybu wybierania
S dwa tryby wybierania:
• DTMF/wybieranie tonowe (najpopularniejsze)
• Wybieranie impulsowe (w starszych instalacjach)
134
OGATECH OG-S60/TWIN/TRIPLE/QUATTRO
Aby zmieni tryb wybierania:
1.
Otwórz menu naciskajc /OK
2.
Wybierz "USTAWIENIA" (SETUP), uywajc klawiszy w gór i w dó
3.
Nacinij OK
4.
Wybierz opcj "TRYB WYBIERA." (DIAL MODE), uywajc klawiszy w gór
5.
6.
7.
4.8
1.
2.
3.
4.
5.
4.9
Nacinij OK
Wybierz tryb wybierania uywajc klawiszy w gór
Nacinij OK, aby potwierdzi
i w dó
i w dó
Przecznik czasu Flash
Otwórz menu naciskajc /OK
Wybierz opcj USTAWIENIA (SETUP), uywajc klawiszy w gór i w dó
Nacinij OK
Wybierz opcj "FLASH" (RECALL), uywajc klawiszy w gór i w dó
Wybierz "FLASH 1" (RECALL 1) dla krótkiego czasu flash (100 ms) lub "FLASH 2"
(RECALL 2) dla dugiego czasu flash (250 ms)
Automatyczne odebranie poczenia
W razie poczenia przychodzcego, gdy suchawka jest na aparacie bazowym, telefon
automatycznie odbierze poczenie przy podniesieniu suchawki. Jest to ustawienie
fabryczne, ale moe zosta WYCZONE:
1.
Otwórz menu naciskajc /OK
2.
Wybierz opcj "SUCHAWKA" (HANDSET), uywajc klawiszy w gór i w dó
3.
Nacinij OK
4.
Wybierz "AUTO.ODPOW." (AUTO ANSWER), uywajc klawiszy w gór i w dó
5.
Wybierz "WCZ" (ON) - aktywacja automatycznego odbierania, lub "WYCZ"
(OFF)
6.
Nacinij OK
4.10
Zresetowanie aparatu
Istnieje moliwo powrotu do oryginalnych, pocztkowych ustawie telefonu, czyli do
ustawie, które byy stosowane przy pierwszym uyciu telefonu.
Aby powróci do ustawie fabrycznych:
1.
Otwórz menu naciskajc /OK
2.
Wybierz opcj USTAWIENIA (SETUP), uywajc klawiszy w gór i w dó
3.
Nacinij OK
4.
Wybierz opcj "USTAW.POCZT." (DEFAULT), uywajc klawiszy w gór i w dó
5.
Nacinij OK
6.
Wpisz 4-cyfrowy kod PIN (fabryczny = 0000). Nacinij OK
7.
Nacinij ponownie OK, aby potwierdzi
OGATECH OG-S60/TWIN/TRIPLE/QUATTRO
135
POLSKI
OGATECH OG-S60/TWIN/TRIPLE/QUATTRO
OGATECH OG-S60/TWIN/TRIPLE/QUATTRO
USTAWIENIA POCZ
TKOWE S
NASTPUJ
CE:
D
wiki przy niemal
WCZON Gono
rozadowanej baterii
E
D
wiki ostrzegawcze, gdy poza WYCZO Ksika telefoniczna
zasigiem
NE
D
wiki przycisków
WCZON Lista pocze
E
Automatyczne odbieranie
WCZON Lista ponownego
E
wybierania
Dzwonek po. wewntrznego
1
Kod PIN
Tryb wybierania
Gono przy po. wewntrznym 3
Dzwonek po. zewntrznego
3
Blokada klawiatury
Gono po. zewntrznego
3
Pusta
Pusta
Pusta
0000
DTMF
WY
CZON
A
3
Powrót do ustawie fabrycznych spowoduje wykasowanie wszystkich
wpisów z ksiki telefonicznej i listy pocze. Kod PIN zostanie równie
zresetowany do 0000.
4.11
Blokada klawiatury
Klawiatura moe zosta zablokowanam przez co nie bdzie mona zmieni adnych ustawie
ani wybra numeru telefonu. W czasie blokady klawiatury wywietlana bdzie ikona .
4.11.1 Blokowanie klawiatury przez Menu.
1.
Otwórz menu naciskajc /OK
2.
Wybierz opcj "SUCHAWKA" (HANDSET), uywajc klawiszy w gór i w dó
3.
Nacinij OK
4.
Wybierz "BLOK KLAWIAT." (KEY LOCK?), uywajc klawiszy w gór i w dó
5.
Nacinij OK, aby wczy blokad
4.11.2 Blokowanie klawiatury za pomoc przycisku * (szybkie blokowanie).
Nacinij i przytrzymaj przez 3 sekundy przycisk ‘*’. Klawiatura zostanie zablokowana.
4.11.3 Odblokowanie klawiatury
1.
Nacinij dowolny przycisk
2.
Wywietlony zostanie komunikat "NACINIJ *" (PRESS *)
3.
Nacinij na 3 sekundy przycisk ‘*’, aby odblokowa klawiatur
4.12
1.
2.
3.
4.
5.
6.
7.
136
Ustawienie zegara
Otwórz menu naciskajc /OK
Wybierz opcj "DATA - CZAS" (DATE - TIME), uywajc klawiszy w gór i w dó
Nacinij OK
Wybierz "USTAW. ZEGARA" (CLOCK SET), uywajc klawiszy w gór i w dó
Nacinij OK
Wpisz godzin (format 24-godzinny)
Nacinij OK, aby potwierdzi
OGATECH OG-S60/TWIN/TRIPLE/QUATTRO
OGATECH OG-S60/TWIN/TRIPLE/QUATTRO
1.
2.
3.
4.
5.
6.
Ustawienia budzika
Otwórz menu naciskajc /OK
Wybierz opcj "DATA - CZAS" (Date - TIME), uywajc klawiszy w gór i w dó
Nacinij OK
Wybierz "USTAW BUDZIK" (ALARM SET), uywajc klawiszy w gór i w dó
Nacinij OK
Aby wczy budzik ustaw "WCZ" (ON) i nacinij OK. Wprowad
godzin (w
formacie 24-godzinnym), o której budzik ma si wczy.
POLSKI
4.13
Lub
7.
Aby wyczy budzik ustaw "WYCZ" (OFF) i nacinij OK, aby potwierdzi.
Gdy budzik si wczy wystarczy nacisn dowolny przycisk, aby go wyczy.
5
5.1
Funkcje zaawansowane
Ksika telefoniczna
Ksika telefoniczna pozwala zapisa 50 numerów telefonów i nazwisk. Nazwiska mog
mie dugo do 12 znaków, a numery do 20 cyfr.
Aby przeczyta, jak mona poczy si z osob, której numer jest zapisany w ksice
telefonicznej, zobacz rozdzia 3.14.
Aby przeczyta, jak wpisa znaki alfanumeryczne, zobacz rozdzia 3.15.
5.1.1 Dodawanie wpisu do ksiki telefonicznej
1.
Otwórz menu naciskajc /OK
2.
Wybierz "KSIKA TEL." (PHONE BOOK), uywajc klawiszy w gór i w dó
3.
Nacinij OK
4.
Wybierz "DODAJ WPIS" (ADD ENTRY), uywajc klawiszy w gór i w dó
5.
Nacinij OK
6.
Wpisz nazw
7.
Nacinij OK, aby potwierdzi
8.
Wpisz numer telefonu
9.
Nacinij OK, aby potwierdzi
10. Wybierz melodi (1-5) za pomoc przycisków w gór/w dó
11. Nacinij OK, aby potwierdzi
5.1.2 Zmiana nazwiska lub numeru
Aby zmieni numer w ksice telefonicznej:
1.
Otwórz menu naciskajc /OK
2.
Wybierz "KSIKA TEL." (PHONE BOOK), uywajc klawiszy w gór i w dó
3.
Nacinij OK
4.
Wybierz "EDYTUJ WPIS" (MODIFY ENTRY), uywajc klawiszy w gór i w dó
5.
Nacinij OK
6.
Przewi spis nazwisk, uywajc przycisków w gór i w dó . Spis jest przewijany
w kolejnoci alfabetycznej.
7.
Nacinij OK, gdy znajdziesz nazwisko, które chcesz zmieni
8.
Aby wróci i wpisa nowe nazwisko, posu si przyciskiem ‘
’
OGATECH OG-S60/TWIN/TRIPLE/QUATTRO
137
OGATECH OG-S60/TWIN/TRIPLE/QUATTRO
9.
10.
11.
Nacinij OK, aby potwierdzi
Wpisz nowy numer telefonu
Nacinij OK, aby potwierdzi
Ostrzeenie! Jeeli otworzysz ksik telefoniczn przyciskiem i zmienisz
numer telefonu przyciskiem
, to zmiana zostanie wzita pod uwag
jedynie dla tego poczenia i nie zostanie zapisana w ksice telefonicznej!
5.1.3 Kasowanie wpisu
Aby skasowa wpis:
1.
Otwórz menu naciskajc /OK
2.
Wybierz "KSIKA TEL." (PHONE BOOK), uywajc klawiszy w gór i w dó
3.
Nacinij OK
4.
Wybierz "USU WPIS" (DELETE ENTRY), uywajc klawiszy w gór i w dó
5.
Nacinij OK
6.
Przewi spis nazwisk uywajc przycisków w gór i w dó . Spis jest przewijany w
kolejnoci alfabetycznej.
7.
Nacinij OK, gdy znajdziesz nazwisko, które chcesz skasowa
8.
Wywietlony zostanie komunikat "POTWIERD" (CONFIRM). Nacinij OK, aby
potwierdzi lub
, aby przerwa.
5.2
Wyszukanie suchawki za pomoc aparatu bazowego
Po naciniciu przycisku przywoania znajdujcego si na aparacie bazowym wszystkie
suchawki zaczn dzwoni. Dzwonienie to pomoe Ci odnale
zgubion suchawk.
Dzwonienie wycza si naciskajc po prostu dowolny przycisk na suchawce.
6
6.1
Zarzdzanie wieloma suchawkami
Przyczenie dodatkowej suchawki
Drug suchawk naley rejestrowa tylko wówczas, gdy nie czy si ju
z aparatem bazowym, lub gdy kupiono now suchawk!!!
Do aparatu bazowego moesz doda nowe suchawki, jeeli obsuguj protokó DECT GAP.
Aparat bazowy moe obsuy maksymalnie 5 suchawek. Jeeli masz ju 5 suchawek i
chcesz doda jeszcze jedn lub wymieni, to najpierw musisz skasowa jedn suchawk, a
pó
niej zarejestrowa now.
Aby zarejestrowa suchawk, naley ustawi aparat bazowy w specjalny tryb rejestracji:
1.
Nacinij i przytrzymaj przez 6 sekund przycisk na aparacie bazowym.
2.
Aparat bazowy wyda sygna d
wikowy. Aparat jest gotowy do zarejestrowania nowej
suchawki. Po naciniciu tego przycisku masz 90 sekund na rejestracj nowej
suchawki.
Po uruchomieniu trybu rejestracji w aparacie bazowym zacznij rejestracj na nowej
suchawce:
138
OGATECH OG-S60/TWIN/TRIPLE/QUATTRO
6.1.1 Jeeli dodatkowa suchawka to OGATECH OG-S60
3.
Otwórz menu naciskajc /OK
4.
Wybierz opcj "SPIS" (REGISTER), uywajc klawiszy w gór i w dó
5.
Nacinij OK
6.
Wybierz "REJESTR. BAZ" (REG BASE), uywajc klawiszy w gór i w dó
7.
Wpisz numer aparatu bazowego (od 1 do 4). Numery, które migaj s ju uywane.
8.
Wpisz kod PIN aparatu bazowego (fabrycznie 0000)
9.
Nacinij OK. Suchawka rozpocznie wyszukiwanie bazy DECT
10. Gdy suchawka zlokalizuje baz, wywietli jej numer identyfikacyjny. Potwierd
rejestracj naciskajc OK lub zatrzymaj naciskajc .
11. Jeeli suchawka nie odnajdzie bazy to po kilku sekundach powróci do trybu
gotowoci.
12. Spróbuj ponownie zmieniajc numer bazy i sprawd
, czy w Twoim otoczeniu nie ma
jaki zakóce. Przybli si do bazy.
6.1.2 Jeeli dodatkowa suchawka to inny model
Po uruchomieniu procedury rejestracji na aparacie bazowym, postpuj zgodnie z
zaleceniami dot. rejestracji zamieszczonymi w instrukcji obsugi suchawki. Suchawka musi
by zgodna z systemem GAP.
Gdy suchawka nie jest zarejestrowana w bazie to na wywietlaczu widoczna jest ikona i
migajcy tekst "NIE ZAREJEST." (NOT REG). Gdy suchawka jest rejestrowana w aparacie
bazowym to baza nadaje jej numer. Jest to numer wywietlany na suchawce po nazwie.
Numer ten naley stosowa przy poczeniach wewntrznych.
Profil DECT GAP gwarantuje prawidowe dziaanie jedynie podstawowych
funkcji pocze pomidzy rónymi markami/rodzajami. Istnieje
moliwo, i pewne usugi (np. CLIP) nie bd dziaa prawidowo.
6.2
Wyrejestrowanie/kasowanie suchawki
Mona wyrejestrowa suchawk z aparatu bazowego, aby umoliwi tym samym rejestracj
innej.
1.
Otwórz menu naciskajc /OK
2.
Wybierz "USTAWIENIA" (SETUP), uywajc klawiszy w gór i w dó
3.
Nacinij OK
4.
Wybierz "USU SUCHAW." (DEL HANDSET), uywajc klawiszy w gór i w dó
5.
Nacinij OK
6.
Wpisz 4-cyfrowy kod PIN aparatu bazowego
7.
Nacinij OK
8.
Wybierz suchawk, któr chcesz usun
9.
Nacinij OK, aby potwierdzi
6.3
Rejestracja suchawki w innym aparacie bazowym
Jeeli chcesz uy suchawki OGATECH OG-S60 z innym modelem aparatu bazowego.
Aparat bazowy musi by zgodny z systemem GAP.
1.
Sposób ustawienia aparatu bazowego w tryb rejestracji opisany jest w instrukcji
obsugi tego aparatu.
2.
Wykonaj dziaania 3 do 10 opisane w rozdziale 6.1.
OGATECH OG-S60/TWIN/TRIPLE/QUATTRO
139
POLSKI
OGATECH OG-S60/TWIN/TRIPLE/QUATTRO
OGATECH OG-S60/TWIN/TRIPLE/QUATTRO
6.4
Wybór aparatu bazowego
Suchawki mona zarejestrowa jednoczenie nawet w 4 aparatach bazowych.
Aby wybra aparat bazowy:
1.
Otwórz menu naciskajc /OK
2.
Wybierz opcj "SPIS" (REGISTER), uywajc klawiszy w gór i w dó
3.
Nacinij OK
4.
Wybierz "WYBIERZ BAZ" (SELECT BASE), uywajc klawiszy w gór i w dó
5.
Nacinij OK
6.
Wybierz baz lub wybierz AUTO, uywajc klawiszy w gór i w dó
7.
Nacinij OK
Przy wyborze aparatu bazowego migajcy numer oznacza aktualnie wybran baz. Jeeli
wybierzesz ‘Auto’, to suchawka bdzie automatycznie szuka kolejnej bazy jeeli bdziesz
poza zasigiem!
7
Rozwizywanie problemów
Objaw
Moliwa przyczyna
Rozwizanie
Pusty wywietlacz
Baterie nie s naadowane
Sprawd
uoenie baterii
Naaduj baterie
Suchawka jest
WYCZONA
WCZ suchawk
Przewód telefoniczny jest
podczony nieprawidowo
Sprawd
poczenie
przewodu telefonicznego
Linia jest zajta przez inn
suchawk
Poczekaj, a druga
suchawka zostanie odoona
Suchawka jest poza
zasigiem
Zbli suchawk do aparatu
bazowego
Aparat bazowy nie jest
zasilany prdem
Sprawd
poczenie
przewodów zasilania w
aparacie
Suchawka nie jest
zarejestrowana w aparacie
bazowym
Zarejestruj suchawk w
bazie
Aparat bazowy lub
suchawka nie dzwoni
Ustawiona gono wynosi
zero lub jest zbyt cicha
Dostosuj gono dzwonka
Ton jest prawidowy, ale nie
ma poczenia
Tryb wybierania jest
nieprawidowy
Dostosuj tryb wybierania
(impulsowy/tonowy)
Nie ma moliwoci
przeniesienia poczenia na
PABX
Czas FLASH jest za krótki
Ustaw urzdzenie na dugi
czas flash
Telefon nie reaguje na
przyciskanie przycisków
Bd czynnociowy
Wycignij baterie i wó je
ponownie na miejsce
Brak tonu
Miga ikona
140
OGATECH OG-S60/TWIN/TRIPLE/QUATTRO
OGATECH OG-S60/TWIN/TRIPLE/QUATTRO
8.1
Gwarancja
Okres gwarancji
Urzdzenia Topcom s objte 24-miesicznym okresem gwarancji. Okres gwarancji
rozpoczyna si w dniu zakupu nowego urzdzenia. Firma Topcom nie udziela adnej
gwarancji na bateria standardowe lub akumulatorki (typu AA/AAA).
Czci eksploatacyjne lub wady nieznacznie wpywajce na dziaanie lub warto sprztu
nie s objte gwarancj.
Gwarancj naley udowodni, przedstawiajc rachunek zakupu orygina lub kopia, na
którym widnieje data zakupu oraz model urzdzenia.
8.2
Obsuga gwarancji
Wadliwe urzdzenie naley zwróci do zakadu serwisowego Topcom wraz z wanym
rachunkiem zakupu oraz wypenion kart serwisow.
Jeeli w urzdzeniu wystpi usterka w trakcie trwania okresu gwarancji, firma Topcom lub jej
autoryzowany zakad serwisowy bezpatnie usunie powsta usterk spowodowan wad
materiaow lub produkcyjn, przez napraw lub wymian urzdzenia lub jego czci. W
przypadku wymiany, kolor i model urzdzenia mog róni si od urzdzenia pierwotnie
zakupionego.
Data pierwotnego zakupu bdzie okrela pocztek okresu gwarancyjnego. Okres
gwarancyjny nie ulega przedueniu, jeeli urzdzenie zostao wymienione lub naprawione
przez Topcom lub autoryzowany zakad serwisowy.
8.3
Wyjtki od gwarancji
Uszkodzenia lub wady spowodowane nieprawidowym obchodzeniem si lub prac z
urzdzeniem oraz uszkodzenia powstae w wyniku zastosowania nieoryginalnych czci lub
akcesoriów nie s objte gwarancj.
Gwarancja nie obejmuje szkód wywoanych przez czynniki zewntrzne, takich jak pioruny,
woda i ogie, ani uszkodze powstaych w czasie transportu.
Gwarancja nie ma zastosowania, jeeli numer seryjny urzdzenia zosta zmieniony, usunity
lub nie moe zosta odczytany.
Wszelkie roszczenia gwarancyjne zostan uznane za niewane, jeli urzdzenie byo
naprawiane, zmieniane lub modyfikowane przez uytkownika.
9
•
•
•
•
•
•
•
•
•
•
Dane techniczne
Standard:
DECT (Digital Enhanced CordlessTelecommunications)
GAP (Generic Access Profile)
Zakres czstotliwoci:
1880 MHz do 1900 MHz
Liczba kanaów:
120 dupleksowych kanaów
Modulacja:
GFSK
Kodowanie mowy:
32 kbit/s
Moc emisyjna:
10 mW (rednia moc na kana)
Zasig:
maks. 300 m w przestrzeni otwartej /10-50 m wewntrz
budynku
Zasilanie aparatu bazowego: 230 V / 50 Hz dla bazy
Baterie suchawki:
2 akumulatory AAA, NiMh 550mAh
Wytrzymao baterii suchawki:200 godzin w trybie gotowoci
OGATECH OG-S60/TWIN/TRIPLE/QUATTRO
141
POLSKI
8
OGATECH OG-S60/TWIN/TRIPLE/QUATTRO
•
•
•
•
•
142
Czas rozmów:
10 godzin
Czas adowania:
6-8 godzin
Normalne warunki uytkowania:+5 °C do +45 °C
Tryb wybierania
impulsowe / tonowe
Czas flash:
100 lub 250 ms
OGATECH OG-S60/TWIN/TRIPLE/QUATTRO
SERVICE RETURN CARD - RÜCKSENDEKARTE CARTE DE RETOUR SERVICE - RETOURFICHE
RETURN WITH YOUR DEFECT PRODUCT
Name/Vorname/Prénom/Naam:
Surname/Familienname/Nom/Familienaam:
Street/Straße/Rue/Straat:
Nr./N°:
Box/Postfach/Boîte/Postbus:
Location/Ort./Lieu/Plaats:
Post code/Postleitzahl/Code Postal/Postcode:
Country/Land/Pays/Land:
Tel./Tél.:
E-mail:
Model name/Modellbezeichnung/Nom du modèle/Modelnaam:
Serial Nr/Seriennummer/N° série/Serienummer:
Purchase date/Kaufdatum/Date d’achat/Aankoopdatum:
(DD/MM/YYYY) - (TT/MM/JJJJ)
Fault description/Beschreibung des Defekts/Description de la panne/Beschrijving defect:
(Original Proof of Purchase has to be attached to this return card to be valid for warranty)
Model name/Modellbezeichnung/Nom du modèle/Modelnaam:
Serial Nr/Seriennummer/N° série/Serienummer:
Purchase date/Kaufdatum/Date d’achat/Aankoopdatum:
(DD/MM/YYYY) - (TT/MM/JJJJ)
Fault description/Beschreibung des Defekts/Description de la panne/Beschrijving defect:
MD9900211