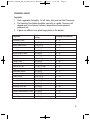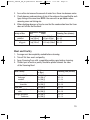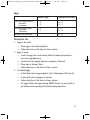
1
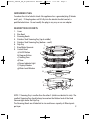
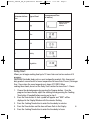
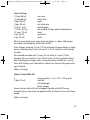
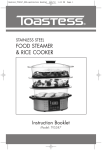
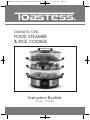
Booklet_TVS682_EN_R.qxd:Salton Booklet
5/16/11
5:01 PM
Page 1
STAINLESS STEEL
FOOD STEAMER
& RICE COOKER
Instruction Booklet
Model: TVS682
Booklet_TVS682_EN_R.qxd:Salton Booklet
5/16/11
5:01 PM
Page 2
IMPORTANT SAFEGUARDS
When using electrical appliances, basic safety precautions should always
be followed including the following:
1. Read all instructions.
2. DO NOT touch hot surfaces. Use handles or knobs.
3. To protect against electrical hazards, do not immerse cord, plugs,
or the appliance in water or other liquid.
4. Close supervision is necessary when any appliance is used by or near children.
5. Unplug from outlet when not in use and before cleaning. Allow to cool
before putting on or taking off parts, and before cleaning the appliance.
6. DO NOT operate any appliance with a damaged cord or plug or after
the appliance malfunctions, or has been damaged in any manner.
Return appliance to Toastess for examination, repair or adjustment.
See Warranty.
7. The use of accessories or attachments not recommended by Toastess
may cause hazards.
8. DO NOT use outdoors.
9. DO NOT let cord hang over edge of table or counter, or touch hot surfaces.
10. DO NOT place on or near a hot gas or electric burner, or in a heated oven.
11. Extreme caution must be used when moving an appliance containing
hot liquids.
12. Prior to connecting or disconnecting plug from wall outlet, turn any control
to “Off”.
13. This appliance is for Household Use Only. DO NOT use appliance for other
than its intended use.
14. DO NOT leave unit unattended while in use.
15. CAUTION: This appliance generates heat and escaping steam during use.
Proper precautions must be taken to prevent the risk of burns, fires
or other damage to persons or property.
16. This appliance generates steam – DO NOT operate uncovered.
17. Use oven mitts or potholders when removing Cover during operation.
18. Always open the Cover away from your face to avoid escaping steam.
SAVE THESE INSTRUCTIONS
HOUSEHOLD USE ONLY
2
Booklet_TVS682_EN_R.qxd:Salton Booklet
5/16/11
5:01 PM
Page 3
GROUNDED PLUG
To reduce the risk of electric shock this appliance has a grounded plug (2 blades
and 1 pin). If the plug does not fit fully into the electrical outlet contact a
qualified electrician. Do not modify the plug in any way or use an adaptor.
DESCRIPTION OF PARTS
1.
2.
3.
4.
5.
6.
7.
8.
Cover
Rice Bowl
Steaming Bowls
Stainless Steel Steaming Tray (top & middle)
Stainless Steel Steaming Tray (bottom - small)
Drip Tray
1
Base/Water Reservoir
2
Control Panel
a) On/Off Button
4
b) Program Button
c) Cooking Time
d) Timer
e) Power Indicator Light
f) Display Window
5
g) Water Level Window
3
6
7
8
g
a
b
c
d e
f
NOTE: 1 Steaming Tray is smaller than the other 2 (which are identical in size). The
smallest Steaming Tray should always be used on the Bottom level of the Food
Steamer right above the Drip Tray.
The Steaming Bowls are all identical in size and have a capacity of 4litres/quarts
per layer.
3
Booklet_TVS682_EN_R.qxd:Salton Booklet
5/16/11
5:01 PM
Page 4
BEFORE FIRST USE
Wash the Cover, Steaming Bowls, Rice Bowl, Steaming Trays, and Drip Tray in soapy
water. Rinse and dry. Wipe the Base with a damp cloth. Never immerse the Base in
water or any other liquid.
HOW TO USE
Steaming Bowls
The Steaming Bowls can be used in different ways:
Single level (one bowl):
a. Use 1 each Steaming Bowl and Steaming Tray
b. Place food on Steaming Tray
c. Place Steaming Bowl over food
d. Place Steaming Tray with Steaming Bowl on the Drip Tray
e. Cover
Multiple level (2 or 3 bowls):
a. Place food on Steaming Trays NOTE: The items that need the longest
steaming time should be placed on the bottom level of the food steamer
b. Place the Steaming Bowls over food
c. Gently place one Steaming Tray with Steaming Bowl on the Drip tray and
place the second Steaming Tray over the top of the first Steaming Bowl
d. If you want to use the third level, repeat process above and place over the top
of the second Steaming Bowl
e. Cover
How to Steam
1. Place Steamer on a level surface close to a 120 volt A.C. outlet.
NOTE: DO NOT place under wall cabinets.
2. Fill the Water Reservoir with the maximum amount of cold water (See marking
on Water Level Window). Any excess water can be emptied out at the end of
the steaming cycle. If more than 60 minutes of steaming is required and water
is not visible in the Water Level Window you can add water, without removing
the Steaming Bowls, by pouring through the openings in the Handles on either
side of the Drip Tray. DO NOT fill past the MAX mark on the Water Level
Window. NOTE: The maximum amount of water is 1.2 litre/quart.
IMPORTANT: DO NOT add salt, pepper, seasonings, etc. or liquids other
4
than water to the Base.
Booklet_TVS682_EN_R.qxd:Salton Booklet
5/16/11
5:01 PM
Page 5
3. Place the Drip Tray over the Base/Water Reservoir.
4. Place the Steaming Tray(s) and Steaming Bowl(s) on the Drip Tray.
5. Plug unit into wall outlet. “0:00” will be displayed in the Display Window and
the Power Indicator light will be illuminated in green.
6. There are 5 cooking programs available. Please see the chart below. Choose
the desired program by pressing the Program Button.
NOTE:
You can increase the cook time up to 60 minutes in each program by pressing
the Cooking Time Button, but you cannot reduce the preset cooking time
shown under the following programs Rice, Fish, Poultry and Vegetable.
Cooking Program Egg, allows you to manually select the cooking time from
0 to 59 minutes. If you continue to push the Cooking Time Button past 59
minutes, the countdown will start again from 0 minutes.
7. Press the On/Off Button. The Power Indicator Light will change from green to
red. The steamer will begin to heat and the pre-set time will appear in the
Display Window and begin to countdown in minutes.
8. When cooking is completed the original cook time selected with will be
displayed in the Display Window and Steamer will beep once indicating that
the pre-programmed cooking time is complete. The Power Indicator Light will
change to green again.
CAUTION: The food steamer gets hot during use. Always use oven mitts
or pot holders when handling the Lid, Steaming Bowls, Steam Trays, Rice
Bowl and Drip Tray.
CAUTION: When removing the Lid, grasp the handle and slowly lift the side
that is away from you to allow steam to escape before setting the Lid aside. To
avoid burns, always hold the Lid so that escaping steam flows away from your
hands, arms and face.
9. At any time if you wish to stop the steaming process before the end of the
elapsed time, press and hold the On/Off button. The unit will beep and the
Power Indicator Light will change to green.
5
Booklet_TVS682_EN_R.qxd:Salton Booklet
Nombre de touche
du bouton de fonc- Type of Food
tion
1
Egg
2
Rice
3
Fish
4
Poultry
5
Vegetables
5/16/11
5:01 PM
Page 6
Preprogrammed Time
(in minutes)
Manual function
from 0 to 59
minutes
Delay Start
Allows you to begin cooking food up to 12 hours later and can be used on all 5
programs.
CAUTION: Perishable foods such as meat and poultry products, fish, cheese and
dairy products cannot be left at room temperature for more than 2 hours. (No longer
than 1 hour when the room temperature is above 32ºC/90ºF.) When
cooking these foods, do not set the Delay Start function for more than 1-2 hours.
1. Choose the desired program by pressing the Program button. Once the
program has been chosen, adjust the cooking time by pressing the Cooking
Time button (if needed) before moving on to step 2.
2. Press the Timer button. A clock symbol will appear and “0:00” will be
displayed in the Display Window with the minutes flashing.
3. Press the Cooking Time button to enter the time delay in minutes.
4. Press the Timer button and the hour will now flash in the Display
6
5. Press the Cooking Time button to enter the time delay in hours.
Booklet_TVS682_EN_R.qxd:Salton Booklet
5/16/11
5:01 PM
Page 7
6. Once the delay start has been set, press the On/Off Button.
7. The Power Indicator Light will flash in green and the time will begin to count
down in minutes.
8. The Steamer will start to heat when the timer has reached the preset delay
start time. The Power Indicator Light will change to red.
10. When cooking has completed the original cook time selected with will be
displayed in the Display Window and Steamer will beep once indicating that
the pre-programmed cooking time is complete. The Power Indicator Light will
change to green again.
11. At any time if you wish to cancel the Delay Timer or stop the steaming
process before the end of the elapsed time/steaming cycle, press and hold
the On/Off button. The unit will beep and the Power Indicator Light will
change to green.
Insufficient Water
If the water in the Water Reservoir has completely evaporated, the unit will beep
11 times, the cooking process will automatically stop and the display will show
the following:
Unplug the food steamer, and allow to cool for approximately 15 minutes before
using again.
Add more water to the Water Reservoir and continue steaming.
HELPFUL HINTS
1. Steam cooking times will vary depending on the size, freshness, amount of
food being cooked and the desired degree of doneness. Use the Steaming
Charts as a guide but experiment with this healthy method of cooking by
varying the cooking times. This will help you to obtain the best results to suit
your taste.
2. Smaller pieces of food cook faster than larger pieces; a single layer steams
faster than several layers and foods of uniform size will steam more evenly.
3. Foods with longer steaming times should be placed on the lowest level of
the food steamer. Once these foods are partially cooked, remove the Cover
and add the other Steaming Bowls, if required.
4. Arrange food with spaces between pieces to allow for maximum steam flow.
5. When steaming large quantities of food, stir halfway through cooking.
6. Juices from meat or poultry should not drip onto other foods. Never place
meat or poultry in the Middle or Top Steaming Bowls above other foods.
7
7. Do not steam frozen meat, poultry or seafood.
Booklet_TVS682_EN_R.qxd:Salton Booklet
5/16/11
5:01 PM
Page 8
STEAMING GUIDES
Vegetables
1. Wash vegetables thoroughly. Cut off stems; trim; peel and slice if necessary.
2. The Steaming Chart below should be used only as a guide. Doneness will
depend upon size of pieces, freshness, temperature of water, personal
preference, etc.
3. If pieces are different sizes, place larger pieces on the bottom.
Artichokes, whole
Asparagus, spears
Beans, green or wax
Beets, cut
Weight
lb. (kgs.)
4
1 lb. (450 g)
1/2 lb. (225 g)
1 lb. (450 g)
Brocolli, florets
1 lb. (450 g)
20 – 22
Brussel Sprouts, whole
1 lb. (450 g)
24 – 26
Cabbage, sliced
1 lb. (450 g)
16 – 18
Celery, sliced
1/2 lb. (225 g)
14 – 16
Carrots, sliced
Cauliflower, florets
Corn on the Cob
Eggplant, chunks
Mushrooms, button
Okra
Onions, sliced
Parsnips, sliced
Peas, shelled
Potatoes, small,whole
Rutabaga, small dice
Spinach
Squash, Acorn/Butternut, sliced
1 lb. (450 g)
1 lb. (450 g)
3-1/2 lbs (1.5 kgs.)
1 lb. (450 g)
1 lb. (450 g)
1 lb. (450 g)
1/2 lb. (225 g)
1/2 lb. (225 g)
1 lb. (450 g)
1 lb. (450 g)
1 lb. (450 g)
1/2 lb. (25 g)
1 lb. (450 g)
18 – 20
20 – 22
14 – 16
16 – 18
10 – 12
18 – 20
12 – 14
8 – 10
12 – 13
30 – 32
28 – 30
12 – 14
22 – 24
Turnips
1 lb. (450 g)
20 – 22
Frozen Vegetables
1 lb. (450 g)
18 – 20
Vegetable
Steaming Time (minutes)
30 – 32
12 –14
12 – 14
25 – 28
8
Booklet_TVS682_EN_R.qxd:Salton Booklet
5/16/11
5:01 PM
Page 9
Fish and Seafood
1. Clean fish or seafood before steaming.
2. Fish fillets or steaks can be steamed in the Rice Bowl with seasoned butter,
lemon or other favourite sauces.
3. Clams, oysters and mussels may open at different times. Check the shells
to avoid overcooking.
Fillets, frozen
fresh
Weight
lbs. (g/kgs.)
1/2 lb. (225 g)
1/2 lb. (225 g)
Fish steaks, cod, salmon, tuna
1 lb. (450 g)
12 – 14
Clams, in shell
1 lb. (450 g)
10 – 12
Fish and Seafood
Steaming Time (minutes)
10 – 12
6–8
Crab, King Crab, legs and claws 1/2 lb. (225 g)
Soft Shell
8 – 12 pcs.
20 – 22
20 – 22
Lobster, tails
whole
2–4
1-1/4 lb (340 g)
16 – 18
18 – 20
Mussels, in shell
1 lb. (450 g)
14 – 16
Oysters, in shell
3 lbs. (1.3 kgs)
18 – 20
Scallops, Bay – shucked
Sea – shucked
Shrimp, medium in shell
large in shell
1 lb. (450 g)
3 lbs. (1.3 kgs)
1 lb. (450 g)
1 lb. (450 g)
14 – 16
18 – 20
10 – 12
18 – 20
Rice
1. Fill the Base with the maximum amount of water.
2. Add rice, water, broth and spices to Rice Bowl. See the Rice Steaming Guide
for quantities of rice and water or check package directions.
3. Place the Drip Tray over the Base/Water Reservoir.
4. Place the Steaming Tray on the Drip Tray, add Rice Bowl onto Steaming Tray.
Place Steaming Bowl over Rice Bowl. Cover.
5. Plug into the wall outlet and follow steps 6 to 9 in the ‘How to Steam’
section
NOTES:
1. There are many types of rice. Follow specific package directions for quantities
of water and rice. Use the chart below as a guide.
9
Booklet_TVS682_EN_R.qxd:Salton Booklet
5/16/11
5:01 PM
Page 10
2. For a softer rice increase the amount of water. For a firmer rice decrease water.
3. Check doneness and consistency of rice at the minimum time specified for each
type, stirring at the same time. NOTE: Use oven mitts or pot holders when
removing cover and stirring rice.
4. When checking doneness of rice, be sure that the condensation from the Cover
does not fall into the Rice Bowl.
Variety of Rice
Brown, regular
parboiled
White, regular
long grain
Combined in Rice Bowl
Rice
Water
1/2 cup (125 ml) 1 cup (250 ml)
1/2 cups (375ml)
1 cup (250 ml)
1 cup (250 ml)
1 cup (250 ml)
1-1/2 cups (375ml)
1-2/3 cups (420ml)
Steaming Time (minutes)
37 – 39
43 – 45
45 – 50
50 – 55
Meat and Poultry
1.
2.
3.
4.
Sausage must be completely cooked before steaming.
Trim off fat from meat and poultry.
Spray Steaming Trays with a vegetable cooking spray before steaming.
Thickest part of meat or poultry should be placed towards the sides
of the Steaming Bowl.
Meat / Poultry
Weight
lbs. (kgs.)
Steaming Time (minutes)
Beef, sirloin 1/2“ (12 mm) slices
hamburger
meatballs
1/2 lb. (225 g)
1 lb. (450 g)
1 lb. (450 g)
10 – 12
16 – 18
22 – 24
Chicken, 4 breasts – boneless
drumsticks
1 lb. (450 g)
1 lb. (450 g)
12 – 15
24 – 26
Lamb, cubes
1 lb. (450 g)
26 – 28
Pork, chops 1/2” (12 mm) thick
cubes
1 lb. (450 g)
1 lb. (450 g)
12 – 14
24 – 26
Sausages, precooked
frankfurters
1 lb. (450 g)
1 lb. (450 g)
14 – 18
14 – 18
10
Booklet_TVS682_EN_R.qxd:Salton Booklet
5/16/11
5:01 PM
Page 11
Eggs
Number of Eggs
Steaming Time (minutes)
In the shell (directions below)
soft cooked
hard cooked
1 – 12
1 – 12
10 – 12
15 – 17
In a Cup (directions below)
soft cooked
hard cooked
1–4
1–4
9 – 11
12 – 14
Scrambled (directions below
6
20 – 22
Directions for:
1. Eggs in the shell:
• Place eggs in the Steaming Bowls.
• Follow directions in the How to Steam section.
2. Eggs in a cup:
• Crack raw egg into a custard cup which has been sprayed with a
non-stick vegetable spray.
• Season with salt, pepper, butter or margarine, if desired.
• Place cups in Steamer Bowl.
• Follow directions in the How to Steam section.
3. Scrambled Eggs:
• In Rice Bowl, beat 6 eggs together with 2 tablespoons (30 ml) milk.
• Season with salt and pepper, if desired.
• Follow directions in the How to Steam section.
• Stir eggs halfway through cooking. NOTE: Always use oven mitts or
pot holders when opening the Steamer during operation.
11
Booklet_TVS682_EN_R.qxd:Salton Booklet
5/16/11
5:01 PM
Page 12
RECIPES
Oriental Chicken and Vegetables
3/4 lb. (340 g)
boneless, skinless chicken breasts,
cut into 1-inch (2.5 cm) pieces
1/3 cup (85 ml)
sweet-and-sour sauce
3
green onions, cut into 1-inch (2.5 cm) pieces
1
medium green pepper,
cut into 1-inch (2.5 cm) pieces
4 oz. (112 g)
fresh Chinese pea pods
2 cups ( 500 ml)
bean sprouts
1/4 cup (60 ml)
sweet-and-sour sauce
2 tbsp. (30 ml)
sesame seeds, toasted*
Stir chicken and 1/3 cup (85 ml) sweet-and-sour sauce in a bowl until evenly
mixed. Cover and refrigerate 30 minutes.
Drain chicken; arrange in single layer on Steaming Trays. Top with onions,
pepper and pea pods. Cover and steam 14 minutes or until chicken
is no longer pink in center.
In a serving bowl, toss chicken mixture, bean sprouts and 1/4 cup (60 ml)
sweet-and-sour sauce, until evenly coated. Sprinkle with sesame seeds.
Makes 4 servings.
*To toast sesame seeds, heat in ungreased skillet over medium heat about
2 minutes. Stir occasionally, until golden brown.
12
Booklet_TVS682_EN_R.qxd:Salton Booklet
5/16/11
5:01 PM
Page 13
Lemon Shrimp
1/4 cup (60 ml)
1/4 cup (60 ml)
2 tbsp. (30 ml)
2 tbsp. (30 ml)
1/4 tsp. 1.5 ml)
1-1/2 lbs. (675 g)
1/2 cup (125 ml)
2 tsp. (10 ml)
2 tsp. (10 ml)
soy sauce
lemon juice
sugar
dry white wine
ground ginger
raw medium shrimps, peeled and deveined
water
cornstarch
water
Mix soy sauce, lemon juice, sugar, wine and ginger in a bowl. Add shrimps.
Cover bowl and refrigerate at least 30 minutes.
Drain shrimps, reserving 1/2 cup (125 ml) marinade. Arrange shrimps in single
layer on Steaming Trays. Cover and steam 12 to 15 minutes or until shrimps
are pink.
Mix reserved marinade and 1/2 cup (125 ml) water in 1-quart (1 litre)
saucepan. Mix cornstarch in 2 tsp. (10 ml) water; stir into marinade mixture.
Heat to boiling over medium heat, stirring constantly, and boil for 1 minute.
Serve with shrimps and, if desired, hot cooked rice. Garnish with green onion
tops if desired.
Makes 4 servings.
Salmon Steaks With Dill
4
1 tbsp. (15 ml)
salmon steaks 4 – 5 oz. (110 – 140 g) each
fresh dill
salt and pepper
lemon wedges
Season salmon steak with salt and pepper. Sprinkle with dill. Place on
Steaming Trays, cover. Steam for approximately 15 minutes. Serve with lemon
wedge.
Makes 4 servings.
13
Booklet_TVS682_EN_R.qxd:Salton Booklet
5/16/11
5:01 PM
Page 14
Steamed Fish
1 – 10oz.
4
4
1
1/2 tsp. (5 ml)
1 tbsp. (15 ml)
1 tsp. (5 ml)
1 tsp. (5 ml)
package frozen flounder fillets
medium size mushrooms, sliced
green onions cut in 1” (2.5 cm) pieces
stalk celery, sliced
ground ginger
white wine
soya sauce
Worchestershire sauce
dash hot pepper sauce
Place fillets in a heatproof plate that fits inside the Steamer Bowl/Tray.
Sprinkle mushrooms, onions and celery over fish. Combine, ginger, wine, soy
sauce, Worcestershire sauce and hot pepper sauce in a small bowl. Spoon
over fish. Place plate inside Steamer Bowl/Tray, cover and steam for 20
minutes.
Makes 2 servings.
Rice Pilaf
1/4
1/4
1/4
1 tsp. (5 ml)
2
1
1-2/3 cups
green pepper, diced
red pepper, diced
yellow pepper, diced
vegetable oil
green onions, sliced
cup long grain rice
chicken broth
Sauté peppers and onions in a skillet for 1-2 minutes. Combine rice, chicken
broth and pepper and onion mixture in the rice bowl. Place on Steaming Tray,
cover and steam for 50 – 55 minutes.
Makes 4 servings.
14
Booklet_TVS682_EN_R.qxd:Salton Booklet
5/16/11
5:01 PM
Page 15
CARE AND CLEANING
1. Unplug unit from outlet and allow unit to cool completely before cleaning. Make
sure that the Drip Tray and Base are cool as these are the parts closest
to the Heating Element.
2. Empty the Drip Tray and Base/Water Reservoir.
3. Wash the Cover, Steaming Bowls and Steaming Trays, Drip Tray and Rice Bowl in
warm soapy water or on the top rack of the dishwasher or with a soft cloth and
mild dishwashing liquid. Rinse with clear water.
IMPORTANT: NEVER IMMERSE THE BASE/WATER RESERVOIR IN WATER
OR ANY OTHER LIQUID. NEVER USE ABRASIVE CLEANSERS.
Descaling
If scale deposits build up on the heating element follow the directions below
to descale.
1. Pour 3 cups (500 ml) of clear vinegar into the Base/Water Reservoir. Fill
up to the maximum fill mark on the Water Level Window with water.
DO NOT use Drip Tray, Steaming Bowls or Cover.
2. Plug in and set Timer for 30 minutes.
3. When Timer rings, unplug unit from outlet and allow to cool completely.
4. Empty the Base/Water Reservoir.
5. Rinse with cool water several times. Wipe with a damp cloth. Dry.
IMPORTANT: NEVER IMMERSE THE BASE IN WATER OR ANY
OTHER LIQUID.
15
Booklet_TVS682_EN_R.qxd:Salton Booklet
5/16/11
5:01 PM
Page 16
A short supply cord is provided to reduce the hazards of becoming entangled
in or tripping over a long cord. Extension cords may be used if care is exercised
in their use. If an extension cord is used, the marked electrical rating of the
detachable power-supply cord or extension cord should be at least as great as
the electrical rating of the appliance. If the appliance is of the grounded type,
the extension cord should be of a grounded 3-wire cord. The extension cord
should be arranged so that it will not drape over the counter top or table top,
where it can be pulled on by children or tripped over.
LIMITED WARRANTY
Toastess International warrants that this appliance shall be free from defects in
material and workmanship for a period of one year from the date of purchase.
During this ‘in-warranty’ period, defective products will be repaired or replaced
at the discretion of the retailer and/or Toastess International. This warranty
covers normal domestic usage and does not cover damage which occurs in
shipment or failure which results from alteration, accident, misuse, abuse, glass
breakage, neglect, commercial use or improper maintenance.
A defective product should be returned to the original place of purchase within
the retailer’s stipulated return/exchange period*. If you are unable to have
a defective product replaced under warranty by the retailer, please check our
website at “www.toastess.com” for the service centre nearest you or you may
contact us for assistance by mail, e-mail, fax or telephone as listed below.
To ensure prompt ‘in-warranty’ service, securely package and return the product
to us prepaid. Be sure to include the original proof of purchase and a description
of the defect along with your address and zip/postal code.
For repairs not covered by the warranty, please contact us for assistance.
TOASTESS INTERNATIONAL
Customer Service Department
81A Brunswick
Dollard-des-Ormeaux
Québec, Canada H9B 2J5
E-mail: [email protected]
Fax: 514-685-8300
Tel: 514-685-2820 (Ext. 226)
* Return/exchange policies at each retailer vary and may differ from the Toastess International
1 year limited warranty period.
16