1
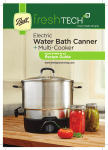
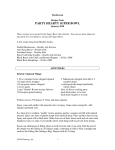
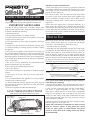
IMPORTANT SAFETY INFORMATION
®
A short power supply cord (or cord set) is provided to reduce the
risk resulting from becoming entangled in or tripping over a longer
cord. Longer cord sets or extension cords may be used if care is
™
properly exercised in their use.
Indoor Electric Grill
If an extension cord is used, the marked electrical rating should
be at least as great as the electrical rating of the appliance. The
longer cord should be arranged so that it will not drape over the
This is a
Listed appliance. The following important safeguards countertop or tabletop where it can be pulled on by children or
tripped over.
are recommended by most portable appliance manufacturers.
Connect the power supply cord to a polarized outlet only. As a
safety feature, this appliance has a polarized plug (one blade is
To reduce the risk of personal injury or property damage, when wider than the other). This plug will only fit in a polarized outlet
using electrical appliances basic safety precautions should always one way. If the plug does not fit fully in the outlet, reverse the plug.
be followed, including the following:
If it still does not fit, contact a qualified electrician. Do not attempt
to defeat this safety feature.
1. Read all instructions.
2. Do not touch hot surfaces. Use handles or knobs.
3. To protect against electrical shock, do not immerse control, cord,
or plug in water or other liquid.
4. Close supervision is necessary when any appliance is used by or Before using for the first time, become familiar with the Grilln-Lite™ Indoor Electric Grill, Fig. A. Wash Grill and drip pan
near children.
according to “Care and Cleaning” instructions, page 2.
5. Unplug from outlet when not in use and before cleaning. Allow
to cool before putting on or taking off parts, and before cleaning 1. Set Grill on a flat, dry countertop.
2. Insert drip pan. Note: Each handle assembly has a built-in drip
the appliance.
6. Do not operate any appliance with a damaged cord or plug or in pan guide (Fig. B) which holds the drip pan (Fig. C) in its proper
the event the appliance malfunctions or has been damaged in any position. These guides are located below the grilling surface. To
manner. Do not operate if the legs become cracked or damaged. insert the drip pan, position it so it is resting on both drip pan
Return the appliance to the Presto Factory Service Department or guides, and slide the drip pan under the Grill. When the notches
to the nearest Presto Authorized Service Station for examination, under the drip pan rim meet with the ridges on the drip pan guide,
the drip pan will drop into the correct location. Always insert or
repair, or adjustment.
remove the drip pan from the side closest to you.
7. The use of accessory attachments not recommended by the
Side View of
appliance manufacturer may cause injuries.
INSTRUCTIONS AND RECIPES
IMPORTANT SAFEGUARDS
How to Use
8. Do not operate Grill without drip pan in place.
9. Do not use outdoors.
10. Do not let cord hang over edge of table or counter or touch hot
surfaces.
11. Do not place on or near a hot gas or electric burner or in a
heated oven.
12. It is recommended that this appliance not be moved when it
contains hot oil or other hot liquid.
13. Always attach heat control to appliance first, then plug cord
into wall outlet. To disconnect, turn control to “OFF” then remove
plug from wall outlet.
14. Do not use appliance for other than intended use.
SAVE THESE INSTRUCTIONS
THIS PRODUCT IS FOR HOUSEHOLD USE ONLY.
ControlMaster®
Heat Control
Closed Nonstick
Grilling Area
Open-Grate
Nonstick Grilling Area
FIG. A
Drip Pan
Drip Pan Guides
Notch
Drip Pan
FIG. B
Ridge
Notch
FIG. C
Never operate Grill without the drip pan in place as doing so
could damage the countertop.
3. Insert the Control Master® heat control into the Grill so the two
electrical pins on the Grill are fully inserted into the heat control.
4. Plug cord into a polarized outlet, and turn Control Master®
heat control to proper temperature (see page 2 for cooking
temperatures). Preheat Grill for 10 minutes. The recommended
setting for most grilling is 400°. The light on the control will
remain on at that setting. At the other recommended and “keep
warm” settings, the light usually will cycle on and off. Cycling at
lower temperatures is normal.
5.Prepare food, place food on Grill, and cook according to grilling
time chart (page 2) or recipe (pages 3-5).
NOTE: This Grill features a DiamondCoat® deluxe nonstick
finish for stick-free cooking. To help protect this special
surface, use nylon, plastic, or wooden utensils. Using metal
utensils or cutting foods on the cooking surface may damage
the nonstick finish.
1
6.Turn heat control to “OFF” when cooking is completed. Unplug heat
control from wall outlet then from appliance. Allow unit to cool to a
comfortable temperature before removing drip pan or cleaning the Grill.
Helpful Hints
• The closed grilling area (see page 1, Fig. A) is ideal for grilling
small foods, such as sliced mushrooms which may fall through
the open-grate grilling area.
• When grilling, the temperature of the grates may be increased or
decreased by adjusting the Control Master® heat control.
• Preheat Grill for 10 minutes for best results.
• Before grilling, trim meat of excess fat to prevent smoking.
• Soak wooden skewers in water for 30 minutes to 1 hour before
using to prevent burning.
• Use plastic tongs or spatulas for turning meat, poultry, and fish.
Forks can pierce meat, allowing flavorful juices to escape.
• Marinate or rub lean meat, poultry, and fish with a small amount
of vegetable oil to enhance flavors, retain moisture, and prevent
sticking on the Grill.
• Plastic, resealable bags work well for marinating. Place
marinade ingredients, meat, fish, or poultry in bag, seal, mix
well, and put in refrigerator for several hours or according to
recipe instructions.
• To speed the cooking time of larger cuts of meat or poultry, tent
the Grill with a piece of aluminum foil.
• Prevent the transfer of bacteria by using separate plates for raw
and cooked meat, fish, and poultry.
Care and Cleaning
Grilling Time Chart
Food
Setting* Approximate Grilling Time
(total in minutes)
Beef
Steaks, 3⁄4-inch to
1-inch thick (medium)
(well done)
Hamburger (well done)
400°
400°
400°
10 - 15 minutes
16 - 20 minutes
15 - 16 minutes
Chicken
Breast, boneless/skinless
Breast, with bone
Drumstick/Thigh
Wing
350°
400°
400°
400°
18 - 25 minutes
30 - 35 minutes
20 - 22 minutes
16 - 20 minutes
Fish and Seafood
Fillet, 1-inch thick
Shrimp
400°
400°
10 minutes
4 - 6 minutes
Kabobs
Beef (medium)
(well done)
Vegetable
400°
400°
400°
8 - 10 minutes
12 - 14 minutes
8 - 12 minutes
Lamb chops
1-inch thick (medium)
400°
16 - 20 minutes
Pork Chops
3
⁄4-inch to 1-inch thick
Boneless
With bone
400°
400°
16 - 18 minutes
14 - 16 minutes
Before initial use and after each subsequent use, wash Grill Sausage
thoroughly in warm sudsy water, rinse, and dry. Do not immerse
Precooked
325° - 350°
8 - 10 minutes
Control Master® heat control in water or let it come in contact with
Uncooked
400°
12 - 15 minutes
any liquid.
Food residue can be removed by scrubbing with a fine cleansing Veal
1-inch thick (medium)
pad - nylon mesh or other ordinary cleansing pad. Do not use steel
Boneless
400°
8 - 10 minutes
wool or abrasive kitchen cleaners.
IMPORTANT: To insure continued accuracy of the Control
After cooking, serve or keep food warm by reducing the heat
Master® heat control, avoid rough handling in use and storage.
setting.
* The light on the heat control will remain on at the 400° setting.
It will cycle on and off at 350° and lower settings.
Internal Meat Temperatures
These internal meat temperatures are recommended by the U.S. Department of Agriculture. Use a meat thermometer for complete accuracy when
measuring meat temperatures.
BEEF, VEAL, LAMB, OR PORK—GROUND
160°F
Medium
HAM
160°F
140°F
Reheated
PORK—STEAKS, CHOPS
160°F
Medium
170°F
Well done
BEEF, VEAL, OR LAMB—STEAKS, CHOPS
145°F Medium rare
160°F Medium
170°F Well done
POULTRY—BREASTS, THIGHS, WINGS,
DRUMSTICKS
170°F Cook until juices run clear
2
Vegetable Recipes
Vegetable Grill
1
1
1
2
2
3
1
1
1
2
1
1
⁄2
1
⁄4
1
red pepper, cut into quarters lengthwise and seeded
green pepper, cut into quarters lengthwise and seeded
yellow pepper, cut into quarters lengthwise and seeded
small zucchini, cut in half lengthwise
yellow crockneck squash, cut in half lengthwise
large button mushrooms, cut in half lengthwise
large red onion, cut crosswise into 1⁄2-inch slices
white onion quartered by cutting down through the stem end
cup olive oil
teaspoons chopped fresh cilantro
tablespoon lemon juice
teaspoon salt
teaspoon pepper
teaspoon chopped fresh parsley
Salmon with Cilantro Butter
⁄4
3
11⁄2
1
⁄4
1
⁄8
2
1
1
cup butter, room temperature
tablespoons minced cilantro
tablespoons lemon juice
teaspoon salt
teaspoon pepper
pounds salmon fillets
Olive oil
cup water
Salt and pepper
Combine butter, cilantro, lemon juice, 1⁄4 teaspoon salt, and 1⁄8
teaspoon pepper. Shape into a log about 1-inch in diameter, wrap,
and refrigerate several hours or until firm. Set heat control at 375°
and preheat Grill. Brush salmon lightly with olive oil; sprinkle with
salt and pepper. Grill salmon 10 minutes or until done. Salmon is
done when it turns opaque. Top each serving with a slice of cilantro
butter.
Set heat control at 375° and preheat Grill. Prepare vegetables. Shrimp – Garlic Skewers
Combine olive oil, cilantro, lemon juice, salt, pepper, and parsley.
2 pounds jumbo shrimp
Coat vegetables with olive oil mixture. Grill vegetables 8 to 12 1
⁄ cup olive oil
minutes, turning them 3 or 4 times and brushing with olive oil 1 3
⁄3 cup tomato sauce
mixture.
3 large cloves garlic, minced
Vegetable Kabobs
2 tablespoons white wine vinegar
1
2 tablespoons chopped fresh basil
⁄4 cup red wine vinegar
1
⁄4 teaspoon salt
1 tablespoon olive oil
1
⁄2 teaspoon fresh ground pepper
2 teaspoons garlic powder
12 large whole cloves garlic
2 teaspoons dried rosemary
1
⁄8 teaspoon pepper
Peel and devein shrimp. In a bowl, combine olive oil, tomato sauce,
8 large mushrooms, cut into 1⁄4-inch slices
minced garlic, wine vinegar, basil, salt, and pepper. Place shrimp
1 large yellow pepper, cored, seeded, and cut into chunks
in a large plastic bag or glass dish and pour tomato marinade over
1 large green pepper, cored, seeded, and cut into chunks
shrimp. Gently toss or stir to coat evenly. Cover and refrigerate
1 red onion, cut into chunks
1 hour, tossing or stirring shrimp 2 or 3 times. Place the whole
2 yellow squash, cut into 1⁄2-inch slices
cloves of garlic into a saucepan of boiling water and boil 3 minutes.
10 cherry tomatoes
Remove garlic cloves and set aside.
In a bowl, combine wine vinegar, olive oil, garlic powder, rosemary,
and pepper. Place prepared vegetables in a large plastic bag or glass
dish and pour wine vinegar marinade over vegetables. Gently toss
or stir to coat with marinade. Cover and refrigerate 4 to 8 hours.
Set heat control at 400° and preheat Grill. Thread vegetables on
skewers and grill 8 to 12 minutes, turning occasionally.
Seafood Recipes
Halibut with Pepper Butter
⁄4
1
1
⁄4
1
⁄8
4
1
cup butter, room temperature
teaspoon chili powder
teaspoon red pepper flakes
teaspoon salt
halibut steaks, 1-inch thick
Olive oil
Salt and pepper
Combine butter, chili powder, red pepper flakes, and 1⁄8 teaspoon
salt. Shape into a log about 1-inch in diameter, wrap and refrigerate
several hours or until firm. Set heat control at 400° and preheat
Grill. Brush halibut lightly with olive oil and sprinkle with salt and
pepper. Grill halibut 10 minutes or until done, turning once. Fish is
done when it turns opaque. Cut pepper butter into 4 slices and place
on halibut steaks.
Set heat control at 375° and preheat Grill. Thread shrimp and garlic
cloves alternately onto the skewers, bending each shrimp almost in
half and passing the skewer through the body twice. Place skewers
on grill and cook turning them frequently. Brush shrimp and garlic
with reserved marinade while grilling. Grill 9 to 12 minutes or until
shrimp turns pink.
Poultry Recipes
Herby Chicken Breasts
1
1
3
⁄4
1
4
1
teaspoon marjoram leaves
teaspoon garlic salt
teaspoon pepper
teaspoon ground ginger
boneless skinless chicken breasts
delicious apple, cut into 1⁄2-inch slices
Combine marjoram leaves, salt, pepper, and ginger. Rub mixture
onto all surfaces of the chicken breasts. Cover chicken and
refrigerate several hours. Set heat control at 350° and preheat
Grill. Grill chicken breasts 20 to 25 minutes or until done, turning
occasionally. Place apple slices on Grill during last 5 minutes,
turning once. If desired, brush chicken breasts with melted butter
during last 2 minutes.
3
Teriyaki Chicken Breasts
Basic Barbecue Sauce
⁄4
⁄4
2
5
1
⁄2
2
2
1
3
11⁄2
1
⁄2
1
⁄4
1
⁄3
1
1
⁄2
3
1
cup soy sauce
cup dry sherry
tablespoons honey
cloves garlic, minced
teaspoon red pepper flakes
pounds boneless, skinless chicken breasts
In a small bowl, combine soy sauce, sherry, honey, garlic, and red
pepper flakes. Place chicken breasts in a large plastic bag or glass
dish and pour soy sauce mixture over chicken. Cover and marinate,
in the refrigerator, for several hours.
Set heat control at 350° and preheat Grill. Remove chicken breasts
from marinade and grill them 20 to 25 minutes or until done,
turning occasionally.
tablespoons olive oil
onion, finely chopped
cloves garlic, minced
cups tomato sauce
cup cider vinegar
cup Worcestershire sauce
cup sugar
teaspoon chili powder
teaspoon crushed red pepper
Place oil in saucepan. Using medium heat, sauté onion and garlic.
Stir in remaining ingredients and bring sauce to a simmer. Reduce
heat and simmer uncovered 30 minutes, stirring frequently, or until
sauce has thickened slightly.
Buffalo Wings
Glazed Barbecue Sauce
1
2
2
1
1
1
1
3
1
2
⁄3
2
2
1
1
1
⁄4
1
⁄4
1
Combine all ingredients in a saucepan. Heat to boiling, stirring
constantly. Boil and stir 3 minutes.
In a bowl, combine vinegar, Worchestershire sauce, oil, red pepper
sauce, red pepper flakes, salt, and pepper. Place chicken wings in
a large plastic bag or glass dish and pour vinegar mixture over the
wings. Gently toss or stir to coat evenly. Cover and marinate, in the
refrigerator, for several hours, stirring wings occasionally.
Thoroughly combine all ingredients in a mixing bowl.
cup apple cider vinegar
tablespoons Worcestershire sauce
tablespoons olive oil
tablespoon hot red pepper sauce
teaspoon red pepper flakes
teaspoon salt
teaspoon pepper
pounds chicken wings
cup crumbled blue cheese
cup sour cream
large cloves garlic, minced
teaspoons Worcestershire sauce
Salt and pepper
1
⁄2 cup milk
In a small bowl thoroughly mix the remaining ingredients to make
a blue cheese sauce. Cover and refrigerate. Set heat control at 375°
and preheat Grill. Remove chicken wings from marinade and grill
25 to 30 minutes or until done, turning frequently and brushing
with marinade. Serve with blue cheese sauce.
Meat Recipes
Spareribs with Barbecue Sauce
4 pounds baby back or country style spareribs
Choice of one of the following Barbecue Sauces or your
favorite Barbecue Sauce
Set heat control at 325°. Grill spareribs 45 minutes or until done,
turning them occasionally. Brush with Barbecue Sauce during last
10 minutes.
15-ounce can tomato sauce
teaspoon onion powder
cup vinegar
cup mild molasses
tablespoon cooking oil
Fast and Easy Barbecue Sauce
⁄4
⁄2
1
⁄4
3
1
3
1
cup dark corn syrup
cup ketchup
cup Worcestershire Sauce
tablespoons Dijon mustard
teaspoon ground ginger
Steak with Spice Rub
3
1
⁄4
1
⁄2
1
⁄4
4
2
tablespoons brown sugar
teaspoon salt
teaspoon pepper
teaspoon coriander
cloves garlic, minced
pounds sirloin steak, 11⁄2-inches thick
Olive oil
1 large onion, cut into 1⁄2-inch slices
1 large tomato, cut into 1⁄2-inch slices
In a small bowl, combine brown sugar, salt, pepper, coriander, and
garlic. Rub steak lightly with olive oil and then with brown sugar
mixture. Cover steak and refrigerate several hours.
Set heat control at 375° and preheat Grill. Grill steak 15-18
minutes for medium doneness, turning once. Brush onion slices
lightly with olive oil and place on Grill during the last 10 minutes,
turning once. Brush tomato slices lightly with olive oil and place
on Grill during the last 5 minutes, turning once.
4
Spicy Pork Chops
⁄4
2
2
4
1
cup thick and chunky hot salsa
tablespoons water
tablespoons orange marmalade
boneless pork chops, 1⁄2-inch thick
Combine salsa, water, and marmalade. Place pork chops in a large
plastic bag or glass dish and pour salsa mixture over chops. Cover
and marinate in the refrigerator for several hours, turning pork
chops several times. Set heat control at 325° and preheat Grill. Remove
pork chops from marinade. Grill 20 minutes or until done, basting with
marinade last 5 minutes.
Consumer Service Information
If you have any questions regarding the operation of your Presto®
appliance or need parts for your appliance, call our Consumer Service
Department weekdays between 8:00 AM to 4:30 PM (Central Time) at
1-800-877-0441 or write:
NATIONAL PRESTO INDUSTRIES, INC.
Consumer Service Department
3925 North Hastings Way, Eau Claire, WI 54703-3703
You may also email your inquiries to [email protected]. Inquiries
will be answered promptly by telephone, letter, or email. When writing,
please include a phone number and a time when you can be reached during
weekdays if possible.
Any maintenance required for this product, other than normal household
care and cleaning, should be performed by our Factory Service Department
or any Presto Authorized Service Station. Be sure to indicate date of
purchase and a description of defect when sending an appliance for repair.
Send appliances for repair to:
CANTON SALES AND STORAGE COMPANY
Presto Factory Service Department
555 Matthews Dr., Canton, MS 39046-0529
Appliances may also be repaired at any Presto Authorized Service Station.
Check your yellow pages for Service Stations near you.
The Presto Factory Service Department and Presto Authorized Service
Stations are equipped to service all PRESTO® appliances and supply
genuine PRESTO® parts. Genuine PRESTO® replacement parts are
manufactured to the same exacting quality standards as PRESTO®
appliances and are engineered specifically to function properly with its
appliances. Presto can only guarantee the quality and performance of
genuine PRESTO® parts. “Look-alikes” might not be of the same quality
or function in the same manner. To ensure that you are buying genuine
PRESTO® replacement parts, look for the PRESTO® trademark.
PRESTO® Limited Warranty
This quality PRESTO appliance is designed and built to provide many years of satisfactory
performance under normal household use. Presto pledges to the original owner that should
there be any defects in material or workmanship during the first two years after purchase,
we will repair or replace it at our option. Our pledge does not apply to damage caused by
shipping. To obtain service under the warranty, return this PRESTO® appliance, shipping
prepaid, to the nearest Presto Authorized Service Station, or to the Factory Service Department.
When returning a product, please include a description of the defect and indicate the date
the appliance was purchased.
®
We want you to obtain maximum enjoyment from using this PRESTO® appliance and ask
that you read and follow the instructions enclosed. Failure to follow instructions, damage
caused by improper replacement parts, abuse or misuse will void this pledge. This warranty
gives you specific legal rights, and you may also have other rights which vary from state
to state. This is Presto's personal pledge to you and is being made in place of all other
express warranties.
NATIONAL PRESTO INDUSTRIES, INC.
Eau Claire, WI 54703-3703
©2003 by National Presto Industries, Inc.
Patent Pending
72211.02
5