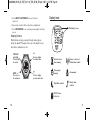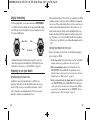
1
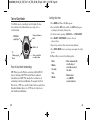
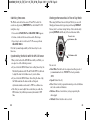
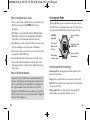
W-219 608-095000 NA
performance
watch
user
guide
608-095000_W219_NA_EN_T-0411-16_TMX_W188_EN.qxd 3/10/11 2:54 PM Page CVR2
©2005 Timex Corporation
BODYLINK® SYSTEM
Performance Watch User Guide
English
page 1
Français
page 75
Español
página 153
Português
página 231
608-095000_W219_NA_EN_T-0411-16_TMX_W188_EN.qxd 3/10/11 2:54 PM Page CVR4
TABLE OF CONTENTS
Register your product at www.timex.com
Introduction ............................................................................3
Welcome! ....................................................................................3
Before you begin ........................................................................4
Performance Watch Overview ..............................................5
Watch terminology......................................................................5
The chronograph ........................................................................6
Resources ....................................................................................7
Watch buttons ............................................................................8
Display icons ............................................................................11
Starting the Bodylink® System ..............................................12
Messages ..................................................................................15
Display formatting....................................................................16
Preparing to use your Watch ..................................................16
Watch Modes ..........................................................................19
Time of Day Mode ....................................................................20
Chronograph Mode ..................................................................25
Vertical Mode ............................................................................29
608-095000_W219_NA_EN_T-0411-16_TMX_W188_EN.qxd 3/10/11 2:54 PM Page 2
Finish Mode ..............................................................................31
INTRODUCTION
Interval Timer Mode ................................................................36
Lap Data Mode ........................................................................42
Summary Mode ........................................................................45
Basic Timer Mode ....................................................................50
Alarm Mode ..............................................................................53
Configure Mode ......................................................................55
Care & Maintenance ............................................................64
Changing the battery ..............................................................64
INDIGLO® night-light ............................................................65
Water resistance ......................................................................65
Legal information..................................................................66
International warranty (U.S. limited warranty) ....................66
FCC Notice (U.S.) / IC Notice (Canada)..................................69
Declaration of Conformity ......................................................71
Welcome!
Congratulations! With your purchase of the Timex® Bodylink®
System you have hired your new personal trainer. Using your
Performance Watch in partnership with your digital Heart Rate
and Speed + Distance Sensors offers you an unprecedented ability
to track, store, and analyze key indicators of your personal fitness
level.
We dedicate this manual to information regarding your
Performance Watch. This sport watch functions as the brain for
your Bodylink System, providing you comprehensive, real-time
workout data gathered from your digital Heart Rate Sensor, Speed
+ Distance Sensor, or both.
You will find your Performance Watch provides very user-friendly
fitness technology. But, like any new technology, you should take
the time to familiarize yourself with its features and functions to
optimize the usefulness of your purchase.
So, have fun exploring! Check out the Performance Watch modes.
Review the Quick Start Guide to develop a basic understanding of
your Bodylink System. Most of all, enjoy your new fitness partner
on your road to increased performance!
3
608-095000_W219_NA_EN_T-0411-16_TMX_W188_EN.qxd 3/10/11 2:54 PM Page 4
Before you begin
This manual contains information about, and instructions for,
setting up your new Performance Watch and using it with the
digital Heart Rate and Speed + Distance Sensors. To assist you in
learning about your Performance Watch, this manual contains
several elements to increase your understanding.
4
➤
An overview of the Performance Watch buttons, display icons,
and modes
➤
Sectional glossaries that explain many of the references used for
the Performance Watch and the Performance Watch modes
➤
Complete, comprehensive instructions for setting up and using
your Performance Watch in each mode
➤
A primer covering the links between your Performance Watch
and each of the Fitness Sensors for each appropriate mode
➤
Real-world scenarios, appearing in grey text boxes, that explain
how you might use your Performance Watch as part of your
activity routine
PERFORMANCE WATCH OVERVIEW
Watch terminology
Your Bodylink® System has its own language that you will learn
as you become proficient in operating it. As you learn this
language, you will encounter some important words and phrases.
We promise; no one will make you take a vocabulary test!
But, reviewing key terminology will help you more quickly
understand how your Bodylink System operates. So, take a
minute to review some of the words that will appear throughout
this manual.
➤
Bodylink System: The Bodylink System allows you to track
and store real time data using a family of wireless devices in
conjunction with your Performance Watch.
➤
Performance Watch: The Performance Watch, (Watch) houses
the data center for the Bodylink System.
➤
Fitness Sensors: The Bodylink System includes two digital
sensors: the Heart Rate Sensor and the Speed + Distance
Sensor.
➤
Heart Rate Sensor: The Heart Rate Sensor (HR Sensor)
measures your heart rate. The Fitness Sensor User Guide
provides detailed information for setting up and using your
HR Sensor.
5
608-095000_W219_NA_EN_T-0411-16_TMX_W188_EN.qxd 3/10/11 2:54 PM Page 6
➤
➤
Speed + Distance Sensor: The Speed + Distance Sensor
(GPS-3D Sensor) tracks speed, pace, distance traveled, altitude,
and more, using GPS based technology. The Fitness Sensor User
Guide provides detailed instructions for setting up and using
your GPS-3D Sensor. Note that sometimes the Watch will refer
to the GPS-3D Sensor as the S+D Sensor.
Print resources
In addition to this manual, your Bodylink® System includes these
valuable resources:
➤
Bodylink System Quick Start Guide: Information to help you set
up and begin using your Performance Watch in conjunction with
your Fitness Sensors, and an overview map of the different
Performance Watch modes
➤
Fitness Sensors User Guide: Information for set-up, operation,
and maintenance of your Fitness Sensors
➤
Heart Zones® Tools for Success: Information to use your digital
Heart Rate Sensor in conjunction with the Heart Zones Training
System fitness program, meant to help you to increase the
strength and endurance of your heart
GPS: The GPS-3D Sensor uses information gathered from
global positioning satellites (GPS) to calculate your speed,
distance, and elevation.
The chronograph
As you learn about your Watch, the word chronograph may cause
confusion. Remember this: a chronograph is a tool for measuring
time. You will notice a Chronograph Mode, but Vertical and Finish
Modes operate from the chronograph. Any time your Watch
functions as a timing tool, it operates using chronograph (or
timing) functionality.
Vertical
Mode
chronograph
measures time
Chronograph
Mode
6
Resources
Finish
Mode
Web resources
The Timex® Websites offer beneficial information to help you
optimize your Bodylink System.
➤
www.timex.com/bodylink/: Information about Bodylink System
features and product simulations
➤
www.timex.com/software/: Current software releases for Timex
products
➤
www.timex.com/fitness/: Fitness and training tips for using the
Bodylink System
7
608-095000_W219_NA_EN_T-0411-16_TMX_W188_EN.qxd 3/10/11 2:54 PM Page 8
In addition to the Timex sites, you may also want to visit the
Website referred to in Heart Zones® Tools for Success. At
www.heartzones.com you will find information to complement
the material provided in the booklet.
Watch buttons
The Watch offers multi-functional buttons that serve three
purposes. You do not have to memorize button functions for each
mode. Let the Watch serve as your guide.
Most of the time, the Watch buttons function according to the
labels printed on the Watch case. If you do not see any symbols
around the edge of the display, follow the information printed on
the Watch case to guide you in using the buttons.
INDIGLO®
night-light; Press
to light the watch;
hold to silence
target zone alert
MODE
Press to go to
the next mode
START/SPLIT
Press to start timing
or take a split
DISPLAY
Press to display
performance data
SET/FORMAT
Press to set or
change the display
format
STOP/RESET
Press to stop or
press and hold to
reset
Additionally, in any mode where you can view your heart rate, you
can hold the INDIGLO® button to quickly silence an audible target
zone alert. Once you push the button to change the alert, it will
remain silent until you change it to another target zone alert type.
See “TZ zone and alert” on page 57 for more information.
Setting buttons
Use Watch setting buttons to set Watch functions (for example,
setting the time or a target heart rate zone). When the + and –
symbols appear at the edge of the Watch display, you have initiated
the setting process.
INDIGLO
night-light
Press to light
the watch
DONE
Press when
finished setting
+
Press to increase the
displayed value
SELECT
Press to move to the
next value
–
Press to decrease
the displayed value
The steps listed here allow you to set Watch functions.
1. Press and hold the SET button until the word SET briefly appears
on the display, followed by a flashing value.
2. Set the first value by pressing + (DISPLAY) or – (STOP/RESET).
8
9
608-095000_W219_NA_EN_T-0411-16_TMX_W188_EN.qxd 3/10/11 2:54 PM Page 10
3. Press SELECT (SET/FORMAT) to move to the next
value to set.
Display icons
4. Repeat steps 3 and 4 for all the values that need adjustment.
Watch display icons
5. Press DONE (MODE) to save your changes and complete the setting
process.
Viewing buttons
Watch buttons can help you navigate through viewing options.
Seeing the ▲ and ▼ triangles on the edge of the display lets you
know there is information to view.
INDIGLO®
night-light
Press to light
the watch
▲
MODE
Press to go to
the next mode
▼
Press to display
next data value
Interval or basic
timer running
Sensor(s) activated
(blinks when trouble)
Chronograph
running
Alarm armed
Night Mode enabled
Hourly chime
enabled
Press to display
previous data value
GPS-3D Sensor
battery low
10
11
608-095000_W219_NA_EN_T-0411-16_TMX_W188_EN.qxd 3/10/11 2:54 PM Page 12
Starting the Bodylink ® System
When using the Performance Monitor, you can view real-time data
from a Heart Rate Sensor or Speed + Distance Sensor, or both, in
Time of Day, Chrono and Timer. The procedure to do this is the
same in all modes, though the data that you can view and their
position on the display in each mode will vary.
1. Make sure you’re wearing your Heart Rate Sensor or Speed +
Distance Sensor, or both, and that they are powered up and
functional.
2. Stand at least 6 feet (2 meters) away from any other users of
fitness monitor systems and from any source of radio interference
such as electrical equipment, power lines, etc.
NOTE: Though the Bodylink® system has a working range of
about 3 feet (1 meter) from the sensors to the watch, for the most
reliable operation, make sure that the watch is as close to the
sensors as possible when starting the system up.
3. Press and release the DISPLAY button. This tells the watch to
look for any Bodylink® sensors nearby; it will search for one
minute. The antenna icon will appear on the watch display,
indicating that the Bodylink® system is active.
12
NOTE: As a convenience, Chrono and Timer will automatically
search for Bodylink® sensors for fifteen seconds upon entering
the mode.
4. When the watch has successfully detected transmissions from the
sensors, the watch display will switch to a new format showing
some or all of the sensor data, depending on the mode. Time of
Day and Timer show the data in the lower line exclusively, while
Chrono allows up to three lines of performance data.
Viewing Performance Data
Press and release the DISPLAY button to select the data or
combination of data that you wish to view during your workout. For
your convenience, a “banner” showing the names of the information
and their position on the display is shown briefly before showing the
data itself.
Here are a few more things you should know to use the watch
effectively:
• While in the Chrono, press and release SET/FORMAT to swap
the positions of the information in the upper and middle display
lines. This allows you to view the data most important in the
larger middle display line.
13
608-095000_W219_NA_EN_T-0411-16_TMX_W188_EN.qxd 3/10/11 2:54 PM Page 14
• If you want to stop monitoring data from your Bodylink® sensors,
hold the DISPLAY button down until the message HOLD TO
SHUT OFF RCVR is displayed on the watch display. Continue
holding the DISPLAY button for a few more seconds; the watch
will beep indicating that the radio link between the watch and the
sensors has been shut down.
TIP: If you are already viewing data from one sensor, for example,
the Heart Rate Sensor, and you wish to also view data from the
Speed + Distance Sensor, simply press and hold the DISPLAY
button until the watch emits a short beep and the antenna icon
begins flashing. The watch is now searching for a second
Bodylink® sensor. When it detects this second device, the antenna
icon will stop flashing and the display may change to a new
format that includes the new information. Press and release the
DISPLAY button (as detailed previously) to view various
combinations of two sensor’s data.
Messages
When using the Watch with the Fitness Sensors, the Watch may
display messages to communicate the status of either of the
Sensors in conjunction with the Watch. Messages include:
NO DATA FROM HRM (GPS) The Watch is not receiving data
from either the HR or GPS-3D Sensor. Ensure the Sensor is not
more than 3 feet (1 meter) away from the Watch, is operating, or
has not inadvertently locked on to someone else’s Sensor. The
Watch will attempt to establish a connection for one minute after
this message displays.
NOISY DATA FROM HRM (GPS) The Watch is experiencing
radio interference. Try to move away from any potential sources of
interference (for example, televisions, monitors, or motorized
devices). The Watch will attempt to establish a connection for
30 seconds after this message displays.
SEARCHING The GPS-3D Sensor is still trying to link to GPS
data. You cannot view speed, pace, distance, or positional
information until the Sensor locates GPS satellites.
WEAK GPS SIGNAL The GPS-3D Sensor lost its link with GPS
satellites. The GPS-3D Sensor operates more accurately in more
open areas (such as an area without a lot of tree or cloud cover)
and at quicker speeds.
FATAL GPS ERROR The GPS-3D Sensor has encountered a
severe internal error. Contact Timex Customer Service.
14
15
608-095000_W219_NA_EN_T-0411-16_TMX_W188_EN.qxd 3/10/11 2:54 PM Page 16
Display formatting
In Chronograph Mode, you can press and release SET/FORMAT
to switch the data values displayed in the upper and middle display
lines. This allows you to display the value most important to you in
the larger, middle display.
Heart Rate
Time
Time
Heart Rate
The booklet Heart Zones® Tools For Success included in your Watch
packaging provides excellent procedures and Timex® recommends
you use one of these methodologies. However, if you cannot use any
of the procedures described in Heart Zones Tools for Success, you
might consider using the widely used, though highly debated, agebased method. Begin with the number 220 and then subtract your
age. For instance, a 35 year old would begin with 220 and subtract
35 (the person’s age) which gives an estimated maximum heart rate
of 185.
Setting your Watch for first use
Once you determine your heart rate, set the following parameters
prior to using your Watch:
Switching the display formatting does not apply to ascent rate
which always appears in the middle line of the display. For more
information on ascent rate, see “Vertical Mode” on page 29.
Preparing to use your Watch
Determining your heart rate
In addition to many other useful features, your Watch uses
technology that helps you track detailed information about your
heart rate. But, before you can track this information, you first
need to determine your maximum heart rate. You can use many
methods to estimate your maximum heart rate.
16
1. Set the time of day. For detailed information on Time of Day Mode,
including instructions for setting time of day, refer to page 20.
2. Enter your maximum heart rate. In Configure Mode, select
HRM SETTINGS and then MAX HR. Your maximum heart rate
setting determines your five preset heart rate target zones. For more
information refer to “Max heart rate” on page 58.
3. Select your desired heart rate display units. In Configure Mode,
select HRM SETTINGS and then HRM DISPLAY. Your Watch gives
you the option to view your heart rate in beats per minute (BPM) or
as a percentage of your maximum heart rate (PERCENT). For more
information refer to “Heart rate display” on page 58.
17
608-095000_W219_NA_EN_T-0411-16_TMX_W188_EN.qxd 3/10/11 2:54 PM Page 18
4. Determine your target heart rate zone and alert. In Configure
Mode, select HRM SETTINGS and then TZ ALERT. Use the target
zone alert to keep your heart rate within a defined range to maximize
your performance and prevent either over exertion or under
utilization of your heart during exercise.For more information refer
to “TZ zone and alert” on page 57.
5. Choose the unit display for your Watch. In Configure Mode set
length, speed, pace and altitude units to your liking. Refer to “Unit
settings” on page 62 for further information.
6. Set the ascent rate update. This setting in the ALTITUDE
SETTINGS group calculates how quickly you change altitude during
you workout (also known as vertical speed). Set this feature shorter
for faster vertical activities such as skiing or longer for slower vertical
activities such as climbing. Refer to “Update ascent rate” on page 60
for detailed information.
Though not necessary to adjust before your first workout, you may
want to review and configure the speed or pace target zones
(page 59), distance alert (page 59) or additional hands-free features
(page 60).
WATCH MODES
You can cycle through each of the ten modes by pressing MODE.
➤
Time of Day allows you to display the time, date, and day of the
➤
Chronograph tracks and displays performance data.
➤
Vertical features vertical data such as ascent rate, altitude, and
➤
Finish lets you to predict a time for a specified distance and set
➤
Interval Timer allows you to set the Watch up for interval
➤
Lap Data presents stored lap information.
➤
Summary displays data recorded while the chronograph runs.
➤
Basic Timer enables you to time an event that counts down
➤
Alarm manages up to five alarms.
➤
Configure permits you to customize Watch functions to meet
week for two different time zones.
elevation.
alerts if you are off pace.
workouts.
from a specific time to zero.
your needs.
18
19
608-095000_W219_NA_EN_T-0411-16_TMX_W188_EN.qxd 3/10/11 2:54 PM Page 20
Setting the time
Time of Day Mode
Your Watch can act as an ordinary watch to display the time,
date, and day for two different time zones, using a 12- or
24-hour format.
INDIGLO®
night-light
View performance
data
Hold to set
To
Chronograph
Mode
View or switch to
secondary time
1. Press MODE until Time of Day Mode appears.
2. Press and hold the SET button until the word SET briefly appears
on the display, followed by a flashing value.
3. Set the first value by pressing + (DISPLAY) or – (STOP/RESET).
4. Press SELECT (SET/FORMAT) to move to the next
value for setting.
5. Repeat steps 3 and 4 for all the values that need adjustment.
6. Press DONE (MODE) to save your changes and complete the setting
process.
For Time of Day, you can set the following values:
• Hour
Time of Day Mode terminology
UTC: When you use the Watch in conjunction with the GPS-3D
Sensor, it will align with UTC (Universal Time, Coordinated
formerly known as GMT). This describes the local time zone in
relationship to the Greenwich Meridian. For example, New York
City is in the -5 UTC zone, since New York is five hours earlier than
Greenwich Meridian; Moscow is +3 UTC, since it is three hours
later than Greenwich Meridian.
20
• Minute
• Seconds
• Year
• Month
• Date (automatically
sets the day of
week when you set
the date)
• Hour format
(i.e., AM/PM
versus 24-hours)
21
608-095000_W219_NA_EN_T-0411-16_TMX_W188_EN.qxd 3/10/11 2:54 PM Page 22
Switching time zones
Viewing performance data in Time of Day Mode
The Watch can track two time zones (T1 and T2). Look at the
second zone by pressing START/SPLIT or, switch from T1 to T2
using these steps:
When using the Fitness Sensors with your Watch, you can scroll
through performance data by pressing and releasing DISPLAY.
You may elect to continue viewing the day of the week instead by
pressing DISPLAY until the day of the week becomes visible.
1. Press and hold START/SPLIT until HOLD FOR TIME 2 appears.
Press to view
performance data
2. Continue to hold until the time switches and the Watch beeps.
3. Repeat steps 1 and 2 to switch back to T1. The message will read
HOLD FOR TIME 1.
Note that you must independently set the time of day for each
time zone.
Performance data
Synchronizing the Watch with the GPS-3D Sensor
When you first activate the GPS-3D Sensor with your Watch, you
can expect one of the following scenarios:
➤
➤
➤
22
If you activate the GPS-3D Sensor before setting time of day, the
Watch will synchronize both T1 and T2 with UTC. You will need
to adjust the hour for both time zones to your local time.
If you activate the GPS-3D Sensor after setting the time of day,
the Watch maintains the hour and date settings and
synchronizes minutes and seconds to UTC for each time zone.
Note that you cannot adjust the seconds when you enable the
GPS features; they will always remain synchronized to UTC
time.
You can view:
➤
Heart Rate: Current heart rate expressed as either percent of
your maximum heart rate (PERCENT) or beats per minute
(BPM)
➤
Speed: Current velocity
➤
Pace: Current velocity, expressed in minutes per selected distance
unit, such as miles or kilometers
➤
Distance: Distance traveled since you began operating the
chronograph
➤
Altitude: Current elevation above sea level
23
608-095000_W219_NA_EN_T-0411-16_TMX_W188_EN.qxd 3/10/11 2:54 PM Page 24
Time of Day Mode tips & tricks
Chronograph Mode
➤
You can return to Time of Day Mode from any other mode on the
Watch by pressing and holding MODE until the time of
day displays.
➤
The Watch does not automatically adjust for Daylight Savings
Time. When switching between Standard Time and Daylight
Savings Time, you must manually adjust the hour value.
INDIGLO®
night-light
View performance
data
➤
If the Watch does not detect either of the Fitness Sensors, the day
of the week will appear on the bottom line of the display.
Swap upper and
middle lines
➤
You can only reset the seconds value to zero if you use the Watch
in conjunction with the HR Sensor.
To Vertical
Mode or hold
for time
➤
You may adjust the minutes value ahead or behind the correct
time and the watch will remember your setting. This feature
helps people who like to set their watches a little ahead to keep
them on time.
Time of Day Mode example
Assume that you live in San Francisco and work with a client in
Singapore. Like all busy people, it is imperative you keep track of
time, so you set T1 to your local time. But it is also important to
have a quick reminder of your client’s time, so you set T2 to
Singapore time. With both time zones available, you can quickly
check your client’s time or even switch your monitor to display T2
when you travel to Singapore.
24
Chronograph Mode operates as the main workout data center for
your Watch. It can record elapsed time for up to 100 hours. It can
also register data from the Fitness Sensors for up to 100 laps.
Start timing
or take a split
Stop or reset the
chronograph
Chronograph Mode terminology
Chronograph: The chronograph records time segments for the
duration of your activity.
Lap: Lap time records the time for one segment of your activity.
Split: Split time records the total elapsed time since the beginning
of your current activity.
Taking a split: When you take a split, the chronograph will
complete timing one lap and begin timing a new one.
25
608-095000_W219_NA_EN_T-0411-16_TMX_W188_EN.qxd 3/10/11 2:54 PM Page 26
Operating Chronograph Mode
Viewing performance data in Chronograph Mode
When using Chronograph Mode, take splits manually by pressing
START/SPLIT or you can set the Watch to automatically take
splits by time or distance. For more information on setting the
Watch to automatically take splits, refer to “Hands-free settings”
on page 60.
When using the Fitness Sensors with your Watch, you can scroll
through performance data for each lap of your workout by pressing
and releasing DISPLAY. For Chronograph Mode, viewing options
include:
➤
Heart Rate: Current heart rate expressed as either percent of
your maximum heart rate (PERCENT) or beats per minute
(BPM)
2. Press START/SPLIT to begin timing.
➤
Speed: Current velocity
3. Press START/SPLIT again to take a split and automatically begin
timing a new lap. Press MODE to immediately display new lap
information or wait for a few seconds and the Watch will
automatically begin to display data for a new lap.
➤
Average Speed: Average velocity for the period that
chronograph has been running
➤
Pace: Current velocity, expressed in minutes per selected distance
unit, such as miles or kilometers
4. Press STOP/RESET to stop timing when you want to take a break
or you reach the end of your activity.
➤
Average Pace: Average per-minute speed for the period that
chronograph has been running
5. Press START/SPLIT to continue timing or
➤
Distance: Distance traveled since you began operating the
chronograph
Use these steps to operate the chronograph in Chronograph Mode.
1. Press MODE until Chronograph Mode appears.
6. Press and hold STOP/RESET to reset the chronograph display to
zero.
26
27
608-095000_W219_NA_EN_T-0411-16_TMX_W188_EN.qxd 3/10/11 2:54 PM Page 28
Chronograph Mode tips & tricks
➤
If you press MODE to switch the Watch to a different mode while
the chronograph continues to run, the stopwatch icon will
appear to indicate the chronograph still operates.
➤
If you use the Watch with the HR Sensor you can set it to
automatically begin taking a heart rate recovery calculation each
time you press STOP/RESET to stop the chronograph. However,
if you press START/SPLIT again before the recovery cycle has
completed, you will cancel the recovery. For more information,
refer to “Recovery” on page 58.
Chronograph Mode example
Recently you heard that a training method for long distance
runners called the run/walk method can help increase your
overall endurance and burn more calories. This method calls for
running for a period of time followed by a short period of walking.
You decide to use Chronograph Mode to help you try this method.
You press START/SPLIT when you begin running and then after
10 minutes of running you press START/SPLIT again and walk
for 2 minutes. You continue using these two sequences until you
have completed a 60 minute run/walk.
Vertical Mode
Vertical Mode operates as a viewing mode in conjunction with the
GPS-3D Sensor with a focus on displaying information about
altitude. In particular, Vertical Mode tailors the Watch to allow you
to view data related to vertical activities (for example, climbing or
skiing). If you do not use the GPS-3D Sensor, you will see the
message NO GPS DATA and you cannot enter Vertical Mode.
INDIGLO®
night-light
View
performance data
To Finish Mode
or hold for
time
Swap upper and
middle lines
Start lap or
take a split
Stop or reset the
chronograph
Vertical Mode terminology
Ascent rate: How quickly you climb or descend.
Vertical speed: Another term for ascent rate.
Operating Vertical Mode
1. Press MODE until Vertical Mode appears.
2. Press START/SPLIT to begin timing.
28
29
608-095000_W219_NA_EN_T-0411-16_TMX_W188_EN.qxd 3/10/11 2:54 PM Page 30
3. Press START/SPLIT again to take a split and automatically begin
timing a new lap.
4. Press STOP/RESET to stop timing when you reach the end of your
activity.
5. Press START/SPLIT to continue timing or
6. Press and hold STOP/RESET again to reset the display to zero.
Viewing performance data in Vertical Mode
When using the Fitness Sensors with your Watch, you can scroll
through performance data for each lap of your workout by pressing
and releasing DISPLAY. For Vertical Mode, viewing options
include:
➤
Heart Rate: Current heart rate
➤
Ascent Rate: Vertical speed
➤
Pace: Current velocity, expressed in minutes per selected distance
unit, such as miles or kilometers
➤
Speed: Current velocity
➤
Distance: Distance traveled while you run the chronograph
➤
Altitude: Current height above sea level
➤
Elevation: Difference between your current altitude and the
altitude when you started the chronograph
Vertical Mode example
You are heli-skiing in Banff on a run estimated at 2,700 vertical
feet (823 vertical meters). Curious about the accuracy of the
estimate as well as how long it will take you to make your run,
you start your GPS-3D Sensor, navigate to Vertical Mode and
press START as you take off down the mountain. At the end of
your run, you press STOP and then DISPLAY until you see
Ascent Rate and Elevation (expressed in a negative number since
you traveled downhill). Use this information to see how fast you
skied and compare the Watch expression of elevation to the
estimate given to you by your guide.
Finish Mode
Finish Mode allows you to predict how much time it will take to
finish a specified event distance (marathon or 5K race, for
example) based on current GPS-3D Sensor data. To help you stay
INDIGLO®
night-light
To Interval
Timer Mode or
hold for time
Start timing or
take a split.
30
View
performance
data
Hold to set
Stop timing
31
608-095000_W219_NA_EN_T-0411-16_TMX_W188_EN.qxd 3/10/11 2:54 PM Page 32
on pace for your predicted finish, you can set the Watch to alert
you if you are moving either too quickly or too slowly for your
desired pace.
If you do not use the GPS-3D Sensor, you will see the message NO
GPS DATA and you cannot enter Finish Mode. Additionally, you
must reset the chronograph to zero prior to operating Finish Mode
or it will not operate properly.
Finish Mode Terminology
Target time: Your desired time to complete the race or workout.
The Watch uses this time to alert you if you are going too slowly to
complete the event within the selected time.
For Finish Mode, you can set the following values:
➤
Pre-set or custom event distance (for custom, you can set the
distance up to 999.99)
➤
Unit (NM, KM, or MI)
➤
Target time
➤
Alert option (an audible alert will cause the Watch to both beep
and flash the predicted finish time and a silent alert will only
flash the predicted finish time)
Operating Finish Mode
1. Press MODE until Finish Mode appears.
Setting Finish Mode
2. Press START/SPLIT to begin timing.
You must stop and reset the chronograph to allow the configuration
of Finish Mode. However, you can still configure Finish Mode even
when you see the message NO GPS DATA displayed.
3. Press START/SPLIT again to take a split and automatically begin
timing a new lap.
1. While in Finish Mode, press and hold the SET button until the word
SET briefly appears on the display, followed by a flashing value.
2. Set the first value by pressing + (DISPLAY) or – (STOP/RESET).
4. Press STOP/RESET to stop timing when you reach the end of your
activity.
5. Press START/SPLIT to continue timing or
6. Press and hold STOP/RESET again to reset the display to zero.
3. Press SELECT (SET/FORMAT) to move to the next value to set.
4. Repeat steps 2 and 3 for all the values that need adjustment.
5. Press DONE (MODE) to save your changes and complete the setting
process.
32
33
608-095000_W219_NA_EN_T-0411-16_TMX_W188_EN.qxd 3/10/11 2:54 PM Page 34
Viewing performance data in Finish Mode
When using the Fitness Sensors with your Watch, you can scroll
through performance data for each lap of your workout by pressing
and releasing DISPLAY. For Finish Mode, viewing options include:
➤
Finish Time: The predicted finish time based on your current
speed and distance. The finish time will flash if your current pace
will not allow you to finish within your selected target time. If
you stop moving, the Watch display replaces the finish time with
the word STOPPED.
➤
Heart Rate: Current heart rate
➤
Pace: Current velocity, expressed in minutes per selected distance
unit, such as miles or kilometers
➤
Average Pace: Average per-minute speed for the period that
chronograph has been running
➤
Speed: Current velocity
➤
Average Speed: Average velocity for the period that you run the
chronograph
➤
Distance: Distance traveled while you run the chronograph
34
Finish Mode example
You are training for a 100 KM bicycle race. Last year you rode in
the same race and finished in 4 hours, 15 minutes. This year your
goal is to finish in less than 4 hours. You read in a training
magazine that, when training for a race, you should devote one
day a week to riding at a distance equal to your event, working
toward your goal time. To help keep you on pace, you set Finish
Mode to 100 KM for a distance and 4 hours for a time. You set the
Watch to alert you audibly when you go slower than your required
pace to help keep you on track as you ride.
35
608-095000_W219_NA_EN_T-0411-16_TMX_W188_EN.qxd 3/10/11 2:54 PM Page 36
Interval Timer Mode
Interval Timer Mode offers a flexible six-interval countdown timer,
and can retain settings for up to five different training sessions. It
includes warm up and cool down intervals and four training
intervals for each training session. You can set the group of four
training intervals to repeat up to 99 times. You can set the warmup interval to run one time at the beginning of your training
session and the cool down interval to run one time at the end of
your training session.
Reps: The number of times you choose to perform an interval
group. In the example above, if you choose to run the interval group
three times, you will go through your series of ten, two, twenty, and
five minute timings three times in sequence. This would represent 3
reps.
Warm-up: The period at the beginning of your workout that helps
prepare your body for a more intensive training session.
INDIGLO®
night-light
View performance
data
To Lap Data
Mode or hold
for time
Hold to set
Selecting an interval workout
▼
You can use the Watch to set and store up to five workouts labeled
WKOUT 1 though WKOUT 5.
Start timing the
interval workout
Select, stop, or
reset a workout
Interval Mode terminology
Interval Training: You can use interval training to help you vary
the intensity level within one workout, ultimately helping you work
out longer and harder.
36
Interval: Intervals relate your exercise to specific periods of time.
For instance, you can run for ten minutes, walk for two, run for
twenty minutes, and then walk for five – this would represent four
training intervals.
Cool Down: The period at the end of your work out that helps
your body to recover to a state of normal functioning.
1. Press MODE until Interval Mode appears.
2. Press ▼ (STOP/RESET) to choose the workout you want to set
(WKOUT 1 through WKOUT 5).
Since you must reset the interval timer to select a new workout,
you may need to press the STOP/RESET button more than once
before you can view a new workout.
37
608-095000_W219_NA_EN_T-0411-16_TMX_W188_EN.qxd 3/10/11 2:54 PM Page 38
Setting up an interval workout
1. Press and hold the SET button until the word SET briefly appears on
the display. The setting screen will appear with the word WARM-UP
flashing.
2. Press ▲ (DISPLAY) or ▼ (STOP/RESET) to review settings for
each workout interval. Settings include WARM-UP, INTVL 1 – 4, #
OF REPS, and COOL-DOWN.
3. Select an interval to set and press SELECT (SET/FORMAT). Press
+ (DISPLAY) or - (STOP/RESET) to select one of five preset or
three custom heart rate zones. You can also select no target zone or a
manual target zone alert for this interval only. Once you choose your
zone, press SELECT (SET/FORMAT).
If you did not select MANUAL in step 3, go to step 5.
4. Set the upper and then the lower heart rate values for the MANUAL
zone. Press + (DISPLAY) or - (STOP/RESET) change the values
and SELECT (SET/FORMAT) to move through the digits. When
you finish setting the limits, press SELECT (SET/FORMAT).
5. Press + (DISPLAY) or - (STOP/RESET) to change the time values
and SELECT (SET/FORMAT) to move through hours, minutes,
and seconds. If you set an interval to zero (00:00:00), the Watch will
automatically skip this interval during your workout.
6. When you scroll past the final value in the interval time, the Watch
automatically advances the next interval (or # OF REPS if setting
the WARM-UP or COOL DOWN intervals). Repeat steps 2 to 5 to set
all intervals and reps for the selected workout.
7. Press DONE (MODE) to save your workout and complete the
setting procedure.
38
For Interval Timer Mode, you can set the following values:
➤
Warm up (set target heart rate zone and time)
➤
Intervals 1 through 4 (set target heart rate zone and time)
➤
Number of Reps (does not include warm-up or cool down
intervals)
➤
Cool down (set target heart rate zone and time)
Operating Interval Timer Mode
Use these steps to operate the interval timer for a workout.
1. Press MODE until Interval Timer Mode appears.
2. Press START/SPLIT to begin timing.
3. Press STOP/RESET to stop timing when you want to take a break
or you reach the end of your activity.
4. Press START/SPLIT to continue timing or
5. Press and hold STOP/RESET to reset the chronograph display
to zero.
Heart rate target zones and alerts
During the setting process, you have the option to use one of the
five standard, three custom, or a unique heart rate target zone alert
for each interval. You may also choose to use no target zone alert.
While you run the interval timer, the target zone alert settings you
select will override the heart rate target zone alert you set in
Configure Mode (see page 55).
39
608-095000_W219_NA_EN_T-0411-16_TMX_W188_EN.qxd 3/10/11 2:54 PM Page 40
However, the setting for the alert type (AUDIBLE, VISUAL,
or NO ALRT) in Configure mode will still operate while you run
the interval timer. The Watch only ignores the limit settings.
Keep in mind that these settings affect the target zone alert only.
The target zone alert settings used in the interval timer do not
affect the heart rate statistical data tracked and displayed in
Summary Mode.
Viewing performance data in Interval Timer Mode
When using the Fitness Sensors with your Watch, you can scroll
through performance data for each lap of your workout by pressing
and releasing DISPLAY. For Interval Timer Mode, viewing options
include:
➤
Heart Rate: Current heart rate expressed as either percent of
your maximum heart rate (PERCENT) or beats per minute
(BPM)
➤
Speed: Current velocity
➤
Pace: Current velocity, expressed in minutes per selected
distance unit, such as miles or kilometers
➤
Distance: Distance traveled since you began operating the
interval timer
➤
Altitude: Current height above sea level
40
Interval Mode tips & tricks
You can set the Watch to take a split when an interval ends by using
SYNC TIMER & CHRONO (see page 61). This will override the
auto split function and allow you to have a record of your
performance for each interval.
Interval Mode example
For cross training purposes, you decide to add a one-hour spin
class to your workout routine one time per week. You decide to
use Interval Mode to help you track both time and heart rate for
your class. You set up WKOUT 1 as follows: WARM-UP for 5
minutes with NO TZ (indicating no heart rate goal), INTVL 1 for
5 minutes at Z4: 156 – 175 (in beats per minute), INTVL 2 for 1
minute in Z3: 136 – 156, INTVL 3 for 10 minutes in Z4 and
INTVL 4 for 2 minutes in Z3. You then set the # OF REPS to 3,
indicating you want to repeat INTVL 1 through INTVL 4 three
times. Finally, you set the COOL DOWN to 5 minutes with NO
TZ. This entire workout takes you approximately 60 minutes and
helps you track both time and endurance goals.
41
608-095000_W219_NA_EN_T-0411-16_TMX_W188_EN.qxd 3/10/11 2:54 PM Page 42
Lap Data Mode
Viewing performance data in Lap Data Mode
Lap Data Mode allows you to review stored lap information for
time and heart rate information. To record lap data, you must run
the chronograph in one of the chronograph modes.
▲
When using the Fitness Sensors with your Watch, you can scroll
through performance data for each lap of your workout by pressing
and releasing DISPLAY. For Lap Data Mode, viewing options
include:
➤
Lap and Split Time: Lap time includes data for each segment of
your activity, and split time shows data for the overall activity.
➤
Lap Average Heart Rate and Time in Average Heart Rate:
Average heart rate displays the average heart rate for the lap, and
time in average heart rate shows how much time during the lap
you spent at the average heart rate.
➤
Lap Average Speed: Average velocity for the period that
chronograph has been running
➤
Lap Average Pace: Average per-minute speed for the period
that chronograph has been running
Access this information using these steps.
➤
Lap Distance: Distance traveled for the lap
1. Press MODE until the Lap Data Mode appears.
➤
Lap Altitude: Altitude displays the height above sea level at the
end of your lap
➤
Lap Elevation Change: Elevation is the net change in altitude
during the lap
INDIGLO®
night-light
To Summary
Mode or hold
for time
data value
▼
data value
When you use Lap Data Mode, each recalled lap will display three
lines of data. The lower line will show the lap number labeled RCL
(for recall) for each lap you stored in the chronograph.
2. Press ▲ (DISPLAY) or ▼ (STOP/RESET) to navigate through
data for each lap.
42
43
608-095000_W219_NA_EN_T-0411-16_TMX_W188_EN.qxd 3/10/11 2:54 PM Page 44
Lap Data Mode tips & tricks
➤
Once you restart the chronograph from zero for your next activity,
you erase lap data from your previous activity.
➤
If you want to view information for your entire activity refer to
Summary Mode in the next section.
➤
If you have activated SYNC TIMER & CHRONO (see page 61)
then your lap data is equivalent to your performance for each
interval.
Lap Data Mode example
You love to ride your bike, but you just finished a long ride and
you are exhausted! In your exhaustion, you forget to look at the
lap data for your ride and you reset the chronograph to zero. You
think you have lost your data, but then you remember. You can
still view lap data for your ride, as long as you do not restart the
chronograph first.
Summary Mode
Summary Mode allows you to review overall information recorded
by the chronograph for your most recent activity. Data does not
update while displayed.
INDIGLO®
▲
night-light
data value
To Basic Timer
Mode or hold
for time
▼
data value
Summary Mode terminology
Zone: A predetermined heart rate range for your activity.
Recovery: A measure of your level of fitness and fatigue based on
rate at which your heart rate drops over a short period of time after
strenuous exercise. For further information, refer to Heart Zones®
Tools for Success.
Operating Summary Mode
1. Press MODE until the Summary Mode appears.
2. Press ▲ (DISPLAY) or ▼ (STOP/RESET) to navigate through
summary data.
44
45
608-095000_W219_NA_EN_T-0411-16_TMX_W188_EN.qxd 3/10/11 2:54 PM Page 46
Viewing performance data in Summary Mode
If you do not use your Fitness Sensors, the only information you
can view in Summary Mode is the total time for your activity while
the chronograph was running. Total time is equivalent to split time
in Chronograph Mode.
When using the Fitness Sensors with your Watch, you can view
performance data for the following five data groups:
Heart Rate
➤ Average Heart Rate: Your average heart rate calculated over
the period the chronograph was running.
➤ Peak Heart Rate: The highest recorded heart rate during your
activity.
➤ Minimum Heart Rate: The lowest recorded heart rate during
your activity.
➤ Time in Zones: Taking into account your total workout time,
the Watch displays how much time you spent in each of the
heart rate zones during your activity, including all five preset
zones, all three custom zones, and below Zone 1 (sometimes
referred to as “Zone 0”) (refer to “HRM settings” on page 57 for
information on setting up this feature).
➤ Average Heart Rate in Zones: The average heart rate in each
of the heart rate zones, including all five preset zones, all three
custom zones, and below Zone 1.
➤ Recovery: Your heart rate change over a selected period
of time recorded at the end of your activity (refer to “Recovery”
on page 58 for information on setting up this feature).
46
Speed
Average Speed: Your average speed calculated by dividing
distance by time.
➤
➤
Maximum Speed: Your quickest speed.
➤
Average Pace: Your average speed expressed as minutes per
distance unit traveled.
➤
Best Pace: Your fastest time traveled per minute.
While Average Speed and Average Pace are the same value
expressed two different ways, Best Pace and Maximum Speed are
not. Best Pace is determined by analyzing all the pace values of
your activity; Maximum Speed is the fastest speed calculated by
the GPS-3D Sensor during your activity. While closely related,
these two values are not equivalent and may not agree.
Distance
➤ Event Distance: Your accumulated distance traveled during the
activity while the chronograph was running.
➤
Odometer: Your accumulated distance traveled since you last
manually reset the odometer. Since the odometer does not
operate in conjunction with the chronograph, you can use this
feature to track accumulated distance over several workouts.
47
608-095000_W219_NA_EN_T-0411-16_TMX_W188_EN.qxd 3/10/11 2:54 PM Page 48
Time
➤ Event Time: The total time for your activity while the
chronograph was running. Event time is equivalent to split time
in the chronograph modes.
GPS
➤ GPS Battery Level: The current voltage level for the GPS-3D
Sensor displayed in bar graph format. You must be receiving
data from the GPS-3D Sensor to view this information. When
the graph displays only one segment and you see the battery
icon on the Watch display, you should change the battery.
Summary Mode tips & tricks
➤
Once you restart the chronograph from zero for your next
activity, you erase summary data from your previous activity.
➤
If you are wearing the HR Sensor, you can initiate a recovery
calculation while in Summary Mode by pressing and holding
START/SPLIT while viewing your recovery data.
➤
If you want to view information for each segment of your activity
refer to Lap Data Mode in the previous section.
48
Summary Mode example
Recently, you have decided to focus on your heart rate during your
workouts. In Configure Mode, set your maximum heart rate at
195 BPM. When you finish any of your workouts (whether
running, biking, swimming, or any other type of activity), you can
refer to Summary Mode to review your heart rate information.
This information includes your average, peak, and minimum
heart rates as well as average heart rate and time spent in each of
the heart rate zones. Using this feature will help indicate the
levels at which you worked your heart throughout your workout
and serve as an indicator of whether or not you need to adjust the
intensity of your workout.
49
608-095000_W219_NA_EN_T-0411-16_TMX_W188_EN.qxd 3/10/11 2:54 PM Page 50
Basic Timer Mode
For Timer Mode, you can set the following values:
Basic Timer Mode allows you to set a fixed time from which the
Watch counts down to zero (for example, 10, 9, 8, …). You can set
the timer to stop, repeat or switch to Chronograph, Vertical, or
Finish Mode after the countdown.
INDIGLO®
night-light
To Alarm
Mode or hold
for time
Start the
timer
➤
Time (hours, minutes, seconds for up to 99 hours, 59 minutes,
and 59 seconds)
➤
End action (STOP, REPEAT, or CHRONO)
Operating the timer
1. Press START/SPLIT to start the timer countdown.
Set timer
2. Pause the countdown by pressing STOP/RESET. You may resume
the countdown by pressing START/SPLIT again, or reset the timer
by pressing and holding STOP/RESET.
3. When the timer reaches zero, a brief alert sounds.
Stop or reset
the timer
Setting the timer
4. The timer will stop after the alert if set to STOP
OR
the timer will begin another countdown if set to REPEAT and
continue until you press STOP/RESET.
3. Set the first value by pressing + (DISPLAY) or – (STOP/RESET).
The lower line of the display will show RPT and a number (for
example, RPT 2). RPT indicates the timer is repeating and
the number indicates how many times the timer has cycled
through the repeat countdown. You will also see the repeat
icon, indicating the timer is set to repeat.
4. Press SELECT (SET/FORMAT) to move to the next value to set.
OR
5. Repeat steps 3 and 4 for all the values that need adjustment.
The timer will switch to Chronograph, Vertical, or Finish Mode if set
to one of those modes. You will see the switch mode
icon, indicating the timer will switch modes at the end
of the countdown.
1. Press MODE until Basic Timer Mode appears.
2. Press and hold the SET button until the word SET briefly appears on
the display, followed by a flashing value.
6. Press DONE (MODE) to save your changes and complete the setting
process.
50
51
608-095000_W219_NA_EN_T-0411-16_TMX_W188_EN.qxd 3/10/11 2:54 PM Page 52
Basic Timer Mode tips & tricks
➤
You can press MODE within Timer Mode to switch the
display to another mode without disrupting the operation
of the timer. The timer icon will appear indicating timer
operation.
➤
The timer will only switch to Chronograph, Vertical, or Finish
Mode if you reset the chronograph to zero and turn off Sync
Timer & Chrono (see “Hands-free settings” on page 60).
Basic Timer Mode example
As part of your overall health plan, you decide to take a 30-minute
walk during your lunch hour two times a week. To help keep
track of time so you do not return late from your lunch hour, you
set the timer to 15 minutes and then set it to repeat one time.
After 15 minutes the Watch beeps telling you to begin walking
back to your office. Since you set the timer to repeat, the Watch
begins timing another 15 minute session helping you track how
much time you have to return to your office.
Alarm Mode
You can use your Watch as an alarm clock for up to five separate
alarms. When you set an alarm, the alarm clock icon appears
in Time of Day Mode. You can set an alarm to ring at the
same time every day, or only weekdays, weekends, or even
only one time (useful for appointment reminders).
When the Watch reaches a scheduled alarm, the alarm tone sounds
and the INDIGLO® night-light flashes for a period of
20 seconds. You can silence the alarm during this period by
pressing any button on the Watch, or, if you do not silence the
alarm before the alert finishes, a backup alarm will sound after
five minutes.
INDIGLO
night-light
To Configure
Mode or hold for
time
Turn alarm
ON or OFF
52
▲
alarm
Set alarm
▼
alarm
53
608-095000_W219_NA_EN_T-0411-16_TMX_W188_EN.qxd 3/10/11 2:54 PM Page 54
Selecting an alarm
You can use the Watch to set and store up to five alarms labeled
ALM1 though ALM5
1. Press MODE until Alarm Mode appears.
2. Press ▲ (DISPLAY) or ▼ (STOP/RESET) to choose the alarm
you want to set (ALM1 through ALM5).
Setting an alarm
1. Press MODE until Alarm Mode appears.
2. Press and hold the SET button until the word SET briefly appears on
the display, followed by a flashing value.
3. Set the first value by pressing + (DISPLAY) or – (STOP/RESET).
4. Press SELECT (SET/FORMAT) to move to the next value to set.
5. Repeat steps 3 and 4 for all the values that need adjustment.
6. Press DONE (MODE) to save your changes and complete the setting
process.
For Alarm Mode, you can set the following values:
➤
54
Alarm type (WEEKDAYS, WEEKENDS, ONCE, or DAILY).
A DAILY alarm will ring every day at the selected time,
a WEEKDAYS alarm will ring Monday through Friday at the
same selected time, a WEEKENDS alarm will ring Saturday and
Sunday at the same selected time, and a ONCE alarm will only
ring one time at the selected time and then automatically
turn off.
➤
Alarm time (hours, minutes and AM/PM if the time is set to
12-hour format).
➤
Alarm status (OFF or ON). You can also press START/SPLIT to
switch the alarm status.
Note that if you change any alarm settings, you automatically turn
on the alarm.
Configure Mode
INDIGLO®
night-light
Press when
done viewing
options
Activate a
Quick Set
▲
Option
Select an item
▼
Option
Use Configure Mode to set options that enhance the performance
of other Watch modes, for the following six setting groups:
HRM settings: Heart rate settings allow you to set target zones
for your heart rate.
S+D settings: Speed and distance settings affect the Watch
response to data received from the GPS-3D Sensor.
Altitude settings: Altitude settings configure target altitude and
set smoothing and ascent rate calculations.
55
608-095000_W219_NA_EN_T-0411-16_TMX_W188_EN.qxd 3/10/11 2:54 PM Page 56
Hands-free settings: Hands-free settings provide options to
configure the Watch to operate automatically in conjunction with
the GPS-3D Sensor.
Watch settings: Watch settings provide options for customizing
the general operation of the Watch, including hiding data
or modes.
Unit settings: Unit settings allow you to determine distance
(for example miles versus kilometers) and heart rate (beats versus
percentage) display units.
7. Press DONE (MODE) when you have finished setting an option
within a setting group.
8. Press DONE (MODE) again to return to the setting group level.
HRM settings
Prior to configuring your heart rate settings, refer to Heart Zones®
Tools for Success for information on the importance of tracking
your heart rate and how to determine your maximum heart rate.
Then, configure the following heart rate settings:
➤
Operating Configure Mode
Unlike other setting functions in the Watch, Configure Mode
includes a menu hierarchy for the setting groups.
1. Press MODE until Configure Mode appears.
NO ALRT turns off the alert completely, SILENT warns you with
a visual indication (an up or down arrow on the Watch display) if
you go above or below your target heart rate zone, and AUDIBLE
combines a warning melody with the visual alert. You will hear an
ascending melody if you go above your zone and a descending
melody if you go below your zone.
2. Press ▲ (DISPLAY) or ▼ (STOP/RESET) to move to the next or
previous setting group.
3. Press SELECT (SET/FORMAT) to enter a setting group.
4. Press ▲ (DISPLAY) or ▼ (STOP/RESET) to navigate through
the options within a setting group.
5. Press SELECT (SET/FORMAT) to select an option within a
setting group. This may allow you to change a setting or take you
to another level.
6. Press + (DISPLAY) or - (STOP/RESET) to set the option within
a setting group.
56
TZ zone and alert: You may select from one of five preset heart
rate zones (labeled Z1 to Z5) or three custom heart rate zones
(labeled C1 to C3). You may also choose whether or not to have
the Watch alert you if your heart rate goes outside of your target
zone. Options for alerts include NO ALRT, AUDIBLE, or SILENT.
➤
Custom zones: You may set the upper and lower target zone
number or percentage (depending on how you choose to show
your heart rate) for up to three custom heart rate zones, labeled
CUSTOM 1, CUSTOM 2, and CUSTOM 3.
57
608-095000_W219_NA_EN_T-0411-16_TMX_W188_EN.qxd 3/10/11 2:54 PM Page 58
➤
Recovery: This feature helps you determine how quickly your
heart rate returns to a lower heart rate value at the end of your
activity; the quicker you return, the better your fitness level. You
can set the Watch to calculate a recovery heart rate when you
stop the chronograph for one minute, two minutes, or off.
Selecting OFF will prevent the Watch from automatically
calculating a recovery heart rate when you stop the chronograph.
You may still manually calculate your recovery rate in Summary
Mode, set to one minute, if you select OFF in Configure Mode.
➤
Max heart rate: Enter your Maximum Heart Rate. The Watch
uses this value to calculate the five preset heart rate zones and
serves as a reference for displaying your heart rate as a percent of
your maximum heart rate (PERCENT).
➤
Heart rate display: You can set the Watch to display your
heart rate as either a percentage of your maximum heart rate
(PERCENT) or in beats per minute (BPM). The setting you
choose will determine how your heart rate displays in all other
Watch settings.
58
S+D settings
➤
Zone type: Similar in concept to a heart rate target zone alert,
you can set the Watch to track your speed or your pace and to
alert you if you move too slowly or too quickly (alert types include
an audible alert that beeps or a silent alert that flashes). You can
set speed and pace limits independently. For instance, set pace
limits to control pace for your run and set speed limits to values
useful for cycling. Then simply switch between the settings for
each activity.
➤
Distance alert: Set the Watch to alert you for distance intervals.
For example, you can set the Watch to alert you for every mile
you travel. The distance alert will only function when you run the
chronograph. If you would like the Watch to take a split based on
distance traveled, refer to the Hands-Free Settings on page 60.
Smoothing: Smoothing is useful if you feel that the displayed
speed or pace values appear to be too erratic. Smoothing applies an
averaging filter and may cause the displayed speed or pace values to
respond more slowly to changes.
➤
Speed smoothing: Turn speed smoothing off or on.
➤
Pace smoothing: Turn pace smoothing off or on.
59
608-095000_W219_NA_EN_T-0411-16_TMX_W188_EN.qxd 3/10/11 2:54 PM Page 60
Altitude settings
➤
➤
Smoothing: Smoothing is useful if you feel that the displayed
altitude value appears to be too erratic. Smoothing applies an
averaging filter and may cause the displayed altitude value to
respond more slowly to changes. You can turn altitude smoothing
off or on.
➤
Auto stop: This feature enables the chronograph to stop when
you stop moving. It may take a few seconds for the GPS-3D
Sensor to detect that you have stopped moving, causing a slight
delay in stop time.
➤
Sync timer & chrono: This feature allows you to set the
interval timer and the chronograph to start and stop
simultaneously so you can record chronograph data when you use
the interval timer. The completion of an interval in Interval
Timer Mode will cause the Watch to take a split in the
chronograph. Use this feature if you want a record of your
performance for each interval in your workout. Each interval
corresponds to one lap or segment in Lap Data Mode.
Update ascent rate: Set the Watch to update the period at
which the ascent rate is calculated. You can choose intervals of 30
seconds, or 1, 10, 30, or 60 minutes. Set this feature shorter for
faster vertical activities such as skiing or longer for slower
vertical activities such as climbing.
Hands-Free settings
Hands-free features automate chronograph features, freeing you to
focus on your workout instead of operating your Watch. Even when
enabled, you can still take manual splits without affecting the
hands-free operation. Configure the following hands-free settings:
➤
➤
60
Auto split: This feature enables the chronograph to
automatically take splits based on elapsed distance or time. For
instance, you can configure the Watch to take a split every 10
minutes, or, if you set Auto Split to 1 MI, then the Watch will
automatically take a split every mile.
Auto start: This feature enables the chronograph to start when
you start moving. It may take a few seconds for the GPS-3D
Sensor to detect movement, causing a slight delay in start time.
You must turn the sync timer & chrono setting off if you want the
timer to switch to Chronograph Mode at the end of a countdown
in Basic Timer Mode.
Watch settings
Configure the following Watch settings:
➤
Night-Mode® feature: When enabled, the INDIGLO® nightlight turns on when you press any button. This feature disables
itself after eight hours.
➤
Hourly chime: When enabled, the Watch will chime at the top of
every hour.
➤
Button beep: When enabled, the Watch will emit a beep when
you press any button.
61
608-095000_W219_NA_EN_T-0411-16_TMX_W188_EN.qxd 3/10/11 2:54 PM Page 62
➤
Mode hiding: You can choose to show or disable the following
modes: Interval, Lap Data, Summary, Timer, or Alarm. For
example, if you disable Lap Data Mode it will not show up at all
until you enable it again from Configure Mode. You can also
choose to show, hide, or disable Vertical Mode or Finish Mode.
➤
Data hiding: You can choose to show or hide blank data from
the Fitness Sensors. For instance, if you do not use the HR
Sensor for your workout and you choose to hide blank HR Sensor
data, you will not see any information related to heart rate since
this data relies on the use of the HR Sensor.
Unit settings
Configure the following unit settings:
➤
Distance: Set the Watch to display distance in terms of miles,
kilometers (KM), or nautical miles (NM).
➤
Speed: Set the Watch to display speed in terms of miles per hour
(MPH), kilometers per hour (KPH), nautical miles (NM), or auto.
➤
Pace: Set the Watch to display pace in terms of miles (MPH),
kilometers (KPH), nautical miles (NM), or auto.
➤
Altitude: Set the Watch to display altitude in terms of feet,
meters, or auto.
62
In unit settings you can set speed, pace, and altitude to any unit
independently or to the default auto setting. When set to auto, each
setting automatically follows the distance unit setting. This allows
you to quickly change units for all your data displays without
having to adjust every setting every time, yet allows flexibility for
certain situations.
For example, a runner typically chooses kilometers for her unit
settings. However, when running a marathon, she changes her
distance unit to miles (a marathon is always 26.2 miles), but she
chooses the kilometers unit setting for pace. During the
marathon, the runner can view her distance in miles to match
the course markers of the race, but she can view her pace in the
more familiar minutes per kilometers for a greater
understanding of how quickly she is running.
63
608-095000_W219_NA_EN_T-0411-16_TMX_W188_EN.qxd 3/10/11 2:54 PM Page 64
CARE & MAINTENANCE
Changing the battery
WARNING: CHANGING THE BATTERY YOURSELF MAY
RESULT IN DAMAGE TO THE WATCH. TIMEX
RECOMMENDS YOU HAVE A WATCH RETAILER OR
JEWELER REPLACE THE BATTERY.
If you choose to replace the battery yourself, check the back of the
Watch (caseback) for the specific battery type and size required for
your Watch. Carefully follow the steps below:
1. Place the Watch face-down on a flat work surface.
2. Separate both halves of the Watch band or strap using a small flat
screwdriver.
You must install the caseback in the same direction you removed it or
the buzzer element will not function after reassembly.
3. Using a 00 Phillips-head screwdriver, remove the four screws that
secure the caseback and set them aside. Carefully remove the
caseback and set it aside.
WARNING: ALWAYS KEEP THE WATCH FACE DOWN ON
YOUR WORK SURFACE. IF YOU TURN THE WATCH OVER TO
REMOVE THE SCREWS OR CASEBACK YOU MAY LOSE THE
SMALL ELECTRICAL CONNECTORS INSIDE THE WATCH.
4. Carefully open the battery clamp and remove the battery.
64
5. Place a new battery in the battery compartment, making sure the
side with the + marking faces you.
6. Reattach the battery clamp.
7. Replace the caseback, making sure the black gasket sits firmly in the
case groove and the caseback properly aligns with the Watch to
ensure the buzzer will line up with the internal connections (see note
after Step 2).
8. Carefully reattach the bands or straps so that the shorter piece with
the buckle attaches to the upper set of lugs.
INDIGLO ® night-light
Electroluminescent technology illuminates the entire Watch face at
night and in low light conditions.
Water resistance
Your Watch withstands water pressure up to 86 psi (equals
immersion to 164 feet or 50 meters below sea level). This 50-meter
resistance remains intact so long as you keep the lens, push
buttons, and case intact.
WARNING: TO MAINTAIN WATER RESISTANCE, DO NOT
PRESS ANY BUTTONS WHILE UNDER WATER.
While your Watch will resist water, you should not use this Watch
for diving, as it is not a diver’s Watch and you should rinse your
Watch with fresh water after exposure to salt water. The Watch
will not display Sensor data when operated under water.
65
608-095000_W219_NA_EN_T-0411-16_TMX_W188_EN.qxd 3/10/11 2:54 PM Page 66
LEGAL INFORMATION
TIMEX and NIGHT-MODE are registered trademarks of Timex
Corporation. BODYLINK is a registered trademark of Timex
Group, B.V. INDIGLO is a registered trademark of Indiglo
Corporation in the U.S. and other countries. HEART ZONES is a
trademark of Sally Edwards.
International warranty
(U.S. limited warranty)
Your Watch is warranted against manufacturing defects by Timex
Corporation for a period of ONE YEAR from the original purchase
date. Timex and its worldwide affiliates will honor this
International Warranty.
Please note that Timex may, at its option, repair your Watch by
installing new or thoroughly reconditioned and inspected
components or replace it with an identical or similar model.
WARNING: THIS WARRANTY DOES NOT COVER DEFECTS
OR DAMAGES TO YOUR PRODUCT BASED ON THESE
CONDITIONS:
1. after the warranty period expires;
2. if the product was not originally purchased from an authorized
retailer;
3. from repair services not performed by the manufacturer;
66
4. from accidents, tampering or abuse; and
5. case, attachments or battery. You may be charged for replacing any of
these parts.
THIS WARRANTY AND THE REMEDIES CONTAINED HEREIN
ARE EXCLUSIVE AND IN LIEU OF ALL OTHER
WARRANTIES, EXPRESS OR IMPLIED, INCLUDING ANY
IMPLIED WARRANTY OF MERCHANTABILITY OR FITNESS
FOR PARTICULAR PURPOSE. TIMEX IS NOT LIABLE FOR
ANY SPECIAL, INCIDENTAL OR CONSEQUENTIAL
DAMAGES.
Some countries and states do not allow limitations on implied
warranties and do not allow exclusions or limitations on damages,
so these limitations may not apply to you. This warranty gives you
specific legal rights and you may also have other rights which vary
from country to country and state to state.
To obtain warranty service, please return your Watch to the
manufacturer, one of its affiliates or the retailer where the product
was purchased, together with a completed original Product Repair
Coupon or, in the U.S. and Canada only, the completed original
Product Repair Coupon or a written statement identifying your
name, address, telephone number and date and place of purchase.
Please include the following with your Watch to cover postage and
handling (this is not a repair charge): a US$ 7.00 check or money
order in the U.S.; a CAN$6.00 cheque or money order in Canada;
and a UK£ 2.50 cheque or money order in the U.K. In other
countries, you will be charged for postage and handling.
67
608-095000_W219_NA_EN_T-0411-16_TMX_W188_EN.qxd 3/10/11 2:54 PM Page 68
WARNING: NEVER INCLUDE ANY ARTICLE OF PERSONAL
VALUE IN YOUR SHIPMENT.
U.S.: call 1-800-328-2677 for additional warranty information.
Canada: call 1-800-263-0981. Brazil: call 0800-168787. Mexico:
call 01-800-01-060-00. Central America, the Caribbean,
Bermuda and the Bahamas: call (501) 370-5775 (U.S.). Asia:
call 852-2815-0091. The U.K.: call 44 020 8687 9620. Portugal:
call 351 212 946 017. France: call 33 3 81 63 42 00. Germany: call
+43 662 88 92130. The Middle East and Africa: call 971-4310850. Other Areas: contact your local Timex retailer or
distributor for warranty information.
TIMEX INTERNATIONAL WARRANTY — WATCH REPAIR COUPON
Original Purchase Date:
(Attach copy of sales receipt, if available)
Purchased by:
(Name, address and telephone number)
Place of Purchase:
(Name and address)
Reason for Return:
FCC Notice (U.S.) / IC Notice (Canada)
Timex Corporation declares that the following products, which
include all components of the Timex Bodylink System, are
compliant to the relevant FCC Part 15 and Industry Canada rules
for Class B devices as follows:
Product Name: Speed + Distance System: GPS Transceiver
Series M5xx/M1xx
Heart Rate Monitor System: HRM Transmitter
Series M6xx/M5xx
Product Type: Intentional Radiator
Model
FCC ID No.
M850/M576 Speed+Distance Monitor
EP9TMXM850
IC Cert. No.
3348A-12181
M185/M187 Speed+Distance Monitor
EP9TMXM185
3348A-TMXM185
M515/M579 Heart Rate Monitor
EP9TMXM515
3348A-M515
M640 Heart Rate Monitor
EP9TMXM640
3348A-TMXM640
These devices comply with Part 15 of the FCC rules. Operation is
subject to the following two conditions: (1) The device may not
cause harmful interference, and (2) the device must accept any
interference received, including interference that may cause
undesired operation.
THIS IF YOUR WATCH REPAIR COUPON; PLEASE KEEP IT IN A SAFE PLACE.
68
69
608-095000_W219_NA_EN_T-0411-16_TMX_W188_EN.qxd 3/10/11 2:54 PM Page 70
Product Name: Watch Receivers: HRM/Speed+Distance Series
M6xx/M5xx/M1xx
Declaration of Conformity
Manufacturers Name:
Data Recorders: HRM/Speed+Distance Series
M5xx/M1xx
Middlebury, CT 06762
Product Type: Unintentional Radiator
This equipment has been tested and found to comply with the
limits for a Class B digital device, pursuant to Part 15 of the FCC
rules. These limits are designed to provide reasonable protection
against harmful interference in a residential environment. This
equipment generates, uses, and can radiate radio frequency energy
and, if not used in accordance with the instruction manual, may
cause harmful interference to radio communications. If this
equipment does cause harmful interference to radio or television
reception, which can be determined by turning the equipment off
and on, the user is encouraged to try to correct the interference by
reorienting or relocating the receiving antenna; or by increasing
the separation between the equipment and receiver.
Caution: Any changes or modifications to the equipment listed
above, not expressly approved by Timex Corporation, could void
the user’s authority to operate this equipment.
Industry Canada Notice: This Class B digital apparatus
complies with Canadian ICES-003. Cet appariel numérique de la
classe B est conforme à la norme NMB-003 du Canada.
70
Timex Corporation
Manufacturers Address: 555 Christian Road
United States of America
declares that the following products, which include all components
of the Timex Bodylink System, are compliant to the relevant EU
Directives as follows:
Product Name:
Speed + Distance System: GPS Transceiver Series M5xx/M1xx
Heart Rate Monitor System: HRM Transmitter Series M6xx/M5xx
conforms to the following product specifications:
LVD: 72/23/EEC
Safety: IEC 60950
EMC: 89/336/EEC and amendments 92/31/EEC, 93/68/EEC,
and 98/13/EEC
Emissions: EN300-330-1, -2
Radiated Emission 9kHz to 30MHz H-Field
(magnetic)
Radiated Emission 30MHz to 1000MHz E-Field
(electric), Ref. EN55022
71
608-095000_W219_NA_EN_T-0411-16_TMX_W188_EN.qxd 3/10/11 2:54 PM Page 72
Immunity: EN300-683
Radiated Immunity 80MHz to 1000MHz, Ref.
EN61000-4-3
ESD Electrostatic discharge, Ref. EN61000-4-2
Supplemental Information: The above products comply with
the requirements of the Low-Voltage Directive 72/23/EEC and the
EMC Directive 89/336/EEC (including amendments 92/31/EEC,
93/68/EEC, and 98/13/EEC) and carry the
0983(!) marking
accordingly. Notifying Body – Underwriters Laboratories Inc.,
CAB# - 0983; 1285 Walt Whitman Road, Melville, NY 11747.
Timex Corporation declares that these low power radio equipment
devices are in compliance with the essential requirements and
other relevant provisions of R&TTE Directive 1999/5/EC.
Product Name:
Watch Receivers: HRM/Speed+Distance Series M6xx/M5xx/M1xx
Supplemental Information:
The above products comply with the requirements of
Electromagnetic Compatibility (EMC) Directive 89/336/EEC
(including amendments 92/31/EEC, 93/68/EEC, and 98/13/EEC)
and carry the
marking accordingly. Conformity Assessment
Body (CAB) – Underwriters Laboratories Inc., CAB# 0983; 1285
Walt Whitman Road, Melville, NY 11747.
Timex Corporation declares that these low power electronic devices
are in compliance with the essential requirements and other
relevant provisions of the EMC Directive.
Agent:
Brian J. Hudson
Director, Test Engineering and Module Development
Date: 22 June 2005, Middlebury, Connecticut, U.S.A.
Data Recorders: HRM/Speed+Distance Series M5xx/M1xx
conforms to the following product specifications:
Generic Emissions Standard EN 55022: 1998
Generic Immunity Standard EN 55024: 1998
72
73